Medium braids. Easy DIY hairstyles - step by step photos. Two three-strand braids
🧡 147 👁 116 284
Sometimes, to do a hairstyle, you need to spend a lot of time and effort, and the result may not live up to expectations... We offer you a selection of easy hairstyles for every day that you can do with your own hands in just a few minutes!
Thanks to such simple hairstyles, you can surprise your colleagues and friends with new looks every day, choose a hairstyle to match any set of clothes and, even if you don’t have time to get ready, look great!
Step-by-step photo lessons of simple hairstyles for every day
Easy hairstyle with two braids for every day
This hairstyle is perfect for work, school or walking. It is enough to braid two braids and fasten them at the back to create an interesting hairstyle. You can style your hair either with an even parting or with a side parting.
Stylish shell hairstyle
The shell hairstyle is suitable for office style and business meetings. However, if you decorate it with a beautiful hairpin, then in tandem with an evening dress it will create a romantic and elegant look. The shell hairstyle has the right to be a little disheveled, and a few curls near the face will complement the look.
It does not take much time to create; the hair must be twisted to one side and secured with hairpins.
Volumetric styling with a ribbon in the style of Brigitte Bardot
1. Separate part of the hair from above and comb it, using hairspray to fix it.
2. Gather the hair at the back of the head and grab strands at the temples, they will support our bouffant. At the same time, do not pinch the tail with an elastic band; the volume should be preserved.
3. Tie a ribbon and fix your hair with hairspray again - your easy hairstyle for the evening is ready!
Easy hairstyle with braiding and bun
For this hairstyle, we need a special roller to create a voluminous bun; if you don’t have a special bun, then a regular sock will do, you just need to cut off the front part of the sock and twist it. If you liked the hairstyle, also check out " " 🧡
1. Tilt your head down and comb your hair.
2. Start from the bottom hairline with a French braid.
3. Finish the braiding approximately at the top of the head and collect all the hair, secure the base tightly with an elastic band.
4. Take a donut and twist your hair around it to create a full bun.
Another option for a simple hairstyle with a bun and braids
1. Part your hair evenly.
2. Braid two identical braids on each side. To do this, you need to start braiding a French braid, make a few stitches of braids, grabbing the hair, and then finish the braid in the usual classic way.
3. Gather all your hair into a ponytail at the bottom of your head, including the ends of your braids.
4. Now use a roller or sock to twist the volumetric bun.
Bun twisted into a knot
A simple and quick hairstyle, in case you have 5 minutes left to get ready! Just divide your hair into two equal parts and tie it in a knot, then twist the strands into ropes and wrap them around the knot, secure the hairstyle with hairpins and you are ready!
Easy hairstyle for a Great Gatsby themed party
For a hairstyle in the style of the 30s, you will need a special headband, it is better if it is decorated with stones or beads. Divide your hair with a side parting so that 70% of the hair is on one side. Place the headband on your head and begin twisting your hair around the elastic at the back, creating a slightly messy hairstyle. This should be done from one ear towards the other. When you reach the second ear, create a small loose bun and also secure it with an elastic band.
Braid crown - a simple hairstyle based on braided braids
A fairly specific hairstyle that is suitable for a certain occasion or style. Divide your hair into two halves with a straight parting in the middle and braid 2 fishtail or braids. Do not make the weave too tight, it should be loose and voluminous. Now cross each braid to the opposite side along the top of your head and secure it behind your ear with a bobby pin. The braid crown is ready! Do you like braids for long hair? Check out our site, for which the editor was awarded!
Beautiful hairstyle for thick hair
The hairstyle is quite light, but it requires long and thick hair, then it will turn out voluminous and interesting. The hairstyle combines French braiding and bun.
Easy romantic hairstyle with curls with your own hands
This delicate hairstyle is suitable for medium-length hair. Create a low ponytail at the back, leaving two wide strands of hair near your face. We make a bun from the ponytail; it can be done in the usual way by twisting the hair into a rope or using a roller to get a voluminous bun. Then we twist the front strands with hair curlers, secure a few strands around the bun, and also leave a few strands loose near the face.
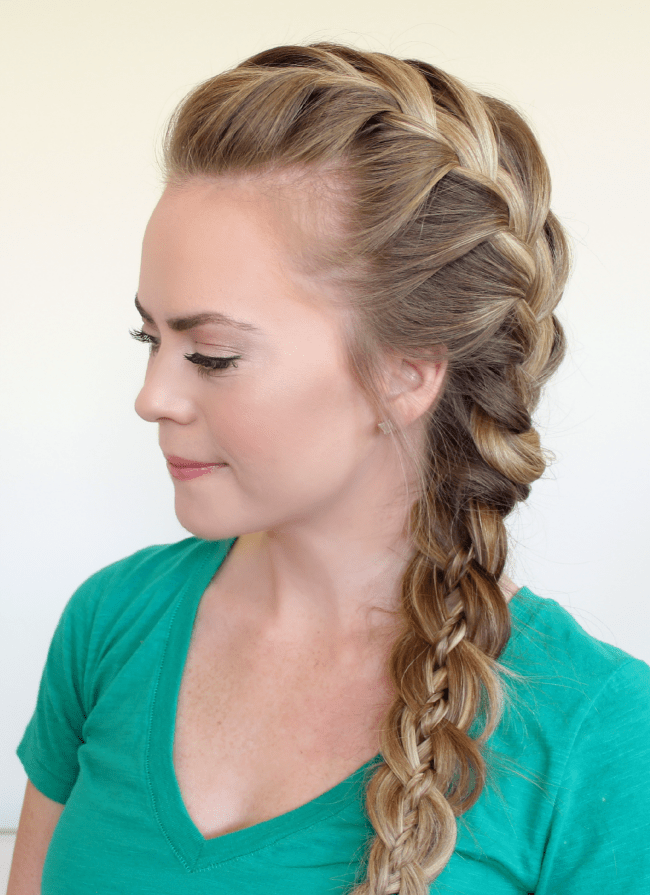
Loose hair with a French braid
The hairstyle is very light and at the same time looks very stylish. Before creating a hairstyle, you can curl your hair slightly. We part the hair on the side. Start the French braid from the parting along the hairline towards the back of the head. After making several grabs of hair, finish braiding in the usual way. Then separate a small strand from the other side of the parting and connect this strand and the end of the braid at the back of your head. Tuck the loose strand under the pigtail and secure it with a bobby pin, and do the same with the tip of the braid. Fix your hair with hairspray and catch admiring glances.
Voluminous ponytail with braided spikelets - easy styling for every day
1. Part your hair to the side.
2. From the side where most of the hair is, start braiding a spikelet or fishtail braid.
3. Braid the braid to the end and secure the end with an elastic band.
4. At the back of the head we collect the hair and secure it with an elastic band, catching the braid there. Position the braid so that it lies beautifully on the head and goes into the ponytail. You can make a small backcomb on top for volume.
5. Wrap a small section of hair around the base of the ponytail to hide the elastic.
This hairstyle looks very beautiful and elegant, so you can wear it to a celebration or a romantic evening.
A variation of the previous hairstyle with a French braid
The hairstyles are very similar to each other, the only difference is what kind of weaving to do. In this version we do French weaving.
Evening simple hairstyle for long hair
Make a low ponytail and turn it inward as shown in the photo. Comb your hair until it doubles in volume. Now we carefully collect the hair and tuck it into the resulting hole, so that we get a voluminous bun at the bottom. Place a beautiful decoration or hairpin above the bun.
A quick way to make curls
This is perhaps the fastest way to style your hair with curls!
Triple ponytail - an easy hairstyle for every day
The hairstyle is suitable for girls to go to school and kindergarten; it is strong enough and can last all day.
1. Separate the first part of the hair from above and make a ponytail. Using a strand of their tail, we wrap the base to hide the elastic.
2. Separate the second part of the hair a little lower and make a second tail, while also capturing the tip from the first tail. We also wrap the tail with a strand.
3. Do the same with the remaining hair and wrap the ponytail with an elastic band again. The triple tail is ready!
You can also make a ponytail not from 3, but from 5 or more parts. To do this, take small strands of hair and add the previous collected hair to them.
French braid and bun
A beautiful easy hairstyle that is suitable for long hair; in order to create it you only need to know how to braid a French braid; you can see the step-by-step lesson in the photo.
Ethnic motives
This hairstyle can also be called Boho style. This effect is achieved due to the arrangement of the braids, which resemble special ethnic jewelry. Quite an original styling that won’t be difficult to do.
Summer hairstyle with headband
Instead of a headband, you can use a rolled scarf, a wide ribbon, or a straw headband. The style of this hairstyle is relevant in the summer because the headband is a bright accessory that cannot be hidden under a hat.
Delicate look with a high ponytail and loose hair
1. Curl your curls using a curling iron or curling iron.
2. Separate a small strand of hair from temple to temple on top and lightly backcomb it.
3. Gather a ponytail at the top of your head and secure it with a small elastic band.
4. Using a thin strand, wrap the base of the ponytail and secure it with a bobby pin.
5. Spray your hair with hairspray and enjoy the gentle princess look - easy, quick and simple!
Twist braid - an easy ponytail-based hairstyle
1. Comb your hair thoroughly and gather it into a ponytail at the back of your head.
2. Divide your hair into two equal parts and twist them into two strands
3. Then twist them together and secure the end with an elastic band. In this case, you need to twist the strands in one direction and twist the braid in the other, then it will be in the form of a beautiful spiral.
Quick hairstyle for school with inverted ponytails
This hairstyle allows you to open your face and remove strands from your eyes so as not to interfere with your studies or work; it looks especially beautiful on long, thick hair.
Twist the flagella
To create this easy hairstyle you will need no more than 5 minutes, but it looks feminine and gentle, take note!
Adding decorations
The most ordinary hairstyle can be transformed if you decorate it with a beautiful hairpin. Interesting jewelry in itself creates a unique image and adds sophistication to you. Here is one of the hairstyle options with decoration.
Easy hairstyles for every day - step by step photos
Create easy hairstyles and be beautiful every day!
Braid hairstyles have always been popular among fashionistas. This option is great for both everyday and evening looks. Today, there are many types of braided hairstyles. We offer you a selection of the most popular ones with detailed photos.
Evening hairstyles with braids for medium hair
For medium-length hair, there are a lot of interesting ideas for hairstyles made from braids and spikelets. You can braid a braid with 4 strands, which looks impressive even on thin hair - just add one more strand to the three, alternately weaving them into a braid, as in the video.
If you are going on a holiday, you can choose original version with two braids, gathered back with loose hair, tied in a bun or braided with only bangs, leaving the rest of the strands to fall beautifully on the shoulders.


Hairstyles with braids for long hair
Those with long, voluminous hair can also experiment with braided hairstyles. Going on a date weave a strand of hair behind your ear into a Greek braid, grabbing strands on one side, then switch to the other side, alternately changing the grip technique. Thus, you will get a beautiful option in the form of a snake with loose hair.
A side parting and a French braid of bangs, smoothly turning into a ponytail, are perfect both for the evening and as an option for every day. It can also be woven into a voluminous bun, which can easily be made from an extension of the braid by pulling strands from one side and twisting the hair into a bun, as done in the pictures below.
The braid hairstyle looks feminine and romantic, done slightly carelessly and not tightly. You can also braid the braid the other way around - from the bottom up, grabbing the strands on the sides, gathering the tail on the top of the head into a bun.


Watching a video on how to braid this hairstyle


Braid with pencil for long hair
If you like stylish and unusual braided hairstyles, pay attention to the following option. The pencil braid hairstyle looks truly original, despite the fact that it is very easy to do at home.
In the video you can see a detailed weaving technique:


French braid hairstyle
For those who choose braid hairstyles for medium hair or long curls, classic french will be an excellent option for any occasion. Simple and easy to implement ideas are suitable for both the bride and the office employee, since everything depends on the small details.
We bring to your attention a video tutorial on braiding:


Braid hairstyles
Hairstyles with braids have many variations - they are not just fashionable, but truly beautiful and easy to do. The scope for creativity is inexhaustible - you can weave all your hair into a braid, separate strands, collect them into a spikelet, and then into a ponytail or bun, braid two braids at a time, combining them into one. In a word, your imagination will tell you how to create a suitable image.


Watch the technique for performing this braided hairstyle in the video:


Side braid with curls
Separate part of the hair at the forehead and braid it, leaving a long ponytail to fall freely with the rest of the hair, or gather it all in a ponytail - long curls combined with braiding are a great idea for a wedding or romantic hairstyle with braids:


Heart made of braids
The original hairstyle of small braids is very easy to do. Part your hair into two parts and begin to weave a braid from individual strands, forming it in the shape of a half-heart. Do the same with the second part:


Braid around the head
It won’t be difficult for you to braid a stylish braided headband with a simple video instruction:


Braid with elastic bands
A simple and original version of braided hairstyles for long hair. All you need are small elastic bands that are similar in color to your hair. The video describes the technique in detail:


Bun with a braid
For an everyday look - a great option. Choose any form of braid - with or without backcombing, and then simply gather all your hair into a bun, diluting your usual hairstyle with an unusual detail in the form of a braid:


Greek braid
Another simple and affordable way to create a real masterpiece from your hair. Watch the video to learn how to do this weaving:


Spit waterfall
Excellent for those with long and medium hair, it will take no more than 5 – 10 minutes to complete. The remaining hair can be curled into beautiful curls or gathered into a ponytail or bun. The video tutorial will help you work out this hairstyle in detail:


Braid star
This hairstyle is more suitable for young princesses, but you can braid it when going to a themed party. Instead of a description, we invite you to see for yourself how hair stars are made in the video:


Gulka with a braid
Another variation on the theme of braiding - you can start the braid both from the bottom and from the top, gathering your hair into a neat braided bun, as in the video: , or by selecting a regular beam:


Three-braid braid
This braid looks very voluminous and is ideal for thin hair. It's very easy to do, just braid three separate braids and then gather them into one:


Mermaid braid
An original but complex braid hairstyle that requires some experience and strict adherence to technique. Watch the video:
Braiding was popular centuries ago and remains relevant today. Braids are a hairdressing classic that will never go out of date. Braids for medium hair (the photos will serve as visual instructions for braiding) are a fashionable solution for all occasions.
- Braid on dry, clean hair.
- The length of the ribbon should be more than 2 times the length of the hair, since the ribbon is usually folded in half.
- Everything necessary for weaving is prepared in advance: hairpins, clips, elastic bands, comb.
- It is better to put on the outfit in which you will go out in advance, since changing clothes, especially with a narrow neck, can damage your hair: pull out the ribbon or fray the strands.
How to choose a hair ribbon
Different types of ribbons are chosen for different occasions, based on the type of event, costume, style, hairstyle:
- A smooth satin ribbon is suitable for office work, meetings, and official events. Working with it requires practice: it is important to practice in advance.
- Ribbons decorated with rhinestones, chiffon, and silk items are suitable for evening wear.
- White ribbons with rhinestones, flowers, and pearls are selected for the wedding dress.
- There are thick knitted items and ribbons with fur. They are used for everyday hairstyles and informal events.
Products with national patterns and ethnic designs are suitable for themed costumes.
Braid with ribbons
Step-by-step instructions for braiding medium hair:
- The hair is gathered into a neat bun in the place where the braid will begin.
- The ribbon is tied around the head, secured with a bow or hidden under the hair.
- Begin weaving by attaching the ends of the ribbon to one of the strands. Sometimes the two ends of the tape are run along two strands at once.
- When weaving, it is important to ensure that the ribbon is on top.
- Depending on the type of tape, if necessary, make sure that it does not turn over on the wrong side.
At the end, the braid is tied with a thin elastic band, the remaining ribbon is wound on top and a bow is tied.
What is Kanekalon
In the hairstyles of modern fashionistas, you can notice strands of hair that differ in color. This fashion trend has come into modern times from past decades. This is how the informals expressed themselves. The difference is that girls used to actually dye their hair pink or green.

Today you can buy ready-made artificial hair and Kanekalon is the manufacturing material for such multi-colored strands. The name of the material became the name for the strands themselves. They vary in color, length, and have fastenings that are invisible under the hair.
Braids with Kanekalon
Braids for medium hair (photos and videos can be found on the Internet) have been very popular since such a hairstyle was demonstrated by world celebrities: Kim Kardashian, Katy Perry. Russian celebrities quickly adopted the fashion trend: Elena Temnikova and Nastya Kamenskikh were spotted with multi-colored braids.
Step-by-step instructions for weaving braids with Kanekalon:
- The strands are secured at the base of the braid.
- The ends of the Kanekalon are tucked under the hair to create a feeling of natural strands.
- Weaving begins by throwing artificial strands over your curls. Each of the three strands of the braid should have an equal amount of Kanekalon hair.
- Any weaving option is suitable.
- If the ends of your hair begin to come out due to a haircut, they try to hide them in artificial strands.
If this does not work, then a fastening is made at this place: the completion of the weaving. Next will be just a ponytail made of Kanekalon.
Classic three-strand braid
A neat hairstyle for a girl, girl or woman. An eternal classic that does not age and does not go out of fashion, since it is its basis. Suitable for any occasion: from home cleaning to wedding.
Weaving pattern.
- Dry hair is combed.
- Divide into three strands from the bottom growth line.
- Place the left strand on the middle one and pull it up.
- Now - right to middle.
- Braiding continues along the entire length of the hair, leaving the ends for fastening.

Braids are easy to braid on medium hair. Photos with instructions are often easier to understand. The explanation will help you understand the details of the work.
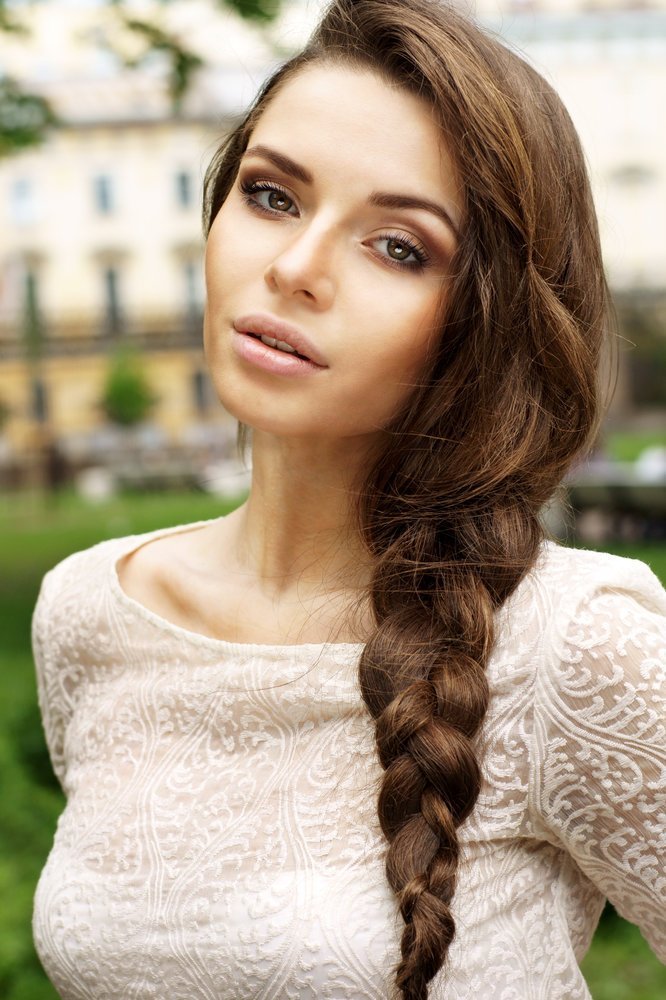
Two three-strand braids
An excellent option for any length that can be braided. This makes an adult woman look younger and looks very natural on a girl. A young girl will look innocent and neat with two braids.
Weaving pattern:
- The strands are combed from the back and divided into 2 equal halves.
- Separate one so as not to get in the way, weave the first braid according to the pattern: each outer strand overlaps the middle one in alternating order.
- Braid to the end, secure with a bow, hairpin or elastic band.
- Start weaving the second one. Compare the initial strands: the braid should form a mirror image of the first. It should not be higher or lower, to the right or to the left.
- Braid similarly to the first option and fix.
Braids for medium hair (the photos are a good visual aid) are suitable for any representative of the fair sex. For beauty, you can make the row between the braids not even, but wavy. It will be original.
Two braids crossed at the back of the head
This option is a fashionable solution for a walk, school, or visiting.
Instructions:
- The hair is divided into 2 halves, starting from the forehead.
- Gather one into a ponytail from below so that the strands do not fall out or get tangled.
- Weaving begins from the forehead, from the beginning of hair growth.
- Select three strands and place the outer ones on the middle ones.
- New curls are added.
- So they weave to the back of the head.
- They fix it.
- The second braid is created in the same way.
You can pull out the strands a little with your fingers and fix them with varnish. The hairstyle will be less durable, but more voluminous.
Four strand braid
A more complex weaving option. Looks great on highlighted hair. Stylish, suitable for any type of clothing. Feminine, like any type of braid.
Braiding a four-strand braid:
- The curls are divided into 4 equal strands.
- Mentally number: from left to right.
- Now the third is placed on the second and pushed under the first. She ends up on the edge.
- Braid similarly with the opposite side.
- Weaving continues until the desired length.
- Fixed with an elastic band or tape.

Braids for medium hair (the photos will help you understand the process, and the instructions will be a good help) - this is an excellent choice for a party, youth get-together, or relaxing on the beach. Weaving ribbons or Kanekalon into this type of hairstyle is more difficult. First you need to “get your hand” in order to weave without thinking.
Then you will have enough dexterity to weave ribbon or artificial hair. You can braid it on your own head in 10 minutes.
Five strand braid
This look is suitable for those girls who have more than average hair length. The product looks better on thick hair - on thin hair, the beauty of the weave will be difficult to notice. It is better to do braiding on clean hair. It’s good to wet them a little after combing. For beginners, it is better to start braiding by grabbing the hair with an elastic band at the roots. A simple ponytail is made: it’s easier to learn.
Weaving pattern:
- The curls are divided into 5 strands, mentally numbered from left to right.
- The fifth strand is pulled over the third, but under the fourth.
- Now the first: on top of the third, but under the second.
- The pattern is repeated with a new arrangement of strands: the strand that has now become the fifth is again pulled over the third and pushed under the fourth.
- Weaving continues until the end. The result is an original braid.

The result is fixed with an elastic band or tape.
Spikelet
Braids for medium hair (photos will help you understand the braiding) are a wonderful feminine hairstyle option. Classic version: one spikelet. You can determine the place to start it yourself; usually the upper point of the back of the head is chosen for this.
- Hair is combed.
- Take the side strands from the temples in a line to the back of the head in the right and left hands.
- The middle strand is the top one. It is important to adjust the thickness: all strands are the same.
- The left one is placed on the middle one.
- Now the right one to the “new” middle one: the one that was just left.
- In a similar way, all strands are swept from the edge to the middle.
- At each stage it is important to tighten the braid tightly. Her accuracy depends on this. Then you can loosen and pull out the strands for a more aesthetic appearance.
- The spikelet can be released from the hairline, leaving the ponytail hanging. In the classic variation, no more than 5 cm remains from the end of the hair. At this point the braid ends, it is intercepted with an elastic band.
You can tie a ribbon on top and make a bow.
Half-spikelet
This is the option mentioned above: the spikelet is woven according to the standard pattern - from the crown, but ends at the lower hairline, where the tail is then left. It turns out to be half a spikelet: there is an openwork weave on the head, and you can do whatever you want with the tail.
For example:
- Leave the tail hanging.
- Twist it to make curls.
- They are broken into many small braids and braided. You can weave threads: it will turn out original, bright. Classic on top, informal on bottom.
- Can be twisted into a cocoon.
- Fix it on your head in the shape of a circle.
Make a cone and decorate with beautiful hairpins.
Boho Braid
This species is rightfully considered one of the most beautiful and easiest. Boho braid is an elegant braid that resembles a spikelet. It is located from the temple through the bangs, down the ear, along the back of the head. There the braid is braided to the ends and secured like a crown.
Boho braid - step by step instructions:
- It is better to braid on unwashed hair.
- Comb, moisten, divide along the temple on the left.
- Begin weaving like a spikelet from the left temple to the right, taking strands along the way from the forehead and from the top of the head.
- In this weaving they go down along the ear, forming a semicircle.
- Having reached the left ear, they braid a long braid from all the remaining hair.
- Wrapped around the head like a crown.
- The ends are secured so that they are not visible.
- Fluff: pull out the strands.

It is in this version that the Boho braid looks incredibly beautiful.
African braids with threads
A cute option that emphasizes individuality and spontaneity. It is a mistake to consider it exclusively youth. Firstly, age is a convention, and secondly, African braids look great on both men and women of any age. A rebellious hairstyle requires only one thing: healthy hair.
Detailed video tutorial on how to braid hair using acrylic threads:
African braids are not suitable for weakened and damaged hair!
How to weave:
- Braids are woven from the place of hair growth, straight, in the usual way.
- The thickness of the strands should be fixed: all of the same size.
- The thread is woven from the root, most often into one strand. It’s more convenient to weave this way.
- It’s difficult to do this hairstyle on your own, it’s better to entrust the job to a hairdresser or a friend.
- The braids are braided to the end, fixed imperceptibly, preferably with threads.
- Weaving time: from 4 to 6 hours.
There are special machines for weaving African braids that can speed up and facilitate the process.
Danish braid
There are many different names for this type of braiding: “reverse” braid, “dragon”. Correct name: Danish braid. In the old days, deceased women and girls were braided this way: by bringing the strands down. Today, few people are interested in relics of the past: the hairstyle looks great on the living. This option is preferred by Hollywood divas and domestic “stars”.

The essence of weaving is that the curls are not thrown over the middle strand, but are pushed under it. This is where another name comes from: reverse. Weaving is no more difficult than regular weaving, you just need to adapt and get used to it. Beginners often start with a Danish braid and end up with a regular spikelet: habit kicks in.
Danish braid pattern:
- Select 3 strands at the top of the back of the head.
- Begin weaving: insert strands under the middle one one by one, as in weaving a spikelet.
- Braid to the end, using all strands.
- Fixed.
In this option, the additional volume created by pulling each strand from above also looks great. It is better to fix the result with varnish.
Greek braid
Greek weaving will help create an unusual and bright image:
- All hair is divided into 2 parts with an even parting.
- Start weaving a regular braid from the base of the bangs area, on one side.
- Strands of the upper part of the head are woven, as when weaving a spikelet.
- Enough to braid to ear level.
- Do the same with the second half of the hair.
- Fasten both braids behind, forming a semicircle.
- Fix the ends so that they are not visible.

The rest of your hair can be left loose or pulled back.
French or spikelet
The French braid and the spikelet are almost identical. These variations differ in the type of weaving. The difference is in some variations. If a spikelet can only be braided in straight and reverse form, divided into a certain number of strands, then the French braid has a separate variation called the “French waterfall”.
French braiding:
- Hair is combed thoroughly.
- Weaving begins from the crown.
- Divide the upper part of the hair: from the temporal zone to the crown into 3 parts.
- The left one is placed on the middle one, then the right one on the middle one.
- You need to tighten it firmly at every stage.
Braid to the desired length and secure.
Three French braids - dragon
Stylish option: start the hairstyle by dividing it into 3 zones. To do this, select the middle zone with an acute angle, retreating 5-7 cm from the hairline on the forehead. Separate them with an even line: the beauty of the hairstyle will depend on this. Fix the middle part.
 Braids for medium hair: photo of braiding one of the Dragon hairstyle options
 - Start weaving the side braid to the left of the forehead, using only the remaining hair, not touching those that were separated for weaving the middle braid.
- They weave in the reverse way: the strands are brought not up, but under the bottom.
- Braid to the end, put on an elastic band.
- Proceed to the middle part. They braid it without affecting the curls separated for the third braid. To do this, it is better to make a tail out of them.
- Weaving the middle braid is done from the beginning of the separated part: take small strands in your hands and pull them down.
They complete the weaving and begin the third braid. They do the same with her.
Circular French braid Snail braid
The snail braid looks very feminine and natural. It is enough to correctly divide the zones and start weaving in the usual way.
How to braid a spikelet:
- Divide the zone for the first turn: the beginning will be in the ear area. Separate a semicircle 5-8 cm thick from the top point of the right ear, across the left side. Finish at the lower point of the right ear. The middle of the hair is fixed with an elastic band: a ponytail is made so that the hair does not get in the way.
- The spikelet is woven along the separated area: a semicircle is made.
- Having finished weaving at the lower point of the right ear, unravel the tail in the middle, and continue to weave in a circle going inward, using the remaining hair.
They braid it to the end and fix the braid in the shape of a snail: twist it in the middle.
Braid-harness
Fashionable solution. This braid looks original in a smooth or artificially careless version.
Instructions:
- Clean, combed curls are fixed in the right place. You can close the elastic by wrapping a strand of hair around it.
- Divide the hair into 2 parts.
- The curls are wound around the fingers in the same direction and intertwined with each other, after which they are fixed.
Fish tail
Another type of braid that will add variety and emphasize femininity and style.

Braiding from the lower hairline:
- The curls are divided into 3 parts, weaving begins in the usual way, using small side strands.
- The thinner the selected strand, the more beautiful the tail looks.
- Weave 2/3 of the total length, secure with an elastic band. This is how the braid looks most aesthetically pleasing.
Braid horns
Another hairstyle variation using braids. This type of horn looks better than regular winding and lasts a long time. It is convenient to fix and very simple to make.

- Make 2 high ponytails.
- A spikelet or reverse braid is braided on each ponytail, and the ends are secured with thin elastic bands.
- Wrap the braid around an elastic band, hiding the ends at the bottom.
You can secure the result with hairpins.
Ponytail
Neat and simple hairstyle. It will take no more than a couple of minutes.
- They make a ponytail.
- Comb it and braid it from base to end.
- The bottom is secured with an elastic band or thread. The fastening can be hidden with hair.
Any weaving method is suitable: regular or reverse. A fishtail or five-strand braid looks good in this version.
Basket
One of the most feminine images: a girl with a wicker basket. To do this you will need more than average hair length. Thickness does not matter in this hairstyle: the strands can be pulled out, adding volume.
- Divide all hair into two parts with a horizontal line.
- Start weaving from the right ear down, capturing only the lower strands.
- Gently round the braid along its entire length, moving to the upper strands, braiding it to a full circle.
The rest of the hair is hidden in a braid or twisted like a snail near the basket.
Braid with elastic bands
Small elastic bands can turn a simple braid into a real masterpiece.
There are 3 options for choosing rubber bands:
- They are chosen to match the hair color.
- They choose the same color of clothes.
- Choose multi-colored ones, like a rainbow.
The last option is more suitable for children.
The weaving process is no different from the usual:
- The tail is made, the weaving of a regular braid begins.
- Each strand is secured with an elastic band, separating the curls from each other.
- Secure the ends with an elastic band.
Braid twist or harness
Twist is a variation of a regular tourniquet. But the weaving principle is very different. In order to make such a braid, you need to wash and comb your curls well. Braid on dry hair. For the hairstyle you will need several elastic bands.

Sequence of working with hair:
- They make a tail and weaken it.
- On top of the elastic, divide the hair in the middle and drag the entire tail there.
- The pulled out tail is again separated with an elastic band, the space between the two elastic bands is again divided and the tail is pulled through.
in this way the weaving continues until the end.
Waterfall for medium hair
Hair length from 10 to 30 cm is considered average. It is more difficult to braid a waterfall at this length, but it looks better on hair that is shoulder length or shorter.

Stages of hairstyle construction:
- Weaving begins from the temple, the lower strands are not affected.
- The braid runs horizontally, from ear to ear through the back of the head.
- Each lower strand is released.
- The lower hair can be secured with an elastic band or a hair clip so as not to take too much.
- Only the top of the hair is involved in braiding. The bottom and strands released from the waterfall remain untouched.
The end is fixed and covered. You can curl all the falling curls.
There are many hairstyle options for those with medium length hair. Braids (photos will help diversify your braiding skills) will emphasize individuality and uniqueness.
Article format: E. Chaikina
Useful video about braids for medium hair
Video on how to braid hair using the flagellum method:
French braid on curly hair 
For an everyday look, using one type of weaving is suitable, but for an evening event, different types are combined for hairstyles and the hairstyle becomes unique and inimitable.
The advantage of braids over other styles is simplicity and speed of execution, convenience and variability. They can be done on hair of any length.

Classic braid: braid it yourself or contact a specialist?
The classic braid is the most popular and simplest type of weaving. It is made from three equal strands. In addition to hair, you can use ribbons, wire, threads.

Before you start braiding, you need to comb your hair well, wet it a little and treat it with styling product. Then they make a tail in the place where the braid should be. It is divided into three equal-sized parts. The right outer strand is placed on top of the central one and brought under the left one so that it now becomes the middle one. Then the left curl is superimposed on the central one in front of the right one. This sequence of actions is repeated until the end of the tail and secured with an elastic band.


On the basis of a seemingly simple braid, magnificent hairstyles are created that amaze the artist’s imagination and attract everyone’s attention. The principle of all weaving begins from here.
Varieties of the classic braid - weaving from a larger number of strands. More hair is used, the product is thicker and more beautiful.
There are two ways to weave a multi-strand classic braid.

- The hair is divided into four strands of equal size. The third curl is placed on top of the second and brought under the first. The second goes on top of the fourth, which is then overlapped with the first so that they are between the second and third.
- The hair is divided into three parts and a multi-colored ribbon is attached between the second and third strands. The first is placed under the second and aimed at the tape. The third is placed on top of the first and placed under the tape, the second is brought under it and placed on the tape. The first strand is overlapped with the second and placed under the ribbon.
Advice!There is no need to tighten your hair too much while braiding. This can lead to hair loss and headaches. Slightly disheveled, it looks elegant and stylish.

French braids: simple and fast
The French braid is suitable for straight and wavy hair. It can be woven in the center or diagonally. To make the work easier, you need to use a small elastic band to secure the tail from which you will get a braid. It is divided into three zones. The right strand is placed in the center through the top, then the same is done with the left. Next, new strands are added to the main curls. Thus, by the end of the braiding, all the hair is woven into a beautiful braid.


The advantage of French weaving is convenience. All hair is included and does not interfere. The curls can be decorated with flowers and you will get an excellent wedding hairstyle.
A stylish solution for a braid is a headband of hair or a diagonal arrangement. You can complete the design not just with an elastic band, but twist the end into a lush flower, if, of course, the length of your hair allows it.


Advice! To make your hair look voluminous, it is recommended to backcomb the roots. To prevent it from standing out too much, lightly comb it on top.
The waterfall attracts with its lightness and grace
The French braid can easily be transformed into a beautiful waterfall. The effect is achieved thanks to flowing, falling strands.
The first stage of creating a hairstyle is combing the hair. Smooth strands are easier to work with. To help them hold better and not fray, they can be treated with fixing agents.


Next, a strand is separated near the temple, which is divided into three identical parts. The first braid begins as a standard classic braid with the first curl on the side. When the top strand is on the bottom, you should forget about it. The waterfall begins to flow. Replace this strand with a new one and continue weaving to the end of the head.
There are several types of waterfall. It can be flat or falling diagonally. A multi-stage waterfall looks original when there are several of them on long hair.


The hairstyle gives the owner a romantic, feminine look, especially if the curls are curled at the bottom. Curves will be emphasized by highlighting or tinting.
Advice!You should not stop at one weave. Different types of braids can be combined into one hairstyle.


The Dutch know the secrets of weaving
Dutch braiding also closely resembles the French version. The only difference is the location of the strands. Each outer strand is placed under the middle one, not above it. You can create it in just five consecutive steps.


- Step 1. A small bunch of hair is separated from the top and divided into three equal parts.
- Step 2. The rightmost curl is placed under the middle one. Then they do the same with the left one - the first link is ready.
- Step 3. New strands are woven into the structure on each side of the head, placing them under the central one.
- Step 4. The technique continues to the end of the hair, where it is secured with an elastic band or a beautiful hair clip.
- Step 5. You can add volume along the entire length by straightening the links.


Based on the Dutch braid, there are varieties of other hairstyles. For example, two weaves from different sides make a magnificent crown. Weaving can also be made fragmentary, that is, done only in the frontal area or above the bangs, like a headband.
Advice! Long hair can be left as is, but it is better to twist a short braid at the end and pin it with a hairpin.
Fish tail
A fishtail or spikelet hairstyle is created from just two strands and will decorate any look. It looks most beautiful on straight, smooth hair, but careless tousled strands also look impressive on long hair.

Before braiding, the hair must be treated with fixatives, combed well and moistened. Next they are divided into two parts. A strand is separated from the first from the outer edge and brought from above to the center. The same manipulation is carried out with the second part. In the middle, the side strands are intertwined and the weaving continues.

It should be borne in mind that thin strands take more time, but create a complex, beautiful design. The hairstyle suits any style and becomes an excellent addition to a romantic, airy look. To create a playful look, you can braid two identical braids on the right and left sides, joining them into one.
Advice!A fishtail can be braided not only at the back of the head. If you place it on the side, combing it on the other side, you will get a spectacular evening hairstyle.

New bright style with African braids
The main difference between African weaves is that Kanekalon artificial fiber is added to natural hair. It helps create volume and thickness. In adults, their number reaches 120-400 pieces, in children no more than 100. Each braid is more than seven centimeters in length.

Stylists distinguish six types of Afro braids. The first is a corrugation, in which the strand is unusually twisted. The pony is also a twisted strand, but there is a loose curl at the tip. Kanekolon, which is shaped into a curl, is called curl. A ready-made braid called zizi is woven into the hair. Sinhala braids are twisted strands of natural hair, without the addition of additional components. Wide strands are called curls.
The originality of this type of braids is that kanekolon can be used in different colors. Attach it to hair of any length.

Caring for your braids is simple: just wash the roots with shampoo once a week. This is done with a washcloth so as not to harm the hair. To avoid discomfort after braiding, you need to rinse your hair in a decoction with chamomile. Itching appears in the first days because some hairs are tightly pulled if they are short or caught in a neighboring braid.
Advice!You need to wear afro braids for no more than three months, then you need to make a correction or completely undo them so that your head can rest from the constant heaviness.

The best alternative to the classics is a spiral braid
A spiral of two strands is woven, much faster than other hairstyles and requires minimal physical effort. Very easy to do yourself.


Step-by-step instruction:
- The hair is divided into two equal parts and secured with an elastic band.
- Each strand twists in one direction, but when weaving them together, in the other. The design will fall apart if you twist the hair in one direction. During weaving, the strands unwind, so you need to remember to twist them tighter.
- The end is secured with an elastic band or a beautiful hairpin.


Advice!The plait can be styled in different hairstyles. For example, a bun looks impressive, especially if you decorate it with bobby pins with rhinestones or small flowers.
Goddess hairstyle
The favorite hairstyle of the Greek goddess Aphrodite is a braid. Its peculiarity is its location on the head. It weaves in a circle, forming a stylish headband. To create, you will need a comb, an elastic band, hairpins, jewelry and a hairpin for fastening.

First you need to comb your hair and treat it with a fixative. The parting can be left straight or made diagonally. The hair on the left side will not be needed for braiding, so it needs to be fixed separately so as not to interfere.
On the right side you should select the strand from which the masterpiece will be created. It is divided into three equal parts and classic weaving begins. After several links of a regular braid, an additional strand is taken from the side and woven into the main structure so that the outer strand becomes denser. Continue in this manner until the ear.

The right side of the hair can be left untreated, but simply combed well and also pulled into the main hairstyle. But Greek weaving looks more beautiful on both sides, completely framing the head.
Advice!Thin and sparse hair looks better if the braid is not tightened, but slightly loosened. The technique adds sexuality and charm to the image.


Openwork braids for long hair
The openwork version of weaving remains one of the main fashion trends for several seasons. They can decorate holiday hairstyles and add originality to everyday ones.

The main secret of openwork is in luxurious hair lace. It falls out of the braid in thin loops. In fact, all you need is some skill and you can quickly make an openwork braid with your own hands at home.

First, the hair needs to be combed well and treated with fixing agents. Next, you need to select a strand of hair in the place where the braid will be located. It is divided into three equal parts and begins to be braided using the classical method.


After several weaves, strands are pulled from the outer links so that they form small loops. The more hair stretches, the more lacy layers there will be. Continue until the end of the hair.
Advice! The loops should be symmetrical, then the braid will look neater.
Chic and at the same time simple hairstyles for medium hair - DIY braids are always in fashion. Of course, average hair length does not always make it possible to experiment with different types of weaving, but you can still create several unusual and interesting hairstyles. Choose one of the hairstyle options below to highlight your individuality!
“Spikelet” turning into tail
It is believed that the spikelet is the basis of all braiding. Before making complex hairstyles, you should try to weave something very simple. This version of the spikelet has its own special twist, so it doesn’t seem very simple at all.
When doing this hairstyle, divide your hair into two parts. For now, grab the smaller part with an elastic band. Weave a spikelet from most of it. To do this, divide this part of the hair into three more parts at the crown and begin to intertwine the strands.

Now braid the separated strand into a braid and wrap it around your ponytail at the base. Secure the tip with a small hairpin or bobby pin. That's all, a simple and at the same time original hairstyle is ready.
“Greek braid” - a lightweight version
Greek style hairstyles do not lose their popularity. They add some zest and suit almost every face type. This option, which will be described below, can be done independently, even if you have never done this before.

So, divide your hair into two parts (pin one of them). In the free part, grab a strand of hair and start braiding it. Braid to the base of your neck and secure your hair with an elastic band. Braid the second part of your hair in the same way.

Now connect all the strands of hair and braid one braid. Tuck it inward and pin the braid with hairpins. It will be very impressive to decorate your hairstyle with a bow, a flower or just a beautiful hairpin.
Reverse braiding
Nowadays, reverse braids are no less popular. They look more magnificent due to the fact that they are more voluminous. These braids are ideal for fine hair as they give it extra thickness.

Let's take a closer look at the step-by-step weaving of such braids. Comb your hair and grab a section at the top of your head. Divide it, as usual, into three parts. Now take one extreme part and place it under the bottom of the main part (as shown in the photo). Continue weaving in the same style until the very end. Tie the end with a nice elastic band. The braid is ready!

Two braids braided to the side
The combination of braids can be quite varied. The hairstyle presented below is made of two braids, braided on the side and collected in a bun, and of course, decorated to your taste. With a little practice in braiding, it’s quite possible to do this hairstyle yourself.

Let's get started, comb your hair and start braiding, grabbing a strand of hair from the temple. Bring the braid across your head diagonally, grabbing wide strands to make your hairstyle more voluminous. Tie the end of your hair with an elastic band.

Then you should braid the second braid along the bottom of the hair, grabbing all the strands and also tying the end with an elastic band.

Now let's start forming the beam. Fold your hair inward and secure it with a hairpin. You've got an elegant side bun. Decorate it to your liking (for example, with a bow). Your hairstyle is ready!
Fishtail braid
Another traditional braid. However, you also need to practice weaving it if you want to do it yourself. It should be noted that it looks very original and interesting on hair.

Comb your hair and gather it into a low ponytail (first pull out strands of hair at your temples). Divide it into two parts. Start braiding by separating a small strand from the side of each part of the ponytail and connecting it to the other part of the ponytail. You get a kind of superficial braiding. Braid to the very end and tie your hair with an elastic band. Pull out the hair strands on the sides of the braid a little to make it look fuller.


The next step is to decorate your braid. Twist the strands of hair that you let out at your temples. Then wrap each strand around an elastic band at the base of your neck. And secure your hair with hairpins. That's all, the hairstyle is ready.

Fishtail in a bun
Using such weaving is very good for a beautiful bun, as the result is a rather interesting frame of the head with hair. All this looks a little different than regular braids in a similar hairstyle.

Divide your hair into two parts and start braiding a fishtail braid on one side of the temple (how to do this is described above), continuing until the very end of the hair length. Do the same with the second part of the hair. Fluff the braids a little on the sides. Now gather the ends of the braids into a bun, securing them with hairpins. If done correctly, you will end up with a bun of hair similar to a flower. The hairstyle is ready!
Braid of two strands
A good option for a braid is two twisted strands. This hairstyle is much easier to do than the previous options, but this still makes it look less impressive.

You should also start braiding your hair with a gathered ponytail. Divide the hair in it into two equal halves and twist each into a tight strand.

Now twist the two strands together so that they form a kind of rope. Twist the end with an elastic band. By the way, this hairstyle can be done in three parts, resulting in three strands. They can be braided as usual. This will make it look much fuller and fuller, especially if you have thin hair.

Bun and braids
Another good option for using braids, both in everyday hairstyles and in more festive ones, is a bun braided on both sides with braids. This hairstyle is quite suitable for beginners, and, of course, for more experienced craftswomen.
You need to start doing it by separating the strands. Release the side strands, and gather the main part of the hair at the back into an elastic band. To make the bun more pompous, the hair can be combed and then wrapped in a bun, pinned with hairpins.

Now braid the side strands. It is better to use a French braid outward (just not too tight) to make the hairstyle look more impressive. Bring each strand of hair over the bun and wrap the ends around it. All you have to do is secure your hair with pins and voila! The hairstyle is ready. Use additional accessories such as a ribbon wrapped around it or a bow attached to the side.
Bun of braids
This hairstyle is quite romantic and suitable for a date or a simple walk. It’s not difficult to do, but it’s advisable to stock up on two mirrors (large and small) so you can see what and how to do from behind.

Let's start by dividing your hair into five sections. Three equal parts on the bottom and two on the sides. We start braiding from the bottom hair. Then beautifully intertwine the finished braids from below and secure them with hairpins. Now start braiding the top strands of hair. They also need to be lowered onto the sides of the finished basket and beautifully intertwined with the finished strands. Decorate your hair with a scattering of flowers - and you are beautiful!
Four-strand braid
For those ladies who are tired of three-strand braids and want to try something new, a four-strand braid is perfect. It is quite possible to do it yourself (this will be discussed below).
Comb your hair and gather it into a ponytail. Select one strand and braid a regular thin braid. Divide the remaining hair into three strands.

Now let's start braiding the braid. Place strand number four on top of strand number two. Strand number three should be on top.
Now place strand number one on top of strand number four. Strand number two should go from above.

Let's continue weaving. Strand number three should be braided under strand one. Strand number two should be on top.

Now place strand number four on top of strand number three. Strand number two should be on top. Continue weaving until the very end.

Straighten your hair with a thin braid in the center. Straighten the braid to the sides to make it look fuller. The hairstyle can be decorated with different accessories - flowers, beads. This hairstyle will look interesting with a ribbon or a beautiful braid.
Now you can safely start making hairstyles for medium hair - braids with your own hands. Each of the presented options, thanks to clear instructions, is quite easy to do, even if you are new to braiding. A little skill and imagination and soon any hairstyle with braided elements will be in your hands!
Hairstyles for medium hair - DIY braids video tutorials