Pattern of a fur hat with ears. How to sew a fur hat with your own hands. We sew a faux fur hat step by step
One of the fashion trends in recent years can confidently be the earflap hat. Everyone wears it, from young to old. The hats with ear flaps are sold by a retail chain, and someone may have already bought one for themselves. But you can sew such a headdress yourself. It is only at first glance that it seems that sewing it will be difficult. But that's not true. This article will tell you how it is created and from what material, how it is made for a boy.
Pattern starts with paper
You will need: fur (faux or natural) or water-repellent raincoat fabric, lining fabric (thinsulate or fleece), interlining and all the necessary accessories for sewing. Of course, it’s better to experiment on something small, even if you have sewing skills. You can safely take on sewing a hat for a child if you get ready for work and make patterns on paper, focusing on recommendations and calculations.
So, we begin work with a pattern for a children's hat with earflaps, for which we take the necessary measurements with a centimeter tape: the circumference of the head, face and the length of the arc from the line of the eyebrows to the back of the head. For a two-year-old child, these measurements will be as follows: head circumference = 48, face circumference = 52, arc length = 34 cm.
We make calculations for the wedge
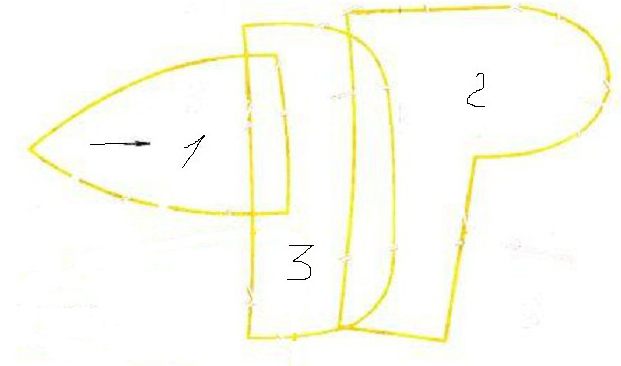
The main part of the hat is the bowler, it consists of 6 wedges. To correctly calculate the base of the wedge, you need to take into account how thick the insulation of the cap will be. If the insulation is thick, you should add 6 cm to the head circumference, that is, you get OG = 48 + 6 = 54 cm. Now you can find the width of the wedge 54: 6 = 9 cm. The height of the wedge is found by dividing the distance from the eyebrows to the back of the head in half, that is 34: 2 = 17 cm. Now you can make the first part for the pattern of a children's hat with earflaps - a wedge pattern (1 part in the photo). We get a rectangle whose sides are 9 and 17 centimeters. Mark the center on the upper side (9: 2 = 4.5) and build an isosceles triangle. From the middles of the sides of the triangle, we put 1 cm perpendicular to the side, then we connect the top of the triangle and the points of its base with a smooth line.
Constructing the ears and visor of the hat
The second element for a boy is the ears themselves. It was to build the ears that all the preliminary measurements were needed. We make the necessary calculations. The length of the part for the ears is calculated simply: subtract two centimeters from the length of the four wedges, then divide everything by 2. It turns out (9 x 4 - 2): 2 = 17 cm. Height is OL - DL = 52 - 34 = 18 cm. We build a rectangle, on the first side of which we put 3-4 centimeters down. This will be the back of the hat. Next, the eyelet itself is built arbitrarily (2nd detail in the photo).
The visor is made on a rectangle with a width equal to the lengths of two wedges minus two centimeters - 9 x 2 - 2 = 16 cm. The length of the rectangle is the size of the visor itself, for example 8-10 cm. We also draw the visor line smoothly (3rd detail in the photo). The details of the pattern need to be laid out on the prepared material and cut out, making 0.5 -0.7 cm more seams over the entire area. But the lining and insulation parts should be cut 1.5-2.0 mm smaller than the main one. By the way, the calculations and construction of a pattern for a men's earflap hat are no different from a child's one; it is simply possible to replace the wedges with a simple dome. Use your imagination here.

Technology of sewing hats with earflaps
The cut out parts of the hat must be sewn correctly. The wedges from the base material are sewn together first. If it is fur, then when cutting, you need to pay attention to the correct placement of the wedges so that the pile goes in one direction. If it is raincoat fabric, it can be quilted by connecting a wedge of raincoat fabric and insulation, for example, non-woven fabric. The quilting must be done before sewing the wedges.
The lapel with ears is sewn together with the lining material or sewn from two layers of the main fabric. The layers are folded right sides inward. The visor is also sewn. All parts are turned right side out and stitched together with the cap. Not all of the lining under the cap is sewn together. 2 wedges remain unsewn so that you can turn the hat inside out and then carefully sew this seam by hand. Sewing a hat with earflaps for men using a pattern made as indicated above is no different from sewing a children's headdress. The only difference is the sizes.

Tailoring quality
It should be remembered that there must be seam allowances. Having finished working with a fur product, you need to lightly sprinkle it with water, comb the pile and dry it. You definitely need to check the quality of the work. It, of course, depends largely on the experience of the seamstress. When creating a hat model, you should correctly measure, calculate and prepare a pattern for a hat with earflaps for your men. Of course, the craftswoman would like to see her husband or adult son in a beautiful hat that fits well on his head. If it’s still too small, don’t be upset. You can always add another wedge in the cap, as well as reduce it if the headdress turns out to be too big.
Popular styles of men's hats with earflaps
Patterns for any hats can be made independently, as it became clear from the article. The main thing is to take all measurements correctly. Having learned how to sew an ordinary classic hat with earflaps, it’s worth imagining a little and sewing a fashionable trendy Russian Cossack headdress for your household - a kubanka or papakha. And if you have a mink skin in the house, why not practice on it. After all, men's mink hats with ear flaps do not leave the catwalks. These look especially beautiful with inserts made of leather, leatherette or suede.

Since men's hats with ear flaps are designed both for warmth and to harmoniously complement the image, sheepskin hats remain popular. They tolerate rain and humidity well. That's how many different materials you can use for sewing. The main desire. It’s not for nothing that people have this proverb: “The eyes are afraid, but the hands are doing.”
The earflap hat has become very fashionable and stylish, and at the same time no one can argue with its practicality. It will keep you warm in the most stubborn frosts, and thanks to your skills you can make it as stylish and beautiful as possible. In this article we propose to consider patterns for women's and men's hats - ear flaps.
Pattern of a women's hat with earflaps:

Thanks to this pattern, it won’t be too difficult for you to get a new hat. Transfer the pattern details to the fabric and sew in the marked areas. Don't forget about seam allowances and fittings to create your hat to size.
Pattern of a men's hat with earflaps:

Head circumference - fifty-six centimeters.
The hat consists of 3 layers: top part, insulation and lining.
For the upper part, you can use fabric such as bologna, corduroy or thick knitwear. The upper part can be combined from different colors and structures.
For the visor use fur with a small pile. For lining, I'm considering soft jersey or fleece. For insulation use. padding polyester
Seam allowances: for sewn seams - one centimeter, for overcast seams - 0.7 centimeters.
When printing the square, keep an eye on this. so that its sides are ten centimeters long. We cut out the parts and get to work. Before you start sewing, check that the measurements taken match the pattern. The seam allowances are already marked on the patterns. The pattern is given for the top of the hat, and the lining and insulation are cut according to the base. patterns.
Summer is coming to an end, and hats and panama hats are a thing of the past. They are being replaced by warm hats made of fur and knitwear. Not every woman has the means to buy an expensive mink hat, so there is an alternative way to purchase the item at minimal cost. All you have to do is look through your old clothes and find ones that are unwearable. It is suitable for cutting out the intended hat.
Where to start cutting?
First of all, you need to choose fur for the hat pattern. Skins can be ordered on the website or bought on the market, but if this is not possible, the best option is to look for an old fur product in your wardrobe. The most important item with which the pattern will be created is a stationery knife or a sharp razor blade. It is worth considering that the size and shape of each person’s head is different, so you need to immediately measure the volume of your own head with a centimeter in order to later use the measurements to create patterns. Here is an approximate list of items that are needed to create from fur:
- fur (fox, arctic fox, mink, ermine, etc.);
- graph paper;
- stationery knife;
- pins;
- centimeter;
- ruler;
- tailor's chalk.

When creating a pattern, be sure to take into account seam allowances and, on fur, the direction of the pile. It is important to know that the fur is placed pile side down so that its structure is not damaged during cutting; the cut is made carefully along the skin. If the material is lying around in your wardrobe, you should sprinkle it with water, comb it and let it dry. The same method works when stretching skins, only water is applied to the skin.
Types of fur hat patterns
There are many patterns for women's fur hats that are easy to make with your own hands. The only question is what material to choose. The base of the hat can be leather or knitwear, and twill is often used as a lining. The range of stylistics is extremely diverse: from classics to wolf animal figures). The most wearable are:
1. Ushanka hats made of fur, the patterns of which have 12 parts: 2 ears, 2 wedges, 4 medium wedges and 2 parts of the visor. The wedge is a kind of “petal” made of fur, and the visor is a part that is sewn on the front of the product.

2. “Seven-season” hats, tied under the chin, are often worn by children. Patterns for children's fur hats are made according to the same principle as for adults, only they differ in size.

3. The Boyarka hat is the easiest to make, because it has only 4 parts that need to be sewn together.

Pattern starts with paper
You need to use a centimeter to measure the circumference of your head, the distance from the ears, forehead and back of the head to the middle. Putting all the measurements taken on paper for fur is easy to do because it consists of only four parts:
Top of the product;
. visor;
. bottom;
. lining walls.

The top of the cap also consists of four separate parts, which are similar to pointed petals. If you pick up a cap or any leather hat and examine it carefully, you will notice the seams on the sides. These are stitched wedges. The size of the head circumference must be divided by 4, and the resulting number should be taken as the width of the petal and draw a line on paper. The end mark of the wedge should be placed perpendicular to the width line, taking into account the distance, for example, from the ear to the middle of the head. The ends of the wedge are connected to this mark. Then you need to step back 1.5-2 cm from the part and add a dotted line for the seam allowances. The first wedge is ready. Three more of these will need to be made. The width of the visor is chosen arbitrarily, and the length - taking into account the size of the head and allowances. The bottom and walls are built according to the same principle as the visor. When the paper pattern is ready, it needs to be transferred to the fur using tailor's chalk and cut out with a stationery knife.
How to create a fur hat pattern?
The length of a person’s head is 55-58 cm. These parameters must be taken into account when creating patterns for a fur hat pattern. For convenience during construction, the paper is folded in half. From the middle from top to bottom, 23 cm is laid out, and the width is taken 12 cm, this will be the side part.
The ears consist of two parts - a rectangle and a square. The first part is 11 cm wide, and the length is the width of a landscape sheet; the sides of the second are 9.5 cm. The finished patterns are cut out, pinned to the wrong side of the fur and outlined with chalk.
Pattern for a children's hat - is it difficult to make?
First you need to select the appropriate model. Details of a children's headdress may resemble parts of a woman's fur hat pattern, but may differ in structure, for example, ears, decorations, ties with pom-poms. If you get ready to work and make patterns, focusing on the instructions, then there is nothing difficult in the work. To facilitate the process, you can use artificial fur, which does not require preliminary preparation (stretching, styling). This material is easy to care for, easier to clean, and easier to work with while sewing.

How to improve the quality of patterns?
It is imperative to remember that for fur hat patterns, seam allowances of 1.5-2 cm must be taken into account. After completing the work, the finished product must be sprinkled with water, combed and dried. It’s worth checking to see if there are any unevenness, whether the fur is properly processed and whether the materials are damaged during cutting or sewing. The quality of work corresponds to the level of experience of the master. When creating your own model, you cannot neglect the basics and specified sewing standards, otherwise the patterns will turn out to be of poor quality, and the work will have to be redone. All possible shortcomings are easier to correct in the process. If the hat turns out to be a size smaller, you should add a couple of wedges or recalculate the measurements and alter them.
The earflap hat has become quite a fashionable trend in recent years.

At first glance, it seems that sewing one yourself is quite difficult, however, this is not so. We would like to offer you a master class that will tell you in great detail how to sew an earflap hat, which is also presented here.
Of course, first of all you will need fur, which can be either artificial or natural, fabric for lining and all the accessories necessary for sewing.
So, let's get started - patterning a hat with earflaps.


Please note that all details must be duplicated in two materials: fur and fabric for the inner lining of the hat. Some parts require two copies.

First, we begin to sew together the fur parts, folding them in pairs with the right sides facing inward. After stitching, the parts are turned inside out. In this case we are talking about a visor, which we will return to at the end of the work. But first, it should be sewn from two fur parts.

The base of the hat consists of a long central part and two sides, with which the work begins by sewing them together. The parts are pre-fixed with pins, after which they can be stitched together.

After the main part of the hat is ready, so-called ears should be sewn onto it, of which there are also two, one on each side.

All parts are also sewn first with the front side inward.

In the same way, you should sew exactly the same hat only from lining fabric.

Now two identical hats should be connected to each other. To do this, the lining hat, turned inside out, should be put on, as it were, a fur hat, which is turned right side out. This way, both hats are facing each other.

Now you should stitch along the bottom edge of the hat, leaving a small hole for turning it right side out. Follow the seam allowances, which should be within 0.5 - 1 cm.

Through the hole left, the earflap hat can be turned right side out, and the hole can be carefully sewn up by hand.

The final step is to sew the visor onto the intended place. Remember how we sewed it at the beginning of the master class?
All that remains is to take this blank and sew it on the front of the hat.

That's basically it, the hat with earflaps is sewn with your own hands. Is it really not difficult at all?
The earflap hat remains an integral part of Russian history and a piece of clothing that has not lost its relevance to this day. It is indispensable during harsh winters, protecting against the piercing cold wind and frost.
In addition to its practicality, the earflap hat belongs to very beautiful headdresses. If desired You can sew a fur hat with earflaps yourself. Of course, this will require time and effort, but the result will exceed all expectations.
How to sew a women's hat with earflaps?
- Prepare a centimeter, paper for the pattern, 0.5 m of lining material and material for the hat. First, measure the circumference of your head, then draw a circle on paper with a radius of ¼ of the obtained value. Then bend the resulting circle in half and cut along the fold line. Step back 1 cm from the circle, rounding the cut line. Make 2 symmetrical recesses on top, 4 cm deep and 2 cm wide.
- Now draw a rectangle with sides 18 and 12 cm. Cut one short side around the circumference. These will be the ears of the ushanka hat.
- Subtract 24 cm from the resulting head circumference and divide the remaining figure in half. Now with this length and height of 10 cm, draw 2 rectangles. One of them will become the back of the hat. Place the second rectangle lengthwise and cut off the 2 upper corners along the circumference. It will make a visor.
- From the main material, cut out the parts - 2 parts each for the cap and ears, one each for the back part and the visor. From the edge of the pattern, step back 0.8 cm in width. Exactly the same number of parts are cut out of the lining material, cutting the material strictly according to the pattern. These parts should be smaller in size than the main fabric parts.
- Sew the back part of the lining and main material and the ears together. Then sew them along the edge. Now make darts and sew the cap from the lining and main fabric, leaving only a line between the darts on the lining, unstitched part. Sew the details of the visor.
- Connect the cap along the side seams, on the wrong side mark the points that should be on the back of the head and the middle of the forehead. Fold the back part with the ears in half and, starting from the middle of the back of the head, sew symmetrically in both directions to the cap. After this, mark the middle of the visor and sew it on both sides of this point. Sew the cap made of lining fabric to the visor and to the back part with the ears. Turn the hat inside out through the hole left and then sew it up. Your beautiful earflap hat is ready.


To sew a fur hat with earflaps, you will need lining fabric, fur pieces, a plywood board, and ribbons for tying. You can make such a hat from any fur that you have on hand. Even pieces from old fur products will do.
- From thick paper you need to make a pattern for the future parts of the hat: ears, visor and cap. The cap will consist of 2 parts. For it, you should draw a horizontal line 30.5 cm long, and in the middle build a perpendicular line 14 cm high. From the point where the 2 lines intersect, you need to step back vertically 2 cm. Then you need to draw a horizontal line 28.5 cm long, so in such a way as to intersect the vertical line exactly in the middle of the length.
- Next, you should draw 4 horizontal lines with a length of 27, 25.8, 22.5, 17 cm and an indent of 2 times 1.5 cm and 3 cm. On the vertical from the last point up, you need to indent another 3 cm and mark the point. After this, connect all the resulting points on the left and right with a smooth line to the top.
- It's time to mark the dart. You need to move 4.5 cm upward along the central vertical, 3 cm to the right and left along the lower horizontal from the center point. Then connect all 3 points with straight lines.
- Next, the ear pattern is constructed. To do this, draw a horizontal line 13.5 cm long. Then it is divided in half, and from the center a vertical line of 12 cm is drawn perpendicularly. From bottom to top, points 3, 3 and 3 cm are marked on it, then 1.5 and 1.5 cm. From Horizontal lines with lengths of 12.6 cm, 11, 9 and 7 cm are laid out on them. This is done in such a way that the middle of each line falls on the marked points. The resulting points are connected.
- The visor pattern drawing will show half of the piece. To build it, you need to draw a rectangle with sides 11.5 and 13.5 cm. On the smaller side you need to put 3 times 3 cm, 2 and 5 cm. Draw perpendiculars to the opposite side from these points. Mark the points 0.5, 2, 3.5 and 11 cm along these lines. Then connect them with a smooth line, which will mark the front line of the visor.
- On the opposite side of the rectangle, which is smaller, you should set aside a segment 9.1 cm long, then 0.8, 0.8 and 0.8 cm. From these points draw perpendiculars to the opposite side. On the second perpendicular, set aside 7 cm, and on the third - 10 cm. Connect the 9.1 cm mark with a smooth line to the point of the opposite corner and with the marks 0.8/7 cm, and 0.8/10 cm. This will be the back line of the visor.
- Place the pattern pieces on plywood and then outline them with chalk. You can pick up pieces of fur or take a whole piece of the required size. The pieces should be attached to the patterns so that the pile is in the same direction. The color and its height should be appropriate and the same.
- The pieces must be sewn together with frequent stitches over the edge. At the same time, no lint should get on the inside. The stitched part needs to be laid out and the seam broken with a wooden hammer. The fur should be moistened, the pieces should be straightened, secured to the board with the nap facing outward using nails and left to dry.
- The fur must be removed from the plywood, the pattern details should be laid out and outlined with chalk, then 2 parts of the cap, a visor and 4 parts of the ears should be cut out. The first step is to sew up the darts of the cap, sew the cap, sew on the visor and ears, turn the fur outward and sew in the ribbons.
- After this, lay out the lining fabric on the bias, transfer the pattern details, cut, sew, iron and sew into the hat.
Do you want to add an exclusive winter item to your wardrobe, become even more stylish and fashionable, and at the same time love and know how to sew? Then try sewing a hat with earflaps with your own hands. This will require time and patience, but all the effort spent will pay off in full, and another unique thing will appear in your wardrobe.