Decoupage of boxes: we create an exclusive thing from an ordinary cardboard box. Do-it-yourself decoupage of a cardboard box: nuances and methods Decoupage of a cardboard box with a cloth
An ordinary solid box, for example, from under shoes, can be turned into a unique work using the decoupage technique. Decoupage of boxes transforms them into beautiful interior items, in which it is convenient to store cosmetic accessories, small toilet items (hairpins, combs, brooches, etc.), various receipts, chargers, etc. This is especially important if you have furniture with open shelves in your room. Decoupage of boxes of different sizes in the same style and color scheme will allow you to decorate any room with a classic interior, and deliberately different decoupage of cardboard boxes will emphasize the atmosphere of a child's room, hallway or dressing room.
The proposed master class for beginners will introduce you how to decoupage a cardboard box.
You will need:
- shoe box (preferably without gloss);
- three-layer napkins with a pattern;
- acrylic paints;
- glue for decoupage;
- soft new sponge;
- soft brush for varnishing;
- hard brush for gluing;
- acrylic lacquer.
Before we get started, let's choose a motive. When choosing napkins for decoupage, we try to take into account the size of the box: for a large box, we select a large pattern, for a small one - small elements.
Decoupage boxes with napkins
1. If the box has a glossy surface, we need to remove the gloss with fine sandpaper. We carefully remove small pieces, brush off the dust. If the box is made of ordinary rough cardboard, then this operation is not needed.

2. We cover the entire outer part of the box with acrylic white paint with a sponge, trying to paint evenly. Let the paint dry well.

3. Glue the napkin with a brush, considering the following:
- for the sticker, only the top colorful layer of the napkin is used;
- glue is not applied under the napkin, it is necessary to glue a dry napkin with a brush dipped in glue;
- glue should start from the edge, holding the napkin with your hand from the other edge and smearing with a glue brush with wide strokes on the surface.
If you do not have decoupage glue, you can use acrylic varnish.

4. Fragments of the picture are glued not only on the lid, but also on the sides of the box. Let the box dry. We fix the pattern with acrylic varnish, applying it in several layers. If the acrylic lacquer is glossy, then the product will be shiny, matte lacquer will give the work a vintage character. Layers of varnish must be calculated correctly, checking after applying the next layer and drying, whether the box closes well.

5. We decorate the inside of the box, pasting it with napkins, covering it with acrylic paint and laying it out with a cloth. Separators can be placed inside to form smaller cells.

Improving your technique, you will gradually learn how to design more complex products: original gift wrapping, book covers, decorative tables.
Decoupage of a cardboard shoe box.

Author: Beginners in decoupage sometimes worry that they can accidentally, due to inexperience, spoil a beautiful blank. Everyone makes mistakes: someone forgets to separate the extra paper layer, someone may tear a napkin, or unfortunate folds will appear ... Skill comes with experience!
And experience is best gained by honing your skills on simple basics that are easy to find at hand and that you don’t have to spend extra money on.
An excellent option for the base for decoupage is a cardboard shoe box. It often happens that after buying a pair of shoes, the box is kept at home for some time until the purchase warranty expires.
In reality, it remains much longer, because you probably forgot about it :) So, finding the box is pretty easy.
It will also not be difficult to come up with an application for it after decorating: it will be possible to store documents, paints, medicines, materials for sewing and needlework and much more in it. The point is small, let's start decoupage!
To decoupage a cardboard shoe box, we need the following materials:
. decoupage varnish glue for hard surfaces;
. acrylic finishing varnish;
. finishing fixing varnish;
. acrylic primer;
. paints for painting (or from any other line of acrylic paints): Titanium White, Light Green, Chrome Oxide, Orange, Lemon, Yellow Medium;
. napkins for decoupage;
. palette, scissors, iron, ruler, simple pencil, foam rubber sponge, synthetic brushes.

Surface preparation
We cover the surface of the box and lid with acrylic primer. The shoe box is quite large, so you need to arm yourself with patience - all the interesting and creative stages are yet to come.

Our box has loose joints at the corners, so we additionally strengthened them by gluing them with masking tape.

After we have covered all the surfaces with primer, let them dry.
Then sand with sandpaper.

After sanding, cover with soil again.
And skin again. We will repeat these two steps (priming + sanding) until the surface is smooth and the corner joints glued with masking tape are even with the rest of the surface.

After we have achieved perfect smoothness, we cover the box with acrylic paint to match the future napkin motif.

Decoupage process with an iron
This time we will decoupage in a “hot way”.
This method is ideal for gluing napkins to large flat surfaces.
Evenly cover the surface with decoupage adhesive varnish and let it dry.

After the glue has dried, lay out our napkin on the surface. We look for it to lie flat, straighten it and smooth it with our hands.

With a hot iron (but not at maximum power, but at medium power), we iron this side of the box through a sheet of paper (many recommend taking baking paper for this purpose).

The napkin sticks perfectly evenly. Trim off excess edges.

Now the most important step! We cover with varnish over a napkin. The most important thing here is to make the layer as thin as possible.
You don’t need to coat the napkin abundantly, otherwise it will bubble. We act carefully, easily working with a brush from the center to the edges.

Repeat the gluing process on all planes of the box.
We coat with decoupage glue-lacquer, dry.

On the dried varnish, we iron the napkin with an iron through a sheet of paper.

Trim off excess edges.

Gently apply a thin layer of varnish on top of the napkin.

We think over the composition on the lid.
We pulled out two large sunflower flowers from napkins and placed them in different corners.

Glue. We coat the places under the napkins with glue-lacquer.

We iron it through a sheet of paper and fix it with a thin layer of varnish.

After the initial thin layer of varnish has dried, boldly cover the entire box with a layer of acrylic glossy varnish.

Background refinement
We lay out on the palette the acrylic paints that we need (Titanium White, Light Green, Chrome Oxide, Orange, Lemon, Yellow Medium) and acrylic varnish.
Dip a small piece of foam rubber sponge into the paint and varnish.

We start tamping. It's okay if we go a little on the napkin: the excess can be wiped off.

When adding each next color, do not forget to dip the sponge into the varnish: this will create an interesting glazing effect.

Add colors to match the napkin to smooth out the harsh transition.

Excess varnish and paint that have fallen on the drawing can be easily wiped off with a dry cloth.

After the background has dried, we slightly finish the petals of sunflowers, adding bright and contrasting strokes and highlights to them.

Add some splashes of white paint. An old toothbrush will do for this. Do not forget to put unnecessary paper or newspapers under the box so as not to stain the workplace.

We collect Brown paint on the sponge and go through all the corners of the box, focusing on them.

We cover with acrylic varnish.

And we finish our work with a layer of finishing fixing varnish.

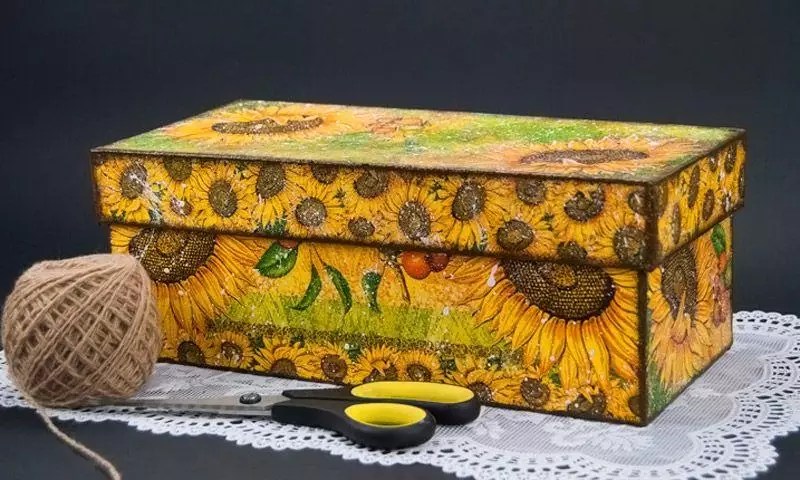
From an unnecessary shoe cardboard box, the result is such a cozy box for storing balls, knitting and sewing accessories.


http://www.tairtd.ru/
Decoupage, marriage, roasting, voyage ... When I say that I do decoupage, people somehow soften, blur and even begin to fawn. Just the same "goltepa" of mother Balzaminova. And I involuntarily demonstrate this "goltepa" as a sign of the adequacy of the era. Indeed, "I knit socks" or "I cross-stitch" does not arouse the same interest and respect.
And you screw in some kind of "goltepa" (there are a lot of them now: patchwork, quilting, quilling, felting, scrap - sorry, Lord - booking, etc.), and you find a response from the Eurasian new settlers in Moscow. And you see a magical and enchanting picture of Russia's "cultural mediation": they put "seeds" in your pocket, put "stupinators" in your shoes, write "kartof-markoff" on the price tag, take out a "pudder box", sing a song about "arintir", say sacred "abanamat" and run to decoupage ...
And in every house you can decoupage, hope and re-decoupage a lot of old, ugly, boring, boring things. And let there be some experienced masters, and even with diplomas and - oh God! - an international reputation, and even if there are such beautiful pictures with such beautiful things in books and magazines, this is not a reason to give up your desire and your creations.
All these things I did before I started my blog. Therefore, no master classes.(And again about the patient ... "Master class" is some kind of stupid word, licked from a foreign culture and foreign language. "Master class" on the topic "paper-glue-wood", "girl-draw-flower" , "sit-ass-chair-beautifully"...).
What is special about this text? Combination of technology and emotion. How happy, upset, tried, said to myself "never", and then said "what if". This will be a master class - on the topic "woman-unskilled-decoupage-learn-well done!".
If this helps someone, I'll be glad. And I'm already good.
STOOL.
The first experience - a stool from Ikea. Reason - an article with pictures in a needlework magazine. All the materials were picked up by a saleswoman in an art salon, smiling knowingly after my explanations. The minimum minimum and the cheapest.
Made with:
Two bottles of acrylic paint - bright blue and yellow-beige (written "ivory"),
Flat synthetic glue brush
A flat brush is cheaper for varnish,
Flat synthetic brushes for paint (the smart saleswoman pressed on these flat brushes),
cheap decoupage glue
Acrylic lacquer in a bottle
A decoupage card with kids (that is, a simple paper sheet with pictures, only the paper is somewhat thinner than ordinary writing),
And the napkins that stuck out in the napkin holder.
The whole job took 2 hours, including waiting to dry. And how I trembled, soaking the papers from the decoupage card in water, and then blotting with a cloth! And how glad I was that they were evenly smoothed out with a flat brush and glued without bubbles! Amelie from the film of the same name loved to dip her hand into bags of cereal, here - the same living tactile pleasure. In addition to the brush, you can smooth the pieces of paper and smear with your fingers.
I didn't sand or prime. I didn't know what to do at all. But the stool was even, thank God. Yes! I put it together myself!
Everything worked out. Wings grew immediately. And there was no plan, she shredded the pictures as God puts on her soul, and she simply glued the napkins on the holes. It turns out that this style of sticking is called decopatch. (Greetings to Mr. Jourdain!).
After use, the stool became even more beautiful: it peeled off where it needed to, got dirty in the right places, darkened. In the family, these children fell in love and are called "hungry". Still, it turned out more fun than regular painting or staining.
The experience is:
Acrylic paints and acrylic varnish are needed. Remember the word "acrylic". Acrylic - does not smell. All acrylic washes off with soap and water, no chemicals needed.
Need flat synthetic brushes (I fell in love with #12 and #14). Then round and fan brushes appeared in my collection. According to art history legend, fan brushes were invented by Leonardo, and flat brushes were invented by the Impressionists.
- If the work plan includes painting large surfaces (chair legs, whatnot planes, etc.), then you can buy large flat brushes at an ordinary hardware or hardware store. They're worth every penny. The numbers of such brushes exceed 20: No. 20, No. 22, etc.
Need glue for decoupage (then I tried ordinary PVA, I didn’t like it).
The paper must be soaked before sticking. Wait until it curls up into a tube and unfolds. And then blot the paper with a cloth, and it sticks wonderfully.
I have never varnished anything before, it turns out - nice and beautiful.
The work is no more difficult than the application in kindergarten.
True, we must wait until all the layers have dried in turn (paint - once, glue - two, the first layer of varnish - three, the second layer of varnish - four). And this requires endurance, like a scout.
DOOR.
Bad experience, I must admit.
After the stool, she grew bolder and took the door. Without taking off the hinges! And immediately with napkins! I redid it more than once, until I realized that nothing could be fixed. The napkins were wrinkled, torn, did not lie flat (on weight!). But a negative experience is also an experience. This is the cure for pride. I look at the door and humiliate myself. And those roses too! Then, of course, I will accumulate strength and redo it.
In general, there is a lot of vulgarity in this type of decoration, and you can’t hide from it: roses, lavender fields, girls with and without hearts, puppies, kittens, calves, lambs, gold, bronze, shine-shine-shine... Things are rare, the author of which undisguisedly has impeccable taste. I do not possess. As an inexperienced cutter and gluer, I rush along the already laid paths, and there is the tradition of "seals".
The experience is:
- "Napkins for decoupage" is a fiction; These are ordinary napkins, consisting of several layers. For decoupage, you need to tear off the top layer with a pattern. You can use a needle with which to exfoliate the napkin. And some napkins delaminate if you just blow on the edge.
These napkins are sold everywhere: in hardware stores, supermarkets, online decoupage stores, needlework shops, etc.
There is a special glue for napkins (it is also varnish at the same time), when working with this glue, the napkins do not have time to get wet, stretch and tear (I later tried, trying to justify myself behind this door).
A drawing from napkins can be cut out with tiny scissors, a scalpel (not medical, of course, but with what is sold in stores for decoupage or patchwork), or you can tear it out. Very small elements are pulled out with a toothpick: you need to poke the wet tip around the pattern and carefully detach it from the napkin.
______________________________________
(I redid it two and a half years later. The old door was already going through the 4th painting, and I had to putty the surface, close up the gaps with putty, re-nail the detached plank, endlessly sand it, etc. To mask the bumps, craquelure was invented: on the door itself, on the planks, on the stand.And roses again! What are you going to do! And where to go? Antique mosaics, gnomes, houses, watches, advertising posters with girls, views of cities with the Eiffel Towers and Big Bens - this would look even worse on the utility door. I applied it, I looked - it was worse ... And the big flowers covered the irregularities of the door. Also a plus.
Two shades of turquoise mixed with white and green acrylic paint.
Craquelure on the door and on the riser.
Under the craquelure - multi-colored paint: brown, gold, green.
On the bar is a napkin. Torn motifs with flowers.
_____________________________________________
Then I switched to small forms, commensurate with self-esteem.
BOX FOR THINGS AND PAPER.
I learned a lot and did it for the first time.
I learned that there are blanks for decoupage, and was very surprised. Bought a wooden box. And rice cards with pictures for decoupage. And varnish for one-step craquelure, that is, in Russian - cracks.
Craquelure shocked the process and effect. You apply dark paint, let it dry, then - craquelure varnish, let it dry according to the manufacturer's instructions, and then - light paint. And cracks appear right under the brush. Such pleasure, such genuine joy! The intrigue is right under your nose: what will happen, how will they spread? But light paint must be applied carefully and only in one layer! Otherwise, you will get stains, blots, mess. You need to fill your hand and learn how to make even strokes with a flat brush.
For the first time I tried to splash with a piece of foam rubber (see supposedly blue sky).
First time trying to stick rice paper. And it's good to cut it off, and it's convenient to stick it. And you don't need to soak it.
For the first time I rubbed the edges with sandpaper.
In my opinion, it turned out Provence. That is, a redneck, a province. French. (I don't call names, it's style).
Decoupage style is a very funny topic. Provence, Victorian style, shabby chic, simplicity, etc. - the beauty of how they develop their horizons and knowledge in the field of market marketing. In this sense, the story with the advent of the shabby chic style is very funny and indicative: one nimble American lady received a patent for things with craquelure, scuffs and roses, and a very corrupt "shabby chic" turned out.
And this wonderful Provence stood on my grandmother's terrace: it was a home-made, white-painted wardrobe, made in the poor post-war period. And I drew flowers on it and wrote all sorts of words.
The experience is:
Need soil! Front surface decoupage need sanded with sandpaper and primed.
The word is terrible, from some kind of excavation work. But it turns out, again, it’s nonsense: you just need to cover the surface with a layer or layers of acrylic light paint or acrylic primer (it’s sold that way, that’s what it’s called; but it is, if I understand correctly, a mixture of paint and putty).
What for? Firstly, less paint and glue are used: they are not absorbed in large quantities into a porous surface (wood, cardboard). Secondly, the surface becomes more even. Thirdly, the drawing of thin napkins and a decoupage card on a light ground surface will be visible in all details.
But you can also refuse the soil if, for example, you really want to preserve and emphasize the beautiful and intricate surface of the tree, etc. It all depends on desire and intention.
Sandpaper is a friend of decoupage. Surfaces and layers must be sanded. I mainly use paper with two zeros: 100, 200, 400, 500, 600. No. 1000, which many people like, is for microscopic work.
Large emery is very necessary if you need to prepare an old thing for decoupage (with old paint, old varnish, dirt) or an unprepared wooden surface. If the tree is first sanded with coarse sandpaper, and then with fine sandpaper, then it becomes perfectly smooth. And you also need to sand the layers of varnish at the very end of the work (the so-called finishing varnish). And yet - with the help of sandpaper, you can make worn edges.
It is very interesting to make worn corners and edges. You need to apply the first layer of paint (usually dark), let it dry, rub the selected places with any candle, then apply a different paint (usually light), let it dry, and then rub those same places with fine sandpaper, especially without pressing. Very nice job! Both for the eyes and for the hands!
Rice paper for decoupage is a real treat. In everything. (There are other natural materials from which decoupage paper is made).
There are blanks for decoupage. And there are hardware stores that sell raw wooden products (chopping boards, bread bins, spoons, spatulas, salt shakers, benches, high chairs, shelves, etc.) that can be decoupage. They are cheaper than special blanks.
Varnish for craquelure - not expensive (there are Russian ones).
STANDS FOR KNIVES.
I ran around the apartment to find something that can be redone. I found a stand for knives, the varnish from which had peeled off for a long time.
And she repeated everything: she removed the varnish and dirt with large sandpaper - primed - applied a layer of dark paint - covered with varnish for craquelure - walked along the edges with a paraffin candle - carefully applied light paint with strokes from top to bottom with a flat brush - carefully rubbed the edges with fine sandpaper (with a slight movement in one direction), which peeled off very easily - pasted motifs with flowers and food - tinted the edges of the picture with a bottle - applied 2 layers of varnish.
For the first time I applied underpainting, that is, I simply painted over the edges of the paper with the bottle with a brush and foam rubber (it was smaller than necessary). And again I was surprised: even if the color is not one to one with the picture, it still turns out well. Such natural shadows or stains.
I know and see what happened in style "winks his eyes at me and won't say anything", "Yura, Yura, I'm such a fool" and "The nightingale of Russia is a glorious bird." I know and I see. But still like it.
This is what decoupage is good for - the process leads to joy and tenderness, regardless of the result.
Experience:
I learned that there is putty on wood; I bought a small box from a hardware store and after cleaning the surface with sandpaper I patched up the embossed logo. And in general, in the construction and hardware store she became "one of her own". The seller is already flirting: "Girl, why do you need sandpaper?" And I was his intellect: "How is there no five hundred? Well, let's six hundred. Do you have sheets or footage?"
For underpainting, I bought a set of brushes: ordinary children's round and cheap ones. In this case, it does not matter - synthetic or natural.
BOWL wooden.
I love her, touch and squeeze. It turned out smooth, smooth, because I varnished it and sanded it, varnished it and sanded it ...
I used rice paper on the warm inside, and napkins on the cold outside. This is the intention. I understood this word right in my mouth - "for-thought". That is, the thought has not yet been born, but the anticipation, the image, is already there.
And here I finally got rid of the fear of napkins. No matter how you stick them, no matter how sophisticated, they will still turn out with wrinkles. And it turns out that it is necessary to do this: let it dry, cover it with several layers of varnish and sand it with fine sandpaper. This whole operation must be repeated several times.
I made this bowl for several days, letting the varnish dry. Sanded and varnished six times.
I keep candy...
TRAYS.
Well, where without trays!
One tray was just white and nothing, the other two were old and shabby from pressed straw.
She dumped everything she could on these trays. You can doubt the skill and taste (I doubt it myself), but breakfast has become more fun.
For the first time I tried another craquelure - two-step. It sounds more difficult, but it is easier to do: the first varnish from the set is applied, then the second varnish from the set (they are sold this way). Cracks will appear, and they need to be "showed", that is, something to be rubbed into the cracks. This is something: purpurin (fine-fine powder of different colors), oil paints, bitumen (this is such a dark oily rubbish in vials or canisters), eye shadow, crumbled pencil lead, shoe polish, etc. First you need to rub fingers, brushes or cotton swabs, and then just brush off the excess and wipe.
I bought gold purpurin and rubbed it into the trays with a frenzy. Therefore, they are all in gold and sometimes seem to be in conflict with Russian nature. And in bright places rubbed dark eye shadow.
Butterflies from napkins.
Cracks on red - purpurin, on light - eye shadow.
Motif from a napkin around the perimeter.
Tray after two years. As you can see, it works.
The edges of the tray are covered with soft plastic, similar to rubber; Here's some paint peeling off. As well okay.
The experience is:
If the wooden surface is not primed, but immediately painted with acrylic paints, the tree looks through, and this is very nice.
Two-step craquelure is better to buy in sets (this is especially important for those who do not understand chemistry and do not want to suffer with the selection of varnishes).
The manifestation of cracks is a special topic in decoupage. For example, after bitumen and oil paints, ordinary acrylic varnish cannot be used. If you are interested in the accumulation of knowledge in the field of the great science of chemistry, you can develop in this direction. I am not interested. Therefore, I develop either with purpurin, or with shadows, or with a lead, or with tinted shoe polish.
Trays covered with acrylic varnish are functional. Just do not wash them under running water. And if you wash, then it is quickly wiped out.
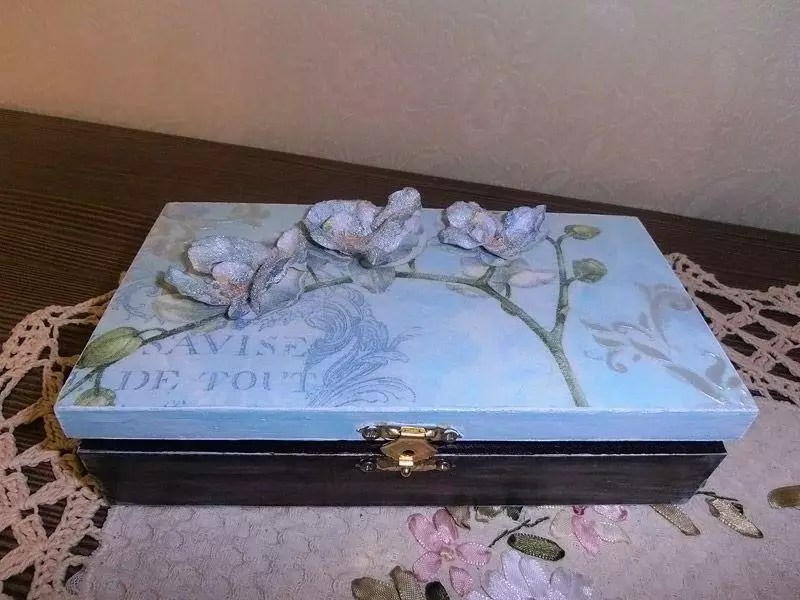
BOX WITH ANGELS.
For the first time I tried Paltal. Past of my ear flew the words "Paltal", "Mandan", and I haveged. It turns out nothing special. Potal bought in leaflets; it turned out that it was a thin foil. And Mordan turned out to be thin glue.
First you need to apply mordan, let it dry, but do not dry (the label says how long to wait). Then take Paltal ... it's easy to say - take it. Try to take! It is thin, and even electrified, and besides, it is bent from the slightest blow. You can use tweezers. To optimize the process, you can prepare any small box-cap, in which the pieces swelling. Close all windows and don't breathe on her! And then apply potal pieces to the desired place covered with varnish. Experienced masters advise to use special brushes (forgot, as they are called): Round at the base and smoothly cut from the villion. They are "stuffed" with potal, that is, they are simply gently and gently poked. But I had a small surface, and I cost flat brushes. They also stuck Paltis perpendicular to the surface. It is not necessary to pay attention to the fact that Pottia is crushed and rhat; sticking it with "patches" is normal. Then let dry following the glue instructions. And then a soft brush and soft movements to smear the extra potal. It will remain only where the glue was. I don't know why, but it's fun!
Primpted Paluth then trembled by extinguishing paper so that gold seemed to be old. As she could, she rubbed it. If the criteria for evaluating work are eternity, art and professionalism of restorers, my experience of gluing sweat is terrible. And if you do not take off in height, but from the point of view of utilitarianism and your own pleasure, then I am a well done, and it turned out beautifully.
I especially liked how the sequins sweated for a long time flying all over the apartment and sticking to everything and everyone!
This time it turned out a Victorian style. This style is no longer French, but the English village. Its feature is dark tones, excess gilding and pretty pictures with a claim.
Inside.
I realized that some wooden blanks were made poorly. Here: the glue stuck out of the seams (in some places - all the drops) and the emery did not give in. After passing through the stain, this glue turned into some kind of red color. I had to gather and all the angles take place close in color paint.
The experience is:
There is nothing complicated in gluing the sweatshirt. You just need to follow the manufacturer's instructions for the glue-mordan.
The cheap simulator for wood from the shop is very good. How many colors! And it can also be mixed.
Big blanks from shops for decoupage are not worth the money for which they are sold. Offended forever.
BOX WITH "SPRING".
When making this thing, I realized that it is impossible to spoil anything with decoupage. You can always change. Just don't freak out.
The basis of the idea was the material - a rice card. Working with her is nice to menation. Fit to size "Spring" Botticelli.
If you understand the symbolism, then this is the anthem of forced defloration and all sorts of violence over the body and the soul of a woman with whom she should accept and learn to enjoy. In other words, there is an attempt to combine in one woman and a naked uncomplex pagan nymph, and a quietly highly oral virgin Mary (the worldview of the Renaissance! We are Christians, but I love the Greek-Roman bodily paganism very much!). And how cute are the naive male hints: girl, your age is short, hurry up!.. On the right - it's still spring, and on the left - it's already autumn. According to the customer's idea, it was necessary to hang it (the picture) over the bed of the younger brother preparing for the wedding. A tip, so to speak.
At first, I really wanted to do the sidewalls like this: put the bottom layer of paint with the transitions from one color to another, then the squinting varnish, then the bright paint again with smooth transitions. And nothing happened. Stripes came out, like a mattress.
Plotkala-Point and redoned. She stressed the napkin with herbs and curls, Potoli pieces-blots, hung out essay in different places and with different intensity, and everything turned out: aged, grown, uneven surfaces of supposedly used things! This is what I wanted.
(And if it covered insurmountable despair, you can take sandpaper and construct everything to the hell. The surface for work only will become even more).
On the bottom of the strip left.
BOXES FOR PENCILS AND WRITTEN STUFF.
Still, more pleasure get from the decoration of the thrust things. Amazes alternative: garbage or beauty. And at the same time you feel your benefit as a person and as a woman.
Is it not because decoupage captured the expanses of our Motherland that it fell on the fertile soil of the Soviet tradition: washcloths from pantyhose, fish from dropper tubes, baskets from multi-colored wire, blouses from a loose thread of a cotton conveyor?
And it turned out the "male set" on a written table.
Again used rice paper, napkins, acrylic paints and one-step cracker. And that's it.
It is very difficult to cover such small containers with paint from the inside: and so you will try, and so, and with brushes, and sponges ...
The experience is:
Plastics need to lose emery, and then apply primer. Better - in several steps. And everything will work out.
Thick cardboard can also be decoupage, but the primer must be applied in thin layers and allowed to dry. And then the cardboard gets wet.
Cardboard
And sometimes it just does not exit. Just decoupage!
For example, such a story. I bought a German table for a sewing machine, scary to say for what money. And the accessories compartment was closed with extruded chip cardboard. You can't get into their German brains and you will not understand why it was necessary to use an element from the recycling of such a terrifying look. Probably, they save nature and demonstrate how they save it.
Now laying up the table, I sit in sew and say: "Hello, girls!"
Napkins were torn and applied with elements.
Girls over napkins.
Acrylic paint on the contour of the figures.
BOOK WITH COMICS.
This thing brought me joy. There was a completely dead bookcase, on which flowers were placed in the summer, and in the winter they were given free to the winds and frosts. Yes, and it was made with the same care as a wooden container for vegetables.
And the idea was born due to fatigue from floweks and mimic plots of decoupage cards.
Comics!!! Paper thin, easy to glue. After wetting in the water, it does not break, but stretching the same as a decoupage card. Cut, pull out and stick as you like. Throwing paper does not require, because it is comics, and there is no need to hide, that this is comics. (I know that the highest pilot in decoupage is when there is no reasons to notice the glued paper).
The only thing that scares: after getting wet, the reverse side is translucent. But when the picture dries, no traces of the reverse drawing will remain. Easy to repair: if the element was struck, then you just need to cut and stick a different element of the collage, and then cover with varnish.
For fun and some "ideas", three shelves tried to arrange in different colors: the top is predominantly brown, the middle is blue, the bottom is red. Elements 1) cut out, 2) pulled out, 3) cut out with zag-zag scissors.
And she also aged partitions and legs: after painting, she went through sandpaper both along the edges and along the planes.
After my repair, this exclusive was no longer taken by the balcony ...
Experience:
No need to become attached to special materials for decoupage; ideas and materials - everywhere; These are magazines, newspapers, stamps, postcards, torn books, packaging, candy, wallpaper, music sheets, envelopes, photos, etc. Those who decapit a lot and sophisticated, print pictures from the Internet on the printer.
But in this case, you need to thinning the paper. The first method is wet: cover the desired image with several layers of acrylic varnish, give dry, and on the reverse side, wet the paper and accurately roll unnecessary layers. Dry method: Again, fasten the desired image with several layers of varnish, and on the reverse side, glue the tape and gently tear it together with layers of paper, and so several times.
These tricks require skill, but after this notorious thinning, you understand that you don’t need to yell at children if they come out with crooked sticks and circles.
It is necessary to visit not only art salons and special stores for decoupage, but also ordinary construction and repair. There you can buy: white acrylic paint, acrylic primer, acrylic varnish, flat brushes for large surfaces, sandpaper, bubbles with "colors" (they need to be added to white paint to get the desired shade), paint and varnish in sprays, varnish for craquelure . What about the price! A whole bucket of varnish (I tried both Russian and Finnish) costs the same as a bottle of thin. salon.
If the thing is large and dirty, then it is better to prepare it for decoupage on the balcony (on the terrace, in the clearing). A lot of flying dust from sandpaper!
BATHROOM SHELVES.
This is the first time I've done something really useful. We needed shelves for the bathroom, but I did not want to use glass.
And decoupage!
Immediately there was a readiness for a feat: she boldly took a jigsaw and cut out shelves of the desired shape from a laminate board. Then they alone them and sank, and then decorated.
I have long been friends with napkins and even learned to transfer them entirely, and not fragments.
We serve the shelves for a year, and nothing with them does not happen.
Bottom view.
View from above.
The experience is:
Russian women from the Internet are geniuses! (I don’t know about others, I read in Russian). They have already invented ways to transfer whole napkins. There is a "file method", a method using a fan brush, there is a "dry method".
The fan brush method is for masochists. A "File" and "Dry" - witty and win-win.
The napkins on the shelves were transferred using the file - an ordinary plastic file for papers. The napkin needs to be placed the face face. And then substitute it under a thin flowing of cold water. Slowly and gently twist the file, aligning the wet napkin and expelling the bubbles. Then, with a napkin down, place the file on the surface to be decorated. And without removing the file, to smooth out the image with your fingers. Start from the center. Plastic will protect the napkin from deformation. Wow, perfect alignment! And then, not in a hurry, pull the file, moving it into the horizontal, as a translated picture. And at the very end - cover the already adhered wet napkin with decoupage glue or special glue-varnish for napkins.
And the edges of the napkins? Write to dry and "cut" shallow emery paper. The edge is smooth, as after the scalpel.
From the first time, the transfer of the whole napkin may not work, but then - as on the conveyor.
There are no unnecessary things. Every old thing can be adapted for something new, original and unusually useful in everyday life. And even cardboard boxes have the right to the second life. To give them a new look, just make decoupage, which you can easily do yourself, and you will have a new and useful thing to use or just decorate. In addition, it is quite possible to do the decoupage of a cardboard box with your own hands. Therefore, now you are reading a master class for beginners "How to make decoupage of a cardboard box with your own hands."
Master class on decoupage cardboard box.

To Master Class On the decoupage of the cardboard box, it was successfully necessary, first of all, to prepare materials. Make your own decoupage boxes At home, it is possible as shown in the photo. For this, you will need:
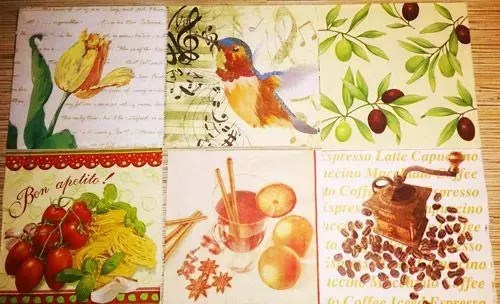
1. Drawings printed in advance on a printer (examples of drawings can be seen on the Internet) or napkins, photographs and other ornaments on paper;
3. Soluble coffee (if you need to be our decor);
4. PVA glue;
5. Acrylic varnish.
Decoupage of a cardboard box: a master class
1. To begin with, sprinkle paper sheets with water, and then gently smear the instant coffee on them.
2. After that, spread the sheets on the table and let them dry.
3. After the sheets dried, brush them into pieces, but they should not be very small.
4. Cut in advance printed figures (drawings).
5. To make a decoupage of a cardboard box - clean the surface of the box from unnecessary elements.
6. Glue the torn sheet to the surface of the box and coat the top with the solution made. Pay special attention to the edges.
7. Clean the entire box, and take the cut figures upstairs.
8. Let the box dry, and then, if desired, you can cover it with acrylic varnish to give it a shine.
Decoupage boxes from under shoes.


Do not limit your imagination, let fantasy get roaring as it should! Create masterpieces with your own hands! Decoupage boxes from under shoes It can be absolutely different and make it at home will not be difficult.

Decoupage of shoes boxes: master class
1. You can cover the box with cloth. Fortunately, there are now many for different tastes. Can be glued with PVA. The only drawback is that the cardboard can get soaked from it, so you need to use it very carefully.
2. In addition, you can save the self-adhesive film. It is very convenient, because you do not need to use any glue. In addition, after decoupage, such boxes can be wiped and even washed with soap.
3. You can also use remnants of wallpaper. If the wallpaper is washes - too, it turns out beautifully, and quite practical. Instead of PVA, you can use a clerical glue stick.
4. And finally, you can just paint the box. When painting a box, you can create different effects. For example, aging or craklera effect.
Decoupage shoebox.
To produce do-it-yourself shoe box decoupage, you will need:
1. Actually, the cardboard box itself;
2. Paper of one tone;
3. Glue (of your choice);
4. Paints.
Shoe box decoupage: master class
You can make the same box as in the photo, but you can connect your own fantasy. So…
1. To begin with, take the box with monochrome paper. It also needs to be absorbent.
2. When pasting, leave excess paper for bends.
3. Catch your baby running around the apartment and dip his palms into pre-prepared containers with paint. Then apply the palm to the surface of the box. The number of prints can be completely different, as well as the variety of colors.
4. After that, you can ask the child to write the names of loved ones on the box, or you can perform this ritual yourself.
5. After drying, the surface can be coated with acrylic varnish.
Decoupage boxes with napkins.
The cardboard box can be adapted for anything. And don't rush to throw away even small boxes. Decoupage boxes with napkins consists of several stages, and make it independently difficult. In the photo you see that you can get. First you need to prepare the materials.
To get started you will need:
1. A small box of any shape prepared in advance;
2. Paint (can be used acrylic and oily);
3. Glue (PVA is suitable);
4. Picture napkin;
5. Manicure scissors;

Decoupage Box Wipes: Master Class
1. To begin with, if the surface of the box is not quite smooth, it must be slightly polished. Grind until it becomes smooth.
2. After that, apply paint on the surface of the box.
3. Carefully cut out the pattern from the selected napkin.
4. Attach a napkin to the surface of the box (lid or walls) and mark with a pencil the place where you plan to stick it.
5. Now take paint. You can mix several shades so that they do not contrast too much with the selected pattern. Then, with a sponge, carefully apply paint to the lid of the box, without affecting the place that you have allocated for attaching the picture.
6. After that, we apply glue to a clean place on the lid, and glue our pre-prepared drawing there.
7. You can also leave the color napkin the outer walls of the box - according to your desire.
8. Done! You made decoupage box with your own hands.
________________________________________________________________________________________
:
Turning paper
Decorative paper of low density with mulberry fibers. Handmade paper. In appearance and structure, it resembles rice, with veins, only softer. Great lies on any surface. Great for decoupage on glass, scrapbooking and other decorative works.
When sticking the tide paper, you need to tear into small pieces and glue a flask. If the canvas of mulberry paper is large and occupies the entire surface of the product, then it can be glued entirely. The main thing is not to cut with scissors, because. The edges of the paper will be strongly highlighted on the product. It is advisable to glue on a light surface. It is best to apply when working with glass surfaces, because in this case, the entire structure of mulberry paper is visible. The surface on which the paper will be glued is prepared in the same way as for gluing napkins, printouts, etc.
(According to materials from the Masterica website: http://masterica.com.ua/tutovaya-bumaga.html)

Price:
Leaf 50x70 cm-15 hryvnia (≈ $ 2).
Leaf A4-4 hryvnia (≈ 0.5 $)
A little help:
Tutovy (lat. Moraceae) - Plant family order rose-colored, including trees, shrubs, lianas and rarely grass. The family has about forty labor and over thousands of species, most of which are highlighted by juicy juice (Military juice).
Famous me: Ficus and Mulberry. For my shame, I completely forgot that Mulberry is a tute tree. Thanks Wikipedia: Refreshing memory.
I don’t know which or which of the mulberries serve as a raw material for making paper, but I really liked working with it.

Little subtleties of working with mulberry paper:
Some of them see above in the description of the taut paper. And also:
If the item you are going to shook the taut paper is not one-window (for example, a box of shoes or candy), then it is first needed to cover the acrylic paint to the color you need.
At work I got into my hands a few boxes are quite comfortable, but boring color. Immediately had to take part in my experiments.)))

As mentioned above: the surface is desirable, should be bright !!! There is a personal bitter experience: I really wanted to make an old-old box, got carried away. Painted the box in a dark shade of brown.

Marriage in work close-up. As they say: "In errors learn."

Decoupage is a fascinating and uncomplicated activity that has many techniques and is accessible even to the youngest craftswomen. With it, you can make exclusive interior items that will decorate not only your home, but also the exhibition halls of Art Gallery. As part of this review, we will look at how to perform do it yourselfdecoupage for beginners Step from photo. Do not worry that something will not work out, in fact, everything is very simple. With the help of this technique, old furniture, dishes, shoes and many other things will find new life in your home.
Products with decoupage - works of art
First of all, let's figure it out with definitions. Decoupage is a gluing pattern to the surface. The picture can be placed on wood, leather, fabric, glass and almost any other product.
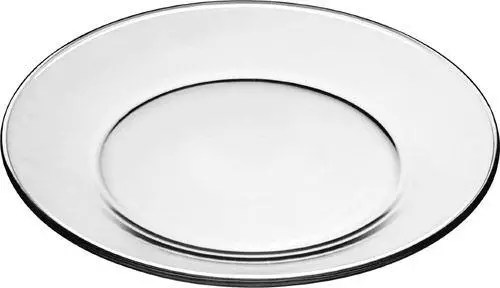
Reverse decoupage is the same process, which has only one feature - the picture is glued under the material. This can only be done on transparent surfaces: glass and plastic. Of course, the picture in this case is glued face up.
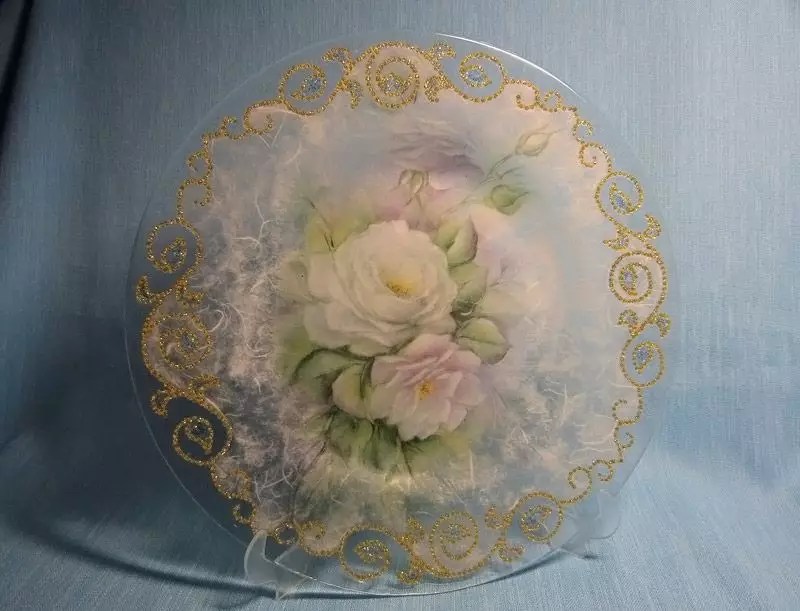
For your information! If a plate is used for direct decoupage, then in the future it will only perform a decorative function. And when using reverse engineering, dishes can be used as usual.
Tools and materials for work
| Materials and tools | Note |
| With this technique, you can decorate the book, dishes, floral porridge, bottles, furniture ,. In general, literally everything that is in your house. |
| Pictures can be used from special decoupapable cards, napkins. In addition, for this purpose, craftswomen use drawings on fabric, old newspapers, and magazine clippings. |
| You can use ordinary nail scissors or a special tool that is sold in needlework stores. The main thing is that the edges of the blades are very sharp. Only it will be possible to carefully cut the desired image on a thin napkin. |
| Completed flat soft brushes. The pile in them should be tightly fixed. "Lost" Vorki may become a serious problem. It is better to have several brushes of different widths for smoothing and applying glue and varnish. |
| It is best to use the usual household PVA. You can buy a specialized composition, but it will cost more. From varnishes it is better to give preference to acrylic. It does not excrete toxic substances and easy to work. |
| To decorate the work, acrylic-based paints, sponges, primer, sandpaper, craquelure can be useful. |


Basic techniques
Secure the drawing on the surface in different ways, let's look at:
Method one
A simple technique for decoupage from napkins is to lay it on an object and fix it with glue. After drying, the surface is covered with varnish.

Method two
For reverse decoupage, a transparent base is used. The image is glued with the front side to the glass. After drying, it is fixed with varnish.

Method three
Artistic composition. For its manufacture, many images are used, which, when glued, are combined into one. To make the picture look like one whole, painting, shadows and accents are added.

Method four
This technique is called "decopatch". For her, they use pictures from magazines, drawings on fabric. To get rid of clear boundaries, the edges of paper drawings are broken. The surface is completely filled with images.

Method five
Creating a three-dimensional image. This is a technique requiring the talent of the artist. First passes the image from the paper napkin. And then there is a painting with a thorough drawing of all the smallest details.
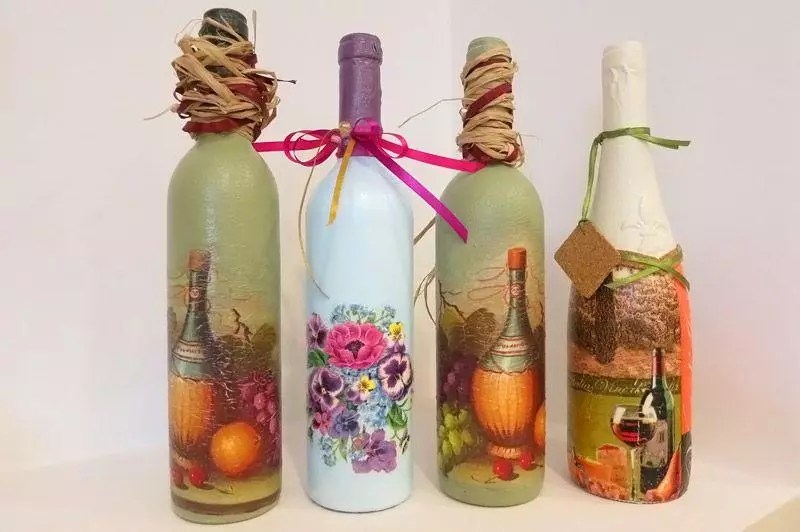
Decoupage Bottles for beginners: Step by step with photos and recommendations
- The easiest and most affordable material from which you can make an original gift. You can buy a bottle with wine or fill the capance of your own cooking. Luxurious decoration in any case will impress.
We have already listed the necessary materials and tools for work, so we will not stop in detail. The only thing to add to the list is a wiper. They pre-process the bottle cleaned from the labels.
Important! Working with a glass vessel is better in gloves. Your fingerprints are unlikely to have artistic value, so it's better not to leave them.
Sequence of decoupage bottles for beginners, step by step with photo:
| Illustration | Stage description |
We apply soil 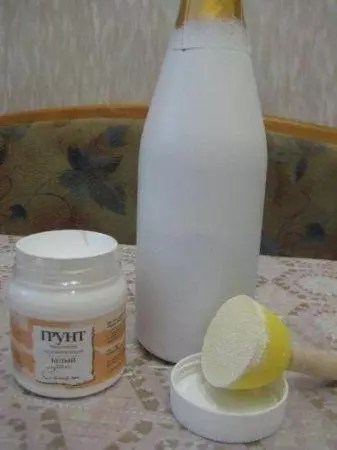 | For priming, you can use acrylic varnish or PVA. The soil should dry well. |
Making the background  | As a background you need to take a white or bright acrylic paint. It may be necessary to apply the composition in two or even three layers in order for the surface to become completely opaque. |
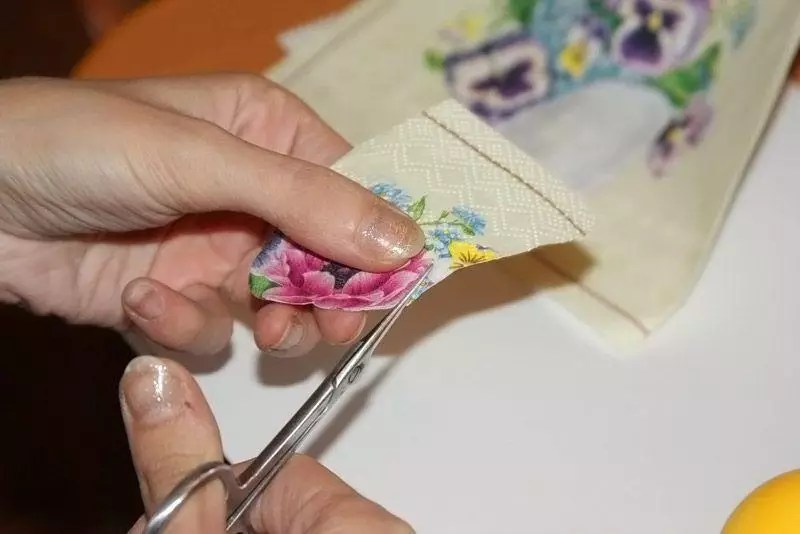
Applying images  | The drawing on the napkin is neatly cut with scissors. If the background of the picture and the bottle match, do without scissors, carefully tear off the napkin. To make the drawing on the printout, it is easier to be twisted in a plate with water. |
Fixing the drawing  | On the surface of the figure you need to apply varnish. This can be done with a soft flat brush or spray gun. It should be followed so that the picture is not covered with folds. It is necessary if necessary, gently straighten with a brush. |
Finishing  | After complete drying, you can gently sand minor flaws in the work. To emphasize the details, use a brush and dark paint. After finishing, apply a final coat of varnish. |
Another option for the original design is decoupage of the bottle with tights. Master class on video:
Some decoupage tricks on glass for beginners: step-by-step recommendations with a photo of drawing a pattern from napkins
The first experience of sticking the napkin may be unsuccessful: wrinkles and folds that spoil the whole result appear inevitably. A few tips on how to avoid this:
- To apply a drawing on a convex surface, you can make "Outts" on it. Cut the edges of the pattern with scissors or even cut out triangular pieces. With the last option, it is better to be careful, there is a risk to spoil the image if the incorrect cutting angle is calculated.
- You can apply glue to the surface, and then attach the drawing and straighten it with a brush. Another method would be no worse - apply glue on top of the picture, while straightening it.
- If the image is applied to an almost flat surface, you can pour glue into the center, apply the napkin and gently accelerate the composition, sprawling the material on the surface.
- On the perfectly flat sheet, you can stick the image with an adhesive pencil.
- You can apply a drawing using a polyethylene piece (pack or stationery). The drawing is placed face down on polyethylene and wetted with water. Then the package with a wet napkin is applied to the surface of the surface. The package is removed, the napkin remains.

Simple master class decoupage boxes from under shoes
The flat surfaces of a cardboard shoe box are an excellent base for decorating. Such an interior box will be a favorite place for homemade little things.
| Illustration | Stage description |
Surface preparation 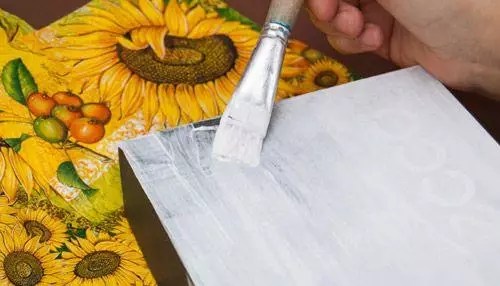  | The corners of the box must be reinforced with pieces of masking tape, then primed with an acrylic primer or paint. After drying, the primer should be lightly treated with fine sandpaper. Perhaps you need to repeat the procedure if the layer is not completely smooth. After you need to paint the box with the color chosen for the background. |
Application of drawing 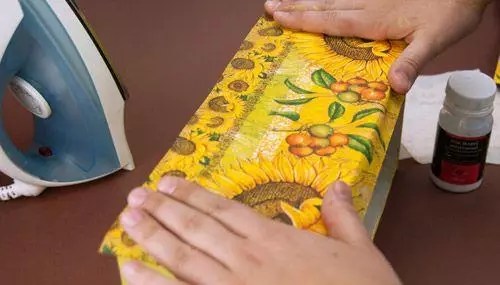  | Place for the pattern is covered with decoupage glue. After a complete drying of the layer, the drawing is superimposed on top and smoothes a hot iron through a sheet of paper. After the napkin is covered with a thin layer of varnish. Too thick layer will lead to the fact that the drawing will be covered with bubbles. This procedure is repeated over the entire surface of the box. |
Decoration and refinement   | The porporal sponge is applied background paint and other shades in the edge of the image. Brush draws small details. To add some negligence, you can spray on top of white paint with a bristle toothbrush. After the final varnish coating is applied. |
Decoupage furniture in Provence style: a master class for updating a chest of drawers
Having tried your hand at simple things, you can safely proceed to do-it-yourself decoupage with napkins. In addition to the usual listed of the working materials, we will need a putty on wood. It is pre-align all the slots, cracks and other irregularities on the surface of the chest, purified from the old paint.
Sequence of decoupage of kitchen furniture with their own hands, photo and description:
| Image | Operation description |
Training  | Furniture should be carefully cleansed from all layers, align the defects with putty. After drying and grinding, all surfaces are primed and rubbed with sandpaper-zero. |
Preparation of pictures  | The pattern on the napkins is carefully cut out or cut off by hand, the bottom layer is removed. The picture is smeared with glue and applied to the furniture. Applique Careful brush is cautious. |
Finish coat 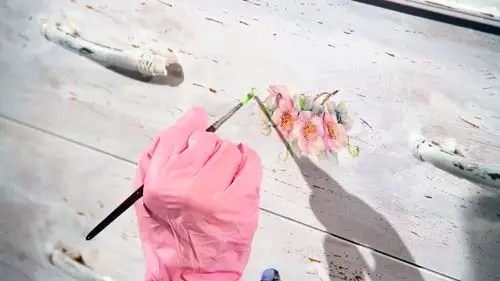 | No need to hurry. All drawings must dry. All furniture should be varnished, not just the place of decoration. On large areas it is convenient to do from a sprayer or canister. So the varnish will lay down in a thin layer. For better effect, you need to apply a series of 3-4 layers, waiting for a complete drying between the processing. |
 | Result. |
Useful advice! If you need to apply a pattern to a polished surface, polishing is pre-treated with sandpaper until the shine disappears.
When decorating furniture, the cloth the process is practically no different from the described.

Decoupage master classes on video
As they say, it is better to see once than hear a hundred times. That is why we offer a selection of video decoupage lessons for beginners.