Do-it-yourself autumn paper flowers. DIY autumn paper flowers Autumn bouquets for the garden
Japanese wisdom from ancient times says:
"The great square has no limits."
Try to fold a simple figure,
And suddenly entice interesting case.
...
And in the fairy-tale kingdom of paper figures
Learn to be kind, be confident,
And many different gifts pleasant
You can give to family and friends.
AE Gaydaenko
Autumn is a creative time: a riot of foliage colors, an abundance of a wide variety of fruits inspire numerous ones. Maternity offers today is not quite the usual selection: autumn crafts, we will not create from natural materials, and out of colored paper!
We need: a pencil, a ruler, a glue stick, paints and a brush, we choose colored paper in autumn shades:
Boasted leaf maple:
I was, like everyone else - green,
And now here I am a -
yellow, red, gold,
And ruddy, and carved -
Well, handsome painted.
Everything in me, as the sun shines,
And anyone notice me!
It was not long boasted.
Suddenly broke away from the branch,
The clearing down dived,
I lay down more comfortable ... and ... fell asleep.
E. Grudanov
Our origami will be assembled from module "shamrock." Driving its assembly:
Option 1. Extra shamrock


Option 2: One-piece shamrock


On the basis of these modules collect our maple leaf. See what stylish, and sometimes completely unimaginable maple leaves you can get:


Collect leaf modules may be of different color, combining them veining pattern:

You can decorate plain paper in the most interesting ways: paint with colored pencils or paints (for example, using a cotton swab), make an application, leave prints and prints of hardwood monotypes, crumple a leaf, decorate for folk ornaments, make a “mound” pattern of cereals or tea leaves adhered to the adhesive.


You can make a rainbow out of a maple leaf:

From the old wall calendar, you can make a calendar autumn leaf.

Or decorate the leaf with original lacing.

The composition called "Autumn Waltz" deserves special attention. It is made of music paper.

You can create the effect of a bright autumn leaf under transparent ice using sparkles and stretch film.

From multi-colored autumn leaves using the origami technique, you can assemble a bright wreath that will decorate any interior.

Accordion sheet
The original accordion sheet is even faster than the origami sheet. To make it, you need to make a bend in the middle of a sheet of colored paper. Fold the sheet "accordion". Make a kind of depression in the center, attach a “shank” of a leaf of colored paper or thread to it, and then connect the two resulting parts of the sheet, glue them together for strength.


Autumn paper crafts with kids
Kids are happy to participate in activities with applications. We choose for them the autumn crafts they like and offer to perform it together. For very young children, you can make blanks that they can stick on the base, and you get an autumn still life:


Pieces of colored paper can themselves become leaves or part of the fruit. To do this, we draw the base and invite the baby to decorate our craft.


Then you can do the craft more difficult. We fold sheets of colored paper in a pile, then in a “book”. We draw the outlines of the future fruit or vegetable with a pencil: apple, pear, pumpkin, watermelon, mushroom, etc.


From a toilet paper roller and a piece of colored paper, you can make an apple or even a whole apple tree. To do this, wrap the roller with colored paper and attach decorative parts to it. For an apple, we use half of the roller and fasten the stalk, leaf, and, if desired, the muzzle. For a tree, we attach a crown pasted over with leaves from pieces of colored paper. For the base of the crown, you can use cardboard or a disposable plate.


Vytynanka leaves
The silhouette cutting technique, beloved by many, can also be used in autumn crafts, postcards for Teacher's Day. This work is already for older students:

You can go the simplest way: cut out the silhouettes of leaves from several sheets of colored paper and assemble an autumn bouquet from them. As in T. Pogorelova's poem:
I have an autumn bouquet
Multicolored and last.
It has maple sheet carved,
Painted viburnum leaf.
small aspen leaf
And a bunch of rowan reddens.
Here is a birch yellow leaf,
And carved yarrow.
The oak leaf is red, bright,
I looked and it got hot.
I'll dry my bouquet
I will invite autumn to winter.

Motherhood wishes you creative success!
Photos used from sites:
Want to learn how to make flowers out of paper with your hands? You've come to the right place! 🙂 Here we have prepared for you an excellent selection of photos and master classes, including new ones for 2019, designed for different skill levels: for beginners and for more experienced craftswomen. After all, flowers can be made from paper, both simple (children's crafts) and complex, which cannot be distinguished from real ones.
First, of course, you need to decide what kind of paper and what techniques you plan to use for your crafts.
Let's look at all the possible home-made paper flowers more. By following the step by step photos in master classes, as well as videos from YouTube, you will learn to do the same beautiful 3D flowers as a gift for his birthday, March 8, the day of the teacher or the composition for the decoration of the hall, class rooms, decor photo zone and other facilities for the holiday .
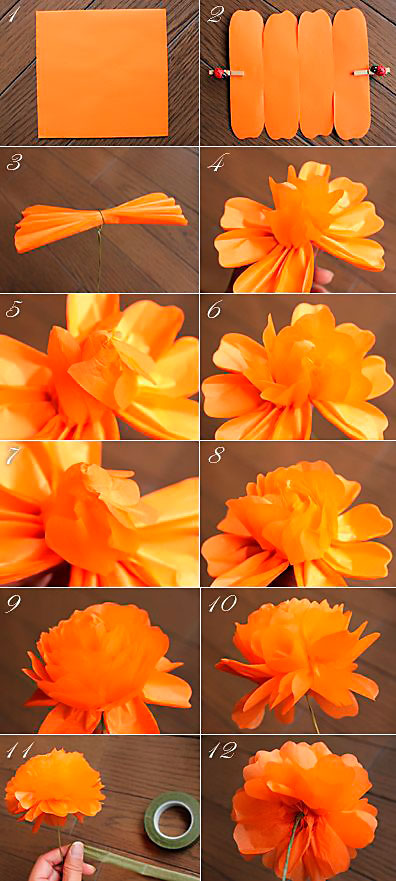
Flowers from corrugated paper
Corrugated or crepe - this is the name of thin wrinkled paper, from which various crafts are made. It is good that the flower elements can make bulky, slightly pushing the fingers microfolds textures and colors are obtained with a curved, convex petals.
The simplest corrugated paper flower:
Pansies, buttercups
Cute and simple buttercups and pansies: to create wild flowers, you need to cut out the same petals, which are combined and fixed with wire or glued to a wooden skewer, the stalk is wrapped with a strip of green paper.


Rose and rose hips
The simplest hack - Rose of corrugated paper That the power of even the children.
From red crepe paper cut out 3 circles, impose them on each other, then we turn into a cone fastening stapler approximately in the middle. Then, half-wrenching him and straighten petals. We fasten it to a skewer, which we wrap with green crepe paper. Glue the leaves. Simple rosette ready.


This is how the scarlet flower turns out:

volumetric rose more magnificently done like this -:

Simple little roses in 10 minutes (how to make a paper flower -):


"Roses for Mom." Christina Matishina.
Made from crepe paper.

And detailed instructions on how to make a basket with flowers with his own hands -
 This is such a beautiful bouquet:


hyacinths
Spring flowers made of paper - hyacinths- is also the most simple crafts.


"Flowers in a vase. Corrugated Paper Hyacinths. Senior group No. 5 MBDOU No. 267 of Izhevsk. Educator Kochurova G.V.

Peony

Beautiful and naturalistic peony obtained from tinted crepe paper: to obtain large voluminous petals, put a white blank of corrugated paper on a cup, spray it with water from a spray bottle, straighten it in the shape of a bowl. We tint with yellow and pink paint, let it dry. We take the core ready or make it from yellow crepe paper, glue it with our lush petals.
Application "Basket of peonies" - a very beautiful voluminous postcard -

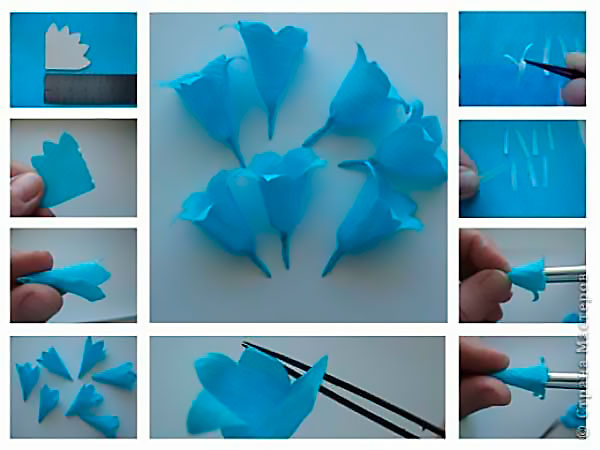
Narcissus
daffodils and lotus —


Please note that the flower assembly technique is the same, but the shape and number of petals are different for everyone, this photo shows the patterns and patterns of the petals and the shape of the core of different flowers:

Such stencils for cutting are easy to make with your own hands.
These simple paper flowers were sent to us by Tatyana from St. Petersburg. The manufacturing technology is simple, but how wonderful the bouquet looks in this children's craft.

Carnations from paper from Masha Shevtsova.

Large growth flowers
Large corrugated paper flowers are simply gorgeous, with them even an adult woman can feel like Thumbelina. You can use it to decorate the hall with your own hands for the holiday, photo zones for taking beautiful memorable photos, you can hang it on the wall or hand it to the hero of the occasion. How to make voluminous growth peonies with your own hands is shown in this video:
Just giant roses:
There is a faster option - huge, but simple flowers that can be hung on the wall of the photo zone:
As you can see, the size of the flowers is limited only by the original paper sizes, real giants are obtained from huge paper.
little flowers
You can also make miniature charming spring bouquets - apple or cherry flowers corrugated paper:


rosebuds, snowdrops, coltsfoot,

crocuses and daffodils,

small poppies, cornflowers,

forget-me-nots… It all depends on your imagination.


Making a flower with a lollipop
Using a small ball (we took a lollipop), you can get a fantasy flower with very lush petals that will keep their shape, but it is advisable to grease the ends with PVA glue so that they do not unwind.

We cut out 5 squares from corrugated paper and wrap them around the lollipop to make the “tail” longer on one side than on the other.


For the core, we fold a strip of red crepe paper several times, cut the ends - these are “stamens”.


We put the core between the long tips of the petals, we wind everything to the stick-stalk. We wrap the stem with a strip of green corrugated paper.

It turns out such an original flower with lush petals.

snowdrops
Delicate first spring flowers snowdrops -


globe-flower
gentle lights (Globe). For the petals have to cut out some of the same circles in which one end is twisted into a tube, and the other - expands and bends. For the core, a strip of paper is cut and twisted into a roll. By the way, how to make the Globe of foamirana see.

Chrysanthemums, daisies, carnations
All master classes on making these flowers from crepe paper on a separate page


Sunflower
Articles made of crepe paper and these seeds. :


Maki
Charming flowers - crepe paper poppies -:

crocuses
Crocuses are spring flowers, so they are often made by March 8th. You can make a simple and sweet bouquet of flowers -.


Corrugated paper flowers with candies
Corrugated paper makes excellent
The easiest option for children corrugated paper tulips with sweets. On March 8, we decided to make tulips for our teachers, because these are the most spring flowers. Of candy picked truffles, and stems have decided to try to do without shpazhek. For this we needed:
- heavy double-sided green paper,
- red crepe paper
- red thread,
- adhesive (or stationery PVA)
- as well as packaging film for flowers and ribbon(the bouquet should look like a real one).
For stalks chopped green paper strips and tied them spirals.
From red crepe paper cut petals oblong, pointed on one side, six pieces for each flower. With your fingers, gently part the fibers in the middle of the petal so that it turns out to be slightly convex.

The candy was inserted into the spiral stem, twisted tightly and glued.

Then they wrapped the candy with petals, as in a real tulip - three inside and three outside. In order not to mess around with glue (such thin paper under the liquid adhesive, it can be said melts), just tied a red thread to match the paper.

Leaves were cut out of green paper, similar in shape to long tulip leaves, glued to the bottom of the stalk.

Two more such flowers - and the bouquet is ready. It remains only to wrap it with a film and tie it with a ribbon.

Paper tulips are ready, it turned out three bouquets.

It can be attributed to a garden and handing.


simple carnation
Another option to assemble a flower from gofrobumagi without glue - strung edge of the long strips on a string like pom-poms, but here you need to act very carefully to thin paper does not tear.


The result is a flower carnation - and just quickly.
Flowers from napkins
Quite easy to do crafts - flowers from paper napkins.


Such crafts are very simple and easy for children. Photos and step by step description Ermashevoy Elena about how to do a bunch of napkins with your own hands.

For such an original bouquet of need:
- paper napkins: yellow and pink (35 pieces);
- bamboo sticks for barbecue (13 pieces);
- PVA glue;
- bronze acrylic paint with glitter;
- green paint;
- tassel;
- scissors;
- felt-tip pen or pencil;
- plastic jar;
- decorative chips;
- satin ribbon;
- linen cloth;
- plastic bottle of 0.5 liters;
- small pebbles.

Paint stick green paint, let it dry.

For bouquet of roses 13 require 117 circles of diameter 8 cm, 9 pieces 1 flower. Cut out the required number of petals.

1 to 7 flower to fold in half circles.

Lubricate the edge of the fold of each circle with glue. Put a stick on a semi-circle and petal screwed on a stick.


In this manner carefully glue remaining pitch.


Poke two circles in the center with a stick.

The upper range of grease glue in three places. Sticking to a ready petals.

Glue the last circle in the same way, the flower is ready.

Let's do vase for a bouquet.


Colored paper flowers


A special double-sided paper will need to bulk flowers. and the regular school colored paper suitable for applications.
The simplest bouquet of colored paper
Make a bouquet of colorful paper with your hands just enough. Even a toddler can handle this task. That is why crafts are a great gift for mom on.
If the child is still well short of scissors, parents can help him. And in the rest of the process should not interfere. Creativity with children is an important part of education. It develops creative thinking, a sense of beauty. In addition, the child sees the mother the joy of receiving a gift, and he becomes happy.

Materials:
glue;
colored paper;
scissors;
pencil.

Colored Paper Bouquet Guide
We take a whole sheet of colored green paper. The long edges of the adhesive grease. Fold sheet in half horizontally to the edges stuck together. Paper and an incision from the fold to space gluing over the width of 1 cm.
 Lubricate the base of the workpiece with glue.
 We turn off the paper tube. Fasten the clips until the glue dries.
 Cut out flower blanks. We use several shades. It will be more convenient to first draw a template, and then cut the flowers along the contour. A few yellow circles will serve as cores for flowers.
 Glue the centers to the flowers.

Each flower is glued to a separate piece of colored paper.
 Distribute the flowers evenly throughout the bouquet. We straighten the leaves. Children's bouquet is ready:

Making a flower with a child
Paper flowers are a great gift for mom. This craft is easy to make and looks much better than real flowers. This step by step tutorial describes the process of making a paper flower.
For a flower arrangement you will need the following materials and tools:
1. Cardboard (yellow and green).
2. Red corrugated paper (can be replaced with a napkin).
3. Stationery glue, pencil, scissors.
4. A small piece of plasticine.
5. Bottle cap.

Step 1:
The flower will consist of three flower blanks of different sizes. From yellow cardboard, you need to cut three flowers of the same shape, but different in size (from largest to smallest). For convenience, you can first draw the shape of the flower with a pencil, and then cut it out. Glue the blanks together. The largest flower should be on the bottom.


Step 2:
Using a pencil, twist each petal down: place the pencil under the petal, press it with your finger and stretch it down to the tip, twisting slightly. These actions will make the flower lush and voluminous.

Step 3:
For the middle of the flower, you will need corrugated paper or a red napkin. It is necessary to cut off a strip about 3 cm thick, then cut many narrow strips to the middle. Twist the workpiece into a roll and cut again. There is another way: just cut the paper into small pieces. In the middle of the flower, apply glue liberally and glue red pieces of paper.


Step 4:
You can make leaves like this: fold green cardboard in half, draw half of the future leaflet at the fold and cut it out. There should be two such leaves.

 Step 5:
To make the stem, you need green cardboard. From it you need to cut off a strip 2-3 cm wide, twist it into a narrow roll and fix it with glue. Cut the top of the stem into four pieces.

Step 6:
All the details are ready, it remains only to connect them together with plasticine. It must be applied to the top of the stem and secure the flower. Leaves are attached in the same way. Glue the flower on plasticine to the bottle cap. This will be the craft stand.

The paper flower is ready.

"Postcard for March 8!". Safonova Svetlana Alexandrovna
Colored paper application. Gift card for March 8.
We need colored paper of red, purple, salad, yellow, green. It is advisable to take glossy colored paper. Cut out three flowers of different shapes. Large, medium and smallest, and so on three times. Then, on the overthrown cardboard, we first glue a large flower, then a smaller one, and so on three times. We cut out a vase from purple paper, glue it on a postcard. We make three yellow circles, make the middle ones into our flowers and glue them. Then we cut out three stems and glue them from the flowers to the vase. Cut out lettuce leaves and glue. Here's a postcard!

This video shows how to make paper daisies, they look very naturalistic, almost lifelike:
Flowers are so realistic that it is difficult to distinguish them from real plants.
Daffodils. Master Class
This master class describes how to fold daffodils from colored double-sided paper.

For work you will need:
a simple pencil
· School line;
· scissors;
two-sided colored paper in orange, yellow and green shades;
· PVA glue;
wooden thin sticks;
small vase.
Work description
Take a half of a standard sheet of yellow double-sided paper. Prepare a ruler and a simple pencil.

Draw squares with sides of 5 cm on a piece of paper. Cut them out with scissors according to the graphic pattern. For 5 flowers, you need to prepare 10 squares.

Take 1 square and make 4 cuts on it, as shown in the photo. Then take 1 wooden stick or rod from the pen and slightly twist the corners of the paper blank.

This will form the petals. For one flower, you need to prepare 2 identical blanks.

Glue them so that the petals of the upper blank are between the petals of the lower one.
To make the center for the daffodil, you need to cut out a circle from orange double-sided paper. After that, bend the circle with the rod, as shown in the photo.

Glue the center to the center of the yellow blanks. One flower is ready.

Make 4 more flowers in the same way. This is how daffodils are made.

To make stems, prepare thin wooden sticks and strips of green double-sided paper.

Just cover the sticks with green stripes, and the stems are ready.

Cut thin long leaves from green paper. Using scissors, slightly twist one end of each leaf.

Glue 2 leaves on the stems.

It remains only to fix the buds in the upper part of the stems.

Beautiful artificial flowers do not look worse than the living.

Collect them in a bouquet and put in a low narrow vase. Look amazing!
Plus, this bouquet is that its beauty can be admired more than one day, because the paper will never wither.
Daffodils - not the only flowers that can be done. Experiment, and your home will be decorated by a variety of flowering plants. For example, a faithful companion of spring daffodils is tulips, how to make them out of paper easily and simply, look at the video:
Blue flower forget-me of watercolor paper
Beautiful three-dimensional flowers for decorating cards and gift boxes can do with their hands. There is such a wonderful direction in needlework - paper-plastic, which allows you to create incredibly beautiful flowers and bouquets. Due to the plasticity of watercolor paper, to make flowers for scrapbooking is not difficult.
Necessary tools and materials for forget-me-nots:
- Watercolor paper is blue;
- Scissors;
- Stencil a flower with 5 petals;
- Container with water;
- The tool with the ball;
- Sponge;
- Soft cloth;
- PVA glue;
- Pearl half beads.
Work description
First you need to make a flower stencil with five petals: you can draw it by hand or print it on a printer. Cut through the stencil even number of florets watercolor paper.

Put flowers in the water for 5-10 minutes. Do not be afraid to overdo, watercolor paper is rather dense and long soak in water. After the allotted time blot workpiece cloth to remove excess liquid. If you can not find the color watercolor paper can be painted plain white food coloring, gel pens, felt-tip pens or gouache. Do this while the paper is still damp.

Put a flower on a damp, soft cloth. The tool at the end with a ball or any other object with a rounded end (e.g., tip pens, brushes) push the edge of the petal and with force towards the center slide. Do the same for all the petals. So the flower will get relief.


Now Put a flower on a fat lip and selling center of the flower. Here, the recess must be longer than the petals.

The second flower petals after squeezing turn inside out and just selling in the center.


Should get here are two kinds of flowers: with petals curled up and down.

Put flowers on a flat surface and leave to dry completely. Dried up flowers turn out very hard, reminiscent of cardboard.
Now it's up to assembly. Glue the flower with the petals inside into the flower with the petals turned outward. PVA glue is great for watercolor paper.


Glue a half-bead into the center of the flower.

The embossed watercolor paper flower is ready! These flowers were used for decoration. Flowers made from watercolor paper are quite hard, so they can be used to decorate wicker boxes and baskets, and also used as interior decoration.

Easter bouquet of snowdrops. Zabrodina Anna.

"Snowdrops". Klementieva Polina and Alexandrova Oksana.
A very cute picture, but despite this, it is not at all difficult for children from the age of 5. To make it, you will need half a sheet of blue cardboard, a white sheet, a green pencil or felt-tip pen, green plasticine, a napkin, glue.

A simple paper flower with your own hands
From ordinary white paper, using a very simple technique, you can make beautiful, elegant flowers that will definitely find application in creativity. First of all, this is the creation of voluminous postcards in the technique, which is often practiced by needlewomen, and these flowers can be collected in a bouquet or simply supplemented with a flower arrangement. A small lush accent is sure to draw attention to a wall newspaper or an ad, a beautiful box or package.

What you need to prepare to create such a flower:
White office paper;
water and a brush;
gouache or watercolors;
scissors;
glue;
decorative stamens;
a piece of thin wire.
How to make a magnificent flower with your own hands in stages
1. In the list of materials used, the colors of paint and decorative stamens that can be used to create a flower are deliberately not indicated, because they can be chosen according to your desire. The basis of the flower is ordinary white office paper, and then you can paint the product with any paints you like or need. First you need to take scissors and a sheet of white paper.
2. Cut out the first flower with oblong petals from paper in the amount of 6 pieces. But the shape of the flower may be slightly different, only it is desirable that the petals are oblong.

3. Using the first flower as a template, cut out 6 identical layers of white paper. The more layers you use to create a list, the more magnificent the product you will get. You can not care about evenness and accuracy.

4. Using a brush and plain water, wet the petals. Dip the tip of the brush into the water and run over the petals as if painting over them.

5. Until the paper is dry, squeeze each petal, while it is convenient to use the same brush or pen, applying to a rounded surface. Thus, you will not only bend each petal into a kind of accordion, but also make them inside out.

6. Do the same procedure with all the other petals, leave all layers to dry.

7. While the layers of the flower are drying, prepare a bunch of stamens. Since a white-yellow flower is shown here, the stamens were chosen accordingly. Take 6 or 7 double-sided white and yellow stamens, use a wire to find the middle and bend in half to get a bunch. Twist the end of the wire to make it sharp. In the future, the wire will help to fix the stamens in the center.

8. The dried layers of the white flower begin to fasten. Glue the second layer on the first layer, shifting it.

9. Then glue all other layers in the same way. Before you is a blank for a lush flower.

10. In the center of the flower, make a small hole with scissors and stretch the tip of the wire, fixing the stamens. Cut the bottom of the bush and coat with glue.
11. Choose a paint color and casually paint over the top of the flower, leaving white gaps to make it even more ornate.

12. A beautiful handmade paper flower is a great addition to.

Simple autumn bouquet - aster
An autumn bouquet made of paper will be an interesting DIY craft for children. It is autumn that is the time of the year that gives us colorful colors and incredible materials for creativity. The craft is a bright bouquet decorated with flowers that look like asters, autumn leaves and a bow.

- a set of cardboard and paper;
- scissors;
- glue;
- black capillary pen;
- semi-beads-crystals;
- brocade bow;
- maple leaf template (or a special hole punch in the shape of any leaf).
How to make an autumn bouquet in stages
Prepare cardboard and paper for work. Thick paper (in this case, green was used) is needed to create the base. You can also prepare junk cardboard from packaging or colored plastic for this purpose. Bright sheets from the set are needed to create flowers and leaves. If one-sided paper is used for flowers, the reverse side of which is white, then interesting two-color buds will be obtained.

From a dense sheet prepared for the base, cut out a detail that resembles a bouquet in shape. The upper part will expand, and on the lower part there will be a tail, like a bouquet.

Cut out some maple leaves (or you can prepare blanks of a different shape, such as oak, chestnut or birch leaves). It is better to use yellow, orange, brown or red paper for this work. Apply veins with a capillary pen. The leaves should be small - this is an addition to the bouquet, which echoes the autumn theme. Make 5 or more blanks.

Stick the prepared leaves on the base. You can glue four on top, one on the bottom, or distribute them as you wish.

Additionally, cut out oblong leaves. These are directly the leaves of asters, which will become the central decoration of the postcard. Curl each leaf with the same scissors. Long details are the decoration of the bouquet.

To create buds, prepare thin brushwood from pink paper. Cut the leaf into thin strips and divide each of them into segments about 10 cm long or so.

Fold each piece into a loop, overlapping the edges. The reverse side of the paper may be white.

From paper of any color, cut circles for flowers. Lubricate the circles with glue and start applying loops around the circumference, forming flowers.

Glue two or more rows of loops to get lush buds. Decorate the middle with half beads. You can pick up half beads to match the flowers or use yellow details.

Model three or more aster flowers to decorate the bouquet.

Glue autumn flowers in the center of the bouquet.

Decorate the lower part of the composition with a brocade bow to mask imperfections, and the bouquet looked complete.
An interesting autumn paper craft is ready.
chamomile
For example, to do paper chamomile, cut out two blanks from white paper and a few from yellow, glue the core onto the main shape:

the Rose
For roses you will need more blanks and effort, but the result will be impressive: fold the square of scarlet paper twice in half and once diagonally. Cut off the tip and the wide edge in a semicircle, make 4 such blanks of layers with 8 petals. To create volume, cut one side of the workpiece and glue it to get different widths of the workpiece: 6, 5, 4 and 3 petals. Twist the petals, insert the layers into each other and glue. Fold the leaves of green paper with an accordion.
"My scarlet rose." Sivolapova Polina.
Red double-sided paper (color printer paper) was required to make this rose.

Another interesting option is two-color: here you will need not only scissors and glue, but also a stationery knife for cutting.

An easy way to do it quickly. Fold 2-3 sheets of paper with one accordion, tie in the middle, cut the edges in a semicircle. It remains only to gently fluff the petals:

simple flowers
simple flowers can be done in a spiral way: a classic spiral or a wavy one, with petals, is drawn on a sheet of colored paper, cut out and twisted into flowers.


Dahlia
And even if you make circles of different diameters out of paper and cut out the petals in them, you get a very magnificent flower - a dahlia.
A flower made from curled strips of paper.
Another way to do rose from ribbon, paper or fabric, simply bending the petals at the right angle and rolling them into a roll:
Video from YouTube:
Hyacinths by Elizar Polyakov:


Large flowers for the photo zone
Flowers for office Decorations for photo shoots can be made from double-sided colored paper.
For example, in this video, paper with a density of 160g was used, it took 15 - 24 pieces. Templates can be taken, for example, here: //pl.pinterest.com/pin/789818853371506785/. How to make a photo zone from paper flowers:
For the photo zone, you need a frame on which the canvas is stretched, and then flowers are attached to it on wire and hot glue:
Another option is to make beautiful hanging compositions, for example, these:
Paper flowers opening in water
You can spend interesting time with a small child at home. This simple but fascinating miracle craft will interest the baby. The joint production of flowers will bring pleasure to everyone.

You will need:
- colored (on both sides) xerox paper;
- office white paper;
- colour pencils;
- glass of water;
- white shallow plate;
- stapler,
- circle templates with a diameter of 6, 10 and 12 cm (for more complex color options).


Easy option
Draw on a white sheet of paper several options for flowers, about 4-5 cm in diameter with not very large petals. Available in different colors and shapes of petals. Now they need to be cut. Bend the petals of each flower to the center in a circle, one on top of the other.


 When the flowers are ready, put a plate and pour some water into it. Now you can lay out paper flowers with bent petals up. And then there will be an amazing transformation. All the petals will open and flowers will bloom on the water.
This action occurs from the fact that the paper absorbs water and tries to return to its original form. And that means it straightens at the fold. It turns out that the flower is blooming.

 Flowers can be immediately cut out of colored xerox paper. You can stick something funny or draw inside the flower. Optional.
More difficult option
Option number 1. The original flower can be made large in 3 layers. Take xerox paper, connect it with a stapler in the middle. Using the template, draw two circles with a 2 cm difference between them. In the resulting bagel, depict the petals. The finger will serve as a template. Cut out the flower, capturing three layers at the same time.
Now correctly fold the petals in the center. One by one, overlapping each other. And so all three circles. It remains to run it on the water and see. The flower will open layer by layer. The kid will love it.


 Option number 2. This flower can also be made in 2-3 layers. Only now the difference between the circles will be 4-5 cm. Long petals will turn out. Now each petal must be twisted inward with a pencil. You can use a thinner diameter.

Origami flowers
Origami flowers, of course, are not so similar to real ones, but they have their own charm. In addition, this technique helps to develop fine motor skills, which is very important for children, and adults too. How can such original things be obtained from an ordinary square of paper?
callas
For the manufacture of children's applications, paper is most often used. We suggest adding some chenille wire to it and making beautiful flowers that look like elegant callas. And when creating the flower itself, the child can be introduced to the basics of the origami technique. The entire process of making such an application is given in this master class.

To create such a craft, we prepared:
- white cardboard;
- red, orange, pink and green paper;
- glue;
- chenille wire;
- pencil;
- scissors;
- ruler.

Flowers for this application will be made of colored paper using the origami technique. Therefore, initially we prepare a square blank. In our case, there will be a square with a side of 8 cm.
 Fold it in half diagonally.
 Now let's unfold the blank of the future flower and begin to bend the sides to the middle line.
 It is necessary to bend symmetrically on both sides.
 Next, the upper parts of the bent elements are bent back. We try to do it symmetrically. We get such a preparation for a flower.
 The middle of the flower will be a piece of chenille wire. It is enough to take about 4 cm. We use orange chenille wire, but if desired, such a center can be made of chenille wire of any color. We fix this piece with PVA glue.
 We bend the lower corner of this flower to the back and glue it.
 In a similar way, we make flowers from pink and orange paper.
 Now we distribute the flowers on white cardboard, after which we fix them with glue.
 From green paper we cut out narrow strips that will become stems on our application.
 Leaves for flowers are also made from green paper. To do this, fold it in half, and then cut out the contour of the half of the leaf. We cut out 3 leaves of different sizes. Glue them to our craft. Application with flowers made of paper and chenille wire is ready.
Step-by-step photos of the process and scheme:

Video how to make origami paper snowdrops:
Video how to make spring lilies of the valley. Valeria uses a large sheet of paper to make it clearer, but for miniature flowers, you need to take 5 x 5 cm squares and repeat after the author:

Carnation flower from modules -:

Submit your photos
Do you also make beautiful paper flowers? Submit photos of your crafts. We will publish the best works and send you the Diploma of the participant of the competition.
Good afternoon - today I start series of articles for decorating the house in autumn. In this article I will show how to make autumn bouquets. I will show you how to choose the material ... and what rules to arrange a bouquet composition. We will see vivid examples of autumn floristry from juicy flowers and dry bouquets of leaves ... How to do low bouquets of autumn material. I'll tell you what original vases can be made from simple pumpkins, zucchini and cabbages ... In short, there will be a lot of interesting things.
So... let's start our floristic selection..
AUTUMN BOUQUETS - from branches, herbs and flowers.
It is better when there are more bright and juicy flowers in the autumn bouquet. Asters, roses, ripe juicy rose hips+ small inclusions of fresh leaves and stems of herbal plants.


To bouquet looked like a solid whole- it makes sense to LINK IT into a single BEAM - and then insert it into a vase with a bunch as a WHOLE AUTUMN COMPOSITION.

It is not necessary to use long stems of flowers and plants ... An autumn bouquet can be made and from short cut flowers and branches(as in the floral examples below).

branches rose hips, hawthorn, barberry and mountain ash in a bouquet creates a special flavor of autumn floristry. You can also add deciduous branches of shrubs or trees ... heavy fruits along the bottom line of the composition and blue flowers along the top edge of the bouquet.

Autumn flowers: garden roses, asters, rose hips and wild roses... And original floral inserts - in the form miniature pumpkins or squash… In order for heavy pumpkin fruits to hold well in the bouquet, you need to carefully “drill” a hole in them ... find a strong branch ... and prick the patison on the branch. And like this, insert it on a branch into our autumn bouquet.

Any container can serve as a vase for autumn compositions ... for example tin milk jug(as in the photo above). Or a clay decorative amphora... or you can place a vessel of water in a wicker basket.
Fresh berries can also be present in the autumn bouquet.
Branches of red currant give the bouquet a juicy shade - especially if the roses also match the color of the berries. And by the way ... in the same composition in the photo below clearly see RULE OF THREE CLASSICAL LINES bouquet(which I will talk about below).

Autumn bouquets of LEAVES.
You can just cut from dwarf maple beautiful twigs with maple yellow leaves. Let their beautiful rods be seen in the crystal water of a transparent vase.

And another interesting move - if you put cleanly washed carrot roots- the tops do not need to be cut, it will serve as part of the autumn bouquet. And by the way, one classic rule of composition (and not only autumn) is visible in this bouquet.

Dry transparent leafy stems it is better to choose high ones - so that they create the TOP EDGE of the bouquet ... and place on the BOTTOM bright juicy flowers and leaves.
HOW to make a bouquet - the rules for a competent arrangement of lines.
The bouquet also has a RULE OF LINES... This rule is well illustrated by the following photo. It is necessary to comply with ri main directions (see yellow branches)– an UP branch with an inclination to the left… a LEFT branch with a slight rise… a RIGHT branch almost horizontally.
And for balance - a few branches or stems should hang down (these are the brown branches in the photo below)

Here is a bouquet below - also created according to the same principle of THREE CLASSICAL COMPOSITION LINES.

LEAVES AND FLOWERS - a friendly combination of shapes and shades.
Small bouquets of autumn flowers and large leaves look beautiful ... Chrysanthemums are ideal for this purpose - they stand for a very long time without fading ...
The color of tea roses ... and the orange-yellow shade of lilies match perfectly with the shade of autumn foliage… and in the bouquet we emphasize this color match with green leafy plants. And also note that as line elements- are used seed stems of plants(brown in the photo below).


And here is an example of how "tea" roses can be made by hand from ordinary maple leaves. Below we see the very essence of the technique itself - and to help yourself, it’s better to take adhesive tape to wrap the bases of such leafy buds along the way (and it’s better to choose a green tape - it’s sold in hardware and florist stores).

DRY BOUQUETS for autumn interior.
DRY BOUQUETS is a great idea for interior decoration for a long time. Such autumn compositions do not need moisture. Such a dry bouquet can even be painted with spray paint (as in the photo below).
Or bouquets can be arranged as decorative "pile" from leaves, cones, seed pods of plants, dry branches, umbrellas of berries and other natural material.

MINIMALISTIC DESIGN - in the design of the autumn bouquet.
The bouquet can be quite modest- the main thing is that the design is stylish. Here's how in the photo below - you can glue funny inflorescences from acorns and acorn caps ... and insert such dry flowers into a vase along with oak leaves. This is a great autumn craft for kindergarten (you can do it with your child). Only wire holders will already be made by yourself.

Even this modest arrangement of leaves in beakers- looks self-sufficient. Also an example of minimalism in the interior bouquet.

After all, you really don't need much. Small flowers… stalks of cereals… umbrella branches with berries – and now you have a beautiful autumn bouquet for a small arrangement on the table.

Or you can use calyx flowers with a very short stem- if you put them on the bottom of a large glass-vase. For linear harmony, add tall stems there- but already muted colors ... so that they do not draw attention to themselves and the center of the composition remains JUICY BRIGHT INFLORMS.

Or cups of flowers can be laid beautiful flower carpet in a flat vase(similar to a bowl or salad bowl).
By the same principle you can make a bouquet of rowan branches, juniper branches and pine needles ...

If you didn’t find a beautiful salad bowl ... then you can mask its walls with dry leaves- securing it all with coils of coarse rope, or woolen knitting thread (as in the photo below).
And by the way - this photo below is an example of that HOW TO EXTEND THE LIFE of your wilting roses(which were given to you ... they are standing in a vase and have already drooped their heads and are about to begin to lose petals - despite the fact that you are changing the water and cutting the stems) ...
Withered cups instantly come to life ... if cut short. lower it into a small bowl (as in the photo below) and decorate the bowl with such a leafy wrapper ... The secret is that the water will not have to get to the bud for a long time. along a long stem ... the buds will receive water in abundance and again the petals will become dense and elastic ... and your roses will delight you for a long time ...

AUTUMN BOUQUETS - on the "oasis" (floristic foam).
You can make a bouquet arrangement in the ORIENTAL STYLE - when the material for OASIS bouquets is placed in a flat vase (this is a porous material, plasticine foam. It is soaked with water and the stems are stuck into it - such a bouquet lives for a long time due to the moisture accumulated in the oasis. And it just takes time Moisten this floral sponge with water from time to time.

In such an oasis, you can stick not only stems of flowers and herbs, but also needles ... cones ... poppy boxes ... and other natural materials. And as we see in the photo below, the oasis can be placed on a saw cut of an ordinary birch log.

Autumn bouquets - from APPLES.
Beautiful bouquets-compositions with apples in the photo below can be made with your own hands.
In order for the apples to hold on - you need to pin on holders. It could be metal holder- with splayed peaks ... we insert the holder into the water ... we prick apples on the peaks ... and fill the gaps with other vegetation.
Or the holder can replace with sharp knots ... sharpen strong thin branches with a knife ... chop apples into branches ... insert them into the water under different pricks ... and fill the rest of the gaps with autumn flowers and leaves.


And you can also use sweet pepper fruits in a bouquet ...

Fruit-beneficial VASES - for autumn bouquets.
Citrus and cucurbits have strong, watertight PEEL. This suggests the idea of using them - AS A VASE.
It is enough just to cut off the top of the fruit ... remove the pulp from it ... fill it with water and put our autumn bouquet in such a fruit vase.
And even head of cabbage can become a vase. No, the pump itself will not hold water for a long time ... most likely it will leak. But you can be smarter ... make a recess in the swing ... into which you can insert a small vase of water.

But pumpkins are the most convenient, of course - such a vase can be used many times ... And not only as a vase, but also as a candlestick for autumn evening gatherings with cozy candle lighting.


In addition to the classic round pumpkin, a vase for a bouquet in autumn can serve as squash, zucchini and ornamental cucurbits having a bizarre curved shape.

And even decorative pimply fruits - which are not stable - can be put on their side - and the neck of such a fruit vase can be made - in the side of the fruit. (as in the left photo below).
Or a vase can be made from birch stump... this is certainly not a fruit - but also part of the plant world.

Vases with decorative filling for bouquets.
As a filling in a vase, you can use - acorns ... cones ... rose hips ... apples ... beans ... cereals ... and other bulk natural material.

And most importantly... water should not be poured into the bulk material itself… otherwise the water will simply darken and all this beauty will simply rot. Better to be smarter.
V wide vase- put narrow vase... so that there is space between the vases. And now we pour water for the bouquet into the inner vase ... and pour a filling of natural material into the space between it and the outer vase.
And also…
I have prepared articles on creating autumn floral masterpieces from natural materials to decorate the interior ...
Autumn table setting - 40 photo examples.
Good luck with your autumn crafts.
Olga Klishevskaya, specially for the site
A universal selection of gift ideas for every occasion and occasion. Surprise your friends and loved ones! ;)
Greetings, dear readers and visitors! I have repeatedly written that I love decorating gifts in the most unexpected ways. And today I suggest you make paper flowers with your own hands. Already twenty-odd methods, by the way.
Now, unfortunately, I rarely get to mass gift wrapping. Moreover, every year there are more and more acquaintances and friends who should be congratulated along with relatives. It's very joyful! I love giving presents. But if I choose them very carefully, then lately I pack them in organza bags, since I decide on detailed packaging only for single holidays (like birthdays).
However, my passion for various kinds of packaging beauty is difficult to overcome, so today I will train with you to make beautiful flowers according to step-by-step schemes.
DIY paper flowers: simple and with a twist
There will be a lot of master classes, get ready. Good news for all rose lovers: there will be 4 of them.
Aster
Guys, honestly, I'm not very strong in the names of colors. So if you see a clear discrepancy for you - write in the comments.
So, the first in line is the aster. For her, cut out five circles: two large, two medium and one very small. Fold each circle in half three times, then draw the edge as in the 4th photo. After unfolding the design, squeeze each petal to add volume. Fold all the circles into each other and decorate the middle.
Almost calendula
This flower is much more like a packing bow. Prepare for it a square of paper of the desired length and cut the edges according to step 2. You will need several such blanks. Lay them one on top of the other and squeeze in the center, tightening with wire or thread.
Now the most important thing is to straighten the petals so that you get a beautiful likeness of a flower. Accordingly, the more layers, the more petals and the more magnificent the flower in the end.
Tip: make several of these flowers of different sizes and glue them on the packaging next to each other, then you get a beautiful likeness of a bouquet.
Calla
To create calla lilies, you can use both ordinary double-sided paper and foamed rubber (here I wrote what it is - in the section about the minion).
For calla lilies, take a stamen (you can crumple it out of paper or make it out of polymer clay) and a petal made in the shape of a heart. Insert the stamen into the petal, fold the edges of the petal over the stamen, gluing them together. It remains only to unscrew the edges to get the maximum resemblance to calla lilies.
Such flowers are well suited for postcards, packaging, and as an independent gift in the form of a bouquet.

Bell
The master class for the bell is quite simple and understandable. Cut out the blank according to the first photo. Glue the edges of it, and gently straighten the ends. To make everything look natural, make the middle of several oblong stamens that will need to be glued inside the flower.
Of these bells, by the way, it will be great to decorate the packaging for March 8 or just a spring birthday.
lilies of the valley
Well, or something similar. For one flower, take a long rectangle and bend the edge of it, as in the photo. Cut the wide part so that you get a lot of small strips. Using scissors, twist the strips (to do this, you just need to run the sharp side of the scissors along these strips, slightly pressing the blade against them).
To prevent the flower from falling apart, take a rod on which you wind a green strip. Then, from above, begin to gently twist the “flower” part, previously smeared with glue. Apply layers tightly so that greenery does not show through from under them.
But it’s not at all difficult to make green leaves - for them, just fold a rectangle of green paper with an accordion and cut the edges with a “triangle”. When unfolded, you will get a lot of green leaves ready to be glued to the base.

Poppy
Now let's use corrugated paper. Cut out about ten teardrop-shaped petals from it. Stretch the wide part so that the blanks resemble mushrooms.
Take a thin wire and wind some paper around it - this will be the core. Wind the petals onto this core so that each slightly overlaps the previous one. When everything is ready, the structure can be pulled down below so that it does not fall apart.
The master class shows how this flower can be attached to a festive cap, but believe me, a poppy will look great on a gift box.

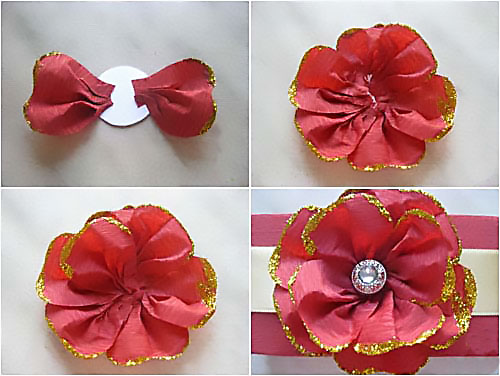
Red flower
What kind of species does he have? No associations came to mind. But this is not the point - to create it, you will need about ten petals (corrugated paper is used, by the way). Their shape is almost drop-shaped. but with a cut end.
Cut out a base circle from thick cardboard. Glue all the petals in layers to this circle, slightly crumpling (doubting? God, how right: _D) the bases, thus forming folds - then the flower will be more voluminous and “fluffy”. Decorate the center with some button or bead.
Such a flower, by the way, will look great from soft felt - so it will gain durability. And if you attach the base for the brooch at the back, you get two in one - a gift decoration and a gift itself.
Extravaganza of color
There are only two flowers, but due to the bright combinations, a very unusual effect is obtained. Take the crepe paper again, cut out a circle and fold it into a chrysalis shape. Cut a “skirt” to it, which you wrap around the chrysalis. Attach the petals on top, gluing them in a circle. Glue two wide leaves at the base.
The second flower is quite simple - cut the fringe and twist it into several layers. Flowers are very simple, they can make a very interesting gift composition.
Unseen flower
To prepare the basis for this flower, I advise you to look here - here for the second Christmas tree the basis is created in the same way. But then the differences begin - each of the corners must be wrapped with a thick wire or knitting needle so that a spiral is obtained.
You can leave this design alone, but I suggest you connect several (say, three) pieces using the existing spirals - the wow effect is provided. Then you can also experiment - combine elements with spirals into unprecedented designs.
Tip: going to a Japanese-style party? Then make such a flower of a very large size and take it with you - it will serve as an excellent decoration for the chandelier.

Peony
“Pio-, pio-, peonies are given by a new acquaintance ...” - the words from the song of the underground group “My Michelle” (I often listen to it lately, inspired). We will make crafts from corrugated paper. You will need five sizes of petals, approximately five copies of each (appearance as in the photo).
Stretch the petals so that you get a semblance of a wave (for both large and small ones). Then form a stamen from the same corrugated paper by folding the paper with further compaction. You can do this on a wire skewer, or you can do it without it.
Glue the petals onto the finished stamen, overlapping each subsequent previous one. Do not tighten the petal too much. At the end, it remains only to cut the green leaves and stick them around the peony.

4 in 1: dandelion, carnation, aster, chamomile
All these wonderful creations of nature are made according to the same principle - cutting the edge of the strip from which the flower will be made. The final shape of the flower also depends on the shape of the cut. Keep in mind that some require a core, while others do not.
Please note: despite the very simple design, the flowers are very realistic. If there is very little time for production, then this is an ideal option.
Experiment and discover your unprecedented plants - be sure to tell us what happened.

paper roses
Magic roses are one of my favorite flowers.
Rose with twisted edge
The main difficulty here is to carefully twist the edge of the corrugated paper, straightening the folds. Then make sure that the folds are even. Now twist the strip so that the layers fit snugly together. At the end, fasten with a thread, cut off the excess.

simple rosette
Need to make a plant in five minutes? Then this rose is for you! Just cut out a circle in which draw a spiral. Cut out the spiral as in the photo and twist the rose starting from the longest link of the spiral (the central part will serve as the base).

big rose
Even gigantic, if you follow just such dimensions. Heart petals are stretched and superimposed on each other in a circle with fixing with glue. Green petals are attached at the end. Of course, the flower does not have to be as big as in the photo - start from your preferences.
Twisted paper rose
Once I already described this way of creating a rose (here is the second one). The principle is exactly the same, but the dimensions of the triangles resulting from twisting must be the same along the entire length of the tape, otherwise there will be a not very neat flower.
Once she even made a Rosemary doll, which took part in the city exhibition. Her whole body was covered with roses, made just in this way (the roses were from ribbons, really).

Clover
I will only show you how to make the base for a four leaf clover. To do this, take a square of paper and fold it in half lengthwise and in half again. Bend the ends to the center. Cut out a heart from the resulting design. The result will be exactly what we wanted - a happy flower.

Nameless
As much as I puffed up, I could not give an intelligible name. As a result, Tovariz remained just a beautiful flower, reminiscent of kanzashi motifs (Japanese art of making jewelry from satin ribbons).
The beginning here is the same as in clover. But after bending the edges, it will be necessary to bend the ends so that the length of the bent part is equal to the length of the visible side in the middle. Then these parts are straightened and their edges are already bent so that the sides are even. They are again bent and glued so that three stamens are obtained. There should be three such petals.
Most of all, such a flower is suitable for decorating a gift in the Japanese style.

And again aster
This time, you already need to glue the petals around the edge until you reach the desired volume. Decorate the center as you wish, or simply fill it with as many petals as possible.

On this large flower review, I declare it closed. I hope you have found exactly the option that will help you decorate the best gift. See you soon, subscribe and share with your friends!
Sincerely, Anastasia Skoreva
Greetings! Today I have selected for you a lot of ideas on the theme of "Autumn". More precisely, we will figure out how to make autumn bouquets with our own hands. With the start of classes in schools and kindergartens, parents are often puzzled by what needs to be done. I think that in the presence of fruits, leaves and dried flowers, it is easiest to create a composition of flowers.
And they turn out so beautiful that they are suitable for a gift for a ball, for Teacher's Day and for the autumn holiday itself.
And to facilitate the search for parents, I decided to make a selection where I collected the most interesting ideas for bouquets using everything that is at hand: from paper to twigs and seeds. There will be simple ideas and more complex ones for those who feel a creative touch and want to create a masterpiece.
One of the most accessible autumn materials are leaves. They have already turned red and yellow. They are collected in beautiful compositions, make the basis for bouquets, or simply put in a vase without embellishment.
And we can roll a rose out of them. And already from such roses and buds to make a bouquet. This is done very easily and for 1 rose you will need from 5-7 leaves. It depends on the level of openness of your flower.
It is important to take those leaves that are still easy to bend and do not break. From dry things, unfortunately, nothing will come of it.
By the way, pick them up so that there is a long tail at the base. It will help to comfortably hold the workpiece and tie a “rose” with it will also be easier.
So let's take:
- 5-7 leaves
- threads.
Let's start by choosing the smallest piece of paper available. Fold it in half horizontally.

And twist into a tube. This is what we got in the middle.

Hold the middle with one hand. And the second again fold the next sheet horizontally. We wrap it around the middle. We don't tighten it too much.


We wrap it in this way until the leaves run out. Not all of them can be used if you want to make a bud.

We open the "petals" and tie all the tails with a thread. To make it more convenient, ask for help from relatives.

This is how the blanks turned out. They can already make a bouquet.

I think that any student will be able to repeat these simple steps and create a bouquet of "roses" on their own.
And now we compose the composition. Indeed, in floristry, not a single bouquet is made without it. The idea always comes first.

You can combine such roses with fresh flowers, dried flowers or mountain ash.

The main thing is that there are no voids in the bouquet, otherwise there will be a feeling of incompleteness. Here is an example with the addition of ordinary leaves. After all, they are also beautiful in their own right.

And here the flowers lie on a beautiful substrate and the center is highlighted with a bright accent.

If you try, you can make roses of different shades, which will look very realistic in a bouquet.

It is not a shame to present such beauty at the Autumn Ball or on Teacher's Day.

It is very beautiful when leaves of different colors and shapes are combined. Nevertheless, our autumn is very diverse and plays with all the colors of the rainbow.

Another idea is when green plant branches are used.

I really liked how the leaves were beautifully wrapped in a tube in this photo. This immediately highlights the composition and makes it individual.

Here, in a composition with autumn fresh flowers, the leaves also actively draw attention to themselves. Agree, it turned out very original.

Another small composition on the theme "Autumn". Very cute and beautiful idea with an apple.

It is worth going into a park or a forest and you can immediately collect a whole bag of material. Twigs of birch, maple, mountain ash, apple tree - everything will suit us. 
A variant of the autumn tree in the form. It can also replace the bouquet. All the gifts of trees are used: from leaves to berries and cones.

You can not fold the leaves, but simply collect them beautifully and tie them with a ribbon. You can keep the color style. For example, take only green or only red leaves.

But you can use the branches themselves! See how self-sufficient they look.


I think that any mother will be happy to help her child create such compositions. And the joint collection of leaves in the forest for a walk will only bring the family closer.
Autumn bouquets of vegetables and fruits
You can use autumn fruits. Bouquets with them are also very popular now and look rather unusual.
For creativity, you need to pick up beautiful, small fruits. No dark spots or wrinkled sides.
Let's start considering possible options for compositions from fruits and berries. And then we move on to vegetables.
Here is an idea with tangerines and rowan. Fruit strung on skewers. For strength, they are fixed with adhesive tape or a special floral tape.

Here you can see that the apples are strung on skewers. They are beautifully combined with asters and mountain ash and bird cherry. Parents made a very original coaster from birch bark.

Apples are combined with any leaves and berries.

Here the emphasis is on rowan. Sprigs of coniferous trees add splendor to the composition.

These bouquets are made to order. Here it is important to firmly connect all the workpieces to each other.

I was captivated by the idea of coloring fruits. For example, such “golden” apples look very expensive. It won't take long to realize that they are real!

Variations with fruits, cones and berries in a pumpkin. A little later I will show how you can use this vegetable.

You can put the composition not in a pumpkin, but in a zucchini.

Apples go great with the "roses" we made earlier.

Step by step video on making fruit compositions.
Now I will show options for bouquets with vegetables. You can not collect all types. And turn on design fantasies and use only two types - pepper and garlic. See what came of it.

Small fruits make pretty compositions.

The entire space between the vegetables, where the junctions can shine through, was covered with rowan berries.

By sticking to a certain color scheme, you can create a very stylish bouquet. For example, using cabbage and succulents. After all, autumn is different.

In this photo, I was subdued by a substrate of rolled leaves. The composition is clearly visible here. A highlight in the form of earrings descending under their weight.

See how beautiful the idea of \u200b\u200bpainting the ears looks. Very bright and lively.

Now let's move on to a very common idea to use a pumpkin as a vase for flowers and grass.
Bouquets with pumpkin
It is convenient to put bouquets in a pumpkin. But in order for them to stand and not wilted longer, all plants need water. How to place it in this large vegetable?
There are three most convenient options: using a floral sponge, using a tin can, or combining both of these options.
So, from the pumpkin we take out the middle with seeds. They can be dried and used for applications and panels. Below will be about this.

And inside lay out a floral sponge. It is sold in many flower shops, as well as in the departments for creativity.
Then water it with water and insert flowers. Most often, this option is needed when you create a bouquet of fresh flowers. The sponge also helps keep the shape of the composition when the stems are stuck into it.
You can also put a tin can inside. In this case, it is not necessary to remove all the pulp. The main thing is that the jar is not visible. We use canned pineapple containers. You can also pour water into it, or you can not do this if you are using dried flowers.
For these purposes, it is better to take a wide pumpkin.

You can use a glass instead of a jar. Its upper side indicates the diameter that needs to be cut out so that the glass fits. For fresh flowers, put a floral sponge inside and saturate it with moisture.
 Ideas for compositions in a pumpkin are in front of you.

A vegetable vase can be decorated with ribbons or braid. 
There are only fresh flowers here.

And here we see the use of spruce branches, bunches of bird cherry and mountain ash. 
A whole composition on the theme "Autumn". 
Such crafts will appeal to both schoolchildren and children of the older group of kindergarten.

The main thing is not to be afraid to use the materials that are at hand. Making a bouquet is a very entertaining and creative process.
How to make paper compositions on the theme "Golden Autumn"
I have an idea to make autumn paper bouquets. Initially, flowers are harvested from which the composition is created.
It turns out very beautifully using the origami technique.


With a splash. 
Let's add leaves in autumn shades to them.

This master class describes the detailed process of creating leaflets.
The ends of the sheet folded with an accordion are smeared with glue and connected.

Maple leaves can also be made using the origami technique.

Here is a detailed tutorial. 
If it is not clear from the photo, then I attach the video.
Everything is described in detail here. I think that you can definitely create a craft from the video, repeating all the steps in stages.
Master classes and ideas from natural material in kindergarten
For little kids, you need something simpler. Therefore, I suggest using natural material for bouquets. We will look at ideas from cones, peanut and pistachio shells, pumpkin seeds, dried flowers.
From cones
It turns out that the cones are very similar to flowers. Especially if they ate unopened things put in water. They absorb moisture and open up. My child, when he saw these metamorphoses, was simply delighted.

The cones can also be attached to skewers, sushi sticks, or toothpicks. To create a round composition, use round floristic foam balls. I made them from ordinary polyurethane foam.

They come in different diameters. All kinds of plants and materials are stuck into them. You can use both fresh flowers and branches, and any other materials.

A beautiful bouquet when the buds are turned tip first. It turns out a very neat composition. The tips themselves are decorated with beads, ribbons, rhinestones and flowers. They adhere well to hot glue.

How do you like this autumn composition. I think it's very original.

Also, the cone lends itself perfectly to painting. They can be painted with gouache or spray paints. The intensity of the color depends on the number of layers.


dense gouache will also be able to cover the natural brown shade of the cones.


If you remove the inner branches, then the flowers will turn out to be more open.

And you can take only one thing and make it the center of the composition.

Another idea from the gifts of the forest. Everything that lies at the trunks and under our feet is used.

Agree, cones are an excellent material for creating an autumn bouquet for children in kindergarten.
From pumpkin seeds
Pumpkin seeds also make great flower petals.

There are two options for buds. The first is to stick seeds on paper in several rows. Here is a detailed tutorial.

The middle can be painted or covered with a piece of colored cotton wool.

With the use of plasticine, you can make such daisies.

Or those flowers.

Let's take a closer look at how this is done. Pumpkin seeds are inserted into the plasticine ball in rows. You can form different buds and variants of inflorescences.

It's also very interesting, don't you agree?
From peanut shells
We rarely buy peanuts, but we often take the shells from friends after the men's get-togethers. To once a year in the kindergarten to make such bouquets for educators.

Whole “hydrangeas” are obtained from pistachios.

It is convenient to attach them to plasticine.

It will be easy for kids to make such daisies. Younger children can insert shell petals into plasticine. And the elders connect them with hot glue.

Using floristic balls (I wrote about them a little higher), you can create the correct spherical shape of a sunflower. See how organic coffee beans look. After all, these are all the gifts of autumn.

Whole pistachios and peanuts can be presented as a gift. To do this, connect them into bags and decorate with corrugated paper.

With walnuts
Of course, walnuts are not bypassed. From the shells you can make an autumn topiary.

Walnut bouquets with whole fruits look very presentable.

You can close the gaps with pieces of napkins.

For interest, you can combine all of the listed natural materials and fruits.
from dried flowers
Dried flowers are very suitable for our autumn theme. They look noble, they can be painted. They will complement any composition.

Everything will do - dry herbs, cereals, leaves. 
And here the spikelets were painted. 
Cotton flowers want the composition to be very delicate and airy. 
A beautiful bouquet of dried flowers in a stand decorated with branches. 
More ideas for you.

An interesting frame for a bouquet of branches.

We mix dried flowers and roses from leaves. 
Golden ears have a very presentable appearance. It’s just that you have to go far for the material - on the field. Look for unharvested wheat. 
Dry grass with leaves are combined harmoniously. 
Many of the ideas I just love.
Applications with flowers on the theme of autumn in the middle group
For the older group, you can offer ideas for applications or panels. They are made from leaves, dried flowers, cereals and seeds.
Idea with a vase in which twigs are inserted. Only the sides and bottom are glued. The top is left free so that the material can be inserted.

Use the candy box as a base and frame for the panel.

Leaves, cones and coffee beans create such an autumnal bouquet.

Different types of flowers from pumpkin seeds for application.

Use coniferous branches.

All bones, seeds and cereals hold well on hot glue.

Leaves and flowers made of paper are no worse than natural material.

You can take the usual frame for the base.

You can make applications in the form of bouquets simpler, or more complicated.
Autumn ideas for candy and crepe paper bouquets
Corrugated paper flowers look incredibly realistic and beautiful. For Teacher's Day, there is an idea for a small bouquet with sweets.

Or a gift idea.

Flowers for a gift can be packed in autumn leaves.

You can use these flowers without sweets.

Let's combine sweets with natural materials: dried flowers, cones and leaves.

Composition with sweets in a basket.

And now a detailed master class on creating roses from corrugated paper. It is easy to stretch and bend and can imitate real leaves.

The colors of autumn are very cheerful and any yellow, orange and red flowers are suitable for them.

I am attaching a video on how you can make several types of flowers.
Corrugated paper is sold in book and stationery stores, in places for floristry, creativity and holidays.
Ideas how to arrange a bouquet
And now you have already decided what your autumn bouquet will be made of, even blanks are made. But you need to arrange it somehow so that it has a more marketable and presentable appearance!
So I offer a few ideas.
For example, take the now popular craft paper. Or packing dense mesh or fabric.

From the same corrugated paper you can make a beautiful envelope. With such a design, it is not a shame to present your craft.

Insert the craft into a paper bag. It can even be folded from scrapbooking sheets.

Mounting foam, foam rubber, floral sponge or polystyrene are inserted inside.

Ideas from reed napkins are beautifully obtained.

You will need:
- napkin,
- can,
- cardboard,
- pencil,
- hot glue (glue gun).
We put a jar on cardboard and circle the bottom. We cut it out and stick it on a tin. We also glue the sides with cardboard.

We measure the height of the walls of the tin and cut off its size on a napkin. We wrap the sides and fix with hot glue.

That's it.
The bouquet can be placed in hat boxes or shoe boxes. To do this, they are pasted over with a cloth or special paper. The bottom is lined with a film on which we put a floral sponge. We fill it with moisture and begin to form a composition.

There is a fun idea for decorating jars with plastic straws for cocktails. The main thing here is to cut them neatly and evenly.

Insert dried flowers or paper flowers into paper boxes. Here is one of the ideas. By the way, in this article I described very much, suddenly you will like something.

Cardboard fits very harmoniously into this composition. Original and beautiful.

To congratulate teachers, you can decorate the packaging with letters. 
Or just put the bouquet in the basket. They are now made not only from vines, but also from newspaper tubes, paper and canton.

Thank you for your attention and wish you fruitful joint creativity. I'm just sure that you can find an idea for yourself and create such a composition that you are not ashamed to give to the teacher and send to the exhibition!