Kanzashi color schemes from ribbons. DIY satin ribbon flowers. Master class for beginners, step-by-step instructions for kanzashi. Other kanzashi for Easter
The specificity of this skill
What do you imagine when you hear or read about beautiful satin ribbon flowers? Someone represents unpretentious gerberas, collected from a crossed narrow ribbon, and someone - an imitation of live roses, which is made by hand and collected by petals. As always, the truth is somewhere nearby - few people make a completely realistic copy of fresh flowers, for this there are still artificial ready-made floristic compositions, but it’s not worth learning to make very simple daisies - you can collect them simply by inspiration.Making flowers from ribbons is an interesting process. He attracts me with the fact that despite the apparent complexity, in half an hour you will definitely get a flower. Yes, perhaps a little ridiculous (you won’t look at my first roses without pity). But - it will work. This is not knitting, for which you will kill a couple of days, and not a miniature painting, which obviously needs talent, but here it is enough to look at the master class about creating flowers from ribbons with your own hands and you will get a finished flower.
Almost all silk ribbon flowers are made in such a way that they are durable. Of course, if you plan to make just decorative bouquets, then special strength is not needed, but if you suddenly want to make a beautiful headband as a gift for your child, on which fabric flowers act as a decor, then I advise you to make every effort to ensure that the flowers do not frayed in the first couple of days.


How is it done
I will tell you several ways to make flowers. I must say right away that the methods are basic, on their basis you can make any other flowers that are visually similar to those described by me. By the way, I advise you to try to make fantasy compositions without trying to embody any living flowers - this way you can better feel the technique and its features.Preparing for production
So where do we start preparing? What is required for work? Write down:- ribbons of different widths and different colors, I prefer satin ones, they look very elegant;
- good sharp scissors (I have ordinary tailor's ones);
- needles and threads of different thickness;
- glue gun and several sticks of transparent glue;
- a pair of tweezers (those for eyebrows will do, but it's better to have a good one if you are going to be making flowers seriously).
I prefer to work at a clean desk under a table lamp, and I advise you to prepare your workplace - remove everything unnecessary, adjust the light.
Kanzashi
My first acquaintance with flowers took place just when I came to the kanzashi master class. This MK became my starting point, and I am grateful to the girls who, in just a few hours, taught me and a bunch of other girls how to make amazing kanzashi flowers from a narrow ribbon, chic kanzashi from wider satin ribbons, and gave a deep understanding of this technique and its capabilities.What is kanzashi? This is the art of decorating hairpins, which came to us from Japan. Pieces of fabric were folded into the shape of flower petals, and amazing flowers bloomed on hairpins that could decorate any hairstyle. Now kanzashi is in vogue, so it is not surprising that many girls have mastered this technique.
To work in the kanzashi technique, in addition to the tools described earlier, you will also need a ruler, a chalk pencil for cutting (you can replace it with a simple pencil or a sharpened piece of dry soap) and a candle for singeing.
Some girls use a lighter, but it seems to me that a candle gives a more even flame, and you can fold the fabric much more accurately when your hands are free.
In total, three types of petals are used in the kanzashi technique: 
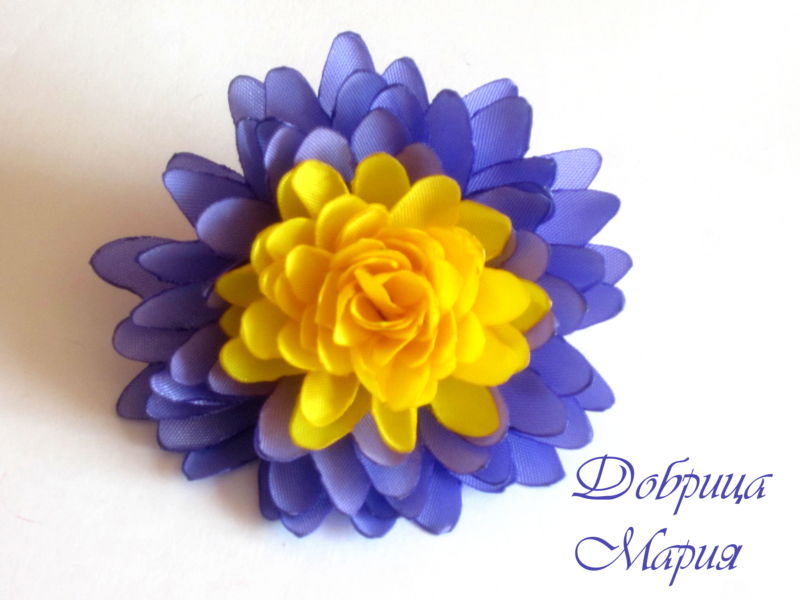
A kanzashi flower from a 5 cm wide ribbon will turn out to be medium in size - you can decorate clothes or a hairpin with it, decorate a headband or make a beautiful home decor.
How to make different petals:
And how to make kanzashi leaves:
Let's start manufacturing 
How to make a kanzashi flower from a 5 cm wide ribbon? The wider the ribbon, the larger your flower will be in diameter.
If you want to make a magnificent flower from ribbons, then I advise you to look at this MK:
And these videos show how to combine different shapes of petals, make double petals from a satin ribbon with your own hands, and how you can collect not only flowers, but also plants, insects and even small animals using the kanzashi technique. By the way, it is kanzashi that is suitable for making snowflakes - watch the video to make sure.
melted petals
The following method of making flowers from satin ribbons is suitable for those who want to make a large composition at once, for example, I made a basket of flowers for my mother's anniversary using this technique. However, there are some nuances:- melted petals look less neat than kanzashi, so you should not use these flowers next to a formal outfit;
- be prepared for the fact that it will not work right away;
- not every ribbon is suitable for the manufacture of these colors, it turns out only by experience.


Step-by-step instruction
- From cardboard we cut out a pattern in the shape of a plump half-heart (as in the photo below).
- We cut out the petals (you will have to tinker) - at least 6 pieces of large ones and the same number of smaller ones and even less, you can double each size.
- Each petal needs to be processed with the help of fire - the edge will gather a little, and the petal will become voluminous.
- Then the petals are collected on the central thread, arrange them symmetrically, with a slight overlap, so that the flower looks voluminous, and best of all, collect them in a checkerboard pattern (see photo below).
- A few beads are attached to the center on a string to imitate the middle.
- Your flower is ready.
simple flowers
Very simple and at the same time expressive fabric flowers can be made in just a few minutes. If you have never tried to make flowers from ribbons, then this way you will definitely succeed.How to make flowers in five minutes?
- Cut the tape - into pieces of 5-10 centimeters. You can take the same pieces, or you can use segments of different lengths, then the flowers will be more natural.
- Slices are carefully melted on a candle - so as not to fray. Make sure that you do not get dark sloppy influxes.
- On the bottom, we make a free line with a strong thread (it is better to take a medium-sized needle so as not to make too large holes.
- We tighten each segment to get a petal.
- From the resulting petals we collect in color - in the middle we use small segments, closer to the edges are larger.
- Glue the middle into the center.
- You can decorate flowers with narrow white ribbons - for example, make stamens or centers.
- The collected flowers are folded into a composition and glued to the base.
A few words about embroidery
Since we are talking about crafts from ribbons, it is worth mentioning such a type of needlework as embroidery with ribbons for beginners. To be honest, before I became interested in this type of needlework, I thought that simple patterns were embroidered from a narrow satin ribbon. No matter how! Embroidery is done not only with the use of thin ribbons, very wide ones are also used - they drape beautifully and allow you to get volume.

What I like about this technique:
- it is easy to achieve the desired result thanks to beautiful materials;
- ribbon embroidery is highly valued among admirers;
- bulk embroidery is obtained very quickly.
Why are schemes good? Despite the fact that all needlewomen embroider the same pictures at first, the embroidery you make will be unique - firstly, because you will choose the colors yourself, and secondly, because the ribbons are the material that needs to be draped. Well, see for yourself - there are more than five shades in each picture, and each one will have to be draped in its own way, which means that the volumetric elements will be different. Don't want to do what someone else has done before you? Embroider small flowers according to your own sketches.
Unusually delicate and airy wild flowers embroidery with ribbons - I am sure that this is the best gift for any holiday, especially if meadow grasses are added to the wild flowers.
I really like embroidery with ribbons of wild flowers - the pictures are not too big, smaller than a landscape sheet, but very delicate and expressive. And for the first embroidery, I advise you to take a simple pattern and ribbons less than a centimeter.
Lessons and workshops for inspiration
How to make cute flowers from ribbons: a master class for the little ones - according to this master class, we made flowers with our daughter, she really liked it.Festive flowers from satin ribbons: a master class of medium complexity - make chic decorative flower arrangements for the holiday, decorate your home and gifts for loved ones.
And a few more simple mk: Now you know how to make a flower from a ribbon - even for a headband, even for a dress, even for gift wrapping. Experiment with different techniques, share your results and collect entire handmade bouquets!
The technique of making flowers from satin ribbons came from distant Japan.
Women gladly decorated their hair with numerous garlands on holidays.
On weekdays, the outfits were more modest.
The order of weaving is simple.
Differs in detail and brightness of the used paints. Flowers are made only from fabric.
A simple technique for making kanzashi flowers from satin ribbons
An example is a living rose flower. You can use satin fabric, for example, pink shades, unlike those shown in the picture. It is recommended to purchase a 125 mm double-sided glitter satin ribbon in the store.

Tools and improvised materials: fabric of different shades, needle and thread to match.
Tape is in hand. The top corner is folded over and sewn on with a double stitch.
The tape is rolled into a roll for 6 turns. The edges should be rolled up evenly.
Now the tape is bent at an angle of 45 degrees, and then wrapped once around the folded roll. For successful fastening of the fabric and maintaining the desired shape, the tape is stitched.
In a similar technique, at an angle of 45 degrees, the future rose folds further. Each turn of the fabric is fixed with a stitch.
When the rose acquires the desired shape and volume, the satin ribbon can be cut off and the tip sewn to the bud.
To top it off, in the overall picture, the rest of the kanzashi flowers from satin ribbons are folded from the fabric. Each flower has a hair band attached to it. After that, the decoration can be worn on the head. A few flowers will make a wonderful ensemble on the headband.
Rose flower in kanzashi technique from satin ribbons
The second experiment with creating a rose with your own hands is even more interesting. Now the future rose will turn out airy and tender. All its petals will sensually flutter from the breath of the breeze or at the slightest movement of the hostess of the jewelry.

Tools and improvised materials: a pleasant red satin fabric, a green satin fabric, a piece of green felt, a hair clip, paper, a ruler, a pencil, scissors, threads, a needle, a candle, matches, tweezers, glue, white wire and foil.
A paper template (or pattern) of a rose petal is being made. In the figure, the paper is lined into centimeter squares. A sketch is drawn with a pencil and cut out with scissors.

According to the template, satin petals are cut out in the amount of 6 pieces.
According to the template with an allowance of 0.5 cm, more petals are cut out in the amount of 6 pieces. They are, accordingly, larger in size than the previous ones.
The paper template is cut with scissors along the entire edge by 0.5 cm. Very small petals are cut out of it in the amount of 6 pieces.
All the resulting petals of the future flower are processed along the edges to prevent shedding of the fabric on the cuts. To do this, a candle flame is lit. Each petal is brought to it and its edge melts a little. At the moment of melting, the fabric is important to stretch. This will give the petals the desired waviness. So around the perimeter.

On fire, the petals are given a concave shape. To do this, each of them is taken with tweezers and held for a fraction of a second at the flame of a candle. The fabric will curl up a bit.
Assembly of petals into a bud. There are two assembly techniques: when the petals are sewn in a circle, and when they are connected in a checkerboard pattern. Choose any method yourself. With the help of a needle and thread, each petal is sewn along the bottom edge into one kanzashi flower bud from satin ribbons with your own hands.

Flower stamens are made from wire and foil. The foil on the wire must be fixed with glue. After that, the finished stamens are inserted into the center of the bud and stitched with a few stitches. Some craftswomen make stamens from cotton buds. In this case, it is recommended to paint the cotton tips in the desired color and, after the paint dries, apply a layer of glue so that such a bright beauty does not wash off if the decoration gets caught in the rain.
The last ones are sewn with petals.
Making kanzashi flower foliage from satin ribbons. A green ribbon is used, 10 cm long. Its edges are processed with a familiar method at the flame of a candle. The corners of the future sheet are bent towards the middle and sewn from the bottom with a basting seam, which will allow the fabric to be pulled together to create a wave. The strips of fabric sticking out from the underside are sewn with a blind seam.

A circle or an oval is cut out of the prepared piece of felt. Leaves are first glued to it, and then a rose. This process occurs with the help of the imposition of "hot glue".

A hairpin is sewn to the felt. That's all, a gentle quivering rose to decorate the head is ready!
A ball of kanzashi flowers from satin ribbons
It is popular to have a coffee tree or similar coffee composition at home. What if someone is allergic to coffee? Or just don't like the smell? Make a kanzashi flower ball from satin ribbons. It is very beautiful and complements the interior with a Japanese traditional twist.

Tools and improvised materials: polystyrene foam, cardboard for a tube, glue, satin ribbon, felt (or burlap), thread, needle, scissors, curly ruler (or compasses), pencil.
A round base is made for the flower. To do this, draw a circle on the felt (or burlap).

The circle must be given a conical shape. To do this, a triangle is drawn in it, as shown in the figure. The circle is cut out. A triangular segment is cut off with scissors and the edges of the circle are sewn with a hidden seam. Got a cone. The wider the triangle is made, the higher and sharper the cone will be, and the smaller the ball will end up.

A satin ribbon is superimposed on the cone, the edges of which are sewn to the textile base.

The satin ribbon is bent at an angle of 45 degrees. The fold is fixed with a stitch.


When the fabric has covered the entire cone, it is cut off and hidden under the flower. Additional kanzashi flowers are made from satin ribbons in a similar way.

A ball is cut out of the foam. A tube is rolled up from cardboard. The position is fixed with glue. The tube is decorated with decorative elements: a thin ribbon, colored paper. A recess is made in the foam ball for the tube, which is inserted there, previously lubricated with glue.
If it is impossible to use foam in the work, it is replaced with crumpled paper wrapped with adhesive tape.
Kanzashi flowers from satin ribbons are glued onto the resulting ball. The ball is decorated with pearls.
Kanzashi flowers have become very popular as hair ornaments, and this is now a favorite type of needlework for many craftswomen. It is more correct to call them kanzashi - these are Japanese traditional women's hair ornaments. Kanzashi is worn with a kimono. And here they are used as bows for girls, and decorate dresses, bags, postcards, hair bands and much more. These products are made from satin ribbons and decorated with beads, sequins and rhinestones. Even ribbon embroidery can be done using the kanzashi technique. Our editors have collected simple and understandable lessons for you so that you can understand everything step by step. Watch our MK, and, perhaps, crafts using the kanzashi technique will become your favorite hobby.
Kanzashi is a technique for creating flower decorations made from materials such as silk, organza, satin. The first acquaintance with kanzashi, for beginners to understand this type of needlework, may seem rather difficult. In fact, this technique is incredibly simple. It is only once to understand its basics and it will be impossible to stop.
Kanzashi - a technique for creating flower decorations made from materials such as silk, organza, satin
The study of any kind of needlework begins with the basics, since only they help to master it perfectly. One of the most common types of kanzashi, tsumami, is based on only two types of petals: round and sharp, and everything else depends on the imagination and skill of the needlewoman.
DIY basic petals
To make petals, you will need the following materials and tools:
- satin ribbon 5 cm wide;
- ruler or centimeter;
- scissors;
- tweezers;
- colorless glue (for example, Moment Crystal) or a glue gun;
- candle, lighter or matches (it is most convenient to work with a candle).

Learning any kind of needlework starts with the basics
Having prepared everything you need, you can start creating a petal:
- Measure 5 cm from the tape and cut.
- Fold the resulting square diagonally to form a triangle.
- Next, fold both side ends alternately to the middle so that you get a rhombus.
- Then fold the rhombus in half along its back side, again you get a triangle.
- Now you need tweezers. They need to pinch the side of the petal that is crumbling.
- Cut off the edge and burn.
- That's all, the round petal is ready. Having made a few more petals, you can collect them into a flower.
The sharp petal is done a little differently:
- First, cut out a square, measuring a length of 5 cm from the tape.
- Then it folds in half diagonally, turning into a triangle, which also needs to be folded in half.
- You will end up with a smaller triangle that needs to be folded in half again.
- One corner of the resulting figure will be with crumbling edges. It must be clamped with tweezers and singe over the flame of a candle or lighter. The sharp petal is ready.
Having studied the basics of the technique and learned how to make basic petals, you can start making a wide variety of flowers: both simple and complex. At the very beginning, it is best to rely on master classes that describe in detail the entire process of making blanks and assembling.
Gallery: kanzashi (25 photos)


Pleated triangular petal (video)
How to make the easiest kanzashi flower?
After making several basic petals, you can make one, albeit simple, but very beautiful flower.
The manufacturing process can be divided into three stages:
- Collection of petals, carried out both with glue and thread with a needle. Moreover, the second option is preferable, since it provides the most reliable coupling between them.
- The design of the back side of the flower consists in gluing a base to it, suitable for further use. It can be felt or ordinary cardboard, covered with a fabric that matches the color.
- Front side decoration. After collecting a flower, it has an open middle, which does not always look beautiful. You can hide it with the help of various beads or other small details. They can be glued with both hot glue and Moment.

After making several basic petals, you can make one, albeit simple, but very beautiful flower.
After these stages, the flower is completely ready. It can be used as a decoration for a hair band, headband, comb or brooch.
How to make a dahlia using kanzashi with your own hands: step by step instructions
A wide variety of flowers are collected from satin ribbons, including dahlias. Moreover, the petals for them are folded in a slightly different way. Find out exactly how below.
For work, prepare the following materials:
- satin ribbon 2.5 and 1.2 cm wide;
- scissors;
- tweezers;
- glue (moment crystal or hot);
- ruler;
- a candle;
- piece of felt.

A wide variety of flowers are collected from satin ribbons, including dahlias.
Step-by-step instructions for making a flower include:
- Preparation. At this step, blanks for the petals are made from the ribbon. Rectangles 7 cm long are cut from a tape 2.5 cm wide, and rectangles 5 cm wide are cut from the other. From 27 to 30 pieces are required for one flower. large rectangles and 16-20 pcs. small ones.
- Making petals. Take one of the rectangles with the wrong side towards you, mentally divide it into three equal parts. Next, fold the left edge inwards at a 90º angle, with the top of the corner at the third point. Then you need to connect the top and bottom peaks, once again bending the left edge of the tape. In this case, you should pay attention to its ends, they must converge. Next, on the front side of the resulting figure, fold the sides inward. Moreover, we bend the upper part slightly, but the lower one is slightly larger (the side edges should converge in the center). Fix the edge of the petal with tweezers, and use a candle to singe its ends. Do the rest of the flower petals in the same way.
- assembly. Take a piece of felt and cut out a circle with a diameter of 4 cm from it. The petals will be collected on it. And this is how it is done: take one large petal, coat its lower corner from the wrong side, attach it to the felt base and press it lightly. So the first circle is glued. The remaining petals are used for the second circle, and it is desirable to place their tops between the first petals. In the event that after gluing the second circle, you still have petals, glue them to the wrong side of the base. So the first row of the flower will become more magnificent. Now it remains to attach small petals. Their first row is glued to the central large petals, that is, they seem to be nested one inside the other. The rest are evenly distributed inside the central circle of the felt base.
- Decoration. After all the petals of the flower are collected, it remains open in the middle. It can be covered with a bead, carnation or some other small decoration.
That's all, the kanzashi dahlia flower is completely ready.
Master class on the topic: how to make a kanzashi rose
Roses made in kanzashi style are almost as beautiful as real roses. And there are many different ways to make them. In this tutorial, you will learn one of them.
So, for work you will need:
- two colors of satin ribbon 5 cm wide (green for leaves and red, pink or any other for the rose itself);
- glue gun;
- thread with a needle;
- scissors;
- lighter.

Kanzashi needlework is very popular in our country today. The Internet ripples with a variety of articles, the forums discuss the techniques of this needlework, there are many master classes on this topic. We could not “stand on the sidelines” either, so in this article we will get acquainted with an interesting art form called kanzashi. Anyone who has the desire can master the technique of creating simple flowers with their own hands. The main thing is patience and in time everything will work out.
The main thing in the article
Kanzashi set
As in any creative needlework, for kanzashi you need to have a certain set of tools for work. The seasoned kanzashi masters have their own exclusive set. Some specifically buy a set of tools for kanzashi, while others use improvised tools in their work. In any case, to start working in this technique, you must have:
- Tweezers- it can be: surgical, anatomical, sewing, tweezers for eyebrow correction are also suitable.
- Scissors can be of any size, the main thing is that their blades are not short.
- Glue must be transparent. Since not only tapes are glued in kanzashi, but metal and plastic parts too, universal glue is also needed. Those who already work in this technique recommend using Moment-Crystal. If you are planning to seriously engage in kanzashi, then it is better to purchase a hot glue gun, it is much more convenient and practical to use.
- Threads must be durable and in tune with the work being assembled.
- Needle to assemble the work, a thin one is selected: 5-8 cm in length. Just in case, you need to have a few pins on hand.
- Candle. This tool is necessary for firing the edges of the tape. Instead, you can use lighter, gas burner, burner etc.
- Satin ribbons different widths, are the main material for work.
- accessories used as centers for flowers. Here you can use intricate buttons, beautiful beads, small balls.
When using natural fabrics, be careful: they may not melt, but burn.
What jewelry is made using the kanzashi technique?

Kanzashi is the name given to the traditional Japanese ornaments used to decorate geisha hairstyles. They were worn with a kimono.
Decorations consist of fabric flowers. Historically, the traditional Japanese women's attire is forbidden to use necklaces and bracelets. Decorating hairstyles has become the only decoration for Japanese women, which made it possible to express themselves. Hairpins, combs, sticks were decorated with flowers from silk ribbons.
Today, the kanzashi technique is used all over the world, and not only for decorating hair. Kanzashi is used to make original accessories, jewelry and even decorate clothes.
Kanzashi ribbons: how to choose materials
 At first glance, choosing a ribbon for decoration is as easy as shelling pears. Take any you like and work. But no, choosing a tape for kanzashi, you need to pay attention to the density of the material. After all, the thicker the tape, the easier it is to work with it.
If it is not possible to purchase a dense ribbon, take a soft one; at the end of work, be sure to treat the product with hairspray so that the decoration keeps its shape better. You should also pay attention to the fact that rhinestones lose their luster under the influence of varnish.
Look at the tape well: it happens that you come across a skewed tape or a tape with uneven thread tension. Such ribbons should be discarded, because in the end result the decoration will not turn out to be even and beautiful.
Most often, a satin ribbon is chosen for kanzashi, less often rep ribbons are used. Beginner needlewomen should start with classic satin ribbons, while self-confident craftsmen can try ribbons in bolder materials and colors. Pay attention to colors:
- strict stripes and frivolous polka dots are suitable for classic hairpins;
- ribbons with funny inscriptions can be used to create children's accessories;
- floral prints on the ribbons will make the decoration solemnly romantic.
Making flowers from kanzashi ribbons with your own hands

It is not difficult to work using the kanzashi technique, in confirmation we will give an example of making a rose from a satin ribbon.
For work you will need:
- Pink satin ribbon 2.5 cm wide to 1.5 m long.
- Threads for sewing pink or white.
- Candle.
- Needle.
- Glue. You can use a pistol or a regular tube.
Progress:
- For a rose, cut off strips of 6-7 cm from a pink ribbon. There should be 12 of them. On both sides, we singe the strips of tape with a candle.

- We fold the corner of the tape and sew it, as shown in the photo.

- We carry out the same operation with another corner and tighten the thread.

- You should get 12 neat petals.

- We take one petal and make the middle out of it. We wrap it tightly in a tube and fix it with a thread and a needle.

- We wrap the finished petals around the resulting center. The first can be sewn on, and the subsequent ones can be put on glue. The main thing is that each subsequent petal overlaps slightly with the previous one.

To make the rose more lush, you need to use more petals.
The photo below shows a step-by-step work in the manufacture of flowers using the kanzashi technique. 


Kanzashi for beginners: the basics of the art of jewelry making
There is no big secret in making kanzashi, the main thing is to learn how to make petals correctly. There are only two types of them in this technique:
- Round.
- Acute.
It is enough for a beginner to work in this technique to make the petals correctly, and the flowers will fold by themselves. We will give the basics for beginners using the example of a 5x5 satin ribbon square.
Round petal for kanzashi
- The square is folded in half diagonally.

- The corners of the triangle fold into the middle.

- Fastened with a thread with a needle.

- Flip over and fold the corners back to the center.

- We fold the future petal in half so that the corners are inside.

- Trim the bottom of the petal evenly.

- We solder the place where we cut it off and level it.

- From such petals you can easily make a beautiful flower.

Sharp petal for kanzashi.
- As in the first case, we fold a piece of tape in half diagonally.

- Fold this triangle in half again.

- Once again.

- Trim off the bottom part.

- Singe the cut part while it is hot, press with your fingers to solder the parts.

- A cut is made from below and singeed.

- The height of the petal depends on the cut line.

- The petal can be with or without a hole. In the first version, the lower cut is simply singeed. In the second, this section is soldered.

- Such petals without special skills can be assembled into a beautiful flower.

Kanzashi master class: a crown for a girl
All little girls dream of being princesses, and, as you know, every princess should have a crown. Every mother can make a crown or a diadem for a little fashionista with her own hands, it will take a minimum of time and a minimum of costs. And the kanzashi crown will be exclusive, made with love, and will decorate the little princess at any celebration. The video tutorials below will help to cope with the task of making a crown for a girl.
Kanzashi paintings in the interior
The trends of the East touched not only hair ornaments, the kanzashi technique is actively developing in design solutions.
Kanzashi paintings made from satin ribbons are now considered the most popular. Carefully done work is something unique, delicate and very beautiful. The flowers in the kanzashi-style paintings seem to be alive. Such paintings will serve as an excellent frame for any interior, whether it be a bedroom or a kitchen.
In addition to the oriental, they can be used in styles:
- classical;
- baroque;
- kitsch etc.
Such paintings perform not only a decorative function, they optimize the space. The main thing is to choose the right size, shape and color scheme.
In small rooms, narrow, non-voluminous paintings should be hung; for large rooms, it is necessary to choose large paintings in massive frames.
Do-it-yourself St. George ribbon kanzashi: instructions for May 9
Today, the St. George ribbon is a sign of memory about the feat accomplished by our great-grandfathers. Walking down the street with such a ribbon means expressing your respect and solidarity to the soldiers who laid down their lives for the opportunity to give birth to ours. And the St. George ribbon, decorated with kanzashi technique, will become not only a symbol of May 9, but also a stylish accessory. 
For a symbolic accessory, in addition to the above tools for work, you will need:
- St. George ribbon - 0.6-1 m.
- Beads, rhinestones or other accessories.
- Brooch pin or clasp.
- We cut the St. George ribbon into 5 squares of 7 cm.

- From each square we make a sharp petal without a hole (how to do this is described above).

- We cut off a tape 20 cm long, make triangular cuts at the edges, singe them.

- Roll up the tape and glue it.

- Using glue, we collect the made petals into a flower and decorate on top with the accessories that you have.


We fix the decoration with a pin on the clothes.
Kanzashi photo: examples of completed kanzashi
kanzashi flowers 


Rubber bands and kanzashi hairpins 


Hoops in kanzashi technique 


kanzashi paintings 


Other kanzashi accessories 


Kanzashi video master class
Try, and by all means you will succeed, albeit not the first time. Kanzashi is a fun process of creating beautiful new jewelry. Do not stop, bring something of your own and good luck in all your endeavors.
Hello friends!
For a long time, my hobby was also a source of income for me, almost all of my jewelry found their owners.
Unfortunately, I did not manage to photograph all my works, but despite this, a large baggage of photographs has accumulated, which I will share today.
I would like to say right away that over the years of work, the quality of photographs has also constantly changed, so please do not be surprised by different photographs)
Perhaps I'll start with one of my very first works, I photographed it on 11.03. 2012 already more than 6 years ago it turns out.
Initially, I planned to make jewelry only for myself and my daughter, but unexpectedly for me, orders immediately poured in. Although I didn’t have any experience and skill at that time, I now look at my first works with a smirk, because they were crooked and oblique and did not last long. However, thanks to commissions, my experience and enthusiasm began to grow, and as a result, I began to make jewelry for sale, and they sold like hot cakes.
Of course, the first photos, like the first works, left much to be desired, but gradually the quality grew with experience, but I want to say that the growth has not stopped yet and I am constantly trying to improve my knowledge and skills, only now I am developing not in one narrow direction, but in different ones.
And this is already a relatively new work, although it is also about 2 years old, but compared to the first one there is a significant difference in everything.

Such a flower is easy enough to make again when there is experience, but beginners can do it too, the only thing is it will take more time.
How to do:
For such a lush flower, you will need a ribbon 0.9 cm wide, I can’t say for sure I didn’t calculate the footage.
Just cut a lot, a lot of segments of 4.5 cm.

Approximate quantity is more than 100 pieces. I didn’t count the exact number either, because I did it until the moment when there were no large gaps left and it would be similar in the arrangement of the petals to a real flower. But it doesn't work the same here.
The size of the flower and the number of petals will also depend on the diameter of the base on which the petals will be glued.
For the base, I usually take a circle of felt, the diameter, as I said, can be different. I have a diameter of 2.5 cm.
To make a petal, the tape is bent in half and the angle is cut at an angle.

Then the corner is sealed with fire.

The lower edges of the tape are bent and singeed.

And the finished petal, or rather the petals, are glued with glue the “crystal” moment to the felt base in a circle. The first circle of petals is glued onto the base 3-4 mm, then the subsequent circles of petals are superimposed, as it were, in a checkerboard pattern, layer by layer, to the very end.

Such chic flowers are obtained from these petals.

back side

A similar flower idea with only rounded petals.

And you can also do it with a contrasting center or with a smooth transition to another color, in general, you have an idea for experimentation.
By the same principle, you can make petals from a tape 2.5 cm wide.

Such flowers are also very similar in terms of the assembly principle, only the tips of the petals here are not soldered together, but are scorched by fire and twisted a little with your fingers.

I used to make the same flowers from a 5 cm wide ribbon.

Although the principle of creation is similar for everyone, the flowers still turn out to be all different.

And so the flower looks on the hair


Lush flower with sharp petals.

And these petals are probably the simplest, a piece of tape simply folds in half, the length of the piece can be different depending on what size and splendor the flower is needed. The width of the tape is 0.5 cm. The length is from 6 to 10 cm, but it can be more or less. Mine was 9 cm.

Kanzashi from a ribbon 2.5 cm wide.
How to make simple ribbon flowers.
Another very easy way to make flowers is with 2.5 cm wide ribbon.
This method is a great option for beginners, I showed it to my daughter, she is sitting now and making such flowers)
How to do:
For one petal you will need a square of tape 2.5 * 2.5 cm.

For a flower in 2 layers, you need 10 petals.

The petal folds in half

And the corners are cut off

lighter burns everything evenly

Petals are collected on a thread of 5 pieces.


The thread is pulled together and closed into a ring.

One layer sticks to another

The middle is decorated as desired, I made this one for a set with Mickey's bows.

The flower was attached to the hairpin with a piece of tape smeared with Moment Crystal glue.


Also from such simple petals you can make such beautiful poppies.


Or rosehip flowers

Or snowdrops

Simple and multi-layered kanzashi.
Kanzashi with sharp, round and other types of petals.
Now let's move on to the part that, in my opinion, is a little more difficult to manufacture. Even the simplest single petals must be made very carefully, they must be the same, and this requires a certain skill.
If in lush flowers it is allowed that the petals are not perfectly even, but somewhere even with a different bend, then here you need to try so that all the petals are one to one. And this, unfortunately, does not always work.
Detailed master class
I have already described, I will not repeat, see the previous article.
And here are some ideas for inspiration


From sharp petals you can make not only flowers, but also such funny butterflies
Round kanzashi petals master class
How to do:
To make such a petal, you need a square of tape.
You can make both large and small petals.
I have a square 5 * 5 cm, but you can also 4 * 4 or 2.5 * 2.5.
It all depends on the idea of what you want to do.
I often combine both large and small petals in one flower, and also combine with other types of petals.
Below you can see it in the finished works.
In the meantime, back to the round petal.

I usually always singe the edges of the tape to make it easier to work with the tape. Then I fold the square into a triangle.

The next step is to bend 2 corners on both sides to the bottom third.

Then the edge of the corners is cut off and soldered with fire.

From the bottom, the excess is also cut off and soldered.

We slightly straighten the middle with our fingers and all our petal is ready.

Such interesting flowers are obtained using round petals and not only ...


Kanzashi fan petals step by step
Another type of petals I call fan, perhaps it has a different name. My performance technique is different from what I have seen on the Internet now. It’s just that when I started doing this, there were few master classes and I didn’t find such a petal, so I learned to do it myself, mainly from photos of finished works.
So now I am sharing my way.
how to do:
For such a petal, a square is also needed. I have 5*5 cm.
I burn the edges with a lighter.

Fold into a triangle

Then one corner is bent and thus the first fold is laid

We bend the resulting fold back and fold it forward again, so the second and subsequent folds are laid.
In general, you should get 4 folds.

The ends are cut and scorched.


But most often I make decorations by combining different types of petals together.


And finally, a couple of ideas for bombing bows, they look just fire in hairstyles !!!


When I started writing this article, I thought all my work and all my ideas would fit in one article, but I was wrong!
I did a titanic job to put it all together, but there is still a lot of work left that, as it turned out, could not be placed in one article.
But on the other hand, this is an occasion to write a new one and probably not even one.
For example, I plan to write an article about beautiful ribbon roses using different techniques.
Don't forget to bookmark the article so you can come back to ideas again.
And that's all I have for now!
Join our group in contact, so as not to miss new master classes