DIY toilet paper vases. Vase from a plastic bottle. How to make a vase from a plastic bottle
Unusual glass bottles of wine often remain at home, which are a pity to throw away, but there is no use for them, and there are always a large number of plastic bottles of soda water of different colors.
Instead of getting rid of them, you can turn them not only into a practical thing - a vessel for flowers, but also create an element of interior decoration.

For those who like to make beautiful unique things with their own hands and who know how to do it from improvised material - a few ideas on how to make a vase from an ordinary bottle.

Glass bottles for handmade vases
Making a vase from a glass bottle is quite simple, you just need to know a few tricks, and then there is scope for imagination and creativity.

The first step is to make the basis for the future vase - the bottle should be cut off the throat, then it will be possible to put not one flower, but a whole bouquet in the vase.


You can do this without tools - you need to take a thick woolen thread 50 cm long, a lighter or matches, a wide vessel with water - so that a bottle can freely fit there, any combustible liquid used in everyday life - acetone, gasoline, alcohol, a bar for sharpening sharp objects or skin.

For safety reasons, you will need goggles and household gloves.

Operating procedure:
- draw a line on the neck of the bottle where the cutting will be done;
- soak the thread in a flammable liquid;
- wrap it around the neck along the intended line in three turns;
- set the future vase on a horizontal surface, set the thread on fire;
- as soon as the thread burns out, place the bottle in ice water - from the temperature drop, the bottle will burst clearly at the place of heating.

Now it remains to sand the chips with sandpaper and start creativity - the process of decorating a vase.

Decoupage technique
The bottom line is to glue the surface with images on paper and fix them with varnish. Usually paper napkins with different patterns are used. It is done like this:

- degrease the glass with a solvent;
- cover the surface with a primer or acrylic paint - they can be white or the color of a napkin, which will be used for decoupage;
- after the paint has dried, grease the places for decoupage with PVA glue;
- attach a pattern cut out of a napkin to the areas smeared with glue;
- with a wide brush or sponge, smooth the napkin from the center to the edges;
- paint the edges of the napkin with paint so that everything looks neat;
- finish the details, decorate with rhinestones or beads;
- finish decorating the surface by covering everything with two or three layers of colorless transparent varnish.

Dot painting decoration
For this technique you will need - acrylic paint of different colors, a felt-tip pen with a thin rod, a special contour on glass - silver or gold, cotton buds, art brushes.

You can choose a drawing to your liking - a tree branch, a flower, patterns. You can draw a cartoon character, a firebird, depict a rural landscape - a house and a river.

The drawing is applied like this:
- degrease the surface;
- draw a sketch of the image;
- transfer it from paper to a bottle with a felt-tip pen and circle the lines with a contour for working on glass;
- let the image dry, remove the remaining traces of the felt-tip pen with a cotton swab;
- fill the image space with a brush with dots of a suitable color and different sizes.

For example, if this is a peacock, then the coloring process will look like this: you need to start filling the contour spaces with paint dots from the body of the bird.

Then color her wings and tail feathers, leaving their center unpainted.

Glue a glass shiny or mother-of-pearl ball in the center of each tail feather, you can lay it out with sequins and beads.

Ribbon decoration
A satin or mother-of-pearl vase is very beautiful, decoration is carried out with appropriate ribbons. It is done like this:

- apply PVA glue on the surface of the bottle with a mesh in thin lines or dots;
- tightly wrap the bottle with ribbons completely, leaving no gaps on the surface.

Ribbons can be taken in different widths, you can with a pattern - both a plain mother-of-pearl vase and with an ornament will look beautiful. In the same way, you can wrap the bottle with thick threads, twine.

With this technique, you can make unique vases with a textile surface.
You can wrap the bottle with ribbons obliquely, horizontally or in a pigtail - all this will create a unique pattern thanks to the light that will play on the satin fabric.


You can decorate a textile vase with beads and bows.

Vases from plastic bottles
You need regular soda bottles. Basic master class:

- on a transparent colorless bottle, apply a top line and a contour where the “lace” will begin;
- cut off at the intended neck;
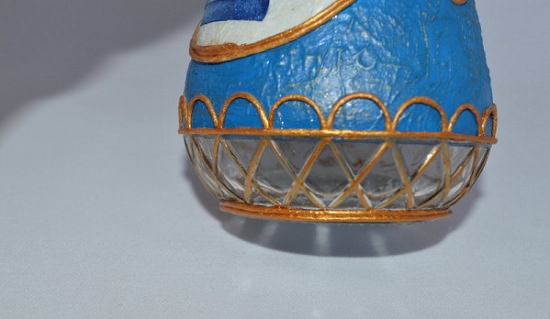
- vertically cut the walls of the bottle into strips down to the contour of the beginning of the "lace";
- bend the strips out;
- bend each strip to the middle of the length and turn it sideways in a plane so that it intersects with the two that are nearby, and reaches the next with the end - this must be done with each strip, the neck of the vase will turn out to be lace.

To make the vase colorful, insert a colored paper sheet or a napkin with an ornament inside.

openwork vase
Required - a plastic bottle, a felt-tip pen, an ordinary nail and a can of paint (you can use a regular stained glass). Then proceed as follows:

- cut off the throat, mark with dots a pattern with a marker, which can consist not only of holes, but also of dashes - not to the very bottom, so that water can be poured into the vase;
- heat the nail and pierce the bottle according to the applied pattern;
Paint the workpiece with spray paint or stained glass.


floor vase
An unusual floor vase about a meter high will come out of plastic milk bottles and a glass jar. You will need - 14 bottles, a 3-liter jar, paper napkins, toilet paper, glue and adhesive tape.

Manufacturing process:
- Glue 12 bottles with the bottoms in pairs with adhesive tape, 2 - fasten them with their own necks;
- install bottles fastened with necks in the center, surround with the remaining six pairs and glue everything with tape;
- install the jar on the structure and tape it with tape.

Then arrange the papier-mâché frame - paste over the structure with paper:
- the first layer - with napkins and solid PVA glue;
- the second - toilet paper with it, but diluted with water in a ratio of 1: 1;
- dry the product, if irregularities are obtained, fill them with napkins;
- apply a pattern with a glue gun, you can glue flowers, butterflies, any decor, or use a stencil, sponge and putty to apply a three-dimensional pattern;
- allow the structure to dry for an hour or two;
- sand the patterns with sandpaper;
- paint the product from a spray can.

small vase
To make it, you will need a 0.5 liter bottle, scissors, a knife, glue or tape.

Cut off the throat from the bottle, cut the upper part into strips, bend them outward downwards and fix them to the base of the bottle with glue or tape. Paint the vase, decorate with beads, sequins or beads.

You can also decorate such vases by gluing pasta of an interesting shape, semolina, coarse salt, shells, small pebbles.

You can paste over the bottle with narrow electrical tape with intricate patterns and paint it with a spray gun, then remove the electrical tape - you get a fancy ornament of perfectly even lines. Making vases from bottles can be interesting and useful to spend leisure time with children.

Photo of a vase from a bottle


Now everything original is in fashion, including vases. If you do not want to receive a stamped item from mass production, you should contact the craftsmen who will accept your order and take into account all your wishes. If there is no suitable artist or you don’t want to spend money, try making a vase with your own hands. To do this, it is not necessary to go to master classes or circles - just read the step-by-step instructions and have a mindset for success.
Peculiarities
A vase made from a plastic bottle has a lot of advantages.
- Availability. All kinds of bottles remain after food and household liquids, which are constantly running out. And if suddenly you need to urgently put flowers, you can take any of the available ones or pour the leftovers into another container.
- Low cost. The cost of such a product mainly depends on how you decorate it. To create the simplest uncoated option, you only need time. More complex options will help out if there is a need to decorate a room temporarily, for example, when moving to a summer house, a rented apartment, etc.
- An opportunity to showcase your talents. Even the creation of a small vase requires patience and some labor skills. In addition, in the process of creativity, completely unusual abilities can appear. In any case, a hand-made thing is a reason for pride.
- Ease of processing. Plastic is easier to work with than harder and thicker materials. A simple craft can be done even by a child. Naturally, care must be taken with cutting tools.
- Environmental friendliness. By recycling materials, you help reduce landfills.


Among the shortcomings, many note that home-made items look too simple and rude. Yes, if you just fill the bottle with water, it will look primitive. It all depends on your desire and skill. Even if something does not work out, there is an opportunity to do better next time by turning a random craft into a hobby.
What materials will be needed?
The most affordable are plastic bottles. They are usually made from two types of plastics.
- PET- they sell drinks, sauces, oil. As a rule, the walls of such containers are quite thin, easily crushed. The contents can easily outweigh them, so they are more suitable for dried compositions, pencils and other small things.
- HD-PE- polyethylene of higher strength, therefore, dairy products, shampoos and other cosmetics, household chemicals are poured into it. Such a container will be more stable. You can safely pour water into it and put flowers.
Almost any type of plastic that we can find in a grocery store cannot be reused for food due to the harmful substances released. In everyday life, they can be used under certain conditions: they can not be heated and exposed to direct sunlight. If you want to make sure the material is safe - pay attention to the markings on the bottom.

Before choosing a blank for a future vase, you need to understand how you will use it. Depending on this, it can be:
- high or low;
- round, square or oval;
- smooth or threaded;
- with straight or curved walls;
- transparent or colored.

Think about where it will be placed. Floor models are larger, while the vase on the dining table should be as low as possible. After you decide - rinse the bottle thoroughly, remove the label and the adhesive layer under it, dry well.
How to do?
In fact, before choosing one of the options, stocking up on materials and tools, you need to soberly assess your own strengths. This does not mean that if you have never done anything with your own hands or have already had a bad experience, you should not start. No and no again! In this case, you need to start with the model that does not require much effort and time, so that there is no temptation to give up everything halfway. Start simple and move on to more complex ones, then you will be proud not only of the result, but also of the knowledge, experience, and skills gained in the process of creation.


painted vase
For its manufacture several steps must be followed sequentially.
- Measure the required height. Use a knife to remove the top.
- Sand down any unevenness on top with fine sandpaper. For reliability, glue the top edge with tape or colored adhesive tape.
- You can start coloring. To do this, take care that the paint does not get on the environment, hands or clothing. Give preference to aerosols: they are applied more evenly than with a brush. If the bottle is very smooth, apply a primer first, wait for it to dry, and proceed with painting.
- If patterns or drawings are supposed to be on the vase, wait until it dries completely.


Despite the apparent simplicity, here it is important to take into account several nuances.
- To ensure that the paint lays evenly and does not peel off ahead of time, thoroughly clean and dry the prepared dishes.
- White or transparent bottles are ideal for coloring. The brighter their color, the more layers of paint may be needed. In addition, the layers of paint affect the intensity of the color.
- For stability, any material can be placed on the bottom that, when solidified, will not dissolve with water, as well as pebbles, decorative balls, etc.

On a stand
In this case, both the top and bottom are used.
- Separate the lower part up to five centimeters high.
- Cut a hole in the bottom equal to the diameter of the bottle neck. Remove the bumps.
- Insert the neck (without cap) into the hole. Thus, you will get a kind of flowerpot on a leg with a stand.


For stability, instead of a support, you can take a piece of plastic or wood and give it any shape. The width of such a stand should not be less than the diameter of the bottle. It is also possible to increase the leg height with a suitable tube. You can connect the components with glue.
wall
With it, you can revive the wall, turning the room into a blooming garden. Ropes can be used for this.
- Cut off the top of the workpiece.
- Make two or four marks 1 cm from the edge opposite each other.
- Heat a nail, awl or screwdriver on fire and pierce in the marked places.
- Now it remains to thread the ropes or laces and hang on the wall. Tie knots at the ends to keep them from falling out.


You can do without laces. For example, a nail in the wall can be threaded directly into the hole itself, then it will not be visible.
For this placement method, it is more convenient to use square or oval bottles. Depending on the decor method, holes are made before or after. Also, the necessary parts of the bottles can be glued to a wooden base and already attached to the wall.
Openwork or carved
Sometimes, in order to radically change the look, you can draw only the edge. Even a student can cope with this task. In fact, the top line can be not only even - depending on your imagination, it can easily become asymmetrical, wavy or jagged. To make it look beautiful and not have to redo or trim anything, mark up in advance and cut along it. To do this, you can use both scissors and a clerical knife.


In this case, a fringe can become a more complicated design method, and it can be bent both inward and outward. This can be done with all the elements, or you can do it through one, or lay them on top of each other in the form of weaving.

If only dry compositions will stand in the vase, then all kinds of cuts and holes can be made along its entire length. They can be repeated, forming a lace pattern. For their implementation, the pattern can be applied directly to the plastic. Also, the drawing can be printed on paper, fixed in several places and cut through it. This will significantly reduce the time, but you must constantly monitor that it does not move.
To create patterns, you can use knives, a soldering iron, or heated metal tools with appropriate tips. The choice of tools depends on your level of skill and dexterity.


The above options, of course, are not the only ones, but they can be taken as a basis, change the technology and get completely new ones. For example, on top of a plain layer, you can walk with a sponge or brush with paint in a contrasting color. The resulting effect looks voluminous and bright.

To hide the polyethylene base, it can be pasted over with threads, fabric, lace, ribbons, rhinestones or any other decorative material at hand. One of the most popular techniques is also decoupage. It is important that the decor matches each other. In order not to overdo it - use no more than two materials, colors or textures. And then your vase will become a worthy exhibit of your apartment.
Magical transformations of an ordinary bottle. Master class with step by step photos.
Description: the master class is intended for all, without exception, creative people who are fond of making crafts for the home with their own hands from waste material, which in fact are used glass bottles. I offer several ways to decorate bottles, as a result of which they turn into original vases that can be used to decorate the interior, as a gift, or an exhibition copy. Teachers of kindergartens and schools can use the master class in working with children to organize circle or extracurricular activities.
Target: making a vase from a glass bottle using various techniques.
Tasks:
* develop the ability to see the unusual in the ordinary;
* introduce various ways of decorating a bottle: decoupage, stained glass painting, paper art;
* develop creativity.
Nowadays, the problem of environmental pollution with human waste is very acute. This is all kinds of garbage, lying not only near garbage containers, but also in our yards, parks, in nature. Wherever a person appears, he often leaves behind a garbage dump. In the spring of 2016, the children of my group and I often observed this picture and did what we could, clearing the groves near the kindergarten, the area around the spring and other beautiful places in our village.
In addition to these activities, the guys and I make beautiful vases from used glass bottles. As a result, there is less garbage on our streets. The guys are thinking about the fact that it is possible, it turns out, to give a second life to objects that are usually thrown away. They bring these things to kindergarten, where we subsequently make beautiful crafts from them.
Today I want to offer various options for decorating a glass bottle. This is a very interesting and exciting activity. Since the bottles are very beautiful and original in shape, I always felt sorry for throwing them away. Why, if you can turn them into beautiful vases?
Note: before decorating the bottle, it must be cleaned of stickers and traces of dirt. Soak in water, remove stickers. We wipe the bottle with alcohol or acetone. Traces of glue are easily removed with a solvent or acetone. We put it on a rag and wipe the bottle. Naturally. We do this part of the work ourselves, without the participation of children. Be careful when using chemicals.

Having got acquainted with the decoupage technique and decided to master it, the first thing I did was decoupage bottles. These were my first crafts in this technique. With children, we also first mastered decoupage, making vases from bottles and cans. On March 8 this year, we gave such vases to mothers and grandmothers.
We will need:
* glass bottle of interesting shape;
* white acrylic paint and varnish;
* napkin with a pattern;
* sponge or sponge for coloring;
* flat brush No. 12 (bristle);
* scissors;
* PVA glue.

Today I have a very original bottle, asymmetrical in shape, with a relief pattern on one side.

Let's play with her form. There is a minimum of work here, since I will not do the background, I will leave the white color. Therefore, we paint only one side, where there is a picture and letters. We paint over with white acrylic paint using a sponge or a special sponge. I make them myself (glue a piece of sponge to a long stick from an old brush with any glue at hand. The sponge is ready. It allows you not to get your hands dirty with paint, as happens when using a regular sponge).

We choose a napkin with a pattern. I have a three-layer with roses.

Cut out three roses very close to the drawing, being careful not to leave paper around the edges. Since there will be no background, with a carelessly cut out pattern, the edge of the napkin on the vase will be visible.

Remove two extra layers. We leave the top with a picture, and we will stick it.

We will stick the picture on the front face of the bottle. Coat it with PVA glue. We dilute thick glue in a ratio of 1 to 1 for more convenient work.

We place the cut roses on the area smeared with glue.

We smear with a wet flat brush on top, pressing and smoothing the pattern. (I also use my fingers for this purpose. With my index finger dipped in glue, I smooth out the wrinkles and better feel the material). Thus, we glue all three roses, placing them as we wish and creating a beautiful composition.

Result:

After drying, we cover only the area with glued roses with acrylic varnish (2-3 layers with intermediate drying). The rest of the surface of the bottle, in this case, do not touch.
Different angles:


This is how it looks in the interior with flowers.


I offer various options for vases made by me at different times.

We use it in our group.

Winter version with a bouquet of artificial flowers.

This vase is already four years old and has not deteriorated at all, although we use it regularly.


And another one like this:


This composition decorates the shelf in my house. It looks, in my opinion, very harmonious.

Several vases for children:


Of course, this is not all of our vases, but I think the essence is clear. Everything depends on you. Imagine, create and everything will turn out!
Beginner Tips:
1. When decoupage always primed with white acrylic paint. Since the pattern from the napkin is translucent and very thin, it simply will not be visible without first painting it with white.
2. When working, one, two and three-layer napkins are used. Don't forget to remove the extra layers. Otherwise, your work will look rough and not quite aesthetically pleasing. You can use absolutely any napkins, sometimes the cheapest ones look great. But some are still not suitable for decoupage: they immediately blur and tear when soaked. We simply do not use them and do not offer them to children.
3. After completing each step, dry the product. Only then can you proceed to the next manufacturing operation. You can use a regular hair dryer to speed up the process. But it is better to wait for the varnish to dry naturally.
4. After gluing the napkin pattern, the fun begins: decorating the craft. You can draw and draw details, apply a background of a different color. The background will unite the disparate details of the picture into one whole and make the work perfect.
5. We apply acrylic varnish in two or three layers. If desired, you can use more durable varnishes, but first make sure that they do not change the color of your craft. Some varnishes are yellowish and may ruin your product.
6. Most importantly: there is nothing to be afraid of. If you don’t like the result of the work, wash it off, delete it and start all over again. The craft is tired - paint over with white paint and decorate again. I do this very often.
Option number 2. Stained glass painting of the bottle.
Recently discovered this technique. While I master it myself and involve children in this business. Today I offer three vases in this technique.
Vase with butterflies.

Materials:
* beautiful colored glass bottle;
* bronze color marker;
* stained glass paints;
* patterns with the image of butterflies;
* scissors;
* braid for decoration;

To make such a vase, you will need patterns with the image of butterflies. For example, these are:

Print and cut out.

We put the butterfly on the bottle and trace around the contour with a bronze-colored marker.


We redraw the drawing of the wings.

We select stained glass paints. When applying stained glass painting, I encountered the fact that it is not always possible to predict how the paints will look after drying. They change color. It also depends on the color of the bottle itself. Therefore, if you do not like the result, we wait for it to dry and carefully remove the fragment of the pattern that we did not like.
So, it is better to put the bottle on the table, placing a cloth on it so that it does not roll. Carefully apply the selected color of the stained glass window, without going over the drawn contour.


This is what it looks like after drying.

I used stained glass paint with glitter. I like the result. It is better to wait for the pattern to dry on one side, then move on. Draw stained glass small butterflies on the other side of the vase.

Dried up.

I propose to decorate the neck of the bottle with a beautiful braid, which in color echoes the painting.

Let's take a closer look at some vase angles.


This is what it looks like in the interior. It's beautiful even. If desired, you can put flowers in a vase.


Vase with flowers

Materials:
* beautiful bottle of green glass lemonade;
* white marker;
* stained glass paints;
* silver braid for decorating the neck of the bottle;
* universal polymer adhesive.

We randomly draw flowers on the surface of the future vase with a white marker. We just fantasize or find the drawing we like and redraw it.

I fantasized the simplest drawing.


We begin to apply stained glass paints. First, on one side of the vase, then, after the pattern has dried, on the other. Otherwise, if you immediately apply paint to the entire bottle at once, it can be smeared or the paint will flow. Will have to start all over again. Therefore, armed with patience, we do everything slowly.


For flowers I use a pink stained-glass window with glitter, for green leaves. Result:

On the other side are flowers with a blue sheen.


We glue the neck with a silvery decorative braid. We glue on universal polymer glue.


In the interior:

Vase "Summer mood"

I will not describe the manufacturing process in detail. It is similar to the one described above. I'll point out the differences. This vase combines stained glass painting with acrylic paints on the background. Transparent lemonade bottle. A drawing was applied to it with a white marker: butterflies, dragonfly, chamomile, berries. Stained glass drawing. The blue background is made with acrylic paint, the grass is drawn in green. Lacquered areas painted over with acrylic paints. A decorative band is attached to the neck.


Option number 3. Vase in paper art technique.

Paper art translated from English paper art. For decoration, napkins, toilet paper and PVA glue are used, with the help of which an interesting texture of the product is created.
Materials:
* glass bottle of kefir;
* PVA glue;
* toilet paper;
* white acrylic paint varnish;
* bronze and purple gouache;
* Polish for hair;
* brushes for coloring;
* stained glass shine;
* decorative braid of gold color;
* pebbles for decor;
* universal polymer adhesive.


We apply PVA glue to the bottle.

We tear off pieces of toilet paper and paste them over the entire surface of the bottle, making folds.

Decoupage of bottles in different versions (photo)
Now, most needlewomen are fond of decoupage, namely, they decorate various items with paper appliqué. And, to be more precise, the decorations are made from special decoupage napkins, which are sold in a wide range on the shelves of specialized stores designed for needlework. Decoupage technique is done on many things made of wood, metal and plastic. But, the most popular is decoupage on glass, or rather decoupage of bottles.
Every housewife will always have an empty glass container, for example, jars for bulk products, intended for throwing into the trash, from the prescription of use. Do not rush to do it yourself. You can try to remake a completely unnecessary little thing into an interesting vase, which, in the future, will decorate your interior, for example, in a marine style. Especially when author's ideas are much more valued than factory decoupage on glass. 


Not only used alcohol bottles are subject to decoration, but also other glass objects that have lost their appearance. Decoupage of a vase will be very relevant.
Bottle for Women's Day
If you don’t know how to make decoupage on glass on a champagne bottle for March 8th, then the presented master class and instructions tell you how to decorate and create decoupage bottles with your own hands.
Prepare a bottle of champagne by washing off all the labels. Then, degrease it with alcohol or window cleaner. Now, you should paint the bottle with acrylic light paint, in several layers, as shown in the photo. 

Select
, from which you can make a figure eight for the holiday of the eighth of March. Cut out the circles and make them in pairs. 

Take acrylic-based paints, mix them to get a delicate shade of salad color. Thus, we will make a non-traditional bottle background. Apply this paint with a washcloth to the entire surface of the product. The bottle will turn out a beautiful spring shade, as shown in the photo. 


Now we do the usual decoupage for beginners. Attach the cut out circles from the napkin to the bottle and anoint them with decoupage glue. After the glue dries, we can assume that the master class is over, but that's not all. It is necessary to decorate the ornament with an acrylic outline or glitter, circling them around the picture, as shown in the photo. 


In the center of the bottle, make an inscription by the eighth of March, it will come in handy. When the green glitter dries, it will shimmer beautifully. Cover all the work done with acrylic varnish, which will give an incredible shine. Now, a festive bottle of champagne is ready to decorate the table on the eighth of March. On the video you can see how the vase is decoupage. 


Video: Decoupage glass vase
Decorate the bottle with egg shells
The technique of decoupage of bottles trimmed with eggshells can be safely presented to your friends or relatives. Since, such work looks original and beautiful, acquiring a three-dimensional look. For work you need the following accessories:
- wine container;
- alcohol;
- eggshell;
- napkin, decoupage glue and brush;
- priming.
Rinse the bottle well under running warm water so that the labels can be easily removed by hand. Then, the entire surface is degreased with alcohol or washing liquid. 

For primer, acrylic paint is perfect. Apply it to the bottle using a dish sponge. Leave the product for a short amount of time to dry, as shown in the photo. 


To make the layer look more even, apply another tier of paint, as shown in the photo. Using a sponge will help get rid of streaks. This time, it will take about 30 minutes to dry. 

And at this time, it is necessary to continue the eggshell master class and start cutting out pictures from napkins in the decoupage style. Put the pictures on a stationery file and blot them with water. With meticulous movements, place it on the main part of the bottle. The following manipulations take place in the same way as for beginners, using glue and brushes. The blank remains to dry for one day. 


Decoupage with eggshells begins with the manufacture of the base material. Rinse the shell under water and dry. Lubricate the entire plane of the bottle with glue and lay out the shell in the form of a mosaic with tweezers. The eggshell ornament will be made on two sides, and in fact, the upper and lower parts of the bottle. After a break of 20 minutes, apply the background paint. This decoupage takes on a voluminous look. 


The last step is to paint the resulting eggshell areas with a darker shade and open with varnish. Now, decoupage on glass, completely handmade. How to make reverse decoupage on glass, in an interesting style, you can see on the video. 


Video: Making a reverse decoupage bottle
wedding bottle of champagne
Wedding attributes are always given special attention. This applies even to wedding glasses and champagne. Decoupage bottles of champagne for a wedding, you can do it yourself. The example that presented the step-by-step photo master class is great for beginners, using a postcard or picture. Prepare the following materials:
- champagne;
- pictures or postcards;
- acrylic based varnish;
- acrylic paint;
- washcloth.
Remove all labels from the glass bottle by soaking it in water. Then, degrease the surface with alcohol. Paint the product with primer. The master class involves the use of postcards. Cover it with acrylic varnish and dry. Now, peel off the top tier of paper and cut out a suitable motif. 


The bottle is smeared with glue, and the selected pictures are applied on top. Gently smooth the drawing to avoid bubbles and wrinkles.
It is necessary to dilute the paint, which, in your opinion, matches the color of the bottle. Draw a darker outline with the brush. Dip the foam washcloth into a light tone of paint and create a haze by smoothing the edges of the image. 


Now, it remains only to paint the veins in silver using an old brush and draw the details. The final touch is varnishing the entire surface of the champagne. Decoupage of a bottle of champagne for a wedding, successfully done. This craft will perfectly decorate wedding tables. A master class on how to decoupage bottles with a cloth, watch the video below. 

Video: Cloth bottle decor
Bottle decoration with tights
In order to implement such an interesting and voluminous master class, and create glass decoupage with pantyhose, you will need the following list of materials: a bottle, craquelure, alcohol, pantyhose, PVA glue, acrylic varnish and napkins, as well as
, washcloth and acrylic paint.
Take the bottle and degrease it using alcohol. Take nylon tights and dip them completely in the glue solution. Then, stretch them over the item to be decorated and form folds. Napkins are also impregnated with glue, you need to make flowers out of them. Drying time is one or two days. 

After that, the product is covered with black paint based on acrylic. Let dry for a while. Choose the picture motif you like and apply it to the bottle, covering it with several layers of glue. Don't forget to take breaks between layers. 
Wait for it to dry, and boldly apply golden acrylic paint with a washcloth, painting over black. Next, the craquelure is applied with a synthetic brush, and after four hours, the second layer is being adjusted. When another two hours pass, and you will see how the craquelure turns into cracks. Using a bituminous patina, we make the effect of aging crafts by overwriting cracks. The final touch that appears after using the craquelure is the application of acrylic varnish to secure the creative work. 

Toilet paper decoupage
Decoupage on glass with toilet paper begins with the preparation of accessories:
- bottle or jar for bulk products;
- toilet paper;
- acrylic based paints;
- napkins;
- glossy varnish;
- scissors;
- brush, PVA glue and washcloth.
Prepare a bottle, and if you want, you can use several cans, after wiping it with alcohol. Cut out suitable miniatures from the napkin. Small squares are cut out of toilet paper. To apply glue to paper, you need a thin brush. Now, evenly attach the cutouts to the bottle, as shown in the photo. We leave it to dry. 


Toilet paper is very thin, so we paint it with white acrylic paint. Large pictures are glued in the central part of the bottle, and small ones on the cap. 

After everything is dry, paint the entire light part of the bottle with blue acrylic paint. The next step is painting with a golden color, applying it to a washcloth. 

Twist from a napkin, thin bundles and paint them in gold. When they dry, you need to make an ornament out of them and stick them on the bottle. After that, the entire surface is varnished. Decoupage of a glass bottle, safely made with your own hands, toilet paper. 

Craquelure in decoupage bottles
The next master class for beginners will teach you how to use craquelure when working on crafts. We wash all the tags from the bottle and degrease it with alcohol or nail polish remover. We prime the container with white. 


Now, you need toilet paper, with which we will decorate the bottle. Wet the paper in glue and attach it to the bottle, making small folds. This procedure must be done very quickly. After that, the craft will take on a three-dimensional look. Tear out a suitable motif from a decoupage card and glue it on PVA glue. The photo shows the result. Leave the bottle to dry for about 6 hours. 


Take acrylic paint of the same color as shown in the photo. Apply it on the surface, but not on the whole, but in parts to make the craquelure more spectacular. Apply craquelure and wait for about two hours. Then, cover the product with light acrylic paint. Paint over those metas where the toilet paper lies, also in white. 


After drying, the bottle is covered with a finishing varnish, as shown in the photo. The voluminous master class on this is over. If you want to learn how to reverse decoupage on glass or decoupage bottles with napkins, we suggest watching a video that shows how to work on a nautical-style bottle. 

As you can see, the instructions and the master class for decoupage of bottles, as well as jars for bulk products, are simple and interesting. It will be clear even for beginners. The variety of master classes and even voluminous ones will let your imagination fly.
Glass and plastic bottles come in a wide variety of shapes and sizes, making them an excellent material for making vases. Today Dekorin invites you to learn how to make vases from bottles with your own hands using improvised means. 29 photos with step by step instructions are waiting for you!
DIY plastic bottle vase
Plastic bottles are very flexible. They are easy to cut with scissors or a clerical knife, so that a vase from a plastic bottle can have absolutely any shape. Here are just a few of the ways you can do it yourself:
- Cut beautiful patterns on the surface;
- Wrap with strips of fabric, ribbons, cords;
- Paint with spray or regular paint;
- Decorate with branches, coffee beans and other natural materials.
You will find ideas and step-by-step instructions for this in the photo below:

Crafts on the table: plastic vases from bottles
Also read:


Do-it-yourself floor vase from plastic bottles

 Also read:
How to make a glass bottle vase
Ways to decorate glass bottles for wine, beer and other drinks are no less diverse. Despite the fact that their shape is much more difficult to change (the maximum is to cut off the neck), do-it-yourself vases from glass bottles turn out to be much more elegant and interesting. Vases from tall and narrow glass bottles are often used in "sets", placing 1-3 flowers in each of them.

At the same time, home-made vases from cognac and other low bottles can be decorated with beads, shells and act as an independent decorative element.


Unlike plastic containers, a glass bottle vase is usually painted on the inside. The paint is simply poured into bottles, where it spreads freely along the walls. Thanks to this, the vases not only get a new color, but also retain the glossy shine of the glass.

An exception is the process of painting with an aerosol. It allows you to evenly apply paint on the surface of the glass, without the formation of smears. Use this option if you want to make your own frosted glass bottle vases or give them an ombre effect.


Using stencils or hand painting skills, you can give a beautiful pattern to a bottle vase.


In addition to painting, you can also:
- Wrap a glass bottle with thick thread or twine;
- Decorate it with ribbons, lace or fabric;
- Apply decoupage.
In the following photos you will see examples of such work.


How to make a vase from a bottle and pieces of fabric: examples with knitwear, lace and felt (the latter can be replaced with felt).


The last 3 photos in this article show bottle vases made with decoupage. As we already wrote in our article, it is recommended to thin the decoupage paper with sandpaper or soak it in water before gluing it to the surface.


Good luck with your creativity!
DIY bottle vases - 29 photos with creative ideas updated: December 26, 2016 by: Margarita Glushko