Dress to the floor without a pattern with your own hands. How to sew a dress without a pattern? The simplest do-it-yourself dresses
Dress in the Greek style ... mmm ... a dream. Where to find, where to go shopping?
Ladies, head to the fabric store if you want to have a truly one-of-a-kind Greek dress.
Your goal is light flowing fabrics (muslin, satin, silk, jersey, thin knitwear, velvet). The fabric should be fluid, thin, easy to fit into soft folds and not wrinkle much.
(By the way, please note that among the flowing fabrics, you can find those that do not crumble on the cut, then you will not need to process the edges after sewing the dress.) The length of the cut should be at least 3 meters.
We will create a dress in the Greek style ourselves. And no patterns! Just a flight of fancy and a mirror. And every woman must have both.
Don't have a sewing machine? So to create a Greek dress, it is not particularly needed.
Have you never sewed anything? And the Greek dress does not need to be “sewn” in the generally accepted sense of the word (with drawings of patterns, darts and darts).
The first way to create a Greek dress.
"Wrap Up and Tie Up"
Here is a visual diagram:
Two decorative pins on the shoulders and tie with a ribbon at the waist or under the bust.
Of course, this simplified version of the dress will swing open in any wind. Therefore, it is this model that will be appropriate at a beach resort over a swimsuit.
And in order to make a full-fledged Greek dress out of this, all you need to do is sew the sashes of the dress along its right side from bottom to top so that the body does not look out. The result is an elegant outfit in the Greek style. This model is good because, while not fitting the body at all, it nevertheless emphasizes the beauty of its curves, thanks to the fluidity of the fabric, seductively flowing over the body. And according to this method of modeling, completely different dresses can turn out, depending on what color and quality of fabric you will use to create them.
For example: ivory satin, a string of river pearls around the wrist, a discreet but exquisite brooch on the shoulder made of the same pearl, hair scattered over the shoulders - and you get the image of a young Aphrodite emerging from the foam of the sea, and your wardrobe is replenished with a fashionable Greek day dress. type.
Or the same model but: black silk, a brooch on the shoulder and a gold-colored bracelet, smoky eye makeup - and this is an evening image of a formidable goddess.
The second way to create a Greek dress.
Drapery on the body.
The great French fashion designer Madame Gré created her dresses in the Greek style, draping them by hand on the body of the model. Her way of making antique dress became classic, and her clients included Grace Kelly, Jacqueline Kennedy, Marlene Dietrich and Barbara Streisand.
As the ancient Greeks used to say: “Not the gods burn the pots,” and we will try ourselves as a fashion designer.
Here is a picture of a Greek dress made from a single piece of fabric.
High-fashion? Yes, high, but not so high that we could not reach it.
What you need: fabric is a little more than 2 of your height from heels to shoulders (if you want a dress to the floor). A decorative braid or ribbon of such length that it is enough to wrap around itself under the chest and at the waist twice.
Let's start. They spread the fabric on the floor, found the middle on it and drew a line in chalk. This line will lie on your shoulders.
Now in the center you need to make a hole for the head - draw a perpendicular line (about 15 cm to start with, so that the head crawls through) and cut it with scissors.
We put our head in the hole, and now we need to decide to what level we will deepen the neckline. (On the dress from the photo there is a neckline that is deep to the waist. But you can stop it under the chest as well, tie it with a ribbon there, and then you can no longer wrap another ribbon around the waist, let the fabric flow freely down, starting to fall right from the ribbon under the chest. And it will be a slightly different model of the Greek dress, less frank). But let's continue...
So, they put it on the head, and marked the desired level of cutout depth on the fabric with chalk. They removed it, spread it on the floor, drew a line to our mark and cut the cutout to the end with scissors. Along the line of the shoulders, the fabric was gathered with pins and then we proceed as shown in the figure.
They tied a ribbon under the chest, but not over the fabric, but under it, on the body. We take the pins and, laying the fabric in folds, pin them to the ribbon, draping first one chest, then the other.
About the same we do with a tape at the waist.
Now, when we already see the image of our future Greek dress, and we are satisfied with how the fabric lay down, you can thread the needle and, taking out one pin at a time, sew our folds to the ribbon with large stitches (or you can sew everything all over again, and then already remove the pins). Stitches can be made oblique and crooked, anyway, we will sew on top of another ribbon or braid, and we will already sew it neatly.
So, we blinded the front of the dress in the Greek style.
The back can be done the same as the front - with a cutout and two ribbons. Or show your imagination, play with drapery. Using the method of pins and pinches for hair, find the very location of the folds when the fabric flows in the most interesting way for you, emphasizing your strengths and hiding your flaws.
The pictures show 3 ways to drape the back of the dress. The third method, “swing”, is achieved by gathering the fabric up (the left and right edges of the fabric are gathered, and the middle sags freely, forming these most beautiful “swings”) Accordingly, for the third method, fabric on the back hem needs 1-2 meters more .
But when playing with fabric and fantasizing, keep in mind that the dress must be provided with free entry and exit, that is, somewhere it must be fastened and unfastened. It is best to sew on the side, at the ends of the ribbons of the front of the dress, one elegant button, and at the ends of the ribbons of the back of the dress - a loop. Thus, it turns out that the dress above the waist does not have side seams, but is fastened with buttons (or Velcro, or decorative fasteners - to your taste).
The third way to create a Greek dress.
Drapery on the "lining".
Let me explain what a "slip" is. Imagine that you have a short dress in a figure, that is, almost in a slip. But you don’t wear it and you won’t wear it, because once you spilled bleach on it, and the stain cannot be removed. And if you still haven’t thrown it out yet, then rejoice, you don’t have to sew a lining on purpose - this dress will serve as an ideal basis for creating your new magnificent dress in the Greek style. That is, it will be this very “lining”.
Put on the slip, take a flowing fabric in tone, throw it over your shoulder (or cut a hole for the head, as in the previous method), form folds and pin them to the slip with pins. Then sew them on first with a rough thread with simple coarse stitches, take out the pins, try them on again and, if everything suits you, sew them on by hand with neat neat stitches. Pull out the draft thread, cut off the excess fabric, if necessary, make a seam. As a basis for drapery, you can use not only a sheath dress, but also a tight-fitting T-shirt or bra. The main thing is that the drapery completely hides the base, and the base itself is the same color as the drapery fabric.
As you can see, a Greek-style dress can literally be made with “bare hands”. Without any drawings and mathematical calculations. Guided solely by intuition and a sense of beauty.
Go ahead, take the fabric and try, create! And you will definitely succeed!
As the ancient Greeks said: "To learn how to play the harp, you need to play the harp."
Original entry and comments
Olga Klishevskaya specially for the site Women's Conversations 2010 - 2011, womenstalk.ru. All rights reserved.
Every girl dreams of beautiful, eye-catching outfits. However, it is not always possible to afford to buy the thing that you want - either there is no size, or the cut does not fit. But you should not be upset - you can try to create a unique, inimitable and completely individual outfit. For example, first try to sew a simple dress, and only then, having learned how to make patterns, you can make more complex outfits.
What is the simplest dress?
A simple dress is a model without frills, frills, edging, wedges and other elements that greatly decorate the product, but also complicate the process of its creation. Perhaps the most difficult thing is the initial stage, when you need to take measurements correctly, and then very carefully and incredibly accurately transfer them to paper. Of course, you can go the other way - to create a dress without a pattern. This will be the primary learning stage, after which you can start sewing more complex outfits.
So, first, as an example for comparison, let's look at how you can create a dress with a simple pattern, and then move on to the process of forming a model made according to more complex patterns. Before you start marking and cutting the fabric, you should prepare the tools necessary for the job. It is worth doing this in advance, so as not to be distracted later, looking for a suitable thread or scissors.
What will be required?
Of course, before creating a simple lung, you need to decide on the fabric - you should immediately abandon too dense or too thin (chiffon, silk). In the first case, the fabric will bulge in poorly fitting places, while in the second, all defects, even the smallest ones, will be perfectly visible, because during the first sewing there can be quite a lot of them.
Do not forget about the selection of a pattern - it will be easier to work with material without decor or with a small abstraction, a flower - where you do not have to adjust and combine the pattern. If the material comes with a large pattern, it is worth making a good margin for fitting.
Next, we prepare the tools - we need a meter, which will be used to measure, and large scissors, allowing us to make a cut with the smallest irregularities. And, of course, they must be sharp. It is better to stock up on several types of needles (in the course of work it will become clear which one fits more comfortably in your hand and makes smaller punctures on the fabric), as well as strong threads. Do not forget to find a crayon or pencil, which will subsequently be used to mark the fabric.
Model with a simple pattern
Of course, you can’t even do it completely without patterns. Now we will look at an example of the simplest pattern of an outfit held by an elastic band on the shoulders.
We need to draw two rectangles 80 x 65 cm (the bases for a rectangle 33 x 55 cm (these will be sleeves), and two - 25 cm (armholes). The dimensions are standard, you can change them at your discretion (the first is the length, then the width ).
We cut out the bases drawn on paper, and then carefully circle them with chalk, leaning them against the fabric. Don't forget to mark the openings. Now we sweep the basics - first on our hands, carefully chipping them with pins, and then sweeping them with bright threads.

Only after that we sew the bases on a typewriter, and if there is an overlock, we overlock the edges. We sew on the sleeves, turn off the neckline by two centimeters and sew it - we insert the elastic band into the resulting gutter. Do not forget to process the edges of the hem and sleeves, and then iron these places with an iron.
The last stage - a simple light do-it-yourself dress needs decoration. Decoration options can be very different - this is an original thin chain on a belt, a simple and discreet brooch, any element that can not only make but also set off its superiority.
What are the measures?
Even simple dresses for beginners require a careful and precise approach: if at least one measurement is taken incorrectly, the model will be damaged.
There are many types of measurements: POG - half chest circumference, POT - waist half circumference, FOB - hips half circumference, POSH - neck semi circumference, LG - chest line, DTS - back waist length, CI - product length, VR - sprout height, NPS - tilt back shoulder, DB - side length, VG - chest height, RTA - front waist length, SHP - front width, and many others.
Each of these measurements should be taken when connecting certain points on the human figure, it is especially important to remember about the stomach - you need to make the necessary margin for it. In addition to the main measurements, there are many additional ones, but in our example we will not consider them.

How to take measurements?
We are considering simple dresses (with our own hands) - therefore, the patterns will not be very complicated either. We need to take only a few measurements - waist circumference, skirt length. To simplify, we introduce several letter designations, according to which the necessary calculation formulas will subsequently be compiled.
R and L are the radii of the circle, B is the detail for the straps, D1 and D2 are the details of the belt, Z is the length of the waist line of the skirt, FROM is the circumference of the waist. The calculation will be made taking into account the necessary allowances. We will use simple formulas: Z \u003d 1/2 (OT - 8), L \u003d (OT - 8) + Z + 5, R \u003d L: 3.14, B \u003d 2 * (OT: 4 + 6), D1 \u003d OT - 8, D2 \u003d 14 + 2. Using these simple calculations, you can make an extremely accurate calculation of the necessary parameters.
What's next?
So, we sew a simple dress with our own hands. This time, the patterns will be made directly on the fabric, without using paper. If you plan to sew a long dress, you will need about five meters of material.

It is always better to buy with a margin, and do not forget that for a model worn with heels, the consumption of matter will still be a little more. If the plans are for a simple dress that does not reach the knees, you will need about three and a half meters of fabric.
From the remaining pieces of material, you can always come up with decorated elements for the model - these can be home-made bows decorated with beads, or elegant flowers that can also be attached to a pin, if necessary, simply removed and put away. In any case, be guided by the principles of “let it remain” than “oh, it wasn’t enough.”
We start to cut
A simple dress (do it yourself for beginners) requires special attention - lack of experience in cutting and sewing can affect the quality of the resulting model. We fold the fabric in half, and then draw a radius P from the corner - just like we do it with a compass.

In a similar way, we draw a radius L. Cut out the skirt along the lines, while not forgetting to leave reserves for the seams (at least one centimeter). We cut out the straps - two rectangles with a width of B, and a length of about two hundred and twenty centimeters. We cut out the belt according to the details D1 (length of the belt) and D2 (width of the belt). So, all the necessary patterns are ready. Now we can start sewing. We stock up on threads and needles, and do not forget that we left stocks for seams one centimeter each.
Line by line
We start with the straps - fold each piece in half, fix with pins and carefully sew along the entire length. The next step is to sew the straps along the width on one side. We process the belt in the same way. Since we are sewing a simple dress, we will not have difficult seams.
Now it's up to the skirt - first we carefully process the hem, and then the side sections. We calculate the required length from the waist line of the skirt and measure four more centimeters down from it. From the received point we measure half of the OT and put another point. We measure four centimeters from the processed cut, bend it, apply the smell, aligning the smell marks and the side seam. We sew carefully, without haste.
We find the middle in front and behind the skirt, apply the straps with an overlap of about four centimeters, sew the resulting layers. Then we sew the basting lines.
Last step
So our simplest dress is ready. However, this is not the end. As in cooking, the final stage is the sample of the dish, and in tailoring, the final moment is the fitting of the product. We carefully put the dress on ourselves, carefully reviewing all the possible flaws. Do not forget to carefully iron all the seams, in no case making oblique folds.
Simple light dresses are good because you can wear them anywhere - both for a solemn event, decorating with a detail in the form of a bow, scarf, brooch, and every day - for work, for a walk or even for a date. Do not forget that after the first wash, the color of the fabric may change slightly, lightening a little, and the length of the skirt will be shortened if the matter sits down. This is especially true if the dress will be worn with heels. The advantageous side of such a model is that the simpler the cut of the outfit itself, the brighter accessories you can choose for it, be it a handbag, bracelet, pendant or earrings.

Such dresses never go out of fashion - they are very comfortable, versatile and practical. Another indisputable plus is that with such an outfit, with the help of additional jewelry, you can create your own, individual, unique image, favorably distinguishing yourself from the mass of other women.
So, boldly take on needles and threads, choose your favorite colors and materials - and go ahead, to create the most unusual, fashionable, stylish, unique, charming, airy, elegant, bright, beautiful, eye-catching dress of the opposite sex! Good luck!
If you are a regular reader of the Samoshveyka website, you probably know that I do not like to build patterns from scratch, especially with complex calculations. I also don't like to wear dresses and skirts, preferring comfortable jeans to them. But this year, succumbing to the persuasion of her husband, I bought a piece of fabric for a dress. It remains the case for small things - to build a pattern, cut and sew a dress.
I scored fabrics of 1 meter and 20 cm with a width of 1 meter 60 cm. I decided to sew a dress cut off at the waist, with one-piece short sleeves and a skirt gathered at the top.
After spending a certain amount of time on the Internet in search of a "miracle pattern", I finally found a video in which I simply and quickly cut a dress without a pattern according to Olga Nikishecheva's master class "How to sew a dress from chintz".
I’ll clarify 2 points - in the video the top of the dress is cut off from the hip line, mine is from the waist, and my skirt is in the form of a “Tatyanka”, that is, it is gathered along the top, and in the video it is a sun skirt.
Although I will cut the dress without a pattern, I still needed the main measurements of the figure, how to shoot - look (note that for calculations we will need girth measurements, not half-girth!):
- chest girth (Og);
- waist circumference (From);
- bodice length along the back from the 7th cervical vertebra to the waist = 41 cm (Dst);
- chest height = 25 (Bg);
- skirt length = 55 cm (Du).
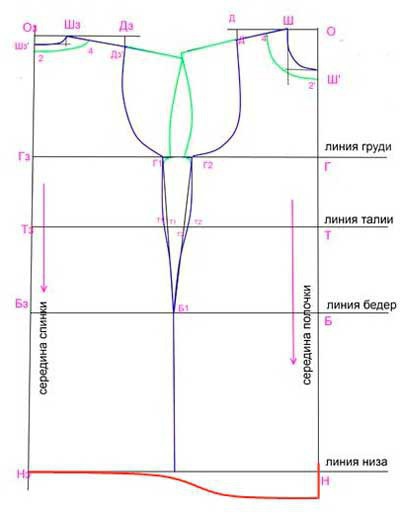
How to cut a dress on fabric without a pattern
From a piece of fabric along the length, I measured the length of the skirt (55 cm) plus allowances for seams (5 cm), cut off a rectangle. This is a skirt detail (160 long and 60 wide). In order for the skirt to have 2 side cuts, the rectangle was cut in half - it turned out 2 rectangles of 80 by 60 cm. Another 10 cm was cut off from the length of the fabric for the belt. The belt will be cut to the width of the fabric.
So, from a 50 by 160 rectangle, you need to cut out the bodice. The rectangle was folded in half with the front side inward, it turned out - 50 by 80 cm, then folded in half again, it turned out a rectangle 50 by 40 cm.
We retreat 1 cm from the fold of the fabric down, put a point, then put 3 cm down from it, put a point, then measure Vg, and Dts, make notches with chalk. Then we draw parallel lines through these points.
Along the neck line, where we put point 3, we measure 8 cm to the right. This measurement may change when trying on the bodice of the dress.
Along the chest line, where we marked Vg, we measure ¼ Og +3 cm to the right.
Along the waist line, where we marked Dst, we measure ¼ from +3 cm to the right.
Please note that we calculate ¼ from the girth, and not the half-girth of the bust and waist.
The video does not say how to build a shoulder cut, only: "shoulder at a slight angle across the entire width of the fabric." I built it like this: from point 8 to the right I measured 10 cm, put a point and down from it - 3 cm. I connected the dots, continued the line to the end of the fabric.
Sleeve length - optional. At a right angle to the shoulder cut, we draw a sleeve width of 15 cm. We connect this point with a point ¼ Og + 3 cm. We round the corner. We make the neck of the front a little deeper than the back. We also lengthen the middle of the back and front by 1 cm and connect it to the side points.
Schematic sketch of how to cut the details of the dress on the fabric:

That's all the construction of the bodice. We cut out the details with seam allowances of 1-1.5 cm. Separate the back part from the front and deepen the front neck. From the remnants of the fabric we cut out a slanting inlay for processing the neck. All the details are prepared and cut out by us. It remains the case for small - to sew a dress.
How to sew a dress
We sweep and grind the shoulder and side sections of the bodice. Slices are processed on an overlock. We iron the seams towards the back.


We do a sample. Correcting the neck line.
We turn over the neck, how to do this, was described in the article.
We sew the sections of the bottom of the sleeves on an overlock, hem with a seam in a hem with an open cut.
We grind the side sections of the skirt of the dress, overcast, iron.

We overcast the top and bottom of the skirt, the bottom of the bodice on an overlock if the fabric is very crumbling.
On the top of the skirt we make an assembly. The assembly can be done in any way: using hand stitches "needle forward", on a sewing machine, loosening the bottom thread, etc. 2 lines are laid, the threads are pulled together.

We cut off the bottom of the bodice and the top of the skirt with the front sides inward, combining the side sections and the middle of the front and back. We sweep, and then we grind on the sewing machine. If the sections were not overcast, overcast.

Cut off from the elastic band 1 cm wide a piece of elastic band with a length equal to the circumference of the waist. We attach the elastic to the seam allowance for sewing the bodice and skirt.
We turn the dress on the front side, hem the bottom with a seam to the hem with an open or closed cut.
We duplicate the belt detail with adhesive interlining. Iron along the fold with the wrong side inward. We process the belt.
It remains to iron the dress. Here is the result.
Every woman wants to be stylish. At the same time, I would not want to spend big money on buying a designer dress. In this case, the ladies begin to think about how to sew a dress with their own hands. Master classes for various models are in abundance on the Internet, fabric - in the nearest store, so why not get down to business yourself!
Self-tailoring has a number of features that distinguish it favorably from a thing bought in a store. First of all, many girls definitely have a couple in their heads - a trio of those options that would fit the figure perfectly, but such specimens have not yet been found on store shelves.
In this case, you can do independent production of clothes.
Pros and cons of a hand-sewn dress
Sewing a dress with your own hands (master class, different models - later in the article) is not difficult, but you need to immediately determine whether this thing is worth the effort, money and time spent.
Such an activity has a number of both pluses and minuses:
| Advantages | disadvantages |
| Individuality of form, silhouette. The ability to take into account all the nuances of the figure and make a thing that will sit on its mistress is just great. | Different fabrics require different approaches. An inexperienced seamstress may fail in the manufacture of a product if she chooses too whimsical materials. |
| There is no need to wait until the master gets around to sewing the customer's clothes. The time it will take to get the finished product depends only on the owner. | Do not exclude the fact that in the absence of skills, the dress will come out far from what it was originally intended. You may have to make several attempts to manufacture. |
| You can choose any color, thickness and texture of the fabric for sewing. | It is not possible to sew a dress without experience with all styles. Experiments can lead to the fact that the thing simply "does not sit down." |
| Relatively lower cost than when buying a dress in a store or contacting a seamstress. | It is not always possible to immediately be able to correctly correct figure flaws with a home-made dress. It is possible, unknowingly, to bring to the fore the negative sides of the silhouette, and not to remove them. |
| The uniqueness of the cut. |
Where to begin?
A beginner in the business of cutting and sewing needs to know exactly the algorithm of actions that must be followed.
Namely:
- Decide on the style, model and length of the future product. For beginners, it is preferable to choose a simple and uncomplicated form of dress. It is better to abandon unnecessary connecting seams and many decorative details. It is optimal to complement a simple dress with original bright accessories.
- Choose color, texture and fabric texture from which the dress will be made. The fabric should be such that it matches the theme of those future events to which the product will be worn. And most importantly, it is imperative to choose a material that will be easy to work with even for a beginner in sewing.
- Prepare all the necessary auxiliary materials for sewing. You need to stock up in advance with edges, adhesive pads, fasteners, zippers and buttons. And, of course, you should never forget about needles, a centimeter, scissors, pins, crayons and hairpins.
- Make a pattern. It will be difficult for a beginner to sew a dress without a pattern. Therefore, when the seamstress takes his first steps, you still need to stock up on several drawings of the future product.

In order to pick up all the necessary tools and materials, it is best to visit a specialized sewing store. In it, the consultant will select the fabric and materials that are required for each individual case. Patterns can be found in large quantities on the Internet.
What to sew first and where to get patterns?
First, it is recommended to opt for a plain dress with a simple cut. It is not so difficult to sew it, the pattern for it is easiest to find on the net and adjust to your own parameters. Speaking of the pattern: you can either order them from a professional seamstress or develop them yourself.
It is permissible to take measurements from existing clothes, then transfer them to a previously printed template.
A visual video on how to cut out and sew a simple dress yourself:
For a simple dress with a straight cut, it is applicable to use an ordinary rectangular piece of fabric as a pattern, on one side of which it is necessary to cut out a bodice, the dimensions of which can be drawn from your favorite T-shirt. This dress is simple and elegant. It is permissible to wear this wardrobe item for any event - both for an evening walk and when going out.
Experts advise choosing plain fabrics of muted, soothing colors.
How to sew a dress yourself for beginner needlewomen
Sewing a dress with your own hands (a master class, different models can also be found in thematic magazines) will not be difficult even for a beginner.
- The main measurements that will need to be taken from the model will be POG, POT and POB. This is half the girth of the chest, waist and hips, respectively. In order to cope with this task, you need to measure the length of each parameter with a centimeter, and then divide the resulting data by two.
- Be sure to depict each new detail of the dress as a separate element. You can never pre-draw details together, since there is a risk of obtaining a poor-quality result - extra folds, irregularities, divergence of seams and the inability to sweep the overall structure.
- Before transferring the pattern to the fabric, you need to additionally check the coincidence of all parameters. Particular attention must be paid to the and connecting lines of all parts of the dress. In the event that a discrepancy is found, you can cut off the excess or glue the missing pieces to the paper layout.
- Be sure to designate the lines of the hips, waist and all undercuts on the pattern. These are the most important components of the future silhouette, and the final work depends on the quality of their implementation.
- A beginner seamstress can make a pattern along with small allowances. So the beginner can avoid damage to the fabric as a result of a mistake.
- Silk, linen or cotton must be ironed before cutting. from the wrong side. If skew or large folds are found, the material should be slightly moistened, then carefully ironed.
- It is also necessary to determine where the right side of the fabric is before starting the sewing process. In some cases, it will be difficult to answer this question right away. You need to focus on the edge of the material, because at the factories all fabrics are folded face down into the roll, on the edges of which there are fixing needles.

Based on this, we can conclude that the punctures of the holes from the needles should be directed from the front side.
General sewing algorithm
Regardless of the type of product, it is necessary to familiarize yourself with the general sewing algorithm before starting work.
It includes several main stages of work, which together make up a single process of cutting and sewing:
- Taking measurements. It is very important to correctly take all measurements from the model. The main dimensions are considered to be half of the girth of the hips, waist, chest, the distance from the elbow to the shoulder, the size of the armhole and the length of the product along the spine line. It is best to measure these points two or three times, and record the most accurate result. Sometimes it will not be superfluous to leave 2 cm of allowance on the armhole and the seam of the spine, in order to use them as a reserve in the future, in case of incorrect measurements.
- Making pattern parts. At this stage, it is necessary to transfer all the measurements taken to the layout of the dress, the model of which was chosen for sewing. It is best to move from large parts to smaller ones, leaving a few centimeters of margin. It must be remembered that it will always be possible to cut off the excess, it is almost impossible to sew on the missing centimeters without damage to the product.
- Preparing for cutting. After the paper blank has been drawn, it is necessary to start transferring the components to the fabric and drawing up the future dress. Each detail is best depicted separately. After checking the dimensions, you can transfer everything from paper to cardboard or oilcloth, depending on which material is preferable to use. Here it will be necessary to mark the most important parts of the dress with a bright line. These are: tucks, chest line, waist, hips, the middle of the object and share. Before closing, the distance between important points is checked with a centimeter. If something does not fit, then the pattern needs to be redone. The neck and collar should be the same, as well as the armhole with the sleeves.
- The layout of the main elements of the dress. The beginning of the cut. Before cutting, a detailed inspection of the fabric for defects is a mandatory item. If imperfections are found, they must be circled with chalk in order to correctly position the parts in the future and bypass low-quality places in the material. If a fleecy or patterned fabric was chosen, all the details are located strictly in one direction. The direction of the villi is from bottom to top. On the table, the fabric should be placed upside down. Another option is to fold the material in half. You can not sacrifice the allowable rate left for allowances and seams, otherwise you can get unnecessary folds or even lack of space for any part of the dress.
- Seam processing and dress tailoring. First of all, a seam designation is laid along all contours, the dress is swept away. You need to start with small details, such as pockets, inserts, darts, wedges and shelves. Then the main seam lines are processed - along the waist, hips, chest and armholes. The back and skirt of the dress are sewn. After the upper and lower parts are connected to each other. You need to start from the back, finish the front. You need to finish with a sleeve cut. Narrow options must first be subjected to heat treatment. Before it, the fabric is recommended to be moistened.
- Fitting. You need to stick pins for trying on for the first time from top to bottom - the tip goes to the floor. This is done in order to avoid traumatic situations, as well as to ensure greater fastening strength. The dress must be put on, then pinned to the place where the fasteners or zippers will be located in the future. The product is straightened and rotated so that all the main lines are located strictly in their places and are directed along the correct vector. The length of the dress is checked, compliance with measurements on the chest, waist, hips, back and length from shoulder to elbow. The undercut is checked for depth. In the case when it is insufficient, you can cut off the excess. The collar and neck of the dress are connected, the angles and method of bending the collar are determined. The sleeve is attached in place. You need to chip it with the help of all the same pins. Provided that the model should have pockets, their location is outlined in chalk and the details are tucked into place.
- The final stage. All previously swept parts are carefully attached to their places. You should not rush at this stage, because carefully ripping a machine seam is a long and very painstaking task. It is best to check all the details as often as possible to ensure that their location corresponds to the intended plan.
Types of dresses
You can sew a dress with your own hands (master class, different models can be found on the Internet) for every taste. Each woman is individual, as is the structure of her figure. Each of them needs its own, special dress silhouette. You can choose from a classic, non-tight and minimalist cut, as well as a richly ruffled, figured copy.
 Sewing a dress with your own hands: master classes on different models will help you independently master the science of sewing
 Below are the most popular variations for cutting and sewing.
boho
This is a very loose and comfortable type of dress. From above it is a blouse, to the bottom it goes into a wide skirt. It is best to use linen fabric for this variation. In order to make this type yourself, you need to cut the material, paying careful attention to the correct folds on the dress.

Then the front and back are connected to each other, the correct cutout is made on the collar. All details are processed in the area of the seams, and the dress is turned inside out. On the reverse side, a collar is attached in the neck area. All undercuts and sides are sewn together, sleeves and additional parts (sleeves, ruffles and shelves) are made.
The edges of the product are processed, everything is carefully stitched.
Trapeze
For the first time, this simple, but very stylish dress was revealed to the world in the 60s of the last century. Since then, almost every season, fashionistas have been trying to add at least one such item to their collection. Sewing such a dress with your own hands is one of the easiest options.
Master classes and different interpretations of this model replenish fashion sites daily. For tailoring, it is necessary to take measurements of the chest, armholes and determine the total length of the product. For this version of the dress, recesses at the waist are not needed, so there is no need to measure this parameter.
It is necessary to carefully measure the dimensions of the neck, then slightly increase the values on the back. This is done for greater ease of putting on, but you don’t need to be too zealous - in the future, a zipper will be inserted into this place. On both sides, along the side seam, you need to make a slight expansion to the bottom - no more than 7 cm.
All the resulting details are sewn together, buttons, pockets, ruffles and zippers fall into place.
To the floor
This variation is able to decorate any woman both in everyday life and at a social event. There are a great many types of dresses on the floor, and each representative of the fair sex will be able to choose something of her own here. The main thing is to follow the general sewing algorithm for any other dress, but attention should be paid to the length.
It is measured from the coccyx to the end point of the hem at the back. The upper part is worked out according to the chosen style. The most versatile and simple option would be a dress - a T-shirt. You can leave a little indentation on the hem to give the hem a more trapezoidal shape.

The more they are, the more folded the skirt will be in the future. The bottom is made of two equal-sized rectangles. All details must be carefully swept away, tried on, clarified whether the length is suitable, and then stitched firmly.
The seams can be finished with decorative threads.
Straight dress
This is truly the easiest type to make. Although from a structural point of view, it is considered elementary, in terms of elegance it will not yield even to the most “cunning” version of the dress. To make a pattern, you need to measure the girth of the chest and hips, as well as determine the length of the future product.

When all this is ready, you need to make a pattern in the form of two (or four) rectangles, having previously drawn armholes for the throat and arms, leaving a cut for zippers or buttons. Dimensions for them are removed in the same way as for any other option. Sleeves are made, respectively, as on other models.
All details are swept together, then, after checking, they are stitched into one object.
Evening dress in half an hour
It often happens that you urgently need to come up with a dress for going out. It would be best to stop at a simple option, which will take a small amount of time to sew. The length, according to the dress code, should not be higher than the top line of the knee.
There is no need to make tight skirts and be zealous with undercuts, since it is impossible to immediately determine whether it will be convenient to move in a tight skirt of your own cut for a long time. You can take one large piece of fabric, sew it on the sides, having previously made a cut of its own length in the middle.
Then you need to process all the edges and pull the fabric into beautiful folds at waist level.
How to sew a dress for full on your own
All women want to be charming, and curvaceous ladies are no exception. Pyshechki would be best to stop at a not too short version of dense fabric. The style can be chosen both free and tight-fitting (the main thing is not to overdo it, otherwise the dress will be ugly and uncomfortable to wear).

Beginners would be better off opting for an elongated style with a V-shaped neckline. The skirt should start just below the chest line and fold a little. You can mark the undercuts designed for the waist. It is preferable to divide the whole model into 4 parts - two rear and two front.
Sew, respectively, first the back parts, then the front. After that, they are all assembled into a single structure.
Maternity dress
Pregnant women especially need to feel beautiful and loved. A well-fitting dress will definitely help to make the right impression on others. However, it is far from always possible to ensure a high-quality fit on such a figure.
Sewing a dress with your own hands (master class, different models for pregnant women can be found on the Internet) in this case will be the best way out.
To do this, you need to take into account several important points:
- It is best to choose a stretchy, not too dense fabric.
- It is necessary to give the girl enough room to maneuver in this dress. Pressure on various parts of the body, especially on the stomach, can be bad for health.
It would be ideal to choose such an option so that the skirt starts just below the chest line and does not interfere with the free movements of the hostess. You can choose a light flowing fabric that will give the model more femininity.
Summer dress
On hot, sultry days, it is far from always possible to shine in all its glory. However, if you take into account several important aspects for tailoring a summer dress, you can safely go to surprise everyone around you with your beauty in a new outfit.
For the summer season:
- The fabric is selected light and light. It's best if it's linen.
- Do not choose too tight styles and synthetic materials - this will make the body sweat too much.
- You can experiment with lace by adding some playful inserts to the design of the dress.

You can opt for such common models as boho, trapeze or rectangle. Also popular in recent years are dresses - shirts fastened with buttons. Their cut is light in execution and very comfortable to wear.
Children's dress for girls
Girls very early begin to show their desire for beauty. It is expressed, first of all, in clothes. In order to make a dress for a real fashionable young lady, it will take very little. Most often, sundresses are chosen for young ladies - they do not hinder the movements of a young lady, they always look cute and are appropriate for any occasion.

Such a thing is cut like a trapezoidal dress. You can play with the pattern and texture of the dress - this will definitely please the little beauty lover.
How to quickly sew a homemade dress without a pattern
It happens that a wardrobe update is urgently needed, and there is neither time nor desire to build patterns. In this case, it is possible to make a dress without a preliminary preparatory stage in the form of a pattern. For execution, you will need a piece of fabric corresponding in length to the future dress and in width about three girths along the hips.

It must be wrapped around you like a pareo, fastened with ties around the neck and shoulders. You can diversify the resulting image with a bright belt.
Sewing a dress with your own hands is an easy and very exciting process, which gives the seamstress an excellent product that fits the figure perfectly, pleases the eye with a well-chosen texture, type and color.
A variety of models, styles and techniques are represented by many master classes and small lessons in the public domain. Each fashionista will be able to find there something of her own, individual. You just need to stock up on desire, enthusiasm and all the necessary materials.
Article formatting: E. Chaikina
A useful video clip about sewing a dress with your own hands
The story tells how to quickly sew a sundress for a girl:
In this article we will talk about how to sew a summer dress yourself. It turns out that every woman can become the owner of a unique outfit.
Do you want to become the owner of an exclusive summer dress, but at the same time you constantly stumble upon the same thing in stores? Well, then the most reasonable solution is to sew the outfit yourself. Such clothes will be the most beloved, comfortable and unique. Well, what if you don’t want to mess with patterns? And here you can find a way out.
How to sew a simple dress for the summer with your own hands?
This dress will be as simple as possible, so it is recommended to give preference to bright fabrics with a catchy print. And stock up on some already existing ready-made outfit - you can rely on its outlines in order not to use the pattern.


- So, spread the fabric on the floor in two layers. Of course, you have to work with the wrong side
IMPORTANT: Keep in mind that if you plan to make a new dress from a non-stretch fabric, then the stencil dress should be the same. It is desirable that there are no zippers in the stencil either - sewing it in can be difficult for beginners.
- Now, based on the workpiece, cut off pieces of fabric. It doesn’t matter if you want to make a new thing more magnificent - just keep this in mind when cutting
- The result is two pieces - front and back. It remains the case for small - sew them together on the sides and straps. The bottom, as well as the openings for the arms and head remain intact
- Now we define the waist. Even the most ordinary elastic band for linen is suitable for this. Measure your waistline and mark it on the fabric. Cut off a piece of elastic to fit.
IMPORTANT: Try to choose a length so that the waist is not pulled tight, but at the same time, so that the fabric does not dangle with the bag.
- Sew the elastic on the wrong side. The fabric will gather into a fold at the waist.
- Do not forget to machine the hem, sleeves and neck- this will allow the work to look neat, and the fabrics do not crumble
 This is what a simple dress we get as a result - colorful, comfortable and light
 How to sew a simple dress with your own hands without a pattern?
If you don't want to bother with patterns, dress in greek style- perfect solution. For this simple but effective outfit, choose something flowy like silk, satin, muslin, velvet, jersey or fine knitwear. This will require a fabric of about 3 meters.
IMPORTANT: It would be ideal to choose a material that does not crumble at the cut point - this will help save time on processing the edges.
The easiest way to make a dress out of a similar fabric- Wrap it around the body and pin it on the shoulders with decorative pins. The waist can be girded with a beautiful ribbon. And in order to avoid plowing at the slightest breath of wind, the open side must be stitched.


How to sew a simple straight dress with your own hands?
First thing, choose the right fabric, because this step is especially important for the case of sewing without a pattern. We recommend a material that "breathes" - with cotton in the composition, with synthetic fibers - such a dress will stretch perfectly and not wrinkle at the same time. The best choice is elastic knitwear. In addition, the dress from it will be comfortable to put on and take off.
How much fabric will be needed? With an average height of up to 175 centimeters and a clothing size of about 50, stock up on material with a width of about 1.5 meters. As for the length, if you are planning a short outfit, 1.1 meters will be enough, if the average is 1.3 meters, if the long is 1.8 meters.
IMPORTANT: If you plan to make a dress with sleeves, you will need an additional 0.2 meters of fabric for short sleeves, 0.4 meters for medium sleeves and 0.7 meters for long sleeves.

So, let's start sewing:
- First of all, iron the material with a hot iron with steam. And look for some t-shirt that best suits your figure.
- After this preparatory stage fold the fabric along the grain line in two layers. Put the T-shirt on top and circle it with chalk for convenience.


- Estimate how comfortable you are with the length - so, if you are the owner of lush hips, you need to make an increase in tissue in the appropriate area. And remember that it is important to leave an allowance of 1-1.5 centimeters. Cut out the received parts
- Now cut the neck desired depth
- Take care of your sleeves. A T-shirt will help you to accurately calculate the size of the slits.
- Prepare two wraps 5 centimeters wide
- Connect the facing for the front to the neckline with pins. Stepping back from the edge about a centimeter, sew. Repeat the same for the back stitch.
- Finish the shoulder seams. It is recommended to do this in a zigzag pattern - this is how slices are processed better.
- Sew on the sleeves. If the allowances interfere, it is quite possible to cut them off.
- Now fasten the sides of the future dress with pins. Try to do this carefully so as not to stretch the fabric. Check if the seams match. Now sew it all


- Sample time! If the hem and sleeves are too long, shorten. That's all - you can wear a dress


How to sew a simple long dress with your own hands?
- Prepare the fabric twice your height and nice ribbon for belt
- Lay the fabric on the floor and mark the middle line with crayon
- And now in the middle of this line cut a hole for the head. Put on the fabric
- Think about how long you want your neckline to be.- can be traditionally up to the chest, or up to the waist. In the latter case, this cutout will be intercepted across with several tapes. In any case, mark the desired length with chalk, and then lay the fabric again on the floor, make a cut to the mark
- Now put the workpiece back on, pin the fabric at the shoulders with decorative pins
- Get busy with ribbons by tying them under the fabric. Either sew immediately, or fasten with pins to start to try on - at your discretion
IMPORTANT: You can not mess with the stitches much, because these tapes will have a fastening function. But on top for decoration, you will have to fix more ribbons.
- Experiment with the back, finding the most interesting drapery options for yourself
- Can the future dress be stitched on the sides, maybe add fancy buttons


How to sew a simple evening dress with your own hands?
You urgently need to get an evening dress, and in the closet there are light scarves or stoles who are not sorry to put on a good cause? Then you are here:
- Turn one of the scarves into a skirt by stitching it around the edges
- Sew elastic at the waist. It is highly desirable that the elastic band be of the same gamut with the outfit, otherwise you will have to dodge with disguise
- Take a second handkerchief to serve as a bodice. m, and with the side that is shorter, baste it to the elastic
- Stretch the future bodice obliquely and wrap around the neck. Wrap around the neck and stretch obliquely to the opposite side from the one with which you swept
- Baste the fabric on the opposite side. Alternatively, you can not throw the scarf obliquely, but wrap one end around the neck, and put the other behind the back and sew them
- Take care of the part of the fabric that is adjacent to the back of the head- stitch it nicely
- Sew and fabric in the neckline


DIY simple maternity dress
Bustier dress is an ideal option for pregnant women, as it will support the breasts and visually stretch the figure. In addition, you can make a very elegant model. And after childbirth, such a dress can be completely used as a skirt.
For such a miracle, you will need 2 pieces of fabric - for the dress itself and for the bow on the chest. As for the one that is intended for the dress, its length should be about 65 centimeters. But as for the width, to determine it, multiply the circumference of the tummy by 1.4.
Now a few words about the fabric for the bow. Approximately its width should be 40 centimeters. But the length is equal to the width of the dress, multiplied by 2.
- We start, oddly enough, with a bow. Fold the fabric in half, sew
- Now take the material intended for the dress itself. Where it is supposed to have a top, create folds
- Finish the side cuts
- Now sew a bow to the main fabric
- Fold the bottom and finish it

 A simple bustier dress without a pattern for pregnant women is a great option
 How to sew a dress for full ones with your own hands?
In the case of a full figure, there must be some tricks- so, a triangular neckline is recommended for visually lengthening the neck, and the style itself should not be sticky.
IMPORTANT: Forget about the numerous ruffles, frills, even if they are stored in large quantities somewhere in your box. Puffy beauties such a design will be completely out of hand.
- So, stock up on a piece of rectangular fabric. You choose the size yourself, depending on your parameters. As for the length, the recommended option is either knee-deep or lower.
- Cut a piece from the top of the fabric- this will be the neckline and neckline. Even if you don’t want to make a neckline, you still have to cut the neckline - in this case, it will be 4-8 centimeters. Sew on the cutout
- Make a hem of the upper part of the fabric and sew it in the form of a drawstring. Put ribbons, ribbons or ropes in there. It is desirable in such a way that they go towards the neckline. Handle the drawstring
- Do not forget to process the sides of the future dress and the bottom. Sleeves can be sewn on if desired.


How to sew a simple chiffon dress with your own hands?
Chiffon - this is just a godsend in the hot season, because it is light, drapes well, and such outfits look very feminine and romantic.


- So, Choose a t-shirt that fits your figure, but does not fit. Fold the fabric in half lengthwise, place the T-shirt on top. It is best to use pins
- outline t-shirt chalk and cut out the resulting workpiece. Remember that in front you need to designate the neck
IMPORTANT: Remember to leave a seam allowance of about 7 millimeters.
- Now cut out the skirt, not forgetting the allowances in this case too.. The canvas in this case should be rectangular in shape. Before the neckline, as in the case of the bodice, fold the material in half. As for the width, then calculate it by multiplying 1.5 by the width of the hips, because there will be gathers. Well, if you want splendor, multiply the width of the hips by 2
- Attach the blanks of the skirt and bodice to each other, check the sides. Connect the workpieces with pins or light stitches
- Sew the blanks. This is best done with a special needle for a sewing machine No. 70 or No. 80. The thing is that chiffon is very thin, and an ordinary needle can only spoil the fabric. Work the bodice from the shoulders first, then from the sides.
- Sew the top of the skirt- so the folds are fixed
- Now sew a skirt with a bodice
IMPORTANT: Pay special attention to the processing of the seam. The fabric is thin, so fold the edges first by 3-4 millimeters, and then by the same amount. After that, you can stretch. Make necklines and armholes in this way.


Fashionable is a model in which the bottom is asymmetrical. Let's see how to make such an outfit:
- As in the previous case, circle the matching jersey, not forgetting the seam allowances and the neckline. Also remember about armholes
- Make a flare on the back which resembles a trapezoid
- Mark the length of the skirt with chalk, and then make curves with smooth lines- the skirt should resemble a train
- Make a flare and on the front of the skirt


Do you love wrap skirts? Well, then you will have to sew a skirt separately:
- The length of the material for the skirt should be not less than 140 centimeters. Fold this material in half
- On the opposite side of the fold, count 10-12 centimeters- it will smell
- The side opposite from the smell should be equal in length to the length of the skirt. Don't forget allowances
- Now connect the smell and the opposite side with a diagonal line, equal to the length of the skirt, Scissor this line
IMPORTANT: The hem of the dress must be rounded smoothly. How to sew a simple silk dress with your own hands?
Silk gives any outfit sophisticated look, but it is undesirable to be especially smart with details. And one more tip- make a loose dress, as silk tends to spread at the seams.
As in previous cases, use some suitable T-shirt as a stencil. As for this case, in working with silk there are nuances:
- The disadvantage of silk is that it slips a lot when sewing. However, this can be easily removed if pre-dilute the starch or gelatin and gently apply the mixture to the fabric at the treatment sites with a brush. Then these places need to be ironed through white paper.
- In the case of silk, be sure to sew a lining on the same parameters as the dress itself. Of course, more time will be spent on such work, but on the other hand, the finished product will take on the appearance of a thing made by a professional
You need to connect the lining and the dress with the wrong side to the wrong side - so the seams will be hidden
- Keep stitches small and also carefully follow their direction
- The gate is recommended to be processed with piping
If you wish, you can create a simple silk dress without a pattern with sleeves - just right for an evening out How to sew a simple knitted dress with your own hands?
Knitwear can be amazing Dress transformer. And don't be afraid - it can also be made without a pattern, and also quickly. It will take only two meters of viscose knitwear.
- Fold the fabric along the width and then along the length- you should get 4 layers in total
- Now measure the neck. Approximate dimensions: width - 7 centimeters, and depth - 8 centimeters. Now cut the neck
- Trim the edges, round them. Unfold the workpiece so that it remains folded in two layers
- From the fold, measure approximately 40 centimeters. In order not to get confused, it is better to put a mark in crayon
- From this mark to the neck draw a line
- cut the fabric, which turned out to be redundant. The result is a one-shoulder opening.
This dress can be worn as a wrap dress with an open shoulder and a knot at the waist. You can also cross the ends on the chest by making a knot behind the neck.
As you can see, it is not necessary to be an experienced seamstress and fiddle with a bunch of patterns in order to create an outfit for the summer. Moreover, you can dress up for any event - both for going to the theater or for a celebration, and for ordinary walks. Be bright and individual this summer!


