DIY paper fox for children. Master class with step-by-step photos. Origami fox - step-by-step instructions for folding and a master class on execution techniques
We continue with beautiful crafts made from plain paper. Today I will teach you how to make a paper fox with your own hands. Compared to, or, this is a very easy craft. Professionals do it in 5 minutes, beginners in 15-20 minutes. When you have made a paper fox, you can paint it or leave this task to your children. This paper fox will decorate your origami corner and add to your collection. As usual, we need a sheet of paper and that's it.
The last steps in manufacturing are the main ones, so be careful, the main thing is to bend the paper in the right direction. Step-by-step photo instructions, as always, for all people, are attached.
Necessarily! Watch the edges of the folding of the paper and which side to lay it on, this is where you should not make a mistake.
Take a sheet of plain, white paper.

We bend the corner like this, only evenly.

We need a paper square, so we tear off the excess part or you can take scissors and cut it off.

We got two parts, the one that is rectangular can be thrown away, we take a square.

From the square we make a simple rectangle, simply bend it, corner to corner.

Once again bend the rectangle into a rectangle. But only to mark the middle (height) of the rectangle.

We turned it back and now bend each side towards the middle. Left.

And then we bend the right one.

This is what we get, we continue to make a paper fox further.

We bend the left corner to the right corner, the fold goes to the back of the specimen above in the photo. So that you get exactly such a rib.

We place the workpiece on its side like this.

We immediately make a tail for the fox.

Now we bend the right side as shown in the photo.

Unfold it a little and this will give you the front part of the fox made of paper.

We begin to bend the middle part as shown in the photo.


This is the white fox we got. As I said, the craft is very easy.

I hope everything works out for you the very first time and there are no difficulties!
The simplest origami models are animal faces. Even children 3-4 years old can do them. The basis for such crafts is the basic shape of origami “triangle”. When explaining to children how to make a triangle, you can do without complex geometric terms. We simply fold a “kerchief” (a square) into a “kerchief” (actually a triangle). The faces made of paper very vaguely resemble the animals we make. Therefore, it is necessary to further decorate them - draw eyes, nose, mouth, etc. with felt-tip pens. If you are doing work with older children, then you can not draw the details, but make an applique.
Having made such faces, you can put them in an origami house, send them on a journey on a fun train, make finger puppets or set up a tabletop paper theater.
Origami animal faces: cat.

Let's bend our triangle in half, marking the center line. Then we'll expand it again.


Let's turn the figure over. Fold the triangle back at the top of the muzzle.


All that remains is to draw the details.

Origami animal faces: dog.
Let's make a basic triangle shape.

Bend and then unfold the triangle, marking the center line.

Focusing on the center line, at an arbitrary angle with the sides of the triangle folded down, as shown in the photograph.

Bend back the triangles at the bottom and top of the muzzle.

All that remains is to draw the eyes and nose with a felt-tip pen.

Origami animal faces: fox and wolf.

Bend the edges upward from the center of the triangle at an arbitrary angle, as shown in the photograph.

Let's turn the figure over. The fox's face is ready. All that remains is to draw the details.


The origami wolf face is made in the same way, but from gray paper.

Origami animal faces: mouse and bear.
Now let's make the faces more complicated. Children 3-4 years old are unlikely to cope with these faces. But for 5-6 years old it’s just right.
Let's make a basic triangle shape.

Fold the triangle in half.

Let's expand the triangle. Bend the corner, as shown in the figure, from the center of the figure (we marked the center in the previous step)

Bend the corner in the opposite direction. This is a mouse ear.

We will also make the second ear.

Let's turn the figure over. Bend the triangle at the top of the muzzle back, as shown in the figure.


Bend the corners of the mouse ears back to make them more rounded. You can use scissors to do this and round off the ears.

Let's draw a face.

The bear is made in almost the same way as a mouse. But we make the bear’s ears smaller (cut it off with scissors) and bend the triangle at the bottom, forming a heavy bear jaw.

Origami animal faces: hare and frog.
Let's make a basic triangle shape.

Bend the triangle in half and straighten it, marking the center.

Fold the base of the triangle up.

Bend the small triangle at the top of the figure down.

Fold the bottom edges of the figure up, aligning them with the center line.

Let's turn the figure over. The origami hare face is ready.

Let's color the face with felt-tip pens.

The frog is made in the same way as the hare. But we need to trim and round off the “ears” with scissors so that we can get eyes. And at the bottom of the muzzle we bend the triangle back - the muzzle will become more round.

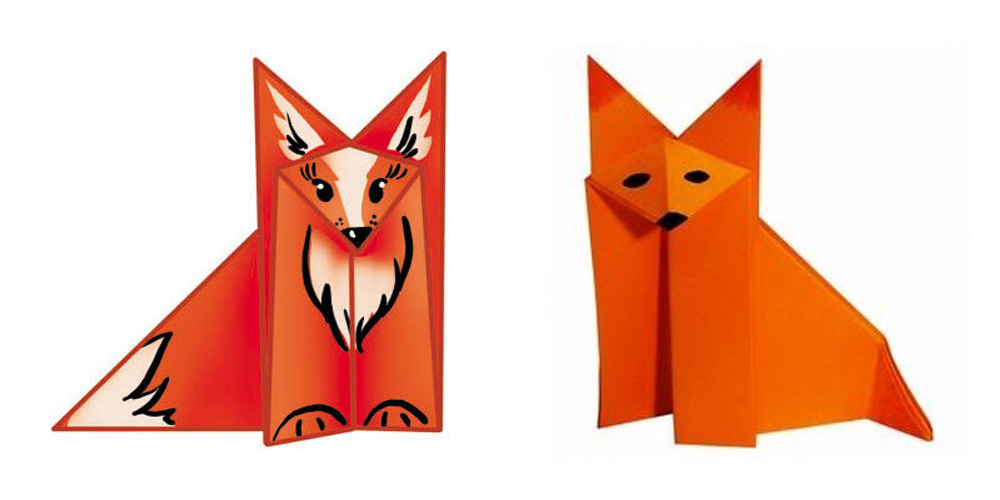
Origami fox is one of the most popular paper origami. If you don’t know how to make an origami fox, then on this page you will find everything you need to assemble this simple paper figurine.
In the first photo you can see what you will get if you follow the assembly diagram below. The second photo of the origami fox was taken by one of our site users. He ended up with about the same fox as in the first photo. It is unclear why he used scissors. If you have photos of origami you have collected, send them to: This email address is being protected from spambots. You must have JavaScript enabled to view it.

Assembly diagram
Below is an assembly diagram of an origami fox from the famous Japanese origami master Fumiaki Shingu. If you strictly follow the instructions, then assembling the origami fox will not take much time, and the result will be the same as in the picture. After doing what is described in the diagram several times, you will understand how to make an origami fox quickly and without peeking at the diagram.

Video master class
Assembling an origami fox may seem like a daunting task for beginners. Therefore, we advise you to enter the query “origami fox video” on the largest video hosting site on the Internet, YouTube. There you will find many different videos about the origami fox, which clearly show the steps to assemble the fox. We hope that after watching the video of the assembly master class, you will have no more questions about how to make an origami fox.
This video lesson will teach you how to assemble a simple origami fox:
If you want to make a more complex paper fox model, watch this video:
Symbolism
The fox in many cultures is a symbol of cunning, deceit and treachery. In Asia, the fox is considered a symbol of eroticism and feminine beauty. Some believe that the fox has a secret connection with dark forces, and consider it a sharply negative symbol.
All children dream of magic, let's help them plunge into a fairy tale.
Interesting crafts for children it is possible make from paper, today I will show you how Yulia Tomilova makes a cute paper fox.
For work we will need:
1. Cardboard (Julia used old folders from binders.)
2. Colored paper (single-sided and double-sided.)
3. Rubber glue and PVA.
4. Compasses, scissors, ruler, paints and brushes.
The fox consists of four parts - a body, a head, and two legs. We make a pattern on cardboard and cut it out. We cut out the fasteners in the form of a zigzag, and you also make the size yourself, thereby adjusting the volume of the part.

Glue the body, head and legs together. We should have four cones.

We glue the bottom to the head and paint all the details with orange paint or paste it with colored paper. We make an apron from colored paper and glue it onto the body. We glue all the parts with rubber glue; it does not deform the cardboard.

We make a hole in the head where the edges were connected and attach it to the body with glue.
Now let's start making the fur. We cut the paper into strips of 1.5-2.5 cm and cut it in the form of grass, as shown in the figure.
Now we run scissors along the fibers so that they bend. We glue the structure from bottom to top. We do not glue the grass on the apron; we tear off the strip near it.

We don’t cover the muzzle with wool, we make ears.

If you want, you can cut off a piece of the muzzle and make a mouth.

Now we can do our fox's hair. Glue the curls to the back of the head in pieces, also make bangs and a large blue bow. We paint the eyes, make the nose out of foam rubber and paint it black. We make the tail and the fox is ready.


This is how the fox turned out.


Hemp pattern: transfer it to cardboard, cut it out, glue it, glue the bottom and paint it.
From papier mache We make a bun, dry it, paint it and put it on a stump. 
We decorate our clearing and we're done.

Don't forget to leave a comment on this article.
Copyright © Attention!. Copying text and photographs can only be used with permission from the site administration and by indicating an active link to the site. 2019 All rights reserved.
Isn't it time for us to add new inhabitants to the paper zoo? Today the collection of animal figurines will be replenished with an origami fox. We will tell you about 3 types of folding of the cunning forest beauty, the more interesting it will be to collect a whole fox family, where each toy will be unique. Take an orange, preferably double-sided, colored sheet and a black marker to draw a sly face for the fox. You won't need more. Now look carefully at how to make a paper fox in no time.
Paper fox: option 1 - a simple toy
Even kids can do the first paper fox. The following schemes will be more complicated, the more interesting it will be to tinker with them. We will need a square piece of paper of a suitable color. You can make it from white office paper and then color your animal or entrust this activity to the children. Next, fold the paper in stages:

- Fold the square of the sheet along the diagonals, then fold it in half along one of the bends into an isosceles triangle;
- Bend the sharp corners of the resulting triangle to an obtuse angle. See fig. 1, step-by-step instructions in pictures will not allow you to make mistakes;
- Now fold the workpiece in half away from you. Having grabbed all 3 “walking” corners, bend them towards you, focusing on the vertical axis of the roll;
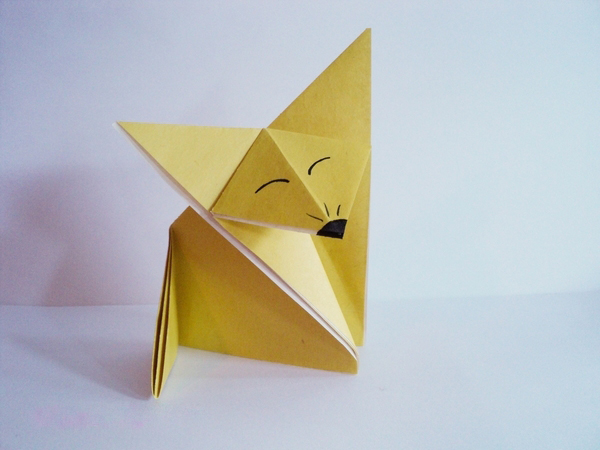
- Then lay out the folded corners - the outer ones will become ears, unfold the double central corner (from the inside) and press it, forming a fox's face out of paper;
- Bend a tail made of colored paper inward, due to which the fox will gain stability. The origami fox is ready, all that remains is to draw its eyes and nose.
This is what you should get:
Paper fox: option 2 - Japanese fox
Do you want to know how to make an origami fox using classic Japanese technique? Everything is incredibly simple: by analogy with the first simple version of the toy. Here you will also need a square of paper. Scheme 2 is similar to the first instructions in steps 1-2, then this origami fox folds a little differently. Proceed step by step, first repeat steps 1 and 2 (the previous simple fox craft made from a square), and then:

- Bend not the “walking” corners towards you, but a strip of the plane on this side (as shown in Fig. 2). This way you will set the supporting “legs” of the cunning animal;
- Next, unfold the fox’s muzzle from the middle corner, straighten the ears and bend the tail part at random so that the origami fox stands confidently, paint the paper fox.
We've done it again! Hooray!
Paper fox: option 3 - a voluminous complex toy
Are you ready to learn how to make a paper fox with your own hands so that the animal looks as much like a real animal as possible? Then let's start analyzing the 3rd (most complex) scheme. She shows us how to make an origami fox with detailed anatomical detailing of the body parts. The scheme is not easy, but you can be proud of yourself if you manage to master the intricate folding technique. So:

- Fold the sheet of paper from a horizontal orientation so that its side edges meet in the center, then the origami paper blank needs to be sharpened both at the bottom and at the top. To do this, bend all 4 corners of the package inward, then unfold them (you need outlines of the edges);
- Open the lower corner “pockets” from the inside (both) and press along the plane. But the upper corners should not be opened, but folded inward (both). Did you manage? Let's make a paper toy for children next;
- We bend the upper corners (future ears) towards ourselves, focusing on the palpable groove. The ears need to be folded towards themselves again, reducing the resulting regular triangle. The ears overlap one after another (see Fig. 3);
- Bend the corners of the bottom edge sticking up downwards, fold the package in half (marking the central axis) and return it to its previous position. Fold the structure along the axis into a step (accordion), as shown in Fig. 3. The lower part now slightly overlaps the upper. Bend the corners of the steps towards you;
- He turns the package face down and bends the head of the future fox towards himself - the upper corner of the workpiece. Next, make folds that separate the front paws from the hind paws towards you (see Fig. 3 carefully);
- Acting strictly according to the scheme, systematically form the details - paws, voluminous muzzle, tail. At first, the origami fox will seem angular, but then it will take on spectacular final shapes. You can watch the video if the diagram is difficult to understand.
A voluminous chanterelle is not made from cardboard - it is difficult to maintain the shape of the workpiece. If you have mastered how to make a fox according to scheme 3, you can easily make origami animal figures of any complexity out of paper. For example, you are quite capable or amazing, which jumps or opens its mouth.
Don’t understand how to make an origami fox, but still want to make a toy for your baby out of colored paper? Use a ready-made template (Fig. 4). Here you don’t have to worry about how to make a chanterelle. It's simple: print out the finished drawing, cut out the parts along the contour and assemble a funny little fox with glue. It couldn't be simpler.
