Master class on making a model “Pet farm. Do-it-yourself joy: making simple toys for pets! Craft house for animals
Welcome to the thematic section about pets. For your convenience, it is divided into chapters, each of which is dedicated to one of the pets - both purely "village dwellers" and those that live in the city. Here you can find summaries of cognitive, integrated and creative classes dedicated to animals; useful illustrated workshops on creating all kinds of crafts and colorful layouts. This section contains and summarizes the rich experience of colleagues in the production of didactic games, all kinds of visual aids and lapbooks dedicated to pets.
We introduce children closer to those who make us kinder!
Contained in sections:Includes sections:
- Pets. Games, manuals, didactic materials
- Pets. Scenarios of events, entertainment, holidays
Showing publications 1-10 of 6119 .
All sections | Pets and pets
Advice for parents "Attitude of the child to pets" Almost all children want to have home pet, basically, their desires extend to a kitten or a puppy - because they are so playful and fun to play with. But, of course, children do not think about the great responsibility that arises with the advent of pet. This and...
Every year on November 30, World Day is celebrated in many countries. pets. For the first time in Russia, this holiday appeared in 2000 at the initiative of the International Fund for Protection animals, although, unfortunately, it has not yet been officially approved. Pupils of the middle group "Sun"...
Pets and pets - Outline of the lesson on drawing with wax crayons "Gift for a Kitten" as part of the thematic week "Cat and Kitten"
Publication "Outline of the lesson on drawing with wax crayons" Gift for ..." Purpose: to introduce children to the concept of "circle"; develop the ability to draw in circular motions with wax crayons. Dominant educational area: "Social and communicative development" Tasks: - to arouse interest in drawing ("Artistic and aesthetic development"); -...
 MAAM Pictures Library
Didactic game about the diversity of animals as living organisms "Russell the inhabitants to your house" Didactic game on ecology in the second junior group Educator: Sipyagina Elena Vladimirovna Didactic game about the diversity of animals as living organisms - “Russell the inhabitants to your house” Goals and objectives of the game: consolidate children's knowledge about domestic and wild animals; teach...
 Purpose: Consolidation and generalization of children's knowledge about the life of domestic animals and their cubs. Tasks: 1. Educational: to teach children to distinguish between adult animals and their cubs; to promote the education of sound expressiveness of speech, the pronunciation of onomatopoeia. 2. Educational: ...
Abstract of a drawing lesson in the first junior group "Traces of the cat Murka" Abstract of a drawing lesson for children of the first junior group “Traces of the cat Murka” Purpose: Development of the creative abilities of children. Tasks: -To form interest in drawing with fingers. - Continue the formation of ideas about pets (about the appearance and habits of a cat ....
Pets and pets - Advice for parents "Beware of dogs!"
Advice for parents "Beware of dogs!" ATTENTION RABIES! RABIES IS A DEADLY DISEASE OF PEOPLE AND ANIMALS! REMEMBER THAT RABIES CANNOT BE CURED, BUT IT CAN BE PREVENTED RABIES is an acute viral infectious disease common to...
Ekaterina Saenko
Dear colleagues! I bring to your attention master class on making a plywood layout"Farm".
I want to warn you right away that the house, the corral for horses and the fence were made for us by the grandfather of our pupil. For which many thanks to him! I just betrayed these amazing buildings aesthetic appearance. See what I got.
For we need to make a layout:
Glue (PVA, Liquid nails, "Titanium");
Varnish on wood;
Newspaper, white paper, napkins;
blue fabric;
Felt (white, green, yellow);
Sintepon;
Mouline threads;
Toothpicks;
Plasticine;
artificial grass;
Stencil-hole puncher "leaves";
artificial turf;
figurines pets;
Scissors;
Sewing machine;
Manual jigsaw
So, first I painted the house and the horse paddock, made in advance, with gouache and varnished them.


Then these models (house, paddock) I glued it to the plywood with titanium glue.

Getting Started tree making. I used the papier-mâché technique. I drew stencils of trees on thick cardboard and cut them out.

Next, we glue our frame of trees with newspaper, white paper and napkins using PVA glue. I waited for complete drying and started painting the trees, then glued the leaves made with a stencil hole punch to the crown of the trees, varnished them.


We glue the corral for pets. We paint it with gouache and varnish it, and then glue it to plywood.

We sew a lake from blue fabric and stuff it with padding polyester. We manufacture decorative ornaments (water lilies made of felt) and glue it all to the plywood.

We glue the trees to plywood and cut out an artificial lawn in the shape of plywood, to which we tie dandelions from floss threads. Cutting a path from Houses, leading to the lake, we fill it with millet, which we cover with varnish. All this is also glued to the plywood with glue.


We make reeds and cover the lake with pebbles. This is the beauty I got! Children love to play!

Related publications:
Program content: to form interest in the profession of a farmer; expand the understanding of the work of rural residents; draw the attention of children.
We came to the garden to see what is growing here. And different riddles grow on the beds. Before we can solve riddles, we need to collect a garden bed.
Purpose: making a model for game modeling in work with preschool children. Children's interest in learning traffic rules.
Paper is the most accessible material for children's creativity. Original paper crafts are obtained on the basis of the "accordion". I suggest making.
Master class on making a model “Primitive people” It is so established in our work that in kindergarten children should develop comprehensively.
Master class on making a model "Russian hut" In our garden, a review competition "Patriotic Corner" was announced. For him, we decided.
Anastasia Sergeeva
Do-it-yourself joy: making simple toys for pets!
Many pet owners know that their pets need entertainment and toys, but often spare money for such trinkets - because sometimes they really are unreasonably expensive. But we know a way out of this situation! After all, in order to make toys for animals with your own hands, you only need old, unnecessary things and the cheapest materials.
The most common pets in our homes and apartments are cats, so let's start with them. Making toys for these animals is not difficult, because any little thing can captivate a playful kitten.
Mouse for a cat
Cats love to chase mice, so we can sew a cute little rodent as a toy for our favorite animals. This is done quite simply, and such a mouse will cost very cheaply - you just need something:
- a small piece of felt or other dense fabric;
- sintepukh;
- strong threads;
- scissors and a needle.
Instead of fabric, you can take an ordinary tight sock and cut off the heel from it - the mouse will turn out to be less pretty, but it will also turn out to be sewn twice as fast.
- We cut out the following parts from the fabric according to the sample above.
- We sew the side parts together - either we sew on a typewriter, or we sew by hand, as you wish.
- From below, carefully sew the tummy of the mouse. We turn the workpiece on the reverse side.
- We fill the mouse with padding quite tightly, and then completely sew up the toy.
- Closer to the front of the body we sew the "ears". You can also add "eyes" made of beads, but this can be dangerous if the cat can tear them off and swallow them.
- We twist the flagellum from two strips of fabric and sew it to make a tail - it remains to attach it to the back of the carcass.
The mouse is ready! You can visually study the work on the toy in the video:
The thinner the fabric and threads, the faster the cat will be able to deal with the toy. Therefore, as the material of a toy for animals, you can take two socks at once so that the carcass is denser. And you can add a little catnip or catnip to the synthetic fluff - and then the pet will certainly not resist such entertainment.
Interactive toy box
If your pet is not too lazy and melancholic, then he will definitely like this magic box. Its attraction for the animal lies in the fact that inside the box there is a ball or a rattle that the cat can drive around the box, sticking its paws into special holes. Naturally, you can safely buy such an interactive box in a pet store, or you can save an average of 1,500 rubles / 600 UAH and make it yourself. Such a toy is made very simply, and if your cat suddenly does not want to play with it, you will not be offended for wasted money.
All you need to create a toy:
- tight box;
- stationery knife;
- Scotch;
- balls or rattles.
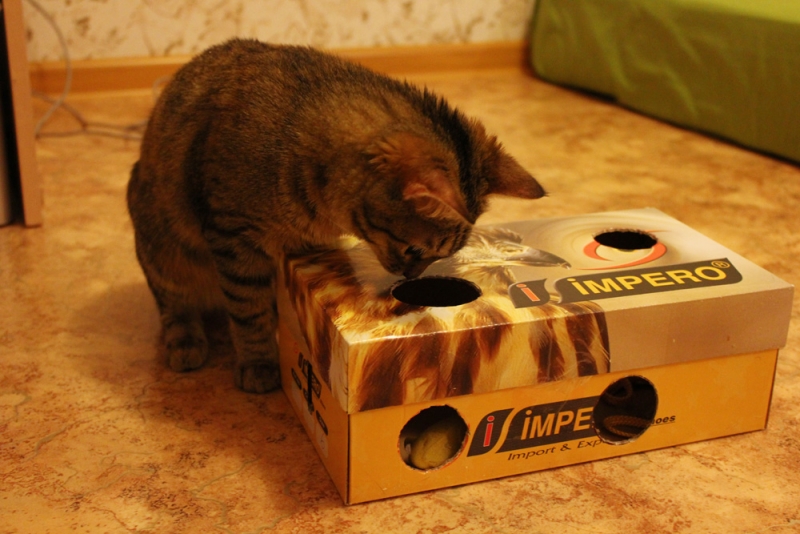
The box should be low, for example, from under a large pizza, tablet or flat shoes - in general, such that your cat's paws can easily reach the bottom. Also, it should be made of thick cardboard so that it does not bend under the weight of the cat.

For more information on how this interactive toy box is made, see the video:
Toy-teaser on a stick
And now you will learn the details of making a toy for animals, which will provide you with a joint game with your pet - this is a teasing stick with feathers. To make such a thing with your own hands, prepare the following materials and tools:
- multi-colored feathers;
- braid and / or lace;
- Super glue;
- threads;
- scissors;
- plastic stick for toys.
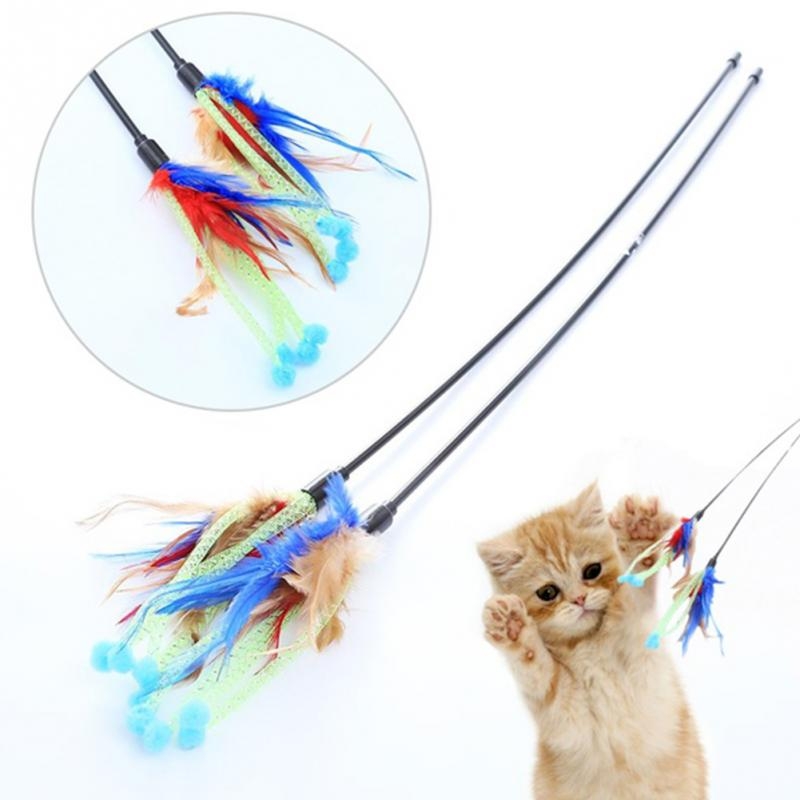
As a stick, you can take, for example, a stick from attaching gift inflated balloons, a stick from an old cat toy, the base of a children's toy fishing rod. Let's start creating toys for animals:
- Cut off a long piece of ribbon and lay it out on your work surface. Prepare feathers, short pieces of braid and pieces of lace.
- Now you need to collect feathers, ribbon and laces into one. To do this, apply superglue to a long braid and start laying our parts across so that their tips “sit down” on the adhesive base. Let them dry.
- Apply a second layer of glue to the braid, attach a plastic stick to one of the ends and start wrapping it in feathers, forming a bun. Wait for it to dry and the teaser toy will be ready.
You will find another version of the cat teaser in this video:
The second place in popularity among our compatriots as family pets is, of course, dogs, so we found cool toys for these pets too. They are even easier to make than cat toys, because the dog will be delighted with everything that can be dragged in his teeth and try to break it into small pieces!
tug toy
The most popular budget DIY dog toy is the tug-of-war, which can be made from old clothes like T-shirts. Actually, strong scissors and a couple of old T-shirts in different colors are all you need.


The rope for dogs is ready! See the video for more details:
Instant Dog Fun Ideas
What other toys can you instantly think of for these animals? We have ideas:
- An ordinary transparent plastic bottle will be a great entertainment for a dog: you only need to wash it, peel off the labels and remove the lid so that the dog does not chew it off or swallow it. By the way, you can put some dog food inside the bottle to make it even more interesting for the animal to play and get treats from the bottle.

- Take an old tennis ball and make two transverse cuts in it on one side so that they form a cross. Place a couple of "bones" from dry dog food into the resulting gap, and give the ball to the pet - let him solve the problem and try to get to the food!
- Do you still have empty yellow boxes from kinder surprises? Collect a few of these and place them in a tight sock, the end of which is tied in a knot. The pet will be happy to gnaw this design, feeling with his teeth through the toe of the box. The main thing is that he does this under your supervision and does not swallow anything superfluous.
But what stylish beds can be made for small pets - watch the video:
Take it, tell your friends!
Read also on our website:
show more
Parents of kids attending a preschool are aware that every holiday is necessarily accompanied by children's crafts for the kindergarten. Some may find this task to be a waste of time. But for the majority, this is still an entertaining and creative process, as well as an opportunity to spend time with a child with interest.
It is important to keep natural materials in stock in accordance with the season, and then any task for the manufacture of works will not be taken by surprise.

Reserves of natural material
When traveling to the sea, you can pick up small stones and shells. In walks in nature, stock up on beautiful leaves, cones and twigs. At the summer cottage, you can plant decorative pumpkins - this is a good raw material for products that is subject to long-term storage.

Leaves can be stored in a book. It is better to hold the cones in the oven and pour boiling water over them, destroying all the bugs. It’s also best not to throw away toilet paper or paper towel cartons, and save plastic bottles with caps. Designate a place for these items by placing everything neatly in the box.
Crafts for kindergarten - this is what the child must cook with his own hands. The degree of difficulty is determined based on the age category.

With skillful direction, the child will be able to create an application, drawing, and mold a plasticine product on his own. Taking into work natural materials in the form of leaves and cones.

DIY craft ideas for kindergarten below will tell you how best to use non-standard tools, such as pasta or plastic dishes.

Plastic bottles can already be classified as standard materials, the possibilities for working with them are endless. Use matches, napkins, and sushi sticks, they are all great tools.

Products in the autumn version can be performed as compositions or as independent works. Perky hedgehogs, old foresters or alien creatures in a flying saucer - all this can really be done by children's hands using raw materials given by nature.
Winter style products
In winter, we have associations for New Year's holidays, and we also do not forget about the day of the defenders of the fatherland.

On February 23, military items will be relevant. You can make greeting cards. Excellent products are made from fabric, but parents should take part in the creation, since it is necessary to cut.

The body is created from fabric, while the corners at the bottom should be stitched, this is necessary for stability. Next, fill the bag with padding polyester and tighten the thread.

It remains to create a face. The nose can be made from a beige bead. Eyes can be used ready-made or create an application. Embroider eyelashes, and build antennae from threads tied into a bundle. Give a tone with blush or lipstick.

Hands are made of fleece or cloth and glued. Alternatively, attach one handle to the cap. Ideas are endless, you can supplement the work with shoulder straps.

Works in the style of autumn
Products in the autumn style are distinguished by the fact that materials given by nature are used for manufacturing. Leaves, cones and acorns of this raw material are in abundance in autumn, which is perfect for crafts on a site in a kindergarten.
As a rule, competitions of works are arranged in the autumn period. The kid is able to create an application on his own with a little help from his parents.

For products from vegetables and fruits, a knife is used, so the work must be carried out strictly under supervision. Paints are often used in gardens. But you can also replace them with material, for example, autumn leaves will serve as stamps for creating a forest.
Note!


You can tell the kids how the birds need their help and make a feeder together.

This contributes not only to the development in creativity, but also brings up a sense of caring for animals.

In winter, the death of birds is very high, because because of the frost it is difficult for them to survive, so care will be taken when creating a feeder.

For the feeder you need: a tree, a box and plastic bottles. Wooden feeders are known for their durability. But not everyone can handle this material. Cardboard is easy to use, but it will not stand up in wet weather.

In this case, the cardboard feeder can be updated periodically, and the baby will like its decoration. Plastic is the most unpretentious material. Easy to work with and will hold up after rain. The work uses a mock knife, so the process is carried out under the guidance of adults.
Note!


Street layouts
You can build situations that convey the meaning of reality, such a game will help you learn the movement on the road, study the signs. Street markings can be drawn with paints on cardboard, houses can be built from boxes. Decorate the urban landscape with greenery and, most importantly, make road signs and traffic lights.
Road signs can be printed from the Internet. A sign stand can be made from a plastic bottle cap and a sushi stick, and fastened with plasticine.

It is easy to create houses from cardboard boxes or glue them from cardboard and paint the facade. Trees are created from cardboard or natural materials.

If you finely chop the green threads and sprinkle them on cardboard, pre-lubricated with glue, you get grass. The soil is easy to create with grits glued to the surface.


Note!

One side has a background color and the other side has three traffic light colors. Glue a thread between the halves and the circle is easily glued so that you can turn it to the hole of one side or another.

bottle craft
Wall panels, plot compositions and toys can be performed in various techniques. It is very easy to make crafts from plastic bottles for kindergarten.
You can make a penguin. This will require two plastic bottles, with the bottom cut to the required size. And the part is placed one inside the other. For convenience, several cuts can be made in the inside.

Using acrylic paints, paint the toy. We make a pom-pom from threads - to decorate the hat.

The scarf is made of braid or fleece, it will successfully hide the junction of the bottles. For the stability of the scarf, you can put it on glue or double-sided tape. Colored paper is used for wings and paws.

Photo crafts in kindergarten


It is possible to captivate any child with such a creative activity as creating interesting crafts from various improvised materials.
There are a huge number of ideas on how to make crafts in the garden with your own hands. Such a rather painstaking and exciting process develops the child's concentration of attention, mental thinking and the acquisition of new experience.

Attending kindergarten, then school, the child develops with the support of educators and teachers, and at home, parents need to find time to work together with their child.

The photo of the crafts in the kindergarten shows the work of children with which they can express themselves.
Spring theme in children's crafts
Spring is probably the most positive time of the year, when nature blossoms and glows from the warm rays of the sun, the birds return, the trees and the first flowers bloom.

A child, unlike an adult, reacts especially impressionably to such changes, so it is in spring that you want to do something new and original.

To implement the ideas of children's creativity, you can use a lot of improvised materials: glue, paints, colored paper, empty plastic bottles, unnecessary boxes, various cereals, threads, ribbons, cones, foliage, etc.

Works can be completely different directions, depending on the material for its manufacture:
Origami in the form of a spring bird
This execution technique provides only for the presence of colored paper and a few primary skills.

What they turn a sheet of plain paper into: flowers, birds, figurines of animals.

Craft "Bird" is quite simple and a young child can handle it. For the spring bird will come in handy:
- branches from a bush on the street;
- scissors;
- colored paper;
- glue - pencil or PVA.
It is necessary to carefully tie a strip cut out of colored paper (which is about 20 cm long and 2-4 cm wide) into a weak knot, so that one side of it is slightly longer than the next.

From one end, you need to cut out the head and beak, and from the other end, the tail. The finished bird needs to be fixed to a tree branch with glue.

Papier-mache style
This technique of work came from Europe and involves applying small pieces of paper to a certain shape, which are mixed with glue. For example: an egg for Easter.

You will need the following materials:
- ball;
- colored corrugated paper;
- used sheets of paper;
- Wheat flour.

For this craft in kindergarten, the first step is to inflate the balloon, then carefully glue the pieces of paper moistened with flour paste on all sides of the balloon. The composition must dry completely within 10 hours.

Note!
Inside the testicle, you can place plasticine birds or other figures of your choice. For Easter holidays, it is worth putting colored chicken eggs in such an egg.

Quilling technique
These are crafts made from paper rolled into a tube. For a picture of a spring lily of the valley, you need to prepare:
- green, blue and white paper;
- thick cardboard;
- glue;
- scissors, tape.

A pair of rectangles are cut out of cardboard, on which the craft will be attached. The contours of the future lily of the valley are drawn on them, then strips of colored paper are twisted using an ordinary toothpick.
The strips are glued along the contour on the cardboard with the corresponding colors (leaves, stem and flowers themselves). A bow is knitted from a ribbon on a flower and a loop is made with it, on which the finished picture will hang.

We decorate the playground in kindergarten
Crafts for the playground in the kindergarten will be an interesting unique decor, to which your child will be happy to make his efforts.

Live pebbles. You need to prepare materials:
- stones;
- acrylic paint;
- coating varnish;
- brushes;
pencil and eraser.

Note!
The simplest option is the shape of a ladybug. Smooth stones of different sizes must first be thoroughly rinsed and dried properly. Then apply the contour of a ladybug on it with a simple pencil and color them with gouache (black, white and red).

To prevent the paint from peeling off, a layer of colorless varnish must be applied to the painted insect. After successfully completed simple work, you can proceed to more complex animal figures.

Plastic bottles
Plastic bottles are the most popular decor for garden crafts. Try to make a palm tree out of used bottles with your child.

A brown plastic container must be cut from the side of the neck (removing the neck itself) in straight strips to the middle, then fasten them together with a hard wire - this will be the trunk of a palm tree.

We choose the height individually. We cut and fasten green bottles in the same way, but there are only three or four pieces, since in the future they will serve as the leaves of the tree, which is also attached to the stem of the bottles with wire.

It is preferable to create natural crafts in the kindergarten in the autumn season, since nature itself provides a huge selection of materials for children's creativity.
Note!

You just have to try to assemble it and turn on a rich imagination, using everything that lies under your feet: branches, dry leaves, cones, acorns.

An interesting wreath on the head will help to make dry maple leaves, fastened with elegant braid and decorated with beads and bows. Or - a cheerful perky caterpillar from a row of acorns with legs made of matches.

The child will definitely like the idea of creating their own original crafts, working on which, moreover, favorably develops motor skills, intelligence and increases mental abilities!

Photo crafts in the kindergarten


