Print out a simple paper tank diagram. How to make a paper tank instructions
Content
Sooner or later, if you have a child (especially a boy), you will be faced with the fact that you will have to make a tank from improvised materials. Or you need to design a theatrical production, decorate a school museum, or somehow wrap a gift for a military man in an original way. We have already prepared, found valuable information and are ready to share with you the data and experience on creating a tank from cardboard.
How to make a military vehicle from corrugated cardboard
A corrugated cardboard tank is a rather interesting and simple option that does not require a template. For such a DIY cardboard tank you will need the following materials:
- corrugated material in green, blue and dark blue shades;
- scissors (sharp only);
- PVA glue;
- School line;
- simple pencil.
First you need to cut the dark blue material into thin strips, and the green material into wide strips. Now you need to twist the blue ones into wheels and wrap them with green ones to make a caterpillar. Use PVA glue to join the pieces. If the wheels turn out to be too small, then you need to use several strips. You can also use double-sided tape, which works well to hold small parts together.
The future caterpillar of a combat vehicle will look something like this:

Please note that the wheels are not all the same size. Larger wheels are placed in the center, and smaller wheels on the sides. You need to make two of these caterpillars.
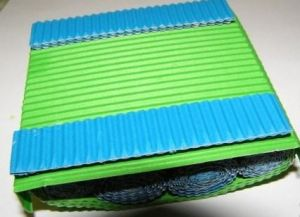
Now you need to prepare a platform from green corrugated material. You need to cut out a rectangle, bend the edges on both sides and glue the tracks, as shown in the photo:

Now you need to cut out two wide strips from blue cardboard, bend them in half and glue them to the base of the product:
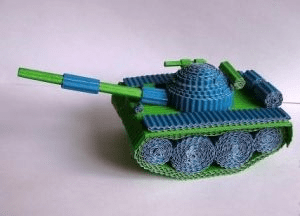
Next you need to make the remaining details. Make the tower according to the principle of a wheel, only much larger; also twist the fuel tanks, a cannon and other necessary components at your discretion. As a result, you will get a beautiful and bright military vehicle that you can present to your child or make with him.
Making a cardboard tank with your own hands without a template turned out to be not so difficult, but we offer another interesting option.
Colored cardboard tank
This is also a fairly light option and you will need regular thin colored cardboard. So, first you need to cut two strips of medium width from a white or any other color sheet and glue them into a ring. Now you need to take a sheet of a different color and glue the finished rings to it and lightly press them down so that they look like a caterpillar.
From a wide strip of the same color you need to build a military machine cannon.

You can make it triangular, as shown in the photo, or you can simply roll the cardboard into a tube.
At the preliminary stage, your craft will look something like this:

The tank can be decorated with army paraphernalia or left as is. This craft can be safely prepared for certain school holidays. A cardboard tank is quickly assembled and does not require any special financial costs.
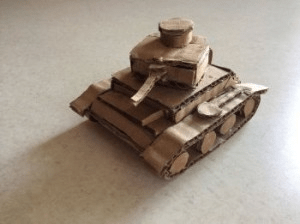
Military vehicle from an old box
And now we will tell you how to make a tank out of cardboard using an old box. TV or refrigerator packaging will do. The main thing is that the material is dense, without any visible flaws. What else is needed:
- scotch;
- any scissors;
- PVA glue;
- pen.
So, a DIY tank made of cardboard with a step-by-step description:
First you need to draw on the base material all the necessary details of the combat vehicle: 8 medium circles, two narrow and long stripes and two short wide stripes.

Now you need to make the tracks - twist the parts into an oval and glue them together; wide stripes need to be glued to one of the sides. Use tape or glue to hold the parts together.

Now on the side where the caterpillar has the open part you need to glue your round pieces. They will act as wheels on the track. Therefore, they need to be placed at the same distance from each other. In this case, use PVA glue.


We just guide you in the right direction, and you yourself can come up with options for how to make a tower or cannon. You can also cut out additional decor from cardboard in the form of a shovel, bucket or some other components.
How to glue a tank using a template
You can come up with a template yourself, draw it and print it, or you can use a ready-made pattern. Recently, paper crafts have become very fashionable. Not only children, but also adults are interested in this technique. We offer do-it-yourself cardboard tank diagrams:
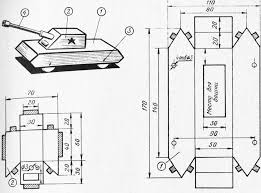
You can transfer the pattern with a pencil onto the main material, or you can immediately print the pattern on thin special cardboard.
Use an old pen or the dull end of a pair of scissors to follow the dotted fold lines to ensure the material folds neatly. Use a small amount of PVA glue to assemble the model.
Chicken egg cage tank
Let's assume that a cardboard tank model can be made not only from this material, but also from a chicken egg cage as a base. You will also need black or dark green paint, a brush, a cardboard base for the tower, and a tube for the cannon. By the way, the tower itself can also be made from part of a cage. The model will look something like this:

How to make a large cardboard tank
You can make a large cardboard tank with your own hands from an ordinary TV or refrigerator box. The principle of its creation is almost the same as in the case of a small model. We want to offer you several photo illustrations that (we are sure) will inspire you to create something truly interesting and worthwhile.
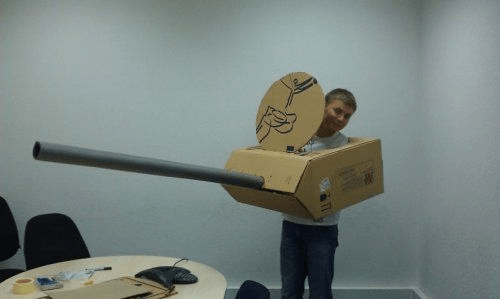
In this case, a regular office equipment box was used. A circle is not completely cut out from above, which plays the role of a hatch. And the plastic pipe acts as a cannon.

We will show you and describe step by step how to make a paper tank with your own hands. This tank model is the most popular. To make a paper tank with your own hands you just need a sheet of A4 paper and scissors.
Instructions for making a paper tank with your own hands.
First, let's prepare everything you need for origami, namely two sheets of paper, first A4, format 30x21 centimeters, second 5x3 cm and scissors. You can also take colored paper. In this case, your origami will immediately take on a unique look.
1. Place a large sheet of paper in front of you as shown in the photo.

2.
Fold in half, along the long side. 
3.
Bend and then straighten one corner first. 
4.
Then do the same with the second corner. 
5.
Do the same on the second side of our sheet (steps 3-4) 
6.
Next, we need to carefully bend both sides so that on the fold line there is a central point formed from two diagonal lines. For clarity, you can look at the photo. 
7.
Fold the corners inward along the fold lines. There are 8 corners in total. 
8.
We place the figure in front of us and bend the top corner down on each side. 
9.
Fold the top of the workpiece until it touches the center line. 
10.
Fold the same strip in half, bending the bottom edge up. 
11.
Then we bend the corners in the other direction so that they don’t interfere with us for now. We do the same as described in paragraphs 9, 10. 
12.
Bend the corners in different directions as they were originally made. 
13.
Place the figure on the table as in the picture. Fold the top corners in half. 
14.
Turn the tank model over to the other side. 
15.
Fold the layout into a ring. Our figure should be fixed, and the large angles should be on top. 
16.
We are making the turret of our tank. We tuck the large upper corners into the folds of the triangles located below. 
17.
As a result, we will get just such a paper model of a tank, only without a gun. 
18.
Now it’s the turn of the small piece of paper that we prepared at the very beginning of the master class. We make a tube out of it. 
19.
We install the cannon in the hole in front. We unbend the folds on both sides at the base, thereby creating caterpillars. 
20. Congratulations, you have made a paper tank with your own hands.
How to make a paper tank video.
Don't be upset if you don't get the craft right the first time. In this case, try again to go through all the stages of assembling origami. Now you know how to make a paper tank.
Don’t forget, we take criticism well, if you don’t like the description of any step in describing origami, leave a review in the comments.
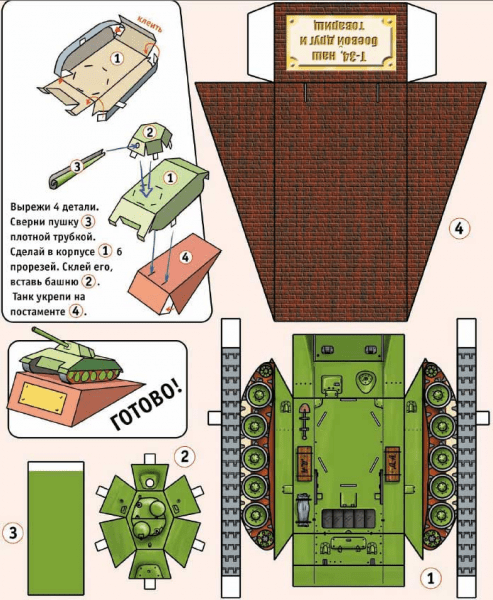
Previously, we published several schemes, but today we want to complement this collection with a new model - T-10 tank made of paper.
The prototype of the T-10 tank was created by Soviet engineers back in 1944, but it was called IS-4. Only after the death of I. Stalin, after whom it was named, was it renamed T-10.
The T-10 heavy tank (its weight is as much as 50 tons) had such good combat and tactical characteristics that its modernized prototypes (see “”) were in service with the Soviet Army right up to 1993.
The tank is equipped with a 122 mm cannon, which could shoot accurately at a distance of 5 km. Its engine developed a power of 750 horsepower. The tank could overcome water obstacles up to 5 m deep (it crossed rivers along the bottom).
Making a T-10 tank from paper
In order to make this model paper tank First, print out diagrams (scans) of the parts on a printer, preferably a color one. However, if this is not possible, it doesn’t matter. The parts of the tank can always be painted.
To print out diagrams of tank parts, you need to choose thick paper, such as photo paper or thin cardboard. Then the tank model will be strong and more durable.
Use sharp scissors to cut out parts. You can also use a utility knife.
Once the pieces are cut out, use an old ballpoint pen and a ruler to make neat folds used to glue the pieces together.
You can use any glue, but a dry glue stick is better. The fact is that it will make the tank model more accurate, since there will be no smudges from it, and the paper will not curl.
Paper diagrams of T-10 tank parts


Instructions for gluing the tank

For dessert, we invite you to look at the domino principle in action, a world record of 125 thousand pieces. Watch until the end. It's worth it.
If you set out to make some kind of paper craft and don’t know what you can create, try constructing a paper tank yourself. Before you make a paper tank, carefully read the instructions and get to work!
Today I will tell you how to make a tank out of paper.
You will need:
You must print the tank template itself on a printer.

Next, we cut out the parts, not forgetting that we will need 2 printed copies, because the second caterpillar did not fit on the sheet. Also, when printing on a computer, you can paint the tank yourself in the color you need, or print on colored paper.

How to make a tank out of paper. Cutting out the details
And as a result, we will get approximately the following set of cut out parts, to which you should add 1 more cut out caterpillar.

Let's start gluing the turret of the next tank out of paper. First we make a cylinder as shown in the picture below. It will connect the tower to the base.


And also in parallel, while we are gluing the turret section by section, in the same way we should begin gluing the base of the tank in parts. While the glue dries on one part, we move on to gluing the next one.
How to make a tank out of paper. Almost done
We are currently gluing the tank tracks into circles and not attaching them to the body.


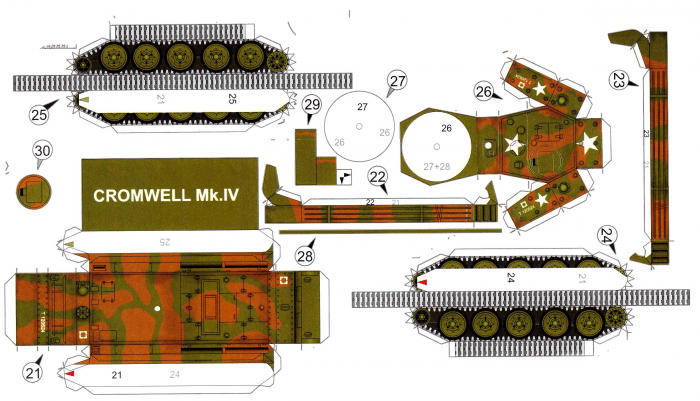
Model for your collection.

Model for your collection.
Developed in the summer and autumn of 1942 at the tank design bureau of the Gorky Automobile Plant (GAZ) under the leadership of Nikolai Aleksandrovich Astrov, the leading developer of the entire domestic line of light tanks of that period.
Print on a printer, on A4 sheets of matte thick paper, cut and glue.
 Model for your collection.
Light tank "Scorpion"(FV101 Scorpion) entered service in 1972, used in reconnaissance units of the British ground forces.
Print on a printer, on A4 sheets of matte thick paper, cut and glue.
 Model for your collection.
The armored personnel carrier was named after a species of Indonesian bull. It is also known as APS-3.
Print on a printer, on A4 sheets of matte thick paper, cut and glue.

Model for your collection.
GAZ-3937 (“Vodnik”) was developed at the Design Bureau of GAZ OJSC. Manufactured at the Arzamas Machine-Building Plant.
Print on a printer, on A4 sheets of matte thick paper, cut and glue.
 Model for your collection.
The Barracuda is designed in a variety of configurations, including an armored personnel carrier, reconnaissance vehicle and police vehicle.
Print on a printer, on A4 sheets of matte thick paper, cut and glue.
 Model for your collection.
Created by the GIAT concern in the 1980s to replace the outdated AMX-30 tank. Serial production began in 1992, with a total of 794 units produced until 2007; as of 2010, there is no further production of Leclerc.
Print on a printer, on A4 sheets of matte thick paper, cut and glue.

Model for your collection.
Panzerkampfwagen IV (PzKpfw IV, also Pz. IV; transliterated as Panzerkampfwagen IV; in the USSR it was also known as T-IV). The most popular tank of the Wehrmacht (a total of 8,686 vehicles were produced), it was mass-produced in several modifications from 1937 to 1945.
Print on a printer, on A4 sheets of matte thick paper, cut and glue.
 Model for your collection.
T-34 (“thirty-four”) - mass-produced since 1940, and since 1944 it became the main medium tank of the Red Army of the USSR. Developed in Kharkov. The most popular medium tank of World War II.
Print on a printer, on A4 sheets of matte thick paper, cut and glue.
 Model for your collection.
The Leopard 2 is one of the most successful and widespread, and by some estimates also the most advanced main battle tank in the world.
Print on a printer, on A4 sheets of matte thick paper, cut and glue.