How to make an artificial cast. Celebrating Halloween - how to make a ghost, ghost, mummy with your own hands. How to make liquid starch with your own hands
Let's learn how to make a ghost, ghost, mummy for Halloween. You can decorate your home and yard with such items, and edible specimens will end up on the table.
Halloween is celebrated in many countries, including ours. Decorate the room appropriately for this event, and place translucent ghosts in the courtyard of a private house that will surprise everyone present. Let the holiday be terribly interesting and unforgettable.
How to make a ghost for Halloween?
You can surprise your neighbors by placing this figurine in your yard for Halloween.

Try to amaze your family by placing these floating ghosts at home.

But first, make sure that those who see such crafts are in good health, because you can get scared if you suddenly see something like this. And making a ghost for Halloween is not at all difficult and you only need so little. This:
- packing tape;
- transparent bags;
- mannequin or volunteer;
- scissors;
- glue;
- optional - gauze or white mesh translucent fabric.
If you have a suitable mannequin, use it. First you need to make the cast body. To do this, you need to unscrew the head from the mannequin.

Now place a large transparent bag, cut side down, over the torso of this exhibit. If you don’t have a mannequin, and a volunteer is helping, then make a small cutout on the top of the bag with scissors and put it on the person. You also need to make slits in the arm area.

So that you can see in which direction the packaging film should be wound further, in the following figure these directions are highlighted with blue tape. First you will need to wind from the right shoulder to the left side, as if obliquely. Then it is wound in the reverse order - from the left shoulder to the right side. When 3 layers of elastic film have been applied, the bottom is wrapped.


A plaster head of one of the leaders is suitable for the template, if there is one in the house. You can also use the top of a mannequin. But under no circumstances should you put a bag on a volunteer’s head. It’s better to put the bag on the ball, on which you first made a nose and lips with plasticine. Now you need to wrap your head with an elastic band. Also make about 3 turns and secure the ends of this film. Here's what you'll get so far.

Place the neck into the cut of the first part, wrap this place with tape cut into strips. You can connect the two pieces this way.
To make a dress for such a ghost, place several clear garbage bags around his waist, after making a neckline. Cut strips at the bottom of the bags. You can pull them slightly to make them wavy.
Place a transparent cloth or gauze on this doll's head. Attach this robe using clear double-sided tape or glue.

Now you can place the figurine in your own home or apartment. And some place such ghosts on the balcony. It’s not hard to guess how vivid the reaction of others who see this will be. But this needs to be done on Halloween, then the public will be prepared for such spectacles.

You can make a ghost or several and hang them in the office, surprising your employees on this day. Some people put LED rods inside these figures to make them glow in the dark.

If you don't have a mannequin, just make the bottom half of the ghost.

If such a Halloween craft decorates the office ceiling, then you will be able to achieve the desired mood at work.
If the boss and employees understand this humor, then the upper part of this ghost can be fixed on the other side of the wall.

To make the woman in white more authentic, make her hands and fingers. Hair can also be made using tape or transparent bags.

If you wish, do only the hands. By investing in LED flashlights, you can illuminate the room in the dark and decorate your home in a proper way for Halloween.

See what else a floating ghost can be. The next master class and step-by-step photos will tell you about this.
How to make a Halloween ghost with your own hands?

Take:
- so-called chicken wire;
- leather gardening gloves;
- clamping scissors;
- centimeter;
- pliers;
- bitumen;
- electrical tape;
- head model made of plaster or foam.

The basis of the figure will be mesh wire. This type is used in poultry pens, which is why it is called chicken.
Take a tape measure and use it to cut a square of 91 cm from the mesh wire.

Here's how to make a ghost from this material. Place this square on the head template. Wrap this layout, trim off the excess.

Now you will need to press the wire in place of the eyes, shape the nose to create facial features.

To make the shoulders, take a baseball bat or a suitable object. They will be rounded, the distance between one and the second shoulder is 44 cm. Cut off the excess.

Fold the rectangle piece of wire down to form the body.

Using a baseball bat, form a bust.

Now you will need to make a dress. To do this, place two rectangles of mesh wire as in the picture. Please note that measurements are in inches. 36 inches is 91.4 cm, and 24 inches is rounded 61 cm.

Now you need to put three strips of electrical tape in the center of these two rectangles so that they form a flower like this.

Using it as a guide, make a slot here.


Now pull the corners of the wire so that the fabric begins to come together. Shape the dress using gloves to avoid injury.

Cut a strip of wire approximately 76 cm long to form a hand with fingers. Attach the first and second arms to your shoulders.

Create a hairstyle for this ghost using the wide part of the bat.

Attach the head to the body. Mark the waist by pressing sections of wire in this place, adjust other elements of the figure

Make other adjustments if necessary. Make the figurine stable and you can place it in the garden among the bushes and trees.

How to make Casper for Halloween?

To make these cuties, take:
- wooden or metal pegs;
- newspapers;
- white bags;
- threads;
- white non-woven material;
- black felt-tip pen.
Determine how many Caspers will make up this composition. If 4, then drive that many stakes into the soil. Remember the newspaper, giving it the shape of a circle, wrap it in a plastic bag. Place non-woven material on top. Draw facial features with a felt-tip pen. Place the figures on the stakes and tie them again with thread just below the head to secure them.

To make it seem like these ghosts are holding hands and dancing, tie the corners of their clothes together.
You can use more affordable material. Make such a charming Casper the ghost from gauze.

To make it, take:
- 1 liter plastic bottle;
- gauze or sieve cloth;
- foam ball;
- a piece of felt;
- liquid starch;
- towel;
- scissors;
- wire.

Cover the table where you will be working with a towel. Place the plastic ball on the neck of the bottle, lightly piercing the round blank. In the right and left sides, just below the middle, insert a piece of wire at the same distance. Fold their ends up.

Now place a rectangle of gauze on top of the workpiece. Spray it with liquid starch.

If you don’t have such liquid starch in a spray bottle, then prepare it yourself from regular starch. You will need to moisten gauze in this paste, squeeze it out, and then put it on the workpiece. Wait until the coating dries, then glue two black eyes cut out of felt here.

You can make hanging ghosts from almost the same material. You will also need a screw with a loop. You will stick it into a foam ball. If you want the structure to be fixed better, then additionally glue the screw. You can paint it with white paint so that it does not stand out against the general background. And with black paint, draw two big eyes for this Casper.

Cut a rectangle from the sieve fabric or gauze. Place it on the ball and cut the ends into strips. To give this fringe a slightly scruffy look, pull it out.
You can make some ghosts and hang them in your house for Halloween.

If you want little ghosts to sparkle in the dark, then we recommend using a garland.

These little Caspers will help decorate your house for Halloween. You will need to take a white garland and wrap each one with white cloth as follows. Cut a square with a side of 35 cm from the canvas, fold it diagonally in half to form a triangle.
Place this blank on the garland ball. Draw eyes and a nose with a black marker, tie the bottom with white thread to separate the head from the body.

Now you can light such a garland and decorate your apartment for Halloween.

How to make mummies for Halloween?
These characters will also help create the appropriate setting. Try making just their heads.

To do this, take:
- white paper towels;
- scissors;
- oranges;
- liquid starch spray or gauze and PVA glue;
- Double-sided tape;
- eyes for toys;
- glue;
- black felt-tip pen with white electrical tape and black electrical tape.
Take a couple or three paper towels and unfold them. Wet with water and squeeze. And if you are using liquid starch, then they need to be sprayed on a towel and left to dry.
Place black electrical tape where you will then attach the eyes. If you treated paper towels with starch, then after they dry, you need to wrap the oranges with this material and secure with tape. If you did not use liquid starch, then wrap the oranges with gauze, periodically wetting this material in PVA glue.
Leave some space for the eye sockets; glue the eyes for the toys here.
You can make candlesticks in the shape of mummies.

Take:
- gauze;
- PVA glue;
- glass jars;
- brush;
- sponge or regular brush;
- toy eyes;
- scissors;
- tea lights or battery-powered candles;
- scissors;
- watercolor or acrylic paints.

Cut long strips of gauze. Apply PVA to the jar and wrap it with the resulting bandages. You can add a few dark spots to keep the gauze from looking new. Glue the eyes for the toys and you can put candles inside.
The hand of a mummy will also be appropriate for this holiday. It's not difficult to make.
To do this, you need to fill a fabric glove with stones. Now soak the bandage in a solution of PVA glue and fool her with it. You can also use gypsum for these purposes.
You can make it in the shape of a hand and a candle. To do this, melt the paraffin. Cool it slightly, then pour it into a cloth glove. First you need to put a thread wick in each finger. Wait until the paraffin dries and the candle takes shape. Then place it on the base, on the pin. Pour red colored paraffin on top.

You can make a mummy hand by putting a glove on a bottle. Pre-moisten the bandage in PVA glue and wrap it around the base.

You can make a mummy as follows. Cut out a base for it from a large sheet of cardboard. Now wrap this blank with newspapers, securing them with tape.

Wrap a bandage on top, moistening it in a solution of PVA glue diluted in half with water.

To make a mummy using the ideas from the next class you will need:
- scotch;
- plastic bags;
- stones;
- bandage;
- scissors.
You can use yourself or a volunteer to put on the trash bag and then pull the other one over your legs.

Take wide silver tape and start wrapping it around this base.

It is better not to make the winding too tight so that you can then remove the workpieces. But in the waist area you simply make a slot so that you can then remove the winding.

Now put plastic bags here, stuffed tightly, and you can also use stones to weigh them down.

Then also wrap yourself or a helper to make the top and arms.

Now connect both parts, stuffing the top with bags as well. Glue these parts together with tape.

To make the head, use a soccer ball, but the nose can be made separately. Attach this part to the base.

For wrapping, use elastic or a simple bandage. Flesh-colored elastic bandages for sale. And if you have cotton, then you need to first dye it with a tea solution. When the bandages are dry, wrap them around the workpiece.

And if you need a Halloween costume for a child, you can partially wrap it with such an elastic bandage without tightening it too tightly. Then you can make this outfit in literally 10 minutes.

You can make a ghost and a mummy and then put them in the garden.

If you need to decorate a table, wrap a dark bottle with bandages or white masking tape and glue the eyes for toys here. You will get a funny mummy.

Here's how to make ghosts out of a bottle. To do this, you need to paint it with white acrylic paint. When dry, draw facial features with a black marker.

To set a themed table, use not only bottle decoration ideas, but also create delicious dishes that have a very unusual look.
What to cook for Halloween?

It is unlikely that anyone will immediately risk trying such a dish. But when he tastes it, he will want to try it again and again. After all, fingers are nothing more than cheese sticks. You will bake them into finger shapes. And use a knife to make several stripes. Place a little ketchup on the ends of each finger and use it to glue the peanut halves here. When serving, place these unusual snacks on a round dish and place a bowl of ketchup in the center.

You can make delicious pizza. Place assorted meats here, cover with tomato paste. You can make white cheese monsters, but place them on the pizza 3 minutes before the end of cooking to prevent them from melting too much and losing their shape. The eyes will become black olives. The next pizza is also made in the shape of a ghost.

Sprinkle some grated cheese on top and make the eyes and mouth out of tomatoes.
If you need to cook quickly, then take hot dog buns, cut them in half, pour a little ketchup into each and put a sausage on it. Trim some of the skin off the sausage so it looks like a fingernail.

Take round buns, place a flat cutlet on each, place slices of cheese on top with pumpkin-like faces cut into them. Heat up those cheeseburgers. Such hot sandwiches will also be appropriate when you celebrate Halloween.

You can make cookies in the shape of a pumpkin, and turn the chocolate pieces into tails when you take this dish out of the oven.
You can cut raw vegetables into slices, cut out their facial features and bake them in the oven. Also serve this dish on the table on this day.

You'll make the following Halloween snack if you take:
- salted straw;
- slices of soft cheese;
- knife;
- green onion feathers.

Cut each slice in half, then slice one side of each half into strips. Wrap the ends of salted sticks with these preparations and tie with green onions.
You can make mummies like this out of sausages.
To do this, you need to wrap these meat sticks in thin strips of dough and bake in the oven.
You can make the dough yourself or roll out the purchased dough thinly and cut it into strips. Then wrap the sausages. When they are ready, add a dab of ketchup so that it turns into mummies eyes.

Not only main appetizer dishes can be prepared according to this theme, but also delicious desserts can be made.
Stick 8 round cookie halves into each chocolate candy. Take two yellow candies and use liquid hot chocolate to glue them on as eyes. The web is also made from hot chocolate, for this you can use a template or do everything by hand.

You can make a delicious dessert using another recipe.
To make one, take:
- bananas;
- White chocolate;
- ice cream sticks;
- a little dark chocolate;
- knife;
- syringe without needle.
Cut the banana in half, now cut each half lengthwise. Place glassine paper on a baking sheet and insert an ice cream stick. Now dip these pieces into melted white chocolate and place them on the prepared surface. When it hardens a little, squeeze out the melted dark chocolate with a syringe so that each piece has two eyes.
You can turn bananas into ghosts, and tangerines into pumpkins that accompany this holiday.

If you make meringues, shape them into ghost shapes. Use dark chocolate to make eyes and mouths for them.

You can bake a chocolate sponge cake, then put one chewy marshmallow on each cake and pour melted white chocolate on top. Then make the eyes and mouths with dark chocolate in a tube.
You can bake a chocolate cake, then use a piping bag fitted with a thick tip or using a syringe to drizzle white chocolate in a spiral pattern. Now go from the middle to the edges with a toothpick to turn this design into a web.

Place a chocolate spider or edible ghost in the center of this dish. You can make a white chocolate ghost on a dark baking surface.
Here are so many interesting ideas for decorating and preparing Halloween dishes for you. To see how to make a ghost, watch the interesting process of making one.
The next master class shows how to make a Halloween mummy from toilet paper.
Regardless of whether you are going to celebrate Halloween, it is simply impossible to pass up the idea of such terribly cute decor! Introduce some adorable ghosts into your home to add some fun to the fun.
Flying gauze ghost
You will need:
- Gauze or other transparent white fabric;
- black felt (or other dense material);
- water;
- 200 grams of starch;
- wire;
- fishing line;
- plastic balls or small balls;
- glasses
First, dissolve the starch in a few tablespoons of cold water. After mixing the mixture thoroughly, add half a liter of boiling water. Cook this mixture for 1-2 minutes, stirring constantly. After the product has completely cooled, you can dip pieces of cloth or gauze into it. We make a small cast using one ball. A ghost with “handles” will emerge from several balls placed on glasses of different heights.
Secure your ghosts with wire or fishing line, after gluing on their eyes and mouth, or even making a screaming grimace.
Illuminated ghosts
You will need:
- Table tennis balls;
- colorless LED garland;
- gauze;
- starch;
- black marker or felt-tip pen;
- masking tape;
- screwdriver or large nail;
- egg tray
Using a nail or screwdriver, make a hole in each ball for the garland. The markings can be painted over with a pattern or pre-wiped with alcohol. Draw some funny or terrible emotion for each future ghost. We place the balls on homemade legs made of masking tape and place them on a tray, away from each other.
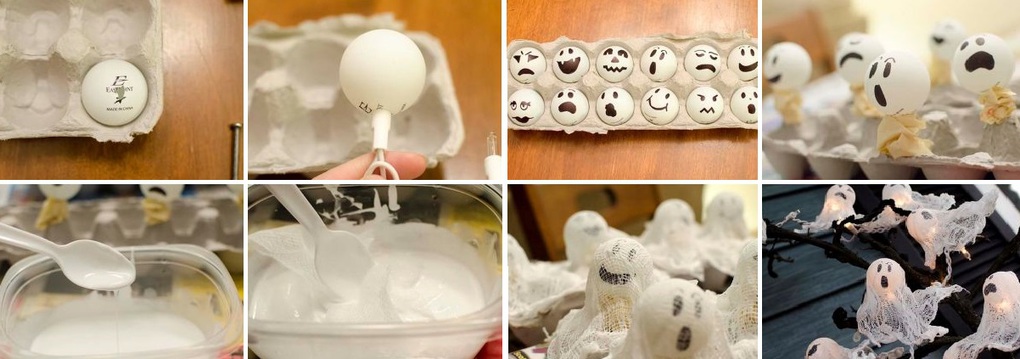
Dilute the starch in the same way as in the previous method. For each cast you will need a piece of gauze or fabric measuring 8x8 or 10x10 cm. Cover each ball with gauze soaked in a cooled solution and leave to dry overnight. We put the finished ghosts on a garland and attach them to the right place. It turns out terribly beautiful!


Ghosts are one of the most favorite characters on Halloween; children dress in such costumes and decorate the house with crafts in the form of ghosts on the eve of All Hallows' Day.
How to do it?
- You will need: wire for the “arms”, a plastic bottle, a ball to shape the head (a tennis ball, or you can inflate a balloon to the desired size and secure it with tape) and a spray bottle of starch (you can use PVA glue).
- First you need to make a frame from wire, a bottle and a ball, after which you should cover this structure with gauze. It is recommended to place a towel under the structure to absorb excess liquid.
- When the frame with gauze is ready, apply starch to the gauze using a spray bottle. I think you can use PVA glue instead of starch; it also holds the shape well, but then you first need to soak the fabric in the solution, squeeze it out, and only then give the ghost its outline using a frame.
- The ghost is almost ready, all you have to do is wait until the gauze dries - add eyes to the ghost and place it on a shelf, above a false fireplace or on any other horizontal surface.

Recipe for creating starch:
Take a glass of cold water and dilute 2 tablespoons of starch in it. Pour about half a liter of water into a saucepan and set to boil. After it boils, add pre-diluted starch to it and stir constantly. The starch will be ready after the mixture in the pan takes the form of something slimy-liquid.
1. First, we create a structure from wire, a bottle and a ball.

2. Cover our structure with gauze. Prepare the starch and apply it to the gauze using a spray bottle.

3. Leave the ghost to dry. To speed up the process, you can use a hairdryer.

4. We take out the frame, now our ghost can do without it. Glue on eyes made of fabric or felt.


Looks impressive, doesn't it?
Little ghosts
This Halloween interior decor idea is very similar to the previous one, the only difference is that instead of starch you can use glue, and also make more little ghosts from the same amount of gauze.
How to do it?
- You will need: a balloon (you can use a chicken egg), two paper or plastic cups, gauze, quick-drying glue, tape, a bowl, a marker or black thread (black beads) for the eyes.
- First, we place one glass on top of another (bottom to bottom) and secure them with tape. Place a balloon or egg inside the top glass. Next, we cut pieces of gauze to the required length and width, soak them with quick-drying glue or starch, place them on a pre-installed structure and wait until the gauze dries.
- Carefully pierce the ball, glue two eyes to the ghost from dark fabric or colored paper.
- Glue black beads or simply draw eyes with a marker.

Now the ghost remains to be hung on a chandelier, door or some hooks.

Original garland
How to do it?
To make such a garland you will need a New Year's garland with small lights, white fabric, scissors and thread.

From a piece of white fabric we cut out squares with which we will “wrap” the garland, and make a hole in the middle to thread the garland through.

We fix the fabric with thread and paint the garland with a black marker.

Such a garland can become an original decoration for windows, doorways, window sills and even bedside tables.


How can you celebrate Halloween without a ghost? Of course not, since this is their holiday. Gauze is best suited for making a real ghost, as it is a light, transparent, white fabric.
In this article we will look at how to make a ghost out of gauze with your own hands.
Master class 1: little ghost made of gauze
You will need:
- gauze;
- black felt;
- corn starch (200g);
- water;
- fishing line or wire;
- balls and glasses.

Halloween is a great opportunity to get creative with your kids and create your own original “scary” decor to decorate your home. There are many great ideas for creating crafts, we suggest you start with the simplest and fastest to make. And in this lesson we will tell you how to create a ghost floating in the air. And to make it you will need the simplest materials that everyone can find at home.
List of tools and materials for creating a ghost:
- a piece of gauze or bandage;
- round plastic base of suitable size;
- a small jar for creating a frame;
- a piece of thin and flexible wire;
- PVA glue;
- hot glue;
- scissors;
- black paper to create eyes.

Craft stages
Step 1. First, we create a frame from a plastic ball and thin wire to create a cast. The ball will give the shape of the head, and the wire will give the shape of the arms. We fix the piece of wire on the ball, bending the ends of the wire upward. We create loops at the ends of the wire. 
Step 2. Place the ball in a tall jar, additionally fix the parts of the plastic frame with thermal glue. 
Step 4. Now the most important point in making the craft. We throw pieces of wet bandage onto the created frame. Carefully form folds along the edge of the craft to give the ghost a floating effect. 

Next, wait for the bandage to dry completely. This process will take at least 2-3 hours. You can speed up the drying process by using a hair dryer. When the glue is completely dry, carefully separate the frame from the craft. 
The most unexpected and impressive element of scary Halloween decor is the realistic illusion of a ghost, when a black and white figure (or one head) suddenly appears nearby or flies right in front of you. By the way, the technique described here is used in the haunted house at Disney Land! And it's actually very easy to reproduce on your own. The illusion can be placed in a shop window or behind an office glass partition to scare people passing by, or you can decorate your home or holiday party with such a creepy creature.
Creating the illusion of a ghost as a detail of the Halloween interior of an apartment or house
1. First, you need to take a video of a scary head or solid figure. In our case it will be the head, but variations are removed by analogy. Stand in front of a background curtained with black fabric, wrap your body in a shapeless black fabric like a cloak so that only your head is visible from this cocoon. Place the flashlight under your head and slightly in front and turn it on, pointing straight up at your face. Turn off the lights in the room (no light should leak from the street either) and start recording on the video camera. Big dark shadows created by a bright flashlight will make your face look absolutely devilish. During recording, do not forget to move your head from side to side, back and forth, and use facial expressions so that your ghost in the recording is as alive as possible.

2. The illusion works great in doorways - a great way to scare people moving from room to room. Place a table in the opening, place a laptop or TV monitor on it - as far as possible and to the left of the opening, i.e. so that the screen is directed to the right. A great option is to place the screen on double stacks of books so that the ghost image is noticeably higher than the tabletop.

3. The key to the success of this illusion is reflection from a clean, flat surface. And this is where plexiglass (plexiglass) comes into the picture. Insert a piece of plexiglass into a small picture frame - this will make the glass much easier to handle later. A large sheet of plexiglass will cost you 3000-5000 rubles. Place the glass at a 45 degree angle to your laptop or TV. Secure the glass in this position with heavy books or bricks (on both sides) so that it does not fall, even if someone accidentally pushes the table or touches the plexiglass itself. Turn on the previously recorded video and you will see an image of a ghost appear in the glass. Experiment with the position of the components and the distance between the glass and the image source so that the ghost “hangs” in the glass exactly where it is needed.

4. Cover your books and laptop keyboard (or use a tablet) with a thick black cloth to prevent those being scared from discovering your trick.

5. Decorate the doorway with even more black fabric to hide the corners of the glass frame and the very existence of the laptop or TV screen. The fabric above the door can be secured with decorative buttons, pinning the latter on top to the wooden door frame.

6. Turn on the video and a ghost will appear between the folds of the fabric. Play with the lighting of the room: if the room is dark, your guests will only see your head. But when there is light in the room, this surprise can actually become even more ominous, as the head will appear to be flying around the room.

The illusion of a ghost in front of an office glass or in a shop window
1. The concept is the same, but the location of the screen in relation to the plexiglass is different. Place the monitor on its back - that is, so that the screen is directed towards the ceiling. Again, place the screen on a stack of books or a box to raise the image higher.

2. Place the table behind the laptop/monitor. Make sure the table is not blocking the ceiling-facing screen.

3. Place the Plexiglass above the screen: rest the upper part against the window or glass, and place the lower part on the edge of the table, securing it with several bricks so that the glass does not slip. The plexiglass should again be at an angle of approximately 45 degrees relative to the screen, but first check the result outside the display window. Then experiment with the height of the laptop and the angle of the plexiglass to achieve the desired ghost position.

4. Hang the black fabric on the window, but do not cover the screen and the reflective surface of the plexiglass. Cover the books/drawer, keyboard and desk with a cloth, turn off the lights in the room or close the display case tightly to prevent light from entering from the store. Be aware that the plexiglass may begin to reflect what is outside in front of the window. To reduce this effect, try turning off all unnecessary light sources outside and inside.

Happy Halloween!

Variation on a theme - face in the mirror
1. We shoot a video in exactly the same way as described above, only this time we wrap the entire head and neck in black, leaving only the face visible. We record the video on a disc, insert the disc into the tape recorder and set it to play cyclically.


3. Connect the screen to the player, hang the mirror with the TV on the wall. Optimally - in the same place where the TV used to hang, then everything will definitely stay in place. We hide the tape recorder nearby.
4. Take a fabric that is the length from floor to ceiling and the width of the entire wall and, having cut out a circle in a strategic place, hang it at a distance from the wall so that the fabric covers the TV and wires, leaving only the mirror frame visible.

All you have to do is turn on the disc and invite guests. This idea looks most creepy in a dimly lit corridor, where ordinary mirrors are lined up in a row.
