Braiding from below. Braiding: hairstyle ideas, step-by-step photos and weaving patterns. Braiding with thin braids
The braid is the simplest and most common type of hairstyle. Thanks to the various types and methods of weaving, braids are extremely popular. Neatly braided hair is a convenient hairstyle in everyday life, relevant in an office environment and beautiful at a celebration.
To make your hair manageable and easy to braid and style, you can use various products in the form of foam, gel, or secure uneven strands with hairpins. You also need a good one.
Weaving a regular braid
The most common and familiar from childhood was an ordinary braid, braided from three strands of hair. Having divided the hair into three parts and observing the sequence, we intertwine the hair with each other.
First, we intertwine the third part with the first and second strands, then the first with the second and third, and the second strand with the third and first. It is important to ensure that the strands are pulled tightly and the hair does not come out. Having finished this hairstyle, you can use a regular elastic band, a beautiful hairpin or weave a ribbon.


Braiding two braids
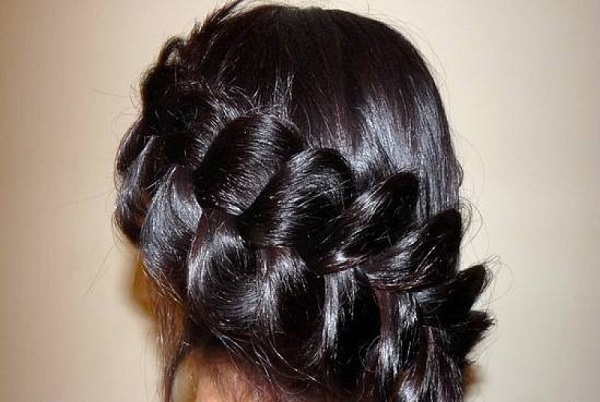
On thick, heavy hair, two braids will look great and original.

The photo shows a hairstyle with two braids.
For this hairstyle, the hair must be divided into two equal parts. Now each of them needs to be braided in the usual way, but it is important to make sure that the braiding of both braids starts from the same level.
Braiding a spikelet
Braiding a “spikelet” braid will be a little more difficult than a regular one, but the braiding technique is very similar, so you can do it. You should start braiding the same way as with a regular braid, only you need to take not all the hair, but only the top part and divide it into three equal strands.
It is important to evenly distribute the strands so that the braid ends up looking even. We begin to weave the strands like a regular braid and slowly weave new small strands of hair from the remaining hair on the side. In this way, continue to weave strands into the main braid until the hairline on your head ends.

Loose hair can be pulled back into a ponytail or braided into a regular braid. If the “spikelet” is not voluminous enough, you can fluff it slightly with a comb. The “spikelet” will last a very long time in excellent condition if it is braided as tightly as possible.
Fishtail braiding
We comb the hair back and divide it into two equal parts. We take each of the strands in our hands. Using the index finger of your left hand, select a thin strand of hair from the side (about 2.5 cm) and move it to the right side, securing it with your right hand. Then, with the index finger of your right hand, separate the same strand on the right and move it to the left, securing it with your left hand.


We repeat these steps until we reach the end. We tie the end of the braid with an elastic band or decorate it.
French braiding
Comb your hair and separate part of the hair from the top from the parietal area. Divide the strand into three equal strands and begin to weave, first placing the left one on the center one, then the right one on the center one. Then place the left strand over the center one and add the left strand to it. Now place the right strand over the center one and add a strand of hair to it on the right.


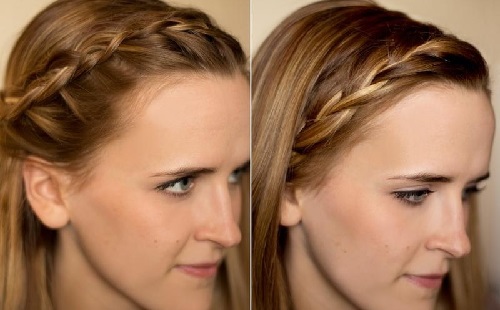
The photo shows a French braid from the side.
In this way, alternately add strands to the weave on the right and left. Tighten the loose ponytail with an elastic band or braid it into a regular braid. Once you start braiding a French braid, you can easily experiment. This French braid pattern, also suitable for two braids, a side French braid and a side braid.
This hairstyle is very convenient for everyday life; once you learn how to braid a “French” braid, it will become your favorite.


French braiding from bottom to top
Weaving this braid must begin from the back of the head, moving towards the crown. Use the weaving pattern of a regular French braid. You can complete your hairstyle by tying the ends into a bun or ponytail.

Inverted French Braid
Comb your hair. Take a section of hair and divide it into three equal parts. Place under the central strand, first the right and then the left strand. Place the right section under the center section adding a section of hair on the right. Now place the left one under the center one, adding part of the hair on the left to it.


The loose ponytail can be styled into a simple braid or ponytail. By stretching the braid a little, you can make it more voluminous.
Braiding Waterfall
Comb your hair in a side parting and begin to weave a regular French braid horizontally from your forehead towards your temples. Then we place the top strand on the middle one, separate a small strand from the top of the free ones and place it on the middle one, while releasing the lower part.
Near the thrown bottom strand of loose hair, separate a small strand and place it on the middle one. We repeat this each time adding a braid of loose hair to the top strand, place it on the middle one and release the bottom strand, replacing it with a new one.


Braiding 4 and 5 strand braids
Braiding this requires special skill and skill. To begin, you need to comb your hair back and divide it into five equal strands. Cross the right strand with the strand closest to it.
We cross the most central strand with the strand that was on the right. Then we cross the central one with the one to the left of it (not the outermost one). Now cross the leftmost one with the adjacent strand on the right. When braiding, try not to pull the braid too tight. Now braid the second row following this pattern. Such actions must be performed until the braid is woven.


The “Swiss” braid is woven in the same way as our regular three-strand braid, but each strand must be twisted with a strand. This hairstyle looks quite unusual and elegant, so it will be a godsend for both work and leisure.

Braiding tourniquet
First you need to collect your hair in a ponytail, then divide it into two equal parts. Then twist the right strand of hair towards the right, about 3-4 turns, and hold it tightly with your hand. Do the same with the left strand.
Now you need to carefully cross both strands, making sure that they do not unwind. As usual, secure the ends with a tight elastic band.

According to the pattern of twisting one braid, you can braid two. To do this, comb your hair in a middle parting, following the pattern, twist one part of the hair, then the other. Loose hair can be twisted together, braided, or left loose.


Braiding "Wreath"
Take a small section of hair from your temple and divide it into two equal parts. Then wrap the bottom part around the top and connect the strands into one. Now take a small strand from the loose hair below and wrap it around the top double strand.

Braiding "Crown"

Weaving "Linno Russo" with ribbon
At the top of the head, separate a small strand of hair and put a ribbon on top of it and cross it. Next, select the strand below the previous one (Fig. 3), divide it into two parts and wrap each with the ends of the tape, so that the strands are at the bottom of the hair, and the tape is on top.


Knot braid
A knotted braid is very easy to make and will look elegant and neat. Separate the top part of the hair and divide it into two parts. Tie these parts together from right to left or vice versa (Fig. 1) like a regular knot. Next, add strands to the remaining free edges of the hair and tie the knot again, do this until all the hair is woven. The end of the braid can be secured with an elastic band and wrapped to the bottom.


Weaving a braid "Bow"
This braiding is more of a decoration for an already woven braid; it is quite simple to do. First, you need to braid the braid, leaving a thin strand of hair parallel to it; it is from this that you will later form bows.
After the braid is braided, we separate a small strand from the loose hair left for the bow and spray it generously with hairspray, then bend it in half to form an ear. Using a hairpin, carefully thread the eyelet under the braid, holding it with your hand.


Braiding a braid “Snake”
Separate the top strand of hair from the side and divide it into three equal parts. Start braiding a regular French braid, adding strands only from the top. When braiding, you should lead the braid along an inclined line, bring the braiding to the temple and make a turn of the braid, we braid the braid further by adding a strand as before on top, ignoring the bottom.
If you have long hair, you can make turns along the entire length, depending on your desire. When braiding the lowest braid, the hair is picked up both from below and from above. The ends of the hair can be braided or left free.


Braiding "Basket"
At the crown of your head, select an area of hair and gather it into a high ponytail. From the top we begin to weave a regular French braid, each time adding strands of free hair on the right, and from the tail on the left, you need to take them of such thickness as to be enough for the entire braiding.
Thus we weave in a circle. Having reached the place where weaving begins, we begin to weave a regular braid. We fix the end with an elastic band and hide it under the base of the tail; for greater fixation of the hairstyle, you can also secure it with bobby pins.


Snail braiding
Separate a small strand from the middle of the head and divide it into three equal ones. Then we begin to weave a regular French braid but with one grab on the right. At the beginning, it is important to take small strands so that there is enough hair for subsequent circles. Next, we braid the braid over the entire head, moving in a circle. We carefully fix the tip of the hair and disguise it under a hairpin.

Braiding "Flower"
To create a flower from hair, you need to braid a regular braid, but you need to braid it not up, but down (inverted braid), you need to braid it without tightening it too much.


Braided hairstyle "Butterfly"


Braids never go out of style. The French braid is an original, stylish solution for hair of any length for any occasion. The variety of its types is impressive: classic, on the contrary, oblique, waterfall, headband, openwork, besides, French braids are an excellent addition to many beautiful evening hairstyles.
Weaving devices
A comb and thin elastic bands are the minimum set for weaving French braids. This is quite enough. Bobby pins, hairpins, ribbons and various hair accessories can also come in handy, depending on the intended option. All this can be easily found in the arsenal of almost any girl.

French braid for beginners
French braids look chic. Initially, it may seem that weaving them is incredibly difficult. But this is a mistaken opinion. This weaving technique is within the capabilities of everyone, the main thing is to understand the essence and practice a little so that the result has a neat, attractive appearance.
The first step in mastering the technique of weaving French braids is a classic braid.
Universal and simple, suitable for both thick and sparse hair. Some people confuse it with a spikelet, but this is a mistake, since the techniques and types are different.
If your hair has just been washed and is too loose, you need to wet your hands with water and moisten it a little or use styling mousse. This will make the weaving process much easier.

- We comb our hair; fine hair should be combed well at the roots;
- Select a strand in the middle near the face; for convenience, you can fix it with a silicone elastic band that matches your hair color;
- We take two more strands on the sides of the first and make a binding as for a regular braid;
- We grab new strands on both sides and make a binding again;
- We continue this action until we run out of free hair;
- Next, we finish the braid in the traditional way and tie it with an elastic band.
You can pull out the strands, thereby adding volume and airiness to it.
Everything is absolutely simple. Once you have mastered how to weave such a braid, you can try to experiment: braid it on the side, or make braids on both sides.


Having mastered the classical technique, you can safely begin conquering the braid in reverse. This hairstyle not only looks great, but will also visually increase the volume of any hair.


- We take part of the hair near the forehead and divide it into 3 equal parts;
- We place the right strand under the central one, and the left one under the right one. Thus, initially the left strand should become central;
- To the current left strand we add a strand of hair from the side and place it under the central one;
- We do the same on the right side;
- In this way we braid to the end and get a French braid in reverse;
- We secure the end with an elastic band and carefully straighten the strands of the braid with our fingers.
You should straighten it from the end of the braid to the beginning so as not to spoil the look.
Having learned how to braid a braid the other way around, you can experiment just as you would with a regular braid and create grandiose hairstyles every day.


The four-strand braid looks like real craftsmanship. But mastering the technique of weaving it is just as easy as the previous options. The main thing is to follow the instructions, try, take your time, and everything will definitely work out.


- We divide the hair into 4 equal parts;
- Take the second strand from the left, pass it under the next two and wrap it over the one on the far right. Now it should be second from the right;
- We pass the rightmost strand under the two adjacent ones and wrap it over the second one from the left;
- We add hair to the leftmost strand and in the same way pass it under the two adjacent ones and wrap it over the last of them;
- We do the same with the far right strand;
- Thus we continue to weave until the end.
Another option that cannot be ignored. Weaving on yourself is quite inconvenient, so it will require endurance and accuracy. But the result looks amazing.


- We comb our hair and select 3 strands in the temporal zone, in the place where our waterfall will begin;
- We move the top strand over the middle one and pass it under the bottom one;
- Then we transfer the first strand from above onto the second and twist it into a bundle;
- We separate a new strand from above and pass it between the strands of the strand: over the first, under the second, release the third and twist the first and second into a strand;
- And thus until the end;
- We secure the end with bobby pins or a beautiful hairpin.
bezel
A French braid headband is a great addition to any hairstyle. It can be used to decorate both fluffy curls and collected ones. The headband can be made in various shapes: wide, narrow, around the head or just on top, you can make it double, triple - there are many options.


- Separate part of the hair along the growth line;
- The remaining curls can be gathered into a ponytail so as not to interfere;
- We braid the headband using the reverse principle, i.e. we weave the side strands under the central one;
- Add hair to the braid on one side only.
Fish tail
The French fishtail braid is quite unusual. Its main difference is that it is woven from only two strands, but despite this it has a wonderful appearance.


- We start braiding as in the version with a regular French braid: we separate part of the hair at the forehead, divide it into three strands and make one regular braid;
- We connect the two strands on the left into one and get two working strands from which we will form a fishtail;
- Now we pinch off part of the hair on the right and add it to the left strand;
- From the left strand we pinch off a thin strand, move it to the right and add a strand of hair there, plucked off from the free left side;
- Now we perform the same manipulation on the right and so on all the way to the neck;
- We finish the braid by shifting thin strands alternately from left to right and from right to left, securing with an elastic band.


The French openwork braid looks really very sophisticated and simply amazing. And in order to create such beauty you won’t need a lot of skills. The secret is quite simple. Just braid the braid in reverse and carefully pull out thin strands from it.
A great way to create a unique look is to weave a ribbon into a French braid. It's not difficult to do, and it looks just great.


Using French braids, you can create many hairstyle options, both for every day and for special occasions.


French braids have not gone out of fashion for many years. This hairstyle will undoubtedly give the hostess a charming look and emphasize her individuality, femininity and uniqueness.


Braids always remain in trend. Braiding looks beautiful on hair of any length. There are many variations of this hairstyle. The French braid has been at the peak of popularity for a long time.
Today we will talk about a type of reverse braiding - an inverted braid. It is slightly different from the classic one, but looks very impressive. The main thing is to follow the step-by-step instructions and carefully study the photo.


Classics of the genre
In Rus', a long braid has long been considered a symbol of femininity. Many rituals were associated with it. These days, such rituals are no longer practiced, but braids are still in fashion. Previously, there weren’t many varieties, but now you won’t surprise anyone with a simple scythe.

Weaving an inverted braid seems difficult at first, but with a little practice you will understand the technique. Then such a hairstyle will become a matter of minutes for you. You will need:
- massage hairstyle;
- spray bottle with water;
- rubber;
- Polish for hair.
Step-by-step weaving pattern

Technique:
- Comb your hair well. Separate a small section of hair above your forehead. You can experiment with thickness, this will significantly change the appearance of the braid.
- Divide the separated strand into three equal parts. Lightly spray the hair with water from a spray bottle, this makes it easier to separate one strand from another.
- We place the left strand under the middle one, the right one on top of the middle one, then the left one on top of the right one.
- After each cross, pull the strands very tightly, they will look neat, and the hairstyle will last longer.
- We free our left hand from the hair and hold everything in our right. Place your palm down and turn the two outer strands up. So the left strand turns out to be the middle one.
- We dive under the outermost strand on the left side, take a little from the head of hair and place it on the middle one. Take a strand approximately the same size as the main one.
- With your left hand, fix the base of the braid, release the two outer strands and turn it upside down. Again, place the outermost strand on the right side on the middle one with a small curl from the main hair.
- Using the same principle, braid the remaining hair.
- You can make a voluminous braid by securing the end of the curved braid with bobby pins at the very bottom. This hairstyle is decorated with shiny pins or barrettes.
- After finishing braiding, spray your hair with hairspray.
With the help of a French braid you can create a lot of beautiful hairstyles for every day and for any occasion.
Reverse braid on bangs

If you want to leave your curls loose, but also want a braid element, then you can only braid your bangs. To do this you will need to do the following:
- Comb your hair. Separate your bangs or a small section of hair from your forehead.
- Start weaving according to the pattern above, from one ear to the other.
- Secure the end under the hair with bobby pins so that it is not visible.
- Twist the rest of the hair a little and sprinkle with hairspray. You will get an original, simple hairstyle for every day.
Hairstyle with a bun


An excellent hairstyle for every day: start weaving an unusual French braid from the back of your head, finish at the top of your head, and gather the strands there into a messy bun. It is recommended to backcomb the curls a little in front to create volume.
Decorate this hairstyle with a bow or a bright elastic band. Once braiding is complete, secure the styled hair with hairspray. Buy medium hold hairspray, then your hair will always have a natural look.
original flower


Many have seen such weaving at brides' weddings. And we didn’t even realize that you could create a miracle of hairdressing with your own hands.

Step by step:
- Separate your hair with a side parting.
- From the side that is larger, separate the strand and start weaving an unusual French braid.
- In an inside-out braid, place the side strands from below.
- Continue weaving, do not forget to pick up strands from each side.
- The braid is braided from the parting to the side. You can stretch the braid a little along the way, so it will become more voluminous.
- When you have reached the other end, make a smooth turn back. Then finish weaving.
- Secure the finished braid with an elastic band, wrap it in the shape of a flower, and secure with bobby pins.
- Place a shiny hairpin or hairpin in the center of our flower.
- Don't forget about hairspray, thanks to it, your masterpiece will last a long time and will delight everyone around you.
Five strand braiding option


The styling looks impressive at any event:
- Comb your curls and divide them into five parts. The strand should not be parted in the middle.
- Gather each strand into a ponytail.
- Braid each section into a topsy-turvy French braid. Start braiding not from the bangs, but closer to the crown.
- Secure each braid with a small elastic band, after stretching the strands.
- Wrap all the ends of the braids into a ring, secure them at the very end of the back of the head, and cover them with braids on top.
- Decorate your hair with a bow and sprinkle with glitter hairspray.
Malvinka made of hair with a bow


Making a hairstyle is a little more difficult than a regular little one, but read the instructions, look at the photo and you will understand that everything is not so difficult.
Weaving technique:
- Comb your hair back, separate the top part, and tie a ponytail. Wrap it with a small amount of hair and secure it with a bobby pin.
- Move the ponytail forward and secure it with a special clip.
- Using the remaining hair, begin to create an inverted French braid.
- As you weave, pull out individual strands, so the design will become more openwork.
- Complete the braid and secure with a small elastic band or a beautiful bow.
- Divide the remaining strand in front into a couple of parts.
- We comb each part, then smooth it.
- We wrap the strand in a loop, form part of our bow, secure it at the base with an invisible one, but do not hide it.
- We do the same actions with the second strand.
- There should be two small ends at the bottom of the bow, connect them together and cover the center. We secure it with invisible ones.
- Straighten the bow, smooth out any stray hairs or style with gel/wax.
- This design is secured with varnish.
Everyone will be delighted with such a bow with a braid. You will certainly become the most beautiful lady at the holiday, all the men will not be able to distract their eyes.


An inverted braid is an alternative to a regular braid. It can be woven on its side or as a headband. To begin with, just master the technique, then it will be easy for you to cope with any complex hairstyle.
Based on French weaving, you can create many unusual styles. It looks interesting if you start weaving not from the top of the head, but from the back of the head. The main thing is to find a little time, then a flight of fancy will do its job.
How to weave a French braid: video
Video tutorial on how to weave a reverse French braid:
A complete collection of materials: “bottom-up braid hairstyle” for you and your friends.
Hairstyle french braid from bottom to top with a bun is a hairstyle that has gained popularity among girls all over the world for its simplicity and elegance. If you want to learn how to braid from the bottom up, read our tips and watch the video.
Tilt your head down and flip your hair back. Apply a little mousse to help your hair stay in place. Weave a regular French braid with added strands above the middle strand on the right and left sides. After braiding the braid to the level where the bun will be located, tie it with a thin elastic band. Gather the rest of your hair into a high ponytail with a tight elastic band.
A French braid from the bottom up is suitable for both everyday wear and evening wear. As a daytime option, gather a regular bun from your ponytail hair and secure it with bobby pins. To make your hairstyle more elegant, you will need a roller to match your hair, which will allow you to make the bun perfectly smooth and voluminous. Also try to create a quick and beautiful bun like Kim Kardashian's, decorated with a braid.
French braid at the back of the head, braided from bottom to top
There are places where the requirements for hairstyle are such that the strands should be out of the face and should not get in the way at the back of the neck. This includes the gym, and in yoga classes it is even tougher; the hair must remain strictly in place. But for these purposes it is not necessary to create a dull ponytail or a boring “ballerina” bun.
The following hairstyle meets all the above conditions, only it is done with a creative approach, in addition, it also looks very cute (you can count on compliments from others).
It will help you out if you don't have time to wash your hair immediately after training.
4 most fashionable techniques for creating a hairstyle Bun with a braid (35 photos)
Well-groomed, flowing hair is certainly beautiful, but not always practical. Sometimes you want to pamper yourself with a cute braided bun, fortunately, a huge number of options for such a hairstyle invite you to experiment. We will tell you about the most beautiful and stylish options, including describing how to make a bun with a braid using a donut (not the tasty and sweet one).
By making a bun framed by a braid, you will get an original, current and complete look.
Braided bun options for all occasions
Despite the ease of implementation, a hair bun can be a great addition to both casual wear and a festive dress. If you want to remain elegant and unique even on your way to work, a braided bun is the perfect option for you. Let's look at the most popular variations of this hairstyle.
Kim Kardashian is a famous fan of braided buns
Bun framed with a braid
A small bun framed with a thin braid is an excellent option for going to work. It will take you about 10 minutes to create (a small price to pay for a fashionable hairstyle), so you can spend more time not on styling, but, for example, on your morning coffee.
Any girl who does not have special skills in creating complex hairstyles can cope with the design of such a bun. So:
- Comb your hair and gather it into a high ponytail, leaving one strand for a braid.
- Twist the main part of the hair around the base of the ponytail and secure with hairpins.
- Braid the remaining strand into a small braid, wrap it around the resulting strand and secure with a hairpin or a bright hair clip.
If you want to add some originality to your look, you can use a two-strand fishtail braid instead of the usual braid.
Depending on the thickness of your hair, you can adjust the width of the braid
This seemingly incredibly simple hairstyle can be widely used for festive occasions. All you need is:
- add volume to your styling using backcombing;
- wind the strands on a medium or large diameter curling iron. Firstly, it adds texture to your hairstyle, and secondly, a beautiful curly side curl will make your look even more elegant and feminine;
- decorate the bun with a ribbon woven into it or a beautiful hairpin.
As you can see, you don’t need much to create an original hairstyle and stand out at a party. You don’t have to spend a lot of time and effort to create an unusual hairstyle.
French style voluminous bun
A braided bun can look truly stunning if you don’t deny yourself some experimentation. This way you can try new braiding techniques every day and get completely different hairstyles every time.
For example, a French braid will make a seemingly ordinary hairstyle sparkle with new colors.
By adding a beautiful accessory, you will add a light festive touch to your look.
- Comb clean, dry hair into a high ponytail. Separate a thin strand from it and wrap it around the base.
- Separate a small strand from the ponytail again, but now divide it into three equal parts.
- Start braiding a regular braid, but cross the side strands not over the central one, but under it. This way you will create a voluminous inverted braid with your own hands.
- After a couple of weaves, start picking up new strands from the ponytail., thereby switching to the reverse French braiding technique.
- When the hair from the ponytail runs out, use the remaining strands to create a regular braid., carefully hide the tip under the bun.
As a result, you will end up with an unusual bun and braid hairstyle. If you want to improve it, you can resort to using a stylish hair accessory (clips, headband).
Donut styling
We have already told you how to make a bun with a braid around it, now we will describe how to make it from braids. To do this, we need the special hair donut mentioned at the beginning.
The photo shows another option of how you can create a bun with braids using a donut
- Comb your hair and gather it into a high ponytail.
- Attach a donut or sock at the base of the ponytail and distribute the hair around it.
- Separate a small strand and braid it into a braid (regular, fishtail or reverse).
- Thread the braid into the donut and wrap it around it. Don't make it too tight.
- Attach the remaining ponytail to the next strand and braid it as well.
- We repeat the procedure with the rest of the hair, with the only difference that we do not tuck the last braid into a donut, but wrap it in a circle.
- Gently stretch the strands of braids so that they cover the sock or bagel. To make the styling last better and last longer, we secure it with hairpins.
Inverted braid with bun
The main feature of this hairstyle is that the braid is not woven from the back of the head down, but vice versa. The instructions for weaving it are quite simple and clear:
An inverted braid from the back of the head is one of the most fashionable and popular hairstyles.
- Tilt your head down and comb your hair thoroughly.
- Separating thin strands in the area of the ears, begin weaving a French braid, all the time picking up new curls.
- Having reached the top of the head, when all the strands are collected and only one ponytail remains, braid it into a regular, careless braid. Wrap it around its axis and tie it into a bun.
To make your hairstyle look even more original, you can pre-twist the strands or backcomb them. Texture and volume will add a touch of romance and sexuality to your styling.
A braided hairstyle from the bottom up and a bun on top from the usual version will become more festive if you decorate it with a satin ribbon or a hairpin with rhinestones. This hairstyle with an unusual braid will add charm and confidence in your irresistibility. What more could you ask for?
Finally
Creating a bun with a braid takes literally 5 minutes, but in the end you will get a practical and charming hairstyle. And most importantly, by changing the weaving pattern, every day you will be able to create more and more new images that will be united by one thing - unchanging style and compliance with the latest fashion trends.
A braid bun is another great option for creating a luxurious hairstyle.
To get even more interesting and useful information on the topic, watch the video in this article. If you have a question about how to create a bun with a braid at the back of your head or have your own thoughts on our topic, write about it in the comments.
Top-down French braid with a bow or bun photo + video tutorials
French braid from top to bottom
with a bow or bun photo + video tutorials
Any woman is ready to give everything to look great at any time of the day or night. In fact, such unprecedented efforts are being made for this that it’s scary to say, but fortunately, in our time there are many beauty salons and auxiliary means to facilitate this responsibility.
Among such a huge number of different hairstyles and ideas, it is not so easy to navigate, which is why we try to cover the most complete fashion trends: read, watch, and enjoy.
The pigtail braid is one of the most practical and at the same time elegant hairstyles. Due to its simplicity, it is suitable for almost any woman, regardless of her age and social status.
A big plus of braiding, of course, is the ability to save time and effort; very often you have to rush and it’s not always possible to get yourself in order, but if your hairstyle is firmly fixed, then it will always be at the proper level.
However, not everyone likes to walk around with such simple hair; sometimes the heart requires more complex shapes. One of the best ways to diversify a picture is to combine several weaving methods or use accessories.
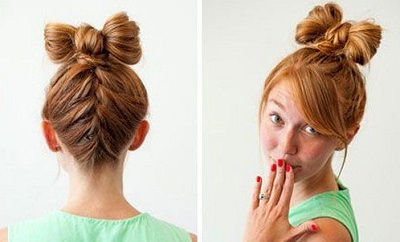
The combination of a bow plus a spikelet is extremely popular. The braid is carefully braided from the bottom up, after which a bow is made from the remaining hair on top. As a result, you get a rather original and uncomplicated hairstyle that can impress both fashion connoisseurs and ordinary people.
There are many advantages to mixed styles, but the main thing is that using simple techniques, you can create a unique look without resorting to the services of professionals.
You can come up with many options: combine a braid and ponytail, add a bow or bun, perhaps make a more complex weave using backcombing.
Very soon you will notice that people pay attention to you and maybe even imitate you.
Like any type of braids, our bottom-up braids are the best option for everyday use. Going great with most everyday outfits, this headpiece can help you look great at any time.
Don’t think that she won’t look good paired with an evening dress; feel free to use your new image to go anywhere and leave your doubts at home.
The first video shows two options for weaving a French inverted braid with a bun from a sock and a bow
In the second video tutorial, the option of braiding a spikelet from bottom to top and top to bottom, and the remaining hair of this original hairstyle is secured in a playful ponytail
In the third video lesson there are two hairstyle options using a bottom-up French braid with backcombing and flirty curls.
Reverse French braid with bun
Braided hairstyles look elegant, feminine and romantic. And if regular braids may seem too traditional, a seductive French braid will help you be the center of attention. You can make sure that the fashion for braids is returning by leafing through glossy magazines, full of photographs of stars with just such stylish hairstyles.
The French braid is suitable for absolutely any representative of the fair sex, regardless of age and face type. This hairstyle goes well with clothes of any style and color, visually filling the image with youth, amazing freshness and charm.
There are quite a lot of options for French weaving; each individual weaving differs from the other not only visually, but also in the complexity of the technique. Some people like a cute French braid, while others prefer a sophisticated French braid on the contrary. The only condition is sufficient hair length. True, you can use artificial or natural strands, surprising friends and acquaintances with an unexpected hairstyle for one evening.
In any case, admiring glances from others are guaranteed, because few people believe that such a masterpiece can be created with one’s own hand. However, this is true; you don’t need any special devices or expensive cosmetics. All you need is a fine-tipped comb, rubber bands, hairpins and a little patience.
French braid in reverse, from bottom to top with your own hands
As the name suggests, this braid is braided from below, from the neck.
1. With your head down, comb your hair thoroughly.
2. Start braiding with thin strands at the neck, in the middle of the back of the head (at the top of the ears). Divide a wide strand into 3 sections, begin to weave a French braid - the side strands cross over the middle one, new strands are picked up on both sides with a new braid. If you choose a reverse French braid, then the side strands cross under the central one. Grab larger strands as you approach the crown.
3. At the top of the head, when all the hair is collected and a ponytail remains, braid it into a regular braid, secure the end of the finished braid with an elastic band and wrap it in a bun. Or, if you prefer a bun, create a ballerina bun or a messy bun.
4. Secure the resulting bun with hairpins or bobby pins.
For special occasions, the braid can be decorated with decorative accessories with rhinestones or flowers.
An original French braid will create a unique charm and help you gain confidence in your attractiveness. After all, this feeling is the main secret of female charm.
Video of a French braid in reverse, from bottom to top
Video of a regular French braid from bottom to top
Reverse French braiding
Since ancient times, long and luxurious braids have been considered the dignity of any woman. At the moment, there are a huge number of ways to weave a wide variety of braids, ranging from classic to complex French ones. Despite the complexity of weaving, the French braid, on the contrary, is widely popular among girls and women of different ages. Thanks to its unusual appearance, the braid fits with any outfit, emphasizing the femininity and sense of style of its owner.
QUICK NAVIGATION THROUGH THE ARTICLE
Weaving methods
It is not difficult to learn how to weave such braids, however, you will need a lot of patience and care, because if you miss one moment, you will have to start the work again.
The methods of weaving French braids are quite diverse and are divided into separate types:
- simple French braid;
- braiding from bottom to top;
- reverse French braid;
- "Waterfall" braid.
Regardless of the type of weaving of such braids, hair decorations remain the same. In order to give your hairstyle originality, you can use combs with stones, hairpins, bobby pins, all kinds of bows and flowers.
Simple French braid
You can weave such a braid as follows: from the side, and starting from the top of the head down. Before starting work, you need to thoroughly comb your hair and apply foam to it for better styling. Then you begin to braid, taking a small strand from each side, as shown in the photo below. The remaining hair must be braided like a regular braid and secured with an elastic band. Next, you should pull the strands out of the braid (see photo). To complete the work, various decorations are added.
You can learn more about installation in the video below.
The next installation scheme is almost the same. The only thing is that weaving starts not from the top of the head, but from the temple. First of all, one strand is separated and divided into three parts. Next, you begin to weave a braid, taking the strands a little at a time on the sides. When weaving such a hairstyle, it is necessary to tighten the strands more tightly, since at the end they will need to be slightly stretched, and in a loose style it does not look so impressive. After braiding the braid to the end, secure it with an elastic band.
Braiding from bottom to top
This type of hairstyle is undoubtedly the most unusual, because in addition to the traditional bun at the back of the head, you can use a bow or curls secured to the side.
In order to get this style, you need to lightly comb your hair and braid, starting from bottom to top:
Have you tried different products, but your hair still falls out? Then this complex is for you.
- tilt your head forward and divide part of your hair into three strands;
- start weaving, gradually taking strands from the side;
- Having reached the crown, pull the resulting braid and the remaining hair into a ponytail.
The weaving technique is described in more detail in the training video.
The final result of such a hairstyle depends on the desires and preferences of its owner. There are several styling options: a bow, a bun or curls secured with a comb on the side.
Reverse braid
The French braid, on the contrary, is the most popular among girls, as it is woven quickly and looks amazing with any outfit. This hairstyle can be used both in everyday life and for a celebration.
To begin, comb your hair thoroughly, starting from the top of your head towards the back of your head. Then sprinkle your hair with mousse or foam so that the strands do not get tangled and lie correctly when styling.
The pattern of such installation is simple, but requires care during weaving:
- at the top of the head, separate three strands and begin to braid the braid; for convenience, the strands are numbered from 1 to 3 on the right side;
- strand number 3 must be placed under 2, thus replacing the third strand. The result is a numbering of 1-3-2;
- in order not to get confused, again number the resulting strands from 1 to 3;
- the first strand is placed under the second, ultimately replacing strand number 1;
- then you need to repeat the previous steps to the end.
You can learn more about the technique of creating a hairstyle in the video below.
This hairstyle looks unusual and playful, and at the same time gives its owner femininity and elegance.
Spit "Waterfall"
The “Waterfall” hairstyle goes well with large romantic curls and suits any image. The weaving pattern is shown below.
To begin, take a section of hair near your forehead and divide it into three parts: top, middle and bottom. Then begin to weave a regular French braid, placing the middle strand on the top strand, and, in turn, the bottom strand on it. Next, the top strand is placed on the middle part, the bottom one is released, and instead of it, a new strand is taken from the top of the hair and woven into the hairstyle. Thus, the process of weaving the “Waterfall” hairstyle takes place.
Good afternoon, dear girls!
I love braids. Look at the photographs
I personally have a few types of hairstyles - loose straight/curly hair, loose hair with swept-back and combed bangs, a bun, a high ponytail, a side braid.
The ponytail and bun often give me headaches
But still, I love braids... and on a hot day a simple bun gets terribly boring. Yesterday in the news on social media. online I saw a photo I liked under some snotty quote - the back of a girl’s head with a braid from the bottom up. First I started experimenting and fantasizing on myself, and only then I thought to google it and found this hairstyle. It’s called a “French braid from the bottom up”, it can be simple (like mine) and inverted, have different versions of the “top”... let’s see what I got. Please do not judge strictly, this is the first attempt (albeit the third time) of such a braid
So let's get started.
This is what we have this morning. Curly disheveled hair
Of course, it would be easier with straight hair, but right now I wanted to repeat it, and on the 3rd day after washing my curls are not so pronounced: 
Comb your hair, tilt your head forward and comb your hair in this direction. We separate the strand at the base of the neck, divide it into three parts and begin to weave a regular French braid towards the crown. It’s easy in principle, but difficult on yourself - your arms and neck get tired, you can’t see anything and your hair gets tangled. I'll definitely try it on one of my friends, it should turn out prettier. This is what it looks like, trying to take a photo with my free hand from the “lean forward” pose
:

Then you can continue to weave a simple braid from the remaining hair and collect it into a bun. Or you can tie a ponytail: 
I would now make a bow out of straight hair. And from your wavy ones - a bun, dividing the tail into 2 strands and twisting them around the elastic band in opposite directions. Then I secured the bun