DIY tear-off calendar for every day. DIY calendar - step by step instructions on how to make a desk and wall calendar. DIY Advent Calendar from a Big Box
Our regular customers are already well aware of our new product -. You can use it to do unique gift do it yourself, spending a minimum of time and money on it. Everything you need is already included in the kit: 13 sheets for printing, a base made of fruitboard and a spring for collecting structures.
To create a calendar, we need:
- 12-13 thematic photos for each month
- Special for creating calendars, available for free download.
Let's get started!
We launch it on the computer.
We select the type of object. If you are preparing a calendar in A5 format, choose "Calendar A5", B6 - "Calendar 4x6", A5 photo album - "PhotoBook 8: 5". In our case - "Calendar 4x6".
We select the type of information display in the calendar. I liked the third option more - the photo above, below the calendar days.

We choose the year for which we make the calendar.

Photos related to each month are posted on calendar pages. To do this, select the folder in which the photos are stored in the folder tree. AND simple drag place the desired photo in the desired location. If the photo is larger than the calendar area, it is centered. If necessary, you can change the position of the photo in the designated area. To do this, right-click on the image on the calendar page and hold it while dragging the photo.
We do this with every calendar page.

Additional text can be added to the calendar page if needed. To do this, on the upper toolbar, press the "Text" button and enter the required text in the lower toolbar. After entering the text, the inscription can be moved along the calendar page in the same way as the picture in the previous paragraph.

After all the calendar pages are filled, better to save the project... To do this, press the "Save" button on the top panel and save the file to the desired location on the computer.
It is important to note that the package includes 13 sheets. It is assumed that the thirteenth page is for the cover page of the calendar. But don't rush to use it. You never know what? Maybe the printer will ask you to reset the cartridges at the most inopportune moment and the page will go to waste? In a word, leave the last sheet in reserve.
Before sending the calendar to print - print one test sheet... This is necessary in order to:
- Make sure the printer prints well, is calibrated, and all nozzles are clean.
- See how put calendar sheets in the printer correctly... In our case, we used an Epson P50 printer with a BlackBox CISS. It prints images from bottom to top, so calendar sheets need to be placed with the holes facing up.

The field for printing all sheets - we collect the calendar. To do this, fold the base along the folds and attach the two springs included in the kit on top.

After - we put the calendar sheets on the spring in the correct order. The calendar is ready!

In our case, we got an excellent cat calendar for bookkeeping))).
By the way, without the selection of photos, the calendar was made in 15 minutes.
It turns out that after spending 15 minutes of time and $ 5-7, you can make an excellent gift that will delight a person for a whole year! What could be better?
Make soulful gifts with Printchip!
Today I will tell you how you can quickly make yourself a desk calendar from paper and cardboard with your own hands. On the pages of my calendar, there are empty windows for future sketches, but you can easily decorate such a blank to your taste by pasting your favorite photos or any beautiful pictures into the windows. Such a handmade calendar can be a great gift for a friend for the New Year or February 14, especially if you play it with thematic photos, dilute it with funny inscriptions or wishes for every month. The desk calendar is made very quickly, in 1-2 free evenings, and then it makes you happy all year round!
Necessary materials
- 6 sheets of A4 watercolor paper or any other thick cardboard - for pages with the names of the months
- Dummy knife
- Paint and ink if you hand-write the names of the months and dates (or a printer to print the finished layout)
- Soutache, satin or any other decorative ribbon - 20 cm
- 1 sheet of scrapbooking paper 30.5 x 30.5 cm (or any other beautiful paper for the cover)
- Cardboard 23x42 cm. (I cut it out of a sheet of ordinary Whatman paper)
- PVA glue or glue stick
- Stationery punch for 2 round holes
- Ruler
- Simple pencil
If everything is ready, then you can proceed. The scheme of work is very simple:
- I make blank pages,
- I create a basis for a calendar made of cardboard,
- I paint pages
- I collect all the elements into a single whole.
Pages with months
I cut six sheets of A4 watercolor cardboard in half, getting the next 12 pages.  With a pencil I outline the middle of the sheet and draw a line along it. Aligning the middle line with the mark in the middle of the hole punch, I make holes on 3 sheets at a time.
 I repeat the operation 3 more times and get 12 leaves with exactly matching holes.
Basis for the calendar
I cut out 2 rectangles of 22x15 cm from scrapbooking paper. These are the future endpapers of the calendar.  From whatman paper I cut out a sheet measuring 23 x 42 cm.From one edge I glue both rectangles of scrap paper to it one after the other. After drying, I fold the folds and fold the triangle, not forgetting to leave 1-2 cm for gluing from the bottom to the side wall. At the top of the triangle, I also mark the middle and make two holes with a hole punch. After that, I glue the bottom to the side wall and get a rather rigid structure, which will be the basis for our desk calendar.

A little lettering won't hurt!
Pages with months can be decorated in a thousand different ways, who has enough imagination for that, from a banal printout of ready-made templates to colorful drawings for each page.  You can make free lines for planning or notes. Since I make my calendar for sketches, it is important for me to leave some free space for future drawings. Therefore, I write the names of the months with silver acrylic paint, the days and dates with black ink, and in the center I draw a window in the form of a stamp. This is what happens in the end.

Assembling the calendar
I cut 20 cm of the soutache tape in half. I thread each segment from under the triangular base, stretch it through the leaves with months and again bring it back, inside the base of the calendar, where I tie a knot.  It is important not to tighten the ribbons too much, leaving enough freedom to easily turn the pages. Cut off the ends of the tape. The calendar is ready! If you need to draw something on it, then at any time you can fold it in half, and then straighten it again into a triangle. It is very comfortable!

If you want to add a block for notes to your calendar, make it brighter, or just practice scrapbooking once again, then you can be inspired by such a wonderful video master class from Lena Paul on creating a desk calendar with a fluffy chanterelle.
Creative mood for you, great inspiration and the most interesting and beautiful calendars!
From cardboard on the site there are also excellent master classes on creating postcards, postcards - and paper!
Greetings to all visitors!
If earlier you had to use standard calendars, then with the development of computer technology, you can make your own calendar, with your own holidays (for example, mark the birthdays of relatives, anniversaries and celebrations on it), your design, your size, etc.
In general, do everything the way you need it (so as not to forget anything and congratulate everyone on time!). Agree, it would be convenient to know in advance where and what holidays, and plans await you ?!
In general, there are a lot of ways to make your own calendar, and not all of them are suitable for a person who is poorly versed in PCs. In this article I will give several step-by-step instructions (in different programs) for creating your own colorful calendar (I think that everyone who wants to figure it out).
By the way, if you want to know the exact weather forecast, you may be interested in an article with recommendations and an overview of sites about the weather. -
Using Calendar Design Program
![]()
The most convenient program to "cook" a calendar for yourself. Judge for yourself:
- you have access to a variety of calendars formats: pocket, flip-flop, desktop. The time interval is also configurable: for a month, for a year, a quarter;
- There are dozens of various templates in the program: each template can be modified to suit your requirements;
- you can add any of your dates to the calendar: birthdays, vacations, important events in your life. Each such date can be highlighted with a special color, and even a picture;
- you can print calendars on paper of various sizes (almost all types of printers are supported).
Perhaps the only drawback is that the free version has a problem with saving in some formats. To summarize, in general for solving our problem - the program is irreplaceable, one of the best of its kind. I will consider in detail how to make your calendar in it.
- After installation from the launch of the program, you will see a welcome window with the option to start either a new project or open a ready-made one. In my example, I will choose a new one.

- Next, you need to select the type of calendar. In general, here are all the types that you may need: wall calendars (some of the most popular), desktop, pocket, one month, 12 months, calendar from scratch. For example, I chose the option of a wall calendar.

- Then dozens of all kinds of templates will appear before you: green, blue, light, dark, with nature, with animals, old, etc., etc. In general, you need to choose one of the proposed options - I do not advise here (as you know: "the taste and color - there are no comrades ...").

- The next step is to choose a photo for the calendar. Here you can put a photo of your pet, family photo, nature, etc.

- Then you need to set the year of the calendar (from what date to start counting - by the way, it is not at all necessary from the new year) and set the format of the sheet (by default, it is the usual A4). After installation - click the "done" button.
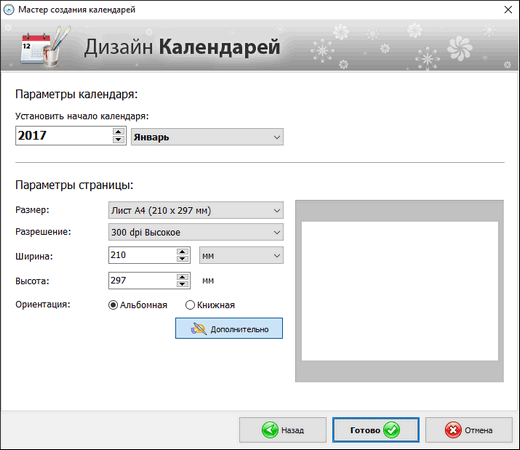
- Actually, your calendar is ready! There is little left to do: adjust some more points that were promised at the beginning of the article ☺.

- Choice of Holidays... To do this, open the "Holidays" section in the top menu of the program, tick the boxes which of the holidays to show on the calendar. For example, you can show not only official holidays, but also Orthodox holidays.

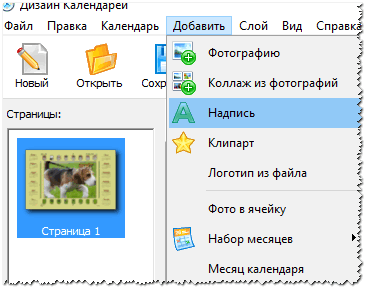
- Tincture of decoration. If the calendar needs improvement, you can always add the inscriptions you need, select any of the dates, configure, for example, the lunar calendar, add a page, etc. To do this, use the "Calendar" settings section.

- The "Add" section will help you add an inscription, logo, photo to your calendar. An example is shown in the screenshot below.
In general, a good and relatively simple way to create colorful and vibrant calendars (in my opinion ☻).
In Microsoft Word and Excel
Word and Excel are on every second home computer, which means that this method will be relevant and in demand. In addition, the calendar can be made quickly, without downloading or installing additional software. I will consider all the steps step by step using the example of Word, Excel 2016 (so that there are not so many of them ☻).
Free analogues of Word and Excel -


Online way to create a calendar
The network now has dozens of different sites for creating a variety of calendars. I will give a few examples, which I stopped myself ...

A simple site for creating a calendar, business card, envelope. It is very convenient to use it: everything is done in steps, everything is in Russian. The service supports JPG and PNG images, there is a collection of ready-made templates, beautiful fonts, etc. In general, it is convenient, fast, beautiful!

This site is notable for the fact that you can choose a theme and calendar template (for example, any holiday on February 23, March 8, etc.), then upload your photo to it, and download it to yourself. Note that any of the templates can be changed quite a lot: add text, change the background, change some elements.
Well, then, having printed out such a calendar, it will become an excellent and original gift.
By the way, your uploaded photo will be automatically processed with the necessary filters and neatly entered into the color scheme of the selected template.
In general, there are a lot of such sites, and I will not dwell on all of them ...
In this article, we will suggest ideas for calendars that you can make yourself.
A calendar is usually a necessary purchase. However, maybe it makes sense to think about the fact that such an item also serves as part of the decor? And if you make the calendar yourself, the interior will also acquire a zest!
How to make a calendar with your own hands for children in kindergarten, school: step by step instructions, photo
With small children, you can make a simple and at the same time unusual button calendar:
- First of all, you need to ask the baby choose the right size buttons. Such a task will contribute to the development of fine motor skills of the hands.
- Next, you need to ask the child cut out circles with numbers from paper. Such a task will teach you to handle carefully with scissors.
IMPORTANT: The circles must be large enough to fit inside the buttons.
- Then you need glue circles into buttons, but ourselves Buttons - stick on any calendar base. It can be fabric, cardboard. Such work will develop in the child perseverance, creative thought.
Teachers also advise doing with children weather calendar, which will help the child to quickly learn not only numbers, days of the week and months, but also weather phenomena.
Will come in handy:
- A4 paper
- Felt is thick and thin
- Velcro tape
- Cloth and bias tape
IMPORTANT: The dimensions of the bias tape should be approximately 1.5 m.
- Embroidery threads
- Needle, scissors
The work process is as follows:
- First you need to depict on paper sketch.

- Further a panel is cut from thick felt about 30x42 cm in size.It also needs to be cut 19 pieces to indicate months and days of the week in 2x10 cm format, 12 pieces for numbers 4.5x7 cm, 6 or more parts for 10x10 cm weather.


- Further are created blanks made of thin felt.

- Are now sliced Velcro strips.

- Then the ribbons need to be sewn to the felt pieces sticky side out.


- It's time to prepare patterns of numbers.

- The numbers you need cut out of thin felt.
- Further felt figures need put on thick felt plates and sew them among themselves.


- Further weather phenomena are cut out of thin material- the sun, clouds. The rain can be cut out, or you can simply embroider.
IMPORTANT: They should also be sewn onto thick pieces of fabric.


- On small strips you need write months, days of the week... It is preferable to use for this purpose disappearing marker- you can embroider on it, and the paint itself will come off over time.


- Now you need to cut and sew or just embroider with threads on the largest basis for making a phrase "Weather calendar".
- Further Velcro is sewn on according to the diagram below:


- Now you can attend pocket creation- all removable parts can be folded into it. Cut out one blank size 17x32 cm, two blanks 15x32 cm, one strip 10x63 cm.
IMPORTANT: For parts with a format of 15x32 cm, you need to round off along one edge.

- Now two identical blanks are folded with the front sides to each other, stitched on three sides, and then are turned inside out. On the edge that is not sewn up, you need to do allowances, tuck them, stitch to the edge... Attached from above with threads Velcro.
- Further the fabric strip must be folded with the wrong side out, ironed, sewn to the pocket. At the same time, allowances are turned away onto the pocket, attached.


- To the pocket the second part of the sticky strip is sewn on, and the pocket itself is sewn to the blank for the calendar.
IMPORTANT: The corners of the large felt blank must be trimmed in such a way that it eventually repeats the outline of the pocket.


- Connect top and bottom pocket. The edges should be sheathed oblique inlay.

- Top corners calendar is worth furnishing loops- with their help, the calendar must be attached to the wall. And so that the loops are not striking, you can decorate them with sticky strips- symbols of the month can be attached to such strips in the future.


How to make felt advent calendar?
The so-called advent calendars, which count from the first day of December to the last, are especially popular in Europe. After all, a certain pocket corresponds to each day, in which a surprise is hidden. It is not uncommon for people to create such calendars on their own. So, for a felt gingerbread calendar house you will need:
- Felt - by all means must be brown, since the gingerbread house is of exactly this shade. The rest of the colors are selected at the discretion
- The hanger that clothes are usually placed on
- Threads, needles, scissors
- Decor - buttons, sequins, beads, sequins
It is not difficult to create such beauty:
- From brown felt need to create two large patterns-base d for the house.
IMPORTANT: They must be wide enough to fit the hanger.
- Blanks you need to sew facing outward.


- Now stands cut out the pockets. You should not immediately glue them onto the base - it is preferable to think over the plot in advance and, if necessary, decorate the pockets before placing them on the calendar. This will make the job much easier.
- Do not forget about figures! They can be cut from the same felt or any other fabric. You can also attach it as you like - with Velcro, glue, threads.
- The final and most creative stage remains - decor! You need to stick snow-covered window sills and a roof, a Christmas tree, candy canes, snowmen, etc. on the house.


How to make a desk calendar from paper and cardboard? How to make a DIY scrapbooking calendar?
In order to create such a calendar, you will need:
- A4 cardboard
IMPORTANT: It is preferable to choose the following density - 250 g / cm2. Such density is observed in photoboard.
- Scrap paper with any motives
- Springs, if there is a binder or rings, if not
- Decor elements
- 2019 calendar grid printout


You can get to work:
- First of all, you need crease the baseboard, that is, the creation of a groove for further folding of the material. Normal folding in half can damage the image, so creasing is preferable. It is advisable to use a special board for this process.
IMPORTANT: Of course, not everyone can have a board, so you can get by with improvised materials. For example, a ruler and a pen that doesn't write.
- After creasing the cardboard must be folded in a kind of triangle, which will be stable on the table.
- In order to make the sides of the calendar elegant, you need each of them decorate with scrap paper. When cutting rectangles, be sure to take into account allowances... They are enough for about 2-3 mm.
- Now rectangles are glued to the photoboard base.
- Then you can do calendar grid.
IMPORTANT: The leaflets should be arranged in any way you like and printed so that each month is located on a separate piece of paper.


- You can start decorating front side of the calendar.
- Next, the leaves with months are stacked in a pile, and the pile is processed binder. Binder also needs to process the basis for the calendar. If there is no such tool, you can make fastening with rings.
- Now you need the leaves string on a spring or rings, attach to the base.


How to make a wall calendar: description, ideas, photos
To make the following universal calendar you need:
- Cork board
- Buttons that are convenient for attaching something to such a board
- Colored cardboard
- Scissors
- Markers

Operating procedure:
- You need to cut days out of colored cardboard for every month. The colors can be alternated as you like.


- Then pieces of paper are attached to the board buttons, and numbers are applied with a marker.


IMPORTANT: It is most convenient to fix not all months, but one actual one.
- On a separate sheet the name of the month is written.
- That's all - you can hang your calendar on the wall! The period of the month change is celebrated a new portion of paper days. By the way, on the leaves you can not only draw numbers, but also write notes.


The next calendar idea is similar, but has some nuances. For manufacturing you need:
- Cardboard base with picture frame. Need a glazed base. Preferred size not less than 30x40 cm
- Colored cardboard or colored paper. Stickers can be used
- Double sided tape
- Scissors
- Marker
IMPORTANT: You need to choose a water-based marker, traces of which can be easily removed with a sponge.
Getting started:
- The basis is needed mentally delimit into 31 sections- one actual month will be presented.
- Further stickers are attached. If you only have colored paper at hand, you need to cut it into squares, which, in turn, should be attached using double-sided tape.
IMPORTANT: You don't need to write on these pieces of paper yet!


- If provided decor, it is worth doing it at this stage.
- All that remains is cover the workpiece with glass. Here on it already you can make notes- month, days, various notes.


How to make a tear-off calendar from paper: description, ideas, photos
Required:
- Plain wooden board
- A blackboard you can write on with chalk
- Acrylic paint in white, as well as a multi-colored set of paints
- Spray paint
- Clamps, screws to them
- Paper
- Double-sided tape
The order of work is as follows:
- Wooden plank should cover white paint.
- After the paint dries, you need to apply stripes and other patterns colored paint.
IMPORTANT: It is preferable to apply the paint randomly.
- Then, in the place where the chalk board will be attached, you need attach scotch tape.

- Board is attached.
- The clamps need to be painted which is sprayed. It is preferable to leave gaps - this will create an old-fashioned effect. Alternatively, you can scrape off fresh paint.


- With screws the clamps are attached to the board.
- The calendar is ready! Left attach to the clamps pieces of paper on which the dates will be written. As the dates go, the pieces of paper will be torn off. On the blackboard, you can write months.


How to make a calendar with photos from cardboard: ideas, manufacturing schemes, photos
Favorite photos can be added to the calendar quite simply. All you need is:
- Actually, photos
- Cardboard
- Pre-printed calendar grids with months and dates
- Scissors
- Hole puncher
- Double-sided tape or glue
- Satin ribbon or twine


You can start:
- So, first of all, you need compare the sizes of photographs, cardboard blanks and calendar grids.
IMPORTANT: They must match.
- Photo need to stick on cardboard.
- Then you need to do holes at the bottom of the cardboard with photo and at the top of the stack of sheets with dates.
- Need to connect the photo with the calendar grid. And this can be done with twine or tape.


Herringbone Advent Calendar Bag Advent Calendar Bucket Advent Calendar Bright easel desk calendar with themed designs to match each month
The options for creating calendars can be endless. This is why the hand-made is unique, which allows you to decorate your interior with unique things. And as a gift, such a calendar is quite versatile!
A few ideas for making calendars with your own hands:
Which you can do with your own hands, to all dreamer parents who like to create an atmosphere of magic and celebration for their children. Of all the holiday preparations, the New Year's waiting calendar for children has a special place - the cutest decoration of the festive house.
30 DIY Advent Calendar Ideas
Since the waiting calendar came to us from Catholic countries, traditionally the Advent calendar for children consists of 24 postcards or cardboard houses with gifts, according to the number of days left before Catholic Christmas from December 1.
But since we are counting down to the New Year, then your Advent calendar can consist of 31 cards (now bags, sachets, parcels, pouches, pockets, mittens and everything that your imagination allows) or 24, as in the traditional calendar are also used expectations, just give it to the child not on the first of December, but a few days later.
Another reason to make a do-it-yourself waiting calendar this year is to teach your child how to use the calendar and count.
Advent calendar made of paper bags

All you need to make an Advent calendar like this are paper bags, stencils, a pretty ribbon, and little gifts for kids. As gifts, there can be various sweets (gingerbread, candy, marshmallows or marshmallows), postcards or stickers, small toys or figurines (children love to do something with their own hands, and not just receive ready-made gifts).
Advent calendar for kids from boxes
For this advent calendar, all the cardboard boxes that can be found in the house will come in handy, even cardboard tubes from paper towels. After all, gifts to children in the New Year's calendar do not have to be big. It can be an eraser or a funny pen with a New Year's print, new colored pencils with your favorite cartoon characters on the package, which, by the way, can also be made by hand.
Jewelry Box Advent Calendar

If you don't have jewelry boxes, then you can make cardboard boxes for the Advent calendar with your own hands here, for example.
Advent calendar made of envelopes

This is an excellent solution for the New Year's waiting calendar if you decide to give your child postcards, certificates for purchases and master classes, tickets to New Year's shows or photos with the brightest events of the past year.
Advent calendar with riddles

On each piece of the New Year's waiting calendar, write the place where the gift is hidden or that you need to guess in order to receive a prize. The kids love quests and riddles.
Advent calendar - Christmas town

Simple triangular advent calendar

This Advent Calendar can be without gifts or surprises. Its essence is that it will help children navigate how many days are left before the New Year. Just remove one card every day.
Advent calendar from different boxes
Advent calendar boxes are very easy to make. And also any gifts will fit in it: and crafts, and coloring, and sweets, and tickets to the New Year's show, and toys.
New Year's calendar of waiting "Santa Claus"


It is very easy to make this calendar of waiting for the New Year with your own hands. Print both parts of the picture, glue. Santa Claus needs to be decorated and attached, for example, to the wall so that the beard is free. Every day the child will cut off one division from the Advent calendar with scissors - "one day". This will help him keep track of how many days are left before the holiday.
Puree Jar Advent Calendar

Christmas calendar garland

This advent calendar made of paper is perfect if you are sure that children should not give gifts every day, but at the same time want to create a festive atmosphere of anticipation of the New Year.
Cute advent calendar for kids with animals

We will gladly tell you how to make a winter forest for your Advent calendar with your own hands. For example, here's the instruction, or here. Christmas trees made of paper can be made
Clothes hanger advent calendar

This is perhaps one of the simplest Advent calendars that you can make with your own hands - you just cling, everything that you are planning to give your child, on a clothes hanger.
New Year's calendar in a frame

To make such a waiting calendar with your own hands, you have to work hard: at least 31 linen bags will need to be sewn. But such a complex frame can be replaced with a cork board.
Vintage advent calendar in suitcase

Another option for an Advent calendar that you can do with your own hands one or two times. We put gifts in a suitcase. Or a pretty bag.
Advent calendar of Christmas balls
If you are planning to update your arsenal of Christmas balls, then this Advent calendar is just for you.
Hanging new year calendar with garland

Christmas calendar in pots

Rag advent calendar

Cones made of multi-colored felt or cotton will not only be a beautiful garland, but also an excellent Advent calendar for children.
Advent calendar for kids from tin cans
