Felt angel for Christmas tree. How to make an angel from felt? Materials for work
Christmas angel made of felt - a charming DIY New Year's craft. Such a toy is a Christmas tree decoration, a table decoration, a souvenir gift or a figurine for a Christmas nativity scene. In addition to felt, to make this Christmas angel you will need a bead and a piece of chenille wire. You can make this craft with children 8-9 years old or older. For younger children, we suggest making or. During the New Year holidays, I want to look into the future. We suggest you entrust the fate of your guests next year to the Christmas angels. Make as many crafts as you expect to see at the holiday table. Place a note with a “prediction” inside each figure. Of course, all predictions must be favorable! Place felt Christmas angels on a tray and let each guest choose their own destiny for the coming year with their own hands. May everyone be healthy, rich, smart and beautiful! Happy New Year and Merry Christmas!
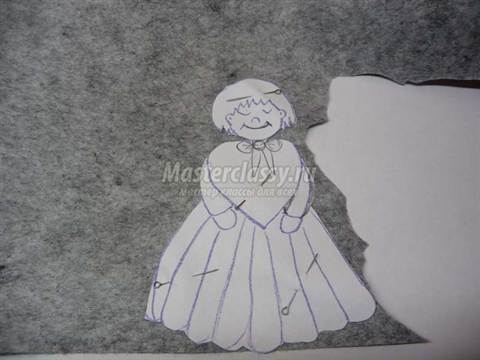
To make a Christmas angel you will need felt, a chenille stick, a bead with a diameter of 2cm in white or light color, hair threads and braid for finishing.  Print or draw the angel pattern on paper. Cut out the pattern.
  Pin the paper pattern to the folded felt using a stapler.

 Pay attention to the fold line on the material.
  If you are using braid trim, sew it to the sleeves of the angel dress at this stage. The braid should extend slightly beyond the felt pattern. If the braid is synthetic, singe the ends over the fire so that the braid does not unravel.
  Sew one side seam of the angel's dress using a buttonhole stitch, tucking the braid into the seam.
  Making hands for a Christmas angel. Fold a chenille stick, preferably white, in half.
Then bend the stick so that you get the hands of an angel.  The angel's hands should be such that they extend slightly beyond the dress.
 Insert the Christmas angel arms into the dress and sew the second side seam.
  If you are making trim, at this stage sew the braid along the bottom of the felt angel's skirt.
  Through the chenille wire loop, thread a rope on which the angel will hang.
  Insert a bead with a diameter of 2 cm through the string - this is the head of an angel.
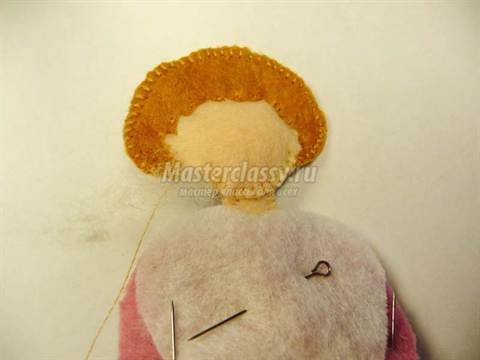
Making hair for a Christmas angel. We suggest making angel hair from wool threads.  We wind the hair threads onto the base, cut the bundle of threads and remove it from the base.
  On top of the angel's head we have a string for hanging. We put a bun of hair on our head and tie it with this string.
 If you wish, you can use a little glue and glue the hair to your head so that it lies more neatly.
We sew the wings of the Christmas angel to the dress with several straight stitches. 

 And the last attribute of the Christmas angel is the halo. Cut out a circle of felt and make a small cut in the center. We pass a garter rope through the cut. To keep the halo on your head at a slight angle, you can glue it to your head.
  We insert a Christmas star made from a toothpick and rhinestones into the angel’s hands. The rhinestone can be replaced with a beautiful bead or a star can be cut out of paper. We break off the toothpick a little from the bottom.
Our New Year's craft - Christmas angel made of felt is ready.
If you are making just a figurine and not a pendant, then instead of a rope for the pendant, take the threads that you use for the angel's hair. After tying the hair to the head, you can attach the remaining threads to the hair, and simply glue the halo to the head.
Tip: If you want to draw the face of the Christmas angel, then it is best to draw on a wooden bead with colored pencils.
On the eve of a loved one's upcoming birthday, everyone thinks about what they can do to please or surprise them? It’s good if there is an idea for the right gift, or the person has already expressed his wish. And if not? You can express your feelings by creating a charming soft one. An excellent way out in such a situation is an angel made of felt. The work is not troublesome, anyone can handle it.
How to make an angel from felt
What materials do you need to purchase to make felt angels with your own hands:
- Multi-colored felt. Everyone chooses the color they like. For example, flesh-colored material is suitable for making the arms, legs and head of an angel. Hair can be made red or golden. The scarlet heart will certainly attract attention to the craft. The wings and dress can be snow-white.
- Glue to hold the necessary parts together.
- The pastel is dry.
- Acrylic dye black.
- Ribbon - width 1 cm (color chosen independently) will be used to make bows.
- Rhinestones or beads for decoration.
- The color of the threads is selected depending on what kind of felt is taken.
- Stuffing for a toy (you can use padding polyester or holofiber (a synthetic material that replaces feathers and down and does not cause allergic reactions).
- Scissors.
- A few needles.
Completing of the work. Felt angel patterns
Now we will consider in more detail how to make a soft toy. The first stage is making a pattern. It will not be difficult for a person with the ability to draw to make it according to the model, but for the rest there is a little trick. All you need to do is copy the pattern from the article, paste it into a document on your computer, and stretch it to get the required size. Then put the document to print. The last step is to cut out the template.

For one-sided elements (wings and hair), you will need to make one piece each. Hands, legs, head, dress and heart are double-sided. They will have to be sewn together, which means you will need patterns for two parts.
Where is the best place to start?
You can start by making the arms and legs of the toy. The threads must match the color of the material. Stitching is done using a loop seam and a fine stitch. One side should remain unstitched for stuffing the parts with the selected materials. The legs can be sewn up, and the arms can be put aside.
The outfit for the angel is sewn from the top edge. And again, the threads are matched to the color of the material. From below, between the two patterns, you need to insert the legs and sew them with a regular stitch. Use padding polyester to fill the body through the hole remaining in the place where the head will be attached. To make the job easier, you can use scissors for pushing. Once the stuffing is complete, sew up the hole and trim the thread.
It is most convenient to sew the head and hairs together. The parts are neatly applied to each other. To make it easier to work, it is recommended to fasten them together using pins. Between the seams of the hairstyle, pieces of felt from which the head was made may be visible; for a more neat appearance of the toy, it is best to make the hair a few millimeters longer.

The thread is matched to the color of the hairstyle, and all the details are sewn together at once, starting from one ear and ending next to the other. At the very end, the thread needs to be secured and cut. Then the part is stuffed, and then you can sew up the head from the bottom.
What is glue used for?
With this important tool, the main parts of the felt angels are held together. Glue is applied to the bottom of the head and to the toy’s outfit in the place where the neck should be. The parts then need to be brought together for gluing. While the toy dries, you can move on to the next stage of work.
Scarlet threads will be needed to stitch the heart, which you also need to remember to fill with filler.
During this time, the toy will dry, and you can sew the handles to the outfit. At the next stage, the heart is glued to the angel’s palms. Apply glue to the inside of the arms and attach the heart.

The wings are also attached to the back using an adhesive solution. Bows are made from ribbon, and the eyes and mouth of the craft are painted with acrylic paint.
How to make a toy more interesting
Figures of winged babies will look more elegant if you use knitting technology to make them. To make a knitted felt angel you need to prepare:
- white felt or lace fabric;
- light wire (the length is calculated based on the size of the toy’s wings);
- thin hook;
- fluffy thin thread;
Stages of work
All felt angels will need wings. Schemes are made individually; they must have a suitable size and shape. You need to remember that each part will need two pieces.
It is necessary to twist the wire from one edge. The thread is tied to a wire loop, and then tied using a hook. The felt is pierced with a hook, then the threads are secured, and you can continue working.
The wing is tied at the edge with a wire grip. It is best to use columns without a cape. During operation, the wire must be bent along the contour. It is recommended to create several columns in the bend areas so that the binding does not tighten.
To complete the work, the opposite end of the wire is inserted into the lower loop, secured and cut. Then you need to use a hook to secure the thread and then break it.
The second wing is tied in exactly the same way.

So, the wings are ready, all that remains is to attach them to the backs of the felt angels. Charming toys can serve as a cute gift for a loved one or act as an element of decoration, taking their rightful place on the New Year tree.
Wonderful, rosy-cheeked, robust angels can be a wonderful decoration for a child’s room. If you know how to sew at least a little, you can create a wonderful craft - an angel made of felt. You can create a cute doll and an unusual applique for a children's room.
The benefits of working with felt
High environmental friendliness, plasticity and the absence of “shedding” of the edges of felt, made from the finest down of goats and rabbits, allow this material to be used for children's creativity. Preschool children can create wonderful and bright appliques from multi-colored woolen sheets.

Making them is not difficult, and the pleasure and benefits from the exercises are guaranteed. When working with small parts, cutting them out with scissors, gluing them, the child’s speech center is stimulated. This happens due to its proximity to the center responsible for fine motor skills of the hands and fingers. Let your child choose the color scheme of the craft on his own, and he will develop his creative talent. Connecting parts into a whole picture will contribute to the development of logic, because it’s like putting together a puzzle, only from fabric.

Application for kids
There are many different patterns for sewing felt toys. Figures can be flat or three-dimensional.
Use the pattern to create applique details, just sew them together, there is no need. You can glue the felt using PVA glue.
To complete the application with your child you will need:
- Figurine template;
- A sheet of colored cardboard for the background;
- Glue and scissors;
- Sheets of thin felt in various colors;
- Decorative elements - sparkles, beads, braid, ribbons.
First, choose a suitable picture. You can draw it yourself and make a template, or use one of the patterns below.

Trace the prepared template onto sheets of felt and cut out the details. All that remains is to trust the child to assemble them under your guidance. Invite your child to decorate his angel himself. Place the finished picture in a frame, let the baby admire the fruits of his painstaking labor.
For older children
When a child already knows how to use a needle, you can offer him to create a simple felt angel with his own hands, for example, like this one.

To make it you will need:
- Felt of various colors;
- Sample;
- Sewing supplies;
- Scissors;
- Filler;
- Decorative elements - snowflakes, ribbons, lace, beads, rhinestones.

Transfer the pattern to cardboard and cut out the parts.


Make cuttings in accordance with the selected shades of felt and try them on.


Sew the body, arms and legs and fill them with stuffing. Make neat and even stitches using a seam “over the edge”; there is no need to turn the parts inside out.

Sew the legs to the hem of the angel's dress.

Sew the wing parts together and fill them with stuffing.


Sew and stuff the rest of the details too.
Decorate the hem of the dress and the outline of the wings with sequin ribbon and lace.

Sew the sleeves and handles to the dress, securing them with sequins.

Decorate your head with a ribbon and decorate your face by embroidering it with floss threads.


Use instant or hot glue to attach the head to the body. Complete the angel trim by sewing on a hanging ribbon.

You can combine toys into garlands or make a mobile out of them.

Gift for Valentine's Day
Do you want to please your soulmate with an unusual gift? Use bright and colorful felt! We offer you a master class on creating a very cute angel with a heart. It will be relevant for any occasion, be it your wedding anniversary, first date, or just celebrating Christmas or Valentine's Day.
To make an angel you will need:
- Felt (red, white, nude and brown);
- Second glue;
- Acrylic paints;
- Dry pink pastel;
- Sewing supplies;
- Filler;
- Satin ribbon, adhesive rhinestones.
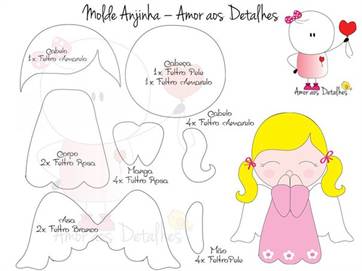
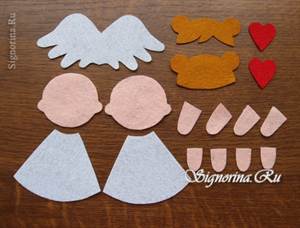
To work, use the following pattern.

Place the cardboard template of the part on the felt and cut out the necessary parts.
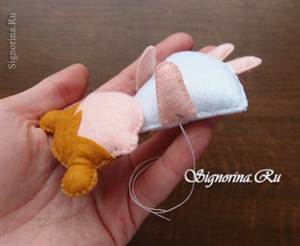
Sew the arms and legs. The legs can be closed immediately.

When sewing the dress, insert the leg pieces into place and sew them with running stitches.

All four parts of the head are sewn together immediately.
Note! When cutting, carefully ensure that the details of the hairstyle are slightly larger than the head.

Secure the head with instant glue.
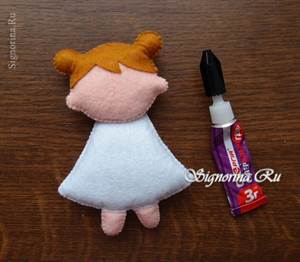
Sew handles to the sides of the dress.
Sew a heart and place it in the angel's arms using glue.

The wings are also attached with glue.

Draw the angel's eyes and blush.

Sew ribbon bows, decorate them with adhesive rhinestones and glue them to your hair.

The angel is ready!

Preparation for the main holiday
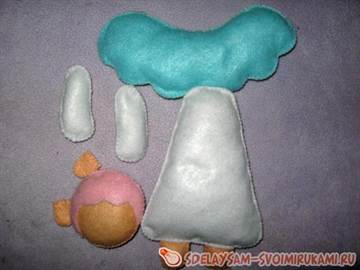
When rare snowflakes begin to float outside the window, you can’t help but think that the main holiday of the year is just around the corner. New Year's angels made of felt will help you decorate your home. You can study the process of their “birth” step by step in this master class.
You will need:
- Felt;
- Sewing supplies;
- A little filler;
- Scissors;
- Decorative elements.
To work on a New Year's figurine, you can use any sketch. Draw an angel, cut it out on a thick felt base, cut and sew the parts, and make your angel beautiful. The principle of operation is no different from that described above. You can follow the stages of creating a New Year's toy in the photo.


A felt angel is a very cute and delicate product that will appeal not only to children, but also to adults. Such an angel can decorate a New Year tree, radiate warmth and please the eye. But this is not the only use of an angel, it can also be given as a valentine for Valentine's Day. This master class will help everyone who wants to learn how to make original and beautiful things with their own hands.
Craft with a scarlet heart
For a beautiful angel you will need the following materials:
- felt fabric (white, red, flesh and light brown);
- Super glue;
- black paint (acrylic);
- dry pastel;
- red ribbon 1-1.2 cm wide;
- 2 rhinestones;
- threads to match each color of felt;
- padding polyester

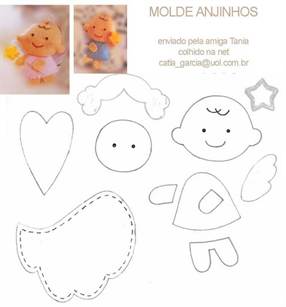
The pattern for working on the product looks like this:

It needs to be printed or, if there is no printer, transferred from the monitor to paper. To do this, place a sheet of paper on the monitor screen and trace all the contours with a pencil or pen.
Then, to make one toy, you need to cut out two parts each for arms, legs, head, heart and dress. Wings and hairs - one copy each.

Next, start sewing the arms and legs of the doll. To do this, take threads in a pale pink tone and sew the parts together with a buttonhole stitch using small stitches. Stuff them with padding poly for volume. Immediately sew up the legs completely with regular stitches, and leave the arms unsewn for now.

Use white thread to sew the dress, starting from the top edge. At the bottom, insert the legs between the two parts of the dress and sew these places with regular running stitches. Fill the body with padding polyester through the hole in the neck area. Push the stuffing through using a sushi stick or the tip of a pair of scissors. Sew up the upper part of the body and break the thread.

Sew the head together with the hair: attach these two parts to each other and go through small stitches. The hairstyle should look a couple of millimeters larger than the head. Start sewing from the ear, piercing four parts at once with a needle, then go to the next ear, close and break the thread. Replace it with pink and continue stitching the entire lower part of the head. Push the filler first into the buns and ears, and then the whole head. Sew everything all the way down and cut the thread.


Attach handles to the side seams of the dress and sew them with a buttonhole stitch. Sew up all the holes through which the parts were stuffed.

Use red thread to sew a heart, like an angel, and fill it with padding poly.


Apply glue to the inside ends of the handles and glue the heart to them.

The large wings should cover the back of the angel; they should also be glued with super glue.

Paint small eyes with black acrylic paint. You can also use beads as eyes.

You can crush dry pastel and apply it to your face as a blush.

Now make two primitive bows from a 1 cm wide ribbon. Cut two pieces 4-5 cm long, burn the edges. Fold the ribbon so that its ends overlap each other by 3-4 millimeters, sew through the middle and pull together to form a bow.
For decoration, you can glue a rhinestone in the center and sew a bead. It would be nice to attach bows to the hairstyle with glue.

The angel is ready!
Pink angel

Such a beautiful angel can be given to a little girl on her birthday or hung on the tree on Christmas Eve.
Necessary materials:
- felt (in white, soft pink, pink, beige and brown);
- white round beads;
- narrow pink ribbon.

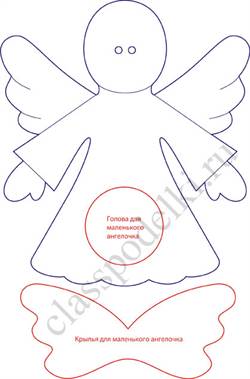
Prepare a pattern for the angel and cut out all the parts from felt. For the body you will need to cut two identical parts.

Sew the pocket to the dress using a loop stitch.

Embroider the face and sew on the hair using the same stitch.

Place the head on the main part, secure with a pin and sew with a loop stitch. Also sew on a halo discreetly.

Arrange the remaining parts in places, add a bow and a loop for hanging. Ready!
Video on the topic of the article
A funny and quite beautiful angel made of felt, created with your own hands, is considered a wonderful New Year's decoration for the Christmas tree. Creating such a toy will not require much time, and the materials are available and the price is reasonable. To make your own felt angel, you should draw a pattern of the elements or use a template from the Internet, increasing or decreasing it to the size you need.
Materials for work
Before work you need to prepare everything you need. To create an angel yourself, you need to buy the following materials:

After preparing the materials, you can proceed to creating a pattern for the product.
Creation of an Angel
 In order to sew a soft craft, you need to take the first step - create a pattern. It won’t be difficult for a person with the skills to draw and make it according to a model, but for others there is an interesting trick. You just need to copy the felt angel pattern on the Internet, paste it into a document on your PC, stretch it to make the desired size. Then print the pattern. The final step will be cutting out the template.
For one-sided parts (wings and hair), you will need to create one element for the angel from felt. The pattern of the arms, legs, head, dress and heart suggests that these parts of the craft are double-sided. They need to be sewn, which means you will need patterns for 2 parts.
Making figures and clothes toys
You can start the process by creating the limbs of the toy. The threads must match the color of the material. The work is done with a buttonhole stitch and a small stitch. One side must be unsewn for stuffing with certain materials. Legs can be sewn up immediately, and put the handles aside for a while.
 Clothing for an angel is sewn from the top edge. In this case, the threads are selected according to the color scheme of the fabric. At the bottom, between the 2 parts of the clothing pattern, you need to insert the legs and sew them with a simple stitch. Then you should use padding polyester to stuff the body through the hole remaining in the area where the head will be attached. To simplify the process, you can take scissors. Once the stuffing is complete, the hole is sewn up and the thread is cut.
The head and hair are easiest to sew together. The parts are slowly attached to each other. To make it more convenient to work, they need to be fastened using pins. Between the seams of the hairstyle, pieces of the material from which the head was created may peek out. For a higher quality look, it is better to make the hair a few millimeters longer.
The thread is taken to match the color of the hairstyle and all parts are sewn together at once, starting from one ear and ending next to the second. At the end of the work, the thread must be secured and cut. Then the head of the product is stuffed, and after that you can sew up the head from below. So the topic of creating an angel from felt with your own hands has been discussed.
Wings for a costume
It’s very easy to create your own wings for an angel. The materials for their creation can be very different. The frame can be created from wire, onto which the fabric part will be stretched.
In the standard version, the wings are cut out of plain paper. The process is then performed as follows:

In other tutorials on how to create angel wings from cardboard, they suggest connecting them with a large elastic band. It is also necessary to create straps for the handles. A hole is created at the base, then the rubber band is secured on both sides, and the fastening area is masked with feathers from filters or napkins. When you create straps, do not forget to calculate their width and height before doing so. That's it, the work is completed.
Attention, TODAY only!