Make a beautiful toy for the Christmas tree with your own hands. DIY New Year's toys. Decoration of Christmas tree decorations with fabric and threads
Hi all! The approach of the New Year requires, so to speak, pleasant chores and preparations. In this article you will find many ideas for DIY toys (balls, snowflakes, snowmen and many others)
This master class inspired me to create. It turned out that even ordinary cardboard from a box can be made into such beauty:

Unfortunately, I don’t know what they sprinkle on the photo on the right, but I can recommend dry wallpaper glue and glitter. In the article about You can also read about sparkles (where to find them and what they look like).


I really like the idea of sock snowman toys. You can put these under the Christmas tree or make a craft in the kindergarten. This is not new, but they look great... and do not require special skills or material costs!

They won me over :)

Watch a video on how to make these snowmen on our channel.
They turned out so cute!
The simplest toys for the New Year are felt toys. Felt is an affordable material, and patterns do not need to process sections.

My sister has been able to do hand stitches since she was 6 years old. I think it won’t be difficult for any girl to sew such felt toys under the supervision of her mother!


There are bright colors on sale that will make interesting decorations that will look great on the green needles of the Christmas tree and are also safe for the child. I remember the eldest, when he was still small, climbed onto the back of the sofa and tore a glass toy “icicle” from the Christmas tree...... and took a bite... Fortunately, it only cracked and he didn’t swallow anything. Good thing I was there. But I was convinced that I had secured the toys high. This year we will hang safe toys on the lower tier and secure the tree more tightly, otherwise the youngest one will be a hurricane!


Light bulbs + imagination + some drawing skills =

All children love to draw! So give them free rein for their creative imagination!

Balls, balls, balls...the most popular New Year's toys:


I suggest you look at an interesting technique for decorating a ball:


I found these photos as an example. After all, if you think about it, there are a lot of ideas for decorating balloons, just change the color of the ribbons, fabric, paper, sparkles and paints... Go ahead and create, friends!
Where can I get a blank for a New Year’s ball if I can’t buy it? Do it yourself! The video shows in great detail how to make a high-quality blank for the ball.
And this video will tell you how to make a papier mache base:


Originally, yes, from bottle openers. I wonder if the author collected from friends or if he drank so much soda!
Well, anyone who knows how to weave from newspaper tubes will not have any difficulty in weaving such a ball:

A voluminous ball of kusudama paper is perfect for decorating a Christmas tree if you sprinkle it with a little glitter.

How to make a kusudama ball:

Very cute mobiles:


You can make such a lantern from two components from hanging flowerpots and a garland. Especially relevant for terraces and verandas of private houses.

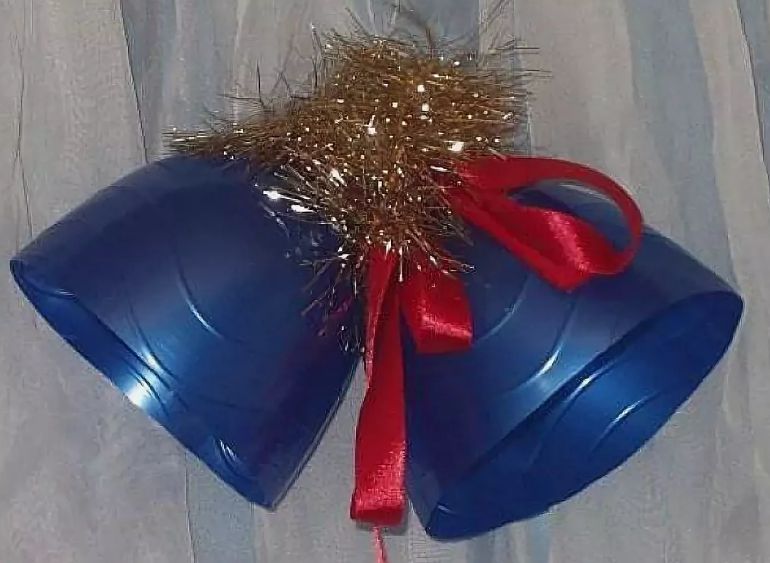
Colorful bells are made from coffee machine capsules:


Dinoyogurt cups are also suitable for this purpose!
Napkins come in handy too:

The most magical night of the year is coming very soon! Left just a little bit. To fill the apartment with this magic, we decorate it in New Year's style - balls, sparkles, tinsel, snowflakes and, of course, the symbol of the New Year. This year it's the Yellow Pig.
Making Christmas tree decorations with your own hands is doubly enjoyable. Especially if you have children. The moments when you make a Christmas tree craft together will never be forgotten by your little one. These magical moments bring you closer together and fill you with a fabulous mood.
Today's ideas will help you decorate your Christmas tree, make a craft for kindergarten, school, or win a street tree toy competition. All of them are easy to make and very original. Choose, take note and create yourself or with your children.
Christmas tree decorations for the New Year from scrap materials
To make a beautiful toy, it is not necessary to buy special materials and devices for this. Everything original is simple. Likewise, interesting decorations can be made from the simplest things that are at hand.

Beautiful crafts from light bulbs

DVDs will come in handy.

Another option for a New Year's toy.

You can use plastic bottles.
Decorating a Christmas ball with your own hands
Plain balloons, which are sold in every store on the eve of the New Year, can be decorated to your taste. This way you will save money, because decorated balloons are much more expensive than plain or transparent ones. Plus, it's a great way to get your creative juices flowing.

You will need:
- plain balls;
- PVA glue;
- glue brush;
- artificial snow (sold in many stores);
- sparkles.
Manufacturing:
1.Pour PVA glue into a small bowl. Don't pour out too much as it won't be good for long after that. Using a brush, lubricate the ball from above, from the loop, to approximately the middle. But you can do it in any order you like. Now, pour artificial snow onto the glue and lightly press it onto the ball with your fingers. Leave until dry.

2. You can also draw any pattern (heart, snowflake, etc.) with glue, sprinkle it with glitter or glue it with rhinestones.
New Year's toys made from tin cans
You can make interesting Christmas tree decorations from ordinary Coca-Cola cans. It's very simple.

You will need:
- tin cans for Coca-Cola or other drinks;
- scissors;
- felt-tip pen;
- stencils for toys (you can use paper or cookie cutters);
- thin satin ribbon or other string for a loop.
Manufacturing:
Coca-Cola has long symbolized Christmas and New Year. Everyone remembers the famous advertisement and the song “The holiday is coming to us...”. So why don’t we make beautiful Christmas tree decorations from cans of this drink?! You can also use tin containers from other brands.

1. Cut off the bottom and top of the jar. Cut the cylinder in half to make a strip. Draw shapes on it using various stencils. You can use cookie cutters or paper snowflakes.
2. Cut out according to the design. Punch a hole at the top and insert a loop.

3. Some shapes, for example, a star, can be bent at the edges, thereby giving it volume. Alternatively, you can glue the figure to a New Year's ball or simply hang it on the Christmas tree.
Homemade lanterns made of cardboard or colored paper
Back in school we were taught to make Christmas tree lanterns with our own hands. This process is not only entertaining, but also very useful for fine motor skills, intelligence and attentiveness. Now we will remember our childhood and immerse ourselves in this magical atmosphere.

You will need:
- colored cardboard (preferably A2 size) or paper;
- ruler;
- a simple pencil;
- needle;
- hole puncher;
- decorative decorations (twigs, berries, snowflakes, etc.);
- thin satin ribbons.
Manufacturing:

1. Cut the cardboard into strips 15 centimeters wide, the entire length of the sheet. Now you need to draw lines along the entire length, 1.5 centimeters wide. Then carefully cut through with the tip of the scissors. This will make them easier to bend.

2. Fold along the lines like an accordion. Mark 6.5 centimeters from both edges. In these places you need to pierce the entire accordion with a needle so that there are 2 holes on each fold, the distance between them will be 2 centimeters.

3. Now you need to make a fold from the upper right side, in the middle, to the lower left hole on the first frill. Now from this bottom hole, fold the cardboard to the top right on the second frill. Thus, fold the entire accordion.

4. Now you need to gather the ends, while giving volume to the figure along the folds.

5. Fold the figure as in the photo.

6. Use a hole punch to pierce the accordion on both edges. Insert one strip on each side through all the holes. Secure the corners with this tape.
7. Decorate with prepared decorations and hang on the tree.
How to make three-dimensional balls for a Christmas tree from plastic bottles
There are plastic bottles in every home. We buy soda, milk, kefir and so on there. Don't rush to throw them away after emptying them. After all, you can make beautiful New Year's balls from such bottles. Bottles that are not smooth, but embossed in a circle, are more suitable. But regular ones will do too.

You will need:
- plastic bottles;
- a beautiful ribbon, about 2 centimeters wide;
- rhinestones, sparkles optional;
- glue;
- nail;
- ribbon for loop;
- pliers.
Manufacturing:

1. Cut the bottle into circles 2 centimeters wide. Or, if you are using a bottle with a round relief, cut along them. You get even rings.

2. Cover each circle with a beautiful ribbon. You can also coat it with glue and sprinkle it with sparkles or rhinestones. In this case, be sure to leave a free space of 2 centimeters wide on opposite sides. These will be the joints of the rings.

3. Connect the rings into a single ball, holding their joint. Heat the clove over the fire, holding it with pliers so as not to get burned. Pierce the place where they connect. Thus, they will be fastened together and a hole will be created for the loop.
4. Thread a ribbon or other string. Hang it on the Christmas tree.
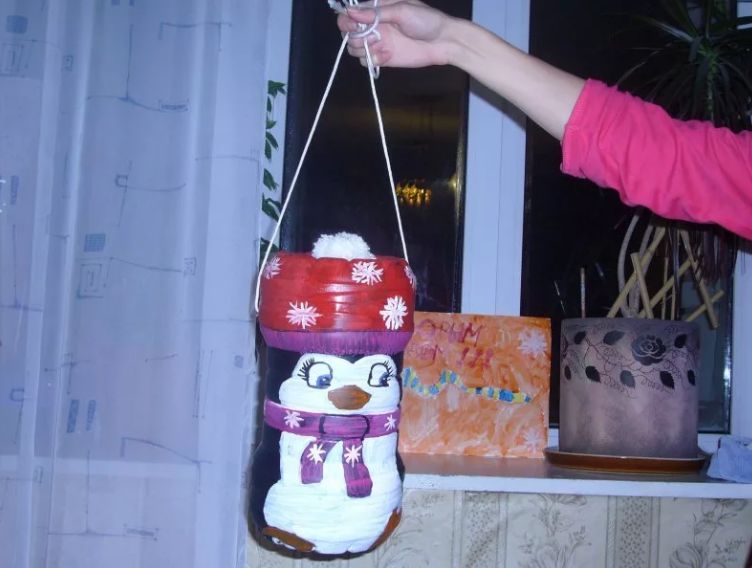
Large toy for the New Year tree on the street from a tin can “Gift from Santa Claus”
A kindergarten or school often announces a competition for toys for a street Christmas tree. You always want to do something original, interesting, but at the same time uncomplicated and not expensive. Nowadays you can see a lot of beautiful crafts on New Year's Eve in the form of huge candies, houses or compositions from DVDs. I offer you a very simple version of a craft for a street Christmas tree.

You will need:
- a large can of coffee, enamel paint, etc.;
- a packing sheet of paper (preferably New Year's themed);
- silicone glue gun;
- scissors;
- a small square of plain paper;
- ribbon or other rope for tying;
- decorative bows;
- decorative tape.
Instead of a jar, you can use any box.
Manufacturing:

1.Spread wrapping paper in front of you. Try on how you will place the jar here. Glue a string in the form of a loop to the top of the jar, so that later the toy can be hung on the Christmas tree. First glue the two ends to a small square of paper and then secure it to the jar.

2. Turn the jar upside down. Coat the bottom with a small amount of glue. Try on the wrapping paper so that the can is glued to it exactly in the center. Place the paper in this way, with the pattern facing up, and press firmly to secure the glue. Turn over.

3. Apply glue to the top and glue the short sides first.

4. Now you need to gather the long ends into a ponytail. But to do this, you first need to select the corners with an accordion and glue them together. At the same time, do not forget about the thread, which is intended as a loop for the Christmas tree.

5. Gather the ends into a ponytail, pulling the thread out. Tie it with a beautiful ribbon and tie a bow. Decorate with decorative bows or other elements of New Year's decor.
New Year's toys for the Christmas tree made of salt dough
All children love to play with plasticine. Invite them to make a craft from completely safe, natural “plasticine” - salt dough. The result will please everyone. After all, the baby will see a real miracle. A piece of dough turns into a wonderful toy in his hands, and then hardens completely; it can be colored to suit any taste and even hung on a Christmas tree!

You can make dough shapes using cookie cutters or sculpt the shapes yourself using your hands and a clay knife.
To prepare the dough you will need:
- flour, coarse salt and water in equal parts;
- plasticine knife;
- acrylic paints of the desired colors;
- sponge for washing dishes and a thin brush.
The dough must be prepared from three ingredients - water, flour, salt. Knead it and get to work right away. Now we will look at such a craft using the example of the symbol of the coming Year of the Pig.

1. Roll a small piece of dough into a ball and roll it out into a thin layer. This will be the face of our Piggy. Make the same layer, only smaller and glue it to the muzzle. Use a toothpick to identify two nostrils.

2. Attach eyes and ears. Use a knife or toothpick to make peculiar folds on the ears.
3. Cut out the heart and handles. Stick them as if the pig is holding a heart with his hands. On it you can write any wish or congratulations for the New Year. If you plan to hang the toy on the Christmas tree, do not forget to make a hole for the string.
4. Heat the oven to 100 degrees. Send our pig there. There it will dry for several hours. It should harden completely.
5. To give the figure a contour, you need to paint it with dark paint using a sponge, and then rinse it under running cool water. This way the paint will remain in the recesses. Then you can begin the final coloring. After drying, thread the thread, secure the ends and hang the toy on the Christmas tree.

In the same way, using any stencils, you can make other toys.
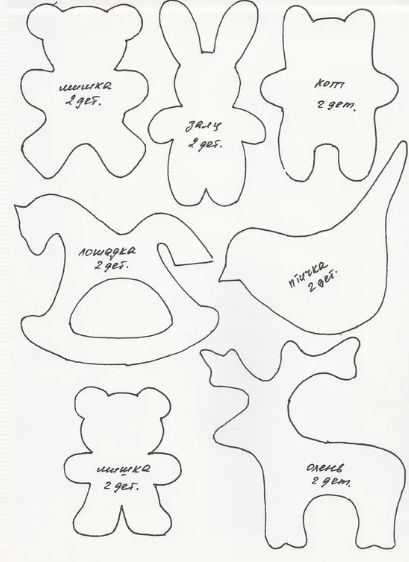
DIY felt Christmas tree toys
Do-it-yourself felt toys are becoming increasingly popular. Even children can make them, of course, under the watchful supervision of adults. This material is pleasant to the touch. Working with him is a pleasure. And what cute toys they make... Admire them for yourself!

As you can see, sewing such toys is not at all difficult. All you have to do is draw a stencil, transfer it to felt and cut it out. And then be guided by your imagination. You can glue this fabric to cardboard cut out using the same stencil. You can fill the toy with padding polyester and decorate it to suit your taste.

For example, to sew such a cute deer you will need:
- scissors;
- felt in white, light brown and dark brown colors;
- thread and needle;
- beads for eyes;
- ribbon or string for a loop;
- padding polyester or other filler.
1.First, transfer the drawing onto a white sheet, according to the template in the photo. Cut them out. Now transfer it to felt in this order - the body, ears and tail are on light brown, the nose and spots are on dark, the muzzle will be white.
2. Cut out shapes from the wind. Sew two parts of the body, not forgetting to leave room for stuffing. After stuffing, you need to stitch it too. Sew on all the other elements, make a loop and glue on the eyes.
 You can also use these stencils or draw your own, guided by your imagination and creative flight.
5 ideas on how to decorate a Christmas tree with your own hands (video)
There can never be too many toys on the Christmas tree. Therefore, I offer you 5 more interesting ways to make Christmas tree decorations yourself. All of them are simple to implement and very original.
Decorating the New Year tree is a special ritual that we all love since childhood. Then our parents enveloped us in this magic, buying new Christmas tree decorations or making them with us. Today we are helping our children create something special and decorate our New Year's beauty with it. In kindergarten or school, on the eve of the New Year, they always announce a crafts competition. Today's toys will become worthy competitors.
I wish you good luck in all your endeavors! Happy New Year! See you soon!
2016-11-25 519

Contents
The New Year is getting closer, and for those who know how to do DIY Christmas toys, the time for fruitful work is coming. Making toys is a tradition that arose at a time when mass production of Christmas tree decorations had not yet been established. Today, there are plenty of factory-made toys in stores, but the tradition of making them yourself has not disappeared. This is explained simply - handmade jewelry and toys give off a special warmth; they look homely and cozy. A nice bonus is that you can be proud that the toy you made yourself exists in a single copy.

How to make New Year's toys with your own hands?
New Year's outfits for the green beauty have undergone changes many times during the existence of the tradition of decorating the Christmas tree. In stores you can still buy standard decorations - glass balls of various colors and sizes, stars reminiscent of the Soviet past, glass cones, fruits and other traditional products. You can also add an element of creativity to the Christmas and New Year holidays and try to make New Year's toys for 2017 with your own hands.

DIY New Year's toys from scrap materials
The choice for work is almost limitless - any available material can be used. Christmas tree decorations are sometimes made from the most unexpected materials. New Year’s creativity also has its own “leaders” - materials that are used most often:
- Wood, plywood;
- Paper;
- Beads;
- Felt;
- Textile;
- Beads;
- Natural materials - branches, vines, cones, etc.

Christmas tree toys made from salt dough
You can even make DIY New Year's toys for the New Year 2017 from flour. One of the simplest and most inexpensive materials for making New Year's toys is salt dough. There is flour in every home, the process is interesting (especially for children), and the result is a completely worthy replacement for ceramic and glass toys.
To work you will need:
- Wheat flour;
- Water;
- Salt (fine);
- Paints;
- Varnish (optional);
- Leg-split;
- Oil;
- PVA glue.
Important! To make the dough more flexible, you can add a little baby oil (can be replaced with vegetable oil or olive oil).
Dissolve salt in warm water, add flour, knead the dough. To get a variety of figures, you can use dough molds. The lack of shapes is not a problem; figures from salt dough can be sculpted by hand. To add texture, you can use anything - pencils, plastic bottle caps, lace. While the dough is still wet, you need to make holes for the rope holder.

After drying (1-3 days, depending on the thickness of the product), the toy can be painted, a pattern applied, small photos pasted and coated with acrylic varnish.
Christmas decorations made from branches
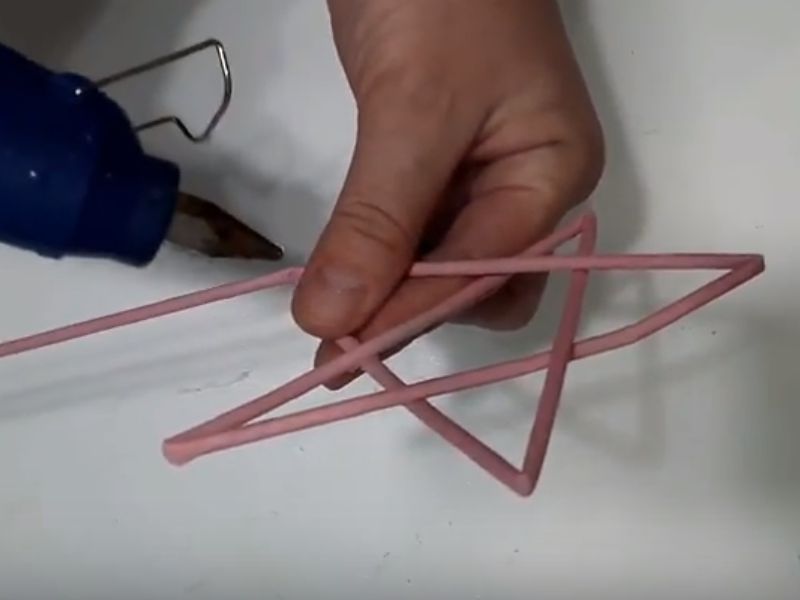
DIY New Year's toys are often made from scrap materials. A simple but effective way to decorate a Christmas tree or home for the New Year is to make toys from natural materials - for example, from branches. To make a stylish toy “Ball in eco-style” you will need wire and branches.

Lifehack! It is better to collect branches in October or November, when they still contain a sufficient amount of moisture. Later collected vines and branches may be brittle and unsuitable for making toys.
Make several (5-6) circles from the wire. Form a ball “skeleton” from them, fasten the circles together with hot glue or wire. Carefully twist small diameter branches or vines over the base. To keep the branches tightly, they can also be secured with hot glue. It is easy to thread a ring of twine or ribbon into the finished ball. The stylish eco-ball is ready!
New Year toys made of beads
You can also make spectacular New Year's toys from beads. It will not be easy for beginners to make jewelry that is massive or has a complex shape. But without any problems you can make hearts, Christmas trees, and stars. To make such a toy you will need wire and beads. First you need to string the beads onto the wire, and then form the desired shape, tightly securing the ends of the wire. You can use ribbons for hanging.

New Year's toys made from light bulbs
For those who are still puzzling over the question “How to make New Year’s toys with your own hands?” An option using items that previously had a utilitarian function is perfect. New Year is coming soon, so don’t rush to throw away burnt out light bulbs. They make charming Christmas tree decorations. A little imagination, and you won’t have to settle for the usual glass balls.

Attention! For the first (background) layer, it is better to use spray paint. It is easier to apply, and this paint goes on evenly. It is much more difficult to create an even coating with a brush or sponge.
DIY New Year's toys: patterns and diagrams
DIY New Year's toys made of paper
Paper is a universal material, and Christmas tree toys and decorations made from it are cheap, practical and simple. To begin with, you can choose flat (not voluminous) jewelry. These can be snowflakes, Christmas trees, and other themed figures.


Important! You should not take too thick paper or high-density cardboard: when cutting, the edges of these materials become “shaggy” and the product does not look neat.

Another accessible method is to use paper to decorate ready-made toys - for example, balls. An ordinary glass ball will look much more original if you stick decorations cut out of paper on it. Or, for example, a small collage of photos.
A more complex way is to make toys using the origami technique. Using separate paper blocks, you can assemble a variety of decorations - for example, a Christmas tree.

Even children can make New Year's toys out of paper with their own hands. Most of the diagrams and patterns are simple; it will not be difficult for a child to cut out a snowflake, a Christmas tree or the silhouette of a bird. And from individual paper figures and silhouettes you can make a New Year's garland to decorate a Christmas tree or room. To do this, you can use a ready-made diagram from the Internet or come up with a design yourself. Christmas garlands can be decorated with snowmen, balls, patterns, Christmas trees, and animals.


From felt
Felt is a soft, fairly dense felt. This material is perfect for making New Year's toys. It’s easy to work with – you don’t need to process the edges; you can buy felt in almost any color and shade in the store. To make a stylish New Year's toy, only two or three colors of felt are enough. For example, a combination of red and white - classic New Year's colors - is perfect for creating simple decorations. It is not necessary to choose complex patterns; it is enough to cut out simplified silhouettes from paper. For example, these:

More ideas for New Year's toys for handicrafts -
You can transfer the pattern to felt using chalk or a bar of soap. Then each type of figurine must be cut out in duplicate. Large DIY New Year's toys can also be made from felt, as it is sold in sheets of different formats.

Attention! Felt lends itself well to cutting, but you need to choose sharp scissors for the job. It is better to secure the pattern on the fabric with pins to get a neat silhouette.
In the photo: DIY felt Christmas toys:


It is better to sew felt parts with contrasting threads - if the toy is red, then you can use white or beige threads. If the toy is white, the decoration with red, green, and brown threads will look harmonious.
Small felt toys can be used both to decorate the Christmas tree and to make interior garlands. Bright ribbons, regular white clothesline, and twine can be used as a base.

Christmas trees, hearts and houses are traditional details of New Year's design. Recently, toys in the form of animals with which the New Year is associated - deer and elk - have become increasingly popular.


DIY felt Christmas toys look bright and festive without any additional decor. If desired, you can give them additional flavor by decorating them with buttons, sequins, ribbons, or, for example, embroidery.


The advantage of a homemade garland is that it can be made taking into account the size and color scheme of the room that needs to be decorated. To make a garland you do not need a sewing machine - the felt parts are sewn by hand.

Thanks to the pliability and softness of the material, making toys takes very little time - about half an hour for each. If there is a need to make the toy voluminous, it is stuffed with cotton wool or holofiber.
Important! For stuffing, you can use either cotton wool or holofiber, but you need to take into account that when washed, the cotton wool inside the toy gets knocked down and the product loses its shape. If you are going to use toys in the future, it is advisable to use holofiber for stuffing - it tolerates moisture well and the product does not lose its shape.
From fabric
To make a New Year's toy from fabric with your own hands, it is not at all necessary to have sewing skills. For example, such a ball can be made using scraps of fabric. An ordinary Christmas ball or a foam blank is used as a base.
Hi all! The New Year is getting closer and we will soon be decorating the Christmas tree. As luck would have it, I discovered that there was absolutely nothing at home to decorate the forest beauty. A dog just appeared in the house and completely chewed everything up. Therefore, this year I decided not to buy, but to make it myself. Plus it's a great activity for kids.
Soon there will be a competition for the best toy in schools and kindergartens. It's time to think and build something. Besides, you don’t need anything special for this. After all, decoration can be made from improvised materials. This is exactly what our topic of today’s article will be about.
Just recently we did , and . It turned out very beautiful. The same will happen with Christmas tree toys. After all, this is not only an interesting activity, but also fun for the whole family. Just imagine how amazed your guests will be when they see all your creations. Somehow I even wanted to celebrate the holiday as soon as possible.
The youngest daughter is already asking how soon we will decorate the house. Can not wait to! And it’s not surprising, now I myself, like a child, make something for New Year’s. I hope you are in the same mood? So let's channel our impatience in the right direction!
We'll start with the simplest one first. You have felt or any other fabric lying around somewhere, great. Prepare it and choose any template you like. You can simply redraw it or print it. Cut out, sew both parts and you're done. For volume, put padding polyester or cotton wool inside and don’t forget about the loop. It is with her help that our toy will stay on the Christmas tree. Let's start with the symbol of the coming year.


Some are light and some are heavier. But both of them turn out simply wonderful.


It turns out it's very simple. The main thing is to cut, and the rest is up to the needle!
How to make Christmas decorations for an outdoor Christmas tree from plastic bottles
Parents don’t really like assignments from teachers or class teachers. But everyone has encountered this. The task is simple: make a toy for the Christmas tree, and not just a simple one, but a street one. You need to decorate the school or garden area with something. Yes, you can transform your yard, it’s so simple. Stock up on plastic bottles of different sizes, glue, paint and something shiny (tinsel, glitter, tape, foil).
How can we live without the symbol of the coming year? We'll definitely do that first.


What about bells and balls? They are easy to make and so beautiful!


There are many options, show your imagination and you will have the best toy.
Christmas tree toys made from scrap materials for children
There is nothing easier than making a toy from what you have. You can just have a light bulb and paints, and you will have a work of art. You just have to think about what you want and you're done! I bring to your attention a sufficient number of options from which you can choose your favorite or do everything. I think your Christmas tree will be the most elegant.


It's simple, now let's make a symbol of the year.
Pig (piggy) for the New Year tree 2019
Whose year is it? Of course, the owner will be a yellow earthen pig (boar). Therefore, in order for everything to be good in the new year, it is necessary to make toys in the form of this animal. The materials at hand will help us with this. There will be both simple and more complex ones.


How to make New Year's toys from paper
These decorations can be made by the whole family. It's always interesting to spend quality time together. After all, you will not only feel good, but also have fun. And children love it very much. As you know, you can make a lot of interesting things from paper. And if it is also shiny, then the toys will be extraordinarily beautiful.
This one will be the simplest. Carry paper of two colors. Cut strips of it 1.5 - 2 cm thick and 10 - 15 cm long. Then fold them in half and glue the edges, and also stick them to each other.
The longer the stripes, the larger the diameter of the decoration.

How do you like this option?


Maybe you have any other ideas? Share with us and our readers in the comments below.
Making paper toys in the shape of a fan
There is nothing simpler than a paper fan. You just need to fold the paper like an accordion and you will get an interesting decoration. This method can be used to make not only a fan, but also other shapes. And which ones you will see below.


There are so many more ideas ahead. Let's definitely look at them.
Video on how to make a New Year's tree toy from beads
I bring to your attention a video. I found it on the Internet. The author makes a wreath of beads in it. You can hang it on a Christmas tree or decorate some furniture in the house. Be sure to take a look. It seems that this is very difficult to do. But in fact, everything is simple and fast. To do this you will need green beads, wire of different thicknesses, as well as glue, beads and a small ribbon.
Did you like it. Me and my girls have already decided to make one. Perhaps you will get more than one and different sizes. I think this year's tree will be simply wonderful. And you?
Vintage USSR New Year's toy made of cotton wool
Many people remember those unusually beautiful toys. I had several of them: Santa Claus, Snow Maiden and a snowman. Nowadays you won’t find such people anymore. And why, when you can make them yourself. I want to say right away that making them is not difficult, but it is labor-intensive and time-consuming.

We will need:
- Cotton wool;
- PVA glue diluted with water;
- Acrylic paints;
- Flat brush;
- Styrofoam ball;
- Wire;
- A thread.
We divide the cotton wool into layers. They should be thin. Then we lubricate the foam base with glue and wrap cotton around it. We also soak it. Thus there should be at least five layers. Then let it dry. This takes about 8 – 12 hours.

Now let's make the nose. Roll a small piece into a cone. Lubricate with glue, just leave the base dry. Lubricate the head in the place where our carrot will be attached and attach the nose. We coat again.

Now let's make the headdress. We also lubricate it, but do not touch the base. Then we stick it. To prevent the attachment points from being noticeable, you need to mask them with small pieces of cotton wool and also lubricate them. Let it dry again.

Now let's decorate our snowman. We make a puncture on the hat with an awl and insert a wire loop there. We tie a thread or rope. Now you can hang it on the tree.

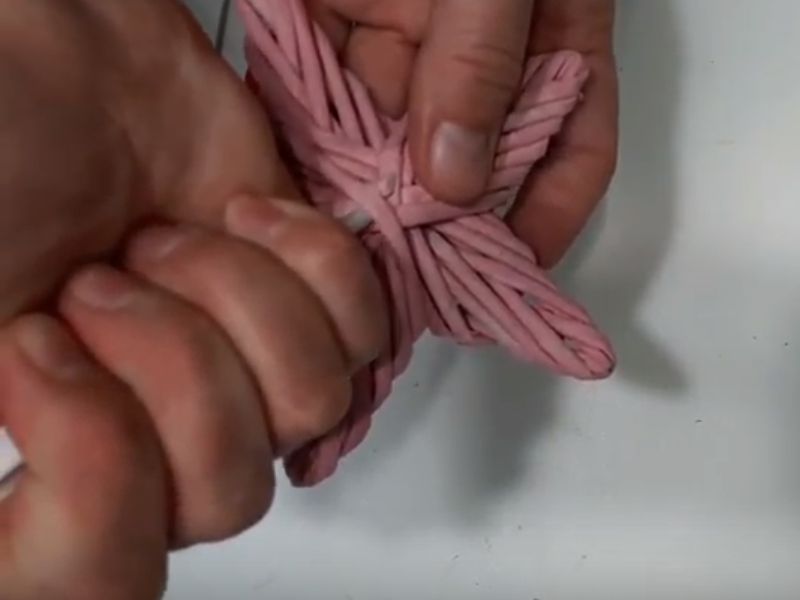
The lightest Christmas tree toy made from newspaper tubes
I've never made a toy this way before. Yes, I just didn’t know it was that simple. But when I tried it, I realized that it was as easy as shelling pears. But I want to say right away that you will still need patience. After all, you must first make the tubes, and you need quite a small number of them. and also stock up on glue and paints.

So, first we make the tubes. To do this, cut strips of newspaper 5 cm wide. Wind them onto a knitting needle or onto skewers at an angle of 45°. To prevent it from unwinding, be sure to coat the edges with glue. Then you can paint it any color and dry it. Let's start making a toy. Making a star shape. At the end, be sure to fix it with glue.
If the tube runs out, it can be extended. To do this, insert one into the other.
We continue, only now we will wrap our figure with this tube. We wrap the tube around the opposite end in the form of a loop and go to the other end.
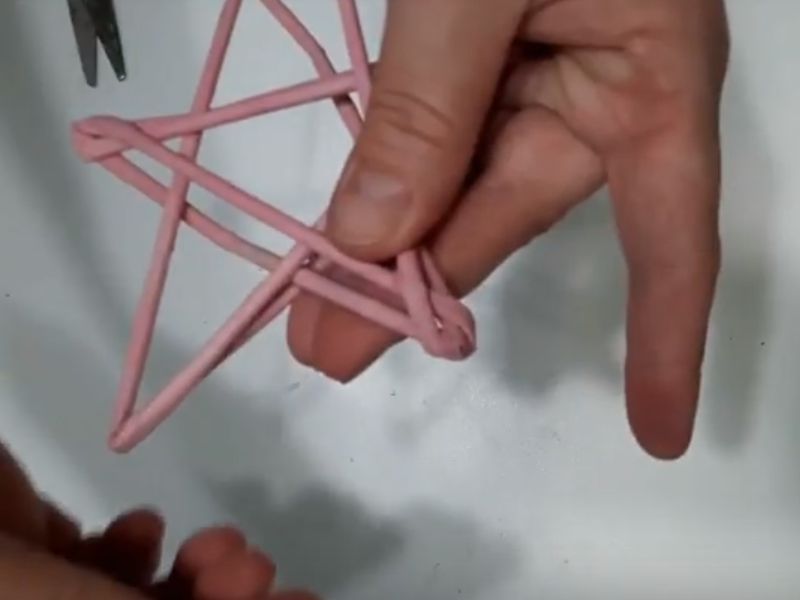
So in a circle until we completely wrap our star. The result is a three-dimensional figure. We insert the end and fix it with glue.
Large do-it-yourself toy for a school competition
I hope you liked the Christmas tree decorations. Now your forest beauty will be the most charming. After all, there is nothing better than handmade toys. And if children took part in the process, then it becomes even more beautiful. Get creative and get ready for the New Year with us!
Do you want to decorate your Christmas tree with unusual decorations that you won’t find in stores this year? The only opportunity is to make making New Year's toys fun and interesting. And don't be afraid, it's not difficult at all.
Christmas handmade can be an excellent decoration for your Christmas tree and a nice gift for family and friends. Take your children as helpers and get to work!
DIY Christmas tree decorations will help create a New Year's mood
1. Decoration from cubes

You can write whatever you want on the cubes! Think about what phrase from a Christmas comedy or line from a New Year's song will cheer up your household?
2. Toys made from caps


3. All you need is glitter, spray, paint and tape

And take a stencil with the image of a rooster! Years later, you will remember with what pleasure you had making Christmas tree decorations with your own hands at the end of 2016!
4. Delicious cocoa toys

You probably won’t be able to eat them, but these balls whet your appetite right away!
5. Pencil balls

Does your child love to sharpen colored pencils? Let him do it profitably! Shavings - into a ball, and the decoration is ready!
6. Do you like rustic style? Then these wooden decorations are for you!

Don't forget to draw a rooster!
7. It's just a ball and thread, but how beautiful!
As easy as pie! Even a small child can handle this!
8. Ribbon decorations

Making these Christmas decorations will help your kids quickly learn how to tie their shoelaces.
9. Snowflake made from clothespins

These gorgeous snow flakes are actually 8 clothespins glued together and painted.
10. We don’t skimp on the glitter!

There's no such thing as too much glitter! Especially at Christmas!

A fairy-tale character will come to visit you, but not to steal the holiday, but to decorate it.
12. Another great idea for decorating a Christmas tree!

Spruce twig, wooden beads, letters, white confetti or paper. We place all this in a transparent ball. Ready!
13. Snowman
Do you like to draw? Then this idea is 100% suitable for you.
14. Yarn decoration

Styrofoam balls + sticky glue + yarn + thin wire. And voila!
15. Foam jewelry

Take paint for foam balls with red glitter and apply it to the base. And tie it with a ribbon.
16. Clay star

If you are not a sculptor, use special clay molds.
17. Glitter decoration

Remember the main rule of creating Christmas tree decorations with your own hands? Yes, you can never have too much glitter!
18. Snow crystals

Apply glue to the ball and roll it in salt to create beautiful crystals.
19. Great gift idea for a loved one
Use special stickers.
20. Paper tape + spool of thread. Very nice!
You can write anything! You can list holiday attributes, you can write the words of a Christmas song or fairy tale, or you can exchange wishes with loved ones in this way!
21. Glowing snowman

22. Decoration from cartridges

A great idea for a New Year's gift for a hunter.
23. Vision board

24. Decorate the pine cone with a bow - and the New Year’s craft is ready

Pine cones are an indispensable material for making Christmas tree decorations with your own hands. And versatile! Bows, sparkles, ribbons - everything suits them! As a last resort, pour them into a transparent jar, and it will be beautiful!
25. Beautiful owls


Charming, aren't they?
26. Would you like to eat this cake? Not worth it, it's made of polystyrene foam

No need to stand at the stove! Complete saving of holiday time.
27. Made from an old skirt

The fabric can be any - you can use either a skirt or pants. But try to stick to the holiday colors!