Crocheted star pillow. Crochet "Star": pattern diagram and description Description of crocheting a star pillow
The hook allows you to create patterns of extraordinary beauty, thanks to which any product acquires a special effect and charm. One of these patterns is “Star”. It allows you to create a magnificent canvas - quite dense, voluminous, as if woven from a thousand stars.
If you don’t know how to knit this interesting motif yet, this article is for you! In it we will tell you how to crochet the “Star” pattern. The pattern diagram will be simple and understandable for craftsmen with little experience. Using this motif, you can create original and stylish products - handbags, clutches, for newborns.
Beautiful, connected Scheme and description of work
This original, textured pattern is actually quite easy to make, you just need a little practice. To create a sample, take any yarn and a hook. Let's start crocheting the "Star" pattern. The operating diagram is shown in the figure below.

First of all, we will assemble a chain of air loops (any number, depending on the tasks, but a multiple of three, plus 1 lifting chain). Next, we knit one row with single crochets. We perform three air loops and begin to knit the stars themselves using unfinished stitches. We insert the hook into the second and third air loops, grab the threads, but do not knit. Then we insert the hook in turn - into the first, second and third columns of the previous row, each time pulling the thread. Now we knit the resulting 6 loops on the hook together. We complete the unfinished column with an air loop. The first star is ready.

We continue to work on the sample
If you look closely at the pattern, you can see that our star consists of rays that converge in the central loop. To knit the next element, insert the hook into the center of the first star and grab the thread. Now we insert a hook between the last two columns - “rays”, and pull out the thread. There are three loops on the hook.
Now we insert the hook into the third column of the base (into which we knitted the fifth ray of the first star), and grab the thread. Finally, insert the hook into the fourth and fifth loops of the base, pull the thread and knit all six loops together. We complete the element with an air loop. Using the same principle, we crochet all the stars. Pattern diagram of the third row: we perform single crochets, one at a time in the air loops and the center of the stars.

The fourth row is knitted with unfinished stitches, exactly the same as the second. Next we alternate rows. We get an unusually beautiful crocheted “Star” pattern. The diagram and principle of operation should now be clear.
Chic stole for autumn. Crocheted star + pattern of the "Broomstick" pattern
Using the “Star” pattern, you can create not only dense, durable fabrics, but also delicate, lace products. A brumstick (the “Extended Loops” pattern) will help us with this. “Star” looks impressive and stylish in combination with this pattern. By combining motifs you can create uniquely beautiful things and interior items. For example, to make such a chic stole, you just need to learn how to make elongated loops using improvised means - a ruler or a thick knitting needle.

The stole is knitted by alternating two patterns to the desired size. In your work you can use the following scheme of “Elongated loops”.

"Star" motif. Decorative element for your ideas
Beautiful canvases with a star pattern can be made from individual parts. To do this, knit the required number of stars, connecting them, for example, with single crochets or using a fillet mesh.

How is the “Star” crochet done? The pattern diagram is not complicated, and neither is the description of the work! We start with a chain of 5 air loops and form it into a ring. We knit the first row like this: we perform 7 VPs, then 7 between which we perform 3 VPs. We connect the row with a loop. Second row: perform 3 VP lifts and 39 double crochets.
In the third row we need to create eight rays of our star crochet. The pattern of the pattern is as follows: we perform 1 lifting loop and 1 single crochet. Next we knit 6 chain stitches. In the second loop we perform a single crochet, in the third - a half double crochet, in the fourth - a double crochet, in the fifth - a double crochet, and in the sixth - a double crochet. The first ray is ready, by analogy we knit 7 more elements.

We complete the motif with a connecting loop, fasten and cut the thread. Our elegant star is ready. Such beautiful motifs can be used to make a cute or sofa cushion. With such stars you can decorate your interior in an original way, using them for a wide variety of design solutions. Stars will be relevant on Christmas and New Year's Eve.
Another simple way to crochet beautiful stars
The pattern diagram for a small motif is presented below. To work, prepare cotton yarn of medium thickness and hook No. 3. Start the work with 5 VPs, close them in a ring, then do 3 more, and then 2 C1H. Then knit 1 ch and 3 single crochets. Repeat the rapport three times and complete the row. Start the third row with a connecting loop in the first double crochet of the bottom row.


By analogy, we crochet 4 more rays of our star. Is the pattern diagram clear? We hope so. We finish the work, cut the thread. We fix the rays of the star with needles and place them under the press. All is ready!
21 September 2015
New Year is coming - a holiday of magic and wonderful fulfillment of desires. To feel all the charm of this holiday, we decorate our house with garlands, toys, decorate the Christmas tree and turn on the twinkling lights. The modern market for New Year's products provides the widest selection of all kinds of Christmas tree decorations, but I really want something unique, original, my own.
A master class on making a Christmas tree is offered stars related crochet. The simplest elements of knitting, a little imagination and an exclusive decoration are already hanging in a place of honor.
So, to make your knitted masterpiece, prepare:
- red yarn (or another color);
- Crochet hook;
- filler (cotton wool, fluff, padding polyester);
- beads, rhinestones, ribbons and everything that might be useful.
Crochet star
We knit a red star from diamonds. For the product we need 12 pieces.
We knit 15 rows according to the pattern.

After each row we unfold the product. And we start the new row with an ascent. As a result, we get the correct rhombus.

We repeat these steps 11 more times and get 12 identical diamonds.

The star will consist of two halves, each requiring 6 diamonds.

We sew 6 rhombuses with the central sides.

We get two stars, which we put together and sew together on the sides, leaving one ray unsewn. Turn it inside out.

We fill the product with padding polyester.

We sew up the rest of the part, first inserting a loop for our toy into the last ray.

Use your imagination and decorate the star to your liking.

The toy can be made in one color or combined in different colors (up to a rainbow) or alternating two shades. The toy is ready!

Bound Star You can hang it on the Christmas tree or decorate it with a New Year's composition. Decoupage lovers can easily make a star instead snowflake. All homemade decorations will look great on this green beauty. Good luck in your creativity and happy holidays.
Especially for the site Handicraft Lessons Olechka30.
New Year tree for a bottle from Lilia Ulanova: Knitted balls, bows from candy wrappers, star.

2.
3.
4.
5.
6.
7.
8.
9.
10.
11.

Sliding ring
1:8 dc (or sc) in the ring.
2: *1 dc (or sc)* dc (or sc)* 2.
3-4: 9dc (or sc),
5: *2 dc (or sc). prssn (or sbn)* -2.
6-7: 12 dc (or sc).
8: *3 dc (or sc). prssn (or sbn)* -2
9-10: 15 dc (or sc).
11: *4 dc (or sc). prssn (or sbn) * -2.
12-13: 18 dc (or sc).
14: *5 dc (or sc). prssn (or sbn) * - 2 times.
15-16: 21 dc (or sc).
17: *6 dc (sc). pr dc (or sc)* -2.
18-19: 24 dc (sc).
20: *7 dc (sc). prssn (sc)* 2
21-22: 27 dc (sc).
23: *8 dc (sc). prssn (sc) * 2
24-25: 30 dc (sc).
26: *9 dc (sc). prssn (sc) * 2
27-28: 33 dc (sc).
29: *10 dc (sc). prssn (sc) * 2
30-31: 36 dc (sc).
32: *11 dc (sc). prssn (sc) * 2
33-34: 39 dc (sc).
35: *12 dc (sc). prssn (sc)* 2 times.
36-37: 42 dc (sc).
38: *13 st s/n (sc). 2prssn * 2
39-40: 45 dc (sc).
41: *14 dc (sc). prssn (with bn) * 2
42-43: 48 dc (sc).
44: *15 dc (sc). prssn (sc) * 2
45-46: 51 dc (sc).
47: *16 dc (sc). prssn (sc) * 2
48-49: 54 dc (sc).
50: *17 dc (sc). prssn (sc) * 2
51-52: 57 dc (sc).
53: *18 dc (sc). prssn (sc) * 2
54-55: 60 dc (sc).
56: *19 dc (sc). prssn (sc) * 2
57-58: 63 dc (sc).
59: *20 dc (sc). prssn (sc) * 2
60-61: 66 dc (sc).
Stuff the base, then, holding it, begin to make contractions (dc). Knit: *1 dc (sc) decreasing (insert hook into loop, then insert hook into next loop, yarn over and pull yarn through all loops), repeat from * to end.
Knitting twigs
Tie 10 ch. then make a half-stitch in the 2nd row * 1 half-stitch in the next stitch, repeat from * to the end of the row. Then knit according to the pattern below.

a - air loop
- half single crochet
- single crochet / double crochet
double crochet stitch
- double crochet
- reduction of three st. s/n or st. b/n
Assembly

3.

Clothes idea for the Christmas tree Podarёnka
Height 25 cm
Hook No. 2, acrylic yarn 300m/100g, wire.
Legend:
sc - single crochet
Dc - double crochet
VP - air loop
Prib - 2 sc in one loop
Dec - 2 sc together
Extended loops
Christmas tree color thread
1 - 6 sc in the ring
2 - 6pr = 12 sc
3 - (1 sc, inc) x 6 = 18 sc
4 - (2 sbn, inc) x 6 = 2 4 sbn
5 - (3 sc, inc) x 6 = 30 sc
6 - (4 sbn, inc) x 6 = 36 sbn
7- rear st. with extended loops = 36
8- = 36 sc - plastic bottom, making a hole in the center for the wire
9 - 36 sc with elongated loops
10 - 36 sc
11 - 36 sc with elongated loops
12 - (10 sbn, dec)*3 = 33 sbn
13 - 33 sc with elongated loops
14 - (9 sbn, dec)*3 = 30 sbn
15 - 30 sc with elongated loops
16 - (8 sbn, dec)*3 = 27 sbn
17 - 27 sc with elongated loops
18 - (7 sbn, dec)*3 = 2 4 sbn
19 - 2 4 sc with elongated loops
20 - (6 sbn, dec)*3 = 21 sbn
21 - 21 sc with elongated loops
22 - (5 sbn, dec)*3 = 18 sbn
23 - 18 sc with elongated loops
24 - (4 sbn, dec)*3 = 15 sbn
25 - 15 sc with elongated loops
26 - (3 sbn, dec)*3 = 12 sbn
27 - 12 sc with elongated loops
28 - (2 sbn, dec)*3 = 9 sbn
29 - 9 sc with elongated loops
30 - 4ub
We stuff it as we go, insert the wire, bend the tip at the top into a loop, and wrap it with Christmas tree-colored thread.
At the bottom we leave a longer wire-barrel + loop in the boot for stability.
Boot and hat
Shoe color thread
7 ch, 1 r. - in the 2nd: inc, 4 sc, 3 sc in 1st, 4 sc, inc = 15
2 - 2 inc, 4 inc, 3 inc, 5 inc, inc = 21
3 - (1 sbn, inc)*2.4 sbn, (1 sbn, inc)*3.6 sbn, inc = 27
4 - (2 sbn, inc)*2.4 sbn, (2 sbn, inc)*3.7 sbn, inc = 33
5 - 6 sbn, inc, 8 sbn, inc, 6 sbn, inc, 9 sbn, inc = 37
6 - back stitch - 2 sc, dec, 33 sc = 36
7 = 36
8-9 - white = 36 sc
10 - shoe color = 36 sc
11 - 13 sbn, dec, 2 sbn, * dec, 1 sbn * -2, dec, 2 sbn, dec, 7 sbn = 31
12 - 2 sbn, dec, 10 sbn. *dec, 2 sbn* -2, dec, 7 sbn - 27
13 - 12 sbn, (dec, 2 sbn) * 2, dec, 5 sbn = 24
14 - 14 sbn, 2 dec, 6 sbn = 22
15-17= 22 sc
18 - white = 22 sc with elongated loops
19 - white color = "crawfish step"
Insert the insole inside, loop the wire, and stuff it.
Wrap or tie the visible part of the wire between the tree and the shoe with a thread the color of the trunk (brown, for example). You can knit a circle - close it, fill it.
Circle
1 - 6 sc in the ring
2 - 6pr = 12 sc
3 - (1 sc, inc) x 6 = 18 sc
Hat - ch 18 in ring
1- 5 = 18 sc
6- 8= 18 dc


Required:
about 35 r polyamide thread of a suitable color;
hook No. 2.5;
needle and thread;
cap from a tube of toothpaste (for the base);
a little cotton wool;
pencil (barrel);
plasticine.
Legend:
Bold dot = 1 air loop (air loop)
stick = 1 single crochet (st b/n)
cross = 1 double crochet (st s/n)
If the icons are connected at the bottom, the columns are knitted into one base.

Knit the main part of the Christmas tree according to the pattern: cast on a chain of ch. about 24 cm long. Start each row with 3 ch. rise.
1-3: dc
4: (1 dc, 3 ch, 1 dc) - in 1u to the end
5: - in each arch of the previous row, again knit *1 dc, 3 inn and another 1 dc*, and between them - arches of 3 ch. Do not knit this row to the end, but stop at a distance approximately equal to one turn around the “trunk” (pencil).
Turn the work and knit the 6th row, which begins with arches of air loops.
When the arches have knitted a distance equal to one more turn around the pencil, continue knitting the 6th row according to the pattern of the 5th row.
Knit the last 7th row in the same way, only to the place where the 3rd turn ends. Thus, the Christmas tree expands downward.
Next, the Christmas tree twisted around the trunk needs to be secured with a needle and thread.
Then make the base for our Christmas tree. To do this, fill the lid of a toothpaste tube with plasticine of any color. Place some cotton wool on top of the plasticine, tear it slightly in the middle and insert a pencil. Decorate the Christmas tree with a garland of beads and beads.

1.
2.
3.
4.
5.
6.
7.
8.
9.
1.
2.
3.
4.

First, let's tie a cone.

tie 4 tbsp into a magic ring. b/n
4 tbsp. b/n
(st. b/n, +) (+ we will denote the addition - in one st. b/n, knit 2 tbsp. b/n)
6 tbsp. b/n knitted for both half-loops
6 tbsp. b/n knitted in the back half-loop
(2 stitches b/n., +) repeat until the end of the row
8 tbsp. b/n knitted for both half-loops
8 tbsp. b/n for the back half-loop
(art. b/n, +)
12 tbsp. b/n knitted for both half-loops
12 tbsp. b/n for the back half-loop
(2st century b/n, +)
16th century b/n knitted for both half-loops
16th century b/n for the back half-loop
(3st century b/n, +)
20 tbsp. b/n knitted for both half-loops
20 tbsp. b/n for the back half-loop
(4st century b/n, +)
24 Art. b/n knitted for both half-loops
24 Art. b/n for the back half-loop
We will need orange Baby Vita yarn (100% acrylic, 100 g, 400 m), sock knitting needles (7 pieces), a needle with a large eye for sewing parts and padding polyester or other filler. We cast on the knitting needles 108 loops. 1 row. 108 p. 2 row. Divide into six sock needles of 18 loops each.  We knit 7 knit stitches (kl), then pull through. First, we remove two loops on the right knitting needle, placing the knitting needle under them on the left.
  And we knit the next one after them, like the front one.
  Then we pull this knit stitch through two loops.
  And leave it on the right knitting needle.
  In this way, the number of loops is reduced by two, and along the entire row - by 12. A beautiful convex braid will be formed at the place of broaching; it will be in the middle of the ray of the star. After stretching, we knit another 7 stitches and the last 1 purl loop (sp). 3rd row. 6 lp, broach, 6 lp, 1 ip.
  4 row. 5 lp, broach, 5 lp, 1 ip.
 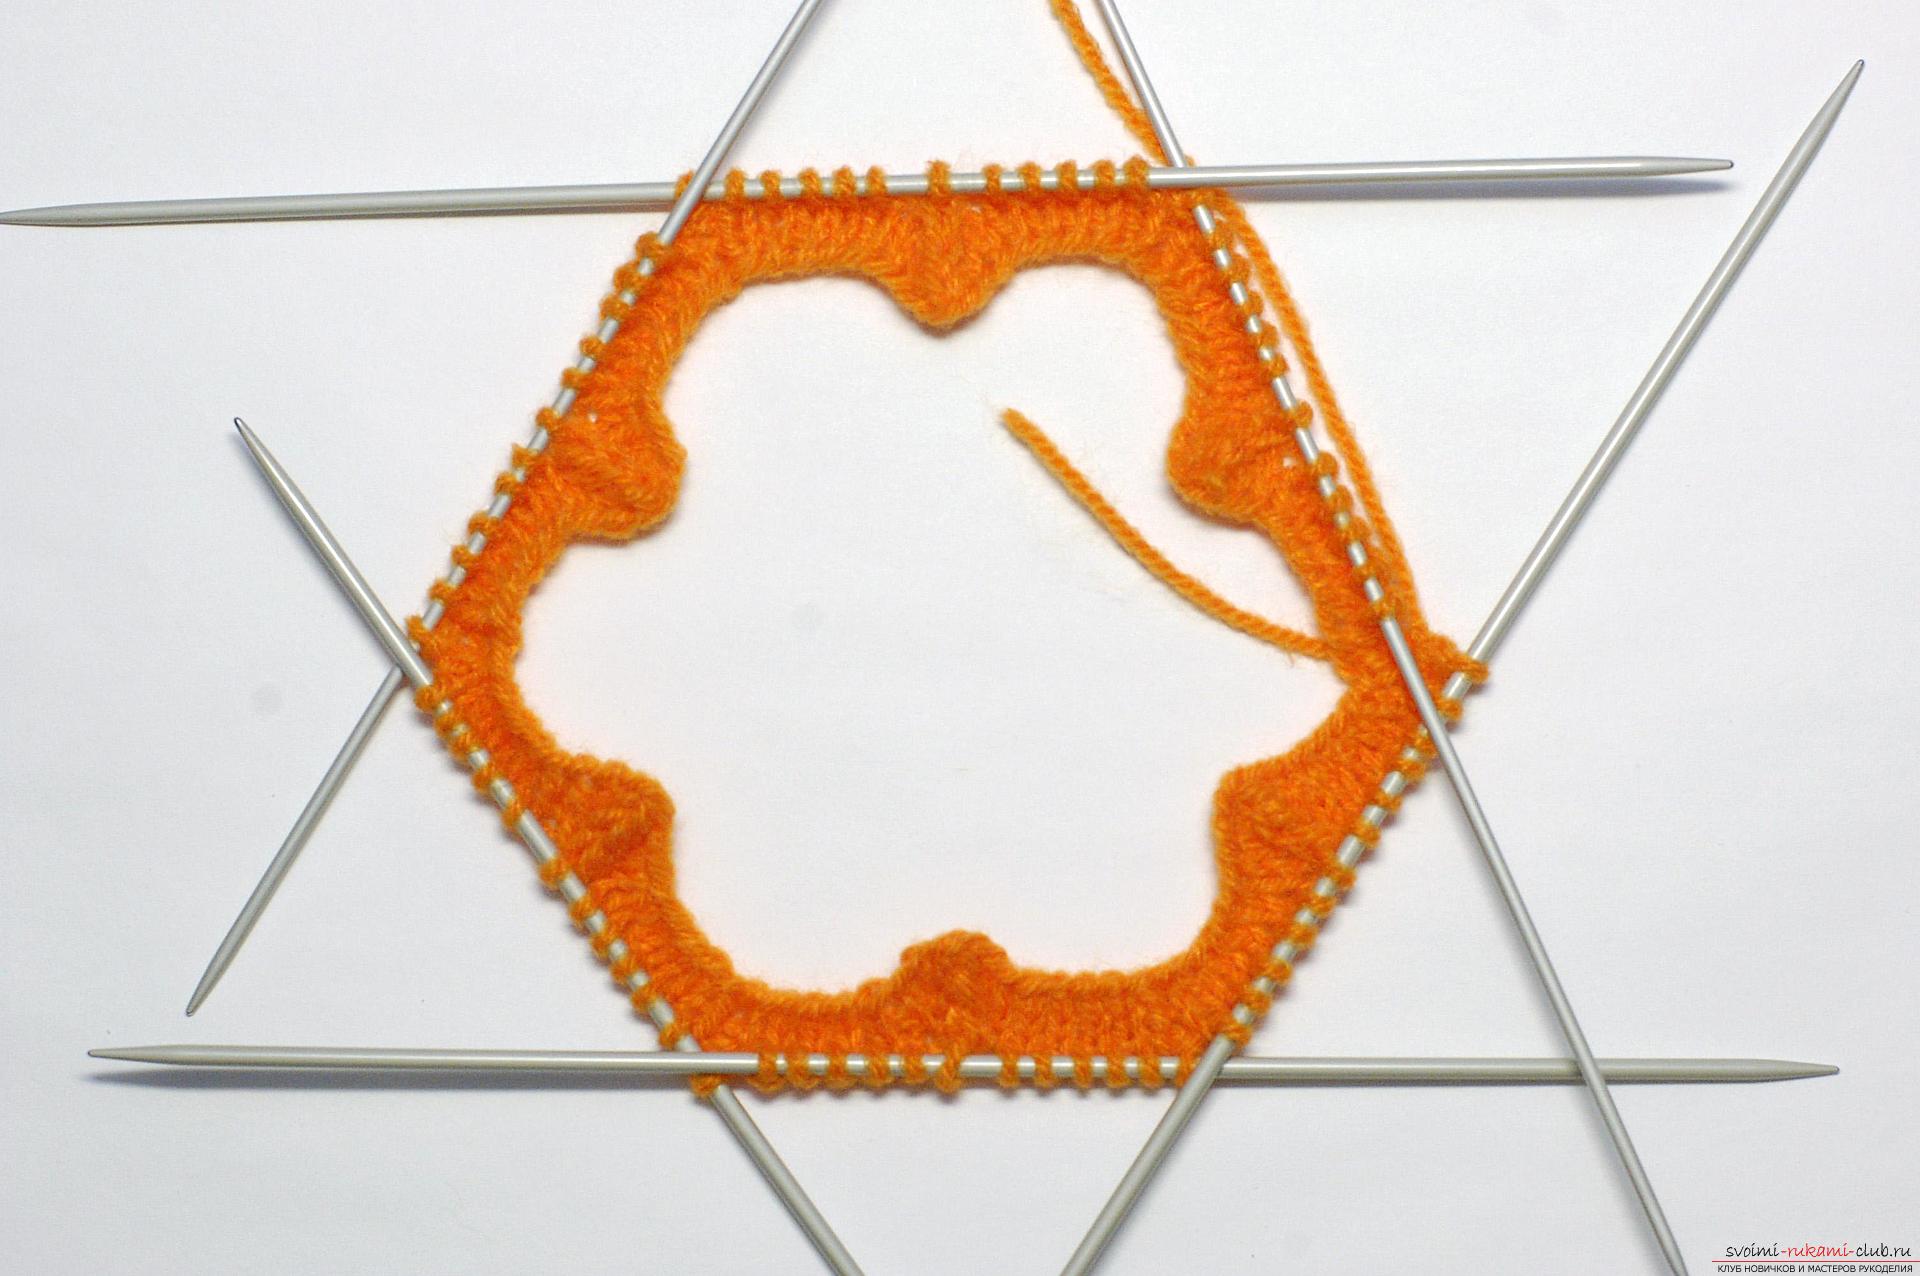 5 row. 4 lp, broach, 4 lp, 1 ip.
  6th row. 3 lp, broach, 3 lp, 1 ip.
 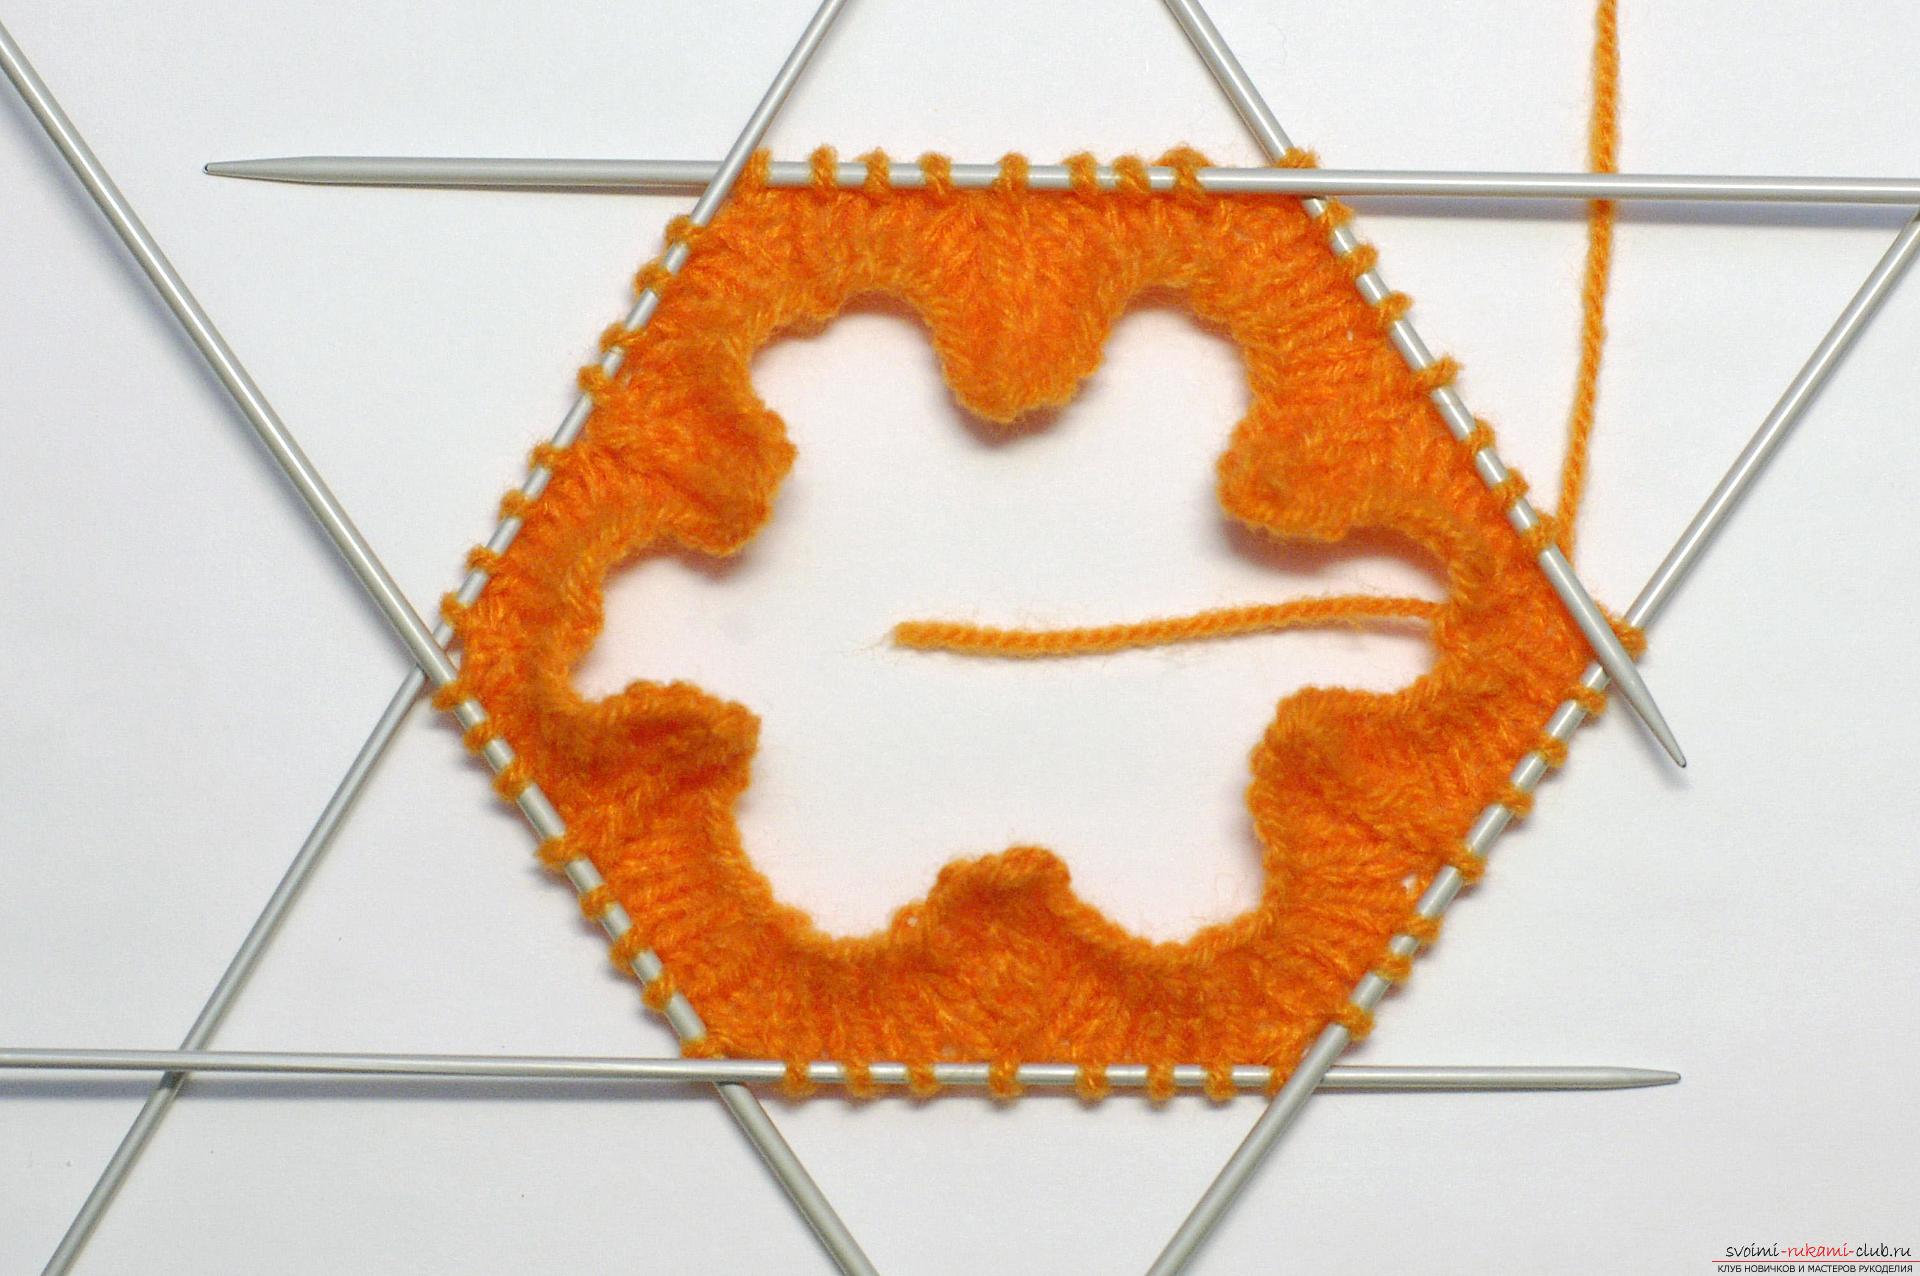 7th row. 2 lp, broach, 2 lp, 1 ip.
  8 row. 1 lp, broach, 1 lp, 1 ip.
  9 row. We put the knitting needle on the left by the first two loops, remove them to the right, knit the next one, pull it through the first two and knit the last one as a purl. There are only two loops left on the knitting needle - pull through and purl. To prevent the knitting needles from jumping out of the knitting, we distribute it into three.
  10 row. We knit two loops into one knit stitch.
  11 row. Two loops in 1 loop.
  We tighten the remaining loops in the middle and hide the end inside. Let's knit another such piece, sew them together using a needle with a large eye and fill it lightly with padding polyester.
  From the thread left over from sewing, we will raise a chain of air loops and make a loop from it into which you can insert a ribbon.
  You can use the ribbon to hang our star on the Christmas tree. Happy New Year and Merry Christmas!
Comments
Related posts:
The master class will teach you how to crochet a New Year's craft - a knitted garland for a Christmas tree A step-by-step master class will teach you how to crochet a knitted crown for a girl The master class will teach you how to crochet a New Year's craft - a knitted Christmas tree toy
A mischievous star pillow made of plush yarn from Lyudmila Pershina. The star consists of two parts, which are knitted the same way and then sewn together. To knit a pillow you will need 1.5 skeins of yarn with hook number 4. Yarn consumption may differ from that indicated, it will depend on your knitting density, yarn and hook size.
The span of the sprocket wedges is about 40 cm.
Source: https://vk.com/pixtas_handmade
Description of crochet star pillow
Legend:
VP - air loop
sc - single crochet
pssn - half double crochet
dc - double crochet
ss - connecting loop
We knit a star DC, connecting the rows using a SS. The beginning of the row is from the 3rd ch.
1. Cast on 4 ch and knit 9 dc into the first loop, ss (3 ch count as 1 dc) = 10
2. pr*10 = 20
3. (1 dc, inc)*10 = 30
4. (2 dc, inc)*10 = 40
5. (3 dc, inc)*10 = 50
6. (4 dc, inc)*10 = 60
7. (5 dc, inc)*10 = 70
8. (6 dc, inc)*10 = 80
Wedges knitted in rotating rows of dc:
1. 2 ch, 16 dc
2. dc in the first loop, 14 dc
3. dc in the first loop, 12 dc
4. dc in the first loop, 10 dc
5. dc in the first loop, 8 dc
6. dc in the first loop, 6 dc
7. dc in the first loop, 4 dc
8. ss in the first loop, 3 dc, ss
The first wedge is finished, we break the thread. We attach the thread to the general circle, where we had the first 16 dc for the first wedge and similarly knit the second and subsequent wedges.
When all five wedges have been knitted, we do not break the thread, but tie a star around the perimeter of the sc (2 sc on the sides of the wedges at the base of the sc), we knit 3 sc at the tops of the wedges.
If you are satisfied with the size of the star, then you can leave it that way, but I made it a little larger and knitted 2 more rows of sc around the perimeter.
We knit the second part of the star in the same way, fold them right side out and connect them with a hook. We knit two PRSN stars in both loops. At the tops - 3 hdcs per loop.

Eyes(2 parts)
We knit in the usual way in a spiral.
Start in black.
1. 6 sc in the ring
2. pr*6 = 12
3. 1 sc, change color to white, inc from hdc, 1 hdc, (inc from dc, 1 dc)*2, inc from dc, (1 hdc, inc from hdc)*2, 3 dc, cut thread.
Sew on the eyes on rows 2-5. We embroider the mouth on the 4-5th row.