DIY cockerel for the New Year. The brightest and most interesting crafts for the New Year DIY symbol of the year made from jute
In the popular game "Crocodile" there is a trick that allows you to quickly direct the participants' thoughts in the right direction - the "suitcase". The player draws a rectangle in the air, which is the initial shape, onto which he adds additional details and circumstances - a “suitcase” with a steering wheel, a “suitcase” with a roof, and so on. The same principle can be used to create toys and crafts, if there is no ability for high art, but the need to create gifts or holiday attributes is present. How to make a symbol of 2017 with your own hands, so that the result is pleasing to the eye, and the process of creating it does not take much time?
Find out at first sight
When making toys for the New Year, you need to decide on their purpose. This determines how durable the crafts should be. For example, Christmas tree and interior decorations can be disposable and made from paper and other improvised materials. Gift items will require more labor, and the material for their creation should be more resistant to external factors.
The rooster, the symbol of 2017, can be depicted with your own hands in several forms:
- adult male bird;
- chick;
- abstract representative of the chicken tribe.
The main thing here is that the character is recognizable, and naturalistic similarity is secondary.
As a gift for school-age children, you can make the famous cockerels on sticks from burnt sugar and citric acid or bake gingerbread cookies in the shape of birds.
Lenten dough is suitable for making “cranes” - traditional Slavic dough products with which it is customary to welcome spring. Lenten pie dough is rolled into thin sausages, each of which is tied into a knot with two tails (a head with a beak and a tail) and baked. If you give birds combs and wide tails, they become cockerels.

The house where the birds live
Decorating your home for the holiday with cheerful birds is the easiest way to flatter the pride of the symbol of the year. You can make “wind chimes” or decor for a window or doorway.
Required:
- thick design paper;
- scissors and stationery knife;
- glue;
- decorative braid or lace;
- felt-tip pen or eyes for adhesive-based toys.
Paper will be required in three colors - for the body (white, gray or yellow), for the beak, legs and crest (orange or red) and for the wings and tail (any - at the discretion of the author).
- Circles are cut out from the background paper (the optimal diameter is 12-15 cm).
- A segment of the circle of approximately 35-45 degrees is removed and the workpiece is glued into a cone to form the body of the bird.
- Two identical pieces for the legs are separated from the braid.
- Glued to the body from the wrong side.
- The legs (4 pieces) are cut out according to the template and glued to the ribbon so that each ribbon is between two paper fragments.
- The comb (2 pcs.), tail (2 pcs.) and two wings are cut out with allowances of 3-5 mm on the fastening side.
- For the beak, a small circle is made with a small allowance. It is formed into a cone, and the allowance is folded inward, coated with glue and attached to the body.
- The parts of the comb (and tail) are glued together (there is no need to glue the seam allowance).
- Holes are cut in the bird's body to secure the comb, wings and tail.
- The allowances of the parts are passed through the holes and glued on the wrong side.
- A hole is made in the comb for thread or fishing line to hang the bird from a garland or architectural object.
A similar principle is used when creating birds from paper cups. The only difference is that the flat bottom of the workpiece allows you not only to hang, but also to place a bird equipped with wire rather than fabric legs. To make legs, you can use floral wire with tape winding.
To secure the wire to the product, you should twist its ends into a ring and glue it to the bottom of the glass with an adhesive plaster.

For memory
The symbol of 2017 made from paper is a fragile decoration, and many needlewomen are not even considering it as a gift. However, a paper cockerel can be not only a decorative element, but also a memorable symbolic souvenir if it is made using the origami technique, as a bookmark or appliqué for a New Year’s card.
You can decorate glass and mirrors with carved cellulose birds.
It is not difficult to make an educational cockerel toy based on the construction set principle as a gift for a child from cardboard and self-adhesive paper or rubber.
Required:
- a set of colored sheets;
- cardboard - 2 sheets;
- pencil;
- felt-tip pen;
- ruler and scissors.
DIY toys like these, a symbol of 2017, serve as an excellent alternative to industrial designs and help a little person learn colors and shapes, develop memory and fine motor skills. 
On a sheet of cardboard you need to mark the outline of the bird, consisting of:
- square (head);
- rectangle (torso);
- five triangles with an obtuse angle as a vertex (4 for the tail and 1 for the beak);
- isosceles triangle (pedestal).
Trace the outline of the figure with a felt-tip pen.
Exactly the same elements need to be cut out of cardboard and design paper. Figures are cut out of decorative material in duplicate - for pasting cardboard parts and for forming a basic picture.
Glue the hard carrier of the individual elements and the design layer together. Glue the second design kit to the base picture.
To make it easier and more interesting for your child to play, you can paste over the parts of the construction set on both sides, and as a template, come up with one or a couple more animals that can be depicted using this set of figures.

Bird on a teapot
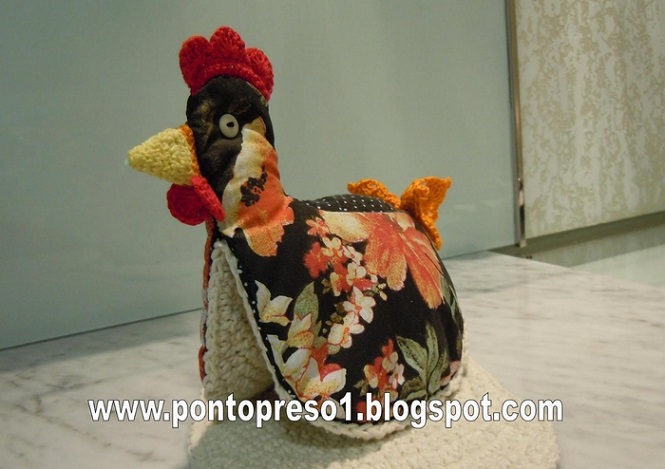
When making the symbol of the New Year 2017 with your own hands, fabric crafts should also not be overlooked.
A chicken or cockerel for a teapot can be good.
You will need:
- decorative fabric;
- natural lining fabric;
- interlining;
- felt (for decoration);
- insulation (sintepon).
- Draw on paper and cut out a non-convex pentagon with right angles at the base.
Mark the figure on all types of fabric (except felt) with an allowance of 1 cm (to mark one-sided fabric, it must be folded in half so as not to make a mistake with the location of the front and back parts).
- Cut out the felt parts (beak, comb, tail and wings).
- Fold the finishing fabric with the right sides inward, placing the beak, comb and tail between them so that their bases are located along the outer purl edge of the workpieces. Sew the blanks together along the upper contour with a distance of 1 cm from the edge. Leave the lower seam allowance free.
- Turn right side out.
- Fold the non-woven and lining elements into a “sandwich” (non-woven fabric, 2 linings with right sides facing each other, non-woven fabric) and sew along the contour indented from the edge.
- Place the “sandwich” in a decorative “case” and lay insulation between them.
- Fold the bottom allowances according to the principle of a linen (sewing) seam and stitch the bottom edge of the product in a circle.
- Secure the wings with an overcast stitch.
You can further decorate the product with embroidery or appliqué.

Winter toy
A glove is a wardrobe item that, when it loses a pair, becomes useless. But don’t rush to get rid of a lonely knitted accessory on the eve of the Year of the Rooster.
The rooster, the symbol of 2017, made with your own hands from this material, which is available in every sense, can bring joy and good luck to both small and large family members for a long time.
To transform a glove into a bird you will need:
- padding polyester or cotton wool;
- threads;
- beads or buttons;
- felt beak, comb, crop and wings.

All felt parts, except the wings, are cut out in a single copy.
To make the wings look more impressive, it is advisable to make them multi-colored - 3 layers of fabric for each wing. The size of each element along the outer edge should be slightly smaller than the previous one, but the bases should match.
The toy is not completely filled with filler - 4 fingers of the glove should remain empty - they will form a tail.
- The opening of the glove must be stitched in a circle using a basting stitch and tightened.
- Sew the beak, crop and comb to the thumb (stuffed with filler).
- Gather each wing together and secure it to the body of the bird.
- Sew the glove at the base of the four empty fingers to prevent the filler from migrating. It is advisable to decorate the fingers of a plain glove with embroidery.
- You can sew small beads or buttons as eyes.
Representatives of the chicken tribe are a good base for creative experiments: they can be created from almost any available material. A wonderful handmade gift - a decorative interior panel on which the symbol of the year will be embroidered with buttons and beads of different sizes and colors.
The rooster, the symbol of 2017, made with your own hands from various materials, will be a wonderful memorable gift for a loved one.
And according to legend, he will also bring good luck to the house where he settles.

You can make a simple symbol of 2017 with your own hands from, decorating the craft in the form of a wall panel. At the beginning of work, you will need to decorate the background (sky and grass) with a layer of plasticine of the appropriate color. We immediately make clouds in the sky. Then a brown fence is laid out, and sunflowers are planted near it. We sculpt a bright village rooster on the fence, making it quite convex.


Plasticine makes a real New Year's souvenir - a picture with a cockerel.

Painting with a cockerel - the symbol of 2017
The New Year's cockerel can be made from salt dough. Watch the video for more details:
You can make a rooster from a bright cardboard sheet. To do this, we cut off one of the corners of the cardboard around the circumference and roll it into a cone. We cut out wings from the remaining paper, and a scallop, beak and paws from red cardboard.


Using the same principle, you can make little cheerful cockerels.

You can arrange them in the form of a postcard, the decoration of which will be feather wings.

The original cockerel is made from paper rings and a triangle, into which stripes can easily be turned.

And if the body is made from a paper cylinder, the cockerel will become more stable.

By rotating the cylinder vertically, you will get the basis for the original pendant.

Pendant "Cockerel"
And by gluing its lower part, you can make interesting souvenirs. Feather wings will give them a special chic.


Feathers can also be used to create a cockerel from a bright household glove. If you replace it with a knitted glove, the craft will be more durable.

The smallest creators will be able to make a cockerel using drawing and appliqué techniques.
Print and cut out the template for drawing the “cockerel”.

Template for drawing "cockerel"
We paint the cockerel in the most rainbow colors. All that remains is to decorate the rooster's tail. We cut bright strips from colored paper and ask the children to roll them into small tubes. Glue the tubes onto the tail.

Drawing and applique for the smallest “cockerels”
To make the cockerel even brighter and more beautiful, sprinkle it with glitter.

Little children will be able to make a “Rooster” applique from colored feathers. The basis is two sheets of thick paper, between which a stick is glued.

Applique of colored feathers “Rooster”
In kindergarten, you can make a joint project called “Cockerel made from palms.”

The beautiful “cockerel” applique is made from coffee beans and real feathers.

Rooster applique made from coffee beans
Feathers are also useful in making bell cockerels, the base of which is sculpted from clay. It’s also convenient to use cells from egg cartons as a base.

You can turn an entire carriage for chicken eggs into a rooster box. Fill it with small candies - and you've got a gift for kids!

You can also use other waste materials in your work - for example, disposable plates. Pendants made from them are easy to manufacture.

Funny cockerels are made from colored clothespins decorated with pieces of felt.

And from a piece of knitwear or cotton fabric you can sew a real soft toy in the form of the symbol of the year.

Beautiful New Year's cockerels are made from multi-colored felt. We connect the pattern pieces together with thread or glue. We fill the inside of the craft with cotton wool.

You can make a flat cockerel on a stick from felt.

Skilled craftsmen will be able to make a cockerel from colored wool.

Watch the video master class: “New Year’s cockerel made of felt.”
The cockerel created using the technique looks very beautiful.


Not inferior to it in originality and beauty is the cockerel in the wall panel, decorated from flat multi-colored buttons. Using buttons of different sizes will make the picture more expressive.

Rooster applique made from buttons
And by placing such a panel in a frame with glass, you will significantly extend its service life.

Painting "rooster" made from buttons
A charming colorful cockerel is made from beads.

Very different cockerels can be made using vegetables and fruits. You can decorate your festive New Year's table with this symbol of the year.

Table decoration "rooster"

A very impressive cockerel is made from apples.

We connect the parts of the craft together using toothpicks.


Look at the video - how to make a fiery cockerel from foamin.
Show the kids how to make the symbol of 2017 with your own hands, a master class - and they will definitely surprise you with unusual ideas and solutions!
A wonderful holiday is approaching again - New Year! A time of joy for children and adults, the fulfillment of dreams and desires. After all, it’s true that on this day people radiate some kind of special enchanting energy, and the spirit of magic blows everywhere around.
The symbol of the coming year 2017 will be the Fire or Red Rooster. The characteristics of this sign are cockiness and show off, but honesty, pride, and justice are also its characteristics.
On the eve of the New Year, time drags on for a sadly long time, so creating crafts for the Year of the Rooster with your own hands, but better with children, will be a wonderful entertainment here. This is a very good reason to distract the little naughty girls and a reason to spend time together. In addition, the eve of such a holiday implies many festive events in kindergartens and schools, when mothers are busy creating New Year's costumes and crafts.
This activity is useful for toddlers to do with their own hands, as it develops fine motor skills of the hands. With the smallest children, you can try to make easy crafts for the New Year 2017 using various cereals or plasticine of various colors. Plain and corrugated paper, pencils, felt-tip pens and safe paints are also perfect for this task.
Older kids won't be bored either. When creating crafts with them, you can use various techniques that are more complex and interesting. Materials such as felt, plasticine, wooden parts, cardboard and plastic boxes of various sizes, old puzzles, cotton wool and puff pastry and many other materials that are subject to flight of fancy are applicable here.
As for the types of crafts, there are plenty of them: voluminous and flat snowflakes, Christmas trees, snowmen and various animals, garlands and confiture, lanterns and Christmas tree decorations.
But we should not forget that the main decoration of the holiday on New Year's Eve 2017 is the Rooster. It also needs to be done with your own hands.
DIY crafts for the New Year 2017 for kindergarten.
From a very young age, children are taught to do things with their own hands. And you can’t do without crafts for the New Year 2017 in kindergarten. These, of course, are mostly simple products made from paper, foil and plasticine.
- Simple applications.
The easiest, but favorite activity for children. On a regular (colored) sheet of paper you can create very interesting pictures, create a house, a Christmas tree, a snowman and much more from colored paper parts and glue.
Photos of several ideas:

 New Year 2017 card


Video: Applications for the New Year in kindergarten.
Video, Master class:
 Photo: Plasticine snowman.
 You will need: salt or sugar, semolina, small twigs, red cloth, plasticine, a wooden stick.
We make three plasticine balls of different sizes. Pour sugar (salt) and semolina onto a piece of paper, and roll the balls in this mixture until they become completely white. We form a snowman - put the balls on a stick in order, the largest should be at the bottom. We decorate: a bandage around the neck, twigs - these are hands, eyes, a nose and a nose can be made with buttons or plasticine.
Video: Snowman made of plasticine.
Video, Master class:

How could it be without the symbol of the year!
You will need: water, salt, PVA glue, flour, paints.
Making the dough: you need to mix 400 grams of flour and a glass of salt, add water (250 ml), add 40 grams of PVA. Now we use our imagination and sculpt the body, wings, beak, comb and head of the cockerel. We connect all the parts of the product and put it in the oven for one hour. When the craft has cooled, it needs to be decorated with paints, preferably acrylic, and dried well.
Video: DIY dough rooster.
Video: DIY symbol of the year:

You will need: cotton wool, glue, water, starch
First you need to cook a paste from water and starch: dissolve 1 spoon of starch in a small amount of liquid, put it on the fire and add a glass of boiling water, cook until thick, stirring. Throw cotton wool into the paste, set everything aside for a day until the cotton wool dries. Next, we twist the balls and make a snowman, combining the balls with glue. When it dries, we decorate and paint it.
Video: DIY cotton wool snowman.
Video, Master class:

You will need: pieces of fleece, beads and beads, scissors, various ribbons, a needle and strong thread, a pencil.
We make paper blanks - a large circle, a flower, a small circle for the middle, a leaf. Using these templates, we cut out the parts from the fabric twice, since the toy will be double-sided. We decorate the flower by drawing veins on it or embroidering them. Next you need to connect it with the leaves with thread. We sew a flower and a leaf to the base ball, attach the middle, and attach a bead or other decoration to the middle. The first part of the craft is ready. We do the second one in the same way as the first. Now we sew both parts together, connecting them to each other, and attach a ribbon loop on top - and the original toy is ready!
Video.
- Postcard-rooster made from cereals.
You will need: buckwheat, rice, semolina, cardboard, paints, brushes, glue, tweezers
The very first thing to do is find a rooster template and print it. Next, draw this template on a cardboard base of any color. Now you need to take a brush and wet it with thick glue, and then carefully apply it to the contours of the drawing. We place buckwheat on the glue with a stick or tweezers, although you can simply cover the lines with it and shake off the excess. Then we proceed according to the previous scheme. In this way you can make pea eyes, a beard from wheat, a crest, beak and tail from dyed rice, a body and legs from semolina. There is always room for experimentation here! Next, the painting needs to be allowed to dry thoroughly.
Video.
- Simple DIY snowflakes.

You will need: paper (white or colored) and scissors.
Take a simple square leaf and fold it exactly diagonally. Next, fold the triangle in half, and then in half again. We cut off the resulting figure at the bottom as you like: you can straightly, or along some beautiful contour. We draw patterns on the triangle that we will use to cut, and we do it. We take out the unnecessary parts of the paper and unfold the snowflake! Moreover, the patterns can be very diverse, there are no restrictions here.
Video: DIY snowflakes for New Year 2017.
Video: How to make beautiful snowflakes for the New Year 2017.
DIY crafts for the New Year 2017 for school.
Since older children go to school, they can be asked to make crafts for the New Year 2017 that are more labor-intensive.
- Rooster made from napkins or corrugated paper.
 Photo: Beautiful DIY craft for New Year 2017
 The craft turns out very bright and voluminous.
You will need: a piece of thick paper, napkins (corrugated paper), glue in the form of a pencil, scissors, matches.
First, select a template design and print it on thick paper. Then we cut the napkins into small pieces, about a centimeter by centimeter, and decorate the product. We twist each square around the match in the direction of the arrow, and then we smear its base with a piece of paper with glue and attach it to the picture in a given place until we fill the entire part. We do the same with the following colors. It is better to look at such a craft from a distance, since up close all the corrugated parts merge.
 Photo: Do-it-yourself string Christmas tree for New Year 2017
 You will need: several skeins of thread, tape (foil), glue, thick paper, decor.
The first step is to roll a cone out of a sheet of paper. Next we cover it with tape or foil. We take the threads, dip them in glue and thickly envelop the made cone with them. Then you need to dry the product well on a flat surface. When everything is well dry, remove the paper cone, separating it from the foil or tape, and begin to decorate the Christmas tree to your liking: with balls, rhinestones, sequins, sparkles and ribbons.
Video. DIY thread Christmas tree.
Video, Master class:

You will need: a stapler (glue), a lot of colored paper, scissors.
At the very beginning, we cut out many thin strips of multi-colored paper of the same size. Then we fasten the first strip so that a circle appears. We thread the next one through it and also connect it into a ring. In this way, a chain (garland) of links is obtained.
Video. DIY paper garland.
- Wooden decoupage.
You will need: a flat piece of wood, varnish, paint, a napkin with a picture, a sponge, brushes, glue, scissors.
To begin work, you need to sand the piece of wood so that its surface is almost smooth. Then we paint the tree with white paint using a sponge. While all this is drying, we choose the design that we will apply. Then we cut out the necessary parts of the picture from the selected napkin, and glue them onto a wooden base: first we lay glue, then the napkin part, and glue again on top. When the pasted drawings dry, you will have the feeling of a painted picture. But it lacks a background, which we create around it using paints. At the very end, everything needs to be coated with a safe varnish, preferably in a couple of layers. Such products are also decorated with glitter, cotton wool and beads.
- Felt Christmas tree - DIY postcard.
 Felt Christmas tree - DIY postcard
 You will need: pieces of felt, plain and patterned cardboard, buttons, scissors, braid and glue.
First, you need to bend ordinary cardboard in half widthwise, and from the cardboard with the picture, cut out a rectangle smaller than the base of the product and glue it to the front side of the gift. Next, you need to cut strips of ribbon as long as the sides of the postcard, and glue them onto the patterned cardboard on the sides using PVA. Now we make a template from paper in the shape of a pear, and with its help we cut out blanks of Christmas tree branches from the felt (20 pieces). Now you need to form a Christmas tree. We start from the bottom, take about 8 blanks and lay them out in a fan. When you like the position of the lower tier, glue it to the cardboard. Next, we take 5 more blanks and also make a second layer of branches. And so on, just so that the next layer is smaller than the previous one. The herringbone must be completed by the last three pieces. In our case, the top of the tree will be a button. To imitate Christmas tree decorations, we use sequins or beads. The original postcard is ready!
Video.
Master Class:
- DIY vintage style star.
You will need: a glue gun, a brush, a pencil, scissors, corrugated cardboard, lace, paint, bag fabric, buttons, twigs.
We make star templates of different sizes, and with their help we cut out three blanks from cardboard. We also cut out a deer from regular paper. Next, you need to connect the stars with glue, and lay fabric stars between them. Then we tie the resulting product with a cord many times so that it also looks like a star. For a highlight, you need to paint the craft as if it were in the snow. To do this, use a brush with white paint to slightly touch the star at different ends. Next, we attach other decor with a gun: branches, buttons, deer. All that remains is to finish the gift with a fabric bow and attach a loop from the rope - the toy is ready!
Crafts for the New Year 2017 from paper.
It may seem at first glance that gifts made from paper are the easiest to make. Yes, this is partly true. Both the youngest member of the family and an older child can easily make crafts from paper for the New Year 2017. Therefore, it is simply necessary to consider the most interesting of them.
 Beautiful application for New Year 2017 with your own hands
 You will need: colored paper, scissors, colored pencils, PVA glue, a template made.
To get started, you need to make a template for the base of the Christmas tree - print a large triangle and an asterisk for the top on white A4 paper. Next, cut out the triangle and glue it onto a colored background. Now we prepare needles for our tree. We take green pieces of paper, place our palms on them, trace them with a pencil and carefully cut them out with scissors. How many there are - we look at the prepared template and the size of the cut out palms. Next we glue our needles. We start from the bottom, and we need to make sure that the fingers remain not glued. You can glue the needles in two layers, the main thing is that the white base is not visible. Now we cut out a star of the color you like according to the template and glue it to the very top of the tree. You can decorate the product with colored balls and garlands, also cut out of colored paper.
Video: DIY Christmas tree applique.
- DIY lantern toy for New Year 2017 made from paper.
You will need: colored cardboard, scissors, a stapler, beads or rhinestones, a needle and a thick thread.
We divide a piece of cardboard with a pencil into four equal segments and a segment measuring one centimeter. We make folds along the lines and fasten everything with a stapler. Take another sheet of cardboard of the same color and wrap a thick thread around it. Next, we connect one side of the cardboard with a thread with a stapler, and cut the thread on the other side. We cut off the unnecessary part of the paper, leaving approximately two centimeters with threads. Now you need to fasten this blank to the first piece and make a loop on top. You can decorate it with beads and rhinestones. That's it, the toy is ready!
Video. Beautiful craft for the New Year 2017.
- DIY snowflake tunnel.
You will need: white and blue leaves, a stationery knife or quilling scissors, regular scissors, a pencil, and tape.
To work, you need to print out paper templates of snowflakes, different in size, identical in shape. Next, we apply the templates and cut out snowflakes from paper (white and blue) only in the center. We remove everything unnecessary. Now, using double-sided tape or glue, you need to fold the tunnel in order, starting with the smallest part. From the largest template we cut out the main beautiful snowflake, which is attached to the larger base of the tunnel. Next, we make a frame out of paper and attach the tunnel there. For brightness, you can add sparkles or beads.
 Photo: DIY paper Santa Claus.
 You will need: red paper, white paper, scissors, glue, multi-colored markers, pencil.
In order for the symbol of the New Year 2017 to be favorable to you, and for the Fire Rooster to protect you all your days, it is best to appease the cockerel with a craft made with your own hands. Such a unique handmade item will not only be an excellent gift for family, acquaintances or friends on New Year’s Eve, but will decorate your room and give it a special flavor.
The rooster is a difficult symbol; this poultry loves only everything natural, so that there is coziness and comfort everywhere, but at the same time it does not tolerate dullness. To make a craft with your own hands for the New Year 2017, you need to use your imagination and creativity. Below we have selected detailed master classes on how to make a craft with your own hands, dedicated to the symbol of the coming 2017 - the Rooster. To do this, you can use pieces of multi-colored fabric or paper, threads and other materials. The ideas we offer are easy to implement and do not require specific skills, you only need desire and imagination. You can bring your ideas to life together with your children; creativity is great for developing fine motor skills, and joint activities with your child will bring you even closer to each other.
If you are planning to make a craft with your own hands for the New Year 2017 with your children, then most of all they will like the rooster made from plasticine mass. To do this, you only need multi-colored plasticine or modeling dough.
First you need to make three balls of small, medium and large sizes from yellow plasticine - the head, neck and body itself, now they need to be connected to each other, carefully smoothing out the boundaries. It is necessary to make two cuts on the sides of the body into which the wings of the rooster will be attached. A comb is formed from red plasticine, a beak is formed from orange, and eyes are formed from black plasticine.
To make a tail for a craft with your own hands, you can choose several colors at once, roll several sausages and flatten them, build a fan out of them and attach them to the body. Now the symbol of the new year 2017 needs to make wings; for this, red plasticine is suitable; from it you need to make two triangular or teardrop-shaped wings. Feathers can be formed with a modeling knife or a piece of plexiglass. It’s better to use the feathers themselves as wings; cut them out of colored paper.
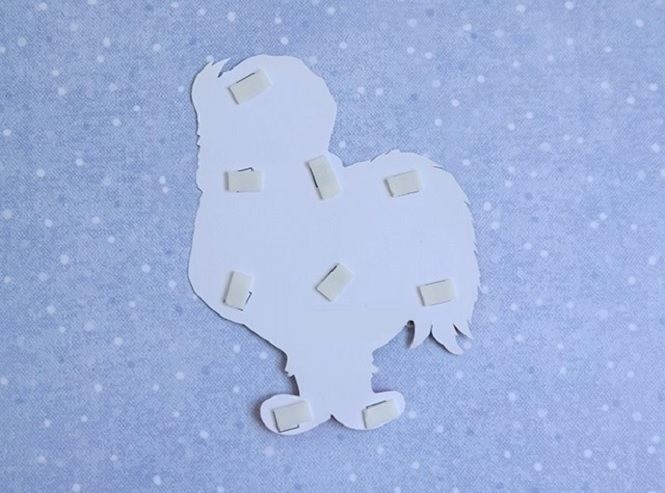
Pillow as a gift
A wonderful gift for family and friends for the New Year 2017 will be a pillow with the image of the New Year's symbol - the Rooster. This DIY craft will not leave anyone indifferent, and if you decide to make a pillow for yourself, it will give comfort and coziness to any room. A cute accessory will enliven the interior of a nursery, bedroom or kitchen; hens and cockerels will be able to fit into your favorite style. It is very easy to create such a New Year's miracle. The idea is to appliqué the image of a cockerel onto a ready-made pillow, however, if you have sewing skills, you can design the pillow or thought yourself.
First, you need to make a pattern of body parts from sheets of paper, then you need to attach the patterns to pieces of fabric and cut out the parts. Then all the parts are sewn onto the pillow base. Flowers, insects and any other decor that will help revive the finished picture will become a wonderful decoration for the symbol of 2017. In addition to the owner of the year, you can make several cute chickens with your own hands, making them from fabric, choosing bright color combinations. Relatives and friends will appreciate such an unusual craft.
Paper cockerel
An excellent gift for the New Year can be a rooster or chicken made from paper. It's very easy to do and doesn't require any special creative skills.

The main thing is to prepare the necessary materials:
- scissors;
- several sheets of colored paper;
- glue;
- several paper boxes of various sizes.
First you need to cut off the top part of the box, make cuts along the fold lines up to half the height of the box itself. To form the wings, tail and head, you need to bend the cut points. The wings must be rounded using scissors. For the tail, make several cuts to the very end, give the head a triangle shape. To make the cockerel bright, you need to cover it with multi-colored paper.
Postcard with a cockerel
It’s so nice to congratulate your family and friends on the New Year 2017 with a beautiful New Year’s card with a picture of a rooster, made by yourself. For this craft you need very little:
- scissors;
- paper;
- Double-sided tape.
And of course, a little imagination and desire.
Templates for the background and figures of the New Year symbol can be found on the Internet, printed on a color printer, and then cut out. If you have the skill of an artist, you can draw it yourself.
The color blue is suitable as a background for the craft; it’s good to add a few snowflakes to it; scrap paper with a New Year’s image already applied is also ideal for the background.
Next, we glue double-sided tape onto the inside of the cockerel figurine and attach it to the postcard to make a three-dimensional drawing; you need to cut out the same figurine from paper two more times and stick it on top of each other, clearly aligning the contours.

Then you can make an inscription wishing everyone a Happy New Year 2017! And inside the card you can write a poetic congratulation. We think everyone who receives such an original craft will be very pleased. The ideas that you embody in your creativity always delight the soul and heart of a loved one!
Knitted gift
For those who know how to knit, an excellent solution would be to make a knitted potholder, which is also perfect as a hot stand. This DIY craft for the New Year 2017 will be an excellent decor for any kitchen and will add a special flavor to the interior.

For a knitted symbol you will need:
- remnants of thread in four colors (yellow, red, brown and white), both wool and cotton are suitable;
- four black buttons;
- medium thickness hook.
The tack is performed as follows:
- first you need to make a pattern of the future rooster on paper or fabric, draw its outline;
- then the body and head of the bird are knitted from brown threads;
- The shirtfront is knitted with white threads;
- red threads are suitable for the comb, and yellow threads for the beak.
You can knit a cockerel either as a whole or separately in parts, and then sew them together. Next, steam the new potholder well. The gift is ready!

Anti-stress cockerel toy
It would be a great idea to make a funny New Year's anti-stress toy with your own hands; many people simply adore things of this kind. Such a cockerel can not only be crushed, but placed on a shelf as a decoration, and it will delight the eye all day with its unusual appearance.
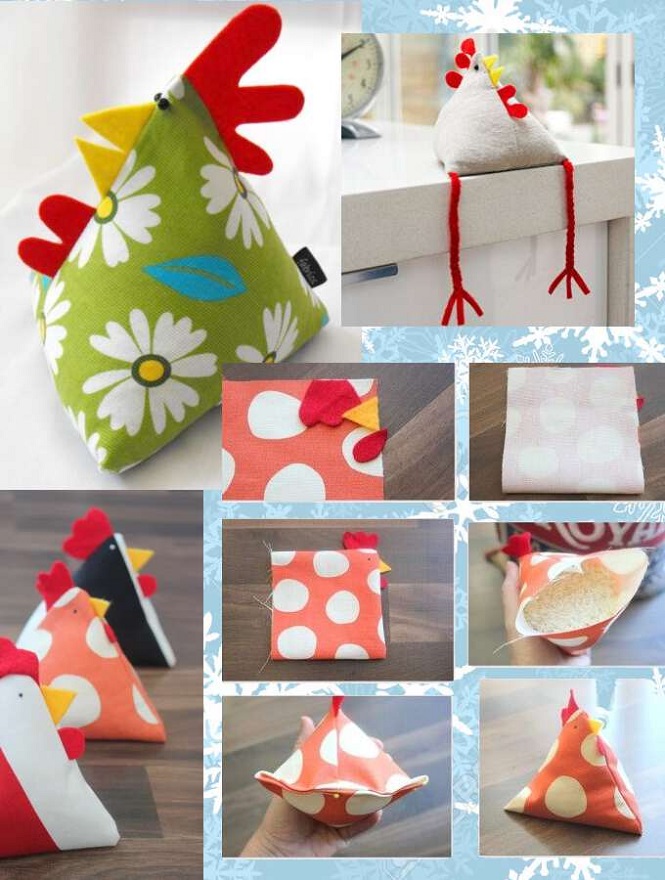
To do this, you will only need pieces of multi-colored fabric, it is better to take cheerful colors, a thread with a needle, and a special filler for anti-stress toys (you can also take regular cotton wool).
- cut a square out of fabric;
- from a red piece we make a comb and beak;
- sew the details onto the corner of the square;
- We place cotton wool or other material inside the resulting cavity;
- Next you need to sew the edges together so that you end up with a pyramid.
The new and original toy is ready, we are sure that all family and friends will like it.
Mother hens
Instead of a rooster, you can make chickens; children will definitely like such unusual New Year's toys. First, you need to cut out patterns for future birds from paper. Next, apply the parts to the fabric and cut out the finished parts, then sew them together, filling the inner cavity with cotton wool.
The beak, comb and eyes are made separately, then they are sewn to the finished toy.
You can decorate the chickens with different colored beads, rhinestones, or cut out flowers from colored paper and glue them to the body.
Heart shaped cockerel
A great idea would be a New Year's gift to your loved one in the form of a heart-rooster. To make a toy, you will need a piece of felt, from which you need to cut two pieces in the shape of a heart. Next, the figurine is filled with cotton wool, a tail, comb and beak are cut out of multi-colored fabric and sewn to the heart.

So that such an original cockerel can be hung, you can sew colored braid along the middle of the body. You can make colorful Christmas tree decorations in a similar way; for this you need to cut out small hearts. Such original decorations will always lift your spirits and will be an excellent decoration for any home interior.
Button figures
Well, probably the most unusual thing will be a cockerel made of multi-colored buttons. You will need bright buttons of different sizes, rhinestones, glue and a thick sheet of cardboard. First you need to make a sketch of the future rooster on cardboard. Next, the image is made with buttons, and the gaps are filled with rhinestones. The finished painting can be placed in a frame.


Now you know that making a symbol for the coming year is very easy. The main thing you need for this is time, patience and a little imagination.
2017, according to the eastern calendar, is the year of the Rooster. The governing element is fire, therefore, the coming year is called the year of the Fiery Red Rooster. On the eve of the New Year, everyone wants to feel the holiday, create conditions for happy changes and get ready for New Year's Eve. This can be done very simply - using symbols.
The sign of the Fire Rooster is flame and red. Therefore, candles, especially red ones, will decorate both the table and the room. Their flickering flames will add charm and comfort to the atmosphere, as if they will please the restive Rooster. You can decorate the table with candles, for example, as in the photo.

Or you can make or buy a candle in the shape of a cockerel.

The plumage of roosters contains green, golden and orange shades. In addition to candles, you can decorate the table with compositions of Christmas tree and pine branches, as well as red, green, yellow ribbons, napkins and other decorative elements.


If napkins with the image of a rooster are used in setting the New Year's table, this will add integrity to the festive design.

And the figurine of the Rooster on the festive table will enhance the already good mood.


In addition, the symbol of 2017 - the Rooster - should appear on our table and on our dishes. The holiday menu should be thought out in advance, and perhaps you should practice artistic decoration of New Year's dishes. This time, experts in oriental traditions recommend any meat except poultry for the New Year's table. It could be beef, pork, lamb. The rooster's perky character also implies generous use of spices.

On the festive table there is a place for classic Olivier salads and herring under a fur coat. In connection with the Year of the Fiery Red Rooster, vegetable salads with corn, sprouted wheat and lentils will be relevant. And if you want to tinker, then you can design them not classically, but in the form of the symbol of 2017 - the Rooster.


A traditional potato side dish will be an excellent gastronomic background for any dish. When serving, even ordinary puree can be decorated in the form of a restive Rooster.

Boiled shrimp and red caviar will successfully complement the “melody” of red in salads or sandwiches. For sandwiches, whole grain bread is a good choice.


Snacks and sandwiches can be served not only on bread, but also on crackers, bread or tartlets.

Such dishes can also be decorated thematically.

The rooster is a symbol of subsistence farming, and holiday dishes should be seasoned at home.

Holiday dishes are best decorated with rooster combs cut from tomatoes or carrots. On the surface of the salads, you can draw a rooster's comb with ketchup, or even better, depict a rooster in profile, making a beak from carrots and eyes from black peppercorns. The rooster's tail can be made from green onion feathers, sprigs of dill and parsley, cucumber, and sweet red pepper, cut into strips.


Cakes baked in the shape of chickens will decorate the holiday. Chickens' combs and beaks can be made from marmalade, and their eyes from berries. The ideas are in front of you in the photo, choose which option you like best.


The cake will seem original if the top cake is also decorated with chicken figures or an image of the symbol of the year. A pastry syringe with attachments and multi-colored cream or pastry mastic will help with this.


When the symbol of 2017, the Rooster, has taken its rightful place on your holiday table and all the conditions for the holiday have been met, all that remains is to wish you happiness and good luck in the New Year!