Knitting pattern white mittens. Simple and beautiful techniques for knitting warm mittens with knitting needles. How to knit mittens for different sizes
If you know how to knit, then knitting mittens will not be difficult for you. And so that the mittens are not only warm, but also beautiful, they can be knitted with various patterns, patterns and braids.
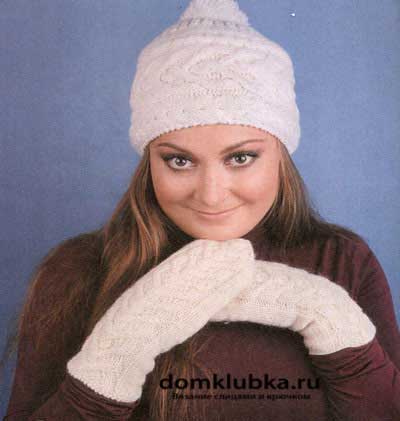
White braid pattern mittens
For these tops you need 100 grams of yarn. 100 m. It is better to take thick yarn.
# 7 circular knitting needles work best.
On the needles we collect 30 loops and knit 6-9 cm with an elastic band. Elastic band knit 1 p. Purl 1 p. Front.
After tying the elastic, move on to the braids pattern. To start forming the pattern, knit 2 p. Purl 9 p. Front and again 2 p. Purl. The rest of the pigtail is knitted only with facial loops, as shown in the diagram. Look at the diagram to the left and follow it. You just need to start knitting according to the pattern, and then the principle will be clear.
Having knitted 15 centimeters, we leave 6 loops on the finger, threading a pin into the loops, and put 6 new loops on the knitting needles and continue knitting.
When the mitten is about the size of your hand, start starting the loops.
First, on the sides of the picture and approximately in the middle of the palm. When 8 stitches remain, tighten the stitches.
So we got beautiful knitted mittens.
Patterned Gauntlets

These mittens with beautiful braids are knitted on five needles or so-called stocking needles. We cast on 52 loops, it turns out, 13 loops on one knitting needle. The elastic is knitted 2x2 for about 40 rows. Below is a diagram and description of how to knit braids correctly.
We knit a finger on the 10th row. On the side of the small braids, add to the two middle loops - in the second row 3 times. Then in the third row 3 times. When there are 18 loops, put them on a pin and continue to knit a mitten. The finger can be tied later. It fits just like the mitten itself, only in a smaller size.
Next comes double knitting, in the first row on the needles we knit alternately one front loop and two together with the front one. In the second row with front loops, two loops together, and so on until the end of the row. Pull off all remaining loops.


Beautiful Knitted Gauntlets
Knit mittens with front stitch, circular knitting, all front loops.
Knit a braid according to the scheme (see the scheme below).
Divide 48 stitches into four knitting needles and tie together to form a circle. Of the first two knitting needles, these are 24 loops, there will be a palm. Of the other two knitting needles, this is also 24 loops, there will be the back side. The first and second knitting needles are knitted with the front stitch.
We count on the third and fourth knitting needles for a pattern, 3 knit loops, 9 loops on a braid, on one needle and on the second 9 loops on a braid and 3 knit loops. Then, after 40 rows, remove 7 finger loops on a pin, and cast 7 air loops on a knitting needle.
Having knitted the mitten along your hand, start running, for this, in every second row, decrease the loop. To get a triangular launch, you need to shoot from the 1st and 3rd spokes at the beginning of the row. With 2nd and 4th needles, last sts. After 24 stitches remain, start decreasing in each row. Pull the last 8 loops.
Knit a finger
Separately, on a knitting needle, remove 7 loops from the pin, on the second knitting needle, cast on 7 loops from the top edge and remove two loops on the sides. You should have 18 stitches. Knit a finger in a circular stitch, all loops are facial. After the desired size, run your finger, just like the mitten itself.
The edges of the mittens can be crocheted and decorated with beads or beads.
Mittens have always been the most practical and comfortable for cold winters. Today in stores there is a huge selection of mittens for the whole family, but it is much more pleasant to wear things that were created with love with your own hands.
Having learned to knit, you can create whole sets: hat, scarf, mittens. They will harmonize beautifully with each other if they are made in the same style with the same pattern.
I propose to go directly to the discussion of the topic: "how to knit mittens with knitting needles - step by step instructions."
How to knit mittens (step by step for beginners)
In order to learn how to knit beautiful stylish mittens, you need to learn how to knit the simplest ones, on the basis of which you can create the most original models for the whole family.
Seamless mittens - a master class with a detailed description (photo)
The most interesting thing is that even a lazy one can cope with this model. They can be monochromatic, but the author suggests adding a few red stripes for variety.
Popular articles:
For work we need a woolen thread (70 g), 5 stocking needles No. 3.
The product is knitted from top to bottom on five knitting needles, as a result of which it will turn out without a seam. Calculation of the number of loops: 20 x 1,7 = 34 loops. Distribute 34 stitches on 4 knitting needles. I propose to round and cast on 36 loops, so we get 9.
For ease of explanation, we will give each spoke a serial number. Closing the circle, we knit four loops of the 1st knitting needle together with the end of the yarn remaining on the 4th knitting needle from the set of loops so that the circle around the edge closes more tightly.

The thumb will be knitted on the 1st knitting needle, for the left - on the 2nd. To do this, we knit the first loop on the 1st knitting needle with a thread of the main color. We knit all other loops, except for the last one, with front colored thread. Then we return the loops, tied with colored thread, to the 1st knitting needle and knit again with the main thread. We get a colored line. This will be the hole for the thumb in the future. Then we just knit up to the little finger (about 8 cm).

Then we proceed to decrease in loops on the toe of the mittens... On the 1st and 3rd knitting needles, at the beginning, we knit the first two loops together with the front one in the second way (behind the back walls), after turning the 1st loop over. On the 2nd and 4th knitting needles, we knit two loops together at the end of the knitting needle in the first way (behind the front walls). So we decrease the loops through the circle until there is half the number of loops on each knitting needle (in our case, when the number of loops on each knitting needle is odd, we decrease the smaller part through the circle - 4 loops), then we decrease the loops in each circle (5 loops). At the same time, on the 1st and 3rd knitting needles, in those rows where the loops do not subtract the first loops, we also turn over and knit in the first way. When there are 2 loops on each knitting needle, tighten the loops and fasten them on the seamy side.
Now let's get down to tying out the thumb... To do this, carefully pull the colored thread out of the thumb hole. Then we insert two knitting needles into the vacant loops, we get 7 loops on the lower knitting needle, and 6 on the upper knitting needles. and the 4th knitting needle will also have 4 loops (3 + 1 from the side edge of the hole). To make it more convenient, the end of the working thread can be lowered into the hole (on the wrong side of the product).

We continue to knit the finger in a circle until the middle of the nail, and then we begin to decrease the loops in the same way as when knitting the mitten toe: on the 1st and 3rd knitting needles at the beginning, on the 2nd and 4th knitting needles at the end, but decreasing do in each row. When the 1st loop remains on each knitting needle, we tighten the loops and fasten them on the seamy side.
Left mitten knits similarly to the right, but in a mirror image: we knit a hole for the finger on the 2nd knitting needle.
Step-by-step instructions for knitting on two knitting needles
Such long mittens are also knitted on two needles. You can separately tie two parts with the subsequent connection of the halves, but we will consider an option where you have to make only one inconspicuous seam (this will be correct and visually more beautiful).
Required: yarn, knitting needles, regular and knitting pin, tape measure, hook, needle.

Let's start with the right part.
We measure the girth of the wrist, the length of the palm and thumb. It is also necessary to measure the knitting density by knitting a little. We measure how many loops are there per 1 cm. I have a girth of 20 cm, in 1 cm - 2 loops. Need 40p-4 = set 36p + 2 edging.
We start from the bottom with a 2x2 elastic band (2 front, 2 purl). It turned out about 10 cm (15 rows).

Next, we go to the main canvas, where you can choose the knitting needles of a smaller diameter. In the second row, add 4 loops evenly. Next, we just knit 7 rows to the base of the thumb. You can try on and, if necessary, knit more / less.
The finger in the mitten is not on the side, but as if not much closer to the palm, so for the right mitten we knit as follows.

- A. - edging, 2p. we knit according to the pattern and remove it on a regular sewing pin.
- B. - Take 6-7 loops for the finger. Depending on the completeness. We knit 7 loops according to the pattern, and remove all the remaining loops on a pin.
- B. - on the working needle, we only have 7 thumb loops.
We knit in height with the main pattern, without edging !!! the length of the finger is multiplied by 2. My finger is 6cm * 2 = 12cm in height. Came out 21 rows. THE FIRST AND LAST WE TIE ON THE DRAWING !!! We return to the knitting needle the loops from the large pin.


Divide all loops by 2. Remove one part with a pin.

Let's get down to cutting.

We knit the purl row according to the figure. I do not have a needle of 20 loops. I knit like this, edging, 1 front, 2 together, 12 front, 2 together, 1 front, 1 out. A total of 20 loops. Reduce this in each front row until 6-8 loops remain on the knitting needle. I have 7.

We close the hinges and do the same procedure with the second half. To finish correctly, simply knit the two stitches together, transferring the knitted one to the main knitting needle.


From these lessons, we can conclude that knitting is not so difficult. Knitting mittens requires basic knowledge and a little free time.
Knitted mittens with a pattern (diagrams and description)
Having learned to knit the simplest models, you can dilute them with beautiful patterns, giving free rein to imagination. In the article "" you will find a large number of them.
And now I propose to switch to more complex knitting mittens (diagrams and descriptions will help you understand this difficult matter).
How to knit beautiful mittens with braids for women
Mittens with braids with knitting needles schemes and descriptions for lovers of the classics.
The pigtail will be the main decoration. We have chosen a simple braid, but if you are not afraid of difficulties, you can choose a more complex and original version.
Yarn - acrylic (you can from angora), about 70 g; stocking needles No. 3.5.

Elastic pattern: 2 persons., 2 out.
Knitting of a "braid" pattern: Cross 8 sts to the left (leave 4 sts on the auxiliary knitting needle before work, knit 4 and knit from the auxiliary knitting needle).
Cross 8 loops to the right (leave 4 loops on the auxiliary knitting needle at work, knit 4 and knit loops from the auxiliary knitting needle).
Cast on 48 stitches and distribute them on the stocking needles, it turns out on each needle 12 loops. Knit with a pattern elastic band 3.5 cm (if elastic is not enough for you, knit more cm).
Then, we start knitting the main pattern. For the convenience of knitting the "braid" pattern, I transfer the loops from the 1st and 2nd knitting needles to one knitting needle. Those. my loops are distributed over 3 knitting needles (and not 4 knitting needles), on the first knitting needle there are 24 loops of the main pattern, and on the 2nd and 3rd knitting needles from the palm of the hand, 12 loops each.
So, the first row after the elastic begins with a knitting needle on which there are 24 loops, we begin to knit the main pattern.
1-6 row: K1
7th row: 1 person., 2 out., 8 loops cross to the left, 2 out., 8 loops to cross to the right, 2 out., 1 person., Loops on 2 knitting needles from the palm of the hand knit faces. We repeat rows 1-7 throughout the entire work.

At a height of 10 cm from the beginning of knitting (you don't have to have 10 cm, everyone has different hands and fingers), we form a hole for the thumb. Let's start with the left mitten. On the knitting needle from the side of the palm (3rd knitting needle) we knit 4 persons., Remove 6 sts on a pin, type 6 sts on the knitting needle (so that there are 12 of them, as before), 2 persons.
We knit the hole for the thumb of the right mitten symmetrically, i.e. on the second knitting needle from the side of the palm: K2
Formation of the toe we carry out after the little finger on the hand is closed.

For a rounded toe, knit two middle stitches together on each knitting needle.
Decrease the loops in each row until only 1 sts remain on the needles (total 4). After that, tear off the thread of the ball and thread it into the needle. Pick up all 4 sts with a needle, pull off and fasten the mittens from the inside out.
After the two mittens are connected, we start knitting the thumb. To do this, remove 6 sts from a pin on a knitting needle, dial 6 sts on a parallel row and dial 4 sts on two side rows. In total, we got 20 sts, we distribute them on 4 knitting needles (5 sts per knitting needle).

And we knit circular rows of faces. to the required finger length. We form the toe of the toe in the same way as the formation of the mitten toe.
Knitting mittens for children
Children love it very much when their mother creates with her own hands, for example, beautiful chanterelles or bears that you can put on handles and go to play snowballs.
Knitted baby mittens with owls
For a child, there is nothing more interesting than patterned mittens. He wears such things with great pleasure, so I propose to please the child with marvelous owls.

Materials and tools:
1 skein;
stocking needles No. 1.5;
additional knitting needle or special removal of loops;
yarn needle;
four beads;
threads and a needle for sewing on beads.
The mittens are knitted in two threads.
So, we collect 32 loops, distribute them to 4 knitting needles (8 on each).
Rows 1-10: elastic band 1 persons. x 1 int.
11 row: persons.
12 row: persons.; add 2 persons from broaches. on each spoke
13 - 18 rows: persons.
19 row: we begin to knit an "owl" on 12 loops of the third and fourth knitting needles. The first spoke - persons.; the second spoke - persons.; third knitting needle - 4 persons., 6 out .; fourth knitting needle - 6 out., 4 persons.
20 row: the same as the 19th.

21 row: first knitting needle - persons.; second knitting needle - 2 persons., remove 6 loops for the thumb hole on a pin, cast on 6 additional loops, 2 persons; third knitting needle - 4 persons., 2 out., 4 persons .; fourth knitting needle - 4 persons., 2 out., 4 persons.
22, 23 rows: first knitting needle - persons.; the second spoke - persons.; third knitting needle - 4 persons., 2 out., 4 persons .; fourth knitting needle - 4 persons., 2 out., 4 persons.
24 row: first knitting needle - persons.; the second spoke - persons.; third knitting needle - 4 persons., 2 out., 2 loops remove for additional. knitting needle at work, knit the next two loops of persons., then loops for extra. spoke - persons.; fourth knitting needle - remove two loops for extra. knitting needle before work, knit the next two persons., then loops for extra. knitting needle - persons., 2 out., 4 persons.
25 - 31 rows: first knitting needle - persons., Second knitting needle - persons., Third knitting needle - 4 persons., 2 out., 4 persons .; fourth knitting needle - 4 persons., 2 out., 4 persons.
32 row: same as 24th
33 - 35 rows: first knitting needle - persons.; the second spoke - persons.; third knitting needle - 4 persons., 2 out., 4 persons .; fourth knitting needle - 4 persons., 2 out., 4 persons.
36 row: the same as the 24th and 32nd.
37 row: first knitting needle - persons.; the second spoke - persons.; third knitting needle - 4 persons., 2 out., 2 persons., 2 out; fourth knitting needle - 2 out., 2 persons., 2 out., 4 persons.
38 - 41 rows: first knitting needle - persons.; the second spoke - persons.; third knitting needle - 4 persons., 6 out .; fourth knitting needle - 6 out., 4 persons.
Row 39: start decreasing. First knitting needle - knit the first 2 loops together. behind the back wall; second knitting needle - knit the last 2 loops of the faces. behind the front wall; third knitting needle - knit the first 2 loops together. behind the back wall; fourth knitting needle - knit the last 2 loops of the faces. behind the front wall. Knit the rest of the loops according to the pattern (persons. And out.)

When there are only 8 loops on the knitting needles, pull them together with a needle. For the thumb, transfer the 6 loops removed to the pin onto the knitting needle, dial from the edges onto three knitting needles 2 + 6 + 2 loops.

We knit 12 rows in a circle. Then we transfer all the loops to two knitting needles and begin to subtract: on each knitting needle we knit the first 2 loops together behind the back wall, the last 2 for the front. We knit the second mitten in the same way - only we leave the hole for the thumb not on the second knitting needle, but on the first.

Sew on beads-eyes and rejoice at the wonderful novelty for winter.
Ideas with bullfinches (embroidery)
Having simple mittens at hand, you can decorate them with original embroidery, which will look gorgeous in a children's outfit.


Video tutorials from the best masters
YouTube today has become a real treasure, where you can find a huge number of training videos. For example, in the blogs of Svetlana Bersanova, you can watch the video tutorial for free. And there are a lot of such good authors. You can find a mentor to your liking and receive the most valuable knowledge absolutely free.
Original mice or white hedgehogs for kids
How to knit mitts
Warm fishnet for a girl (double mohair)
Interesting two-tone minions for a boy 7-8 years old
Jacquard products (video tutorials)
Winter-themed jacquard is a classic that will always be relevant, so I propose to move on to the most difficult options that require maximum time and attention to detail.
Original knitting with an ornament (Norwegian patterns)
For girls with deer
If you want to learn how to knit a complex, but very original "deer" pattern, this tutorial with a detailed description will help you.
Men's mittens with arana for little men
If you learn all the lessons we have proposed, you will be able to fantasize and create products of any complexity: women's fingerless gloves, with a fold-over top, with a false pattern, made of thick yarn and embroidery. Good luck with your endeavors. Try, experiment and spoil your home with nice bundles.
1979
Knitted items never go out of fashion, and are especially relevant, for obvious reasons, in the cold season. If you wish, you can personally create a miracle for each family member. This handicraft is available for those who know how to hold knitting needles in their hands and are familiar with the variety of loops. To make the products colorful, use schemes with a description of patterns for knitting mittens with knitting needles.
Mittens can be knitted in different ways:
- crochet;
- traditionally (2 knitting needles);
- using a set of knitting needles.
As a result, they are obtained in one piece or from parts that are sewn together. On five knitting needles, a product is obtained without seams. First, the dialed loops are divided equally into 4 knitting needles, the remaining one will be working. The top and the palm fall on half. If you knit loops on all knitting needles, you get one row. When knitting mittens, patterns designed for 2 knitting needles are often used.
This requires compliance with certain rules:
- Since this is a circle, then all the loops on the wrong side are knitted the other way around: the face - the wrong side, the wrong side - the face.
- When knitting with a set of knitting needles, pay attention only to the odd rows, which are knitted twice.
- All even rows are counted from right to left, but they knit the loops the other way around: wrong side - face, face - wrong side.
- If there is an offset in the pattern both on the face and on the wrong side, then all the odd rows are knitted, as shown in the pattern for traditional knitting.
Knitting mittens with front stitch
Knitting is difficult at first for those who first picked up knitting needles. It is better to improve your skills by knitting simple things: socks, mittens, scarves. These items are essential for humans. Nowadays you can buy them, and if they are tied by the hands of a loved one, it will become a pleasant and necessary gift.
Yarn selection
The choice of yarn for mittens depends on the weather conditions.
She may be:
- woolen - for severe frosts with winds;
- half-woolen - for variable temperature;
- acrylic - for small children.
Children under one year old are not comfortable in mittens made of wool and semi-wool, because it tends to "bite". Despite the fact that acrylic is a synthetic fiber, it retains heat very well. Knitting threads can be dyed in one or more colors. There is a so-called fancy yarn. It has bumps and lint.
Things knitted from such threads are original and fashionable.
Wool consumption for mittens:
- children - from 50 to 80 g;
- women - 80-100 g;
- male - 100-120 g.
Spoke selection
Knitting needles are the main tool of the knitter. They differ in purpose, in material of manufacture, in thickness. A sweater, a jumper, a jacket, a dress is knitted in paired knitting needles or connected by a fishing line (circular). The knitting needles are made from a variety of materials. The knitter picks them up at her discretion.
What you need to pay attention to:
- Lightness - the hand quickly gets tired from heavy.
- Thread slip - well-finished products do not cling to the thread, which allows you not to be distracted or nervous during work.
- End - the knitting needles should not be too sharp so as not to injure the fingers, the blunt ends will have difficulty prying the thread.
- Size - is determined by the size of the spoke diameter and is measured in millimeters. They are selected depending on the thickness of the thread. The knitting density is achieved by the ratio of the thickness of the knitting needles to the yarn. On a skein of thread, the manufacturer indicates the number of knitting needles for knitting with this yarn.
Steel knitting needles are good for fine yarns. They are not long, the surface is slippery, the hand does not get tired of the weight. Aluminum - stains the thread. Therefore, they are only suitable for dark yarns.
For mittens with patterns according to the schemes with the description, knitting needles of different thickness are selected. For example, for tying braids, harnesses, tools are needed thicker, and for an openwork pattern - thinner. Experienced craftsmen knit the gum with knitting needles 1 size smaller than the main part.
Required measurements
In order for the mittens to fit and fit perfectly on the hand, the following measurements are necessary:

Stages of circular knitting of plain mittens on four knitting needles
With everything you need at hand (knitting needles, yarn, measurements), you can start knitting.
A set of loops and knitting an elastic band
First knit an elastic band. To keep warm, it should fit snugly around the arm and not be short. In children's products, this part is at least 3-4 cm, and adult mittens look beautiful with an elastic band from 7 to 9 cm. If desired, it is knitted longer to make a fold. This will make it look more voluminous. Elastic band - alternation of front and back loops: 1 × 1, 2 × 2. This gives it elasticity. 
To determine the number of loops for the elastic, use several methods:
- You need to knit a sample of 20 stitches. By measuring, they find out how many loops are 1 cm.For example, there are 3 loops per 1 cm, and the width of the wrist is 16 cm. Multiply 16 by 3 and get 48 loops.
- Wrap around the wrist with a thread for work and increase it 3 times. From the resulting length, loops are recruited.
Knitting tools should have the same number of stitches.
Dial 48 sts. Knit the first row of loops with the face and wrong side. Distribute 12 sts on the needles and connect: tie the remaining tail and knitting thread. This place marks the beginning of a new row. You can mark it with a pin. This is how the serial number of the spoke is accurately determined, this is important for further work.
Stitch knitting technique
Patterns for knitting mittens with knitting needles, schemes with a description of which can be found on the Internet, will seem complicated to novice craftswomen. Therefore, it is optimal for them to start working with a simple one - to knit loops with the front satin stitch.
Knitting the thumb hole
The place for the finger is performed as follows:
- Determine which spoke the finger will be on: for one hand - on the third, for the other - on the fourth.
- They knit the first loop, then after 10 p. Thread and tie. Immediately add the missing 10 stitches with a cap, and knit the remaining loop.
- The same is done when knitting a left mitten on an appropriate tool.
Toe creation
To create a toe, start cutting the loops. On the first and third knitting needles, they are knitted in two pieces at the beginning of the row, on the second and fourth at the end.  Reduce every three rows until 8 sts remain. All loops are pulled together with a thread and hidden on the back side.
Knitting the thumb
To knit a finger, they collect loops on a working tool, and the missing ones are added from the edge. They are divided into 3 parts, and work in the fourth.  Knit with the front to the middle of the nail plate, and then begin to subtract 2 loops on each tool until there is nothing left. They are pulled together with a thread that is fixed on the wrong side.
Knitting mittens with an openwork pattern - description and patterns for beginners
Patterns for mittens with knitting needles, schemes with a description of the craftswomen are collected in a collection, using any opportunity: master classes, educational literature, the possibilities of the Internet. They vary in complexity. A beginner needlewoman will select a suitable pattern for herself to develop knitting skills.
You can start improving your craft by using threads of different colors. Take tangles of different colors. The result is striped mittens. Colors can be bright, contrasting for children's mittens. By using stripes of the same color, but in different shades, a more sophisticated version is obtained. 
On the Internet, you can find and use patterns for knitting with a jacquard method. In this case, patterns of various themes are knitted with a thread of a contrasting color. The mittens are tight, as the threads are intertwined on the seamy side, creating an additional layer.
The complexity of openwork patterns is that the work requires a constant counting of the number of loops.
After all, the beauty of the pattern is created by adding them with the help of slip loops and subtracting them by knitting 2, 3 loops together. In this case, the number of loops remains unchanged. One mistake leads to skewing of the product.
Schemes describing patterns for mittens with knitting needles are offered by many sites. When knitting with the front satin stitch is completely mastered, you can proceed to the use of simple patterns. They are knitted after the design of the elastic on the upper side of the mittens, that is, face loops are knitted on the palm.
Pattern number 1. "Pigtails"
A simple braid pattern can be mastered by a beginner:

Pattern number 2. "Royal scythe"
This pattern is more complex than the previous one. Its difference is that the loops are interchanged, first leaving part of the loops in front of work, then behind. It turns out that the pigtail then diverges in different directions, then converges.  In this pattern, only knitted loops. The loops are interchanged after 5 rows. The pattern requires 22 loops.
Pattern number 3. "Openwork hearts"
This pattern is a test of possibilities for a novice craftswoman.
The contour of the hearts is obtained thanks to the holes from the knitted air  loops:
- For one heart, 13 loops are needed if it is a large drawing, and 11 for a small one.
- Divide the loops equally, knit in half, make a loop loop and then two loops together so that their number does not change.
- In the next row, a crochet loop is knitted from the back.
- In odd rows, two caps are made, and next to two together.
- Between them, increase the number of loops to 5.
- This is done in 3, 5, 7 rows. At 9 p. there will already be three caps and 3 p. two at a time.
- At 11 p. - four caps, and between them 2 times three together. Then the drawing is repeated.
Pattern number 4. "Stars"
You can use an unpretentious pattern that will decorate children's mittens.

An asterisk is knitted from three loops:
- first three loops together,
- then cap,
- knit these three loops again.
They are staggered depending on the number of loops. Between the asterisks there are loops, knitted in the front way.
Pattern number 5 "Bumps"
The drawing is simple in execution, and is knitting from one loop 3. Then the canvas is turned and these additional loops are performed on the purl. Bring back the knitting, and cut the loops by knitting them together.  Place the drawing as you wish. It is good for both children's products and youth gloves.
Down mittens
 Patterns for mittens with knitting needles, thanks to the many patterns with descriptions, can be selected at will.
 In severe frosts, mittens made of downy yarn will help protect your hands from the cold. Down products are comfortable, warm, lightweight. To create a downy thread, wool of a special breed of goats is used, which is grown in Russia in three regions: Volgograd, Orenburg and Altai.
A special technology allows you to get a thin and at the same time strong thread, from which craftswomen create things of amazing beauty.
Down properties
The goat down is completely natural. The beneficial effect of downy fiber on the human body has been noticed for a long time. Its healing properties are used in nursing premature babies. To do this, babies are wrapped in downy shawls, which keep warm. Elderly people are saved from sciatica, osteochondrosis and arthrosis with the help of products made of downy yarn.
For colds, alcohol compresses are replaced with a bandage from a downy scarf.
Down products not only retain heat, but also remove excess moisture. In downy mittens, socks, hats, the body will always be dry. The hypoallergenic property of goat down is used in the manufacture of children's clothes. Down mittens have increased wear resistance. Dirt hardly sticks to them. Proper care will allow them to remain in excellent condition for a long time.
The choice of knitting technique from down yarn
Down yarn mittens are knitted with stocking needles (set of five) in a circular manner. The products are warm, soft, lightweight and durable. A thin fluffy thread lies flat, pleasant to work with. The upper part of the mittens is decorated with braids, plaits, and lace patterns. Openwork fantasies in no way diminish the warmth of the product. Therefore, the possibilities of knitters are endless.
Pattern "Openwork leaves"
The drawing requires 22 loops. The pattern of the pattern is designed for an attentive craftswoman. Counting the number of loops is the key to success.  The pattern is obtained thanks to the holes from the knitting of the cap, made by the front method, and the rearrangement of the two front loops. They diverge to the right and left of the central purl loop.
Bindweed pattern
A drawing consisting of unusual flagella will look good on down mittens. The harness itself is an alternation of loops, knitted with the front and the wrong way. Every 10 rows, crossing occurs on one side to the right, on the other - to the left: first knit the front, then the purl loops. 
There are a lot of patterns for knitting mittens with knitting needles. The description diagrams will not be immediately clear. Perseverance and desire will help you overcome difficulties.
Choice of yarn color
Natural downy yarn has different colors: white, gray, black. White thread products are the most spectacular. Modern designers believe that down toilet items go well with fashionable clothes. A set of white hat, scarf and mittens will make the girl irresistible.
Mens mittens
In cold weather, men will not refuse warm mittens tied by the hands of their beloved woman. They are indispensable during walks in the park, skiing in the forest, on the ice rink.
When creating men's gloves, the same methods are used as when knitting women's and children's products:
- choose the yarn and the desired number of knitting needles;
- make the necessary measurements;
- start knitting with an elastic band, which should not be short;
- knit the main part until the hole for the thumb is made;
- continue knitting until the start of decreasing the loops;
- create a toe;
- knit the thumb.
When choosing the color of the yarn, you need to take into account the preferences of men: black, blue, gray, brown, bottle, khaki. To decorate the top of a warm pair, they use all kinds of relief patterns: plaits, braids.
Patterns describing patterns for knitting mittens with knitting needles are not always suitable for men's products. You can use the "Pearl" pattern, which represents the alternation of front and back loops: if in the first row they knit from the front side, then in the next row in its place they knit from the inside out. This is a simple drawing, but it looks decent.
Knitting is one of the ancient types of needlework, but its popularity not only does not fall, but only grows every year. The imagination of knitters knows no bounds. The desire to make a knitted thing special and unique finds understanding among connoisseurs of hand knitting.
Mittens or gloves are a very necessary accessory for the cold season. In addition to the fact that in warm woolen mittens your hands are not afraid of any frost, you can decorate your image with such a detail, add a bright stylish accent. We offer you various patterns of mittens with knitting needles with a pattern, which will surely inspire you to knit new mittens. We will not dwell on the basic techniques of knitting a product, they are on our website. Let's pay attention to the options for schemes and patterns.
One of the common patterns for knitting mittens is braids. These beautiful patterns for mittens can be an independent motif for decoration or combined with other knits. Consider several options for mittens knitted with a braid pattern.
Pigtail mittens
Sizes: S-M, M-L.
We will need:
- yarn containing 65% wool, 35% alpaca, 50g by 75m, gray - 100g;
- the same, white - 50g;
- sets of stocking needles # 3 and # 4;
- markers.
Density: on faces. smooth knitting needles No.4 19p. for 25 rubles. equal to 10cm by 10cm.
Technique:
- additions: we perform 1n., which in the next p. we knit the front crossed so that there are no holes;
- decrease: for 3p. to the marker (M) we knit 2p. in 1p., then from 2p. (between them M) we knit 1l., then remove 1p. front, 1l. and we stretch it through the removed one.
Description
Right
We collect cn. No3 40p. gray threads and knit round 1p. persons / n. Then we go to the elastic band 2l. / 2i.
Having completed 6-7cm in height, in the next river. we distribute the loops: (5l., 2p. in 1l.) x3, 2i., (2p. in 1l., 2l.) x3, 2i., 3l. Total 34p.
We carry out knitting patterns up to 13-14cm. Then add 1p each. on both sides of the 1st loop of the row for the finger - see above. We repeat the additions through the row 4-5 more times. Total 44-46p. We transplant the loops for the finger (11-13p.) For additional. knitting needle or holder. We continue knitting in a round, while typing 1p. additionally behind the finger in the next p. In work 34p.
Having reached 26-28 cm of the length of the product, we set it after 16p. 1st M, then after 17p. 2nd M. We carry out decreases on both sides of the M by 1p. through a row three times, then three more times in each p. As a result, 10p remains. We cut the thread, thread it through the remaining stitches, tighten it, bring it to the wrong side and fix it.
Finger
We transplant the deferred loops to the joint venture. No4, additionally typing 3-4p. behind the finger. In total, we have 15-16p.
We knit 4.5cm - 5cm front ch. round. Then out of every 2p. we knit 1l. We repeat the contractions in one more p. Remains 4p. We cut the thread, thread the loops, pull it together, bring it to the wrong side, fix it.
We knit the left mitten in a mirror.
Laces
We make a lace from white yarn or crochet it. We stretch it through the holes in the canvas. We make two pom-poms Ø2cm. We attach them to the ends of the string. For the second mittens, we do the same.
Check out a few more patterns for knitting mittens with braids.
Mittens with a pattern: MK video
Wide braid
This drawing is best done with a thick thread, then it will be more prominent.
Mittens with a braid pattern with a shadow: video master class
Three graceful braids
For this model, the elastic on the cuff is made according to cx. A.2, the main drawing is according to cx. A.3.
Two-color mittens with knitting needles: MK video
Lapel mittens
An interesting model. The lapel is performed in the transverse direction according to the pattern.
We knit once from 1p. 3p., then repeat from 4p. for 13 rubles. In this case, 12p. and 13 rubles. we knit 5p. shortened p. Rows from 4 to 11 are repeated only 9 times. We complete the cuffs with two p. elastic bands 2l. / 2i., then close the loops. In this case, the initial 4p. we close in the usual way, and the rest - knitting in 2p. together. Next, knit mittens with knitting needles in the classical way, typing loops along the upper edge of the cuff.
Tricolor mittens on 5 knitting needles: video master class
Double braid
We knit according to the scheme. The background of the braid is the seamy surface.
Mittens with a snowflake: MK video
Two-tone knitting pattern
Very beautiful women's mittens are made of two contrasting yarn colors.
We knit cuff braids according to cx. 1, thumb - along cx. 2, the main pattern is according to cx. 3.
Mittens with owl pattern
In fact, owlets are a variant of the braid. Having understood the principle of knitting, you can make this pattern in different sizes, for adults and children's gloves. Let's consider it in more detail.
We will need:
- yarn of medium thickness;
- knitting needles number 4 and number 5;
- markers (M).
Density of the sample on the faces. smooth surface is 18p. by 10cm.
Description
Left mitten
We collect cn. No5 32p. and knit round 24 rows of elastic 2l. / 2i. knitting needles number 4. We pass to cn. No.5 and make decreases: (6 y., 2p. In 1 y.) X4. We have 28p. We knit 2p. persons / n.
Sl. p .: 20l., 2i., 6l. (= 28p.).
Getting started with the thumb wedge:
- 1p.: 3l., From 1p. → 2l., 15l., 4 i., 5l. (29p.);
- 2p.: 4p., From 1p. → 2l., 14l., 6i., 4l. (30p.);
- 3p.: 5p., From 1p. → 2l., 13l., 8i., 3l. (31p.);
- 4p.: 6p., From 1p. → 2l., 12l., 10i., 2l. (32p.);
- 5p.: 7p., From 1p. → 2l., 11l., 12i., 1l. (33p.);
- 6p.: 8p., From 1p. → 2l., 10l., 14i. (34p.);
- 7p.: 9p., From 1p. → 2l., 10l., 14i. (35p.);
- 8r.: 10 years., From 1p. → 2l., 10l., From 1p. → 2l., 2i., 8l., 2i., From 1p. → 2l., (38p.);
- 9p.: 11p., From 1p. → 2l., 10l., 4i., 8l., 4i. (39p.);
- 10r.: 12p., From 1p. → 2l., 10l., 4i., 8l., 4i. (40p.);
- 11p.: 13p., From 1p. → 2l., 10l., 4i., 8l., 4i. (41p.);
- 12p.: 14p., From 1p. → 2l., 10l., 4i., Remove 2p. on auxiliary cn. at work, 2l., 2l. with auxiliary cn., remove 2p. on auxiliary cn. before work, 2l., 2l. with auxiliary cn., 4i. (42p.).
Transfer the thumb loops to the pin:
- 13r.: 16l., 10p. we transplant on a pin, 4i., 8l., 4i. (32p.);
- 14r.: 16l., 4i., 8l., 4i. (32p.).
- We repeat the 14th p. 7 more times. Then:
- 22r.: 16 years., 4i., We remove 2p. on auxiliary cn. at work, 2l., 2l. with auxiliary cn., remove 2p. on auxiliary cn. before work, 2l., 2l. with auxiliary cn., 4i .;
- 23r.: 16l., 4i., 8l., 4i.
- We repeat 23r. three more times. Further:
- 27r.: 16 years., 4i., We remove 2p. on auxiliary cn. at work, 2l., 2l. with auxiliary cn., remove 2p. on auxiliary cn. before work, 2l., 2l. with auxiliary cn., 4i .;
- 28r.: 16l., 4i., 2l., 4i., 2l., 4i .;
- 29r.: 16l., 4i., 2p. → in 1l., From 1p. → 2i., 2i., From 1p. → 2i., 1 broach (= remove 1p. Front, 1l., Pull it through the removed one) , 4i. (32p.);
- 30r .: 16l., 16i .;
- 31r .: 17l., 14i., 1l .;
- 32r .: 18 years., 12i., 2 years.;
- 33r.: 19 y., 10 i., 3 y.
The owl has already been knitted with knitting needles, the next stage is the design of the top of the mitten:
- 34r.: 1 broach, 12l., 2p. in 1l., 1p., 2l., 8i., 2l., 2p. in 1L. (28p.);
- 35r .: 1 pr., 10l., 2p. in 1l., 1p., 2l., 6i., 2l., 2p. in 1L. (24p.);
- 36r.: 1 pr., 8l., 2p. in 1l., 1p., 2l., 4i., 2l., 2p. in 1L. (20p.);
- 37r.: 1 pr., 6 years., 2p. in 1l., 1p., 2l., 2i., 2l., 2p. in 1L. (16p.);
- 38r .: 1 pr., 4l., 2p. in 1l., 1p., 4l., 2p. in 1L. (12p.);
- 39r.: 1 pr., 2l., 2p. in 1l., 1p., 2l., 2p. in 1L. (8p.);
- 40r.: 1 pr., 2p. in 1L., 1 Ave., 2p. in 1L. (4p.).
Thumb
We transfer the deferred 10p. on the knitting needles and knit: 10 l., we collect 4p. (= 14p.). In the next p .: 10l., 2p. → in 1y., 2p. → in 1L. (= 12p.). Then we do 9p. persons. smooth. For the top of the finger, we perform reductions:
- 1p.: * 2p. → in 1l. * - from * to * we will do on all items (= 6p.);
- 2p .: * 2p. → in 1l. * - from * to * we will do on all p. (= 3p.).
Cut off the thread, thread through the remaining loops, tighten and secure.
Right mitten
The knitting pattern for the right mittens with knitting needles with such a pattern is completely similar, but it is done in a mirror image.
Jacquard pattern for mittens
In jacquard knitting technique, you can make two-color or multi-color patterns. We will not consider the features of knitting these patterns in detail, such information is on our website. Just to emphasize again, if several colors of yarn are used to knit mittens, make sure that there are no long broaches on the wrong side. And, of course, the threads must be of the same composition, otherwise their shrinkage will be uneven during washing.
Mittens with Scandinavian designs
Deer
Snowflakes
Animal and plant drawing
In such an ornament, a variety of subjects are used - from colors suitable for women's mittens to funny cats for children's mittens.
Flowers
Hearts
Owl

Hello everyone!
I continue to promote Knitting mittens in this way, because it is a comfortable finger, especially for children in a sock, and it is convenient to knit.
This is an easy way. Having knitted a pair of three mittens in this way, you will be surprised that at first it seemed difficult.
These mittens are knitted of different-sized yarns with the addition of mohair. They asked to make an MK for such a thickness. Therefore, they are "not very".
Made a master class for children's mittens and for adults. She placed a calculation table for any size from 20 loops of a typesetting row to 60 loops.
MK is paid. Detailed. Write, ask.

Beginning of the table. The entire table is in the master class.

What determines the number of loops? From the size of the brush, from the thickness of the yarn. From the number of spokes
What determines the height of the wedge (the width of the initial number of thumb loops)? From the width of the palm. My husband has a wide brush, but short, not musical fingers, which means ... You will understand this when you start knitting.

How to calculate how many loops you need to cast on mittens? As usual. As always, you knitted mittens, you already own these skills. But I will remind you anyway. For a medium yarn for a medium feminine handle, that's 44 stitches. For men, this is 48 loops. For a nursery, it depends on age, from 20 to 40.
So, you have decided on the yarn, (I knit mittens from lan gold 800m / 100g with the addition of thin mohair (it comes with the addition of acrylic, or angora), about 500m / 100g.)
We decided on the number of loops for mittens. Look in the table and distribute the loops into 4 knitting needles, mark the beginning of the circular row with a marker, this is the beginning of the 1st knitting needle, there may be an uneven number of loops on each knitting needle, but it should be the same on the palm and back side, mark with a marker and the middle of the circular row. As soon as we went beyond the marker, we switched to the back of the mitten.

The table will tell you how many loops on the palm you will knit for the finger, from how many loops you will start to knit a wedge, i.e. the future palm, how many loops the thumb will consist of, how many loops to dial on the jumper of the 2nd and 3rd knitting needles. This is the junction of the circular row after removing the loops of the finger with an additional thread (connection of the 2nd and 3rd knitting needles).

Then knit with additions as many rows as in the original number of loops for the thumb. For example, if there are initially 10 thumb loops (no jumper), this would be 10 rows. Thus, as many loops as rows will be added to the wedge (palm).

After that, remove the loops of the finger with an additional thread and connect the loops remaining on the needles in a circle.
Then knit a mitten as usual, according to your length measurements.
Go to your finger. On the jumper, according to the table, you type the loops with a crochet hook without a thread, from what there is so that there are no holes, do not go deep into the mitten, it should be beautiful and imperceptible. Remove the loops from the thread to the knitting needles. Knit a finger along its length.