What kind of craft can be made from egg cassettes. Crafts from egg trays with your own hands. Master class from papier mache, plastic, foam. Photo of egg crafts
Paper trays for eggs only at first glance may seem inconspicuous and useless.
Don't rush to throw them away - use our tips for creating interesting crafts.
You can tinker with your children - it's not a pity to throw away the tray, even if it doesn't work out. And if you buy chicken eggs regularly, you can experiment with trays and get creative every week!


What can be made from egg trays
Consider some creative ideas for egg trays. Even a child can cope with them.
Garland with adorable roses
To create this craft you need:
- One or more egg trays.
- Glue gun.
- Christmas garland.
Sequence.
- We tear the tray with our hands into separate segments according to the cells in which the eggs were. It takes two cells to create one flower.
- Divide the resulting cups into four petals (you can make more). To do this, we tear off the cup, but not completely. It should look like a flower. We also cut off the petals a little at an angle to imitate the real ones.
- The box can be pre-painted in any color you like.
- To give the petals a natural shape, lightly moisten the edges. To do this, dip a soft-bristled brush in water and walk along the edge of the petals. It is important not to overdo it with liquid, otherwise the paper will soften and lose its shape.
- With our fingers we push through the relief of the petal from the inside. In this case, a groove is formed on the outside.
- We will fix the flowers with a glue gun. On the flower, between the two petals, tear the paper to the very base of the flower. We pass a garland through the slot and squeeze the paper back. Similarly, we tear the next flower and plant it on the previous one. The garland will already pass through two flowers.
- The garland light is already securely fixed, but we will additionally use glue. We put it on paper in the place where the garland passes, and hold it with our fingers for a few seconds. In order for the garland to be more airy, it is better to leave two or three bulbs between the flowers.
- When all the flowers have taken their place on the garland, we will decorate it with ribbons. Any pretty fabric can be used. We tie it with a knot or a bow - as you like.
VIDEO INSTRUCTION
Some helpful tips
- These roses can be used to decorate photo frames. It is better to paint the roses to match the color of the photo frame, or, conversely, to give a contrasting shade and fix them with glue.
- Roses are perfect for decorating napkin rings or cards for seating guests at the festive table.
Funny cardboard fish
Strong cardboard from the egg tray is useful for creating an unusual and very similar to a real fish.
For work you will need:
- egg trays,
- glue gun or glue crystal,
- scissors,
- pen,
- two black peppercorns.
Sequence.
- Cut off one cell from the tray with scissors. Then we need to round off the corners. To do this, draw a pen around the line along which we cut off the excess with scissors.
- We prepare 11-13 cells in this way.
- We glue the cells, inserting one into the other. You should get a little body with scales.
- Crumple one cell in half to get a tail. We make cuts on the tail with scissors.
- We make the tail from one cell. To do this, again draw a line with a pen and cut off the sharp ends of the cell along it, as in step 1.
- We glue the tail in the body. Glue the last row of scales to the tail.
- Let's use one more cell. Draw a dorsal fin on it and cut it out. We also need side fins. If you find it difficult to draw, use a picture of a fish - draw fins from it.
- We glue the fins and tail. We glue the eyes - peppercorns, draw a mouth with a pen.
VIDEO DESCRIPTION
Original photo frames
To create crafts you need:
- egg trays,
- cardboard,
- photo or picture,
- pen,
- scissors,
- glue gun.
Sequence.
- We prepare the base - for this we take rectangular cardboard. We glue a photo or image on it. There should be space around the edges - at least a couple of centimeters on each side.
- We cut the tray in the center of one of the rows with cells. Then we need to cut off the convex section of paper that separates the eggs from each other. To do this, draw a line on it outside with a pen, depicting a flower with petals. Cut off this fragment along the line. We get a small paper flower.
- Cut off a fragment of a tray with two cells, cut off sharp corners. We cut the cells together. Draw a flower with four petals inside one of them. The center of the flower should be at the very bottom. We cut it out. We get a flower slightly larger than in step 2.
- We glue a smaller flower into a larger one.
- Draw a circle inside one more cell, and in it lines from the edge of the circle to the center. Cut in a circle and make cuts along the lines, but not reaching the base. Glue the fragment inside a small flower.
- Draw petals on paper and cut them out. We cut a little along the edges so that it looks like a real leaf.
- We glue the resulting flower onto a cardboard with a photograph. We attach the leaves next to it. You can glue them along the upper and lower border of the frame, and place the flowers only in the corners.
You can also make several flowers of different sizes and place them close to each other in one corner of the frame. Another option is more flowers, but fewer leaves.
VIDEO
Useful ideas for home and summer cottages
The container for eggs will definitely come in handy both at home and in the country.
It can be used as:
- Bird Feeders - Simply add grain to the cells and hang the makeshift feeder from the string.
- Stands for small things - coins, hairpins, jewelry.
- Bouquet of artificial flowers - create flowers according to the first master class from our article, attach a stem to them, paint and put in a vase.
- Seedling Containers - Pour soil into the cells and plant the seeds.
- Craft boxes - paint the tray, lay out the threads, buttons, glue a soft pad to the lid from the inside for storing needles and pins.
- Containers for storing crayons - your child will be happy to lay them out on their own.
We hope that now you have no doubts that the egg tray can and should be used in the household!
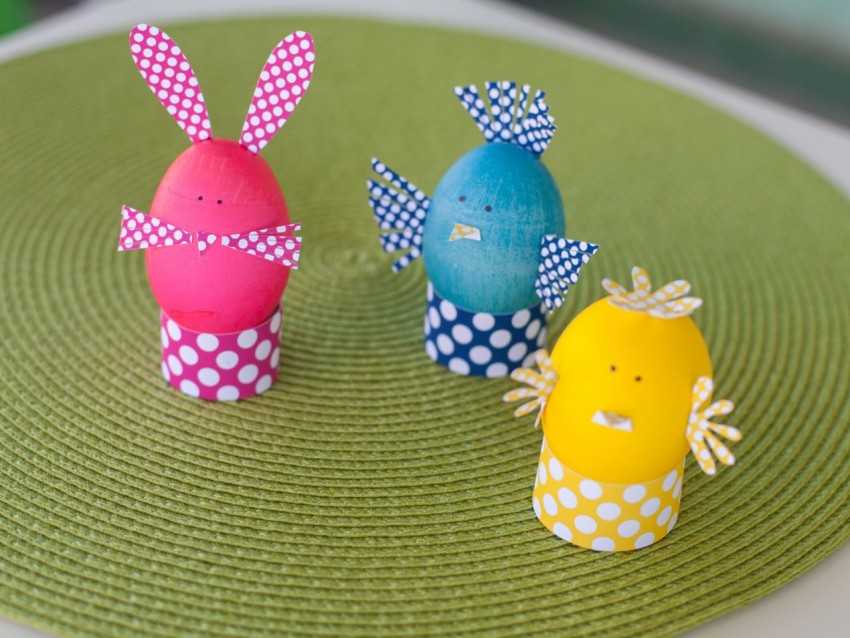
Every child loves to craft, creating original crafts using natural materials for these purposes. Of course, there is a logical explanation for this, for example, first of all, it should be noted that it is really more pleasant to work with them, they are accessible, which is important. For these purposes, you can use both cones and pebbles, certain plants, but of course, empty eggs, eggshells, creating a real work of art.
On the network, you can find many photos of egg crafts, which will allow parents to choose exactly the option that they will try to implement with their child. There is nothing difficult in this, which means that we put a little effort, you can always achieve the desired result.

As a rule, original crafts are really made from eggs, for example, it can be a parrot, a pig. As for the main material for such an activity, you can always find it in the refrigerator.

Craft "Chicken from an egg". Peculiarities
If you want to make an egg craft with your own hands, then know that there is nothing complicated here, you will need to take into account some useful recommendations.
First of all, you should prepare several raw eggs, yellow knitting threads, PVA glue, but of course wood skewers.


The egg can be pierced without much difficulty; for these purposes, a thin needle is used, which should be pierced first one, then the other side, blowing out the liquid contents.

Next, you need to cut the threads, doing this in a small way, smearing the egg with glue using a brush, and then sprinkle it on all sides with various threads, and you need to try to gently press them, then they can stick well.
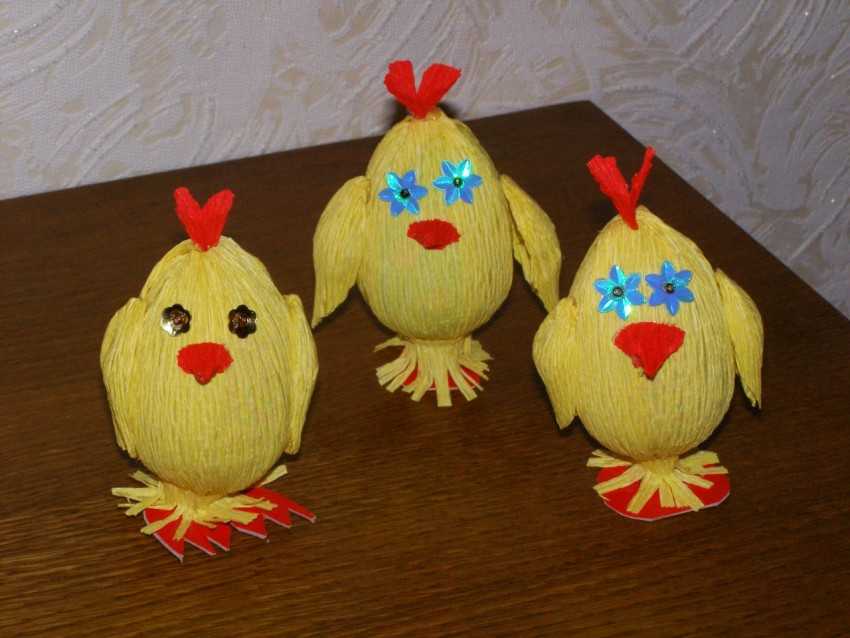
From the bottom of the egg, into the hole that you previously prepared, you need to carefully insert a skewer, if the hole is large, then try to grease the joint with glue, this will lead to the chicken being able to sit firmly on the skewer. A beginner's diagram is sure to help you avoid common mistakes, creating a craft without problems and difficulties.

Do not forget that you will definitely need to glue the eyes of the chickens - beads, beaks made of red cardboard. This is the final stage of making this craft, which means that you will cope with this work unambiguously.

It is worth noting that you can always decorate with such chickens an Easter table, a children's room. Such a simple instruction will always allow you to easily implement such ideas, you can not even doubt it.

Egg crafts for the little ones
As a rule, none of the children can refuse such an activity, since it is interesting and tempting. Therefore, parents must definitely provide him with such an opportunity, especially all the materials necessary for this work are at hand.


Parents can show a master class to a kid who will definitely fall in love with this process, and in the future it will turn into a hobby.

At the very beginning, you need to cook the paste, after which pouring into one plate, cereals into another plate. Also, the task of the parents is to show the baby how to correctly hold the egg.

Semolina, as you know, is white, so you can always add food coloring, glitter to it, but this is not necessary. As for decoration, you can do it in different ways, it all depends on your taste, preferences, and the wishes of the baby.

To please children, you can turn on your imagination and draw on eggshells, for example, funny faces, or you can come up with an interesting fairy tale about Easter men made from eggs. In any case, egg crafts always look interesting, original and unusual.

To make the child's wishes come true, it is necessary to take into account all the simple recommendations that were mentioned, and then the craft egg for children will be made in a short period of time, and you will be able to please your baby. To create it, you do not need expensive and supernatural materials, they are all at hand.


If from childhood you teach a child to make crafts from eggs, then it is possible that in the future he will engage in some other creative activity.


Photo of egg crafts


The papier-mâché technique is in great demand not only as a way to create beautiful crafts, interior items, but also as one of the types of processing of outdated newspaper publications and egg boxes. This skill is now very common, it is used in educational institutions, including kindergartens. The created products are durable, smooth and resistant to weather conditions, so they can be placed in rooms, left outside, as an element of the decor of the courtyard of a private house or garden.
The technique involves the use of two methods - pasting a certain base with newspaper pieces or modeling from a special mass. In this case, egg trays are often used. Collecting them, you can make a large enough sculpture for a winter or summer garden. And all you need is egg trays, water, glue.

PVA is the most common option. Its advantages include ease of use and the ability to form a waterproof film on the surface of the craft. This allows in the future not to use varnish to cover the surface and to expose products to the street, without fear that they may be deformed.
Wallpaper glue is often used by craftsmen.
But for papier-mâché, it should be slightly diluted with water. Crafts made using such an adhesive will not be "afraid" of mold and mildew.
If it is not possible to purchase glue in a store, you can weld a well-known and affordable paste at home.
With the help of cheap components, especially egg trays, which are almost always thrown away, you can make any gizmos, decorate your living room, nursery, kitchen with them. Often, with the help of this technique, craftsmen create beautiful sets for decorating the kitchen, table lamps in the form of fairy-tale characters, or Egyptian cats for decorating the living room.

A feature of the technique and the main key to success is the accuracy of the sculpting. One of the important factors is to allow every piece of the craft to dry well. In this case, it will not fall apart and will not change over time.
Papier-mâché master class: flowers
You can make beautiful flowers with glue and egg trays.
This will require:
- 5 egg trays;
- Water;
- Scissors;
- PVA glue;
- White acrylic or gouache;
- Thermal gun;
- Thick wire (will act as a stem for a flower);
- Paints, brushes.
- Colorless nail polish.

Depending on how many flowers you plan to make, you will need a certain number of wire pieces. There can be 3, 5, 7, 9, 12 - as many as you like. By the way - for flowers, you can make a beautiful vase using the papier-mâché technique.
An adhesive is preliminarily prepared: egg trays are soaked in warm water, after swelling, the water is drained and PVA or paste is added. The composition should have a consistency not liquid, but also not thick sour cream.
First of all, you need to stick the composition onto the wire. Moreover, if you plan to make a rose, it is immediately necessary to mold the stem with thorns. Leave to dry completely.
Flowers and leaves are made using the sculpting technique. They can be of different sizes, curved shapes or have smooth outlines. To understand how to mold them, it is enough to remember how plasticine crafts are molded. The technique is identical.

All parts of the flowers are covered with white. It is better to give preference to gouache or acrylic coatings. Any paint is then easily applied to them. After drying, the parts are painted in the corresponding colors: green - the stem, red, orange, yellow - flowers, depending on which type of flowers is chosen.
The buds are attached to the stems with hot melt glue. Finally, the surfaces are torn with a colorless nail base. Butterflies and ladybirds can be placed on flowers.
Papier-mâché decor elements using egg trays (video)
Papier-mache for the garden
Hedgehog. A hedgehog will look beautiful and original in a garden with flowers and to make it, you do not need expensive components. A papier-mâché hedgehog for the garden is a wonderful decor element. A whole family can dazzle them. The main thing is to show your maximum imagination. An ordinary light bulb is taken as the basis for a hedgehog, because it resembles a hedgehog in structure. But, it is possible to make an animal by sculpting from a mass of papier-mâché (egg trays, water, glue).
If the method of using the base is chosen, then the lamp is pre-oiled with oil so that it is not difficult to remove it later. Things will go faster if you have two bulbs at hand. The composition is applied to half of the base, and you immediately need to form the animal's face and thorns. After drying, the halves of the future craft are removed, glued together "Moment". Legs are made of the adhesive.

The craft is covered with acrylic and painted in the appropriate color. The eyes and nose are drawn with a marker.
Dwarf. Thanks to the papier-mâché technique, the craftsmen make the most interesting compositions. And in the event that there is artistic talent, then there is an opportunity to create large sculptures for the garden, for example, a gnome. Of course, it will take much more time to make, because street gnomes are quite voluminous sculptures. And here it is important that every detail dries well for the strength and strength of the structure.
Will need:
- 5 liter empty plastic container (trunk);
- Balloon or ball (head);
- 30-40 egg trays;
- Water;
- PVA glue or paste (about 1.5 l);
- Paints and brushes;
- White enamel;
- Colorless varnish.

A plastic container and a ball are covered with a mass of papier-mâché. After drying, the bases are removed, and the cut halves of the torso and head are glued together. A mass of papier-mâché is connected to each other. The face and hands are formed from the adhesive. After a while - the rest of the parts - headdress, fingers, legs. After drying - cheeks, nose, eyes, beard. There is nothing difficult in this, the most important thing is that the material should dry well, so there will be a lot of it and if this rule is violated, the sculpture will "float". You can make a gnome for the garden in different poses - he can sit, stand or look out, here as your fantasy tells you.
If you want to be creative, but the thought of the need to buy some special or expensive materials stops you, do not be upset, but just look around. Even simple and seemingly useless items such as egg trays can serve as material for numerous creative projects.
This article will show you what crafts can be made from an egg tray.

Flowers from egg trays
Crafts that you can do with your own hands from egg trays are very diverse. One of the most beautiful and easy-to-execute options is flowers.

Draw lines with a pencil on the calyx of the egg tray and carefully cut out the calyx of the flower. Trim the edges of your bud.


Use acrylic or gouache paint to paint the resulting flower buds. Spread out the petals, giving them the shape of an opening flower.

Use straws to make the stems. Make two holes in the resulting bud, and attach it to the "stem", then thread the wire through the holes. You can attach the bud to the stem with a glue gun.

Decorate the stems by wrapping them in green paper or cloth and cutting out the leaves (it's best to do this from green cardboard or tissue paper).

Laminate the stems and buds with a special varnish or several layers of PVA glue. Decorate the resulting flowers with sparkles, buttons or rhinestones of your choice.

You can also decorate boxes, photo frames and other similar trinkets with ready-made flower buds made from egg cells that are not attached to the stem.

Egg Tray Cockerel
If you want to do something even more original and unusual, then this master class of crafts from egg trays will be of interest to you:
- To make a cockerel, you will need egg trays with long elongated partitions. Carefully cut off the partitions and make even cuts on all four sides.
- You should have four-leafed buds with sharp petals. Cut the buds on one side along the line between the petals.
- Take a strip of thin paper, spread it with glue and connect two blanks with it, sticking it on the inside. You should have a bud with eight petals and a hole in the middle - these are blanks for the neck and head.
- Cut a triangle out of the sides of the litter box and bend it in two places to form a beak for the cock. Use paper and glue to make a beak - you should have a three-sided pyramid.
- Cut feathers for the cock out of thick cardboard - they should look like sharp on both sides, curved blades.
- Cut a scallop out of thick cardboard.
- From the egg tray, cut the barb out for the cockerel. Draw two fused ovals on the inside of the tray, where the two egg grooves meet, and cut out the blank.
- Form the head of the cock from the comb, beak, beard and neck blanks.
- Cut out the blanks for the drop-shaped wings from thick cardboard.
- Cut out feathers from the walls of the tray - blanks elongated and pointed on both sides.
- Glue the feathers onto the cardboard blank of the wing, forming the plumage in several rows.
- Inflate a rubber ball and cover it with a thick layer of PVA glue-coated newspapers.
- After the balloon is dry, cut it in two - one of the pieces that we will take for the body of the cock should be larger.
- Glue the tail feathers on the back and wings on the sides. Glue the cock's head on the front of the ball-shaped bowl.
- Now the fun part is coloring. Color the cock according to your imagination.
- The cockerel is ready. It will be an excellent decoration for the Easter table and an original bowl for eggs.


Mass for papier-mâché from egg trays
Egg trays make an excellent mass for papier-mâché crafts. Soak pre-cut and crushed egg trays in warm water. After they swell, drain the water and add PVA glue or paste. The resulting mass should look like a not very thick sour cream.

To form various kinds of figures and crafts, the mass must be applied to the wire composition and left to dry completely.

What are egg trays papier-mâché crafts good for?
A properly made papier-mâché mass is perfect for creating garden figurines. Covered with PVA glue or special varnish, they will be durable, as if made of clay, and can delight you for a long time, decorating the flower beds of your garden.


Also, decorative objects made of papier-mâché, such as frames for photographs and paintings, dishes, flower vases and figurines, are perfect for decorating the kitchen, nursery, living room and bathroom. Made with love, they will create coziness and delight the eyes of the hosts and guests for many years.

Photo of crafts from egg trays


To make a flower garland, you need a couple of trays, a glue gun and a New Year's garland.
Process of creation
Two cells are enough for one flower, so it is necessary to break the tray into separate boxes. We divide each one into 4-5 petals, tearing off the cup, and to create the look of a real flower, we cut them off. So that the flower is not colorless, pick a color and paint the whole box with it.

Wet the edges of the petals with water using a brush, the natural shape of a flower will appear. But you can't overdo it, otherwise the paper will turn sour and everything will deteriorate. To form a strip on the front side, press your hand against the relief from the inside.

A glue gun is needed to fix the flowers, for this we tear the paper almost to the center and insert the New Year's garland, and glue the edges back together. The second flower is made in the same way, but with a connection with the first. It turns out that the garland is threaded after 2 flowers.

To add volume and airiness, it is necessary to leave 2-3 free bulbs between the flowers. After all the roses are fixed in place, add some decorations in the form of ribbons tied with a bow or knot.

This type of flowers can be used in other ways, for example, in the design of picture frames. There are two options: flowers in frame color or contrast color. We attach the roses to the frame with glue. They are suitable for decorating various coasters on festive tables.

Wonderful cardboard fish
A cardboard tray can be a great base for a lovely and fun fish. Prepare some trays, a glue gun, scissors, whole black pepper, and a pencil.

Cut off only one cell from the entire tray, on which we round off the corners. For smoother corners, circle with a pen and cut along the contour. You will need about twelve of these cells. The scales are made as follows: we take 1 cell and insert it into 2, so do with the rest.

We leave one cell for the tail, it must be folded in half and cut with scissors. The part for the tail is made from one cell from which the sharp ends are cut along the drawn line. And then we place it in a body with scales.

We will make a dorsal fin from one more cell; for this we need to draw the fin itself with a pen and cut it out. The side fins are made in the same way: draw and cut. You can use a drawing from the Internet to make them look very beautiful and believable.

There is very little left, to connect the body of the fish with all its fins, glue the pea-eyes and the image of the mouth.

Egg tray frame
The materials for making crafts are egg trays, a glue gun, a photo, a pencil (pen), cardboard and scissors.

Manufacturing process
A rectangular piece of cardboard will be used for the base of the craft. We take the image (photo) and use a glue gun to connect it to the cardboard. A couple of cm must be left on each edge of the pasted picture.

Now we take the egg tray and make a cut in the middle, with which we divide it in half. The upper convex part must be trimmed along a contour line that resembles a flower. The result is a small paper flower. Then we cut off two cells from the common tray, get rid of sharp corners. Separate the cells from each other and inside one draw a four- or five-leafed flower with a pen. At the very bottom, the center of the flower should be located, cut it out with scissors. As a result, the flower is larger than the first.

The next step is to glue a small flower with a large one, in the next cell we draw a circle and lines from the center to the edge, cut it all out together with the cuts. Glue the resulting part inside the finished flower. We also make petals from a cell using a contour drawn with a pen. To make it look like a natural leaf, we cut the edges with scissors and can be moistened with water.

The final step will be to glue the finished colors onto the cardboard with the image with a gun. We glue the leaves, pressing them tightly to the flowers. The location of the finished figures depends only on your imagination: above, below, on the sides, in confusion and so on. You can also make a frame out of some flowers, or vice versa, only leaves. Flowers can be made in different sizes, with a different number of petals.

Options for decorating your home, garden and cottage
You can find use for unnecessary old egg trays anywhere in your home, garden and summer cottage. Here are some examples of how you can use them:
- bird feeder, pour different grains into each cell and hang it on a tree by a string or rope;
- piggy bank for items: coins, jewelry, pebbles, shells;
- a beautiful bouquet, according to the schemes from the Internet, make several flowers, paint at your discretion, make a stem and leaves, place in a decorative vase;
- boxes for future seedlings, take soil and plant seeds in it;
- a decorative box for your hobby, paint it in various colors, glue buttons and beads, make a lid;
- a box for your child, you can put crayons, a designer and other small parts in it, which can be laid out in separate cells.

We are finishing our article, it seems to us that now you will change your mind about throwing away things that can play a decorative and useful role. Egg trays have many uses, the entire creative process can interest both the adult and the child. When the final work takes its place in the interior, it will become clear that the work was not in vain.