How to sew Christmas tree decorations from felt. DIY felt Christmas toys DIY felt Christmas toys step by step
Click Class
Tell VK
Greetings, my dears! We continue the magical theme of preparing for the New Year. Let me remind you that we previously made and considered. That's not all, and today we are figuring out what kind of New Year's toys you can make from felt with your own hands. This material is accessible and easy to use, so even a beginner child can handle it.
It is not expensive and comes in many shades. And what kind of crafts they can come up with just from it. Last year I wrote and gave patterns for different ones.
Today we’ll look at Christmas trees, fawns, mittens and other New Year paraphernalia. Of course, let's pay attention to the symbol of 2019 - the pig.
Let's talk a little about the nuances of working with this felt:
If you decide to sew all the details, then let's look at what types of seams there are.
You can see that the edges of the crafts are beautifully finished. This can be done either by machine or by hand. If you prefer the latter option, then here is a loop stitch for you to consider.

You can also see that the internal parts are finished with a needle-forward stitch.

Or “over the edge.”

The “chain” type of seam looks beautiful.

Of course, some even embroider with satin stitch on their products, but the seams listed are enough for a novice craftswoman to create a very beautiful craft.

So, we considered the types of seams in advance. Practice them a little, but don't put off creativity until later. After all, initially the toy can be glued together.
What simple and easy thing can inexperienced craftswomen or children make? In my opinion, snowmen, mittens, balls and Christmas trees are the most suitable options.
Here is an idea of where the parts are glued.

Well, let's continue about snowmen. First, a few simple ideas for inspiration, and then step-by-step master classes.

Here we will use a buttonhole stitch to join and finish the edge.


Now let's look at the master class itself on how to make such a cute snowman face for the Christmas tree.
Master class No. 1. Snowman
You will need the bare minimum: three sheets of felt in white, red and orange colors; scissors; threads; filler; decor.
Cut out 2 ball parts from a white sheet (you can use a cotton pad as a template). On the face we draw or make little knots of eyes and a mouth. Glue a carrot from orange felt.

Let's cut the hat, we need two parts. Its length is equal to the diameter of the face. We glue 1 side of the hat onto the blank with a face, and glue the second side onto an empty white round blank.
Now we put a loop of ribbon or thread between them and sew the edges with a buttonhole stitch. We leave a small part unsewn to fill the toy with filler. Then we sew up the edge and decorate the craft.
Master class No. 2.
Another simple step-by-step master class. All steps are shown in the photo instructions.

If you are not yet very confident in your abilities, then choose simple shapes - a ball, a triangle, a heart. Already from them many ideas for creativity come out - take a look.


Master class No. 3. Christmas tree
These holiday trees are also very simple. But let's look at how to make such a craft.
So, we will take felt, a triangular paper template, curly scissors, pencil, filler, thread and needle and decor.
Transfer the template to the fabric. We cut out two parts with curly scissors.
On the front side we make knots for beauty. You can replace them with decor. Then we connect both parts with a “forward needle” seam, after inserting a loop of ribbon or cord inside. We leave the very bottom unsewn and stretch the filler there. We sew the cut and enjoy the craft.


Let's also watch a video that shows step by step the entire process of making the simplest toys.
I think that almost every person can follow the actions of the craftswoman.
Master class on making three-dimensional crafts “Ball”
Now we will greatly complicate the task so that you don’t relax. Let’s take and sew soft three-dimensional Christmas tree balls for decoration. They can act as pillows and even...

Let's take: thin felt, threads.
The pattern is attached after the description of the work process. There are two schemes for the ball: large and small.
So, we transfer the selected pattern onto the fabric and cut out the details. You need to take 6 pieces. Then, from the wrong side, we sew all the blanks with threads, leaving a space on one edge.


We turn the part right side out and fill it with holofiber or padding polyester.

We cut out the remaining parts from the pattern from silver fabric and make a pendant for the ball. We sew all the blanks together and fix them on our three-dimensional craft. Use a cord as a hanger.

Patterns for the ball. 


That's all. You can repeat this craft from different types of fabric.
New Year's toys "Christmas tree" for children, master classes
Christmas trees are also quite simple to make. And they have many configurations, decoration ideas.
for example, you can make a craft with eyes, or with arms, legs, a hat, etc.
Master class No. 1. Christmas tree with eyes
Using the instructions below you can make such a beauty.

For naughty crafts, you need to take green and brown felt sheets, stuffing, scissors, a pattern and decorations.

So, we cut out two identical parts. We decorate them with thread knots, crosses, and stars. We sew on the eyes and mark the mouth with a “Forward needle” stitch in one thread. Now we sew the edges together using a buttonhole stitch or “over the edge”. We fill the toy through the barrel and close this hole with threads. 
Pattern - A tree made of parts. All branches are marked with numbers, so you don’t get confused, you need to cut 2 pieces of each part.

Master class No. 2. Simple Christmas tree
Here is a very easy toy idea. Cut out a four-pointed star and sew the rays together. Fill the craft and decorate it with decor.

Master class No. 3. 3D Christmas tree
How to make a tree for decoration? Yes, just my dears. It is important to see the entire stage of work just once.
Two identical parts are cut out. Then cuts are made. One side has the top exactly to the middle. The other side goes exactly to the middle, but from below. The blanks are inserted into these cuts and the tree is almost ready.


Decorate the branches and praise yourself for their beauty.
Master class No. 4.
Another step-by-step instruction. Shown in great detail.

Master class No. 5. Garland
Here we show you step-by-step how to make a multi-colored felt garland. I think there is no point in explaining here, everything is shown very clearly. To ensure that the cord that connects all the parts is not visible, use two sides of the Christmas tree. Pass the lace through them and seal the edges. This will work out very neatly. 
Patterns


A very unusual craft made from different types of felt. The diagram is attached.


Master class No. 6.
Another detailed master class. Let's take: felt, threads, filler, decor and ribbon.

Using this pattern, we will cut out two parts from the fabric.

We decorate both sides of the pendant with knots or decor.
To one we glue a ribbon or cord folded in half.

Cover this side with the second piece and sew the edges. We push the filler through a small hole and stitch the edge. 
Using this scheme, you can make many variations of toys. Look here, there is a machine seam.

But here it comes manually. 


You can combine colors to get a more unusual craft.


Flat toys also look interesting. You only need to decorate one side of the workpiece.

Buttons look interesting on such homemade trees.


Here is a diagram of a funny Christmas tree made from two types of felt.


You can even make toys on a leg, in the form of a topiary.


Show your imagination and sew to your heart's content! 

Cones make such a wonderful thing for design and decoration.

A few more types of crafts for inspiration.


Not difficult right? I think it’s important to understand the whole process, and only then look at the details that have already been implemented.
How to make a soft angel and New Year's gnomes
At Christmas it is customary to give angels and, for some reason, gnomes. Well, let’s support this idea with our creativity. Using the pattern below, you can make different configurations.

Pattern.

That's how lovely it turns out.

Of course, this is a difficult option and requires skill and diligence. But there are also simpler ideas.

Now let's move on to the gnomes. We also cut out two pieces for each part. We sew them together and fill them with cotton wool. There are only three important elements: the hat, legs and body.

See how you can decorate your home with garland this Christmas. The diagram is attached.

Another template that you can use to sew such funny helpers .


Garland idea.
Well, some gingerbread men for inspiration. Of course, they are also made of felt.

You can add wings to them and you will also get very cute angels.
Stencils and patterns for New Year's toys in the form of mittens
No winter would be complete without mittens. We always need these helpers. Therefore, you can make a toy in this simple version.

Scheme for crafts with a snowman.


Flat idea of mittens and felt boots.

In general, the mitten pattern is very simple, but I’ll give you a couple more. 

Use the one that is more convenient for you.
Simple craft “House”
Of course, fairy-tale houses where comfort and festive mood reign! This is also a great idea for a craft! You can use any templates. The basis, of course, is a square and a triangle for the roof.

Houses can be fantasy and fairy tales, but we believe in magic and fairy tales.

Yes, contrasting colors harmonize very well with each other.

Use sequins, beads, beads as decoration.
I provide a template according to which you can create an entire composition.
And here the fairy houses with rounded corners look very cute.


I think that such a toy will not leave anyone indifferent. My hands are just itching. sew something already.
New Year's felt toy "Santa Claus" with patterns and diagrams
You can't go anywhere without Santa Claus. We look forward to it every year since childhood. We are waiting for gifts and embodying his image in crafts.
There is a scheme for such a good fellow.


And there is a template for this.


This old man is very easy to make.

The European Santa Claus is also familiar to us.

Idea for kids with glued parts.

Three ideas from Morozushki at once. They differ in the shape of their hats and beards.
It’s not a shame to put them under the Christmas tree next to them.
Schemes and templates for New Year's boots
The idea of putting gifts in felt boots, socks and boots came to us from the West. And it really caught on. Moreover, this symbol of New Year and Christmas is very bright and funny. You don't see it on store shelves every day.
Here is a diagram of a gnome boot with cuffs.


And here is a felt boot with Morozushka.
Step-by-step diagram for making a boot with a snowman.

Using the same scheme, you can make such a boot, only with a different decor.

In general, it showed the direction of thought. All you have to do is a flight of fantasy and its implementation.
Patterns of the 2019 symbol of pigs and piglets
I decided to give you a couple of piglet patterns. This is the symbol of 2019. And they themselves are very cute little animals. Especially if they are made of fleecy felt.


I thank all the masters and craftswomen for sharing their works! Thanks to their golden hands, we can create on our own without worrying about making templates and stencils.

Who decided that the pig had to be pink? And we'll make it green!

Of course, these are not all the ideas, but these are the simplest and cutest ones I've ever seen.
Master classes “deer” made of felt for school
Have you been given an assignment at school? Make a craft for the New Year. Of course, someone will run into the forest for pine cones and branches. And you and I will take felt and make it. Let's make it with Santa Claus and a deer. Teachers will definitely love this craft.


Well, if you are not afraid to start a real soft toy. So I propose such a deer as an idea.

To decorate a class or group in kindergarten, make these beauties.


Kids will love smiling crafts with bright accents.


Another Bambi idea.

Many small figures make an excellent garland.

Another detailed pattern with a diagram of how the parts are connected.

We definitely won’t pass by such sadness.
Another idea with a deer.

In general, animals are also a great theme for New Year’s decor.
You need a lot of perseverance and patience. After all, if you sew the seams manually, then you need to maintain the distances between the seams, then the craft will turn out neat and decent.
Felt Christmas toys
Why buy toys when you can decorate the Christmas tree with homemade crafts. Believe me, it will not look old-fashioned, but will only emphasize your individuality. A skillfully made piece of jewelry will raise many questions and admiration.

Different types of bells, stars and other ideas will significantly lift your mood.
Here is a detailed diagram for making a bell - a snowman. I really like her.

And in general, snowmen are an excellent and not at all hackneyed decoration idea. 
Penguins, northern bears, they can also be used for a winter theme.
A few more simple ideas. I won’t give the diagrams here, they are all in the article. And they can easily be drawn with their own hands.


A small master class on a Christmas ball with a little fox and a fawn. All parts are glued together.

Winter hearts are also relevant for pendants.

More ideas for creativity.


Many schemes and templates of New Year's symbols.


The snowflake pattern will decorate any craft.
Buttons and ribbons will add personality.

The idea of a glass of champagne will not come to everyone’s mind either.

Here is a detailed master class on making a colorful ball for a Christmas tree. We used felt in two colors.


Of course, we can’t do without stars and snowflakes. Make backings and colorful parts. Using just one template you can make an endless variety of crafts.


Flat stars, without filler, can be decorated with beads. It will look very impressive.

You can also play with the shapes of the snowflakes!

Thank you for your attention. My task was to inspire the creation of crafts and show how many interesting things can be created, and to instill a love for felt in children. After all, this is a wonderful and simple material for creativity.
Tweet
Tell VK
We bring to your attention some simple ideas for making Christmas toys from felt with your own hands. We chose three New Year's symbols that are not usually toys and made Christmas tree decorations out of them. These toys will become a bright accessory on the Christmas tree and will leave pleasant memories for a long time.
New Year's felt candy
First we will sew a toy, which we call a New Year's candy. We will need:
- Red beads and seed beads;
- White threads;
- Filler;
- Needle and scissors.
Let's start by cutting out the pattern of the future toy and tracing it on felt. We will need two white parts mirroring each other and one red part. We will make leaves for decoration from green felt.


We work very carefully on red felt, trying not to leave pencil marks. We need the part to remain clean on both sides. Then we cut the red part as shown on the pattern. Take your time and cut carefully. Try not to mix up the pieces, so as not to assemble them like a mosaic later.

Let's start stitching. Let's start at the bottom end of the caramel. We take the parts made of white felt and fold them inside out to each other, then, in the third layer, we apply a piece of red felt corresponding to this fragment of the product, and sew them together with an overcast stitch. 


When we come to the end of the red fragment, take the next one and apply it on the other side.


We continue to sew our caramel. Don't forget to apply the red pieces, one at a time, from different sides. As soon as we reach the end of one piece, we take the next one.
Having finished stitching on one side, we proceed to the second side of the toy. The red parts are already all sewn into place and all we have to do is sew the edges and add filler inside.

It’s better to add filler gradually, sew a little, stuff the stitched piece, and so on.

When the New Year's felt candy is completely sewn and stuffed, we begin decorating.

We take our green felt leaves, fold them into a fan, fasten them and sew them to the caramel just above the middle. Sew the leaves together very carefully; the felt at the ends is very thin and can be damaged.

After the leaves are attached to the toy, we take beads and seed beads. We string one bead and one seed bead onto a thread.


Then we thread the thread back into the bead and secure it to the product. Before fastening, check the thread; it may have twisted under the bead. You need to sew the bead so that the fabric is adjacent to the felt. Beads will not only add beauty to our toy, but will also hide the stitches with which we sewed the leaves.

We do the same with the rest of the beads. Finally, we attach a loop to the finished caramel, using it we will hang the toy on the New Year tree.

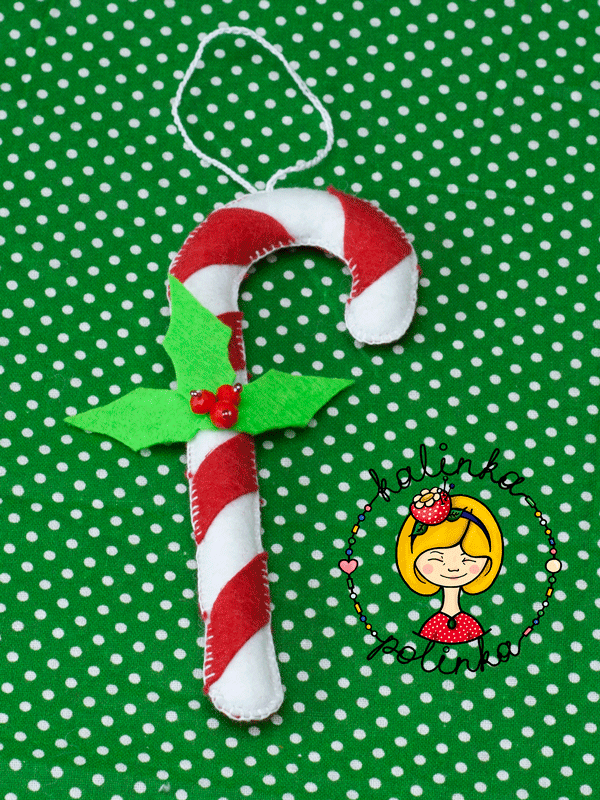
The felt Christmas candy is ready and will be a wonderful decoration for your holiday tree!
Felt mitten
To sew mittens we need:
- Felt in red, white and green;
- Red beads and seed beads;
- White and red threads;
- Filler;
- Needle and scissors.
First, as usual, we prepare the pattern (the pattern is at the end of this article). You can print it out or redraw it, then glue the pattern onto cardboard and cut it out. We apply the finished pattern to the felt and trace it. To transfer the pattern, you can use a chalk or pencil of any color, the main thing is that all traces remain on the wrong side. Of course, you need to be careful with white felt; marks can show through it.

When all the details of the mitten are cut out, we begin sewing. First, let's sew the white parts to the red ones. To do this, we use a regular basting stitch. Make small stitches, at a short distance from each other, so they will hold the parts together more firmly and will look more beautiful on the finished product.


Now let’s immediately sew our decoration onto the front part. We take the leaves, arrange them like a fan, fasten them together and sew them onto the mitten. When fastening the leaves, be careful not to overdo it. When sewing thin parts, felt can fluff or stretch, this spoils the appearance and strength of the product. For example, a carelessly sewn leaf may simply fall off over time.

Sew on the beads. After attaching the leaves, we do not break the thread, but simply bring it to the front side of the mitten and string the bead. After the bead we string a bead. We tighten the thread so that the bead fits snugly on the felt, and thread the corner with the thread back into the hole of the bead. Thus, the thread passes twice through the bead and once through the bead.

Now we fold the front and back parts of the mitten, with the wrong sides facing each other, and begin to sew. Sew along the edge with an overcast stitch. Try to make small stitches evenly spaced apart. Start sewing with the red parts, and when the red parts are sewn, fill the mitten with holofiber or padding polyester. Any other filler you have will do. We don’t stuff it too much, just to give our mitten some volume.
We change the thread to white and begin to sew the remaining upper part. Add a little more filler so that it is evenly distributed throughout the toy, and finish connecting the parts.

We attach a rope to the top part, in the middle, so that we can hang our New Year's toy on the Christmas tree.

The New Year's felt mitten is ready!

Felt boot
The process of creating a boot is similar to making a New Year's mitten.
We will also need
- Felt in red, white and green;
- Red beads and seed beads;
- White and red threads;
- Filler;
- Needle and scissors.
Cut out the pattern. You can change the dimensions of the pattern and make the boot the size you need: small, like a decoration for the Christmas tree, or large to put a gift in it. You just need to change the scale when printing the pattern. Don't forget that the details of the boot should mirror each other.

Sew the top white parts of the boot to the red ones. We use a basting stitch.

We decorate the front part with felt leaves and beads. You can place the decorative element according to your taste: at the top, bottom or even on the toe of the boot)


First we will sew the red part. Start from the top and move to the toe, it will be more comfortable. After the sock is sewn, we will add filler to it and continue connecting the two parts of the boot.

Then we change the thread and move on to the white part. If you are making a large boot for a gift, do not sew up the top part. Just finish the edges along the top with a blanket stitch, without joining them. If you are making a New Year's toy, when you finish sewing, attach a rope or ribbon at the top.

Now we can decorate the holiday tree with wonderful Christmas felt toys!


For convenience, we have prepared a kit for sewing felt toys. You can buy it by clicking here.
Have a great mood and creative success!
The material was prepared by Marta Lunkova, an employee of the KalinkaPolinka campaign.
Felt Christmas decorations are so adorable, charming and cute that you can't help but use this idea for your Christmas tree decorations and home decor! If you have not yet figured out how to make new Christmas decorations for your home this year, then read this article - we have selected some of the most colorful and bright ideas for felt crafts that are easy to make with your own hands and decorate the walls in the house, windows and New Year's Eve. Christmas tree In this article you will find templates and stencils for various felt Christmas tree decorations and other crafts, as well as a selection of photos that will undoubtedly inspire you for some holiday crafts.

What is the most popular Christmas decoration? As a rule, these are banal glass Christmas tree decorations and New Year's decorations made of plastic or other materials. These toys can be found in almost every home, but we all agree that monotony can be very boring. If you see the same Christmas decorations on your tree and the walls of your house every year, then the holidays become too similar to each other. Why not diversify the decor of your apartment with new crafts?
Read also: DIY New Year's crafts.

Jewelry, since it has no practical use, is a pure expression of your creativity. They should be fun and add a cheerful feel to the home. New Year's decorations made of felt will add a touch of warmth and comfort to the holiday atmosphere in your home, they are completely safe for small children, and you can use them for various home decor - these can be Christmas tree decorations, New Year's wreaths and felt garlands, wall decorations, little things for festive table decoration and more. You can also make fantastically chic Christmas boots, cute decorations for the mantel, chairs and tables, chandeliers and so on. The list can go on forever! Miniature, original and funny - these decorations will create a New Year's holiday atmosphere in your home. You can decorate New Year's gifts for your friends and children with felt - for decoration, you can decorate gift wrapping and New Year's gifts made of felt with rhinestones or original homemade ribbons, buttons and everything that comes to your mind.
New Year's decorations made of felt - create a colorful and joyful holiday!

Felt Christmas decorations can be a very pleasant surprise for your family and guests. Felt is a specific fibrous material that is known for its strength and durability. There are different types of felt, and they differ in the texture and thickness of the fabric. In addition, felt can be found in a variety of colors, from which you can create the most original and unique Christmas decorations. Felt is perfect for decorating a home or apartment and is ideal as a material for Christmas tree decorations and other New Year's decorations.

How to make a unique Christmas decoration from felt? Those who are attracted to home decor with homemade Christmas decorations and Christmas tree decorations will need some additional materials and some free time. Instead of spending money on Christmas tree decorations, you can use this time freed from shopping in search of original decor for fun crafts like these. By the way, keep in mind that making these Christmas crafts is fun and suitable for children of all ages - young children can use glue instead of a needle, while older children can create their own patterns, even small gifts for their friends , teachers or grandparents. Why not make New Year's felt crafts with your children?
Read also: New Year's cockerel made of felt and other materials.
What do you need to make felt Christmas decorations?
- stencils of different shapes (snowflakes, snowmen, Christmas trees, etc.);
- felt of various colors;
- scissors;
- pencil (to draw a stencil on fabric);
- threads and needles;
- wool, cotton wool or other materials for filling crafts;
- Beads, buttons, ribbons and other materials to decorate your felt jewelry.

You can buy almost all of these materials at any craft store, and once you have selected a suitable stencil and template, colorful scraps of felt and little things for decoration, you can start making your own felt decorations in the New Year. First you will need to transfer the design from the stencil onto a piece of felt. It's very simple: the stencil is placed on top, and you carefully trace the contours. After this, the drawn parts are cut and sewn together. You can do this by hand or using a sewing machine. When connecting two parts with an ornament, you need to leave some space to fill it with cotton wool, wool or some other suitable materials if you are making a voluminous felt craft for the New Year. After your ornament is ready, you can decorate it according to your taste and imagination. Use these fantastic felt Christmas decoration ideas below and easy instructions to make unique holiday decorations.
How to make Christmas garlands from felt?

One of the easiest ideas for felt Christmas decorations is to make a garland. Firstly, it’s relatively quick and easy, and secondly, it’s a great idea for decorating a child’s room or bedroom. A felt garland will not lose its shape, it will not wrinkle, it is difficult to tear, and you can use numerous options - these can be Christmas trees, balls, snowflakes, mittens, boots, etc.
Read also: DIY New Year's garlands.

Making garlands is much easier than sewing toys: you just need to cut out beautiful Christmas themed designs from felt and attach them to a ribbon. You can use just one color or make a felt garland of different colored elements. The easiest way to make a felt garland is to cut out many circles of bright colors and sew them on a sewing machine, leaving space between the figures. What shapes can you cut out of felt: hearts, snowflakes, stars, tiny socks - anything that you can easily draw on the fabric yourself. You can use the felt garland as wall decor, a fireplace or chandelier, or hang it on your Christmas tree. To make the garland more colorful, you can combine felt crafts with elements from another material - large beads, bells or even glass decorations. You can cut out the same shapes or combine different options. If a garland of snowflakes seems too monotonous to you, dilute them with silhouettes of Santa Claus, New Year's gifts, deer, stars and other elements. This composition will be an excellent decoration for walls or windows for the New Year.
Felt decorations for the festive New Year's table

By decorating the table for New Year's dinner, we add a festive atmosphere to our home. And since felt is a strong, durable material, you can use it to make a wide variety of decorations for the holiday table - from small felt Christmas trees for the center of the table, to decor on napkin rings, coasters and cutlery holders. These great felt craft ideas can also be used as a cute Christmas gift for your guests.
Unique DIY felt Christmas tree decorations

And the last thing we'll look at today is lots of ideas for felt Christmas tree decorations. There are so many great ideas on how to decorate your Christmas tree in the most original way. Remember that making Christmas tree decorations is one of the fun Christmas activities for kids. How to make a felt Christmas tree? Cut star-shaped pieces from green felt. Then stack them together and glue or sew them together. All that remains is to add a star to the top of the tree and your felt toy is ready - you can hang it on the New Year tree.
Read also: DIY felt crafts for home decor.

New Year's flat balls for the Christmas tree, made of felt, look very original. You can use sparkles, beads, satin ribbons to add more glamor and brightness to the craft.

Here's another simple idea for felt Christmas tree decorations: Cut out circles as a base and all other elements and parts of the decor. Then you can sew or glue these elements onto the base. Fold the tiny ribbon in half to form a hanging loop and sew it inside the second circle of each design. You can add cotton wool or wool as a filler if you like, or leave these flat decorations flat. You can use a running stitch or decorative stitch, hand or machine stitch, or simply use hot glue to assemble the design into a single piece.

Another cute idea for felt Christmas tree decorations is to make a hot cocoa mug. Start by cutting out all the felt pieces. Use the template and transfer the outline onto the fabric. Using a blanket stitch, sew a cocoa mug from scraps. Create marshmallows and sew on eyes and mouth (you can use glue if necessary) and sew them to the mug. You can stuff the craft, making it voluminous by adding cotton wool between the front and back walls of the mug, or leave it flat.
Video: DIY felt Christmas decorations
Felt Christmas tree: stencil and step-by-step instructions

Creating a felt Christmas tree as a decoration for a real Christmas tree is a fairly easy process. You will need green felt scraps, scissors, paper, pencil, thread and needles, beads or sequins and filler (optional or use cotton wool). Draw the silhouette of the Christmas tree on paper and cut it out, then attach it to a piece of felt, trace it with a pencil or chalk and cut it out. Sew or glue beads or sequins to decorate the Christmas tree. Finally, add cotton wool as a filler and sew both parts of the ornament together using an offset stitch.

Using the same technique, you can make similar Christmas tree ornaments using felt in a variety of colors and shapes. If you don't know much about sewing, just use glue. You can add a modern twist to these crafts by choosing trendy colors instead of the traditional red, green and white, or experiment with geometric shapes instead of traditional New Year's symbols. However, keep in mind that if you make Christmas decorations from felt with your children, it is better to use traditional winter ornaments to create a festive atmosphere - penguins, snowmen, deer, Christmas trees, balls, lamps, bells, owls, Christmas gifts, houses, gingerbread men, Santa Claus, stars, etc. Enjoy the photo gallery below and you're sure to find plenty of inspiration to create your own felt Christmas decorations!

Felt Christmas decorations - 24 photos

Have a wonderful December! Today we are looking forward to the New Year holidays and decorating our home with felt crafts. Everything will be discussed in more detail later in the article.
Making a choice
New Year and Christmas are ahead of us - a magical time, with joy, gifts and elegant houses. Today I want to show you some super easy home decorating ideas using felt, an affordable and easy to use craft material that you can use to create a whole range of things! From plush toys, pillows, accessories, to wall art and decorations, the options are endless!
I have collected several New Year's projects for you that you can do yourself. Try your hand at this step-by-step tutorial that's good for beginners and advanced DIYers.
Gingerbread toy
These little sentimental felt Christmas Gingerbread Cookies can create a magical mood. Suitable as a gift decoration or Christmas tree decoration.
Necessary materials
- felt;
- white thread and needle;
- small buttons;
- thin ribbons;
- hot glue gun;
- pen/pencil and scissors;
- cotton wool or padding polyester for stuffing;
- stencil or cookies.
Step 1
For each Gingerbread you will need two identical pieces of felt. I used the cookie itself as a stencil, but you can draw a man on a piece of paper and cut it out, tracing the resulting figure onto felt.
Step 2
Cut out your felt, decorate one figure - this will be the top part. You can decorate it to your liking, add various embellishments, I just trimmed the edges with white thread, added a red bow and two buttons using hot glue.
Step 3
Before assembling the two pieces of my cookie, I applied a little hot glue to the back of the top of the head to insert a ribbon loop for easy use of the finished craft (you can use it to attach it to gifts later or hang it on the tree).
Step 4
Then I drew glue from the wrong side along the contour: first the head, then the arms, torso and legs. I also added the padding gradually: after the glue had dried on the head, I filled it with cotton wool, then added the padding to the arms. Always let the glue dry before filling a specific area with cotton wool.
Step 5
When the entire small gingerbread was glued together and stuffed with cotton wool, I waited for it to dry and cut off the excess glue.
Step 6
As you already understand, the thread on the craft is decorative - just sew the gingerbread along the contour using the simplest stitch that we were taught at school during a craft lesson. New Year's cookies are ready!
Felt Christmas garland
And this wonderful mini-garland can not only decorate a gift, but also act as an independent decoration for walls, doors or a Christmas tree. Either way, this warm, soft, cozy felt garland never hurts during the holiday season!
Garland made of warm, soft and cozy felt
Although this is quite painstaking work, which involves cutting out all these small details, the result is worth it - your children will be delighted, and the author's look of obvious manual labor will give your interior a special zest, like everything that is made with your own hands - with love and warmth .
Necessary materials
- sheets of felt (or felt) - I found it on Ali Express, but it is also available in other online stores;
- round stencil (I cut out three sizes: 3.5 cm, 4 cm and 2.5 cm);
- thin felt-tip pen;
- Good sharp fabric scissors;
- sewing machine with white threads.
Step by step guide
- Circles: Count out approximately 10-15 round shapes of different sizes in the same color and then cut them out by hand.
- Triangles: Make a quick template to trace the triangles, then cut along the top corner, which creates a strip of interlocking triangles as shown in the picture. It's fast!
- Arrange your shapes in order lengthwise as you see them (my garland has about 10 shapes).
- Sew the shapes in one long row, leaving no space between each shape.
Felt Ornament “New Year Pudding”
Necessary materials
- sewing needle;
- pin for fixing parts;
- brown, white, dark green and red felt + matching sewing thread;
- ribbon of your choice (I used narrow black ribbon);
- fabric scissors.
Step by step guide
Step 1
First, cut out a circle according to a single template and then make a white icing shape from this circle as in the picture. The second circle cut out will be a brown cupcake, also round in shape. For one decoration you will need two of these forms.
Step 2
Next, cut out a small red circle, about a centimeter in size - this will be the cherry on the pudding. You will also need two leaves - they can be made into any shape. Then cut the desired length of tape. Depending on how the finished decoration will be hung, the ribbon can be long or short, but at least 12 cm in length.
Step 3
Fold the ribbon into a loop and sew securely to one circle of brown pudding. This will be the top of your decoration. It is not necessary to use brown threads to match the felt, since all the seams will be hidden.
Step 4
Next, attach the white “icing” to the front of the ornament (with the ends of the ribbon on the inside) and sew it in place using white thread.
Attach white “icing” to the front of the ornament
Step 5
Now you need to place the leaves and berries - place the leaves on the ornament first and move them around until you are happy with the position. The leaves should overlap slightly, meet under the ribbon, and emerge from the top of the ornament.
Step 6
Once the correct angle is found, place the red berry on one side and sew through the leaves using dark green thread. Most of the stitches should be where the leaves will be hidden by the berry, but you should also sew one long stitch along each leaf to hold it in place. It is not necessary to make a seam all the way to the edge of the pudding; it should only peek out a little from under the berries.
Place leaves and berries
Step 7
Now all that remains is to sew on the second part of the cupcake and add the red berry. You can either sew on the berry first and then sew the front and back of the ornament together, or alternatively, leave the berry for last. The latter option will leave a few red stitches on the back of the ornament, but it will make the job a little less fiddly.
Step 8
Whichever method you choose, sew on the cherry with a large x-shaped red stitch for a nice decorative touch. Sew the front and back of the pudding together using white thread around the "icing" section, carefully pressing the leaves outside the seams.
Create magic with this fancy felt wand
This craft can be used as an independent decoration, or as an envelope for a gift card. Pretend you're a fairy and create magic with this fancy felt wand!
Necessary materials:
- stick 45 cm long;
- brush;
- glue;
- shiny paint with gold;
- cotton wool or synthetic winterizer;
- needle, thread;
- gold sequins, 8 mm;
- three stars cut out according to a template;
- scissors;
- Gift card.
Prepare the necessary materials
What is the most common Christmas tree decoration? As a rule, these are ordinary Christmas tree balls made of glass, plastic or other materials. Such decorations can be found in every home, but you must agree that the monotony gradually gets boring.
Therefore, it’s time to think about how to make unusual Christmas tree decorations from felt with your own hands on a New Year’s theme that can surprise your family and guests. To make such toys look neat and professional, it is necessary to use comfortable materials. Felt is considered one such material.
For those who have not heard of such material, we tell you: felt is fibrous material obtained by felting lint. There are several types of felt, differing in width and structure, but they all have two main properties: strength and quality.
Felt is great for use for decorative purposes and is already used in creating hair jewelry, toys, accessories and other items. This is why felt is perfect as a basis for Christmas tree decorations and other New Year's decorations.
Soft felt toys
 These cute miniature toys are made from leftover felt
 Surely you have already seen such toys in special stores selling products "handmade". But since toys made with one's own hands are not cheap, it is better to sew them yourself.
 Christmas tree toys made of felt in the shape of traditional Christmas trees
 The manufacturing process will not take you much time, and the procedure is exciting and will seem easy even for small children.
 This entire zoo is made of felt: create your favorite animals with your own hands!
 Let's figure out what you'll need:
- ready-made stencils of various shapes(snowflakes, snowmen, Christmas trees and others);
- myself felt(it is advisable to take several colors);
- scissors(since the toys will be small, it is more convenient to use nail scissors);
- pencil(in order to transfer the stencil to the base);
- thread and needle(to connect parts of toys together);
- cotton wool, foam rubber or other materials for internal filling;
- beads, beads, buttons, ribbons and many other materials to decorate your toy.
 Very simple decorations: they can be hung on the tree using a loop
 Once all the necessary materials are ready, you can start creating Christmas tree decorations. First you need transfer the design from the stencil to the prepared piece of felt. This is done very simply: the stencil is placed on top and outlined with a pencil. Then parts are cut and sewn together. This can be done manually or using a sewing machine.

By the way, connect the two parts of the toy You can also use a stapler.
When sewing two halves of a future toy, you need to leave room to stuff it with cotton wool or other suitable materials.
 You can make Christmas toys from felt for the Christmas tree with your own hands
 When the toy is ready, you can start decorating it. For example, the Christmas tree can be decorated with small beads or buttons, which will look like Christmas tree decorations. And colored threads along such a Christmas tree will replace New Year's garlands.
What kind of wine glasses and glasses should be - find out everything about setting and decorating the New Year's festive table using the link.
Read more about do-it-yourself candle decoupage in: Decorate the candles yourself, and let your guests be amazed at the unusual hand-made beauty!
If you sewed Santa Claus, make a beard from cotton wool or padding polyester, and replace the eyes and nose with beads or buttons.
You can embroider original patterns using bright threads on homemade felt toys.
Making a garland
 Elements of Christmas tree garlands can have a variety of shapes
 The advantage of a New Year's garland made of felt is explained by the following:
- firstly, such a garland is very simple and quick to make with your own hands;
- secondly, due to the strength of the material, the edges of the figures do not need to be stitched (the seam is done only for decorative purposes);
- thirdly, the felt holds its shape perfectly and practically does not wrinkle.
 The simplest garland - circles are cut out and connected by machine stitching
 Making such garlands is easier than sewing toys: you just need cut out beautiful shapes and attach a loop to them. By gluing felt of one color onto another and decorating the toys with decorative elements, you will get an unusual garland that will surprise your guests. What can you come up with as decorations for a Christmas tree garland? The easiest way - cut out a large number of circles in bright colors and pass through a wide or strong thread.

From felt you can cut out hearts, snowflakes, stars, miniature socks. Attach a loop to such figures and hang them throughout the room or decorate the Christmas tree. You can use single-layer decorations, or you can hang ready-made voluminous Christmas toys made of felt on a thread on the Christmas tree. With your own hands, if you have the materials and free time, you can make so many amazingly beautiful and original Christmas decorations and Christmas tree decorations!
To make your garland look more original, alternate New Year's toys made of felt and products made of other materials in pairs. For example, combine them with large beads or ready-made Christmas tree decorations made of plastic or glass. You can also come up with original mounting methods.
 String felt Christmas tree decorations on a thread - you get an original garland
 It is not necessary to make a large number of identical toys. For example, do unusual New Year's composition. Let your garland consist of toys in the form of Grandfather Frost, his gifts, several deer, the Snow Maiden, clouds, stars and other elements. This composition will be an excellent decoration for a free wall or window that is not covered with curtains.
Decorations for the festive table

The peculiarity of felt is that this the material is very resistant: If you secure the toy correctly with threads, felt will not fall apart or lose its shape. Thanks to this ability of the material, you can make original decorations for the New Year's table. These can be decorative cakes, sustainable toys and even small Christmas trees.
The decorations you create can be used as New Year's gifts for guests.
There are several ways to make felt toys sustainable. If they have a wide bottom, to it you can glue cardboard or other dense material that will create the basis for the toy. If these are Christmas trees sewn from two parts, attach them to a toothpick or pencil(this depends on the size of the toys), and secure it to small bottle caps or other supports.

You can also do lush Christmas trees: just come up with a base in the shape of a cone, and sew or glue a large number of green felt strips on top. You can use polystyrene foam or plastic bottles as a base, after giving them the required shape.
 Christmas trees on a stable stand will decorate both the chest of drawers and the festive table
 It is desirable that felt elements have several shades. These can be not only stripes: to make your Christmas tree original, cut out drops or elongated triangles from them.
To create a base for a miniature Christmas tree, you can use thick cardboard and make a cone of the desired size from it.

Another way to create a small felt Christmas tree will be useful if you have not found any materials for the base. This is done very simply: cut out a large number of pointed stars (the more ends, the more magnificent the Christmas tree will be). Such stars must have different sizes: it is necessary that each subsequent star is smaller than the previous one.
 Decorative Christmas trees can make an interesting decorative garland
 When the Christmas tree elements are ready, place them in order and connect using strong thread. By the way, it is not necessary to make stars: you can make beautiful Christmas trees using circles.
If there are few such elements, the Christmas tree will not be high enough. You can raise it with the help of beads: they must be threaded after each layer of the Christmas tree.
After the Christmas tree is ready, decorate it with beads or beads, and at the top attach a bow or small star. It can be made from salt dough, cardboard, or also cut out of yellow or orange felt.
 Photos of decorative Christmas trees decorated with beads
 There are more complex ways to create a small Christmas tree for table decoration. Felt elements can be wrapped in different directions and glued to a cone-shaped base. A if the elements of the Christmas tree are first made jagged, the Christmas tree will seem even more magnificent.
 For a miniature Christmas tree, you can take felt of any color or make a multi-colored Christmas tree from leftover material
 By the way, such Christmas trees do not have to be placed on the table. They will decorate any closet, bookshelf or even floor, and create a New Year's atmosphere in your room.

In order to do decorative felt cakes, think about their shape in advance. They can be round, square or triangular, like cake slices.
Are there any old newspapers and magazines left? Great: you can put them to work, and they will allow you to decorate the interior and decorate the Christmas tree with paper decorations.
Find out ideas for New Year's decor: let our photos tell you the best option for New Year's interior decoration of your apartment.
Can be done cupcakes or fruit baskets: for this, the outer shell of felt is connected with a thread so that the walls receive a wave shape. Having chosen the desired shape, proceed to the pattern and begin sewing the toy. Cakes can be decorated with fruits made from fabric or bright buttons.
 Decorative felt cakes
 These are not all the options for using felt in decorating a room for the New Year holidays. It can be used to create themed refrigerator magnets, mug decorations, and personalized bracelets for guests. Show your imagination and you will come up with many more ways to use it. You can also give Christmas tree decorations made of felt to your friends or decorate your school Christmas tree with them.