We make gifts for the New Year from foamiran together with the children. Crafts from foamiran for the new year Do-it-yourself New Year's flowers from foamiran
You can make crafts with your own hands from both standard and unusual materials, which until recently no one would have thought that they could be used for handmade. One of these finds is foamiran. This is a thick material created on the basis of synthetic fibers. Crafts from foamiran can be simple and complex, voluminous and multi-layered, because the sheet is perfectly cut and amenable to heat treatment.
 It is very convenient to work with foamiran, as it looks and feels like thick soft paper. Blanks can be painted with paints, felt-tip pens and pencils, fastened together and glued applications to them. Unlike other materials, it is not difficult for a novice craftswoman to make a pretty craft from foamiran. The only drawback is that it breaks easily, for example, if you draw a pencil with strong pressure. Knowing about this feature, it is enough to be careful.
Foamiran is characterized by the fact that it bends if you hold it over the iron. At the same time, there is no burning, melting and unpleasant odor, the material remains the same in appearance, it only twists. And weaker or stronger, depends on how long it was heated. After cooling, the blanks retain their rounded shape. Do-it-yourself New Year's crafts from foamiran turn out to be beautiful, durable, with them the interior becomes homely.
An example of crafts from foamiran for the New Year - a fluffy Christmas tree. The rest of the time, taking the instructions given as a sample, you can make artificial flowers, greenery and other crafts. The principle of material processing is always the same, which greatly simplifies the creative process. Souvenirs created by skillful hands are good only because a piece of the soul is invested in them. Some needlewomen make amazing masterpieces worthy of becoming exhibits at exhibitions.

The set of what is needed for creativity almost does not change depending on the type of craft. So you can safely buy more foma of different colors, in the future it will be needed. To make a Christmas tree, you will need the following materials and items:

If you want to make a Christmas tree with a crown, you need to additionally prepare a wooden stick, satin ribbon, 3 mm wire and a star or other decor. You will also need a small lid.
 First, proceed to the manufacture of the trunk. They take a wooden stick and wind the wire evenly from below to achieve stability and the desired thickness. Now you need to take a suitable container, pour building gypsum or hot glue into it and lower the stem. When the substance hardens, the wooden base will hold well. Glue or gypsum is better to cover with a circle of brown foma (as foamiran is often called), although it can also be decorated with other material, for example, artificial moss, beads.
The base of an artificial tree is a foam or cardboard cone. If foam is used, the desired shape is simply cut out of it. With cardboard do this:
- cut out a circle;
- on one side, make an incision to the middle;
- rolled and glued.

Now you need to cut out another circle, which will serve as the base of the cone. It is needed to give the structure rigidity. A hole is made in the center of the circle, the figure is put on the trunk, the edges are smeared with hot glue and pressed against the cone.
To give the trunk a decorative look, it is wrapped with a brown ribbon, preferably satin, but another fabric will do. The crown is made if you want to decorate the Christmas tree with a star or other accessory.
It can be straight or curved, including wrapped down. The unusual shape of the crown looks interesting, but someone will like the standard version more.
Cutting and gluing the fringe
 First, strips 2 cm wide are cut from foamiran, then 1.5 cm cuts are made in each to make a fringe. The smaller the distance between the cuts, the fluffier the tree will turn out.
Each blank is applied to the iron, turned on in the "cotton-linen" mode. It is enough to hold the material pressed for 2-3 seconds so that the strips wrap up beautifully. It is not necessary to heat up longer, because the material may deteriorate.
They take one blank, coat the uncut part with glue and fix it on the bottom of the cone, positioning it horizontally or slightly inclined. As a result, the strips should form circles or spirals, as you like. It is important that the cone is not visible through the fringe, so you need to glue the blanks with a slight overlap.
So they glue the entire Christmas tree to the very top. If small pieces of fringe remain, do not throw them away, it is better to glue them between the rows so that the tree looks even more magnificent. Having reached the crown, the top is made of a straight wooden stick or a curved piece of wire. It is wrapped with a strip of foamiran. Such a tip is needed only to make it convenient to attach a star or other decoration. The Christmas tree is decorated with beads, bows, ribbons, balls, and you can also hang small toys.
Pine tree with twigs
This foamiran Christmas tree is almost as easy to make as the previous one, but it is made according to a different principle. The material needs to be taken in two or three shades of green, or more if it is on sale. For crafts with a height of 20 cm, 4 A4 sheets are enough. In addition to foamiran, you will need the following materials and tools:

Tip: pine paws do not have to be made of green-colored material, both blue and white are suitable, but a combination of several colors looks best. If you want to make an original version, you can use absolutely any tone.
Blanks are made in the form of squares. You can not adhere to strict sizes, the main thing is that the scale approximately corresponds to the height of the Christmas tree, otherwise it will seem unnatural. Each square is a future pine foot. It is placed in front of you so that a rhombus is obtained, and the lower side is cut into strips approximately to an imaginary line that divides the rhombus into 2 parts diagonally.
Each rhombus is applied to a heated iron with a fringe, holding it by the whole edge. The tips will bend and you will get "needles". To achieve the desired effect, just hold the workpiece over the iron for a few seconds. Important: an adult must operate the hot appliance.
For convenience, all the “legs” are laid out on the table with the wrapped side up and alternately glued to the cone. You can arrange the elements in any order: in rows, spirals, randomly or laying out a pattern. Curls should intertwine with each other, and between them there should be no gaps. When everything is glued, it remains to decorate the Christmas tree and attach an asterisk or a ball to the top.
By this principle, you can make a basket for gifts, only you will need not a plastic egg, but an open-top base.
On the inside, closer to the edges, the basket will need to be pasted over with decorative material, and on the outside there will be the same scales as for the cone, only of a different color.
Festive candlestick
A wonderful candlestick for decorating the New Year's table is obtained from a wine glass, if you decorate it with foamiran. You will need blue, green and brown material. List of everything you need for crafts:

Considering the festive theme, it is recommended to decorate the candlestick with a figurine of an animal symbolizing the coming year. If the occasion is different, it is recommended to choose the appropriate symbolism, for example, a dove, a heart or a number. Here is the sequence in which you need to make a New Year's decoration from foamiran with your own hands:

Now you need to take the old disk and cut out two circles from the foamiran. One should be the same size as the disk, and the other should be slightly larger than the hole. A hole is sealed with a small circle, and the disk itself is sealed on the reverse side with a large circle. You need to glue it like this: apply glue to the foamiran, smear it, attach it to the disk and hold for a few seconds.
Now you need to stick a symbol of the coming year or another figure on the disk. The glass is again covered with acrylic lacquer and sprinkled with sparkles, only this time white. In the middle of the leg, where the notch is, a button is glued. It is necessary for the candle to hold well. A decorative candle is put on the button and the glass is glued to the disc.
Festive decor, for example, pine twigs or bows, is also made from foamiran. The decoration is laid out on a disk around the glass, and this is where the craft is finished.
Pine branch with a cone
Another option for a festive decoration from foamiran is a pine branch with a cone. Such a product is great for hiding children's New Year's gifts in it. The child will be happy when it turns out that a surprise is hidden inside the pine cone. Here's what you'll need to complete this tutorial:

First, 2 circles with a diameter of 8 and 9 cm are cut out of foma, of which about 1 cm will be spent on the petals. They are cut around the entire circumference. Do the same with the second round. 3 strips are cut out of brown foamiran and scales are formed, adhering to the following parameters:
- The length of the strip is 19.5 cm, the width is 2.5 cm, it has 13 scales 1.5 cm wide.
- Length - 80 cm, width - 3 cm, 40 scales, each has a width of 2 cm.
- The width of the strip is 3.5 cm, the length is 1 m, the number of scales is 40, their width is 2.5 cm.

The edges of the petal circles are covered with white oil pastels. The edges of the strips with scales are also tinted, and the pastel is well shaded to get a uniform shade. The next step is the processing of petal circles with a hot iron, which must be turned on in the “wool-silk” mode and wait until it heats up. Hold the blanks so much that the petals rise. Then all the strips are processed in the same way.
The egg blank is opened, the lower part is separated and the stem is attached to it, it can simply be glued or pierced into the blank and secured to prevent displacement.
Thickness is added to the stem using teip tape or paper. A piece of foamiran is glued from the inside of the egg.
Attachment of scales
 Collect the bump starting from the top. They take a strip with the smallest scales on it, and cut off 6 of them, each separately. Glued to the upper half of the plastic blank, leaving no gaps. After finishing the first row, glue the second, placing the details in a checkerboard pattern, like a real cone. Now you can not separate the scales, but glue them in a strip, not forgetting to overlap. The excess needs to be cut off.
When the strip is over, take the second one and continue to glue the half of the plastic egg. When it is all covered with scales, put on the lower part. The next row is glued a little above the junction, and then continues in the usual manner. Closer to the rounding, you will have to make folds, continuing to glue the overlap.
Having covered the entire workpiece with scales, you need to take a petal circle, put it on the stem and pull it to the base of the cone, and then glue it. Attach the second circle in the same way. Inspect the bump, if necessary, correct individual scales. Now you need to let it dry. When it is clear that the scales are securely fixed, they are opened and in this position each is coated with acrylic varnish. This is a crucial stage, since you need to make sure that the scales do not stick together. It is better not to rush and lubricate the next row when the previous one dries out.
Twig Assembly
 2 strips 5 cm wide and 70 cm long are cut out of green foamiran, cut through them to make a fringe 1–1.5 cm high. They take the wire and wrap the end with a teip tape to attach the edge of the fringe to it. Wind the strips on the wire, forming a spruce branch. In the process of wrapping, the strip is fixed with glue.
Using teip tape, attach the cone to the twig. The main stem can also be decorated with teip tape, and then covered with green oil pastel. To simulate snow, it is convenient to use flock powder, but other similar material will do.
According to the model, you can make as many of these branches with cones as you like, and then lay them out under the New Year tree.
The material that we will use today provides tremendous opportunities. I will show you what crafts can be made from foamiran for the new year. I hope you enjoy my collection.
What holiday without this decoration?
For the wreath we need:
- Green foamiran;
- Glue;
- Scissors;
- Lots of shiny jewelry;
- Ribbon.
Mastering: 
- Cut out the circle.
- On it we create a pattern of shiny stones.
- We make a bow from a ribbon. And also a loop.
- Idea author
Decor can be your own. Here I wanted to show the principle of work.
Flower
The photo shows all stages of work. The piece is beautiful and unique. It can be used to decorate a room, a door, or even as a Christmas toy. The photo uses paper, but I think the craft will only get better with foamiran. Inside the flower are 3 red small inflatable balls.


Christmas decorations

Even figurines simply cut out of bright dense material can already serve as a beautiful Christmas tree decoration. But you can also make a composition from the figures.
We create a designer toy:
- Using a figured hole punch, we cut out small flowers (it does not matter if you have a hole punch with a different pattern, any one will do for this craft).
- We heat the iron; minimum temperature is enough. We apply the blanks to the hot surface. They must acquire volume.
- We pierce the prepared flowers with a French pin. We fix with a pin on a foam ball.
- We fix the loop by stringing it on one of the pins with a flower.
Snowflakes instead of flowers will look original! Such toys are excellent gifts, they will be able to pleasantly surprise you with their elegance.
Different toys for the Christmas tree
These bumps will be much more elegant and voluminous if they are made from foamiran 

You can also make a variety of balls with an application - the pictures increase by clicking:


More templates you may need. I want to remind you that our Santa Claus does not have a clown's hat, but a boyar's hat without a balabon and a much longer beard.


Christmas trees will also look harmoniously from foamiran. In principle, everything that is made from felt can be made from foamiran, even better, because foamiran has two advantages - it keeps the shape that is given to it when heated or twisted, and prints can be made on it. This means that Christmas trees can be more fluffy and toys more natural, remember how in the article about there was a cookie - a heart made of foamiran. It is very easy to make and looks edible.


bezel
In this model I liked the ethnic style, and the fact that even if you don't have templates, you can still make flowers and a headband with them.
We will need:
- 2 sheets of glitter white foamiran;
- Scissors;
- wire cutters;
- Wire;
- Yellow beads;
- Four-leaf flower pattern;
- Foil;
- Glue;
- Glue gun;
- Threads;
- floral tape;
- Iron.
Mastering:
- Cut out according to the template.
- With the help of an iron we give them a shape.
- For a bud: 1 square, 5 circles.
- We also heat the petals for the bud on the iron.
- We make a ball out of foil. While we bend and twist the foil, weave the thread.
- We cover the circle with a square and fix it with glue.
- From above, around the circle we decorate with petals.
- We put 2 flower blanks together. We stretch a thread with a needle through them several times. There should be “tails” on both sides.
- On the front side, the ponytails are stamens. Dip them in glue and beads.
- With the help of ponytails on the inside, we will attach the flowers to the rim. In order not to pull the thread and spoil the pattern, we apply a drop of glue from the inside at the base of the thread.
- For a wreath, we need 4 sizes of wire. We cut off.
- Wrap with tape.
- When wrapping, insert flowers.
- It remains to weave the layers together, folding them 4 times. Glue a ribbon on the edges to tie a wreath.
You can make a different design. For example, attach flowers to a finished headband or make hairpins with this jasmine.
Christmas tree from foamiran

I'll show you 2 options. This one is more complex.

- Cut into squares of green foamiran.
- We make a fringe, making cuts on the side.
- We heat all the parts on the iron.
- Glue the base to the cone.
- We fix the squares to the cone from the bottom up.
- At the top we glue the fringe from the tape.
- Decorate with beads and ribbons.
- Author of the idea and master class
Very cute craft for the new year.
simple spruce

This job is for the little ones.

Crown
Princesses need a crown!
How to do it, see the video:
- Cut out a crown from foamiran. Length - 15 cm. Height of teeth - 8.5; lower level - 3.5 cm.
- We glue.
- We decorate with rhinestones, beads.
- From organza (1.5m by 5cm) we make an elegant "skirt". We make folds and sew. The last seam should be light, not fastened with knots, so that by pulling you can pull the skirt to the desired size.
- We make a bow.
- We attach the base to the bottom of the crown.
- We assemble the structure: we fix the skirt to the headband, hairpin or headband, and the crown on top. On the crown - a bow.
If you remove the “skirt” from organza, such a crown will suit the prince too!
Piggy

If you have a universal mold, let's try to make a cute pig now.

If you make only one, the front part, you can glue a magnet on the back. Such magnets can be made not only in the form of a pig, but also Santa Claus, etc.
Content
We continue the marathon of articles on New Year's crafts. We had different articles on this topic, different variations of crafts and compositions, we offer a few more ideas. These will be crafts made of felt and salt dough, various New Year's compositions that can be taken to a kindergarten matinee, a holiday to school, all kinds of scrapbooking and a lot of interesting things. So let's not beat around the bush for a long time, but immediately get down to creativity.
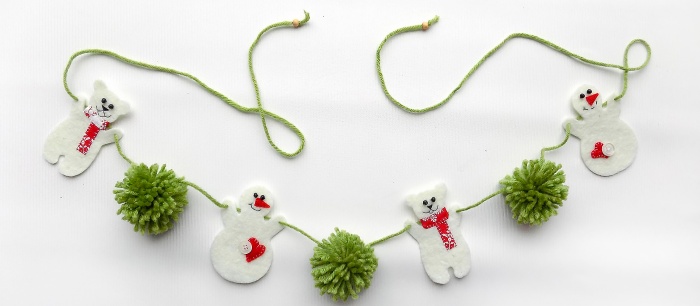
Felt crafts
New Year's crafts made of felt look very homely, cozy, bright. The easiest New Year's option is to sew a garland of felt toys. From this material you can sew New Year's hats, boots, Christmas trees, toys. Moreover, it can be stuffed with cotton, that is, voluminous toys, or they can be flat and it also looks very beautiful. See what it's all about:
The garland can be decorated with different ribbons, buttons, beads and decorate a nursery or a crib. It is not a shame to present such a New Year's garland as a gift to a family where a baby has just been born.
From felt, you can also sew separate New Year's decorations and hang them on the Christmas tree.
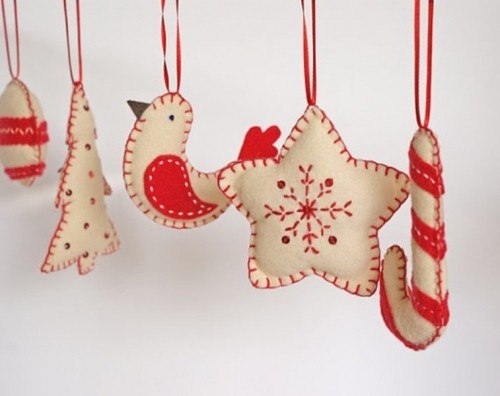
Please note that the pattern can be any, it is not necessary to try to make hidden seams, the toy can be sewn from the front side using a decorative seam and bright threads. Pieces of felt can be used to decorate the toy. For 2018, you can sew figures of dogs, because the coming year is the year of an honest, smart, loyal, courageous and sociable dog.
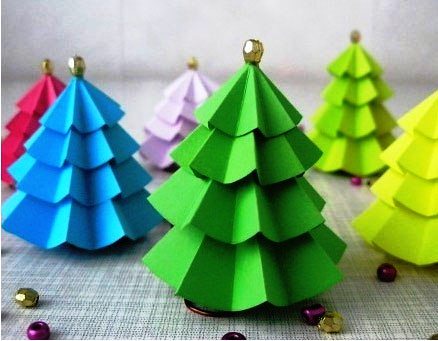
Paper compositions
New Year's paper crafts are more suitable for morning performances in kindergarten and school holidays. It can be anything: from paper garlands to whole floral New Year's panels made of special paper. Let's try to make a Christmas tree paper craft with our own hands. For this we need:
- green sweat paper;
- scissors;
- simple pencil;
- PVA glue;
- compass;
- wire;
- ruler.
To begin with, on a piece of paper, using a pencil and a compass, you need to draw the following picture:
Now the circle needs to be cut and cut through to the beginning of the inner circle.
Now each sector needs to be twisted into a small petal and glued together.
Then the workpiece must be turned over, and a small hole should be made in its center. Next, using the wire, you need to create the following design:

It is on this design that we will put our paper blanks. As you guessed, each subsequent circle should be slightly smaller than the previous one. As a result, you should get such a simple, but rather original and beautiful Christmas tree.

New Year's paper crafts are sometimes as simple as they are original. From such crafts, you can make up a whole composition, use them as a decor for a New Year's children's theater, install them on a windowsill, decorating them with a small garland.
A simpler option, for example, it can be New Year's crafts for kindergarten - these are Christmas tree decorations made of paper. Create paper applications, voluminous paper figures, postcards, garlands with children. We offer just a few possible New Year's options, they are not difficult to make, so there is no point in explaining the whole process.
For some paper crafts, it is better to use colored cardboard rather than colored paper so that the composition keeps its shape for a long time.
The kid will be interesting and exciting, and especially easy. You can cut out all the necessary details in advance, give the child a glue stick so that he only glues the details to each other. Such work will bring pleasure even to the smallest.

Compositions for the New Year from foamiran
We already once told what foamiran is and how it behaves during operation. We only recall that this is a very convenient material in the creative process and very good things are obtained from it. New Year's crafts from foamiran are a cool alternative to felt or paper. You can make flat Christmas tree decorations, sew a garland, make voluminous flowers, you can decorate a gift with figurines from this material. This new and already very fashionable material is easy to cut, stretches, retains its shape well, and is stored for a long time.
Not only some flat figures are made from foamiran, but also voluminous flowers, whole bouquets. In one of the articles we told how to create them. Therefore, if you wish, you can always make such a bouquet for the holiday.
New Year crafts from beads
For the New Year 2018, you can make crafts from beads with your own hands. What could it be:
- Christmas trees made of beads;
- New Year figurines;
- wicker decorations for the Christmas tree.
For example, let's start with a beaded Christmas tree. Such an elementary Christmas tree can be an excellent table decoration and a good present for guests.
You only need to twist the wire in a spiral and string beads of beads on it. See what happens:

A more complex New Year's option, and here you need to have the technique of weaving baubles - these are beaded decorations for the Christmas tree. In such products, you can use small beads of different colors.
For larger items, you can take Czech beads, it is better in quality: the same beads, even color, size.

For such crafts, you will definitely need a diagram.

Ideally, you should get such an angel:

Salt dough crafts
New Year's crafts from salt dough are perfect for a matinee in kindergarten. They can be done together with the child, they do not take much time, do not require large expenses, but look decent enough.

To create New Year's crafts from dough, we need its recipe directly:
- two glasses of flour;
- 1 glass of table salt;
- glass of water.
First you need to mix salt and wheat flour, then add water and knead the dough well. If the dough crumbles in your hands, then you need to add a little water, if it is too viscous, then you need to add flour. The dough should not stick to your hands, dry out too quickly and become covered with a dense crust. Sometimes a few drops of vegetable oil are added to it.
Now your main material is ready and you can sculpt figures with your own hands for 2018. You can use confectionery forms, you can give free rein to your imagination and stick on fairy-tale characters, non-existent magical animals, and so on. New Year's figurines can not be decorated and left in their original form.

The dough after molding must be dried in the oven. Therefore, if you want to use some beads or any other decor, then it is better to glue it after drying.

You can also decorate New Year's crafts after they are baked or add confectionery dyes immediately to the dough.
Cork Wood Crafts
Admit it, adults, do you collect corks from various alcoholic beverages? Do you think that someday they will come in handy, that you will make a beautiful panel or decorate a photo frame? And why not make something out of traffic jams for the upcoming New Year.
The option is simple - this is a panel on the wall of corks in the form of a Christmas tree. The corks must first be cut into thin circles and attached to the wall with adhesive tape.

And you can create a whole three-dimensional structure from traffic jams, just use whole traffic jams. They need to be laid in rows in a checkerboard pattern, not forgetting to coat the layers with glue. You can decorate the Christmas tree with braid, twine, beads or cones. It is advisable to use natural materials to the maximum in order to preserve the concept.

You can make a whole New Year's wreath from corks. Use a cardboard or foam base on which you will attach the corks. Do-it-yourself such New Year's crafts give comfort to the house, remind you of a pleasant time spent and the amount of alcohol you have drunk, who knows how.

This, of course, is not New Year's crafts for school, but it will do for a country house.
New Year's scrapbooking
But this is closer to the school version. Such a useful, interesting, and stylish craft can be exchanged as a gift or sent to someone in the Secret Santa game.
For 2018, you can make scrapbooking dedicated to the symbol of the year with your own hands. And this is our dog, as we have already found out. It doesn't have to be a full-fledged scrapbooking, it can just be a beautiful New Year's card with several sheets.
These are postcard designs. Use craft paper and colored cardboard or felt, different ribbons, ribbons and beads.
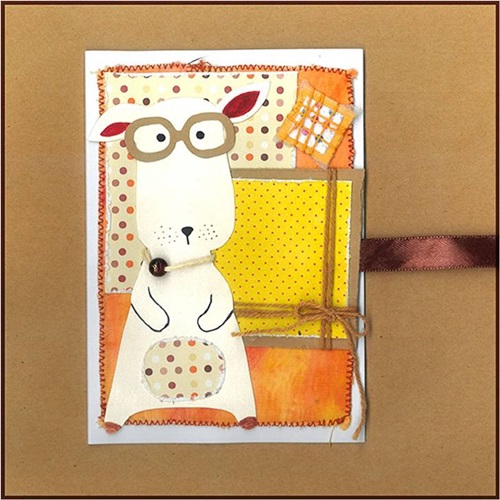
Inside, the sheets can also be designed in an interesting way, draw a comic, cut out various applications from magazines like a wish card, leave a few pages for the future owner of the album to make his own notes, for his desires and dreams.
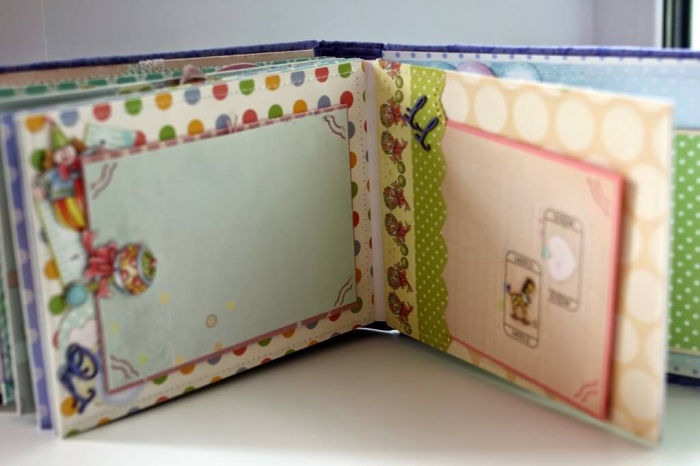
Creating scrapbooking is a whole philosophy, a special art. In a nutshell, you can’t really explain this process, so we suggest watching the video master class, as we usually offer at the end of the article.
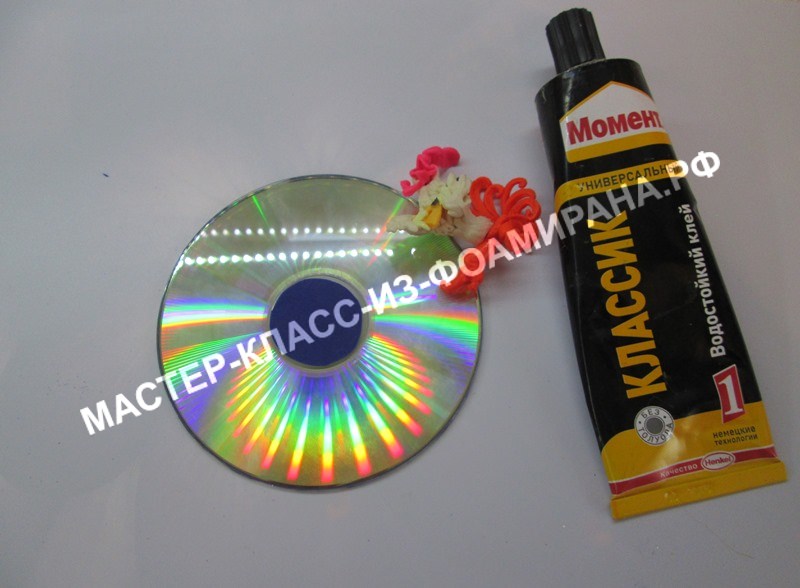
Christmas decoration from foamiran: candlestick (master class with photo)
In this master class, I will show and tell you how you can make a beautiful candlestick from a wine glass. Such a candlestick can be presented for the New Year to your relatives and friends or decorate your holiday table.
To make a candlestick, I needed the following materials:
- foamiran brown, green, blue;
- scissors
- sequins of different colors;
- the disk is unnecessary;
- wineglass;
- acrylic lacquer;
- symbol of the year;
- button;
- candle;
- tassel;
- glue moment;
- office paper.

Here are the basic materials we will need.

We put the glass on office paper, so it will be easier for us to shake off the sparkles and reapply on the glass. We cover the glass with acrylic varnish, making uneven strokes with a bone. And sprinkle with dark blue glitter. We shake off the excess. If the glitter is uneven, sprinkle again.

Then sprinkle with glitter of a different shade.

While the glass itself dries up, we also process the stem of the glass. At the beginning, we apply varnish, sprinkle with sparkles in one color, shake off the excess. Then sprinkle with the second color.

While the glass is drying, we take the disk and blue foamiran, cut out 2 circles. One according to the size of the disk to seal the disk on the reverse side. The second one is slightly larger than the hole on the 3.5 cm disk to seal the hole.

Gently apply the glue on the foamiran, spread it all over the circle, let it dry a little and press it well.
We glue a small circle on the hole of the disk, also glue the moment, as well as a large circle.

Then we glue the symbol of the year on it.

Then we cover the entire glass in some places with varnish and sprinkle with white sparkles.

We take the button and glue it on top of the leg into the dimple. But if the button is large, like mine, cut off a little or bite off with wire cutters. A button to hold the candle that we place on the glass firmly.

That's how I glued it into the dimple on the glass.

Then we glue the glass itself. But in order to make it New Year's with everything, we will make pine branches from foamiran and glue it on a disk around the glass. Here we have such a wonderful New Year's Eve.
New Year's decoration from foamiran: pine branch with a cone (master class with photo)
We continue to make New Year's. If you are preparing gifts for children, then this version of a New Year's foamiran pine branch with a cone, inside of which a surprise is hidden, may suit you. The idea of creating such a gift and patterns were developed by the foamiran master Elena Semanova.

Here is such a pine branch with a cone surprise, I propose to make it today at the master class.
Necessary materials for the branch:
- green and brown foamiran;
- white oil pastel;
- iron;
- second glue;
- brown teip tape;
- scissors;
- wire 1.2mm:
- acrylic lacquer.
- blanks for cones (plastic egg).
 The blank must open. The size of the egg is 10 cm * 5 cm.
Pattern of a pine branch from foamiran and a cone with a surprise

Step-by-step master class on making a pine branch from foamiran

Accordingly, we cut out two petal circles from brown foamiran with a diameter of 8 and 7 cm.

Cut out strips to form a cone. The first strip is 2.5 cm wide and 19.5 cm long and cut out 13 scales on it, each 1.5 cm wide. The second strip is 3 cm wide * 80 cm and cut 40 scales on it. The width of each scale is 2 cm. The third strip is 3.5 cm wide * 100 cm. It also has 40 scales 2.5 cm wide.

We take a white oil pastel and tint the edges of the petal circles.

We also apply tinting to the edges of the cut strips. Shade the tint well.

Then we process the petal circles on the iron, heating silk-wool at a temperature so that the scales rise slightly.

We also process strips on the iron, apply them to the iron in small parts.

We take the lower part of the workpiece and fasten the stem of the cone. If you have a workpiece, like mine, then we take the wire, make a loop at the end and insert the workpiece. From the inside we glue with foamiran and thicken the stem with paper to save tape tape.

Let's start forming the cone from the top of the cone. We take a strip with small scales and cut off 6 pieces, each scale separately. And we begin to glue on the top of the workpiece, closing it.

Stepping back a little, we begin to glue a small strip, glue the scales in a checkerboard pattern, tighten the strip if necessary.

Stepping back a little, glue the next strip. We glue the scales overlapping and in a checkerboard pattern. We cut off the excess.

This is how we glue the rest of the scales.

This is how we glued the top of the workpiece.

We dress the lower part of the workpiece and glue the scales just above the edge and also overlap. Tighten the strip a little.

We glue the subsequent scales already making a little fold, since the workpiece has begun to round off. We glue the scales overlap.

We take the petal circles, thread them through the stem and glue them to the base. Also placing the scales in a checkerboard pattern.

We also glue the second petal circle.

We open the cone and cover each blank with acrylic varnish separately so that our cone does not stick together. Let's dry well.

We take a strip of green foamiran 5 cm wide. The length depends on which branch you will make. I took 2 strips 5*70 cm.

We cut the fringe 1-1.5 mm wide.

We take wire and teip tape. At the tip of the wire, make a loop and process it with teip tape.

We apply the chopped fringe along the oblique and glue it and begin to twist the fringe around the wire, gluing it from time to time.

I fringed 15 cm of wire and fixed a twig with a bump, wrapped the teip with tape.

So I made three branches and fastened them together with teip tape at the place where the cone was attached.
 The stem was treated with a brown teip tape and tinted with green oil pastel. Here we have such a branch with a bump. You can put any gift in a cone and give it for the new year. You can decorate a branch with snow or flock powder, as if powdering it with snow.
Christmas decoration from foamiran: snowflake (master class with photo)
 New Year's snowflake from foamiran, photo
If you want to make a foamiran snowflake, then you will need:
- foamiran white;
- blue or blue dry pastel, as well as wet wipes and cotton swabs;
- sequins and wand;
- iron;
- glue second;
- scissors;
- acrylic glossy varnish and brush;
Step by step MK: How to make a snowflake from foamiran?

According to the pattern, we cut blanks from white foamiran.

We cut holes on the workpiece making the workpiece more beautiful.

We take a blue dry pastel and a damp napkin and tint the end of the workpiece slightly going to the edge of the workpiece.

We take six petals and tint the holes on the workpiece with blue dry pastel, using cotton buds for this.

We process all the blanks on the iron, heating them with an iron at a wool-silk temperature. And we wrap six blanks in a bag.

The rest of the blanks are heated on the iron and left to leave.

We take half-beads and decorate the blanks a little, which were formed into a bag.

I decorated like this. You can to your taste.

Then we glue the pouches at the bottom.

And glue 6 blanks together, in the middle.

Then we glue the rest of the workpieces from below, glue them in a circle, slightly overlapping each other, and begin to glue the second row between the workpieces of the first row.

Glue a bead in the middle. You can take a piece of white foamiran, cut out a 3 cm circle with zigzag scissors and tint the edges with blue dry pastel, process it on an iron and glue it in the center under the bead.

We process the snowflake with acrylic varnish where we want to decorate with sparkles. Instead of acrylic, you can use droplets of glue.

Here is our foamiran snowflake ready. A snowflake can be glued to an elastic band or a hairpin.
Also try to make your own symbol of 2018 -
Traditionally, children make various crafts for the New Year. There are quite a lot of ideas, everyone tries to make their creation the most original. The most popular material for crafts is foamiran, which is quite plastic and easily takes any shape.
New Year crafts from foamiran
Foamarin is used in the manufacture of almost all crafts. Such material is quite easily cut with scissors, it can be painted in different colors. The craft itself is not forbidden to be washed in the future. If necessary, you can give the material any shape.
Crafts from foamiran are allowed to be done with young children, as it is not toxic.
The following crafts are made from such material:
- Herringbone.
- Snowman.
- Christmas decorations.
- Decoration for the New Year.
- Santa Claus and other crafts.
Christmas tree making
First you need to prepare tools and material:

A sheet of foamiran must be drawn with a toothpick so that two equal stripes are obtained. One should be cut into squares to be cut into fringes. With the help of an iron, it is worth bending the ends of the fringe. You need to do this with the rest of the squares. Now the cone is pasted over with finished squares. Without gluing, insert the wire into the top of the head.
On the second strip, you need to cut the fringe and wind it around the crown. The Christmas tree is ready, you can decorate it with small balls or cut tinsel and then it will be completely ready.
Making a snowman
For crafts you will need:

One of the balls should be cut off on both sides. Next, it is sanded with sandpaper. And the second ball must be cut into two halves. One half should be glued to the first ball, and covered with white paint. Let them dry.
Now it’s worth cutting out the details from the sheet according to the templates, such as pens, a carrot nose, a hat, buttons and others, as far as your imagination is enough. Then all the details should be glued to the workpiece. Eyes and mouth are usually painted with black paint. The snowman is ready.
Snow Maiden from foamiran
 The Snow Maiden can be made from a foam ball, if necessary, sanding it first. The ball is cut in half. And they're putting it off.
Cut out the crown according to the template. Hair or pigtails are also made according to the pattern. Then a square is cut out and pulled over one of the halves of the ball. Now glue and cut it all around the edge. After that, you need to glue the hair, and on top and the crown. For beauty, a small paper snowflake is glued to the crown.
The face of the Snow Maiden can be drawn with paints or a felt-tip pen. And with the help of shadows make cheeks. Do not forget to remove excess glue. If a small rope is glued to the crown of the Snow Maiden, then it can be attributed to Christmas tree decorations from foamiran.
Foamiran candlestick
Very beautiful craft - candlestick. For its manufacture should be prepared:

 The glass should be placed on a sheet of paper so that all the garbage remains on it. Acrylic varnish should be applied to the glass with a brush. And sprinkle glitter evenly on top. Shake off the excess. The leg of the glass should also be treated with acrylic and sprinkled with sparkles. The glass should now be left to dry.
Then, using a disk, two circles should be cut out of blue foamiran. One should be the size of a disk and the other the size of a hole in the middle. On the foamiran it is necessary to apply glue for a moment and stick circles of foamiran on the disk.
The glass should be completely covered with sparkles. Then you should take the button and attach it to the leg in the middle. Now the glass should be glued to the disk upside down.
Making a snowflake
As a decoration for the New Year, you can make a snowflake. This will require:

 Using stencils from foamarine, cut blanks for a snowflake. They can cut holes for beauty. Now with the help of pastels it is worth toning the blanks. And with cotton swabs, holes on the blanks are tinted.
Then all the petals should be ironed and wrapped in a bag. The remaining workpieces should also be ironed and simply set aside. Blanks that are in a bag should be decorated with beads. Now they can be glued down. Further, the remaining blanks are glued from below, the second row is also glued between the petals from the first row. A bead is glued in the middle. The snowflake can be treated with acrylic and sparkles applied.
Santa Claus from foamiran
For work you will need:

 From ordinary paper, you can make the basis for the head by crumpling it into a ball. Such a ball must be covered with cling film and overlaid with foil. Now the top should be wrapped again with a film.
And also from the paper you need to make a second lump, only five sheets are already used. The ball should be covered with clay. Then the nose and eyes are glued to the head. Using a brush and conclusions, you can smooth out all the bumps.
Now, using a wooden skewer, you can connect the two lumps together. You can make a hat and a fur coat, and even a beard from the foamiran for Santa Claus.
The bag can be made like this: roll up a ball of paper and clasp it with foamiran and tie it beautifully with a small rope or thread. Santa Claus is ready.
Foamiran cone
From foamiran brown with a hole punch should be cut into a lot of mugs. Each circle should be rounded with an iron.
Now one circle must be glued to the egg-shaped foam at the sharp end. You can continue to glue the particles so that they overlap each other. The tips can be painted with white paint and then they will look like real cones.
flower making
As a gift, you can make beautiful flowers. For this you will need:

 Using the templates, you should cut out 6 circles of petals of different sizes. Leaves can be cut from green suede. Then the petal circles must be circled. Then, through plain paper, you need to iron the petals. Now they should be painted with a dark green color. And the edge of the leaves can be painted to match the petals.
With the help of dry pastels, you can tint the petals of the flower themselves. They also need to be ironed, you can slightly bend the tips. Attach it all to a stick, after wrapping it with green foamiran. Do not forget to glue the stems to the stick. These flowers will be a great home decoration.
Foamiran house
You can make a tea house. To begin with, details are cut out of cardboard; templates can be found on the Internet. Then windows and doors are cut into the details. All this is glued with foamiran. The roof is also made of cardboard, then it can be pasted over with foamiran circles. Get a tile.
From the inside, you can glue pieces of fabric on the windows, which will serve as curtains. Now all the details of the house need to be glued together. It would be useful to glue flowers that are cut from foamiran to the house.
New Year's ball from foamiran
You can make a beautiful Christmas ball with jute cord. For work you will need:

Balls should be glued with twine, leaving no gaps. Now the stencils should be cut out of the foamiran petals, you can use different colors. Then the petals must be connected to each other in the center. Using an iron, bend the edges of the petals.
Ready-made flowers stick to the balls, in the middle you can glue a bead. You can also decorate the ball itself with beads. A beautiful and original souvenir is ready.
Attention, only TODAY!