Original leaf crafts - techniques, tips, photo ideas. Applications from leaves on the theme of Autumn: interesting crafts with photos The best way to stick leaves to cardboard
Autumn, fallen leaves crunch underfoot ... What a pity for this yellow-red fading beauty, crumbling and trampling into the mud. Here is a birch leaf - gently yellow, serrated, here are alders - ribbed, but mountain ash - a family of long leaves on a thin stem. Let's take them home and make them beautiful autumn crafts, applications. We will also need a piece of colored cardboard for the background and glue to stick the leaves.
How to make an application of autumn leaves
Autumn leaves that have dried on the street are not even and rather fragile, so first we dry the leaves ourselves. We find freshly fallen, bright and beautiful, undamaged leaves, and put them between the sheets of some thick book. We put the book under the press (under something heavy). After a week or even earlier, smooth autumn leaves ready for application, they can be easily glued to paper or cardboard with PVA glue.
Sequencing
A real artist sees living images in nature, so we will dream up. Let us lay out before us all our harvested and dried wealth and see what it looks like. Take suitable leaves and lay them out on cardboard until you get a picture. You don’t need to glue it yet, at first just spread it out until everything starts to suit you.
When the picture is brought to the ideal, you can stick it. We take one leaf at a time, remembering where it lay, we spread it reverse side, glue in place. If the application is multi-layered, first glue the lower leaves, then a layer of the upper ones. The craft is ready! You can admire!
But what if, well, the ideas of application do not come to mind, and the leaves look only like leaves, and not at all like bunnies and chanterelles? Then use our ideas.
Leaf Craft Ideas
Applications with animals
Leaf Owl:


Red cat


Bird with chicks:
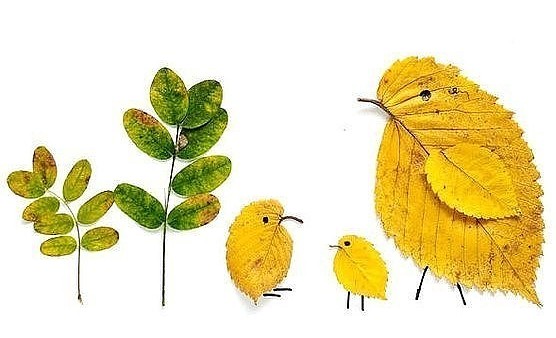


And even an eagle:

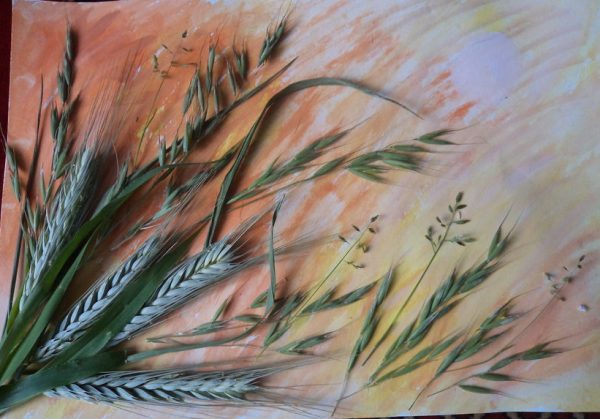
landscapes from the leaves
For a landscape, the background can be painted with watercolors.


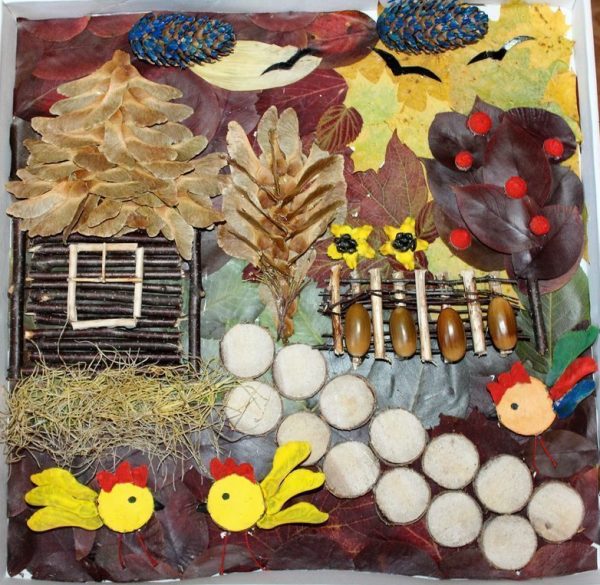


still lifes

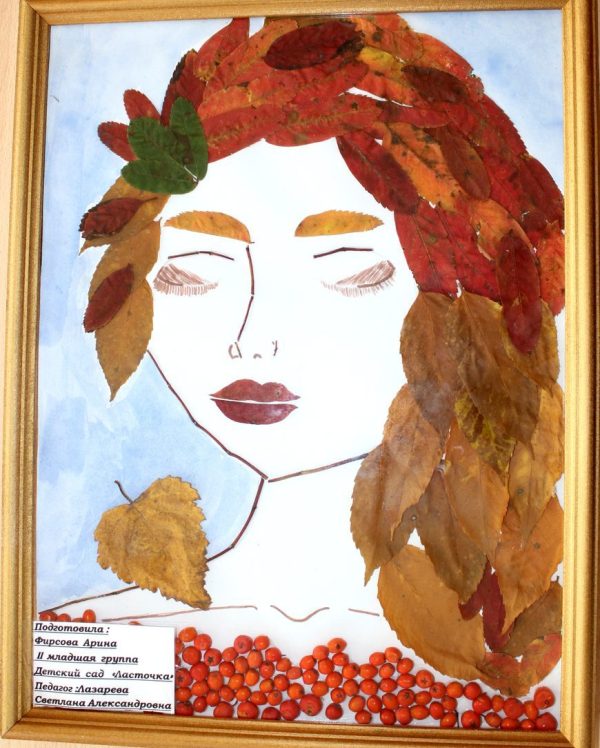
portraits


The finished application (if it is not voluminous) can be put under the press so that after drying it remains even. Store in a dry place, can be framed under glass.
Autumn leaves are the most colorful material for decorating postcards. The colors of the leaves sometimes amaze with fantastic shades! And you can dry them very simply - iron them with a hot iron through paper. This is the most fast way while retaining the bright color of the leaves.
So The first task of October "Autumn Leaf" is to use autumn leaves in the design of a greeting card.
Assignment deadlines for a surprise: October 3 - 16
Surprise from scrapbooksale sponsor: 
How and with what to glue dry plants on a postcard, you can read below (click on "Hidden area" to expand/collapse the text).
Knowing properties various types glue, it is easy to choose the most suitable glue. However, in this regard, there are no strict rules, you can use what seems more convenient or at hand in this moment. The main thing is that the plants are firmly fixed, and there are no traces of glue left on them. When working with dry plant material, several types of glue are used - depending on the situation and the quality of the glued material.
Wallpaper glue suitable for gluing flat surfaces that are completely in contact with each other. It is ideal for securely fixing paper, dried leaves.
Special floral glue "Oasis" used for fast bonding of small transparent elements. It can be applied pointwise. But it should be borne in mind that in some cases this adhesive provides the material.
PVA glue very popular when working with dry plants, because it securely fixes the material, but requires a sufficiently long exposure to dry completely. It is better to apply glue with a thin brush on the thickest parts of the plant (veins, flower core), without smearing the entire surface of the plant with glue.
For gluing coarser parts (twigs, buds) is used hot glue gun. With small drops of hot glue, you can quickly, accurately and firmly glue even the most inconvenient element for gluing. Be aware that hot glue can ruin appearance material, leaving light spots on its outer surface, so it is not used to fix very thin or porous materials.
To fix small and relatively light elements, it is also used double sided tape. It is suitable for gluing a wide variety of materials: natural fibers, petals, leaves and other parts of dried plants.
Written based on the materials of the book "Collages and Panels" by Yulia Maryina.
Dry leaves are very fragile and you need to think in advance how to keep the plants on long time. The easiest way is lamination. I immediately laid out the leaves, grass and flowers in small groups (compositions) between the film, so that later I could easily cut out the desired composition or a single flower. On the first postcards, I glued the laminated leaves with Glossy accents and fixed them with a stapler for reliability. But then I made sure that Glossy accents were holding securely and did not use the stapler anymore.
A few years ago, I simply covered the composition with a piece of transparent film using double-sided tape. Or covered the composition with a transparent self-adhesive film - also a fast and reliable way. Then I glued it under the cut out window in the postcard.
On the Internet I found a very similar way to protect plants called hand laminate.
Can transparent film be stitched onto sewing machine and stick it on a postcard. Or take advantage of the master class, where the photo is inserted into a frame with a plastic window. Thus, you can insert a cardboard box with dried flowers under the plastic.
Perhaps you yourself will come up with a simple and original way plant protection.
Happy creativity!
P.S. You can use purchased dry plants!
1. For crafts, small or medium-sized leaves are more suitable. As well as all kinds of berries (for example, mountain ash), dried flowers, seeds and herbs, spices that any housewife has in the kitchen (peppercorns, allspice and cloves). To highlight the details of the application and its background, you can use pencils, felt-tip pens and paints.
2. Before doing leaf applique, prepare materials for crafts. The leaves collected in the forest or park must be thoroughly dried. To do this, simply iron them with a warm iron, having previously laid paper on both sides. After that, remove the top layer of paper and let the leaves dry completely.
True, this method of preparing the leaves is not suitable if you are making an application with a small child. Yet such a fragile material as dry leaves is more suitable for older children. In babies, the leaves will literally crumble in their hands. In this case, it is better to make an application from undried leaves, and then dry the finished composition.
3. Before gluing the leaves onto cardboard or a sheet of paper, make a barely noticeable pencil sketch of the future application on it. So the child will better imagine the future composition and more accurately glue the details of the application to the paper.
4. As for the glue, the usual stationery is suitable, which must be applied to the sheet with a very thin layer or dripped with liquid glue in several places on the sheet.
5. You can start making the simplest applications already with a one and a half year old baby, gradually complicating the plot.
How to make a leaf applique
1. Mark with a simple pencil the location of the future application.
2. Take prepared leaves. They must be taken with caution. Teach your baby to do this with tweezers or one finger dipped in water.
3. Now you need to glue the leaves to the cardboard. If the leaves are not too dry, then apply the glue directly to them, and if they are dried, then the surface of the cardboard should be covered with glue.
4. After the application is completely ready, cover it with a napkin and put it under the load for a day (for example, under a stack of books).
Leaf applications: ideas
To kids
For the little ones, simple stories are suitable. Ask your child to build from leaves everything that he saw during a walk, for example, trees. Help him glue small leaves (birch or aspen) to the album sheet or cardboard, and draw the twigs and the trunk with paints or felt-tip pens.
Children 3-4 years old
Older children can complicate the task - to think about what or who this or that leaflet looks like. You can not only make some kind of animal or bird, but also create a whole plot, for example, a bird sitting on a branch or a cute hedgehog with mushrooms on its back.
Preschoolers
With preschoolers you can make leaf applications several trees at once (aspen, birch, maple, mountain ash). These can be simple compositions of one figure, and more complex ones, consisting of several figures. From colorful leaves you can make and beautiful postcard, and a bookmark or something else useful.
Create beautiful applications with your child - you can then make a whole art gallery out of them.
What kind of glue is most convenient for making an application, and which one is better to use for crafts with dry leaves? What is the difference between PVA and silicate glue? How to choose a good glue? - We propose to talk about all this in today's article.
Among the whole variety of adhesives, let's consider those that can be useful to us for joint creativity with children, i.e. glues that are useful to have on hand at home. First of all, these are, of course, stationery adhesives.
Silicate glue or, as it is also called, liquid glass, is suitable for gluing paper and cardboard, as well as for paper work that does not require special aesthetics - for example, making papier-mâché. The fact is that during “clean” work, this transparent glue can give an unpleasant nuance - over time it turns yellow and traces and deformations may appear on the paper, and the glue line itself becomes brittle. Another unexpected feature: if you attach black-and-white photographs to an album with such glue, the image on them at the place where the glue was applied can become faded and disappear altogether. However, modern silicate glue usually contains additives that eliminate the above disadvantages.
At the same time, silicate glue has a lot of advantages: it firmly adheres to surfaces, is economically consumed, dries quickly, and is easily washed off with plain water. Silicate glue is convenient for gluing boxes, connecting large paper and cardboard elements, as well as repairing glass products - for example, aquariums, vases, etc.
When choosing silicate glue, pay attention to its consistency. Normally, it should be a clear viscous liquid, without thickening and lumps. Also pay attention to the packaging - it should be convenient for your purposes. For example, glue in a bottle with a dispenser or in the form of a glue stick with an applicator is best suited for children's creativity.

- the main competitor of silicate glue. It is also great for working with paper, cardboard and photographs, and is also useful when creating applications and crafts with fabric, thread, corks, feathers, natural materials. If you have to work with fragile materials (for example, the above-mentioned dry leaves) - PVA will provide the most delicate and at the same time reliable gluing. This adhesive does not wrinkle the paper, does not yellow, and is easy to apply and spread. From most surfaces, adhesive residue can be removed without much effort. And all the children love PVA for how easy and fun it is removed from their hands. The disadvantages of PVA include its ability to dry out in a bottle if it is not tightly closed. On the other hand, you can always remove the dried piece and get to the normal liquid glue.
The "correct" PVA should be thick and white, with a mild specific smell (not sharp and not unpleasant!). PVA glue is offered in bottles with a special double cap, which simultaneously acts as a dispenser and prevents the glue from drying out. The second option is a bottle, the cap of which is equipped with a brush for easy application.

- very convenient and economical hard glue. Made in the form of a stick, it perfectly copes with gluing paper, cardboard and textiles. The glue stick is easy to apply and evenly distributed, it does not stain hands and does not require additional applicators. It is convenient for them to stick small elements or pieces irregular shape, because only as much glue is applied to the paper as needed. Solid glue practically does not dry out, does not deform the surface, does not leave marks. For children's crafts, this is probably the most suitable type of glue.
The disadvantages of a glue stick include its weak adhesive ability - it may not be able to cope with something more complicated than paper and cardboard.
When choosing a glue stick, swipe it across the paper. It should not be too soft, otherwise it will leave pieces on the paper, and not too hard, because. it just won't stick. The glue should slide easily over the surface, leaving a trace uniform in thickness and width.
Hard glue comes in sticks of different sizes, all you have to do is choose a comfortable pencil that matches the size of your child's hand.

Second glue like "superglue". If your crafts consist not only of paper and cardboard, but also of plastic, iron, wood and other materials, ordinary stationery glue will not help you - you will need heavy artillery. Today, there are many universal adhesives that glue any surface in an instant. This "superglue" really works like a magic wand, but it's better not to give it to children. Due to its high adhesiveness, second glue instantly sticks to hands and can easily stick fingers together, so you should work with it very carefully.
In our opinion, these four glues are the most convenient and necessary when doing creative work with children. And what kind of glue do you use?
Children are always interested in novelty. Many of them love to sculpt and draw. To these classes in the form of alternation, you can add creative work- making crafts from beautiful autumn leaves.
She will captivate children - from ordinary leaves and simple materials, available in every home (glue, thread, paper), very beautiful crafts are created with their own hands.

When working on applique, making vases, bouquets, children not only reveal their natural abilities, develop their imagination, but also learn about the world around them.

Collecting a herbarium with children, you can discreetly and unobtrusively introduce them to trees of different species. How can you make crafts from leaves?

Preparing craft material
Since fresh leaves straight from the tree are not suitable for work, they should be dried well. It is not difficult to prepare the leaves, but, firstly, this process will require considerable time. Secondly, drying leaves has its own rules. To prepare good material for future crafts, you need to stick to them. The drying method depends on the type of crafts.
- Dry in a large container - in a basket, box, placing it in a ventilated place. The leaves dry well and do not rot. This material is suitable for those crafts in which the leaves do not have to be even.
- Arrange the leaves in books or albums and press down with a weight on top. This type of drying will take at least two weeks. Leaves will be perfectly smoothed.
- If patience runs out and you want to start work faster, a press invented for a herbarium will come to the rescue: put the leaves in a pile, shifting with paper. This material will dry in 3-4 days.

How to perform leaf skeletonization
This is a special technique for making leaf skeletons. They give crafts a special effect, as they are very light and transparent.

For work, collect fresh leaves, prepare soda, dyes for eggs, a toothbrush, simple paper napkins, small dishes.

Mix it with 1 part baking soda and 4 parts water. Dip fresh leaves into the mixture, covering them entirely with a solution. Put the container on the fire, let it boil and leave on a small fire.

After half an hour, turn off the heat, remove the leaves, laying them shiny side up on a flat surface.

Carefully blot excess moisture with paper towels. With a toothbrush, gently scrape the pulp from each leaf (gently, so as not to damage the leaves).

Rinse the remaining skeletons with water, paint them in the chosen colors. After staining, the skeletons must be dried, and they are ready for use.

Bouquet of flowers from leaves
This is the most easy craft which is made from leaves. For beginners, especially children, it is better to start with this species. It is not necessary to add dried fresh flowers to the bouquet. Leaves are suitable for buds different colors during the autumn season. Children can participate in the process at all its stages.

What do you need to have on hand to create a Bouquet of Flowers crafts?
- Fresh Maple leaves on stems;
- Lesson threads.

Steps for making buds:
- Turn the sheet glossy up.
- Roll it up into a tube.
- Bend the second sheet and wrap around the prepared tube.
- Wrap with many leaves until the flower of the desired splendor is obtained.
- Fasten the bottom of the flower by wrapping it with thread.
- Having prepared many flowers, make an original bouquet out of them.

Topiary from autumn leaves
For a topiary - a tree of happiness, coffee, banknotes, sweets, etc. are suitable. Try to make it from maple leaves.

Prepare for crafts:
- pot as a base;
- stick-barrel;
- foam (foam) ball for the base;
- gypsum;
- paints;
- ribbons, beads, artificial flowers, twigs and other elements suitable for decoration.

Stages of work:
- Heat glycerin with water 1x2 to a hot state, lower the stems of the collected leaves into it, keep for 10 days in a dark place with good air circulation.
- Fix a wooden stick with a solution of gypsum in a pot until it is completely stable.
- Paint the entire structure in the chosen color.
- Put on the top of the stick and fix the ball.
- Insert leaves into the ball, interspersed with decorative accessories.
- Fill the rest of the composition with moss, bark.

How to make a decorative fall wreath
Autumn colorful, bright leaves will be an excellent material for weaving a wreath. It can be attached to windows, doors, walls.

Assemble a set of material:
- flexible branches from any tree;
- dried leaves of contrasting colors;
- bunches with red berries;
- glue, strong threads;
- metallized threads;
- tiny figurines of birds;
- physalis berries.

Action process:
- Bend the branches into a circle or an oval, winding them with threads in several places - it turns out the frame of the future wreath.
- Carefully wrap the frame with prepared threads, leaving protruding branches in some places.
- Glue leaves to them.
- Attach bunches of mountain ash or viburnum, physalis to the frame with glue or thread.
- Attach birds to branches.

Hang the finished wreath in the chosen place. A bright, colorful craft will delight its creators and home.

Fruit bowl
It's time to move on from small, easy children's crafts to crafts suitable for decorating the house. For this purpose, you can proceed to a vase for fruit.

Before work, we collect material:
- glue;
- balloon;
- a tube of vaseline;
- scissors;
- leaves (maple leaves are best).

Actions in order:
- Inflate the balloon to your desired size.
- Coat it with Vaseline over the entire surface, then the leaves will not stick.
- Secure the ball firmly so that it does not move, for ease of operation.
- Lubricate the leaves with glue and stick them to the ball.
- It is advisable to glue the leaves in several layers.
- Lubricate the last layer with glue and dry for 3 days.
- Carefully pierce the ball and remove its pieces from the craft. It remains to put the vase in the prepared place.

Autumn style photo frame
Not a single child can resist the temptation to hang his own drawings, photographs on the walls of his room. Carried away by a new kind of creativity - leaf crafts, he will not give up the idea of mastering a photo frame decorated with unique autumn leaves.

Help him prepare:
- sheets of cardboard;
- paper glue;
- leaves to choose from

Making a frame:
- Immerse the leaves in advance in warm water to soften.
- Draw the cardboard in the form of a frame of the desired size.
- Glue the cardboard frame with prepared leaves.
- Leave to dry.
- Fix inside the photo with glue or tape.

Children's applications from dried leaves
This is the easiest kind of work. From leaflets different sizes, colors are easy to create whole pictures that can become an interior decoration. A series of panels on one theme will look impressive: animals, landscapes, etc.

Owl
If you want to make an application depicting an owl, you need to prepare:
- oak, birch, willow leaves brown shade;
- a set of colored paper;
- thuja branch;
- a piece of cardboard;
- rowan brush;
- a twig from any tree;
- glue.

Start work by drying the leaves and berries. When they are ready, we make the application.
- Cut out an owl from a cardboard sheet.
- Glue birch or oak leaves to depict ears and paws.
- Feathers are made from willow leaves.
- colored paper needed for the eyes and beak.
- We put the owl on a stand - a tree branch.

Firebird
A beautiful application will be made up of birch, linden leaves (you can use wild rose), paper, pumpkin seeds. It is performed as follows:
- A linden leaf will go on the body of the firebird, a head will turn out of a birch.
- Rosehip leaves, glued one at a time, will be the tail.
- Glue birch leaves to the body - wings.
- Pumpkin seeds will serve for the eyes, they also decorate the body.
- Make a crest from a tree branch.

a lion
Making it will be a joy for any child.

He needs help picking up yellow leaves round shape, ash seeds, chestnut fruit, pine twig, yellow sheet of paper, orange cardboard.

Craft from leaves on a yellow sheet of paper, start by drawing a black head with a felt-tip pen. Cut it out, glue it around with yellow leaves - this is a mane. Glue a chestnut in place of the nose. Pine needles will become mustaches. The ash seed will turn into a tongue. It remains to dry the craft, and the child will have a perky lion cub created by his own labor.

Rybka
You can please the kids by creating a fabulous golden fish with them. She needs brown and yellow leaves, oak acorns, ash seeds, blue paper.

We start the work with drawing - we make a contour on a blue sheet, cut it out. Linden leaves will be scales glued to the outline. The tail is decorated with brown leaves. The acorn caps turn into a head, and the fish is ready.

Optionally, you can decorate applications with moss, thuja sprigs, rowan berries.

For decoration, any natural materials: berries, cones, beautiful plants, nuts, seeds, acorns, fruits of various shrubs.

It is important to start creating, and then fantasy will tell you a lot. Leaf crafts will be a joy for children. In addition, the child will receive a lot of emotions during walks to collect leaves and other natural gifts. He will have useful activity, which over time can develop into a hobby. Still being decided modern problem all parents - the child has an alternative to a computer, smartphone and other gadgets.
Photo ideas for crafts from autumn leaves


