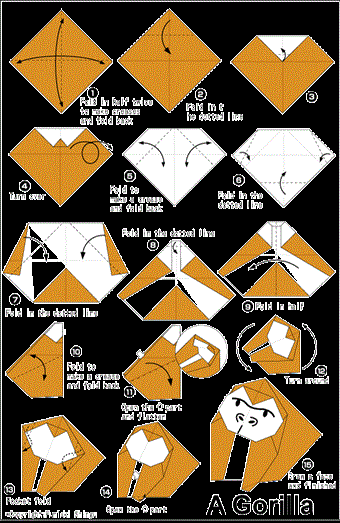
How to make animals out of colored paper. How to make paper animals using origami technique. Making paper animals from rolled paper
Simple animals for kids in engineering origami- this is entertainment for the child and an occasion for parents to teach him something new. Of the materials at hand, you only need colored one-sided paper, scissors, glue, a black pen or a felt-tip pen. The result is easily recognizable funny faces: a cat, a dog, a panda and an elephant.
How to make paper animals
Simple figures you will collect in just a few minutes. Be sure to have your child next to you. Take necessary materials and forward.
Origami panda - instructions for assembly with children
Take a black one-sided sheet of paper measuring 9x9 cm. Fold it in half in diagonal directions. Place white side out in front of you.

Focusing on one of the central folds, bend the opposite ends to the middle, not reaching the center exactly half the distance.

Fold the workpiece in half outward along the transverse strip.

Bend the lower sharp tip up. Fold the top layer down. Hide the tip inside. The panda has black ears and a nose. It remains to make the eyes. Cut out two circles from black paper and make white centers. Glue to craft.


simple paper elephant
There is nothing difficult in assembling an origami elephant head. Take a square 15x15 cm gray color and do the following:
- Fold the paper in half diagonally to make a triangle. Divide it lengthwise into three equal parts so that they can be folded together and you get a figure, as in the photo.
- Bend the bottom up.
- Bend the upper end forward and down so that it is outside - this is the future trunk, and ears on the sides.
- Finish off the trunk by making a couple of folds at the top. The paper is folded like an accordion.
- Draw the animal's eyes or glue from colored paper.


Origami dog
A funny dog will turn out in just a few simple steps. Bend a one-sided brown sheet measuring 9x9 cm along a diagonal line to make a triangle.

Fold the side corners of the triangle together and iron the center fold well.

Direct the sides to the formed center so that the ends are at the top and a multilayer rhombus is obtained.


Position the workpiece - the outer ends of the rhombus are at the bottom. Bend them up at an angle.

Fold the top corner down. Turn the figure over to the other side.


Form the ears by making squares from the triangles sticking out on the sides.

Bend the bottom of the outer layer up. Point the tip down.

Turn the dog's face over to the wrong side again. Bend the free lower end up so that it is even with the outer one and is not visible on the front side. Remove the side pieces inside out.


Flip the dog's face over. Draw the eyes and mouth.


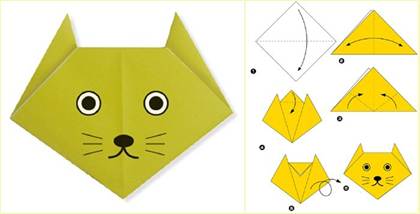
Paper cat and cat
It is difficult, touching on the theme of animals in the origami technique, to pass by cats. Let's make a cat. Repeat the same steps as with the dog until the workpiece is turned over to the other side.


The ears are ready. We fold the lower part, like a dog, bending up the outer layer. The tip is down again.


On the wrong side, hide the second lower end and side parts. Flip. Draw eyes, muzzle, mustache.


And in conclusion, an easy version of the cat. Fold the 9x9 cm orange square in half to make a triangle.

Lightly mark the middle, making a barely noticeable transverse fold. Bend the top corner to it. Lift the sides of the triangle up.


Flip the piece. It remains to decorate the muzzle according to your desire. Origami cat is ready!

I am sure that children are very interested in making animal faces with their own hands. After all, there is a new reason for games and beautiful paper compositions.
There are many more interesting things ahead! Subscribe to always be in the know! I wish you success in your work!
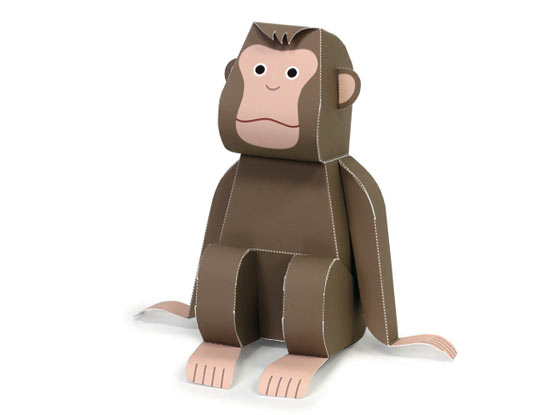
And again voluminous crafts from paper - forest animals: a hare, a fox, an owl, a monkey and a squirrel. The author illustrated very cute forest animals, the design is quite simple, but the model schemes themselves will still require some perseverance in assembly.
Gluing voluminous paper figures is very interesting and not difficult at all. Together with your children, you can collect and glue a lot of funny animals, and then populate a whole paper forest with them. In addition, it is useful for children to collect such models for the development of fine motor skills of hands.
Paper animal patterns
All children love to craft, cut and glue funny crafts. But work on voluminous toys contributes to the development of the child's spatial thinking. I suggest joining the children and doing creative work with them.
Using ready-made schemes that can be downloaded on the Internet, it is easy to make many original volumetric figures of forest dwellers together with the guys. This entertainment will perfectly occupy the child and give many hours of useful and developing activities.
To perform such work, we need to download the diagrams and the assembly manual, print them on a color printer. Then, using scissors, cut out all the details and, according to the instructions that are attached, assemble and glue three-dimensional figures of animals or even a whole tree.
Let's start, perhaps, with the manufacture of a cunning fox out of paper.
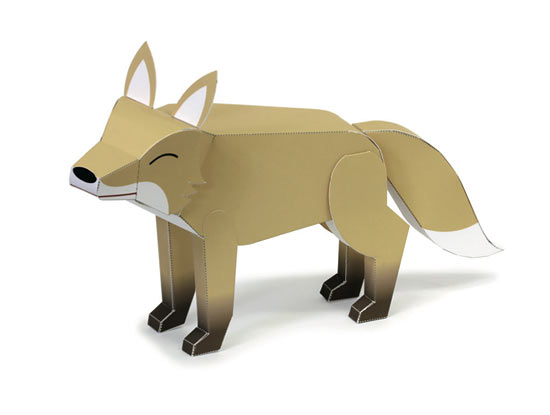
After we print the sheets with details, we take scissors and cut them out, taking into account the gluing allowances. Then bend over dotted lines parts and glue together according to the instructions and the scheme. We glue the ears, tail and as a result we get a real red cheat.
As we remember from fairy tales, the fox has always hunted a bunny and a paper bunny will keep our fox company.
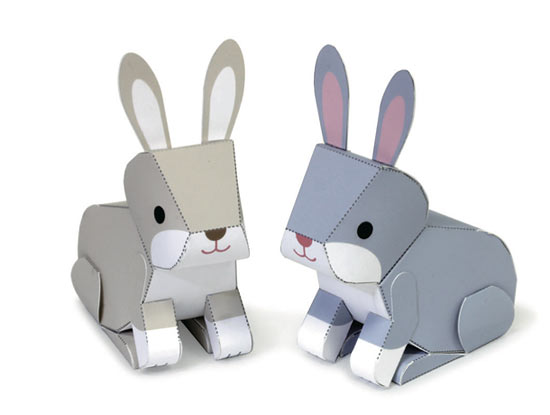
The algorithm for creating a voluminous paper bunny craft is the same as when creating a fox. ,
print it out on a printer, cut it out, bend it along the marked lines, glue it and assemble the toy little animal.
Not only the hare and the fox live in the forest, but also various birds. A voluminous paper bird is made in the same way,

And of course, what is a forest without trees? and assemble it as described above.

Many parents do not know what to do with their children, but you can have fun together and for this it is not at all necessary to invent something supernatural. Try inviting your child to make an origami paper zoo. The kid will certainly be delighted with such an idea, and you will have a great time with your baby during this activity. Well, we will show you how to make little animals out of paper for such a zoo.
Origami for kids
If you look at historical facts, then how to make a paper figure using the origami technique was invented many centuries ago in Ancient China, in which, by the way, the first type of paper was invented. For a long time, only nobles and people of "blue blood" were engaged in such an occupation, and the crafts themselves were used in ritual and religious rites. Over time, the art of origami descended to the lower classes of the population of the Middle Kingdom, and today it has become a popular hobby for many people. Now this technique has conquered not only adults, but also children. different ages.
What is needed to make a paper zoo? Required props
If you are going to do paper crafts for a zoo with the participation of children, it is imperative to prepare the "inventory" that is necessary for work.
1. Initially, you need to decide what the paper zoo will look like. Options to consider:
- a lid from a large box in which you can make enclosures for animals;
- a large drawing paper to color different colors by making the territory for the zoo out of paper;
- a table on which to make fences from dominoes or other improvised means.
2. Paper. You can take any:
- color, it is a priority, since it will not be necessary to color the finished animal figures;
- plain;
- napkins;
- sheets from notebooks;
- A4 format for printing and copier.
3. Scissors. For children, they should be special, so as not to get hurt, with rounded edges.
4. Glue. If you plan to make not only animals out of paper, but also voluminous decorations of the territory, then you cannot do without it. Glue stick is best, it is less easily soiled for children's pens.
5. You may need a stapler, stationery knife but only adults should work with them.
How to make an entertaining toy in the form of a zoo out of paper?
Initially, it is necessary to prepare the basis that will serve as the territory of the zoo, as we have already described above. Include fantasy in the process and try to make an original paper base for the future zoo. Discuss with your child who you will accommodate there, and only after preparing all the props, start work.
Agree, the option of entertaining children in this way is really unusual. Crafts in the form of animals will be a joy to every little one, since the theme of animals is relevant for this age. Of course, absolutely Small child will not be able to realize such a masterpiece, but you can ask him to try folding paper for you or an older brother / sister. By the way, the problems of raising children of the weather are interestingly written in the article:. This will involve all family members in the process.
How to make paper animals for the zoo with children? Step by step master classes
Now let's get down to the most important part of creating a zoo, namely the question of how to make paper animals for a zoo using the origami technique. The following workshops will help you easily populate the zoo.
How to make a crane out of paper? Step by step master class

Take a square sheet, the dimensions of the future figure depend on its size.
1. Fold it twice diagonally.
2. After making bends in the shape of a plus.
3. Fold the workpiece along the folds, as in the photo.
4. Bend the upper side edges to the bend in the middle.
5. Wrap the top of them with a triangle, as in the photo.
6.Now straighten the top, and flatten the bent parts in length.
7. Do the same with reverse side. It should be such a preparation.
8. Expand the workpiece sideways and again bend the edges to the central fold.

9. Wrap the top corner, align. Perform the same actions on the reverse side.
10. Bend, as in the photo, the corners for the neck and tail.
11. Turn sideways and push through all the bends.
12. Pull out the tail and bend the beak.
13. Bend the wings.
14. The crane is ready.

You can populate it in a paper zoo.
Video master class on how to make an elephant from a square sheet
How to make a fox out of paper? Step by step master class
To make a fox, you need to prepare an orange square sheet. The master class is shown on an example from sheet 15X15.

1. Bend the sheet twice diagonally in order to crease the folds.
2. Fold in a triangle, wrap the bottom edges, as shown in the photo.
3. Turn the resulting square over, fold in half.
4. Expand the workpiece, as in the photo.
5. Bend at an angle along the dotted line.
6. In one direction and the other.
7. Expand the folded part, as in the photo.
8. Bend the protruding triangle down like a muzzle, make ears along the edges.
9. It should turn out such a fox.

It remains for her to push the legs-leaves for stability, to make eyes.
Video master class on how to make a bunny from a square sheet
How to make a cow out of paper? Step by step master class
To make a cow, you need a 15X15 square sheet.
1. Bend it in half twice in the shape of + and twice diagonally. You will get such a sheet for work.
2.Roll up as pictured.
3. To get such a blank.
4. Bend the top corner.

5. Expand the resulting workpiece, carry out the actions as indicated in the photographs.

6. It should turn out like this.
7. Bend the workpiece in half. It turns out the body of a cow.

Now we need to make the head.
1. To do this, take an identical sheet to the first one, fold it in half. After to the center line of the fold, wrap the resulting halves.
2. Bend the workpiece again with the joint inward. After, bend the edge of the resulting rectangle, as shown in the photo.
3. Flatten each part of the bent edge (see photo).
4. It should look like this.
5. Make a nose by bending the tip inward. Ears, folding the corners, as in the photo.
6. Bend your neck.
7. Wrap the edges inward so that the cow's neck is not too long.

Glue the body to the neck.

Color the resulting cow and you can put it in a paper zoo.

Video master class on how to make a mouse from a square sheet
Schemes for creating animals from sheets using the origami technique
And a few more options for patterns that will help create pets from square sheets of paper.
Kitty.

Dog.

Bunny.

Bulldog.

Frog.

Turtle.

24 photo ideas for creating a menagerie at home
From improvised means, you can create a magnificent menagerie at home. This craft will be a great toy for a child of any age. A fun pastime in the manufacture of animals is guaranteed to all participants in the process, and what else you can do with your children can be found in the articles:
- if you have a little princess: ;
- if you have a toddler:
Creating crafts with your own hands develops perseverance in children, reveals creative talents and develops fine motor skills fingers. The result of the efforts of your children can be kept as a keepsake or decorate a nursery. If you are thinking about what to do with your child for the evening, do-it-yourself voluminous paper crafts the best choice. This technique is very simple to perform, and the result in any case will please the whole family. So let's get started.
sponge bob and friends
Sponge Bob Square Pants is a very popular cartoon, your child must have seen its characters. We invite you and your child to revive the main characters using a very simple technique. You only need to print the diagrams that are attached to the article, cut along the contour and glue in the right places.
Gary the snail is SpongeBob's pet. It is found in almost every cartoon series. Creating such a beautiful snail is very simple. Print out the chart below:
After you have printed the diagram, cut it out along the indicated contour and glue it on the white indents and that's it. Your snail is ready. It will end up looking like this:

Mr. Krabbs is the owner of the Krusty Krabbs restaurant, the boss of Sponge Bob. More than his daughter Pearl, he loves only money.
Assemble the businessman by folding all the white pieces inward and drain them.
The details are small and there are a lot of them, it is likely that it will be very difficult for children to cope with them, so you will have to help him.
As a result, you will get something like this:
Patrick - best friend Sponge Bob, he accompanies him throughout the cartoon. Such a wonderful pink star will perfectly decorate a collection of voluminous dolls.
Fold and glue Patrick in the same way as the previous figures, and you will get such a simple and good-natured character.
Now it's time to create SpongeBob himself. This main character. Employee of the Month since the beginning of Krusty Krabbs, he loves his job and the Krabbs Patties he makes. He is also a kind and devoted friend. See diagram below:
If you have already made all the previous characters, then you know exactly how to assemble the Sponge. Get such a friend.
Animal world
Volumetric crafts made of paper and cardboard in the form of animals are not only a way to keep your child busy for a while, but also a great opportunity to better remember and visualize the idea of \u200b\u200banimals. Let's start.
"Cunning Fox" is a simple craft that will help your child create their own personal fox. Download the diagram and print it on a color printer.
After the printed circuit is in your hands, arm yourself with glue and glue the cut out parts in accordance with the instructions. If you do everything right, you will get such a lovely little fox.

"Bunny". This time we will collect a shy bunny, it can be a great decoration for your desktop. Download the diagram and print it.
The further algorithm of actions is exactly the same. We cut along the contour, taking into account the indents and glue according to the scheme. In the end, you will get such a bunny.

"Squirrel". A beautiful forest squirrel, along with a nut, will keep the company of previously made figurines. We cut out along the contour and glue in accordance with the instructions, and then you will certainly get such a squirrel.

Here we have such realistic animals.
Video on the topic of the article
For your convenience, watch a selection of videos on this topic.
There are many different fascinating animals on the planet. They can be repeated if desired. various materials. How to make animals out of paper? Everything is very simple, because you just need to take a piece of paper, fold it using schematic images, and as a result you get cute paper animals.
For children, the topic of pets will be very interesting, that is, the creation of dogs, cats, birds and fish. By creating interesting paper figures, children explore the animal world and learn to look at it creatively. Let's look at several master classes for creating such animals with a detailed and step-by-step description.
Making a cat
First, let's look at the method for creating a cute, tailed cat using the following detailed diagrams creation of the angora cat.
For work you will need:
- Paper;
- Scissors;
- Pencil or marker.
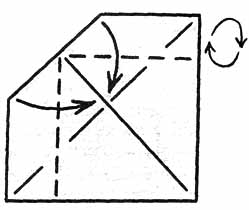
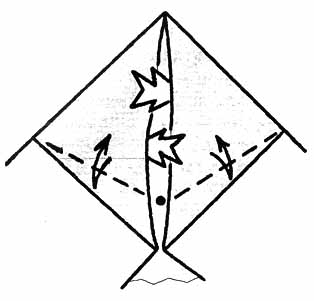
- Take a sheet of paper and cut out a square with even sides. After that, we fold it diagonally, first in one direction, then in the other.

- After that, we bend one of the corners to the middle. Then we turn the resulting workpiece upside down.
- Now you need to bend two of the strips to the middle, as in the image above.

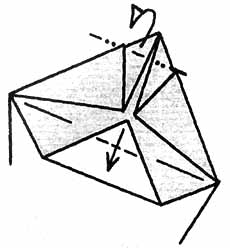
- It turns out the workpiece, as in the photo above. It's time to work with top details.
- Now you need to bend the resulting pockets on the left and bottom, while bending along the lines marked in the image above. Their position is not strictly indicated, but it is necessary that they converge at one point.

- After that, you need to open and flatten both pockets, create a fold along the lines indicated in the picture above. Both marked points must match.

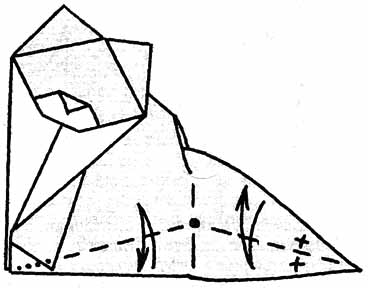
- Raise the triangle up at the back and bend the strips so that their right angles touch the sides of the workpiece.

- As a result, it should turn out, as in the image above, after which you need to turn the workpiece over.


- Now you need to bend the workpiece in half. Please note that in the upper part the fold line turns out to be a "mountain".

- You need to get exactly the same result. After that, open a wide pocket on the left side.

- Then bend the tail so that the dots match. Lower the future ears down.
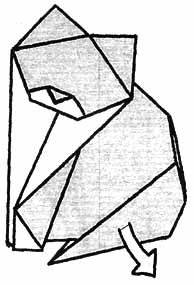
- Now you need a small triangle on the top right side, which captures a piece of the bent tail.

- Now we bend the triangle inside the workpiece, to do this it needs to be slightly opened at the bottom.

- After that, on the future pug, lower the nose down, as in the image above. And we bend the crown back.

- Then you need to open both pockets and flatten them, so you get cat ears.
- We finish the muzzle by bending back lower part on both cheeks.

- After that, you need to bend the tail to the right, then the workpiece cannot be flattened.

- Now you need to bend all the paper layers, as indicated in the image above.
- Then you need to return the tail back. We bend the triangle on the left inside the workpiece, while clinging only one paper layer. At the moment of bending, you need to pull up both layers of paper from the right side.

- The image above shows how the workpiece looks from the back at the time of the previous step.

- As a result, it turns out that the tail hugs the bottom of the outer paper layer. Now you need to pull it down and to the right.

- Now the workpiece has become more voluminous. Now you need to lift the tail up.

- Then we lower it down again. Now you just need to make a few small strokes, and the cat will be finished.

- We bend the outer part of both cheeks of the pug back.
- Now we bend the corners on the paws.
- The figure of a sitting cat will partially rest on the tail, which will move forward from the body at almost a right angle. If desired, you can draw eyes. Now the angora cat is finished.
cute pig
In this lesson, we will analyze how to make a pig using the origami technique with your own hands.
Paper pig can be made in a variety of colors, children will like to make paper animals more bright colors. First, we make a rectangular blank. To do this, fold the sheet in half lengthwise. In order for the pig to be more beautiful, it is better not to take square sheets.

To make further work easier, we fold the workpiece with an accordion into three gates, and then straighten it. As a result, four fold lines are obtained on the part. Then we pull the edges on the left so that the lower and upper edges of this part are straightened. Thus, a pointed rectangle shape is created. The same manipulations are now repeated on the other hand, these actions are shown in the figure in the first part.
Now turn the workpiece over to the other side and fold it in half lengthwise, as in the second part of the image. After that, turn off the sides of the triangles from the side on both sides, as shown in the third part. Then we wrap the triangle inward on the right, as in the fourth part of the image. Then we wrap inward the end of the triangle on the left, as in the fifth part of the image.
Now we raise the lower part of the workpiece, as shown in the picture under the sixth paragraph. It remains only to draw a muzzle for the pig and straighten the paper. Here is the finished cute pig.
Below are a few more simple circuits creating paper animals.
Video on the topic of the article
And in conclusion, we present to your attention a few videos with detailed lessons on creating a variety of paper animals.