Autumn craft technologies for boys. Original autumn crafts from natural materials. Crafts from natural material for kindergarten
In contact with
classmates
With the arrival of autumn, it was not only the time for rains, but also the time for creating beautiful autumn crafts. It's good that autumn is no less generous than summer and we have something to make autumn crafts for kindergarten.
Additionally, to work with natural materials, you will need paints, brushes, a glue gun, small colored pompons, feathers, remnants of felt or fabric, beads, and other options for various decor.
Now, knowing what to make autumn crafts from, let's get down to creating them as soon as possible. For example, pine cones make such cute chickens. For them, you will need cones, yellow gouache, a brush, a foam ball or large bead, a glue gun, plastic eyes, a piece of orange felt and scissors. Paint both the bump and the ball in yellow, glue them together, glue a felt beak and eyes to the head, and a pair of legs to the bottom of the bump. If you have a pair of real feathers, you can glue them on the sides of the chicken.

A hedgehog from a cone can be made in two versions. In the first case, you will need a bump, a piece of light brown or beige felt, eyes, a small black pompom, and a glue gun. Cut out a piece for the hedgehog's face from felt, arrange it appropriately and glue it to the bump.

The second option assumes the presence of a large number of spruce cones, a small plastic bottle with a black cap, a glue gun, jute rope, a large ready-made eyelet, or the remains of black and white felt. Wrap the neck of the bottle with jute rope and glue the cones all over the bottle. Cut out the eyes out of felt and shape the muzzle.

A wonderful owl can turn out if after a trip to the forest you have acorn hats, a piece of bark and a pumpkin seed. Just glue all the details and secure the owl to the tree branch.

To make a snail, you will need chestnuts, plasticine and a pair of matches for horns. If there are no matches, then you can replace them with toothpicks, however, it is worth protecting the child from injury and sticking a bead on the ends of the horns.

You can also turn a chestnut into an incomprehensible, but funny animal by gluing huge paper eyes, a pair of paper legs and a braid hat to the chestnut.

A bright beloved bug, ladybug, you will definitely succeed if you find a chestnut, a couple of eyes, paints and two pushpins. You can read more in our master class.

Young fans of the cartoon "My Neighbor Totoro" can create their favorite character from acorn and paper. Paint the acorn with gouache, and make the ears from tiny pieces of paper or paper and glue to the acorn.

A nutshell will turn into a boat in a matter of minutes if you glue a tree branch inside each shell and attach a leaf sail.

The variety of autumn leaves stimulates children's imagination and, as a result, we can see completely extraordinary things.
For example, these are such funny leaves made of leaves. Just glue the maple leaves to the paper, add the handles, legs and glue the eyes with the spout.

Every kid will get hedgehogs from leaves if the mother draws the face of a hedgehog on paper and entrusts the child to glue leaves - needles to it.


Another forest dweller, red-haired and cunning, can be your fall craft. To create it, you will need a maple leaf, eyes and paper ears, a small spout pompom and PVA glue.

Another version of forest animals made of leaves and paper. To give the craft the features of the desired animal, simply draw a face on paper and glue the appropriate-sized leaf ears.

With the help of leaves, you can make not only animals, but also people. Cut the head out of felt, paper, or foamiran, glue the eyes with a spout, and make a fluffy hairstyle out of maple leaves.

Foresters, the indigenous inhabitants of the forest, are made from cardboard sleeves, leaves, buttons, small stones and pieces of chenille. It is best to fasten all the parts with a glue gun.

Also, cardboard sleeves can be turned into autumn trees by painting them brown, gluing one edge to cardboard, and attaching autumn foliage to the other edge.
No paper? So you can make leaves from cardboard and knitting threads. Cut the leaves out of thick cardboard and wrap them with thick, bright threads. Glue the tip of the thread and hide it between the thread layers.

Do not forget about buttons, another versatile material for crafts.

If you repaint old and unnecessary puzzles, then you can get a beautiful autumn tree. Make a trunk for a tree from the remnants of fabric folded in a pigtail and glued to a dense base.
But, if, nevertheless, you managed to collect large reserves of autumn herbarium, then you can make such beautiful candlesticks. Only small leaves, PVA glue, a brush and a glass jar will be needed.


And acorns can be used to decorate a photo frame, where you will place a photo taken during your last trip to the forest.

As you can see, there are a lot of options for autumn crafts for kindergarten and school. All you need is just to stock up on natural materials for crafts on time and open our website.
In contact with
Every year, nature gives us a lot of natural materials, suitable for creativity, completely free of charge. The process of creating with your own hands develops the artistic taste, thinking, memory of the child, fosters perseverance. But the most important thing is that you can have fun and usefully spend time with friends, delighting yourself and others with crafts.
Preparation of natural materials for their further use
Nature is the best artist, she creates such natural materials that, in skillful hands, turn into works of art!


Plant materials
Chestnuts
Chestnut fruits have a bright brown color and a shiny surface, so they make excellent DIY crafts from natural material. The shell of fresh chestnut is thin, easily pierced with an awl. Chestnuts are a fertile material for working with young children themselves. Many different pupae can be made,.


It is best to store in a cool place in boxes.
Acorns
Oak fruits ripen in autumn, in September-October. collected in various shapes and sizes.


At the same time, their cups (plyus) are also collected, on which they are held. Cocks are very often used separately from the acorn, as an independent natural material for various crafts.

Puffs from acorns and balls made of wool
How to dump even balls of wool, see the video Olga Skibina:

Acorn puffs and Christmas bells


You can store them for a very long time, after thoroughly washing and drying them. But why just store stones like that when the whole family can play with them fun?)


For another way to apply an image to river or sea stones, see the video from You can do it craft... You will be surprised how easy it is!
Seashells
You can collect shells on the banks of rivers, seas, lakes while relaxing with children. Many of them are original in appearance, in shape - oval, in the form of a comb, elongated, etc.
Boil them for a few minutes to free them from living organisms. The shells are washed with a small brush (you can use a toothbrush), after which they are dried, sorted by type and size. Stored at any temperature.
You can also clean the shells in a solution of whiteness and water at a rate of 1: 1. The top layer will disappear after a while, and the shell remains with a beautiful shiny top.
Figures of animals are made from large shells.


Small shells make beautiful applications, garlands:


Shells can be used not only as the main material, but also as additional decor (bird wings, dog ears, flower petals, etc.)


Sand
A very accessible material that can be collected in any sandbox. It differs in structure. Before work, it must be well rinsed and dried. And then you can use it as a decoration in your works:


Storage rules for natural materials
DIY crafts from natural material will be perfect if, after collecting, drying, pre-processing, you properly store these natural gifts. To do this, you must adhere to certain rules.
- A dark, cool and well-ventilated area is the best place to store natural materials.
- You can buy plastic containers for storing every type of material; use cardboard boxes for shoes, tea, sweets; take regular glass jars with a screw top. For seeds, as with beads, it is best to have a container with many compartments.
- Dried flowers are fragile, break easily, so they are placed in a tight box or container. The petals are kept separate from the flowers. Flowers with a stem can be stored in a vase.
- Prepared leaves are brittle too. You can store them in large books. Also, for safety, put them in signed candy boxes, grab a little with tape so that they do not accidentally open.
- The shells are placed in glass jars or plastic containers with a wide neck to prevent crumbling.
Additional tools for natural crafts
To create a beautiful craft from natural materials, you will need additional tools and materials.

It can be:
- colored paper;
- cardboard;
- trimming the skin;
- scraps of fabric;
- bird feathers;
- Styrofoam;
- plasticine;
- wire;
- PVA glue, "Moment";
- gouache;
- stain;
- varnish, etc.
Paper very often used as an addition to natural materials. Children, bending, gluing it, make the work much more interesting.
Plasticine fasten separate parts of simple toys at the initial stage of work. It is not very durable, but it is often used as a supplement in kindergarten and elementary school.

From wire most often they make the frame of the toy, the connection of its parts. Copper wire diameter 0.29-0.35mm - soft, flexible and durable - most comfortable. And for the frame, a wire of a larger diameter is used - 1-1.5 mm.
Thread it is better to take thick, multi-colored (No. 10).
Glue it is better to take white PVA, BF, etc. However, in kindergarten it is better to use PVA glue.
They also use foil, pebbles, cherry bones, bristles.
It is best to store additional material in a small drawer with compartments for each type of material.
The use of additional material depends on the idea, the skill of the children, the degree of development of the imagination! Offer your options, but rely more on children's intuition and desire.

It is also additionally necessary to have certain tools for making crafts from natural material:
- art scissors;
- awl;
- jigsaw;
- tweezers;
- pliers and wire cutters;
- sewing needles;
- brushes for glue and paints;
- cotton cloth for wiping off glue residues.
Scissors for children should be with blunt ends, small, with rings comfortable for a child's hand.
Awl you need to take from a durable material with a handle length of about 6 cm, a diameter of about 2 cm, the piercing part - 3.5 cm
Needle need a large sewing machine. It is imperative to keep it in the needle case with the thread threaded into it.
Attention! Pliers, pliers, drill are used only by an adult!
To draw the contour of the cut out part, you need a simple pencil... For example, dresses, hats for a doll, etc. It is better to take a soft pencil (2M).
Brushes(softer for drawing, harder for glue). Better to buy squirrel brushes (no. 4 and 6). For glue, take a brush with a hard bristle.
Stack- a tool required for surface treatment of clay or plasticine. The length of the stack for children is about 12 cm. You can make the stack yourself from a worn-out brush: round it on one side, and sharpen it on the other.
Crafts from natural material for kindergarten
Kids love it when in their hands chestnuts and plasticine turn into toys with which to play. Crafts from natural materials for kindergarten are not very complicated, so any child can cope with the help of an adult. Sometimes they are made from fruits and vegetables, but more often these are applications from leaves and animals from cones and acorns.
Crafts from leaves and maple "helicopters"
The easiest and most affordable job, even for babies, is an applique made of leaves. If this is the first time you are doing a composition with your child, offer him a picture that will serve as a template. Do not rush to do everything yourself. Invite the kid to choose the leaves at will, so that the work turns out to be similar to the sample. This will develop your child's creativity.
Applique material:
- colorful leaves;
- dense sheet A-4;
- glue brushes;
- PVA glue;
- scissors;
- sample.
To make a simple composition, you need even dry leaves. Put them under the press or in a book. The material is ready in two days. Use scissors to cut out the appropriate pieces and lay them out on a piece of paper.
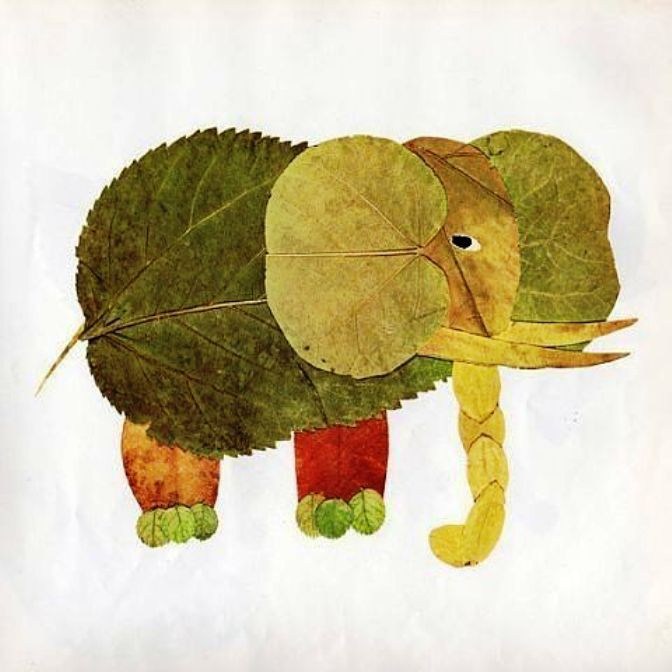
Now you can glue. The background and lower layers first, and then the finer details. For example, if you want to make an elephant, then first make the body and head from the leaves, and then glue the trunk, tail, legs. If you do not have enough eyes, then they can be completed with a marker or made from tree seeds.
It is not necessary to do everything according to the template. You can come up with a picture yourself and create an original composition of leaves.


Use colored paper, felt-tip pens, paints as an addition, so your applications will be even more interesting.
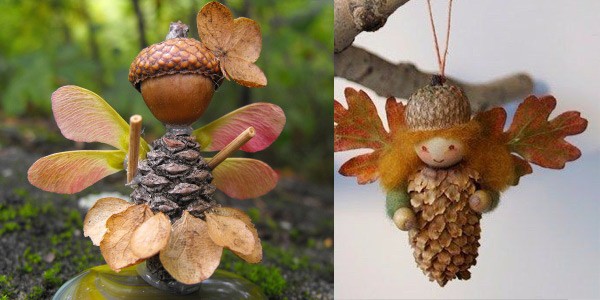
Along with leaves as a basis for crafts made of natural material for kindergarten, "helicopters" from maple are ideal. Just look at this miracle!

Maple Seed Fairy Wings

Maple helicopter dragonflies
Now you are convinced how beautiful and original appliqués from leaves can be. Use these ideas for leisure activities with your kids.
Simple master classes for creating children's crafts from acorns and cones
At the end of summer, acorns begin to ripen, and they make wonderful crafts from natural materials for kindergarten or school. They are well preserved, and on long autumn evenings, together with the children, you can do a pleasant and useful activity that develops the fine motor skills of the baby's hands, imagination and perseverance.
The most common acorn crafts are animals and various people. From toothpicks, matches, thin twigs, you can easily make legs, arms, horns and other small elements. An adult needs to help children poke holes in acorns.
For fastening small parts, you can use a glue gun, Super Moment glue, but only adults should do this. And the safest way for the guys is to fasten the parts with plasticine.
Fly agarics from acorns are even easier to make! To paint acorns, you need to remove the caps from them, and after the paint has dried, glue them in place.


Acorns are very beautiful in themselves, and if they are also painted with acrylics or nail polish, then such crafts will decorate any home.

And from the hats painted with silver paint, you can make an original decoration for the New Year tree. The process of creating such an eco-toy is quite simple: we tightly glue acorn caps onto a foam ball (you can take an old Christmas tree ball). And it sparkled with a new one.

We found another video for you, where Niki Junior
In addition to the "edible" crafts, kids can choose any of the items presented in this huge article "Cross"! We tried to choose the best and easy-to-implement ideas 🙂 Good luck and creative inspiration to everyone!
Good afternoon, today we will be talking about autumn crafts. And we will make these crafts from natural material with our own hands. Autumn is rich in a wide variety of materials. And so we will do with The most different crafts on the theme of Autumn- from leaves, twigs, acorns, chestnuts, straw, moss, dried flowers and other natural material. I will show you interesting ways to create autumn crafts with your own hands using ordinary natural material. in an unusual design way. In this article you will find fresh ideas, that will inspire you to be creative this fall. So we go out on a quiet hunt for ideas for the best crafts of the fall-2017 season.
Autumn natural material is rich in ideas for a variety of crafts for children. Let's see what ideas you can implement this fall.
Compositions from leaves
and natural material.
Who said that autumn crafts made from natural materials should be done while sitting indoors. Golden autumn beckons with the warm sun, the smell of rotten leaves - and we don't want to sit within four walls. We go outside with the children to catch a little more warmth and warm our eyes with the yellow bonfire of autumn foliage.
Crafts on the AUTUMN theme from natural materials can be done right on the street. In my yard, next to the entrance. All you have to do is find a quiet, windless place. Instruct the children to collect a pile of bright leaves and a bucket of dry pebbles.
And now an interesting game begins - laying out crafts from autumn natural material. For beginners, this can be a simple tree. Heavy stones press yellow leaves, prevent them from flying away from the wind. The craft can be saved as a photo.

If there is a whole bunch of pebbles next to your walk, then you can make a craft from natural material on a larger scale (as in the photo below).

If you are observant, you may notice that the foliage underneath is different in color. If we collect yellow leaves from ash or birch in a separate package, red leaves from aspen or Canadian maple in another package, and a little more brown blackened leaves, then we can make such a bear bear Winnie on our porch.

Any silhouette picture can be laid out from a colored mosaic of nature itself. The main thing is to find a place without strong winds. And have time to photograph this beauty before it fluttered from the wind and flew away like a bird.

The natural materials of autumn themselves will tell you ideas for collages - gray branches (like the gray plumage of the wing and tail), yellow leaves (like yellow fluff on the breast). And here you are, a tit-bird.

You don't have to be an artist, you don't have to have many leaves. Even the smallest deciduous piles can be folded into beautiful autumn crafts. The simplest DIY craft, the distribution of foliage according to the colors of the spectrum, looks like real magic.

You become little wizards. Secret gnomes, assistants of Queen Autumn. You hooligan secretly, leaving kind signs, funny symbols of the autumn season.

And some crafts can be done using a tree trunk as a base. Make the tree smile. The nose is a bump, two eyes sawed off from a wood block, and a smile from physalis fruits, strung on a thread.

Do you know what mandalas are? In the east, mandalas are sacred patterns enclosed in a circle. A harmonious pattern repeating in a circle is like a map of the universe. Mandalas are drawn or laid out from mosaics, colored sand, flower petals. Mandalas are a spiritual practice that allows you to touch the divine principle within yourself. You need to make mandalas in a special state of mind - pure, serene, enlightened.
We, too, can make beautiful harmonious patterns of mandalas with our own hands in the form of handicrafts from natural material - a bright beautiful autumn one.

Your autumn mandala craft can be quite small (like in the photo below).

Or a very large one, consisting of many circles in a cyclic pattern.

Mosaic applications
on the topic AUTUMN.
All kids love mosaics. Why don't we make it from autumn natural material.
Since the leaves are too large for a mosaic (and are suitable for laying out large paintings in the yard), for indoor small works we can cut an ordinary juicy maple leaf into small squares. Divide them into bowls - yellow, green, red separately. And let the children themselves lay out a bright mosaic craft from such a pleasant to the touch natural material with their own hands.

As an ornamental material, you can use cereals or seeds. A very good natural material for autumn children's crafts is yellow corn grains or large pumpkin seeds painted with gouache.

And also a mosaic made of solid leaves can become the crown of a tree - a simple and quick craft made from natural materials, which is suitable for kindergarten children. You can glue the leaves on paper, or on a transparent office file - and then such a craft can be fixed on the window, the leaves will shine in the sun. A beautiful children's craft for a younger age.

Crafts on the theme of AUTUMN.
Natural material STONE.
And here is another wonderful idea for crafts from natural materials in the autumn theme. Ordinary flat river stones can be used as canvas for autumn paintings. You can paint the stones with a brush, but it is better to apply the drawing using the dots technique - round wooden sticks or special dots sticks (metal devices with a round ball at the end) are suitable for this. They are sold in the manicure department, as they are intended for painting on nails. The ball tips of the dots sticks come in different sizes, allowing you to draw even dots of any size.

You can also draw owls on the stones - this is the simplest drawing - the main thing here is expressive eyes, a pointed beak, and oval-wings with even rows of feathers. First, we draw with paints, then we outline each painted element with a contour (white, as in the left photo, or black, as in the right photo below). And the contour thin stroke of the elements will make the crafts-drawings clearer and more expressive.
Such crafts-owls made of natural material will look good on a snag with patches of moss, inside a wooden frame, glued to a cut of a log.

And it's even cooler to plant such an owl inside a hole cut in a thick round cut of a tree trunk.

Autumn crafts
with tree branches.
Ordinary tree branches can also become a source of an interesting autumn collage with your own hands. This natural material is lying around completely idle. On a walk, you can give the children the task of collecting beautiful, not dirty twigs in a bag, disassembling them at home, cleaning them from debris and breaking them into small pieces.
Next, on a sheet of paper, draw the outlines of a basket with handles. And either we give the child plasticine, or we arm ourselves with a glue gun and begin to collect our basket from the sticks. Then it remains to put fruits in it (cut out of cardboard, draw and then cut, or perform using the cut-off applique technique).
And if you have collected beautiful leaves together with chopsticks, then you can make a children's craft tree from natural materials.

Long sticks found in the park can not be broken, but put aside to make them a new hand-made panel made of natural materials(as in the photo below). The principle is simple. The sticks are laid in the shape of the sides of a square - we tie the junction of the sticks with twine (wire, thread). And then we decorate such a frame with natural materials and colored paper.

You can put a canvas inside the frame of branches - we tint a sheet of cardboard with paints, make holes on its sides with a hole punch - and tie the sheet with threads to the branch frame, pulling the thread through the holes and around the branch (as is done in the left photo below). And then on this canvas we make an applique made of natural material on the theme of autumn.
Or you can simply decorate the frame around its perimeter - in the lower part of the square we attach a bush, mushrooms, pieces of moss, bark, and a hedgehog made of cardboard to plasticine. On the top of our panel made of natural material we hang a garland of autumn leaves, cut out of colored paper, a sun, clouds, a kite.
From the branches you can lay out large applique in the form of an owl , children's handicraft, which is entirely made of natural material, which is rich in autumn. Branches, dry and fresh pine needles, withered fir legs. You can lay out the applique on a sheet of plywood and fix everything with glue - or make a temporary mosaic for a walk right on the ground or on a hemp.

Looks very nice handicraft Hedgehog made of natural material ... This fall craft is my absolute favorite in this article. Let me even tell you in detail how simple and easy it is to make such a hedgehog with your own hands. It is really very easy. Now you will be convinced of this.

First, we find beautiful thick twigs from a bush or birch branches - we cut them with scissors or a knife into segments with long oblique cuts (as in the photo of the hedgehog below).
For this autumn craft, you will need plasticine - a large piece... Where can I get it? I never throw away the used plasticine from children's crafts, I put it in one common pile - then I soak this multi-colored pile in hot water - it becomes soft like a fresh dough, and easily and simply, I knead this whole lump into a homogeneous mass with my hands - it turns out a large piece of fresh brown plasticine of excellent quality. You can make a variety of crafts from it for a long time.
We form the body of a hedgehog from plasticine- drop-shaped. And in the thick part of the hedgehog, row by row, we stick segments of branches - the oblique sections should look all in one direction.
2 ways to design a hedgehog's face.
1 way... I wrap the hedgehog's plasticine nose with a piece of burlap, or a piece of gauze (bandage) soaked in a solution of iodine with water.
Method 2. The hedgehog's face can be coated with PVA glue, covered with pieces of paper napkins, again coated with glue, again a layer of napkins, on top of the glue and allowed to dry - you get a layer of papier-mâché. We cover it with paint - we draw eyes on it, a nose
Craft-spider web from branches and leaves.
And you can also make beautiful decorative crafts-pendants on the AUTUMN theme from natural material. We need straight, even branches - like a willow. We look at the photo, and below I give a detailed step-by-step description of this children's craft.

A detailed master class on this craft from natural material.
We take a lump of plasticine and divide it into 2 small scones. On the first cake we put twigs in a circle (that is, radially from this plasticine center) - so that the ends of the branches meet in the middle of the plasticine cake. Slightly press each branch so that it sinks into the plasticine. Cover the top with a second plasticine cake, also pressing it on the branches. It turns out a spread with rays of branches.
Now we need coarse threads - those with which in the store they tie up packages with purchases. Such thick gray canvas-paper threads. With them, we begin to weave a cobweb between the branches - starting from the plasticine center and gradually moving to the outer edge, until our cobweb rests against the edge of the maple leaf.
Craft an autumn kaleidoscope.
Also you can do colored kaleidos made of natural material - from branches and leaves (as in the photo below).

For this craft, we'll need glue from a hot gun (or the ability to weave threads between crossed branches). Now I will give a detailed master class on how to create this craft with my own hands.
Step 1 We cut 4 rods of the same size. Two of them we cross a cross to a cross - we fasten with glue or threads. The other two we cross in the same way. We now have two crosses made of branches.
Step 2 We put these 2 crosses on top of each other obliquely - so that they form snowflake shape... We glue the middle of this clutch (or fix it with threads).
Step 3 We make a round ring from a flexible willow twig (fresh or soaked in water). We attach this ring to our "snowflake" of twigs - so that the edges of the ring are at the same distance from the center - for each rod(we measure with a tape measure). If the distances are the same, then the ring will be even, not curved.
Step 4 As a result, we got a circle out of branches, divided into triangular sectors. And all that remains is to find large maple leaves of different colors - pure yellow, pure red, pure green, pure orange. From them it is necessary to cut out triangles suitable in size to the sector-hole in the future kaleidoscope. Cut out the triangle so so that the central vein on the maple leaf passes through the middle of such a triangle- divided it in half like a bisector from geometry. And we attach all these multi-colored triangles made of maple leaves on a glue gun to the sectors of our construction made of natural material.
Autumn applications
Natural material.
And of course, all children love to make applications from autumn natural materials. Small and large paintings of leaves and dried flowers. The most favorite children's crafts on the theme of autumn.

The symbol of autumn made of natural material is, of course, a hedgehog. From what they just don't make it, from leaves, from flowers, from twigs, from maple or ash seeds.

The simplest hedgehog is done like this. Cut out the silhouette of a hedgehog from cardboard. We give children plasticine and maple seeds. We begin to fasten rows of seeds with plasticine on cardboard - you need to start from the back of the hedgehog... Children rush to start from the face - explain to them that this is not correct, that then it is not convenient to do the back rows of needles, when the front needles stick out back and get in the way.
By the same principle, a hedgehog is made from a flat natural material - leaves and dried flowers. Also, starting from the bottom - we attach it to plasticine or glue. This is the most common children's craft on the Autumn theme.

Children also love to make autumn turkeys. It is also a simple craft-bird, which does not require a lot of natural material. The body and head of the bird can be cut from cardboard. Or the head and torso can be cut with scissors from the same maple leaf (as in the photo of the craft below).


YOU can do crafts not using colored paper, but by cutting out all the parts necessary for the painting from natural material, in the event that you do not find a leaf of a suitable shape.


Here's a great idea. Large craft LEO. It can be made from real natural leaves. Or you can arrange it as a collective paper craft. In the kindergarten group, we distribute sheets of paper with a maple leaf painted on it. The task of the children is to cut this sheet along the contour. At the end of the lesson, all the children attach their leaves to the lion's mane. A good idea of crafts on the theme of "autumn" - for the middle group of kindergarten, when the children are in their first year of learning to cut with scissors along the contour - they will cut a maple leaf for about 10 minutes, and puff with zeal like steam locomotives.

If you work in a large children's team (as a kindergarten teacher or teacher, or the leader of a circle), then you can do one big collective craft. For example, here is such a bird made of natural material. We cut out parts of the bird from cardboard - separately the left wing, separately the right, separately the body and separately the tail. Divide the team into 4 creative groups... Each group of children receives their part and begins to lay the leaves on glue or plasticine. After the completion of the work of each brigade - we combine parts into one common bird craft from natural material, bright as autumn itself.

Autumn crafts-paintings
Natural material.
And of course, beautiful bright handicrafts-collages in the form of natural landscapes are obtained from the autumn material. In the photo below, we see how a panel painting was made from different materials - paper, leaves, herbs.

You can dry many flower petals. And make a big collage with the children with a blue sky and a blue river. Stretch a bridge across the river, cut out of a blackened autumn leaf (for the leaf to turn black, it must be ironed with a hot iron through the newspaper).

And if you have little dry natural material, then you can paint a picture with gouache or watercolors and lay out only individual elements of the landscape from leaves and herbs (as in this craft below).

Autumn crafts
from natural material.
The nature of autumn is rich in a variety of ornamental materials - hawthorn berries, rose hips, cones, fluffy moss. After walking in the woods, you can make an elegant autumn composition with a candle. And arrange a romantic candlelit dinner in the fall theme.

A thick saw cut of a log, birch round chocks and walnut shells - this poor natural material can become a source of inspiration for such a craft in the form of a mushroom clearing.

From the cones found, you can make a variety of characters with your own hands. And place them in the form of a single autumn composition made with your own hands from natural material (wood, leaves, moss, chips, etc.).

Fresh oak twigs plucked by a hurricane can be dried in the shade of a shed, under the roof. Oak leaves do not lose their juicy green color when dried. And then they will be able to participate in interesting handicrafts made with their own hands from autumn natural material.

A wreath - a symbol of autumn - made of natural material in all shades of bright foliage will delight your whole family. It is so interesting to collect leaves - to select only the most beautiful ones. You need to weave a wreath with your own hands from willow twigs and weave autumn leaves into it with threads, plant pine cones on wire or glue. On our site there is a special training article on weaving wreaths from twigs and branches -

Bright fruits-boxes of physalis, twigs with fruits of hawthorn, flowers of beetle flower look beautiful in autumn wreaths.

But even if you don't have a bright natural material for making an autumn wreath, don't be discouraged. You can do bright wreath of gray pine cones... You just need to take more gouache. Paint each bud with fall foliage. Sprinkle with hairspray (so that the color becomes juicier and does not get your hands dirty). And then collect all this colorful splendor of autumn in a rich wreath with your own hands.

The cones in the wreath can be placed with their butts forward (as in the photo above), or with their noses in front (as in the craft below).

You can make decorative fall wreaths from any one natural material. Only from rose hips - string the red fruits on a copper wire and bend it in the shape of a heart.

Or your fall wreath can be made from the cuts of a log found in a rasp of firewood.

In the same wood shed, you can find a natural material suitable for making compositions with owls.

Your autumn compositions can look like funny little people from birch sawn cuts, decorated with different natural materials, which autumn is rich in.

And bunches of mown grass can turn into a hedgehog if physalis blooms profusely in you (or in good neighbors). Its boxes can be sewn with threads to a straw bale. Wrap the sharp edge of the bale with twine and glue the nose and eyes.

And you can also make from natural autumn material beautiful candlestick ... We will need the lower part of any white bottle of household liquid (laundry balm, etc.).

We unfold a transparent wide adhesive tape on the table. On its sticky surface, we put beautiful small leaves, seeds and other flat natural material upside down. We put it so that there are empty spaces of sticky tape between the elements (so that there is a sticky space).
These are the new ideas for this fall - from natural materials. You found inspiration here. You fell in love with some crafts. And that means this autumn will not pass by your skillful hands. It remains only to collect natural material, which is abundant everywhere, and, fortunately, it is free. As in that rhyme ...
Autumn is walking in our park,
Autumn gives gifts to everyone.
And we give you even more other articles on the topic of autumn crafts.
Olga Klishevskaya, specially for the site.
Working with natural materials has a positive effect on the development of the child, his imagination and thinking. In order to make beautiful autumn crafts for children, it is necessary to collect various natural materials in advance. You can do this with your child during a walk.
You can collect everything that you see, because it is not yet known what you will need in the process of work. These can be cones, acorns, leaves, seeds, chestnuts, twigs of trees and flowers.
Each work made from natural materials will be unique, as you cannot find the same leaves or cones.
To make an autumn craft with a child, you can use a variety of materials.
You can paint pumpkin seeds to make a beautiful autumn tree

Plasticine and colored paper will also help you with this.


Children can build various animals from chestnuts and plasticine.


Acorns sometimes become indispensable in creating beautiful and original crafts.


Inspired by different ideas, you can have fun with your children. After all, options for autumn crafts exist for different ages.
Autumn crafts for children 2 years old

Every time you are going to do crafts with children, you must take into account the age abilities. For children of the youngest age, paints, cotton pads, paper blanks can be offered as a material. At this age, children begin to be interested in drawing, modeling from plasticine.
Choose the option that best suits your child so that he can actively participate in it.
Make preparations for the winter with your baby. To do this, prepare jar templates in advance.
Take a small apple and cut it in half.
Show your child how to dip an apple cut into the paint on the palette and apply the design to the jar.

If you still have a paper bag of groceries, you can make an autumn tree with your child.

Cut off the bag of handles, make cuts of equal length.

Twist the bag with your hands, placing it on the base.

Spread the branches of your tree

You can decorate the branches with real leaves collected during a walk or cut out of colored paper.
You can make boats from a nutshell and let them go through puddles. After all, everyone knows that this is one of the most interesting activities for young children - to gurgle in puddles.

In the company of the boat, you can make other crafts from nutshells and plasticine


From the natural material collected in the park, you can make a forest composition

Appliques of leaves and flowers will be a great activity with little ones in the evenings.
Draw a sketch of a hedgehog or other animal and help your child stick the leaves on this work


Crafts on the theme of Autumn for children 3 years old
Everyone knows how important fine motor skills and fine motor development are for young children.
Therefore, creating mini crafts is a very important and exciting activity for children.
Such natural material as acorns is quite suitable for autumn crafts for children 3-4 years old.


Make a whole mini forest with mushrooms with your child

To make these mushrooms, you need acorn lids and plasticine.


Chestnuts will help create a whole company of snails. Most importantly, do not forget plasticine

This same composition of materials in addition to acorns can turn into other funny characters of the fall.


How to make a hedgehog from chestnuts

We will need:
- A piece of styrofoam
- Leaves
- Chestnuts
- Rowan
- Plasticine
- Black sponge
- Eye beads
- Cardboard
- Colored corrugated paper
A rectangle must be cut out of the foam for the hedgehog's body.

Wrap the resulting blank in brown paper

Glue chestnuts onto the blank, make a nose out of black plasticine and glue the eyes.
On the back of the hedgehog, you can attach a bunch of mountain ash and plant it on autumn leaves.
A beautiful tree made of leaves and acorns can be made as crafts in a garden

Autumn crafts for children 4 - 5 years old
From the simplest natural materials, you can create an interesting and very funny composition.

We will need:
- Acorns
- Cones
- Leaves
- Paints
- Cardboard
- Plasticine
Use paints to paint faces for your new heroes. To make the watercolor lay down well, coat the acorns with glue with a pencil. You can make ears from the seeds of cones. Place all your characters on heavy cardboard, add leaves and other accessories.
Cobweb: craft for children

To do this work we need:
- Three branches
- Leg-split
- Chestnut
- Leaves
- Wire
- Paints
It is necessary to find three branches of the same length. Cross them together and staple them in the center. Use twine to make a spider web by winding it around the branches.
Cut the chestnut in half and paint with a marker black.
Make holes on the side and attach to the wire. Make spider legs from small branches.
You can additionally decorate the cobweb with leaves.
Autumn crafts with children 5 years old: a clearing with a hedgehog

To make such a cute hedgehog in an autumn meadow, we need:
- Styrofoam
- Napkins
- Acrylic paints
- Leaves
- Rowan
- Cones
- Coffee beans
- Clay Moment
From a piece of foam, make a blank for the body of a hedgehog
Glue the workpiece with napkins using PVA glue, creating several layers
Leave the workpiece to dry.
Glue the coffee beans in rows
Paint the face with white paint and glue the eyes


Squirrel from cones

In the autumn forest, you cannot do without a cute squirrel.
We will need:
- 2 cones
- 2 acorns
- Plasticine
Attach 2 cones with plasticine, connecting them to each other with wide sides.
One bump stands upright, and the other at a 45 degree angle (this will be the tail).
Glue the acorn in place of the head and shape it with eyes, ears and mouth.
Make paws out of plasticine and give the squirrel in her hands her harvest.
Autumn crafts with children 6-7 years old
We often wonder what to do for an exhibition in a school or kindergarten. There can be many options for crafts on the theme of autumn for school. But it is important to do this work together with the child and instill in him a love of creativity. Taking into account the interests and hobbies of children of this age, you can answer that they love animals, and also build houses for them.
Therefore, compositions with houses and their inhabitants may well be competitive in competitions, but also bring pleasure to children.


You can make a funny bouquet from chestnuts

Such a funny couple cannot be found anywhere else.

Autumn Leaves Appliques
Such an owl will certainly appeal to children, and it is easy and simple to make it.

We will need:
- Plasticine
- Scissors
- Leaves
- Cardboard
- Branch
A bunch of rowan

The success of this craft lies in choosing the right leaves.

With scissors, you can slightly correct the shape to make it more symmetrical.
It is necessary to glue a green leaf instead of a head on cardboard
Blind your eyes from white and black plasticine.
We glue them on a leaf
Cut out a beak from a red leaf

Small leaves will suit us for eyebrows.
Green grape leaves are suitable for legs
Application "Autumn landscape"
Necessary materials:
- Cardboard
- PVA glue
- Plasticine
- Rowan berries
- Leaves
- Pencil
Roll up a tree trunk and several branches from plasticine.
They need to be glued to cardboard. 
Press the plasticine against the cardboard.
With the help of a stack, it is necessary to make cracks in the trunk.
Draw the crown with a pencil
Leaves collected in the park and dried in advance must be crumbled.
On the part of the craft where the crown is indicated, apply glue and sprinkle generously with pieces of leaves
