How to make a pencil case with your own hands for school. How to sew a pencil case - the most interesting blog posts. How to make a pencil case out of cardboard
A pencil case is not just a school attribute, but a useful thing that will help you organize your workspace. You can put pens, pencils, felt-tip pens, erasers, rulers, sharpeners and other stationery in it. So that you or your child have an exclusive pencil case, you can sew it yourself.
How to sew a pencil case with your own hands?
You will need:
- Canvas, size 18x7 cm;
- 3 multi-colored cuts of the 1st and the same fabric, in different sizes - 18x4.5 cm; 17x5 cm and 17x6 cm;
- Lining fabric, size 17x18.5 cm;
- Batting, measuring 17x18.5 cm;
- Zipper closure 17 cm;
- Measuring tape;
- Safety pins;
- Needles and notes;
- Scissors;
- Sewing machine.
Instructions:
- Place the colored fabric and canvas next to each other on the table. Sew all the pieces together with an open seam. Then sew along all the sections with the same seam. Place a piece of lining fabric next to it, line it up and pin it together. Sew them on the 1st side.
- Turn the sewn fabric wrong side up and attach the zipper so that the lock is on the right and the zipper is hidden by the fabric. The stripes on the fabric should be perpendicular to the zipper. Pin, then machine.
- Divide the fabric into a lining and an outer section, fold each so that the free edge touches the other, unstitched edge of the zipper. Pin, then machine stitch 3 layers. As a result, you should get a sharp cylinder with a zipper.
- Open the zipper and turn the lining inside out. Lay it so that there is the same amount of fabric to the left and right of the zipper. Pin the open ends of the cylinder. Be sure to overlock or zigzag the zipper tape with your sewing machine.
How to make a pencil case with your own hands?

You will need:
- Tube for toilet paper or paper towels - 2 pcs.
- Scissors;
- Cutter;
- Lightning;
- Masking tape;
- Fabric (fleece or felt);
- Threads and needles.
Instructions:
- Cut 1 tube. Glue the 1st and most of the 2nd with masking tape. The small part of the 2nd tube will serve as a lid. Now sew the cover for your pencil case. Bright colors will suit the child - this will also raise the mood, and the pencil case will not be lost in the baby's backpack.
- The cover should slide freely over the tube. Sew the zipper into the cover and sew the edges. For the lid and bottom, cut 2 circles out of cardboard, glue pieces of fabric to them (you can use other colors than the cover itself).
- Sew the bottom and lid back into place.
Pencil cases for girls: options
Simple pencil case

You will need:
- Bright oilcloth or beautiful fabric;
- Lightning - 20 cm;
- Pins;
- Threads and needles;
- Scissors;
- Sewing machine;
- Decorative items.
Instructions:
- Cut 2 pieces from the base material, measuring 20x10 cm. Fold the fabric and snake with the right sides so that the material is over the zipper and neatly align the edges. Sew the zipper and fabric with a temporary stitch for easy sewing. Using a machine, sew on the basting without touching it. Do the same manipulation with the other piece.
- Open the zipper and sew along all edges of the pencil case. Turn it out and close the zipper. The finished pencil case can be decorated with funny figures, beads and flowers.
Beautiful pencil case for a girl

You will need:
- The main fabric for the pencil case - 38.1x43.2 cm;
- Fabric for overlays - 38.1x43.2 cm;
- Batting - 25.4x43.2 cm;
- Harness - 115 cm;
- Pencil;
- Needles and threads;
- Scissors;
- Spray;
- Lightning - 40 cm.
Instructions:
- Freehand pattern on the base fabric. Make sure that the applied contours can be easily washed off. Tie the fabric with batting and quilt along the lines. Rinse out the contours with a spray bottle.
- Now you can create a frame for the zipper. Tie down guides, sew on base fabric and lining. Stitch the face of the stopper to the wrong side of the buckle frame. Treat the edges of the pencil case with a beautiful tourniquet.
- Make cuts on the folds to prevent the fabric from puckering. Sew the outside and inside of the pencil case and lining. Sew them face to face so that no seams are visible. Unscrew the pencil case.
- Secure and sew on 1 side. In the same way, arrange the 2nd, leaving an unstitched section. Turn out and sew up the hole with a blind stitch. The finished pencil case can be decorated with flowers or beads.
DIY pencil case: photo


Handmade is a fashionable trend that has been gaining momentum lately. A pencil case is a stylish accessory that every student needs. Sewing it is not difficult, and the process of making it can be an exciting game, especially if you attract your child to it. Let him talk about his desires, choose the fabric he likes, or just think over the design.
Many believe that a pencil case for pens and other stationery is an accessory for schoolchildren and students. In fact, he is needed in any apartment. Keeping pens and pencils in a specially designated place is comfortable and practical.
The stores offer a wide selection of accessories, but you can sew the product yourself. Moreover, there are models that do not require the use of needles and threads during manufacture.
DIY pencil case
After about the first year, children begin to have stationery and art supplies: multi-colored pens, felt-tip pens and paint brushes. Moms have more housework, so it will be especially interesting for them to learn how to make a pencil case with their own hands.
 A pencil case is very useful for parents of babies.... Firstly, the child will like to fold products in bright containers. Secondly, this is a great chance for mommy to practice and improve her creativity.
You don't have to start with complex models. It will be enough to sew a regular drawstring bag. The work will take a little of your time. The fabric bag can be decorated with braid, buttons, rhinestones or beads. Such pencil cases for children will be a real find, because they can be bright and interesting.
Before proceeding to creation, it is worth considering the model of your pencil case, calculating its dimensions, spaciousness and stability. All these points must be taken into account before you start sewing the product, because it will be sad if the accessories for work or drawing do not go into the bag.
One of the lightweight models is a one-compartment cover with a zip fastener. With proper operation, such a handbag is modified. Then the inner space will be divided into two or three auxiliary sections, each of which can be closed with a zipper.
Bags differ in shape and size. They can be in the form of a cylinder, parallelepiped, animal, such as a cat. Experienced needlewomen can knit a fantasy pencil case with knitting needles, but for beginners it is better to choose simple models and the following fabrics:
- Synthetic
- Thick and non-slip, for example, a piece of unnecessary jeans or variegated cotton fabric (chintz, calico, satin).
- Jacket, raincoat, upholstery.
We sew a bag-shark
This unusual handbag in the shape of a shark will create a good mood for you and your child. To make it you need:

Step by step creation of shark pencil case


Felt cover
 Pencil cases made of felt are considered very original and easy to manufacture.
This material is malleable and requires processing, because its cuts will not crumble, the inner and front seams only need to be swept by hand, and to make the elements more beautiful, they are cut out with special scissors with serrated blades.
This method is also applicable for natural and artificial leather, suede.
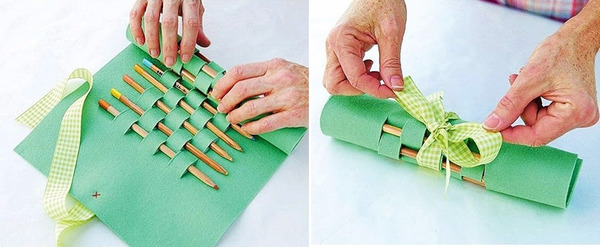
Model without pattern
All that is needed for such a pencil case is a rectangular piece of material, a ruler, pencil or chalk and sharp scissors.
Create small notches in the piece of fabric that will serve as loops for brushes, pencils and pens. Holders are made almost along the entire length of the workpiece, with the exception of the front side, into which the colored roll will be wrapped. In order for the bag not to open, from the side where there are no cuts, it is necessary to attach a braid or ribbon of sufficient length. Wrapped around the product, it will perfectly fix everything that is laid out inside and decorate the thing.
Attention, only TODAY!
Have you always wanted to have in your portfolio things that you will not find in other comrades? Don't you like it when someone has the exact same thing? Like having original school supplies? Then you will definitely need these ideas!
A pencil case is an irreplaceable thing not only in school or college. Pencil cases are also used by adults at work. If you want to pick up a pencil case in the store to your taste and color, but, unfortunately, this was not the case. Then make it yourself!
In this article, we will offer you several options for creating a pencil case with your own hands with a detailed description and instructions. You don't even have to overpay, because almost all the materials will be at your fingertips! A thing made with your own hands will always delight you, you will definitely be proud of yourself, because the result will pleasantly surprise you. So let's get started!
Pencil case-cylinder made of toilet sleeves
A toilet sleeve case? Don't be surprised, because the materials are not important to us. As a result, you will get an original pencil case, which will not give out for anything what it is actually made of. For such a pencil case you will need:
- 2 toilet sleeves,
- the cloth,
- zipper for the lock,
- scissors,
- needle and thread,
- stationery knife.
Progress:
- Prepare the bushings. We cut one sleeve neatly and evenly in half.
- Attach the second cut off part of the sleeve with tape for now.
- We circle the bottom of the future pencil case. The bottom of the pencil case should be made of durable cardboard. There should be two cardboard circles.
- We do the exact same action on the fabric that you want to select. It can be absolutely anything. There should also be two fabric circles.
- Now we take our cylinder and wrap it in the fabric with the front side inward, making supplies around the edges.
- Mark on the fabric where the two bushings will join. It is in this place that the zipper needs to be carefully sewn in.
- Mark the line where you will need to sew the fabric and start sewing the pencil case
- Then turn out the cover, take the cylinder and separate the part of the cylinder, which will be the lid, glued with tape from it. Sew the zipper to the lid so that when you open it it freely folds back and easily closes the future pencil case.
- Now sew 2 cardboard mugs to the pencil case, to which fabric mugs have already been sewn in advance.
- Remove the cover again, turn it to the front side and you can put it back on, enjoying the result. The original cylindrical pencil case is ready!
You can glue the cover to the pencil case. So the fabric won't go anywhere.
Delicate felt pencil case
This is a truly original pencil case that will appeal to delicate people. The pencil case is made of felt, thanks to which it is pleasant to touch it. And the way of storing school supplies here is very different from ordinary pencil cases.
For a felt pencil case you will need:
- felt fabric,
- silk ribbon,
- scissors,
- hot glue.
Cut a rectangular piece of felt. The required size is determined by the height of your accessories. To do this, it will be enough to spread them on the fabric. Apply hot glue between the laid out accessories. Keep in mind that you need to leave a stock for each item. Fold over the bottom of the fabric to make it look like you've covered your school supplies with a blanket. Now take out the accessories and decorate the future pencil case with silk tape, also glued with hot glue.
Then turn the pencil case over and stick a long silk ribbon with which we will tie our pencil case. Our cute pencil case is ready! Put all the accessories back into the case, letting the glue dry completely. Wrap the pencil case in a tube and tie it in a bow.
For such a pencil case, you can choose felt of different colors, you can decorate it not only with a silk ribbon, but also with braid, buttons and other decorations.
Pencil case in a notebook
This simple tip is for those who don't want to carry a pencil case with them. This method is great for students!
For this handy trick, you need:
- ring notebook,
- elastic,
- hot glue.
Progress:
- Open the notebook. We will place the pencil case on a hard cover.
- Now think about what accessories you will take with you. Cut elastic bands to fit the width of your accessories.
- Glue the elastic to the cover.
To keep the accessories firmly in the elastic bands, pull them tight and then glue them.
- Now you can put each accessory in its place.
Here's a clever way to simplify your study days. Now there is more space in your bag.
Original pencil case made of zippers
You definitely have not seen such a pencil case from your comrades, and you can hardly find this in a store. First of all, surprise yourself with such an unusual result and be sure that your environment will notice and appreciate your unique pencil case.
For such an original pencil case you will need:
- zippers of different colors in the same size,
- thread and needle,
- scissors.
Progress:
- Place all zippers on the table.
Arrange the zippers so that they do not repeat from the color. So the pencil case will turn out to be more colorful and unique.
- Now sew all the zippers together so that you get a single piece of fabric with the zippers.
- Now flip the zippers face down and sew the edges to create a keg.
- Now we will make a beautiful and colorful candy from this barrel. To do this, open at least one zipper so that you can unscrew the pencil case.
- Now we sew the pencil case on the sides and turn it out. Our original, colorful and very beautiful pencil case is ready!
As you can see, making such an original, beautiful and unusual pencil case turned out to be very easy! Such a pencil case will also work as a pencil case. Anyone will be delighted with such a pencil case!

Pencil case made from your favorite fabric
Surely everyone has any blouse, T-shirt, napkin. Well, what if, due to some unpleasant incident, your favorite thing has deteriorated, for example, you burned it and put an indelible stain on it. Of course, it will be a pity to throw away your favorite thing. You have a chance to breathe new life into it and translate it into another useful thing. We suggest you make a pencil case that you will take with you every day, and your favorite thing will remain in your memory and will always delight you.
It is very easy to sew a pencil case from fabric. To do this, you will need:
- front fabric (your favorite),
- plain fabric for lining,
- zipper for the lock,
- scissors,
- thread and needle,
- pins.
Progress:
- Prepare two fabric patches: one for the face of your favorite fabric and one for the lining.
- Sew on the zipper between these two fabrics. Be sure to turn the fabric right side down towards each other. We carry out this procedure with two sides of the zipper.
- Now you definitely need to open the zipper, otherwise you will not be able to unscrew the pencil case. Now you need to connect the two sides by carefully stitching them with a machine seam.
- We turn it out. Our pencil case is ready!
Here's another idea for you and another proof that sometimes you don't need to overpay even for such things as a pencil case, when you can make it for free, literally in half an hour!
You can diversify this idea by using different fabrics. You can even sew a pencil case using the patchwork technique. Nobody will have such a pencil case!

An original and reliable pencil case from an unnecessary disc box
The name itself already sounds pretty tempting. Indeed, if you have an unnecessary disk box lying around, why not try to implement this idea and make such a pencil case? A very interesting idea!
So, for such an unusual pencil case you will need:
- disc box,
- a piece of cloth
- wide elastic band,
- glue,
- scissors,
- thread and needle.
Progress:
- Cut out a rectangle from the fabric, which will be equal to the width of the right side of the box from the disk. Cut the elastic of the same width.
- The cut elastic band must be sewn in the middle to the fabric rectangle. This design will keep our pencils in the pencil case.
- Then, on the elastic band itself, we mark the cases according to the size of our accessories. After, according to our marks, we begin to sew the elastic to the fabric, so that we finally have pockets.
- Now this structure can be safely glued to the right side of the box.
To make it less boring inside such a pencil case, you can put a white sheet of paper on the left side. There are just special mounts. On this sheet, you can paint pens or leave various notes for yourself. Outside, you can also decorate the box with your design.

Velvet pencil case from a box
Everyone has unnecessary boxes. No pencil case? Use a box and you won't have to overpay at all! Making such a pencil case is as easy as shelling pears!
For this idea you will need:
- rectangular box that holds school supplies,
- decorative velvet or velvet paper, velvet fabric,
- scissors,
- glue.
Progress:
- Wrap your box in fabric and measure out the cut lines. If there is no fabric, then you can use cardboard with a velvet surface.
- Cut off the required amount of fabric, and then glue on the box.
That's all! Two easy points and an exquisite pencil case!
If you already have a velvet box, for example, from jewelry, then you don't need to do anything, just take out the excess from there and that's it. And if you don't even have velvet, then you can use felt. It is as delicate as velvet. And if there is no felt, then any other fabric will do. Special fabrics for decorative work on an adhesive basis are on sale. Very convenient and efficient!

Leather pencil case: stylish and original
If you are a creative person and do not want to use ordinary and boring pencil cases, then this idea is for you!
For a leather pencil case you will need:
- rectangular leather flap,
- stationery knife,
- ruler,
- braid or silk fabric.
Progress:
- First of all, we measure the required size of the leather flap. It should be cut straight and neatly in a rectangular or square shape.
- With a clerical knife, we make vertical and horizontal cuts in a checkerboard pattern. Be sure to use a ruler to keep your cuts straight and neat.
- Sew two strips of braid or silk fabric on top of the flap in the middle.
- We pierce our pens and pencils into the holes, wrap and tie the pencil case in a bow. Our original and very interesting leather pencil case is ready!
To make the pencil case look prettier, use wide braid or tape to make the bow look voluminous. There is no need to overload the pencil case with various decorations. The braid is enough, because the leather is a rather strict and elegant material. If desired, you can use leather of different colors.
Interesting and funny pencil case in the form of a cat
Do you really like cute things? Do you want cute things to please you in class? Then this pencil case should definitely be created by those who love such cute things as a pencil case in the form of a cat. Perhaps you just love cats, and there was no pencil case in the store in the form of a cute cat. Don't be upset, because you can make such a cute pencil case with your own hands!
To create a cute pencil case in the shape of a cat, you will need:
- the cloth,
- scissors,
- needle and thread,
- zipper for the lock.
Progress:
- First you need to prepare the blanks. These are ears, nose, little body and so on. See sample.
- Then we mark these blanks on the fabric and cut them out.
To make the pencil case look original and interesting in a toga, combine different fabrics in color.
- Sew a zipper between the body parts. Do not forget that we turn the fabric face down.
- Now we sew the details of the cat's face, sew the ears to the face.
For simplicity, you need to attach the ears as soon as you start sewing on the muzzle. It will be easier and faster this way.
- Now you can turn out the pencil case and add a nose, eyes and antennae to the cat.
You can use unnecessary buttons as eyes for your cat, and you can simply draw the antennae with a black felt-tip pen.
Here we have such a cute and adorable pencil case in the shape of a cat! In fact, if you try, you can make pencil cases in the form of different animals, for example, in the form of a dog, a mouse, a snake, a panda and other animals! Then pencil cases can be changed every day and amaze others, and most importantly, please yourself.

Denim pencil case with pockets
It doesn't matter what time of year it is in the yard, but we wear jeans all year round. Although a lot of time has passed since the creation of the first denim trousers, jeans are still in trend and are simply irreplaceable in a modern wardrobe. As sad as it may be, jeans wear out quickly, and sometimes it is a pity to throw them away. This is where thoughts come to mind about what can be made of denim. In this article, we get acquainted with the ideas of creating a pencil case with our own hands, so jeans will be very useful here.
To create a denim pencil case you will need:
- unnecessary jeans,
- scissors,
- thread and a needle or sewing machine,
- braid or any fabric tape,
- optional additional fabric for the inside of the pencil case.
Progress:
- Start by measuring the size of the denim patch you need to fit all your pens and pencils into it. We choose a longer length at the flap, since we will bend the lower part of the fabric.
- Then fold the bottom of the fabric into place. It is this part that will be the pencil pocket. You can immediately spread all the pencils in a rag, or you can make markings and start sewing the compartments for each pencil.
- Sew two fabric tapes to the side.
- Place all of your pencils in each compartment, wrap your denim pencil case in a tube, and tie the ribbons in a bow.
So that the inside of the pencil case does not show the front side of the denim, any fabric can be sewn on before marking the pencil compartments. It will be even more beautiful and original.
Here is such an interesting, and most importantly, useful pencil case turned out from old denim trousers. This pencil case looks stylish and fashionable!

Summing up
These are the interesting ones we have collected for you in this article. Now you can choose for yourself the most suitable method and idea for creating a pencil case with your own hands. As you can see, the material is not so important, because the main thing is the result!
Now you know some interesting ideas and ways to update your school supplies, make them original and unusual. In stores, sometimes you will not find such a pencil case that you liked at first sight. If you are faced with such a problem - feel free to start creating your pencil case.
In addition, a hand-made item will delight you more than a purchased item in a store. And if you are sorry to part with your favorite things, then you can give them a second life and make something new and really useful out of them!
A pencil case is a useful thing if you need to organize your workspace. Pens, pencils, felt-tip pens, erasers and other necessary items are not scattered on the table or lost in the bag.
And school pencil cases are as necessary for children as notebooks or a diary.
But those that are sold in stores are often too bulky, with ugly monotonous drawings (pencil cases for girls - with pink fairies, for boys - dark dark blue cars, and there are almost no alternatives!), And some of them are sometimes dangerous - Poorly made plastic edges or a protruding end of the line can be scratched.
Trying to buy something so necessary at school turns into torment. But you can sew one with your own hands using the videos presented in this article - it will take very little time, the soft fabric will never cause scratches, and the choice of its color depends only on you.
How to make an original pencil case with your own hands? In this step-by-step photo masterclass, you'll see that it only takes five steps.
You will need:
- a piece of canvas (18 x 7 cm);
- three multi-colored cuts of the same fabric - you can take any, for example, linen:
- the first of them is 18 x 4.8 cm;
- the second - 17 x 5 cm;
- the third is 17 x 5.8 cm;
- fabric for lining - 17 x 18.5 cm (if the lining is not always visible, this still does not mean that it should be boring and monochromatic, a good thing is beautiful from all sides);

- piece of batting 17 x 18.5 cm;
- zipper at least 17 cm long;
- measuring tape;
- safety pins;
- sewing machine.
The finished pencil case, as in the photo, according to this instruction should be 9 x 17 cm in size.Please read all instructions carefully before you start cutting. Even a do-it-yourself children's pencil case cannot be sewn without careful measurements.
Do-it-yourself children's pencil case for school: a step-by-step description
So, we begin to sew on our own a school pencil case for pens, pencils and other stationery.
1. First, create the outer part - this is the most creative moment. Lay out the colored pieces of fabric and canvas next to each other - this is how your pencil case will look from the outside (see photo). Then sew along all the pieces with an open seam.

2. Place a piece of lining fabric next to it. The stitched fabric on the “outside” side must match exactly with the lining. Line them up and pin them together, then sew one side at a time.

3. Turn the sewn fabric inside out and attach the zipper so that the clasp is on the right and the zipper is completely hidden by the fabric (see photo). The stripes on the fabric should be perpendicular to the zipper. Pin, and then sew on a typewriter through all three layers (fabric, lining, zipper - on its "right" side, when viewed from the side of the lock).

4. “Divide” the fabric into a lining and an outer section. Fold each of them so that the free edge touches the other, unstitched edge of the zipper - respectively, on both sides. Pin and then machine stitch (all three layers again). You should end up with an open fabric cylinder with a zipper.

5. Open the zipper and turn your pencil case lined out. Place it so that there is the same amount of fabric to the left and right of the zipper, pin the open ends of this "cylinder". Overlock or zigzag on a typewriter, be sure to sew the zipper tape.

Cut off the excess part of the zipper, if there is one (the end that is without a lock; it is on this side, if you did everything correctly, and an extra piece of tape should remain - if, of course, it was originally longer than 17 cm).
Since the pencil case is made of fabric without any frame, it is flat and takes up exactly as much space as the things lying in it. But it can also be quite roomy. Ideal for a school backpack!

Video: how to make a pencil case with your own hands
"School supplies" - parents know how relevant this topic is not only at the beginning of the school year, but throughout the year. This is especially true for younger students. Pens, notebooks, pencils, pencil cases - all this is often lost in children, breaks down and becomes unusable. How to sew a pencil case with your own hands so as to surprise and delight your child - we know the answer to this question. We hope that you will choose from several options for products - the most interesting and fashionable.
It is not difficult to sew a pencil case for pencils with your own hands, you can take any material - calico, corduroy, satin, felt, felt, denim, and so on. Even bright socks will do - you can make a cool pencil case Cat from them. Pencil cases must have a lining, and some have a synthetic winterizer or non-woven fabric.
The second option is a product with an Owl applique. The third interesting stationery pencil case is. The fourth pencil case Bunny can be found at the end of this article.
The fastest and most budgetary option for a school pencil case is a cool pencil case made of bright socks. The brighter you take the socks, the more interesting the pencil case will turn out. You can make such an interesting little thing with hot glue or a needle and thread. If you decide that you will sew a pencil case, and not glue it, this will certainly be more reliable than glue. The pencil case pattern here is very simple: from one sock we make the pencil case itself, and from the other - the Cat's head, paws, ears and tail.

For work you will need:
- Terry or fleece socks (it is better to take an adult size).
- Zipper lock 20 cm.
- A piece of fabric for lining - length - 21 cm, width - 20 cm.
- Glue gun or thread with a needle (optional).
- Ribbon for a bow.
- Ruler, scissors.
- Sintepon or cotton wool for stuffing small parts.

First of all, we make a sewn lining for the Cat. To do this, we fold the piece of fabric prepared for the lining in half. Estimating the length: sets of pens and pencils should be shorter than the length of the lining.

Then glue it with hot glue or sew the zipper to the lining. The zipper looks up.


We take the ends of the thread and tighten them more firmly into a knot. They unbuttoned the lock and put the lining aside. We will be engaged in a pattern.

We begin to cut the pencil case. We take a ruler, apply it to the beginning of the sock, measure out 20 cm and cut it off, as in the photo. The bottom of the sock will go to the pencil case itself, and the top will go to the paws.

Then we cut 18 cm without cutting to the end. Next, we will connect the lining to the main part of the school pencil case.

We spread the finished lining inside the main part. Sew on or glue, connecting the lining and the main part.

The cut edge needs to be gathered by hand and the thread tightened by tying a knot. This is where the Cat's head will be.

Next, we make patterns for the head, paws, ears and tail. To do this, take a ruler, measure 9 cm from the second sock and cut off. This will be the head. Next, we need to cut off 4 more rectangles 9/9 cm. - these are the paws, 1 rectangle 10/9 cm. - the tail, and 4 triangles with a base of 5 cm. - these are the Cat's ears.

We fill the Cat's head with padding polyester, cotton wool, or just finely chopped scraps of fabric. We sew 4 legs along, slightly rounding at the end, on the wrong side. We turn it out onto the face. Unfinished edges are carefully pulled together and sewn together.
We also design the head: we tighten, sew and shape the muzzle - we sew buttons, beads or pieces of felt instead of eyes. We embroider mustache with threads.

Then we glue or sew the front and hind legs to the main part. Sew the details of the ears, sew to the head.

Only after that do we sew or glue the Cat's head to his body. That's all, the sewn pencil case is ready. It remains only to tie a ribbon around Kota's neck.

We sew a pencil case for pencils with one compartment and applique. This master class is more serious and more complicated than the previous one. However, if desired, in one or two evenings it is quite possible to master this interesting work. Transfer the Owl's pattern to the paper, and then to the fabric We will sew the pencil case using a simple pattern, all the required sizes will be indicated. In this work, it is advisable to use a synthetic winterizer for the required volume.
If you don't have a synthetic winterizer, it's okay, buy viscose napkins at a hardware store, they may well replace a synthetic winterizer.

For work you will need:
- Main fabric - 2 pieces of blue - 26/8 cm, 1 piece of blue - 26/10 cm.
- Sintepon or napkin - 27/27 cm.
- Lining - 27/27 cm.
- For finishing a strip of main fabric: 2 pcs. - 13/3 cm., 2 pcs. - 6/10 cm.
- Applique patches.
- Scissors, needle, thread.
- Sewing machine (optional).
- 2 buttons for the eyes.
- Ruler, pencil.
- Lightning - not less than 28 cm. (Iron slider is desirable)

Let's start with the patterns: we cut the fabric according to the indicated dimensions. We got 3 strips: 26/8 cm, 26/10 cm, 26/8 cm. We have to sew them, folding the right sides inward.
After that, take a ruler and pencil and draw equal squares on the fabric. Next, we cut out parts of the applique, according to the pattern.

It is better to take the material for the application of the Owl brighter: this way the owl will not merge with the main fabric.

We apply a synthetic winterizer to the main part and quilt the main part of the product by machine or manually.

We sew applique on top, sew on eyelet buttons.

After we quilted the main fabric and synthetic winterizer, we got this blank. Next, we apply the zipper to the edge of the long side, pin it off with pins, put the lining on top, pin it off.

And we grind this "pie", stepping back from the edge by 0.8 mm-1 cm.

This is how we start to connect all 3 fabrics and the zipper.

We turn the workpiece over to the front one and sew the finishing line 0.3 mm. from the seam.

Then we take our blank and fold it in half so that one half of the zipper meets the other half. We put a lining on top, pin it off with pins.

And we stitch it, stepping back from the edge 1 cm.

We cut out 2 “tongues” 6/10 cm for finishing. We stitch them along the length, turn them out and insert them into the middle from one side and the other. The “tail” should stick out 1 cm. We cut it off with pins.

To design the seams, we take 4 13/3 cm edging cut out by us. We apply it on the side and stitch it by 1 cm.

We turn it over to the other side, bend the free edge of the facing and sew the seam into the seam. They took a ruler and a pencil, marked 2 and 2 cm from the corners, drew a square. Draw a square on all 4 corners of the pencil case. We must connect these corners, giving the product volume.

Sew all 4 corners of the product, cut off excess material, arrange with the two remaining edging. Turn on the face. Here is a case in the form of a pencil case should turn out in the end.

In the video: how to sew a pencil case. You can look in more detail if something is not clear in the master class.