Easy designs on nails in one color. Simple nail patterns for beginners (50 photos) - Step-by-step instructions. Painting with watercolor is not so easy, so we have prepared step-by-step instructions for you
When looking at the works of manicurists, a desire arises to learn how to paint on nails. Our article will tell you how to do it yourself, beautifully and originally.
Before you start learning how to paint on nails, you should keep in mind that this activity requires patience and a desire to improve your skills.
First you need tools:
- needle or toothpick perfect for beginners. They can easily draw simple patterns. This should be done carefully, without pressing too hard on the nail plate, so as not to damage it;
- sponge It is used when working with pearlescent paints. They also get a gradient manicure;
- stick with wooden base, at the end of which there is a cut. It is more convenient to use when decorating a design with rhinestones or similar materials;
- tweezers. Can be used instead of a wooden stick. Also used when working with fabrics and lace;
- dots. It is also called a dotting brush. It is basically double-sided and has 2 balls of different sizes. Used not only to make dots, but also for many patterns;
- brushes for painting acrylic paints. They need to be treated carefully. After work, be sure to clean and dry. It is preferable to store it in a case.
There are several types of brushes and each has its own purpose:
To create a drawing you will need:
- varnishes. They are most suitable for beginners, as they make simple drawings. Due to the thickness of the texture, it is impossible to work with brushes with this material;
- acrylic paints. Used to create more complex designs. The color range is quite varied. You should not experiment and replace them with gouache, as it will simply “float” on the varnish.
To decorate your manicure, use:

Manicure techniques
Drawing on nails is accessible to everyone, as there are many manicure techniques that you can learn at home:

How to draw with a toothpick
When you first try to draw patterns, it is better to use a toothpick to avoid damaging the nail plate.
In addition to this, you will need:
- several varnishes, including colorless (used as a protective one);
- a small piece of lint-free material to remove coloring material from the toothpick;
- nail polish remover.
 Creating a drawing occurs in several processes:
- apply the main tone and wait until it dries;
- use a varnish brush of a different color to put dots or draw a line;
- then use a toothpick to make a pattern;
- Cover the finished dry drawing with protective varnish.
Creating a design with a needle
For such drawing, it is more convenient to use a machine needle rather than a household needle, since you can use both sides of it to create a pattern.
You will also need:
- protective and colored varnishes;
- cloth to remove varnish from the needle;
- nail polish remover.
 Drawing with this tool goes like this:
- protective varnish is applied - it must dry;
- then the nails are painted with the main tone of the design;
- on the still wet base, spread drops of varnish, one or more colors;
- then use a needle to mix the shades to obtain an original pattern;
- To make the drawing have clearer outlines, apply colored drops to a dry base;
- Finally, apply a protective varnish.
The process of painting with acrylic paints with brushes
Before you start painting with acrylic paints on your nails, you should learn how to use a brush. Training can be carried out on a cardboard or plastic surface.
To draw you need to have:
- 2 varnishes – for the base and colorless;
- acrylic paints;
- at least 3 brushes – thin, beveled and rectangular;
- needle or toothpick;
- palette for the main material;
- water;
- napkins.
 The drawing process goes like this:
- cover your nails with a varnish base;
- start painting only after it is completely dry;
- first you need to draw the contours of the intended pattern and only then paint over it;
- make sure that the new layer of paint does not fall on the previous one that has not dried;
- Fix the finished drawing with colorless varnish.
How to make simple designs on nails with a needle
One of the spectacular needle designs is a flower located in the corner area of the nail. It will be appropriate both on a French manicure and on a plain finish. There is no need to worry about learning how to draw such a pattern on your nails.
To achieve the result you need to do 4 processes:

How to make simple designs on your nails with a toothpick
This tool is best used for drawing spirals.
Manicure process:
- The nails are coated with varnish, which will serve as the basis for the design.
- After it dries, a line of a different color is drawn. Its location and thickness depends on the idea of the pattern.
- Next, spirals are made, which can be located on one side of the line or on both.
- A protective agent is already applied to the dry drawing.
- If you want the pattern not to be so clear, the line should be made on a non-dried base.
The following drawing is considered simple to perform, but always original:

How to make simple designs on nails with a brush
Since you won’t be able to learn how to paint masterpieces on your nails with brushes right away, it is recommended to first make simple and original patterns of lines and petals.
A manicure is done in the following sequence:

The process of creating lace nails
But how to learn to draw a lace pattern on your nails, because it requires real skill. There are several options for doing this manicure.
For those who have learned to handle a brush and acrylic paints well, you can paint on your own:
- Apply varnish to the nails, which will be the background of the picture. It can be either light or transparent, or dark. Wait to dry;
- You need to paint with the thinnest brush. On the basis of a contrasting color, lace is created, the pattern of which will be the result of your own imagination;
- Fix the finished dry drawing with colorless varnish.
 To create such a pattern, you can use lace fabric:
- First of all, you need to prepare the basic material. Cut out pieces from the fabric, the shapes of which are identical to the nail.
- Apply a colorless varnish, it will be the background of the picture, and wait for it to dry a little.
- To make it more convenient to distribute the fabric on the nail plate, you should use a toothpick.
- Next, the fabric is coated with colorless varnish. Wait a little for it to be absorbed and apply again to fix the design.
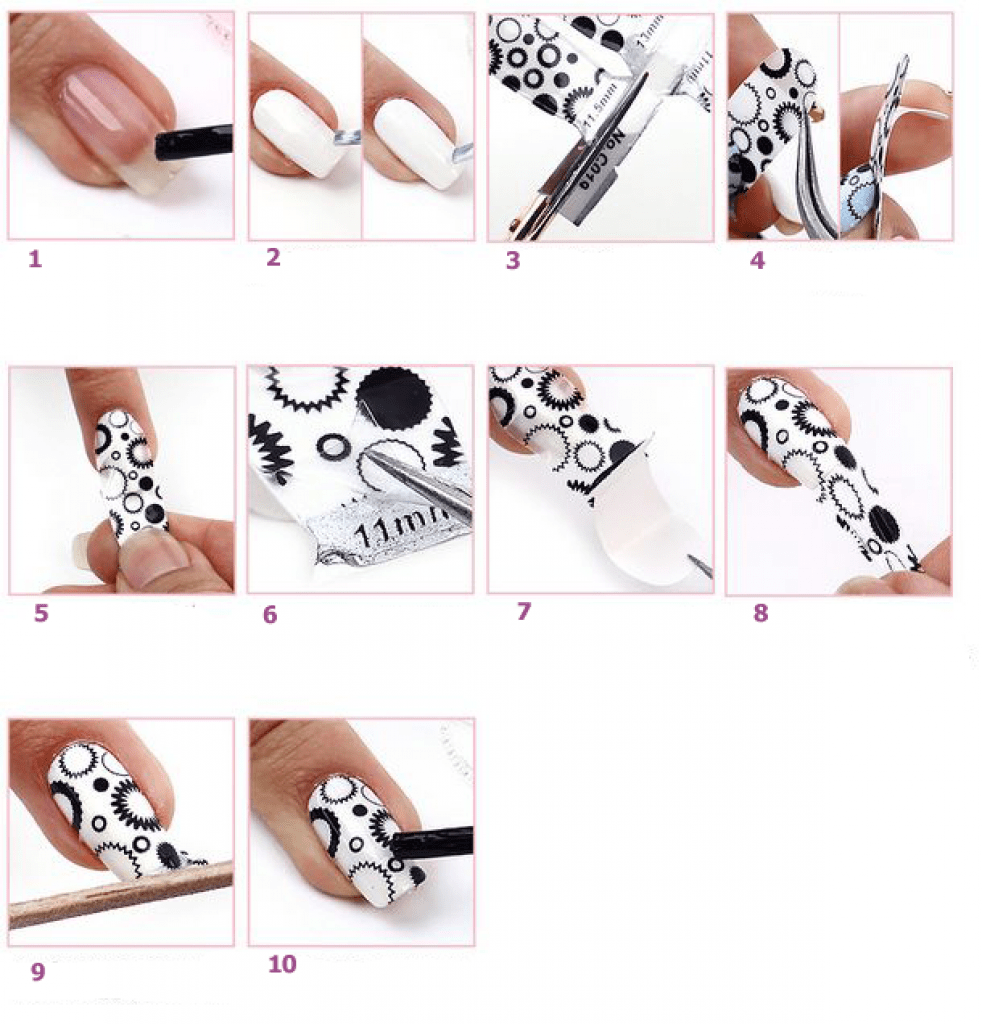
The simplest and fastest version of this manicure are water stickers with lace of a wide variety of patterns.
How to draw French on nails
To make a beautiful French manicure, your nails must be the same shape, length and have neatly trimmed cuticles. On long plates, any imperfections are very noticeable. For a classic French coat, in addition to colorless and white varnish, beige, peach or transparent pink are also used.
The drawing can be done in the following ways:
- Apply the base shade first. Wait until it is completely dry and make “smiles” with white varnish. Seal the result with clear varnish.
- First, a colorless base is applied. After it dries, “smiles” are made and everything is secured with colored varnish.
To make the “smile” perfect, the width should not exceed a fifth of the nail plate, and the bend should be made symmetrically to the growth of the cuticle. This is especially true for short nails - if you make it too wide, then such a manicure will make your hands look rough. It will look best when it is no wider than 2 mm.
 “Smiles” can be applied in 3 ways:
- using a stencil;
- carefully paint with varnish, and remove any unevenness with a brush and varnish remover;
- Use a thin brush to outline the “smile” and sketch.
Today, classic French manicure is common using bright contrasting colors.
In addition, there are so many drawing options that any mistakes can be “hidden”:
- Millennium French is drawn like the classic one, only the “smile” is decorated with glitter;
- art French is characterized by the presence of a pattern or decorative elements;
- the moon jacket is a mirror image of the classic one, where the “smile” is placed on the light part of the base of the nail plate;

- They also experiment with “smiles”, making them in various shapes.

On long nails, a millennium French manicure looks more impressive, and on short nails, a classic manicure in bright colors.
The use of decorative elements in manicure
To make the drawing more original, many decorative elements are used:
- Stickers with a huge selection of patterns that are applied to the main tone using a toothpick. If desired, you can coat the design again with colorless varnish.
- Rhinestones– small pebbles of various shapes and shades. It is best to fix them with glue. You can also use varnish, but they won’t last long this way.
- Broths or beads– multi-colored glass balls. They are used both as a separate part of the pattern and to create a specific pattern. Place on a surface that is not completely dry. Secured with clear varnish.
- Foil- thin metal sheet. Has many shades. Used as part of a pattern or as the main background.
- Confetti– circles of foil in shiny tones. They are used both for a chaotic pattern and a specific pattern. Placed on a dry surface.
- Sticker– paper sticker. Can be used on the entire nail, and as an element of the design.
- Designer ribbons- self-adhesive multi-colored strips that can easily add a pattern to a design. The main thing in using them is that when gluing, the surface must be dry and make sure that the edges do not lift up.
- Glitter. There are 2 types - dry and liquid. The first ones are a shiny powder and are applied to a wet drawing. The second ones are already placed in transparent varnish.
No matter how complex a skill a designer manicure may seem, if you wish, you can learn to draw incredibly attractive patterns on your nails yourself. The main thing is to study the techniques and obtain the necessary tools and means for a high-quality designer manicure.
Video about how to learn to paint on nails
Step-by-step drawing of monograms:
How and with what to draw thin lines:
Nail design, especially if it is created with your own hands, is a great idea in terms of self-expression and creating an image. The simplest decoration method is simple nail designs. Making them is not at all difficult; there are many ideas that have already been invented before. But there will be even more of them if you use your own imagination. You should start with the simplest techniques and gradually improve your talent and capabilities.
Simple drawings for new masters
At first, not everything will be as smooth as we would like. It's because:
- Firstly– you are worried, afraid that you won’t succeed;
- Secondly– you haven’t gained experience and dexterity yet – it’s a matter of time and diligence;
- Thirdly– you probably don’t quite understand what you can use to draw with and how exactly it’s done.

If you follow the main rules, the self-learning process will be more effective:
- Before work, you need to remove the cuticle from the nail plate. A simple warm bath in which your hand is placed for 10 minutes will help with this. This way it will be easier to lag behind the nail.
- Using a wooden stick (or a toothpick) and nail clippers, cut off the rough dermis (skin) around the nail plate.
- Next you need to polish the nail plate. By the way, this should be done not only before applying a manicure, but also for prevention, at least once a month. Instead of polishing, if you don’t have a special nail file at hand, simply degreasing with nail polish remover will be sufficient.
- In principle, the marigolds are ready to be painted. But there is one caveat. Before painting, you should apply a base. The drawing fits more neatly on it, and the drawing process becomes easier. The manicure as a whole will look neater.
- After applying the base, wait approximately 20 minutes.
Now that’s all for sure, you can safely start drawing.

What tools and materials should be on hand
Before the drawing procedure, prepare materials and tools for work; their list and varieties will depend on what you plan to work with, what material you know how to use best, decide on the theme and color parameters.
Nail polishes
You will need the following in your work:
- clear nail polish;
- fortified;
- medicinal;
- varnish fixative;
- glitter;
- glitters;
- decorative powder;
- several different shades of varnish.

Tools
It is impossible to imagine drawing without tools, so everything will be listed below that may be useful in one case or another:
- stickers;
- ready-made stickers;
- template plates;
- brushes;
- needles;
- toothpicks;
- ordinary or decorative tape;
- foil;
- dots;
- acrylic paints.
The simplest drawing ideas for beginners
Having prepared your nails for work, you can apply a design on them using any tools, even handy ones - those that every girl absolutely has at home.
Working with a needle
Original and even simple drawings here and there can be created using a needle. How to use it:
- You don’t need to draw on your nail right away, try doing it on paper. Firstly, you will understand how it works, and secondly, this way you can choose the proportions as close as possible to your nail.
- Apply the base (transparent base) to the nail plate, wait until it dries completely. The base is always applied in 1 layer.
- After the first base layer has dried, you will need to apply another layer - the background layer. Choose the color of polish that will accent the nail, for example, white.
- There is no need to wait until the second layer dries. You can continue working right away.
- Somewhere in the middle of the plate, drop three small dots of, say, red varnish onto a white background, forming a triangle or alternately one after another along the nail.
- You can draw with a needle by immediately poking it into the middle of the highest point, stretching it to the bottom, and so on to all of them, one by one. The result will be an ornament like the one in the photo.
- You can drop, for example, the same white varnish into the center of a red drop, then when stretched, a white stripe on a red background will follow the needle.
- You can stretch the varnish from side to side, and then you get an unusual pattern.

The color palette in such simple drawings has no specific boundaries. The author himself decides what to combine with what.
You don't need to work on all your nails at once. Draw them in order from the very beginning to the victorious finish. Otherwise, you definitely won't succeed.
Painting with a brush
This drawing technology is a little more complicated, but with a great desire, any novice master will cope with this task.
Practice, for starters, using artificial nail plates - this will be a very good workout. If you don’t have them at hand, draw a nail on paper that is approximately the same size and shape as yours.
Drawing technology:
- First, as always, a base coat of clear or medicated varnish is applied to prepared nails.
- Leaves the nail to dry. In this technology, all layers must dry completely as they are applied.
- After the base has completely dried, apply the background layer. The color in this technique should be chosen so that it contrasts with the future painting. First, in one step, the brush is moved from the center towards the cuticle, then the left side of the plate is painted, then the right. If you notice, you should only get 3 strokes of the brush.
- Further work will require a very thin brush. Dab it into the varnish, be sure to remove the excess. And, as they used to do at school, start drawing an element of the pattern or the drawing itself.
- The final step should be the fastening procedure. That is, the nail is completely covered with colorless varnish, along with the design.
For clarity, here are photos of simple drawing ideas.

This technology uses a different number of colors. First, try drawing hearts, simple flowers, lines and other geometry. If you feel the strength to draw a more complex pattern, feel free to get down to business.
Simple painting on nails with acrylic paints
These paints are respected by professionals and those who know how to paint with them. Their peculiarity is that they do not spread during operation, are easy to apply, dry fairly quickly, and last a long time. In addition, they are not dangerous to human health. On sale:
- colorless;
- translucent;
- opaque (overlapping the previous layer);
- pasty.
Can be diluted with water without any problems. They mix easily with each other. After drying, you can safely apply another design on top of them without fear of damaging the original layer. The coating is breathable and looks very attractive and bright.

According to the drawing technique there are:
- Oily. It is used in paste and undiluted form. They are called that because they resemble paintings done with oil paints.
- Pasty. The consistency is similar to liquid dough. The composition is not diluted and is used in the form in which it was purchased. You can only add pigments to it if the idea of the drawing requires it. Paint in the form of thick strokes. When the paint dries, it looks similar to gouache painting.
- Watercolor. Water must first be mixed with the binder, only then watercolor is added. The drawing in its pure form is similar to a watercolor pattern. Characterized by high quality.
- Sliding. You can mix this composition with structural nail gel. The difficulty here is that it will be quite difficult for a novice master to predict the end result. But after a few trainings you can learn this too.
- Glazing. You need to work with this material carefully. All layers that will be applied must be very thin, almost invisible.

You can paint with any type of brush that you know how to work with. For training, it is enough to purchase 6 basic shades and white in order to correct any mistakes in time. To understand them in action, you must first draw a checkerboard-shaped field on paper.
For 6 colors you will need 6 squares of approximately 2x2 cm. Apply the purchased paints to this field one after another (alternately) - paint the entire square with one pigment, then draw them with horizontal lines of a different shade, and finally with vertical lines of a different color. You should end up with 36 colors.
Painting with a brush using acrylic paints
Paint a twig with acrylic paint:
- Choose a very light color for the background (then choose a dark color for the drawing) or vice versa. In our example, it is lilac.
- Draw curved lines in yellow. Choose the location at your discretion, not necessarily exactly as shown in the photo.
- On this arc, draw leaf-shaped figures of the same tone using curved lines.
- Make the veins inside the leaves lighter.
- Secure the result with a transparent fixing layer.

If this drawing seems too easy for you, try recreating these simple ideas. In the first photo the drawing technique is depicted in pictures.

Learn to draw with dots
From the simplest designs to very complex patterns, professionals draw with dots. The simplest techniques are a combination of dots, commas, rulers, and so on of different sizes. The tool needs to be soaked in paint or varnish and begin to paint with it as with a regular brush. During the work, the amount of coloring agent decreases, this can be seen in the ingredients on the nail ornament, which makes the design more natural and realistic.

You can draw your nails with dots however you like. With it you can draw:
- flowers or animals;
- modify the traditional version of French manicure;
- It’s easy for them to create New Year’s motifs;
- personify the seasons on your nails;
- You can draw very stylish abstractions using dots.

Drawings using regular tape
Regular household tape can greatly help in creating nail designs. With its help you can make very different shapes, drawings and even compositions. Geometry is the easiest to do - it is based on lines, and cutting them out with tape is very easy. The cut strips can be applied to the nail plate in any order or sequentially if you want to create a specific shape.
Techniques for working with tape:
- As in all previous cases, the nail is first prepared.
- The first layer is the base layer.
- After drying, apply the background - at your discretion.
- While the varnish is drying, cut a few thin strips from the tape (about 1 mm wide, it can be thicker if you want it yourself), the length should be greater than the size of the nail, so that later there will be no difficulties in removing the strips.
- If the background layer is dry, apply the tape sheets to the nail the way you want it.
It is very important that it is thoroughly high. Otherwise, when removing the strips, you may damage the background layer if it has not dried well.
- On top, cover the entire surface of the nail with varnish of a different shade or several - this is also your prerogative in choosing.
- Allow a few seconds for the polish to begin to dry, but not completely dry.
- Peel off the pasted strips and see what you got.
You can leave everything as it is, or you can further refine the drawing with a thin brush or dots. Adding sparkles, circles and other elements with a different color of varnish.

Today there are many types of decorative tape on sale; it can also be used to create drawings. Here there is no need to cut the strips yourself. It can also be used in terms of decoration. Glitter on nails always looks beautiful, and with decorative tape it looks excellent and unique.
Toothpick drawings
Simple but unique patterns on your nails can be made with a regular toothpick. It is an indispensable attribute of every home, always at hand, and can always help in creating a complete image. If you have already learned how to work with a needle, then there will be no problems with applying designs with a toothpick. The drawing technique and sequence are similar here, only the drawings are slightly different.

Other methods for creating simple nail designs
In addition to drawing with your own hands, you can use ready-made drawings - stickers, stencils, stockers, template plates.
Stickers
Choose a specific color for the base. Paint your nail plates with it.
Once completely dry, stick your chosen sticker on top. They come with an adhesive base.

There are also those that need to be placed in warm water before gluing. After 10 seconds, it is taken out, the figure is carefully grabbed with tweezers and transferred to the nail.

Another type of stickers
Performing a manicure has long been a creative process that requires artistic skills and abilities. After all, nail designs are a newfangled trend that has been popular for several years. Patterns, geometric shapes, abstractions and images can add variety to a boring design.
Any girl can master nail painting if she practices regularly. To begin with, you have to master the simplest drawings and only then proceed to more complex ones.
Nail art at home
To create patterns you will need brushes of various thicknesses, toothpicks or tailor needles, dots, sponge, orange stick, etc.
To create designs on your nails you will need acrylic paints. To begin with, you can use 2 - 3 colors. The choice of colors is very extensive. You can buy bright neon colors or, on the contrary, soft, calm shades. You can also use gel polish for nail design. It can be used on both natural and artificial nails. Gel polish is highly durable and has a wide range of color options. The resulting coating is dried in an LED lamp.

Step-by-step photo of creating a design on nails with roses
In order to make beautiful designs on your nails, you can refer to step-by-step photos on the Internet. You can also buy various stencils and stamps that will help you create a bright and catchy design, as well as various decorative elements: rhinestones, appliqués, fabric decorations, dried flowers, stickers, threads, cobwebs.

Step-by-step photo of creating a butterfly nail design


Stylish geometry manicure: photos of fashionable designs on nails


These days, a beautiful, neat manicure is no longer a luxury. It's more of a part of good manners. Any image successfully complements the original pattern on the nails. It reflects the mood, matches the season, matches an outfit or follows a fashion trend. It is ideal when several aspects are taken into account when creating a drawing. Every woman strives to look well-groomed and at the same time stand out from the crowd and be special. A well-chosen pattern on your nails will help you attract interested glances.


Types of painting
Modern designers and nail art masters never tire of delighting us with new trends every season. Sometimes they update timeless classics. They often create something fundamentally new in the field of pattern making techniques. A manicure done by a master is a true work of art. However, to get an impressive effect, it is not at all necessary to regularly use the services of a manicurist.


Fashion provides many opportunities to create simple patterns and ornaments on your own.
Step-by-step instructions for creating a particular drawing make the process a pleasure. Most of the new techniques look very impressive, but are actually not difficult to perform. Now every woman can pamper herself with new original decor at home as often as she wishes.


Patterns on nails are made using various classical techniques. The most original types of manicure are obtained by mixing different techniques. Drawings in the form of a variety of monograms are always relevant. Moreover, they can be used independently or as additions to other techniques (ombre, French, broken glass). Often, only accent nails are decorated with complex ornate patterns. The rest are supported only by color or similar themes.


Openwork or lace paintings always look very gentle and feminine. It's not that difficult to do them. Beginners use tulle or guipure with a fine mesh for this. This design is in demand not only in the bride’s wedding manicure. They often complement everyday French manicure. Notes of piquancy are created by black lace on a red or natural beige surface, evoking associations with lace lingerie.


Drawings with dots have not gone out of fashion for several seasons. This could be painting with dots, using sequins, kamifubuki or rhinestones. Using simple dots, you can create designs of different colors, spectacular, colorful or more delicate. Sunflowers from dots, fantastically beautiful branches of cherry blossoms, and openwork ligature bloom on the nails.


Patterns that imitate knitted items with a large convex knitting pattern or knitwear are at the peak of popularity in the winter. You even want to wrap your nails in cozy warm yarn. In this case, a matte finish or the use of acrylic powder to highlight knitted braids against a glossy background is encouraged.


You can very successfully emphasize the elegance of an outfit by repeating its ornament on the nails. This is how they draw a chicken foot, herringbone, polka dots and other simple patterns that are on your dress, blouse or suit. At the same time, you should not repeat the drawing literally and select varnishes to match.
It is enough to put only appropriate accents on a few nails.


Indian motifs using the henna mehendi painting technique are making a triumphant return to nail art fashion. Unusually thin, beautiful and delicate patterns are obtained when using milky, gold or brown coating colors.


Popular oriental motifs consist of monograms, cucumbers and rich decor from liquid stones, rhinestones with liquid sparkles for framing. They are most often painted in black or gold on fairly rich contrasting varnish colors. This can also be a volumetric application. In this manicure, unlike others, there is no need to be afraid of going too far with the luxury and splendor of decorative elements.
Methods of applying ornaments
Manicurists most often use brushes when performing various designs. A high-quality tool with natural bristles gives wide scope for creativity. You can write out the finest details, create complex patterns and entire scenes on your nails. At the same time, professionals use a wide range of brushes of different sizes and bristle shapes. If your hand is not yet so precise, or you doubt your artistic abilities, it is better to abandon the brush.


If you really want to, you can start assembling a professional set of two brushes: the narrowest and thinnest and medium thickness. You can practice drawing drawings on special sheets or paper. Gradually move on to the tips, painting on them with acrylic paints. After this, you can start drawing simple patterns on your nails.


Professionals often use dots. This is a stick with a ball at the end made of wood or plastic. This tool is often used by novice manicurists. It greatly simplifies the work of applying a pattern in the form of dots, smooth lines and monograms. You can also create drawings from these elements in different combinations.


Regular tape or special adhesive tape sold in manicure stores will help you create popular designs in a geometric manner. Diamonds, triangles, squares, a complex combination of shapes and colors are actually done using tape. You can even do a three-color manicure in this manner. To do this, the nail plate is first coated with base varnish.
After complete drying, apply strips of tape of the desired shape to the nails and paint the remaining free spaces with a different color.


A regular rubber or foam sponge with small pores is an excellent tool for creating a spectacular gradient on your nails. At the same time, a three-color gradient is rubbed onto the not completely dry base tone with a sponge. To do this, draw three stripes side by side with paints or eye shadows, carefully shading the boundaries between the tones. Afterwards everything is secured with a transparent finish.


At home, students often use improvised tools. It is quite economical and convenient. Even experienced craftsmen usually modify the best tool to suit themselves. So, from an old brush in varnish, after cleaning, you can make a brush for painting the desired shape. To draw fine patterns, use a needle or toothpick. Instead of a dots, you can use an antique hairpin with a round tip or a used ballpoint pen.


To complete the pattern, you can take stencils. Ready-made ones are sold in stores. If it is difficult to find the required pattern, then cut out the stencil yourself. This way you get a neat symmetrical pattern on all nail plates.


When there is very little time to draw complex patterns, but you want to pamper yourself with an interesting manicure, they use the stamping technique (imprinting a design on the nails using a special plate) or a variety of stickers. This pattern must be secured well at the end so that it lasts for several days.


Required materials and tools
Depending on the chosen pattern, you may need a variety of basic and auxiliary tools. The main ones are: brushes of various shapes, dots, tape, a transparent base coat and a finish with the desired effect (sticky, shimmering, matte, glossy), scissors, manicure correction product, cotton swabs and discs.


You can also use rhinestones, rubbing, glitter, stencils, stickers, a needle and wooden toothpicks. Don't forget to choose the covering of suitable colors. This can be classic varnish, shellac, gel for long-lasting durability and acrylic paints for creating patterns.


If you are just starting out in the manicure business, but plan to earn an income, it is better to start with a small number of good quality professional tools. To start, a pair of brushes of different sizes and dots will do (it’s better to choose ones with different balls at both ends). Auxiliary tools at hand will also always be of great help. The collection of coating shades is also gradually being expanded.
First, they take several basic colors (white, black, red, golden, peach, pink), and add a couple of trendy shades for the season (for example, marsala or mint).

How to do it at home?
Anyone can perform basic types of manicure with a simple design without going to a beauty salon. For this purpose, special instructions have been created that allow you to create any pattern step by step. Whatever type of design you choose to create with your own hands, it is worth remembering the important rule of well-groomed nails.

When performing decor in stages, the first step will always be to bring the nails into proper shape. First, carefully remove the remnants of the old coating. Make a warm bath with salt and herbs. After this, a hygienic manicure is performed, removing the cuticle and giving the nails the desired shape. A transparent base is applied to a dry and clean nail plate to match the main tone. Only after this can you coat your nails with varnish and draw patterns on them.


Simple Design Ideas for Beginners
A spectacular manicure is not always difficult to achieve. Even beginners can find many ideas to implement on their own using affordable means. It is better to make patterns from the simplest techniques, moving on to more complex ones that require experience, perseverance and a subtle artistic taste.
Using tape or special adhesive strips, a pattern is now made in the form of chess squares with alternating black and white squares. If you don’t take your manicure very seriously, but add a bit of humor, you can make a cute design with a ladybug on a sheet, balloons, and candies. All of these designs contain small ovals or dots as a base. Even those girls who picked up a brush for the first time since drawing lessons at school can make such a pattern.
It is very fashionable to wear stylish one-color inscriptions on your nails in the form of the names of popular brands, cosmetics brands, and so on. They usually complement manicures on short or medium-length nails in beige or pink, coffee tones. The inscription itself is written in black. The background of the coating can be glossy or matte. You can copy the brand abbreviation, or make an original design with monograms, leaving only a recognizable name.
Beginners should use stickers or stencils to make this pattern.


Simple drawings are made using the technique of applying dots. You can make a floral manicure out of them, a polka dot pattern, or lay out a whole ornament of dot mosaics in the shape of the sun. You can draw with dots of one or two colors, or combine several contrasting or similar shades. The dot technique is used to create entire patterns in ethnic style and images of hearts, animals, and so on. This type of application is also used in a fashionable manicure with the effect of raindrops on the fingers.


A gentle manicure using the French technique has found a second wind today. On the nails, not only the edge is now distinguished, but also the lunula (cuticle growth zone). For highlighting, both classic milky white and silver, red, gold, black and other colors are used. The contrasting border itself no longer follows the strict direction of a smooth line along the border of the nail plate. It can now be beveled, wavy, covered with contrasting patterns. The jacket itself is often complemented by delicate mesh, rhinestones, metallic or monograms on accent nails.


A manicure with a twist can be achieved if you create several black dots one under the other on the main nude color. At the same time, draw two black triangles along the edge of the nail as symbolic tips of the collar. The result will be a manicure in the form of an office shirt. Individual nails can be replaced with gold or black rhinestones.


Drawings in the form of geometric shapes are very relevant in all the latest collections. Clear lines are easy to create using tape. Three-color combinations look most advantageous: beige - burgundy - emerald, black - red - white, mint - gray - lemon, turquoise - raspberry - brown.


A simple but interesting design can be created using a needle. To do this, apply a few drops of a contrasting color to the dried base coat, which are quickly distributed in the form of straight lines over the surface of the nail with chaotic movements.


If there is a special event or a noisy party coming up, you can make a bright drawing using stamping or stickers. You just need to choose thematic patterns. So, for Valentine's Day, red hearts are glued on a soft pink background. For the New Year, it is appropriate to make patterns of white or gold snowflakes on bright red, using stamp impressions.


A good idea if you are short on time would be to simply transform your daytime manicure into an evening one. To do this, you need to take a little varnish of the main color with which the nail is painted, and use it instead of glue to insert rhinestones into the design. You can make a rim or lunula of the nail with gold glitter.
Decorate two accent nails in a metallic style or create a rich pattern using a sticker.

It can be difficult for novice manicurists to create designs on their nails on their own, since modern design is not limited to patterns and allows you to implement interesting and stylish ideas using improvised means. To master the technique, you need to constantly train, study photos of finished works by masters and develop your imagination.
Before you start manicure, you need to study its types:
- Edged (classic). It is characterized by the fact that the cuticle is removed before the manicure. This option is suitable for owners of rough and thick cuticles. Among the advantages of trimmed manicure are: quick and easy to perform, requires a minimum of tools, and tidies up even the most neglected nails. The main disadvantage of this technique is its high morbidity. Without proper experience in manicure, you can damage the skin, cut off excess cuticles and cause infection.
- Unedged. This option eliminates the use of sharp and cutting tools, which reduces the risk of injury. To remove cuticles, special products based on lactic and fruit acid are used. An unedged manicure is faster than a classic manicure, but is not suitable for those with sensitive skin prone to allergic reactions.
Technique for performing trim manicure:
- The key to a neat manicure lies in obtaining the same shape and length. Therefore, the first step is the formation of the future form. Suitable tools are scissors, nippers and a nail file.
- Hand bath. This step is the main basis of trim manicure. To make it easier to remove the cuticle, it should first be softened in water. You can add sea salt, soap or essential oils to the bath. Each finger must be treated for 5 minutes.
- Using a pusher or an orange stick, you need to push back the cuticle. This should be done carefully so as not to harm the nail plate. It is not recommended to place the tool at a large angle; ideally, the stick should lie on the nail.
- Cuticle removal is carried out using rounded scissors or nippers along the entire perimeter of the nail.
- After removing the cuticle, experts recommend applying oil to your nails.
Technique for unedged manicure:
- The nails are given the desired shape using a nail file. If the nail plate is uneven, it should be polished with a buff.
- A special gel is applied to the cuticle. With its help, the skin softens in 2-3 minutes.
- Use a cloth to remove the gel. Then use a wooden stick to remove the cuticle, pushing it back.
- Finally, a cream is applied to the nail plate, which moisturizes and nourishes the skin.
One of the most difficult tasks for beginning craftsmen is choosing a color.
Experts identify a number of basic shades that should appear first in the master:
- white (often used for French or moon manicure);
- black;
- red;
- burgundy;
- pink (preferably warm and cool shade);
- beige;
- silver or gold glitter.
 Nail designs for beginners can be made simply by adding glitter to the design. Photo of the option.
 Nail patterns and decoration can be made with improvised means and purchased materials. For beginning craftsmen, glitter, stickers, dots, brushes, a needle and toothpicks, as well as tape are suitable.
Manicure techniques and methods for beginners
Nail designs for beginners (photos and best ideas are presented below) are performed with the following tools:

Examples of simple but original techniques:
- Drawings of flowers using a hairpin, toothpick or dots.
- Neon manicure. The principle of execution: apply a base varnish, and on top draw dots of various colors and sizes. This option will be a great solution for the summer.
- Regular French or with the addition of patterns.
- Using pieces of tape, you can create a discreet and stylish manicure with stripes.. This design is suitable for both everyday life and work.
- Using a sponge to create a gradient. The color scheme allows the use of any suitable shades.
- Newspaper print. For this manicure you need to cut out pieces of text from a newspaper. The paper is pre-moistened in alcohol and then applied to the nails. Any plain varnish will be suitable as a base.

Tips for choosing varnish:
| Peculiarity | Selection advice |
| Pale skin | pink, silver, green, purple |
| Dark skin | beige, red, yellow, gold |
| Wide and short nails | can be visually lengthened with dark shades of varnish using vertical stripes in the design. |
| Narrow nail plate | Bright varnishes applied to the entire surface will help expand. |
| Matte finish | will be an excellent solution for office work and business style. The brilliant design is suitable for holidays and parties; experts recommend avoiding pearl coating altogether. The basic shades that suit any clothing and occasion are beige and cream. |
| Red manicure | To match the red shade, you must carefully select the entire image. This coating is ideal for going to a restaurant, holiday party or business event. Red nails go well with clothes in gray and black tones. |
| Dark shades | The choice of dark colors is not limited, as these colors are universal. However, you should not combine dark nail polish with brown clothes. |
Manicure options with simple patterns and designs
On a monochromatic manicure
To get a beautiful and original nail design, you don’t have to buy special equipment. There are ways for beginners that will help them master the technique of drawing using improvised means, as well as photo and video tutorials.
For example:
- Drawing with a toothpick. This technique allows you to make uncomplicated and original patterns. According to the application method, the method of obtaining a design with a toothpick is similar to a needle. However, the toothpick has a thick tip, so it will be more difficult to draw fine details. At the same time, it is easier to damage the base coat with a needle. The simplest version of drawing a toothpick is a heart. To perform it, you need to cover your nails with the chosen varnish and wait until it dries completely. Then dip a toothpick into the pink coating and place 2 dots on the surface of the nail, which are then stretched and connected to form a heart. This option is suitable for everyday manicure.

- Drawing with a brush. For manicure, a thin and not too hard varnish brush or a regular watercolor brush is suitable. They use it like a toothpick, but in this case the pattern will be smooth and even. You can draw a pattern according to the selected pattern or randomly.
- V style drawing. This option is similar in appearance to a French manicure. It can be used both in everyday life and for holidays. First, you need to cover your nails with a plain varnish of any shade and dry it. To form a V-shape, it is advisable to use stencils. The tip of the nail should be coated with a color that matches the main shade.
- Simple designs on a single-color coating can be obtained using dots. This tool is used to design nails using dots. Dots have different attachments with which you can get the desired pattern. Despite its simple execution, this design looks elegant on nails of any length.
- Using pieces of tulle. This design allows you to create a delicate and unusual image. You can perform a manicure in any color.
 First you need to cover your nails with base and base. Without drying the top layer, apply a piece of tulle to the nail and press down. After waiting a few seconds, the tulle can be removed. Finally, you need to apply a sealer.
On a multi-colored manicure
In order for the manicure to look appropriate and not look flashy, you need to combine colors correctly: pastel and calm tones are suitable for an elegant look.
Contrasting colors are chosen to decorate nails in a festive style:

On a matte manicure
Matte manicure is gaining more and more popularity due to its spectacular and sophisticated look.
Popular shades for matte finish include:
- blue;
- red;
- black;
- peach;
- pink;
- yellow and orange.
Nail designs for beginners (the photo serves as a clear example of implementation) in a matte version are decorated as follows:

Simple decor for manicure
In addition to the usual designs, nails are decorated with decorative elements: rhinestones, powder, foil, stickers, glitter. Jewelry is selected individually depending on the style and occasion for which the manicure is being done.
On a monochromatic manicure

On a multi-colored manicure
Nail designs for beginners (the photo helps to realize the idea) on a multi-colored manicure have many variations and allow the combination of the boldest and brightest shades.
For example:

On a matte manicure
Popular decor options:

Fashion trends for simple manicure in 2019
Experts say that there is no specific nail shape that everyone should adhere to. However, you should not limit yourself to just the standard rectangular, almond-shaped and square shapes. In 2019, bolder options remain fashionable: sharp nails and a ballerina shape.
Popular colors:
- grey;
- yellow;
- orange;
- green;
- silver and gold.
Fashionable techniques of 2019:

To get a beautiful and original nail design, you don’t have to know how to draw or buy expensive tools.
Simple designs and patterns allow beginners to experiment with manicure using various techniques and decorative options. For inspiration, it is recommended to look at fashion magazines, photographs of finished works and study step-by-step instructions, which describe each step in completing a particular drawing.
Article format: Anna Vinnitskaya
Video about simple nail designs for beginners
Simple and quick nail designs for beginners: