Print paper cut fish templates. Paper fish. Beautiful paper ballerina snowflakes
Is your child already familiar with where and how fish live? What do they eat, what types are there? Not yet?! Then it's time to introduce your baby to the amazing underwater world. And to make the acquaintance not only informative, but also fascinating and unusual, we suggest you make such bright and cheerful themed children's crafts on the theme of Fish.
Craft Fish
Craft paper fish

You can make such multi-colored funny fish from double-sided colored paper with your own hands, accompanying the lesson with a fascinating story about the life of fish.

Cut a wide strip from a sheet of double-sided colored paper and fold it into a neat accordion. It’s not worth folding the accordion to the very end, leave a small piece of a flat sheet that needs to be rounded with scissors and cut out the mouth - this will be the head of the future fish.

From paper of other colors, cut out the fin and tail, glue the finished parts to the fish.
On a separate sheet of white paper, draw a round eye, cut it out and glue it to the head of the fish.
Video master class:
paper fish
How to make paper fish
Panel Underwater world

Now we want to offer you an amazing craft that can become a real art object in your baby's nursery, or maybe an unusual gift for friends, teacher or kindergarten.
For crafts you will need big leaf colored cardboard in blue or light blue. This will be the basis of the panel.
Using ready-made templates, make the inhabitants of the underwater world.

Print the templates on colored paper, then cut and fold dotted lines. You should succeed: fish, crab, starfish. Glue the finished paper characters to a sheet of blue cardboard.

Algae can be cut out of green paper, and air bubbles can be cut out of white paper.
Video master class:
How to make a paper fish
Origami paper fish

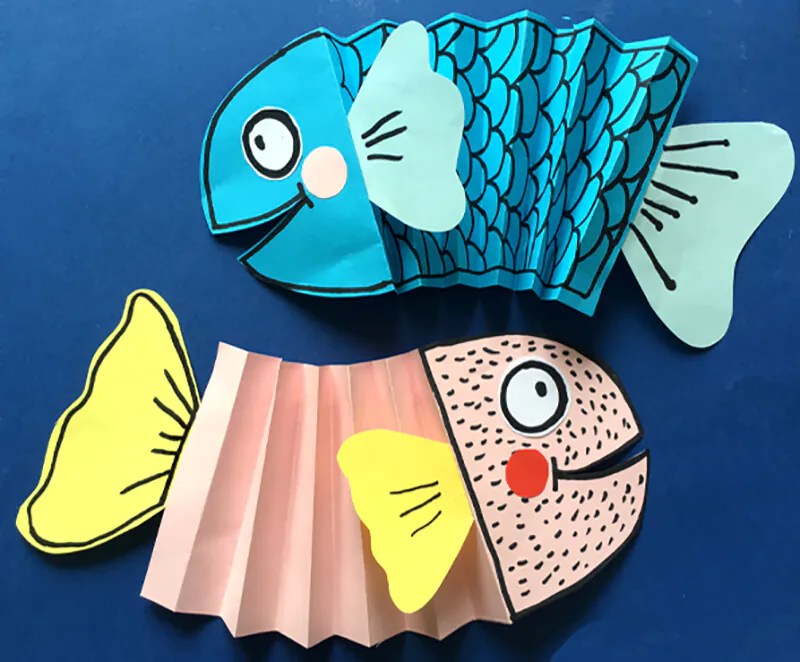
This movable Fish craft will be a great toy!
From a sheet of colored paper, fold the blank following the instructions. Fix it with glue stick.

The two sides of the resulting three-dimensional triangle must be cut with scissors into thin strips.

From paper of a different color, cut out the tail and fins. Glue to craft.

Be sure to cut out round eyes from white paper and glue them to the craft too.

Cut out scraps of colored paper lower part fish, which will be a movable mouth. And glue it too.
Video master class:
paper fish
DIY Fish craft

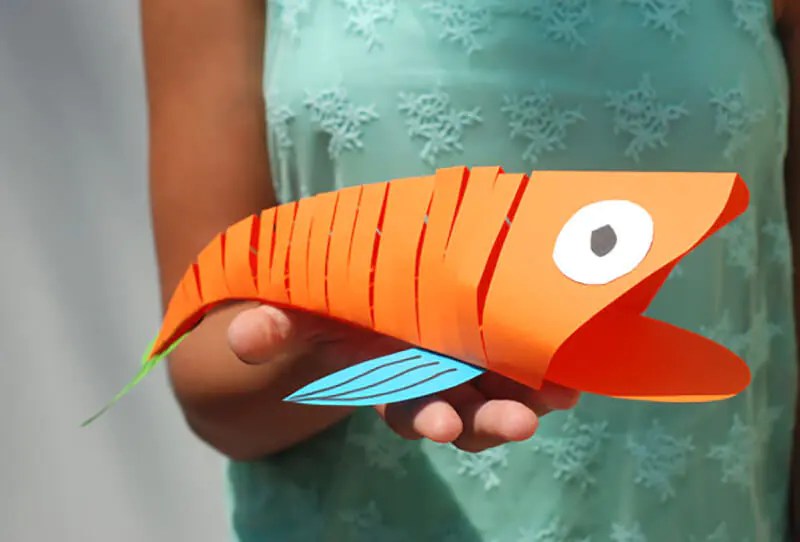
And finally, another option for making paper fish. Girls will especially like this method, because with light hand movements the finished fish can change color.
Cut out the silhouette of a fish from a sheet of colored paper (see photo).

Fold the workpiece in half and make horizontal cuts.
Expand the piece.

Video master class:
Toddlers begin to study aquatic inhabitants with simple and uncomplicated fish. The best way for them to remember what they look like is to draw or make. Of course, young creators do not always do it accurately, and therefore the fish pattern is an excellent solution for creativity, as well as for getting to know marine life.
To create a beautiful and neat appliqué with your baby, it is best to use fish patterns for tracing. Such stencils can also be used as parts. Children love to color ready-made pictures, they will a priori be with neat contours, and the task of the kids is to give color to the drawing.
How to make a fish pattern?
To get started, it's worth talking about where to get a template for cutting out in the form of a fish. If you have basic art skills or can draw well, it's easier to prepare a stencil yourself. Make a sketch on a regular sheet of paper. The simpler the figure, the better, because the child must gradually learn the smallest details..
It is best to stock up on cardboard and cut out fish stencils from it, since the dense material is stronger and more convenient to outline.

If you do not know how to draw, then you can go the other way. Fast and easy way - download ready-made templates fish stencils from the Internet and print on a printer. The picture will have to be cut out along the contour, if desired, it can be decorated with colored paper or painted with felt-tip pens together with the child. If you do not have a printer, then you can redraw a picture found on the Internet from a computer monitor. It's easy to do: put a thin sheet of paper on the screen and trace the outlines with a pencil.
On video: how to make a fish template with your own hands
Application using the Goldfish template (Master class)
Application- this is very useful activity for kids. They learn to use glue and scissors, train accuracy, fantasize by combining colors in the picture, develop hand motor skills and abstract thinking. Work with the bright colors, creating an image from small details is also good fun for children from 4 years old.
To create an application you will need:
- cardboard;
- colored paper;
- scissors;
- glue.

Creating an application according to a template includes several steps:
1. Take one of the simple fish stencils and outline the details, prepare cardboard templates for the child.

2. Find thick cardboard for the background and several sheets of colored paper. First circle the body of the fish, cut it out and glue it to the cardboard. Make the tail and fins the same color, carefully glue them side by side.
 Glue the body and tail
 3. Make scales - this is the most interesting thing in the process of creating a goldfish. Circle the prepared template, and draw a few scales on it with a simple pencil, placing them evenly over the part.
 Draw scales for cutting
 4. After cutting the scales, bend them at a right angle. Spread glue on the part and glue on top of the fish. The scale will add volume to future crafts and a touch of originality. Unusual crafts- a guarantee that the child will be interested in working with you.
 Glue the fins and detail with scales
 5. Of course, a fish needs an eye. Having cut out a circle from white paper, place it proportionally on the heroine of the application. In the same way, make a pupil out of black paper. Further a matter of taste and a flight of fancy.
 Glue the eye
 6. Decorate the background. You can also cut out algae or stones from colored paper.
 We glue the details in the form of algae and stones
 The goldfish is ready. That's how easy it is to make a little sea dweller from colored paper, the kid will definitely like to work with bright sheets of paper, and the templates of the golden mistress of the sea will simplify his work.
Do-it-yourself fish applications (2 videos)
Fish templates and applique ideas (42 photos)


FISH stencils


New Year's do-it-yourself
 USEFUL TIPS
Snowflakes are a traditional Christmas decoration.
Each snowflake is unique especially those made by hand. Paper snowflakes are beautiful and easy to make, because for this you only need paper and scissors.
Thanks to their simplicity, snowflakes become a favorite craft for children and adults.
Read also:
How to make a snowflake
Window decoration for the New Year
How to cut paper snowflakes
Real snowflakes are hexagonal, but you can also try making a quadrilateral or octagonal snowflake.
Here simple instruction how to fold paper for a snowflake. The basic hexagonal shape stays the same, but what makes it different is the pattern you'll be cutting out of that shape.
You can use any paper to make snowflakes: wrapping paper, old magazines, printer paper etc.
However, do not use very thick paper, as it will be difficult to fold and cut.
Hexagonal snowflake

· Fold a square sheet of paper in half to make a triangle (Fig. 1).
· Now fold the triangle in half, connecting the ends (Fig. 2).
· Fold the resulting triangle in three (Fig. 3), as shown (Fig. 4).
cut off upper part so that it is straight (Fig. 5). Start cutting out the pattern according to the pattern or as desired, using straight and curved lines.
Open the snowflake.
Quadrangular snowflake

Pentagonal snowflake

Advice:
- You can use any size sheet of paper. For example, if you want to make many small snowflakes, then you can cut 4 snowflakes from one A4 sheet.
- Leave less paper. How more paper you cut, the more graceful it will be.
- If you can't cut the pattern with scissors, try using a utility knife.
Snowflake templates (print)


Beautiful paper ballerina snowflakes

Such an elegant ballerina snowflake is easy to make with your own hands with your children.
The basic shape of the ballerina is symmetrical, so we need to fold the piece of paper in half and cut it out. template for ballerina.
See also: DIY Christmas ideas

We make a ballerina tutu in the form of a snowflake. Fold the sheet of paper only 3 times instead of 4 so there are not too many layers to cut out. Use different patterns.

After you have cut out the tutu, fold it in half to thread the ballerina figurine, and only then straighten it.

Snowflake templates for cutting


Paper snowflake patterns for cutting
Such snowflakes on the theme of the cartoon "Frozen" can be cut out with the children.


Paper snowflake stencils
You can make a snowflake garland to decorate your home.


Snowflakes can also be cut from coffee filters


Christmas decoration with snowflakes
Hang snowflakes on the window with hooks or paper clips.

Thread the string through the 2 holes in the snowflakes to make a garland.

By gluing several snowflakes with the same pattern, you can make 3D snowflakes.

You can decorate your gift with a handmade snowflake.

Use double sided tape toothpaste or a soap solution to stick a snowflake to a window or decorate your house or other room with them.


It would be nice to catch a goldfish. Make a lot of wishes and let them all come true. It is very difficult to single out the main thing. Well, if not catch, then at least draw.
All illustrations gold fish puffy-tailed rounded beauty with big intelligent eyes. But for a good deed, it is not so much the form that matters as the content. Therefore, the templates will help you choose your fish, and maybe everything for a cozy night lamp, vase, candlestick, made with stained glass or other techniques, draw with children, make an application from colored paper or felt.
The printed template can be transferred to a solid object using carbon paper. To get an image on a light fabric, you need to put the fabric on the drawing and circle it with a pencil. Reduce or enlarge an image on a copier, or set the size and output on a printer. Many put paper or cloth to the monitor and copy the drawings. One of my friends copies drawings from the monitor directly onto T-shirts!


 >
>
Summer will soon come - the time of rest, sun and sea. And since there is a sea, then there should be clothes and beach accessories (bags, towels, etc.). Therefore, the author's drawings of the batik artist will certainly be useful to you. Irina Pereleshina.
Here, mainly, stencils of fish and several sea shells. These drawings are quite large in size, I had to reduce them, but you can always save them to your computer in real size. At the request of the author, the use of these templates for commercial purposes is prohibited.

Here is the site of Irina Pereleshina: http://pereleshina.ru/. This is an artist with vast experience and an eternal passion for finding new things. The author is happy to share his knowledge and experience with his students, offering to visit his batik courses for everyone. The studio is located in St. Petersburg. Irina also has where you can buy or order the desired product.


I can imagine how beautiful these bright, colorful fish will look in the form of painting on fabric! For inspiration, you can run to real beautiful marine specimens:

Bright and nimble waterfowl attract all children, so they will definitely like the voluminous application "Fish in the Aquarium". But the fish themselves in this work are quite complex. Therefore, if the children are small, it is better to make simple multi-colored fish in flat view. You also do not need to make a very small aquarium, since small fish in this technique are quite problematic to make, especially for children.
Work materials
- White cardboard;
- Colored paper in blue or blue, as well as green, red, pink, yellow;
- Glue stick, scissors, simple pencil, black felt-tip pen.

Stages of creating a three-dimensional application "Fish in an aquarium"
How to make an aquarium out of paper?
Draw a round aquarium on a white piece of cardboard and cut it out. Do not make it very small, because small bulky fish are very difficult to make.

Put the aquarium to the blue paper, circle it. And then draw a parallel inner line next to it, as the water should follow the outline of the aquarium, but be a little smaller. Draw a wavy line at the top. Cut out the water.

Fill the aquarium with it, that is, glue the blue paper to the white cardboard blank.

What is an aquarium without algae? Cut out simple wavy stems from green paper. Also cut out circles from white paper. different sizes that will be air bubbles.

Glue the details, now the aquarium is completely ready to receive its inhabitants. At this stage, kids can cut out very simple fish, but older children can be advised to make voluminous fish.

How to make a voluminous fish out of paper?
You will need a small square of paper. Its size depends on the size of the aquarium. Put your square in the created aquarium, does it look normal, does it not occupy the entire area of the aquarium, will two more fish fit there, or at least one more? If the answer is yes, we continue to make a fish.

Fold the square in half, corner to corner, to make a triangle.


Open the double paper.

Where there is a sharper angle, make cuts, not reaching the edge by about a third. You should get 6 thin strips.

Arm yourself with a glue stick and start folding the strips one on top of the other, securing them with glue. First, connect two strips, and glue at the intersection, then two more, well, the last two should converge on top. In the process, try not to lose sight of the tail, with the right cross direction, it should be a fluffy bun, and not just layering.


At the last stage of creation voluminous fish, draw one eye on her with a felt-tip pen, add strokes to the tail.

The green fish was an example, and for the aquarium I made three bright fish - pink, yellow and red.

It's time to put the fish in the aquarium by gluing them in the tail area. This is how a cute application of a fish in an aquarium turned out.

If desired, a strip of white cardboard can be glued on the back so that the aquarium is, as it should be, in an upright position.
