How to make a large paper basket. How to make a paper basket: step by step instructions. Paper strip product
We suggest using unnecessary paper (newspapers, wrapping paper, magazines, etc.) for making useful products - paper baskets. In this article, we will show 5 simple ways weaving baskets. We used a few stripes and tried to keep the process as simple as possible.
Materials required for making paper baskets:
- paper (newspapers, wrapping, colored paper, old magazines)
- Scissors
- Scotch
- Cardboard or thick paper.


I used brown paper for making baskets. Cut strips 30 cm long and 4 cm wide. Fold each strip in half widthwise, keeping the same length. The quantity must be at least 50 pieces.
Step 2. Shopping cart 1.
Take 16 strips and cut them in half. Lay out 8 stripes vertically and 8 stripes horizontally as shown. Weave carefully. When the bottom of the basket is ready, tackle the sides. Take the strip and go to the sides as shown in the picture. Weave the last strip, fold and glue the remaining ends of the strips into the inside of the basket. Thus, the square basket is ready!


Step 3. Basket 2.
You will need cardboard or heavy paper to make the base of the basket - 8 strips of paper. First, take two strips and glue them in the middle to form a cross. Now do the same with the rest of the strips and make sure they are well glued together. After connecting all 8 stripes together, they should look like a star (as shown in the picture). Glue a round piece of cardboard in the middle of the star. Take several strips as shown in the figure and weave a single strip into them. The weaving process must be done in a circle. So, gradually weaving strip by strip, you will form a basket. Do not braid about 2.5 cm to the end of the ribbons. Fold the remaining pieces of the strips inward and glue them together as shown in the illustration.


Step 4. Basket 3.
To make this basket, you need to take a round piece of cut cardboard and strips 0.5 cm wide. Use super glue and glue 12 strips to a round piece of cardboard. Take another strip and start braiding around the glued strips. Continue by interweaving the alternately prepared strips of paper. Continue until the ends of the strips are approximately 2.5 cm in length. Fold the rest of the stripes inward and glue them together. Look how cute the basket is!


Step 5. Basket 4
Take 8 stripes Lay out 4 stripes vertically and 4 stripes horizontally. Tighten the weaves. The fold lines are shown in the figure. Fold the stripes on one side and start braiding by passing one stripe over the other (as shown in the picture). Form a corner at the edges as in the second picture. Continue and after a few steps you will get a shape like in picture 4. You can fold the remaining strips inward, or cut and then fold inward. Use glue. Agree that this is the most easy way making baskets. Hope you enjoy making them.


Step 6. Basket 5.
To make this basket, you need strips of the same length, or strips of strips from the above baskets. Glue or tape all collected strips with glue or tape. Cut out cardboard or heavy paper in an oval shape. Then glue the strip to the oval and carefully start winding around the edge, as shown in the figure. While winding, gently glue the strip and do this until you form a basket. the right size... When the strip ends, fold it inward and use glue to attach it to hide the end.


To complete this basket, you will need sewing machine, sheets of wrapping paper and thread.
Make stripes as shown in the picture. Sew them on sewing machine... Then lay out 3 stripes vertically and 3 stripes horizontally. Connect them with a strip sewn into a ring, as shown in the figure. Then thread the next stitched ring, etc. Continue to weave and shape the basket. When the basket is complete, attach the sewn strip handle to it. Look how beautiful it turns out!


Hello dear readers and handicraft lovers! You probably know a lot about good DIY gift wrapping? It is she who creates the first impression.
We have already considered with you earlier the manufacture of such packages as, and whole. But sometimes it is not just a box that looks much more spectacular, but Wicker basket with a gift inside.
And, which is very important, for the material for making DIY baskets it is not necessary to go to the dacha or to the forest. Everything is at hand, because our baskets are made of ... paper. Yes, either from newspapers or magazine pages. Don't believe me?
In this master class, I will show you how to make a paper basket with your own hands. I think you will need it very soon. After all, Easter is on the way. Put dyes in such an original packaging, and they will surely become the most important gift for your family. And yet - it's very stylish! Honestly!
So, to make a basket of paper, we need:
- office paper (or newspapers);
- liquid glue (PVA or simple stationery for paper);
- paints (preferably acrylic);
- shape (for example, a glass jar).
Here is such minimalism!
Important! Before starting making the basket, I recommend reading the article, which contains valuable experience of mistakes and best practices.
How to make a paper basket:
Part 1. Preparing a paper "vine" for weaving
Cut an A4 sheet lengthwise into 2 equal parts. It is better to cut several sheets at once. We need a lot of paper.
Next, we take a skewer for or a knitting needle and begin to wind our workpiece onto it, starting from the corner. The tubes are obtained. Please note: you need to twist at an angle of 45 ° and as tight as possible. In this case, the tube will come out even and will not wrinkle much, but at the same time it will be quite flexible.
At the end of the winding of the corners, we fix it with glue. Even if the first time you can't wind up a neat tube, you shouldn't worry, it didn't work out for me right away either. By the end of the preparatory phase, the straws will be getting better and better.
We will need such tubes for weaving a basket with our own hands. Only a small portion of the blanks are shown here. In fact, we need them decently.

Now we need to lengthen some of the tubes. Note that each piece is slightly wider on one side than on the other. So, we grease the narrow tip with glue and insert it into the wider end of the other tube. It turns out an elongated stick.

We need 9 such sticks to begin with.
When the improvised "vine" is ready, I suggest flattening it down a little. This will make the weaving more even.
Part 2. Weave the bottom of the paper basket
I propose the easiest way to weave the bottom of the basket with your own hands (however, this weaving is more suitable for small baskets). So, put 4 large tubes on the table parallel to each other. Then we take another long piece and weave it perpendicularly, alternating the position under the tubes / above the tubes. In the same way, insert 3 more tubes in a checkerboard pattern. It turns out such a braided square. Try to weave as tightly as possible, then the bottom of the basket will turn out beautiful and even.

Now, actually, let's start weaving (the warm-up is over :)). We weave the remaining long tube from one side. In the photo, note that on the right I have not 4, but 5 pipes. Then we bend it at an angle of 90 degrees and weave it in a circle, all the time alternating the position under / over.
We make several such turns, gradually adding the length in the above way. You will see how your workpiece will be rounded. The size of our braided circle must strictly correspond to the size of our shape, along which we will braid further. paper basket... In addition, try to equalize the distances between the beams by this time.
As soon as we have reached this point - consider that the bottom of the basket is ready with your own hands!
Part 3. Building the walls!
To make it more convenient, we bend all the rays of the future wicker basket upward. If the container is supposed to be high, then it is necessary to build up the tubes at this stage. I didn’t build up, because the basket is low.
We install the form (I have a 1.5 liter jar in which I roll up). And in order to achieve a beautiful verticality, we will fix the rays with an elastic band at the top of the can and try to expose them with an equal distance between them.

This is where the most difficult stage begins. The fact is that the tube with which we braid the basket will have to be pushed through under the rays every time, and they are fixed with an elastic band. This is not very convenient, so you have to work with a short length, constantly increasing it as needed. In addition, right now you need to try to weave as tightly and neatly as possible, which will require a little more effort, because the vertical sticks are not yet rigidly fixed (just an elastic band).
But all these inconveniences can be stopped after 2-3 rows. Then the elastic will no longer be needed. However, always make sure that the weave turns out to be free of gaps, tighten where necessary.

Having reached the desired height of the walls of the wicker paper basket, let's immediately think about the handle. We will pass our weaving tube between the upper and penultimate rows, sticking it out from the inside. It will be between two adjacent rays. We will not touch them yet. Also note immediately 2 more rays opposite these. We also leave them as they are.
And we cut and bend the rest a little. We coat each tail with glue and, using the same skewer, plug it behind the nearest lower row (Fig. 1 and 2).

This is what a wicker basket looks like after these manipulations (Fig. 3).
Part 4. Handle for the paper basket
Everything is simple here. The tube that we used to braid our entire paper basket is now inside the basket. We circle one of the protruding rays with it and push it inside again. Now it's the same with the other ray. And so on (up to about 2/3 of the length of the future handle). If you want a long basket handle, then you need to build up those two rays.

So we got to the opposite rays. I propose to glue them together, we get such a bridge. Cut off the excess length and braid to the bottom of the handle.

From below, we pass a tube between the last two rows and make another turn on the other side. Lubricate the tip with glue and fix it inside the rows with a skewer.

This is how a hand-made, but not yet painted paper basket looks like.
The only thing left is the painting. It's great that these wicker baskets are made of white paper, which gives a lot of options in the choice of color. I recommend using acrylic paint, because it does not soak or deform the paper after drying, such as watercolor. In addition, dried acrylic paint- by itself is already strong enough and does not stain at all.

Let our paper baskets dry. If you want to give them a special look, you can also varnish it. Here everything is in your hands. And here is my result!

Anyone who wants to can make such baskets with their own hands. It will be very great if my master class will help you decide on this step, because instructions are always easier.
By the way, I have two workshops on making paper baskets, where weaving is not required. Here are the links to them:
You can often see that a variety of baskets act as gift wrapping. Including homemade ones. From this, the value of the gift only grows.
In our master class, we invite you to get acquainted with a simple method of making paper baskets with your own hands.
This version of the craft is good not only for its charming appearance, but also for the fact that it is made almost "monolithic" - almost the entire paper basket is almost a solid sheet. And you don't have to work with many small details.
After appearance the finished craft is appreciated, it's worth getting to work. We need a sheet of thick paper, about 18 centimeters long and the same width. We draw it, as shown in the figure, into three strips equal in width - this is a template.
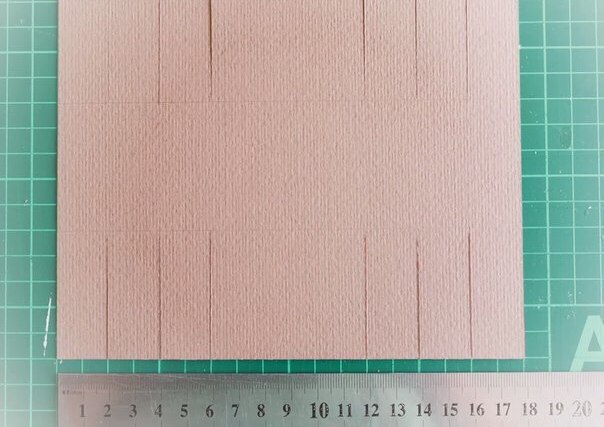
On the side strips, we make cuts across - you should get three strips on each side, 2 centimeters wide. Then we cut off the central parts so that we get triangles. A blank for a paper basket is ready.
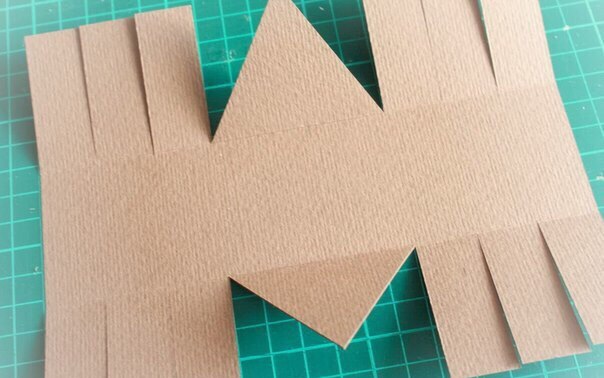
Bend the strips and triangles to the middle, and then bend the central stripes to the triangles and glue them. You can use paper clips or staples to secure the fasteners while the glue dries.

This is how we form the base for the paper basket. We do the same for the rest of the stripes, gradually moving from the center to the edge.
We draw your attention to the fact that the number of side stripes and their width can be chosen arbitrarily, this will slightly change the appearance of the craft, so it's worth experimenting.

We make a pen from a strip of paper, glue it to the central part. To not see the place where the strips are glued, you can stick a decorative paper flower on it.
Actually, the post had to be called, who's talking about what, and I'm talking about Easter again, or keep me seven ... I'm making Easter accessories again, probably I'm already tired of everyone, but in order to rehabilitate myself I will say that today I am with a master class ... and the background is this ... my husband asked to congratulate colleagues on the holiday, at first they wanted to come up with something individual, but then he said that it would be best to make a common basket in order to level everyone up and not offend, so as not to overload me with work, and simply, to carry it easier ... you need to lay 6 eggs, so not every paper and cardboard basket can withstand it ... began to think ... the most ingenious thoughts come at the most unexpected moment, was that with you? And I very much understand Newton with his apple)))) My apple fell successfully at the moment when my daughter was unwinding baking paper all over the kitchen ... it, of course, is not a very legal activity and threatened to turn into mother's cries, but nothing happened the most in the best possible way, and it was the brilliant idea of making an almost real basket of frankly improvised materials that came up ... well, my mother changed her anger to mercy))) It turned out, in fact, like this ... in the traditional Russian style ...
Now settle down with coffee, about everything in detail ... to make a basket you will need corrugated cardboard, baking paper and a hot pistol ... from a helper, a compass, a pencil, a ruler, scissors .. From corrugated cardboard we cut out the details of the basket. I have a round one, therefore, in fact, circles for the bottom-3 pcs and 2 rectangles ... who has a large piece of corrugated cardboard can do with one piece for the walls ...
![]()
We glue the bottom parts together ... it will be convenient to glue the side to such a plump part ..
![]()
Then we glue the details of the side ... I'm 1 cm, and as far as the length of the parts allows ...
![]()
The technology is primitive ... we go around the bottom with a side ...
![]()
Well, we get just such a blank ...
![]()
Then we cut the baking paper into strips 4-5 cm wide ... here you can vary ... make it thicker, the weaving will be less frequent, and vice versa ... it depends on the concept of the future basket ... We twist the strips into flagella .. ...
![]()
We glue the resulting bundles to the basket on a glue gun ... when the flagellum ends, we attach the next one to its tail ...
![]()
Well, and so we paste over the entire workpiece ... it turns out like this ...
![]()
Does it look like the real thing? And if you braid the basket with corrugated paper cords, then you can get bright and joyful baskets))) ... Next, we proceed to the handle ... I have two strips of corrugated cardboard 3 cm wide ... glue them together. ..
![]()
Then we bend the blank in half so that our handle is not flat, because on real baskets it is exactly semicircular ...
![]()
Well, according to the old scheme ... we braid it with flagella ... here it is a little easier because the flagellum can be fixed only at the beginning and end, it will not go anywhere ... Then we fasten the handle in place with a glue gun and voila ...
![]()
I really respect people who weave from newspaper tubes, but those who, like me, this art is not yet available to be discouraged ... very much even a basket for myself and not at all necessary for Easter))) ... You can put a flower in it pot, put all sorts of little things, give a gift and even serve drying in it for tea ... it is strong and environmentally friendly))) It can be made of all kinds of shapes and sizes)))
Well, then, the decor according to your taste ... well, it turned out like this ... Daffodils are the Russian spring ... it's no one to blame that this year it is more and more winter, and we will take it and compensate it like this) ))
![]()
Inside there is a joyful orange sesal ... instead of the sun, which is so lacking and simply because I love the color orange ...
![]()
The color of daffodils is not a drop in an arc, but the mood from them is wonderful)))
![]()
I found a digital stamp on the Internet and use it with pleasure))))
![]()
Weaving itself ... Well, of course, sewing makes the basket very festive, if you make a traditional basket, do not skimp on cotton lace ...
![]()
Well, a pen ..
![]()
In my opinion, the price-performance ratio is unrealistic))) Are you still not in the kitchen? And it's time already ... before Easter there is very little time left)))) I would be very glad if I pushed on interesting idea for a wonderful holiday)
I had a biscuit ... I was lying alone on the shelf ... I decided to make a personal basket for her.
I picked up a suitable size sour cream jar:

I measured it - it seems to be just. I will weave on this jar - to give it at least a little shape.

I cut the newspaper list into 8 parts. These stripes are obtained - approximately 5 cm by 58 cm
I take a barbecue stick and start winding a strip of newspaper on it from the corner. I grease the side of the strip with PVA.

I wind it up until the newspaper strip ends.

I pull out the stick and wind the next strip.
Having made a small supply of tubes, we begin to weave. We take three tubes. We cut two of them in the center - we got 4 short and one long tubes. We remove one short one - we do not need it.
We put the tubes with such an asterisk - at first, three short ones, and one long on top, so that one end is flush with the rest of the sticks, and the other is longer:

We take the long end of the tube and begin to weave the bottom of the basket:


When the tube ends, we drip a little PVA inside it, take a new tube, slightly crush the tip and push it into the hole with glue

Weaving has been practiced since antiquity. Method weaving paper craft, which we want to offer you, arose not so long ago. To do handicrafts, you do not need to purchase special materials. Suitable for work plain paper, you can use newspapers or magazines. It makes beautiful ones in the form of a basket, a casket, bookmarks for a book, and so on.
To make something unusual, you will need newspapers or magazines, tapes for the cash register or paper for packaging, but it is worth noting that each type of paper has its own characteristics.
For example, newspapers are flexible and lightweight blanks. Magazines have a denser texture, especially gloss. From magazine sheets, you can form a tight workpiece, but more durable. The tape for cash registers is soft enough, thin and snow-white, it is convenient to work with it. These types of paper can be easily dyed.

Office paper is tough and rough, but also suitable for weaving. Office paper can be colored, which greatly facilitates the manufacturing process: the product does not have to be painted.
The main condition: for weaving crafts from paper tubes you should choose paper of the same texture. Note that newspapers produced by different printers will differ in sheet thickness.

Paper craft weaving techniques
Weaving paper is quite simple, but there are several techniques you can use. For example, weaving a basket, casket or piggy bank involves the use of blanks in the form of strips and tubes of any shape and with the use of some object - a vase, flower pot or box. The product can only be made of paper vine, or it can be woven over the finished item for a more beautiful look.

As it is already clear, paper should be prepared for work. You should have PVA glue, a wooden skewer or a knitting needle to make straws, scissors with a ruler and a pencil, a pair of clothespins, and a container that you need to braid.
Ribbons, bows, flowers, beads or beads are suitable as a decoration for the craft. To decorate the finished item, you need to prepare a cardboard sheet from which the base of the craft is made, as well as a needle and thread, an awl, a brush with acrylic paint.
To weave any product, you will need to make tube blanks in the form of a paper vine. Before making a craft, pay attention to the strength and plasticity of the blanks, decide on the width and type of paper, the reliability of your product will depend on this.
For beginners, weaving paper can seem like a difficult process, so it is important to adhere to accurate and precise steps.

Let's get to work. We take a knitting needle number 3, cut the paper into strips of 9 cm thick. Don't be lazy and use a pencil with a ruler so you don't have to redo your work later.
We put the knitting needle at the end of the strip and wind the strip on it, the tighter the better. We drip a little glue onto the corner of the tube and glue the end of the workpiece, while the knitting needle must be removed. You will need a lot of blanks for crafts, it all depends on the size of the desired product.
For crafts, you will need not only blanks in the form of tubes, but also strips. We cut newspapers, magazines or plain paper into strips of the required thickness. It is advisable to form strips up to 1.5 cm. Just cut magazine glossy sheets into strips, and we recommend folding newspaper sheets in half for greater strength and preservation of the shape of the product. For example, to make a basket or a casket, it is necessary to cut paper from newspapers into 3 cm wide instead of 1.5 cm.

If the length of the sheet is not enough, glue several strips together so that you do not have to add paper during weaving.
In order for the product to acquire a neat and even look, it is advisable to use a ruler, well-sharpened scissors and a pencil. Mark equal lines on the paper, and then cut with scissors.

For weaving a basket, it is worth preparing tube blanks. Approximately 10 blanks are required for the base and rack of the basket. At the beginning of the manufacturing process, lengthen the tubes, connecting them in two, and secure them with glue.

We put five blanks on the surface of the table, 0.5 cm away from each other. Press all the blanks with a ruler, lift up through one 3 blanks, and drop the glue on the rest from below and put the 6 tube on top.
Lower the workpieces raised up, do the same process with the strips remaining at the bottom, add the 7th tube. By analogy, apply the blanks that remain.

The frame of 10 blanks is ready, now we take 1 tube, turn it at an angle of 90 degrees and weave it. We repeat the steps with other blanks. After weaving in all the tubes, a round base of the basket is obtained. Don't forget to add the length of the vine.
We set a jar or a flower pot on the bottom and use clothespins to raise the blanks up, continue to weave the craft vertically. Having reached the required size of the basket, we arrange the edge of the product. We bend the ends of the workpiece inward, while circling the nearest tube. Insert the edge of the workpiece into the loop. We carry out the actions until the last tube remains, which should be inserted into the loop formed by the initial one.

We form a handle for the basket. We twist a couple of blanks with each other, glue them to the craft or sew them with threads.
Instead of straws for weaving, strips of paper can be used, but as thick as possible. We prepare 8 pieces of strips, length 32 cm and width 2 cm. We recommend taking multi-colored stripes (blue and yellow) to make the basket original.

We put 4 strips of yellow tone on the table and weave 4 strips of blue into them. The square should be centered on the strips and strong.

To form the sides, bend the branches up and continue to weave to the desired size of the product. Fold the remaining strips inward and glue them. Then we form the handle for the basket from the strips.

If you have children who are in school, then you can not buy bookmarks, but make them yourself. Your child will also like this activity.

Cut out a wide strip of paper, fold it in half. At the fold, we draw triangles every 1 cm so that their tops do not touch the opposite edge of the strip. Cut the strip without touching the top of the triangles. Expand the workpiece, cut out the previous strip of a different color. We weave it into the gaps that are formed on the first workpiece. At the end, we glue the ends of the craft with glue.

Experiment with colors and ornaments to create original bookmarks. The pattern can be in the form of droplets, hearts or animal figures.
An elementary method of forming a box is to weave the box with paper tubes.

We select a box of the required size and glue it to the base of the workpiece. Then we bend the racks up, attach them with clothespins. We detach one piece at a time and weave the tubes in a horizontal position, wrapping around the entire box. Weaving ends by twisting one blank of the adjacent tube, tucking its edge into the resulting loop. We repeat the weaving for the box lid.

We paint the craft in any color and decorate with beads, ribbons or beads. We glue velvet or silk fabric into the inside of the box.

First you need to form the base of the shoe out of cardboard. Next, we pierce the holes with an awl through 2 cm of the front of the boot and through 1.5 cm of the heel.

There should be 2 holes on the toe of the shoe, into which blanks (30 pieces) are inserted and glued.

The racks must be braided in a circle with tubes. We weave 2 tiers, attach a clothespin to the 2 central racks to the toe of the boot and weave further.

At level 8 we weave 2 racks together from one edge, and then from the other. We close 2 racks on both sides, then one at a time, you should have 12 blanks for the tongue of the boot.
We bind vertical blanks with horizontal levels. Wrap the edges and glue them. To make a beautiful shoe, it is pasted over with pieces of blanks, dyed, varnished and decorated with the entire craft.

You will definitely enjoy such an exciting and useful activity, good luck!