Making the handle of the sword. Handle for a knife from rope with your own hands, how to make a handle Weaving a knife handle with a cord
A hunting knife is essential for every hunter. First of all, it is used for finishing and butchering prey, but besides this, it remains a faithful assistant in a variety of hunting situations. Nowadays you can find a huge number of different models and modifications of blades on sale. But despite this, the need to make your own knife may arise. This usually happens due to the inability to buy the blade you need, either to replace a lost or broken one you love, or one you saw from friends and liked, or the knife you need is not on sale.
Making a knife from a 9HF saw
In this article we will not focus on the shape and design of the blade, the type and width of the sharpening, etc. We believe that we already have a finished project or sample and will focus on the production itself.
In order for a homemade hunting knife to meet the basic requirements for such blades, it is recommended to make it from high-carbon alloy steels. For example:
- 9HF– tool alloy steel, used for the manufacture of frame, band and circular saws, punches, trimming dies and a number of other tools. Usually saw blades are used as blanks;
- R6M5– high-speed alloy steel of high strength. It is used for the manufacture of many types of cutting tools, drills, saw wheels, the latter can be used to make a workpiece;
- 65G– spring steel, with high wear resistance, can be blued and blackened. They make springs, springs, gears, etc. In addition to sheets, rear springs of trucks are used for blanks. Considered one of the cheapest knife materials;
- X12, R3M3F2 and a number of others are also suitable.
The material for the workpiece can be taken from the above products, although now on the Internet you can order a plate for the workpiece from almost any steel. As a recommendation, take a pendulum saw blade for metal, the usual dimensions are 400x30 mm, thickness 2 mm, rough surface, color black or gray.  If you want to make a homemade knife at home, in addition to the material for the workpiece, we will need:
- Angle grinder (grinder)
- Wheels for it, cutting wheels for alloy steel, for example inox A54S BF, sharpening and grinding.
- Drill or drilling machine
- Vise
- Pobedite and other special drills
- Files and diamond files
- Emery machine (very desirable).
The knife making process will be as follows:

The handle of the knife can be wound using paracord or made of wood; in the latter case, we drill holes in the handle according to a template, according to a sample or drawing. Holes are drilled using special drills with accompanying cooling using oil. It is more convenient to do this on a drilling machine.
To simplify the process, holes are drilled first with small diameter drills and then gradually drilled out to the desired size.

Handle
Knives are decorated with different handles. The choice of material for their manufacture depends on the purposes for which the knife is intended, ease of use and personal preferences of the owner. Below are two ways to make a knife handle at home.
Wrapping the handle with paracord in a few minutes
Using a paracord cord as a knife handle is not only easier and faster, but also more practical. You will always have a couple of meters of cord with you, which can be used for a variety of purposes when surviving in extreme situations.
For the winding we need:
- cord, 2 – 2.5 m;
- thick adhesive tape or electrical tape;
- lighter or matches;
- scissors;
- gloves;
- screwdriver.
 Before you start winding the cord, decide whether you need a lanyard loop and if so, where it will be, on the side of the blade near the stop or at the end of the handle. If it is available, in addition to the ability to hang the knife, in the first case you can insert your thumb into it to make it more convenient and secure to hold the knife, in the second, you can use it to remove the knife from the sheath, etc.
Paracord is wound in the following order:
- We wet the cord, and it stretches better, and when it dries, it will sit more solidly on the knife.
- We seal the knife blade with tape or tape to avoid accidental cuts or cutting the cord. It is better to perform all operations with gloves.

- We press one end of the cord on the head of the handle so that 10 cm remains free.

- We form a loop from the cord, laid along the handle so that the top of the loop protrudes a couple of centimeters beyond the cord winding area.

- Then, holding the knife in your left hand and pressing both ends of the loop with your thumb, with your right hand we begin to wind the cord around the handle, starting from its head.
 We make the winding tight, turn to turn, do not tighten it too much, keep in mind that the cord will still shrink after drying.
- Having brought the winding all the way to the blade, we thread the remaining end of the cord into the protruding part of the loop.
- We cut off the excess cord, leaving about 3–5 cm, and burn the end of the cord.

- After this, pulling the free end of the cord from the side of the handle head, we pull the loop under the winding until the end threaded into it is hidden under the winding. Avoid pulling the loop completely out, otherwise the entire winding will unravel.


Winding is complete. With this option of winding, we will not have a loop for a lanyard. If we want to form it, the winding is somewhat more complicated. Initially, two loops are placed on the handle on both sides of the knife.
To form a loop for a lanyard on the head of a knife, the end of the cord is pressed onto the head of the handle and one loop is pulled to the blade, then the cord is thrown over the head and a second loop is placed on the other side. The winding starts from the head of the knife. Having finished the winding, the remaining end is threaded through both loops near the blade and pulled under the winding by the loop in the headband, thereby forming it.
So that the loop is near the stop, we do the same thing, but on the contrary, we start laying and winding from the stop, and pull the loop there to tighten the clamped end under the winding.
Making an overhead handle as an alternative to paracord
If you are a classicist and want to make a regular handle, use wood for this purpose. It is more accessible, easier to work with, the wooden handle is more pleasant to the touch, does not get cold, slips less in the hand, and if processed correctly, does not absorb moisture. The handle of a knife can be made of oak, beech, maple, birch, walnut or mahogany. In order not to waste time and effort on preparing and drying wood, there are two simple ways to get it. The first is parquet, you can buy it in a special store, where, by the way, expensive varieties are sold individually. The second is old furniture, in the attic, in the garage, at the dacha, with friends, you can always find unnecessary household rubbish and use it.  For the handle you need two dies, if you have a standard size hand, then 10 - 15 mm thick, this includes a margin for processing so that the thickness of the future handle is about 20 mm. The length of the workpieces is 150 - 200 mm, so that there is room for fixing them during initial processing.
In addition to the tree, we will need:
- dowels made of aluminum, copper, brass, iron according to the number of holes and the corresponding diameter;
- drill with drills or drilling machine;
- drills according to the number of holes in the handle of the same diameter;
- a sharpening or grinding machine, it can be replaced by a wood file and a lot, a lot of time;
- jigsaw or hand jigsaw, or see previous paragraph;
- an engraving machine or a file with a needle file;
- sandpaper of different numbers down to the finest;
- epoxy based adhesive;
- linseed oil;
- thick adhesive tape or electrical tape;
- vice, clamp.
We make the handle as follows:
- Before starting work, wrap the knife blade with tape or tape to avoid accidental cuts.
- The first step is drilling. We place the knife blank on a wooden block, press it with a clamp or, at worst, wrap it with tape and drill holes. To make the hole neat, first drill with a thin drill, and then drill out to the desired diameter. After the first hole has been drilled, we insert a key or a drill of the same diameter into it, this is done to fix it so that the die does not move. Let's move on to the next hole.

- We drill the second die in the same way.
- After drilling, we assemble the dies on a knife, using keys or drills, to make sure that all the holes match.

- Then, attaching the dies one by one to the knife using dowels or drills and a clamp, we outline the contour of the handle along the contour of the knife. It is advisable to mark the handle with a slight indentation, 1 - 2 mm, for subsequent processing.
- After marking, we cut out the handle with a jigsaw or grind it on a grinding wheel; in extreme cases, the file is in your hands.

- Preparing the dowels. To make the homemade knife look aesthetically pleasing, we will not rivet the dowels, but glue them in. To do this, use an engraving machine or a file to make chaotic cuts on the keys, in which the glue will harden and set. At the ends of the keys we remove an inclined chamfer at 450.

- Since after gluing it will be inconvenient to process the cheeks of the stop, we finally process and polish them using sandpaper.
- We carefully sand the handle halves from the inside so that they fit tightly when gluing to the plane of the knife shank.
- Before gluing, we make a final test assembly.
- We carry out the gluing itself according to the instructions for the glue. The assembly procedure is as follows: lubricate the inside of one half, insert dowels coated with glue into it, put a knife on them, and then the lubricated second half.
 We clamp the assembled handle in a vice and remove the excess squeezed out glue. Leave the clamped handle for a day.
 - After the glue has hardened, using files, emery, a grinding wheel, and so on, we finally shape, grind and sand the handle of the knife.


- When the handle is completely polished, it is time to soak. It is best to saturate wood with linseed oil. You can buy it in a store for artists, they use it to dilute oil paints.
 The handle is kept in oil for three days to a week. The process can be speeded up by boiling the handle in oil for a couple of hours, but you must strictly monitor the temperature, otherwise the glue may leak.
- Then the handle should dry at natural temperature for about a month, during which time the oil will polymerize and the wood will harden and become impervious to moisture.
- After drying, the handle is finally polished with a soft cloth.
Sharpening for beginners
Before we talk about sharpening a hunting knife, we need to remind you that homemade knives made from the metals recommended in the article are very difficult and take a long time to sharpen, since the alloy steels used have high hardness. This must be remembered when using a knife for purposes other than its intended purpose.
Now about the sharpening itself. At home, knives are sharpened on special sharpening stones. Such stones are ceramic (the cheapest and most common), diamond, natural and Japanese sea stones. The principle of sharpening on them is approximately the same, so in the future, by default, we will talk about the most common ceramic sharpening stone.  In order to sharpen a knife efficiently, it is advisable to have either two sharpening stones of different grain sizes, or, what happens more often, a sharpening stone whose sides have different grain sizes. For ease of sharpening, the size, or rather the length, of the stone should be greater than the length of the knife blade.
It is advisable to sharpen a knife with both hands, so it is advisable to place the sharpening stone on a separate board, securing it either in a hole specially cut for this purpose, or using six nails driven into the sides.  Sharpening the knife begins on the roughest stone. At this stage, the whetstone does not need to be wetted. We place the stone randomly on the table, the main thing is that it is convenient for you to sharpen on it.
The entire sharpening process consists of giving the edge of the blade an acute angular shape. When doing this, you need to remember a few basic rules:
- you need to choose the optimal knife sharpening angle and stick to it throughout the entire process;
- the knife is driven across the stone with the blade forward, as if cutting off a thin layer from it;
- in one movement you need to sweep the entire edge of the blade for uniform sharpening;
- the edge of the blade should always be perpendicular to the direction of movement;
- each next time the blade must be turned over and held with the other side so as not to displace the center of the blade chamfer;
- movements should be smooth, without pressure;
- It is better to sharpen both sides with a unidirectional movement, either towards yourself or away from yourself, since moving the hand away from you is always worse and weaker than moving it towards yourself.
 Now regarding the sharpening angle. It can be from 450 to 300, in the first case the knife will hold an edge longer, in the second it will be sharper. It is better to sharpen a hunting knife exactly at 300, this is not difficult to achieve, just when sharpening, move the knife as if you were cutting a thin slice of butter or cheese.
After you have turned the initial sharpness and brought out the angle of the blade edge, you can move on to a stone of lesser dispersion. It is advisable to periodically moisten it with water so that the edge of the blade glides better and metal dust does not clog the pores.  You can finally sharpen the blade to a mirror shine and razor sharpness by sharpening it on an old leather belt with GOI paste. The main feature of straightening with GOI paste is that the knife is guided in the opposite direction to the blade, i.e. butt forward.
Making a sheath (case) from leather
One of the necessary accessories for a hunting knife is a sheath. They are needed to protect the blade from dulling, and everything around from cuts and damage to things.
You can make a homemade sheath yourself at home, from a small piece of leather about 3 mm thick.
For this, in addition to the skin, you will need:
- scissors;
- a sheet of thick paper for a template;
- pen;
- an awl (a sharpened nail or nails can replace it);
- small nails and a hammer;
- universal glue;
- fork;
- paraffin candle;
- fine sandpaper or grinder;
- nylon thread and one or two large needles;
- pliers;
- snap clasp;
- wax or cream.
The procedure for making the cover will be as follows:
- Making a template. Applying the knife blade to a sheet of paper, trace it along the contour.
 Then around this contour with a centimeter indent we draw another contour, it will be the main one. Cut out the template along the outer contour. Separately, we cut out a T-shaped part for the fastener, the width of the harness is about 20 mm, and we measure the length of the harness along the handle of the knife.
 - Mark the details on the skin. Having attached the template to the leather, we outline the part for one side of the sheath, then, moving the template to the side by 5 - 8 mm, we outline only one side to get a part for half of the insert.
 Then, turning the template over, we repeat the steps, outlining the second side and the second half of the insert. We apply and outline the T-shaped part of the fastener.
- Take scissors and carefully cut out all the details from the leather.

- Applying it to the knife, we try on all the details to see if they match.

- We rub the ends of the insert on the clasp with paraffin candles, and then sand them using sandpaper.


- We apply the fastener to one half, and using an awl and nails we mark and punch holes for the thread, in two rows.

- We sew the fastener; the thread can be pre-lubricated with paraffin.

- For ease of subsequent stitching, we glue the parts together. We cut out a part from the template along the contour of the blade itself. We place this part on the half of the sheath and coat it with glue so that the glue does not come out beyond the inserts. Glue according to the instructions on the tube. Lubricate and glue the inserts.

- At the tip of the sheath, between the inserts, we cut a groove for ventilation.

- Glue the other half. We place the sheath under the press for a while for high-quality gluing.

- We check how the knife fits and sits.

- Use sandpaper to sand the edges of the sheath.

- Using a fork, running two prongs along the edge of the sheath, outline the outline for stitching. Use a fork to mark the holes for the thread.

- If you want, you can get fancy by cutting a thread groove into the face of the scabbard so that it is flush with the leather. In this case, it will then need to be polished with wax or cream in the same color as the scabbard.

- Punch holes for the thread with an awl.

- We sew the cover. You can sew with one thread, or with two threads, threading them through the holes one at a time.
- Attach the button clasp.


- We finally grind and polish the scabbard with wax or cream.

The scabbard is ready.
A lanyard is a special type of weaving that is made with a cord and is used to decorate various types of handles. To this day, they are used to decorate weapons of any kind, especially if they are edged weapons. In simple words, a lanyard is a loop of cable or rope located at the end of a saber or other weapon. In the Russian army, the presence of such a lanyard on a soldier spoke of his special services to the fatherland and showed that this was a badge of honor. Even novice needlewomen can weave a lanyard!
Lanyards were used for convenience and as decoration for the knife, attached to its handle. All objects that riders used before had lanyards at their ends. Therefore, the initial function of weaving a lanyard is considered to be convenience for the person who uses this or that thing.

The secondary function is beauty. It was made as decoration. When the owner of the weapon had free time, he could construct with his own hands all kinds of lanyards from various materials. Knowing the patterns and methods of weaving a lanyard, for example, from leather, the craftsman could advantageously decorate his bladed weapon.

Knowing some patterns and types of weaving knots, a person is able to profitably and without problems make a decoration in the form of a lanyard, even for a checker. Let's look at some of them.
Simple knot
It’s not for nothing that the node is called that way. Therefore, almost everyone, at least once in their life, resorted to using it. It is performed by first knitting a knot upward, and then inward to the first knot.
Straight knot
When connecting the ends in a simple knot weaving pattern, do it twice for both sides.
Simple and straight knots, adjacent to the weaving technology, so it is not surprising that people who know how to perform the first know the basics of the second.
It is fashionable to perform lanyards in the following ways:
- Snake
- Hunting knot
- Cobra
- Square weave
- Round weaving - ball
- Diamond weave.
In this article, you will see how to make a paracord lanyard using the technique of weaving a simple knot.
Since paracord is one of the optimal materials for weaving a lanyard, we will use it in practice.
You will need:
- Paracord or strong cord.
Yes, only this material will be needed to complete the craft.
Start making the lanyard by weaving a simple paracord knot.
Step-by-step master class on how to make crafts:
- Find the middle of the rope.
- Make a loop on this section of paracord.
- Thread the end of the rope through the loop. A simple node is ready.
- Thus, perform simple knots according to the required quantity for you.
- Attach to the desired weapon through the hole on the handle.
- Check the ease of holding this structure.
If you are satisfied with everything, then the craft is ready. We will be glad if this master class turns out to be useful for you.
The lanyard allows you to visually lengthen the handle, even with a short knife to deliver chopping blows. This ability was convincingly demonstrated by participants in the rope cutting competition. This device can make the handle longer, even replace it. Using a lanyard, you can move and extend the accessibility zone of the knife beyond its contour.

The lanyard can not only protect the tool from falling out, but also free your hand, while at the same time allowing you to maintain quick access to the knife. This mount is especially convenient when working at heights, in a boat, in hard-to-reach places and during manipulations that require frequently putting the knife down and quickly picking it up.
However, it should be noted that each specific lanyard cannot perform all functions at once. Most often, it is intended only to perform one specific task.

There are different methods for attaching lanyards. It is attached to the handle, hilt, through a hole in the handle itself, or through a ring, bow - swivel. Each method has its positive and negative sides. For example, fastening through a ring is more compact and movable, but fastening through a hole is simpler and more reliable; fastening through a shackle, especially if it moves tightly along the axis, allows you to stably orient the lanyard and quickly find it by touch.
You can attach the lanyard freely, with a knot, with a clip, on a loop, or secure it with a through clip or a winding of thin wire. In short, everyone chooses the method of fastening according to their taste and needs.
Lanyards are knitted from a wide variety of materials, from decorative cord to chains and birch bark, but it is believed that the best material is leather.
Therefore, when making crafts and choosing material for them, be careful and study its characteristics. After all, working with weapons is not only fascinating, but also fraught with danger.
Videos on this topic in the links below
The most interesting articles:
How to make an ax handle at home
Many people have all the tools and materials on hand to make the necessary tools themselves, but not everyone does this. Some people simply don’t dare because they think it’s difficult, others don’t know where to start. I want to show you that this is not at all difficult and almost anyone can do it.
We will need: a small block of wood, a hacksaw knife, a pencil, and a hammer. You can take a block of wood instead of a block. Split in half and remove the bark. The wood must be well dried, since poorly dried wood can simply crack. Birch is a good material, as it increases impact force, has good toughness and makes the hands less tired from work. In addition, birch is well processed, so it is the most popular material for ax handles. One of the disadvantages of birch is that it quickly rots when exposed to water, so if you need a camp hatchet, it is better to use ash and maple. These are the kind of bars that are perfect for you.

Let's move on to action. First, you need to draw the outlines of the future ax handle on the block; you need it to fit comfortably in your hand and be suitable for the type of work for which you need it. The easiest way is to take another ax and copy its shape, the main thing is that you feel comfortable working with this ax.
A carpenter usually does everything by eye and spends very little time on it, but this requires practice and cannot be done without it. And so we drew the outlines.
Now we need to process the block according to the drawing. To do this, you need to file a little on both sides, and then cut it all off with a knife or chisel; this should be done very carefully so as not to cut off anything unnecessary.

Place the knife in place and slowly tap it with a hammer.
You need to cut strictly according to the shape of your future ax handle.

If you did everything correctly, then you should have an almost finished product. Now this workpiece needs to be planed with a knife.

It is important that the ax handle is oval and not round, since you will hold the round one with tension and, because of this, the accuracy of the blow will decrease.
When you plant an ax, the wood in the area of the ax is slightly crushed by impacts. You need to do this carefully, as you can ruin the finished ax handle.
To prevent splitting, it is necessary to constantly monitor the condition of the lower end of the ax when attaching it. Therefore, it is better to leave an allowance for this. The fit can be considered complete if the end of the ax extends about 8 mm beyond the eye. Then the surface of the ax is sanded with sandpaper.
Impregnation of the ax handle with a special compound
Then comes the next operation - impregnation of the front half of the ax with some kind of waterproof compound. This could be drying oil or ski resin. Ski resin provides more reliable and deep impregnation, but it may not be suitable, due to the fact that the smell will transfer for a long time from the ax to the hands, it is not exactly suitable for the hunter.
Now we have reached the wedge. To do this, you need a well-dried board, so that the thickness is at least 10 mm, and preferably from the same hardwood or, better yet, a harder wood. It is better to make the width of the wedge 1...2 mm greater than the height of the eye, and the length such that it exceeds the width by at least 4 times. When the wedge is ready, the ax is finally placed on the impregnated ax handle, and the cut gap, if it is closed at the entrance, is slightly widened using a chisel.
It is important to lubricate the wedge with any glue before driving it in; it is better not to use rubber-based glue, this is not suitable. To prevent the lubricated wedge from creeping back out during driving, its lead-in part, approximately 10 mm, is not lubricated with glue. When driving a wedge, the ax must be placed vertically on the anvil. This anvil stop works well to prevent the ax head from slipping when you hit the wedge.
Final part
Now take a good look at the ax you made with your own hands. If you notice some shortcomings, you better correct them. Remove any remaining seam allowance and give the final shape to the ax shank. Sand the curved parts with a rasp or sandpaper. This is what the finished ax looks like.

And most importantly, you will be pleased to work with it, because you made it with your own hands. Now you can only improve your skills and practice, and I wish you good luck and always follow safety precautions, because no matter what, health comes first.
The next type that is extremely common these days is leather handles. It is interesting that their most popular variety is not found at all in the annals of history - a bushing made of leather washers with a polished surface. However, more on this below. As for leather as a material for handles, in general it does not have any harmful properties. As a matter of fact, there are only three or four ways to make such a handle:
- covering a ready-made base (usually wooden) with thin, durable leather;
- assembling a package of thick washers with surface treatment;
- installation of flat, thick and hard linings on the shank;
- various types of windings and braids.
Now, in order. The first type of handles is very, very ancient. Products were refined in a similar way, probably back in Ancient Egypt and Rome. The method is simple: a leather stocking with one or several longitudinal seams was pulled tightly, preferably with glue, onto a completely finished sleeve. This style necessarily required the packing of additional rings and sleeves, as well as metal heads that completed the composition. It is precisely because of the abundance of metal that the left-handed weapon shown below has already appeared as an illustration.

From a practicality point of view, this technology provides fairly comfortable, non-slip, pleasant handles that have only one inherent drawback: if the sticker on the base is of poor quality or loose, the cover can slide off over time, and bad leather will certainly become frayed and frayed to holes.
However, as they say, it will last for your lifetime. The use of such handles is not typical for knives and daggers, occurring only occasionally. At the same time, over a long historical period (mainly the 18th - 19th centuries), leather covering was the usual style of frames for long bladed weapons.
Incomparably more convenient handles are made using the inlaid type, when a corresponding number of washers made of hard sole leather are strung onto a shank pin, and then the resulting blank is tightened with a butt plate and turned on a lathe or processed in another way. The surface is carefully ground and rubbed with special polishes or even polished. The handle made in this way is so good that it is widely used among combat army knives. It does not chill your palm in the cold, does not slip in wet and greasy hands, dampens vibrations, and is simply beautiful with the nobility of a truly natural material.

Due to the deep corrugation, the handle may have lost aesthetically, but it has become more comfortable for a gloved or frozen hand when there is no strength to tightly grip the weapon. Of course, over time (and very soon) the protruding edges of the leather discs will become frayed and wrinkled, so that the handle will retain its pristine freshness.
Side overlays made of leather are used so rarely that it was not possible to find a corresponding illustration, and there is no point: leather overlays do not differ in appearance from wooden ones, and their contemplation will not give us anything.
On the contrary, all kinds of windings and braids with leather strips catch your eye every now and then. This delightfully simple style, where, as they say, neither take away nor add, is sanctified by centuries of impeccable service. Let's forget about knives for a moment - the hilt of a Scandinavian sword (reconstruction) gives a comprehensive idea of such installation.
Summary: leather as a material for weapon handles has fully justified itself in the crucible of bloody battles and in the bustle of social life. There is no point in repeating ourselves and re-citing its many advantages. There is only one drawback - any skin is hygroscopic, that is, it gets wet in dew and rain, becoming stringy and sluggish. If you soak it in oil or paraffin, it becomes slippery. A solid handle made of tanned washers, having drunk water once, will dry and dry, and for exactly the same amount of time the shank of the knife will be bitten by corrosion. For stainless steels this does not matter, but a simple carbon (including Damascus) blade will certainly suffer.

Since we are talking about braided handles, it’s time to consider this variety, but first we need to mention the rather rare covering with stingray skin. This is all the more appropriate since it is the best substrate for the braid.
There are probably methods for processing shark and other skins that ultimately produce a material called in European “galyusha” or “fish skin”, but traditionally in Eastern countries only stingrays are used for these purposes. Only their “clothes” provide an indescribable pearl-pimpled cover for the handles of swords and knives, and it is this that is the most recognizable feature of the Japanese style of mounting handles. The inimitable texture of Same-Kawa (Japanese) best holds any type of braid on its surface.
And it is difficult to unequivocally answer the question of what is more beautiful - pure mother-of-pearl relief or the same, but serving as a background for artistic braiding. One can only note that the first option was used, as a rule, for ceremonial knives, designed to please the eye, and not to pierce the insides of the enemy.

It’s a ceremonial blade, but the blade of this 19th century aikuchi is quite combat-ready, polished to transparency and indescribably sharp, as befits a truly Japanese weapon. We see that the handle is covered with one piece of high quality cava with a fine thread joint. The front end is reinforced with a futi ring, and the rear end is closed with a cashier cap. Knowing the legendary meticulousness of Japanese craftsmen, there is no doubt that a hundred years ago this marvelous handle did not have the slightest hint of a joint, but time is merciless even with masterpieces - the skin has dried out and the edges have separated.
The same structure (only with a braid of silk braid) has an innumerable number of hilts of Japanese swords (the concept of “sword” in the archipelago always included all types of edged weapons), which for at least ten centuries have not undergone revolutionary changes. Everyone is free to have a different attitude towards certain technologies, but centuries and centuries of practical testing are a good argument in favor of products that have passed the harsh test with honor.

The characteristic diamond pattern of Japanese handles is the same for all types of traditional weapons; it differs only in the width, color and material of the braid and the style of weaving, of which there are dozens. Purely outwardly they are difficult to distinguish from one another, and
an inexperienced amateur at a distance will generally not understand anything. From a utilitarian point of view, few handles can compete with Japanese convenience and proven expediency. Of course, it is unsuitable for a knife with which you intend to skin a dead seal, getting dirty in fat and blood. Soaked in unappetizing substances, your beautiful braid is only good for making soup out of it in times of hunger. But gutting seals doesn’t happen often, and in other life situations, especially combat, it’s hard to ask for better. A peculiar ingenious method of overlapping and mutually pressing the turns guarantees the integrity of the winding even if one or two loops are cut. The braid will have to be changed later, but it will serve until the end of the battle.
Another example of the ingenious braiding of the hilt of a Chinese saber:

As a matter of fact, the handles of knives, swords, etc., braided in one way or another.
etc. are typical for the entire Far Eastern region. Below are examples of Chinese sabers, designed slightly differently. Pay attention to an interesting principle: two blades made as halves of one whole. Such cunning is quite rare in the European tradition (except that the insidious Spain sometimes indulged in something similar), but the Chinese were very drawn to pair work in general and to dual weapons in particular.

From the exotic in this case we can mention the braiding of whalebone. This is what they did in Japan when designing expensive custom knives.

At all times, it was not braiding that was actively used, but simple winding. In the primitive version, a wooden or metal base is tightly wrapped with linen, cotton or silk (now synthetics are used) lace. If it is single, the winding will be too smooth. An advanced style is working with a braided braid, most often with an ordinary braid of three strands.
As a result, we get a fairly attractive and comfortable handle, which can be updated at least monthly, changing the winding at once. This type of handle is found in our latitudes. Fashionable “skeleton” knives, as well as “survival” knives, are wrapped in many meters of thin, durable nylon, which, if necessary, is used for various household needs, including strangling an enemy or hanging himself in a hopeless situation (just kidding).

At this point, the consideration of braided handles can be considered complete. Brief summary: such products, despite their incomparable convenience and beauty, are definitely unsuitable for wet and dirty work (skinning, cutting up a sheep for kebab, etc.) But centuries of practical tests have shown that nothing better can be invented for combat blades.
And if today military special knives do not have wicker handles, it is only because the latter are low-tech.
First, I want to thank everyone who helped me decide on the shape of the blade. Thank you.
And so I have long wanted to acquire such a weapon, but it was a pity to spend money, so I decided to make it myself.
The material was a piece of steel strip 2x25 mm.
Length 51 cm, blade length 30.
To begin with, I did a preliminary sharpening and shaped the end of the blade, this is necessary so that after hardening it only remains to be sharpened.
And so hardening was one of the most difficult parts of the work, I did it as follows: I made a forge out of bricks, and lit a fire there with coal, took two containers, one with oil and the other with ice water, in which I lit a piece of household goods. soap, and began hardening. Since the part was long, I hardened it in parts, heating it until red hot and dipping it in oil for a second, then kept it in the air for a few seconds, then again in the oil for 6 seconds and then only in water until it cooled completely. With such quenching, it is important that the quenching liquid is not an even line along the part; if this is done, then in this place the part will be fragile, so the part must flutter in the liquid. The second stage of hardening consisted of simply dipping the hot part into water with ice and salt. In principle, this is all hardening. I am pleased with the result because the strip that bends by hand has become very elastic and durable.
I sanded with regular sandpaper, first medium, and then fine. I decided not to bother with the handle and made it a rope handle; it has an advantage, even if the hand or handle is wet, the machete still lies firmly in the hand. You can't achieve this with a wooden handle.
I made the cover from a canvas belt.
Now for the photos.


‹ CrossbowWhich weapon to choose if FOR? ›
The second part of this project shows how I will wrap a wooden handle in leather. There are several ways to make a new leather cover, but I'm showing the cord wrap method here. I didn't invent this method and there are several places on the Internet that show how to do it. I showed how I did it, and I hope my photos and notes will be useful to you.
I really like the look of the cord wrapped under leather, especially when it was specially made to fit the arm. And a sword with such a hilt will be very obedient. Keep in mind that what is shown here is (for the most part) a non-destructive project. If the wrap doesn't turn out the way you hoped, you can always remove the skin and redo it again. However, it should be remembered that the skin, once glued, is difficult to remove and is difficult to remove, but it is possible.
| Working with leather |
|
Before we get started, I'd like to talk a little about working with leather. Leather comes in different types and thicknesses. The type of leather you want to use depends on how the leather is tanned. There is also a type of leather called "chrome" which I don't use because only vegetable tanned leather will absorb water and can be cut properly. Information that comes with the leather upon purchase: The thickness or weight of leather is usually measured in ounces. One ounce is equal to 1/64th per inch of thickness. So at 7 to 8 ounces it is a leather 7/64th to 8/64th per inch thick. In factories, to make the leather of uniform thickness, wet hides are passed through pressing machines. However, every animal is different and there is always a slight variation in the thickness of the entire surface. This is why leather is typically shown in a range of thicknesses, such as 4 to 5 oz., 6 to 7 oz. Etc. We must use very light leather to wrap the handle. The bottom two handles use pigskin (about 1.5 ounces) and for the other handles I used 2-2.5 ounces of leather. I have also seen people using chamois leather, which is easy to obtain in small quantities. One last note on working with leather. Wet skin is very touchy! You can easily leave marks on it even by lightly pressing your fingernail into it. So be careful when handling it. |
Risers on the handle handle
to the begining
The picture above shows most of what we will need to complete the packaging of the sword handle. Namely: a sharp knife, super glue, craft/leather glue (white glue), ruler, and something to cut the leather on, and also a spool of leather lace that I will use as a riser. The black tool on the right is a leather stitcher, I will use it while wrapping the handle in leather, more on that later. We also need a thick thread.
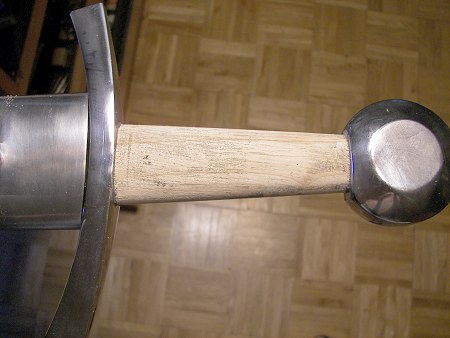
The photo above shows a wooden handle on the hilt of a regular sword. I removed the old leather and glue and sanded it a bit to remove it.

This sword is sharpened, so I decided to keep it sheathed in this case. Now keep in mind that I will be making a new scabbard for this sword, but even so I will not damage the scabbard with the clips. Two clips on the top and bottom are enough to hold the sword in place.

Next you need to figure out how you want to train boners if you want them of course. I decided to make 4 risers. One at the top, one at the bottom, and two central risers. There are many materials you can use for risers, just make sure they are solid and won't get pinched or crushed when you cover the entire surface with leather. I'm using leather strips here, but for the other handle I used nylon rope, and I took some work rope to make the center risers thicker. In order to determine the size and shape of your future pen, you can study other people's pens to find the one you want to use.
I have already glued one riser to the front of the handle (the side of the sword that will be shown, in the sheath, and when hanging on the wall). I used super glue.

In the picture above I continued to glue a few more risers. At this point I just pressed them down to make sure they lay straight. You may notice my labels for them. Use pencils to mark, and you may need outside help to keep everything straight. I think it's important to have the same distance from the top and bottom risers to keep everything looking good. I wanted two middle risers in the center, but that's just how I wanted it. Some people actually place their boners simply according to their fingers. First we glue the front part of the risers.

The picture above shows my gluing on the last step. Using superglue I have to hold them on for about a minute.

Now I've finished gluing the risers to the front of the handle, and I've now turned the sword over and finish gluing them to the back of the handle. The upper and lower risers are already glued.

When gluing the ends of the risers together, it is best to cut them at an angle (about 45 degrees), which will give them a neat appearance and hide the seam. See picture above.

The photo above shows the handle with all four risers. Now everything is ready to apply the skin wrap.
Handle wrapping in leather
to the begining

Now it's time to cut out our piece of leather for the handle wrap. It’s a pity that there is no magic formula for you, and I won’t make it. I fiddled around a bit with trial and error to try my best and get a good piece of wrapper. If the handle were a perfect cylinder then it would be easy to cut out a square piece of leather and glue it on. Of course, most knobs won't look like this, they are angled and tapered in width and depth. What I usually do to cut a piece of leather is I first cut it big enough and then slowly trim the piece to see if it fits or not. Keep in mind that the skin will shrink after drying, and also the risers will bend the skin upward, so always do this with more skin than would be enough.
If you're trying this for the first time, you might want to try cutting out a piece of leather and wrapping it around the handle, but not gluing it. Then dry it with a hairdryer and then put a clothespin or clip on and see how it all turns out. You need to use a hairdryer to warm up your skin thoroughly.
The picture above shows how a piece of leather for the handle handle will look. Note the red cuts in the four corners. You'll cut it there when it's near the end. These cuts will make more sense when you wrap the leather around the handle. REMEMBER... you need to cut slowly here.
Where the seam appears you want to secure and keep it straight, and this may require a little work too. To maintain the seam you need a slight overlap, about 0.6 cm (1/4") or so.
Some wraps actually cover pommels and guards. If you do this, you will need more skin, and again remember that this skin will shrink, and when you start wrapping the skin around the boners, it will also shrink it.

Since we can't just put the leather seams on top, we will have to overlap them a little in the seam area. The leather is now very thin and because I was stitching down the edges I did a good job of trying to make the seam as invisible as possible.
The picture above shows the difference.

The picture above shows that the wrapper's leather is ground around the edge using special. tool. Stitch the leather down to almost nothing. When you're done you'll probably need to trim a little around the edge with a knife as the edge will get a little fuzzy from the stitching.

In the next step, you should soak the leather in warm water for approximately 15-20 minutes. Remove the skin from the water and place it on a towel for a couple of minutes to absorb excess water.
I now have the skin test installed for the last time before gluing. I want my leather wrap to match the shank and guard, but if you notice in the picture above, my leather is actually hanging over the guard and pommel at this point, due to shrinkage it should just match the shank and guard (by at least that's the plan).

Now we are ready to apply some glue and actually get a leather wrap on the wooden handle. I don't have an actual photo of the glue, but the picture above shows how I do it. You don't need a lot of glue, you don't want wrinkles to appear on the skin.
Remember to add a little glue to the seam, but again not so much that it squeezes out. And don't worry, even if the skin is wet, once it's all dry - the glue will stick very well.
NOTE:
Most people and shops always seem to put the seam on the left side, that is, the "inside" side of the handle.
Thick thread winding
to the begining

I then wrapped the leather covered handle with thick thread. I don't remember where I found it, I had it lying around in my closet for years, but it reminds me of something they used to tie around mail parcels. I wrapped it so as not to disturb the risers. This is just one example of threads that could be used. People use different thicknesses of thread or rope for wrapping, as you like.
Again, I wrapped each section individually so I didn't wrap any thread around any of the risers. If you want it all to be one wrap, then at least move it to the riser “back” from the handle. So in the picture above I actually have 5 separate wraps.
Wrap tightly and evenly, especially where risers are.
Okay, now let's take a break from working on the handle; we'll need it to wait at least overnight to dry.

Once the glue dries (I sometimes use a hair dryer to be safe), you can remove the thread. Hope you wrapped the cord well for control! Above is a photo of when I unwrapped it. I'm pleased with the result!

Here is a photo of the finished handle handle after painting. I also applied 2 or 3 layers of paste wax for protection.
It was finished using leather color #12 Medium Brown. I buy everything from Tandyleatherfactory for the most part.
More options for finishing sword hilts
to the begining

In the photo above, I made the handle like on Type XIV swords. Here I used a thin nylon cord and a thicker rope for the riser in the center.

This painting shows skin wrapped in thread. You can easily see the 5 risers on this handle. I only used one length of thread and left out the risers on the back.

Here, after drying the skin, the thread was removed. In the picture above, the pigskin is very thin, and you may have noticed that it is not as smooth as the "cow" leather that I used on the previous project. But I like the way she looks. Small holes from pig hair, which is quite normal. They do not appear after painting and coating the leather.

Here is the Type XIV handle with the new shaft. I stained it with Fiebing leather dye black and applied a couple coats of paste wax.

Here is a shot of my new workshop sword "Hanewi Practical Knight Sword". This tower consists of three risers. Pork skin was also used. Painted using the previous methods.
One thing I would like to draw your attention to. I used the same hilt material and didn't notice how much different they were compared to the hilt handles from the genuine swords. Those are wrapped in thick, often brown leather and the boners appear more rounded. This is because the skin is thicker and cannot bend as neatly as light pigskin. There is nothing wrong with this, but I wanted you to know that simply changing the type of leather can change the entire appearance of the grip.
The picture below shows the top sword.


Above are pictures of fully finished swords.
I hope the instructions encourage and help you in creating your own handles and wrappers. Everything turned out very easy for me.
Not all knives have a wooden plastic handle. Sometimes the design means leaving a bare shank, which can slip out of your hand or make it cold. To avoid this, the steel handle is wrapped using a special method - a pattern of paracord weaving onto the knife handle.
Paracord knife handle.
Materials and tools
Wrapping a knife handle with paracord does not require any special knowledge or tools, and the materials will be affordable for everyone. So, for work you will need:
- paracord cord;
- scissors;
- lighter;
- scotch;
- insulating tape
- vice.
How to choose paracord
To answer this question correctly, you should remember why paracord is used these days. First of all, it is a strong and lightweight rope. Secondly, due to its design features, it is used not only in this capacity, dissolving the base. Thirdly, many useful and fashionable things are woven from paracord, since its range of color shades is very diverse.
What does it mean to “choose correctly”? This means a product that can be used in many ways. And for each of them it will be the most suitable. The most popular products these days are the products of the American company ″Rothco″. It is labeled as “550 Paracord” and is considered a kind of standard. Needless to say, there are many more counterfeits of it than high-quality products. So the places to purchase it need to be chosen with no less care.

As a cord it is very durable. After all, it can withstand a weight of about 250 kg. Although it is not used in mountaineering, it is excellent as a passive insurance for all types of tourism. The shell is made of 32 intertwined nylon threads. It contains 7 cords woven from nylon. Each has three threads.
Those who are eager to purchase Chinese paracord should take into account that most Asians use polypropylene instead of nylon, and the core laces are woven from only two threads. Therefore, such paracord can withstand, at best, no more than 165 kg (or even less).
Preparing the cord
If you purchased a high-quality cord, then all you need to do is cut a piece of rope depending on the length of the handle. It is also necessary to prepare the workplace - clear it of unnecessary objects, place a computer with a circuit in front of you. The blade of the knife should be wrapped with tape or tape to prevent damage.

Pattern for weaving paracord onto a knife handle.
Weaving pattern and process
There are a large number of different nodes and ways of winding the blade. One of the simplest and most popular methods is criss-cross winding. It is performed as follows:
- Place the handle in the middle of the paracord. Cut a long piece of cord and place it on your work surface. Place the handle in the middle of this rope. The length of the cut paracord should be four to five times the length of the handle. At the end of the winding, you can trim off the excess.
- Fold the left end up. Wrap it around the top of the handle and pass it under the right one, pointing it down away from the blade. Both edges should form a loop across the handle. The intersection of this loop should be on the right side.
- Pass the right edge of the cord through the loop. Take the second ending (the one you haven't used until now) and pull it through the loop from the back. Bring it out from the left side. It is necessary to stretch this edge from the back of the loop (the one that is under the handle) through its base, extending it through its top. This step will secure the loop in place. Pull both ends of the paracord firmly to get a firm grip on the handle. After this step, the right and left edges of the paracord will switch places.
- Fold the right end up. Grasp it and fold it over the handle below where you created the previous loop. Pass the right edge under the left, pulling it under and out at the top. As before, you will end up with a loose loop. This time the intersection point should be on the left side.
- Place the left edge behind the handle. Take it and pass it under the handle of the knife.
- Thread the end through the loop. Take the end you manipulated in the previous step and pass it through the loop on the right side of the handle. It is necessary to insert the edge of the loop from bottom to top. Pull the paracord tightly, securing it in place. At the end of this, the cords will again change places.
- Each time, mirror the previous actions performed on the other side of the handle. After tightening the loop on the left, repeat the steps exactly, but this time on the right.
- Repeat until you have wrapped the entire handle. Continue making criss-cross stitches along the handle of the knife, keeping them as close as possible to it and to each other, until you reach the edge.
- Thread the ends through the hole. Pass both ends of the cord through the hole on the edge of the knife handle. In the latter case, to secure the winding, tie the edges with a knot on the side of the hole.
- Tie an end knot. Tie both ends of the paracord into a strong knot. The resulting loop can be worn around the wrist.
After completing this step, the winding is completed.
Resin coating
Now you need to completely wrap the blade and other parts that should not have resin on it with electrical tape. You can, of course, remove it from steel, but why waste time on it.

A knife with a handle made of paracord coated with resin.
Mix a small amount of fiberglass resin. 20 g is enough.
Take an inexpensive brush and use gentle strokes to apply the resin all over the lacing. Let it soak in, if necessary apply the resin again. Then clamp the blade in a vice to dry the handle.
After a few minutes, remove the knife and turn it over so that the resin does not harden in a bead on the downward side of the handle.
Paracord(from English Parachute cord, paracord) is a very light rope made of polymer, the fibers of which are made of nylon. This special type of rope was originally made for the military and was used to attach the rafters of parachutes. Paracord weaving is a skill used by the military. But now paracord is used not only for military purposes, but also for civilian purposes. To be honest, good and high-quality paracord can always be found from a professional hunter. Actually, like the bracelet cord itself. Special paracord weaving patterns and instructions make it easy to make strong loops, belts and weave a so-called survival bracelet. Even paracord braiding for a paracord knife - you can make everything yourself. This way you will get a real men's bracelet. Such a paracord bracelet can be given to a friend as a gift for Defender of the Fatherland Day, for example, and it will be appropriate. A paracord bracelet made by a master is a beautiful and practical product.
The paracord shell is made of numerous interlocking polymer fibers, making it quite smooth. If the paracord is made of polymer nylon mainly or entirely, then it will also be quite elastic. For civilian needs, paracord can be made from cheaper materials, such as polyester; civilians do not need absolute compliance with standards, like military paratroopers. However, a standard is a standard, and before you buy paracord for yourself, you need to figure out whether it is the product you are buying.
How to distinguish real paracord from fake
Real paracord is usually made in the USA. One of the most famous manufacturer brands is Rothco. But, in fact, it is not so important in which country the product is made, what is important is how well its quality meets international standards.
However, the name “paracord” can hide anything that is at least a little similar to the original.
Here are the signs by which you can distinguish a real survival rope from a fake that will not cope with its task.
- If you touch the paracord, you will immediately notice the softness. It is precisely because of the softness of packacord that it is convenient to weave products.
- Light the edge of the paracord. Combustion will occur with a smoky flame, with black smoke. It will smell like burnt plastic.
- The core and sheath fibers are never fused together. The shell will always melt faster and expose the core, similar to stripping insulation.
In such men's survival bracelet You can weave a clasp: a carabiner or a metal loop. In addition, such a bracelet can be woven from leather straps. It will no longer carry a practical load, but will look very stylish.
Weaving pattern for a paracord bracelet with a plastic carabiner
Thick braided knife handle
Very often you can see that hunters have a special braid on knife is also a type of paracord survival cord. Weaving a handle for a knife is quite simple; you can use the diagram below. Thick braided knife handle- comfortable and dense braiding of the handle of a knife or other product, even with a bend in the handle.

The simplest scheme for braiding a knife from paracord
Simple paracord weaving patterns
A paracord bracelet can be woven from cords of several colors, then it will be elegant. However, a paracord bracelet in protective colors is considered classic: green, black, brown and white. A paracord bracelet can be woven in several ways. The most popular weaving patterns are given below.
Thin paracord bracelet
Paracord bracelet with clasp