Do-it-yourself snow queen carnival costume for adults. Be gentle - put on the costume of the queen of the snow! Kokoshnik or crown for the snow queen
Here is such a collar for a harsh Snow Queen:-)
On the mannequin, we mark with chalk the line of the collar of the dress. We build the frame of the future collar from wire along the line (I made long loops, and then twisted them, it turned out firmly and evenly). The number and height of the rods is arbitrary, according to your taste and sense of harmony. I had a task to make them gradually increasing from the center of the neckline to the neck. It is necessary to ensure that the opposite wire rods are the same length and the collar is symmetrical.
To prevent our layout from moving, we attach it to the mannequin with pins. Along the line of the gate itself, from the outside, we twist the wire into rings, a coarse mesh will be sewn on them later (cut an oblong rectangular piece from the mesh, with a good margin). These "rings" will subsequently ensure a secure fit of the collar to the neckline of the dress.

We wrap each protruding wire "thread" with masking (paper) tape. This will hide the metal, because our collar should be translucent and white.

We pin the mesh to the rods, making bends on the material so that the mesh freely fits the frame over the entire area and does not wrinkle anywhere. We cut off the excess mesh from above, focusing on the tops of the rods, leaving 1 cm of margin (just in case).
I did not film the next steps, unfortunately, because I have not yet discovered the Country for myself, so I will simply describe the actions:
It is necessary to remove the mesh with pinned bends and carefully cut off the excess. Unfold the folds, lay them out on the table and, according to this "pattern", cut out 1 more piece from a light translucent matter. Do not confuse the sides (left and right), as even if it seems to you that the frame turned out to be symmetrical, the eye can fail. :-)

Again we pin the mesh to the frame from the wrong side. And we sew to the rods, capturing in series, the mesh and the wire rod. There should be no sagging between collar sections.

Now we do the same operation with a transparent fabric, only from the inside.
When both pieces of fabric are firmly sewn to the frame, you can work on the "points" of the collar. Mark with pins a line of "hollows" between the rods and sew them with small stitches with white thread. Then cut off the excess, stepping back from the edge of the notch by half a centimeter. In this photo, you can see that one half has already been cut off, and the second is not.

For decoration, we will make an imitation of fragments of ice at the corners of the collar. I took an unnecessary disk and cut it into pieces with ordinary scissors. Caution - the disc may crumble and fragments scatter in different directions, they can be picked up by animals or children. Therefore, this operation is best done with wire cutters and in isolation from unreasonable and overly curious creatures.
Then randomly glue the pieces on the tops of the collar.
Snow queens, princesses and snowflakes have always been popular. But after the release of the cartoon "Cold Heart", beautiful ice ladies are just in trend. Both little and big girls like to be the masters of frost and blizzards. Of course, demand creates supply, and it will not be difficult to buy a crown for such a suit. But such crowns are either very primitively made, or they will cost a lot. But the crown of the snow queen with your own hands is not at all difficult to do, you can save a lot and get your own unique decoration.
Simple and budget
The most simple crown for the snow queen with their own hands is made from a minimum set of materials.
You will need:
- Ready-made plastic snowflakes, abundantly covered with sparkles (there are a lot of them in stores before, and after the holiday they can be bought for a penny at sales).
- A strip of white fabric measuring approximately 60 x 8 cm.
- Elastic band 2 cm wide, about 60 cm long.
- Scissors.
- White threads.
- Sewing machine (can be sewn by hand).
- or clear craft glue.
The work must be neat, so you may need a three- or two-liter jar (depending on whether the crown is large or small). It will be convenient to put on jewelry on it and work calmly with a needle or glue.
First, attach the elastic to your head so that it fits snugly, but does not cause discomfort. Cut off the required amount. Then measure the circumference of your head and make a strip of fabric to the desired length. Sew it into a tube of such a size that the elastic fits exactly in it. Don't make the common mistake of cutting as much fabric as the elastic, because it will stretch. Glue the snowflakes around the circumference, taking into account the future tension of the fabric.
Based on "Frozen"
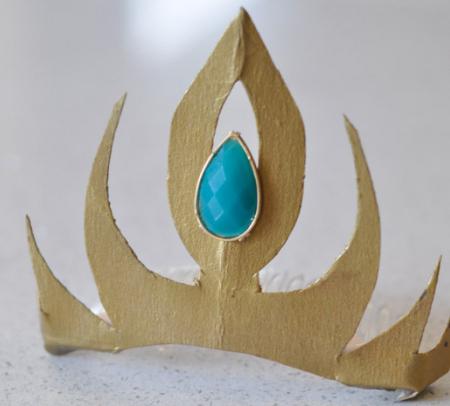
Suitable for little girls in the style of the cartoon sorceress Elsa. To make it, use this master class. The do-it-yourself crown of the snow queen is made from inexpensive materials that are easy to find even without leaving home.
You will need:
- Plastic comb from a hairpin.
- A sheet of thick cardboard about 20 x 20 cm in size (even a thick box of cereals will do).
- Scissors.
- Pencil.
- Golden acrylic paint.
- Turquoise stone with one flat side.
This crown is done like this: fold the cardboard in half and draw the outlines of the crown.

Look at the pictures from the cartoon, note that the base of the crown is the central sharp ledge, and three curls extend from it. It is not difficult to repeat the shape, but if it doesn’t work at all, print out a picture of the crown and copy it. Add 1 cm to the bottom for attaching to the scallop and cut carefully.

In the center of Elsa's crown is a notch and a turquoise stone. Make this cutout, but don't forget to leave some cardboard for the bead to stick on. Paint with golden paint, glue a pebble. Press the crown lightly to make it round and glue on the comb.
More Paper Crown Ideas
By a similar principle, the crown of the snow queen can be made with your own hands from cardboard, glue and sparkles for manicure.

To make it functional, you need to glue a strip of cardboard inside, buy a white or shiny hairband and glue this crown to it.
Well, and another more complex variation made of cardboard, sequins, a headband and a brooch.

A crown of sparkling icicles
For an older girl, you will need a more elegant crown of the snow queen. It is also easy to make it with your own hands.
For manufacturing you will need:
- 70 cm hard wire.
- 5 m of very thin wire.
- Oval beads.
- Teardrop beads.
- Sandpaper.
- Colorless varnish.
- Wire cutters.
- Elastic band 20 cm.
A large do-it-yourself snow queen crown takes longer to make than children's cardboard counterparts, but it will easily survive more than one carnival or photo shoot.

First you need to prepare the base of the crown. To do this, cut the required amount of wire around the circumference of your head, leaving 2 cm of stock on each side. Bend the ends into a loop and process and colorless varnish so that they do not scratch the skin and do not cling to the hair. The crown can be left in this form and fixed in the hair with hairpins, or you can thread the elastic through the loops and securely fasten it to your head.
Then, with a couple of turns, we fix a thin wire on the base and begin to make an imitation of icicles. To do this, we string 10 beads, teardrop-shaped and another oval. We pass the wire back through 11 beads, except for the top one. It turns out a small icicle of beads. Do the rest in the same way, but different lengths. In order for the icicles to stand evenly, you will need to twist them horizontally with each other. It turns out sparkling, like a snow queen. With your own hands, you can make earrings or a bracelet suitable for the costume from the remnants of materials.
On the mannequin, we mark with chalk the line of the collar of the dress. We build the frame of the future collar from wire along the line (I made long loops, and then twisted them, it turned out firmly and evenly). The number and height of the rods is arbitrary, according to your taste and sense of harmony. I had a task to make them gradually increasing from the center of the neckline to the neck. It is necessary to ensure that the opposite wire rods are the same length and the collar is symmetrical.
To prevent our layout from moving, we attach it to the mannequin with pins. Along the line of the gate itself, from the outside, we twist the wire into rings, a coarse mesh will be sewn on them later (cut an oblong rectangular piece from the mesh, with a good margin). These "rings" will subsequently ensure a secure fit of the collar to the neckline of the dress.
![]()
We wrap each protruding wire "thread" with masking (paper) tape. This will hide the metal, because our collar should be translucent and white.
![]()
We pin the mesh to the rods, making bends on the material so that the mesh freely fits the frame over the entire area and does not wrinkle anywhere. We cut off the excess mesh from above, focusing on the tops of the rods, leaving 1 cm of margin (just in case).
I did not film the next steps, unfortunately, because I have not yet discovered the Country for myself, so I will simply describe the actions:
It is necessary to remove the mesh with pinned bends and carefully cut off the excess. Unfold the folds, lay them out on the table and, according to this "pattern", cut out 1 more piece from a light translucent matter. Do not confuse the sides (left and right), as even if it seems to you that the frame turned out to be symmetrical, the eye can fail. :-)
![]()
Again we pin the mesh to the frame from the wrong side. And we sew to the rods, capturing in series, the mesh and the wire rod. There should be no sagging between collar sections.
![]()
Now we do the same operation with a transparent fabric, only from the inside.
When both pieces of fabric are firmly sewn to the frame, you can work on the "points" of the collar. Mark with pins a line of "hollows" between the rods and sew them with small stitches with white thread. Then cut off the excess, stepping back from the edge of the notch by half a centimeter. In this photo, you can see that one half has already been cut off, and the second is not.
![]()
For decoration, we will make an imitation of fragments of ice at the corners of the collar. I took an unnecessary disk and cut it into pieces with ordinary scissors. Caution - the disc may crumble and fragments scatter in different directions, they can be picked up by animals or children. Therefore, this operation is best done with wire cutters and in isolation from unreasonable and overly curious creatures.
Then randomly glue the pieces on the tops of the collar.
![]()
Every little girl dreams of feeling like a princess. And masquerade balls on the eve of the New Year contribute to the fulfillment of children's desires. It is not surprising that many children ask to make them a beautiful costume of the Snow Queen for a matinee. After all, this is a very effective image in the eyes of growing girls.
How to sew a snow queen dress for a girl with your own hands
The image of the queen is not only a dress. For a real royal outfit, you will also need a cape-cloak with a high collar. You don't have to worry about the dress. You can take the usual child dress to the floor of a cold shade, white or blue, and embroider it with rhinestones and tinsel. But the raincoat needs to be sewn to size:
- It is also better to make a raincoat more authentic. Sheathe a piece of fabric along the edge with fur or New Year's tinsel. You can make embroidery with silver threads in the form of snowflakes;
- For a high collar made of cardboard, you need to cut out the base. Everything is individual here: take measurements from the child's neck and transfer to hard cardboard. Glue the finished part with a cloth;
- You can also cut ordinary CD or DWD discs into small pieces, and then glue them with the shiny side along the free edge of the collar. It will look very expensive and spectacular.
Accessories and decor for the dress of the snow queen 
Everything festive and shiny is suitable for decorating a dress, the main thing is to keep everything in one cold shade. Beads, beads, glass beads, rhinestones, silver threads can be used to embroider a dress and make it fabulous. Tinsel and rain will add notes new year holiday. You can use ready-made snowflakes that are used to decorate the Christmas tree.
Well, what is the Snow Queen without a crown? by the most simple solution will buy a baby diadem in the market or in the store. The crown can be either gold or silver. Now on sale is a large selection of crowns for girls who want to feel like real princesses.
If desired, you can make a diadem with your own hands. Spending time together with a child making a costume with his own hand will have a beneficial effect on his development. The cardboard frame can be pasted over with cloth or foil, decorated with sparkles, rhinestones or beads, hanging New Year's tinsel and rain. Moreover, the crown can be absolutely any shape: classic narrow and elegant, reminiscent of a kokoshnik, be intricate in shape with a large number of sharp corners. Here everything is limited only by fantasy.
Reference! You can complement the fabulous image with a staff or scepter. The main thing is that it be spectacular and fit in its own way. color scheme into the big picture.
To complete the image of a real ice queen, you need to pay a little attention to makeup. Naturally, do a professional make-up little child not worth it. But for entourage, you can lightly powder your face with the lightest shade or apply a thin layer of very light foundation. The aristocratic pallor of the face will complete the image, and the girl will feel like the Snow Queen.
Upcoming 2020 New Year is the right time for the cherished desires and dreams of our children to come true, and the winter holidays, especially masquerades and carnivals, provide a wonderful opportunity for this. Have you decided yet what outfit your daughter will wear to such a matinee?
Many schoolgirls really like the image of the Snow Queen - the heroine of the famous fairy tale by Hans Christian Andersen, as well as many cartoons and films. This outfit for a girl can be made by hand. We will suggest some ideas.
The Snow Queen costume is easily recognizable. Its general color scheme can be white or blue. You can decorate it with details of the same color, or you can choose slightly different ones, such as silver gray, and as a result it will look more impressive.
Do-it-yourself Snow Queen costume for a girl for 2020 New Year
For such an outfit, silk satin, guipure, brocade, organza, tulle and other fabrics are suitable. The Snow Queen costume for a girl may consist of a dress with fur trim. You can also decorate a long dress with snowflakes, rain, white beads, sequins and rhinestones.
Another option is to sew a blouse decorated with sequins, tinsel or beads, and to it a tutu skirt made of light silvery tulle.
The Snow Queen's masquerade costume may include a sun skirt. You can make a skirt pattern as follows. Draw two circles on the fabric - inner (for the waist) and outer, making allowances for the seams. Cut out the circles, fold the hem and sew. Bend the belt 2-3 cm, sew and insert an elastic band into it. To make the skirt fluffy, sew a petticoat of white tulle.
For a half-sun skirt, you will need to cut two pieces from the fabric. Sew them, fold the top edges, insert the elastic, tightening it a little, and sew.
According to this pattern, you can sew not only a skirt, but also a cape for this New Year's fancy dress. On the front of the cape in the chest area, sew a decorative snowflake made of plastic or fabric, which can be decorated with mother-of-pearl beads, sequins, rhinestones, etc.
Sheathe the edges of the skirt and cape faux fur or shimmering Christmas tree tinsel - and your daughter in this outfit will be irresistible. After all, this is a carnival costume, it should sparkle in the tone of a decorated Christmas tree!
The bottom of the cape and dress can be decorated with snowflakes - for example, a pattern that includes the following alternating elements:

To this outfit, you can add a wide belt, decorated with a similar pattern.
One more element carnival costume The Snow Queen for a girl is a cape made of transparent fabric, decorated with sequins, white faux fur or silver tinsel. It can be long, like a raincoat, or it can be short - up to the shoulder blades or the middle of the back. Sew a stand-up collar to the cape, which will keep its shape well thanks to the interlining.
The collar can also be reinforced with a thin wire trapezoid frame used by florists. It needs to be covered on both sides with material, decorated with lace, beads and sparkles.
And you can sew a stand-up collar directly to the dress. This part is most conveniently made from light but durable tulle. This is easy to do: cut two strips of the desired height. Sew them together and gather from the side of the neck, stitching a strip of fabric horizontally and stretching a regular elastic band along its edge.
To make the collar stiffer, lay several vertical strips with reguilin - and you will get a design that resembles a fan. Now it remains to carefully sew the collar to the dress. You can decorate this detail with beads or sequins.
Elegance will be given to the costume by gloves that you can buy or sew yourself and decorate with embroidery, sequins or white fur.
For the Snow Queen costume, you will also need a crown, which you can also make yourself. It can be made of cardboard by pasting it with white satin and attaching rhinestones or pieces of unnecessary disks to it.
And you can attach a large crescent cut out of cardboard, painted with silver or covered with the same material from which the cape was sewn, to a white hair hoop.
For a month, you need to stick miniature snowflakes cut out of foil, fragments of “rain” or tinsel, beads, etc. A transparent veil, also decorated with sparkles, is thrown on top of the “horns” of the month.
A crown decorated with white beads or semolina imitating snow will also look great. Semolina or beads should be poured onto the areas smeared with glue and held for several minutes, and then shake off the remnants.
You can make a crown using the quilling technique - from twisted paper strips white or blue, which are glued to the headband and decorated with sparkles. Finally, the crown can be crocheted with fine white yarn and then starched to keep its shape well.
A beautiful mask made of cardboard, papier-mâché, leather or fabric will complete the image of the Snow Queen. You can use ready-made stencils, or you can draw it yourself, with your own hands.
Thick cardboard masks are made according to the following principle:
- With reverse side papers draw the outline of the mask and indicate places for the eyes,
- cut out the contour of the mask and holes for the eyes,
- glue the tape on both sides of the mask.
You can make holes on the sides in the Snow Queen mask and attach an elastic band to it. If the girl does not put on a mask, but only brings it to her face, holding it in her hands, you need to glue a stick or a wooden skewer to this product. Don't forget to decorate the mask with sequins, beads, bird feathers, embroidery, ribbons, rhinestones and other decorative elements.
You just have to apply make-up on the girl's face - silver or blue mother-of-pearl shadows, lip gloss and decorative skin gloss - and the image of a brilliant snow beauty will be completed.