Pumpkin house. Autumn pumpkin crafts for an exhibition at school and kindergarten. Birds and animals
Elena Ivanova
Then cut with a knife lower part pumpkins and with a spoon we take out the pulp and bones from it. We got an empty pumpkin.

In our house there must be windows - carefully cut them out with a knife.

The next step will be the installation of the door - I did not cut the door, but made it from colored adhesive tape.

Then steps appeared near the door, cut out of potatoes, which I fixed with a toothpick so that when transporting to Kindergarten, to the competition, they remained in their place.

I made a pipe from the same potato and attached it to the roof with a toothpick.

Well, then began the flight of wild imagination. Since we have house for forest fairies - accordingly, it should be located in a beautiful clearing - lawn grass helped me here (she has a very rich color).

And of course, flowers of extraordinary beauty grow in the clearing!

And of course, since autumn is in the yard, there must be fallen leaves. And here are the inhabitants themselves - sorceresses, forest fairies,

and each has its own pet forest animal!

This is the composition I came up with!

Related publications:
"House". Master Class. Purpose: development of mathematical abilities. Tasks:1. To form the ability to determine the parts of the day. 2. Develop thinking.
 Autumn is the most mysterious time of the year. She creeps quietly and imperceptibly. Autumn breath of wind and light coolness envelops the earth.
Among the toys that contribute to the successful start of the process of socialization of babies, one of the most important can be called doll houses. They.
Master class "House" In childhood, we all dreamed of becoming princesses and living in a fairy-tale house or castle. And often built various houses.
All children dream of toy houses, which they clumsily try to build from what they have at hand. And sometimes even parents.
The requirements for the RPPS say: the developing subject-spatial environment should provide the opportunity for communication and joint activities.
Good day, dear colleagues! I want to present to your attention the master class "House for mommy". For each holiday of the Eighth.
Hello everyone! Soon autumn competitions will be announced in kindergartens and schools, for which you will need to bring crafts from vegetables and natural materials. I think those who have kids probably know this firsthand. Since every year educators and teachers ask parents and their children to participate in such exhibitions.
In connection with the upcoming event, and since my child herself goes to preschool(so all this will come in handy for us too), I decided to make it easier to find crafts that you don’t have to buy, but do it yourself. I thought it would be great if a bunch of ideas are collected in one place, do you agree with me?!
In today's post, I will show you what you can do with your own hands from a pumpkin. This is a very popular vegetable. And what can be created from it, you can’t even imagine. bunch original souvenirs. Moreover, everything is insanely easy and simple, which even the smallest child can handle.
I'll tell you a secret, I have prepared for you the most big selection autumn pumpkin crafts for boys and girls. Here and now you will find real masterpieces that will definitely allow you to take prizes. So do not leave the page and save it as a bookmark so as not to lose it! I am sure you will find something that you will be happy to build with your kids.
Let's start with products that the smallest can do. Of course, without the help of parents can not do. But how great and valuable it is when moms and dads work with their children. Remember, joint creativity not only develops your baby, but also strengthens your entire family.
Probably the easiest way to make autumn souvenirs from such a sunny vegetable is to draw faces on it and decorate with additional attributes. See what funny boy and the girl turned out. Just take two good fruits, one smaller, the other bigger and draw eyes, nose, mouth and handles. Complete everything with a straw hat and your work is ready.

You can take not a whole pumpkin, but its half. From above, draw a shell like a turtle, and make paws and a head out of potatoes. Your Tortilla Tortilla is ready!

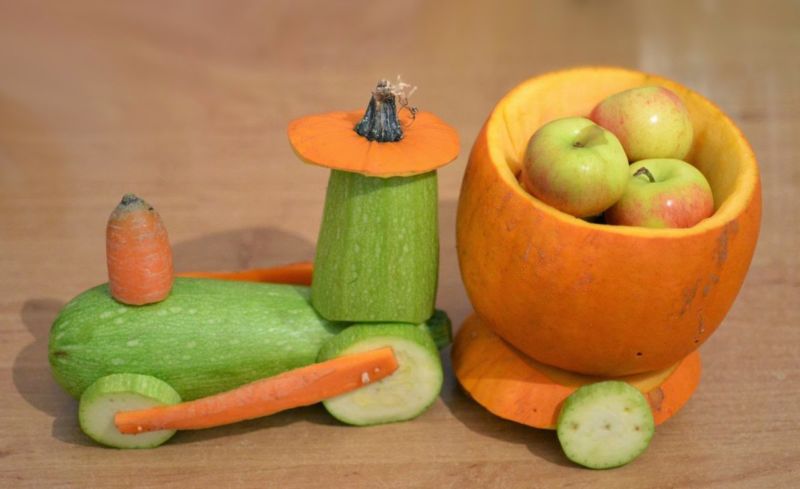
Do not forget that orange carriages are especially popular. For this product you will need a small fruit. You need to cut windows in it and pull out all the pulp. Make wheels out of carrots.

And you can make such a house, decorating everything with autumn leaves. And the inhabitants will be small peeled onions. Cool idea!

And how do you like such a house for a potato spider, well, just a class. Make a cobweb from ordinary woolen threads. Collect herbs, rowan twigs and decorate everything as you wish.

Now I propose to make you such a beautiful snail. And you will need not only a pumpkin, but also a yellow zucchini. Plus sequins, sequins, ribbons and other embellishments.

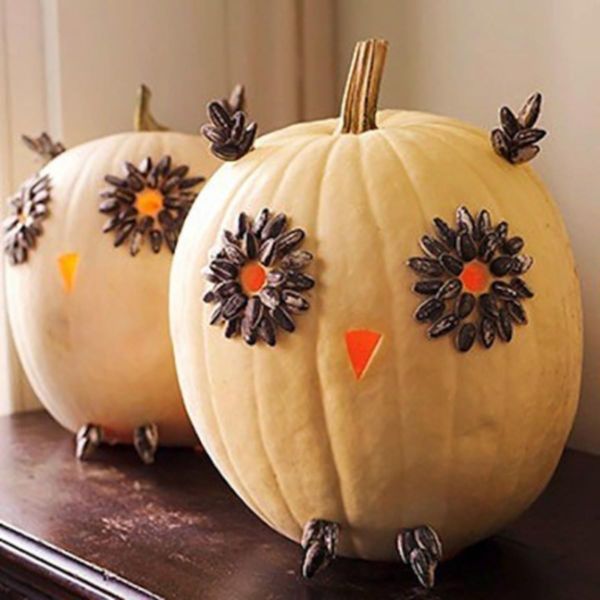
If you have your own garden, and the harvest was a success, then choose two large fruits and create such a graceful owl. Of the work, only cutting out wings, muzzles and gluing them.

Or just cut out. Directly on the pumpkin, draw what needs to be removed and proceed. That's what a cat can turn out!

I also really liked the composition with the leaves. You can make a very cute chicken. Just the little kids can handle this.

Or make a whole family of pumpkin men with your child.

Now I suggest you look at a master class on making a candlestick in the form of a cat. Such work will deserve a lot of applause, and after the competition, do not rush to throw it away. After all, Halloween is ahead, so the candlestick will look very cool in the country or in the fence of your house.
Candlestick in the form of a cat

You will need: large pumpkin, black gouache, brush, spoon, knife, cardboard for ears and tail, pen, line for antennae.
Work process:
1. Take a pumpkin and cut off the bottom from it so that in the future your craft will stand steadily.

2. Using a spoon, scrape out all the insides of the fetus.

3. Now draw the cat's face with a pen.

4. Carefully, using a knife, cut out the muzzle along the contour.

5. Paint the pumpkin black.

6. On black cardboard, cut out the ears and tail. Attach the pieces to the pumpkin with glue or toothpicks. Cut out a mustache from the fishing line and glue it to the muzzle.

7. Well, put inside and light a small candle.

Well, isn't it a beauty? Just a masterpiece!
Do-it-yourself autumn crafts using pumpkins

Look what a funny freak, I don’t even know how to call him correctly. And it is also made of pumpkin and plasticine.

I also really liked the idea with a vase for fresh flowers. To make such a product, you need to take a small and even pumpkin. Cut a circle off the top and scoop out the insides with a spoon. Place a glass inside and pour water into it. Then place a bouquet of fresh flowers in the resulting vase. A real autumn craft is ready. 
You can create such a Winnie the Pooh with a barrel of honey. Well, this is if you have absolutely nowhere to put the fruits). 
And here is an idea with a hedgehog. Well, it's also very easy to do. Plasticine, toothpicks, olives or grapes and pears, that's all the details.

You can also color the fruits in different colours and from felt to make faces of any animals. It turns out very beautiful and effective. A whole fairy tale can be made this way.

Children can make their favorite characters from cartoons and fairy tales. For example, from improvised materials and a small pumpkin, you can get such a smesharik.

And the fruit baskets look great too. Making it easier is simple, well, you yourself see everything from the photo.

Crafts from pumpkins and zucchini on the theme of Autumn
Now let's take a closer look at what can be created not only from an orange fruit, but also with other vegetables.
For example, make such a vegetable machine with a trailer. I think the boys will definitely appreciate it.
What a big mushroom. And cauliflower is right on topic. Schoolchildren can easily cope with such crafts.

Here are some more beautiful mushrooms!

How do you like this zucchini boat? Just a sight. Well, a pumpkin as an attribute of decoration.

Here's another one cheerful company can be built. If the presence of a pumpkin is necessary for you, then make wheels for the car out of it.

Popular fairy tale carriage. Zucchini wheels fit very well.

And here is another pumpkin house for a zucchini spider!

Well, to be honest, I didn’t find a lot of handicrafts from pumpkin and zucchini in a joint form, but separately there are plenty to choose from.
What can be made from pumpkin seeds for the autumn competition
Now I want to show and introduce you to such material as pumpkin seeds. You can also make different souvenirs from them. So keep ideas for your exhibition.
I will show you in detail and tell you how to make such a beautiful chicken.
Chicken from pumpkin seeds and sunflower seeds

You will need: plasticine, pumpkin seeds, sunflower seeds, a small basket, dried grass or strips of colored paper.

Work process:
1. From plasticine black or Brown fashion the body of the bird, form the tail. Roll up a ball of this color. This will be the head. Attach it to your body.

2. Now make pumpkin seed wings. Just stick them into plasticine in several rows.

3. Then also make a ponytail, but start from the top.

4. Take the sunflower seeds and insert them with the sharp side, filling the entire surface of the head and breast of the chicken.

5. From yellow and red plasticine, mold a scallop and a beak. From white and black plasticine form eyes.

6. Take a small basket, lay the dried grass and put the chicken in the nest. Everything is ready!

And here's some more work you can do. See and choose.
Application "Autumn tree".

Hedgehog. True, in the illustration it is made from sunflower seeds, but it can also be made from pumpkin seeds, you just need small seeds. And also paint them black first.

And here's another cute snow-white chicken. The manufacturing technique is similar to the one described above.

Application "Spikelets". Work for preschoolers and primary school children.

The sunflowers are also very impressive. The middle can be made from cereals.

Found another song here. Heroes can be made from some vegetables, for example, from a pear, but a panel is just from seeds.

By the way, working with pumpkin seeds very good for developing motor skills, so take it into service.
New ideas for making pumpkin crafts for kindergarten and school
Wandering around the Internet in search of interesting and original works from this vegetable, I came across such a cool author's craft by Svetlana Ridzel from the Fair of Masters website. It impressed me so much that I saved it and share it with you. Maybe someone wants to perform such an Ekibana.
Pumpkin Ekibana

You will need: pumpkin, acrylic paints, brush, piece of sponge, corrugated paper (fabric, felt, foamiran), wax, scissors, wire.
Work process:
1. Wash the pumpkin and cut off the tail.

2. Paint the entire fruit with white paint using a sponge. Wait until it dries.

3. Now, starting from top to bottom, paint the product according to the colors of the rainbow: red, orange, yellow, green, blue, blue, purple.

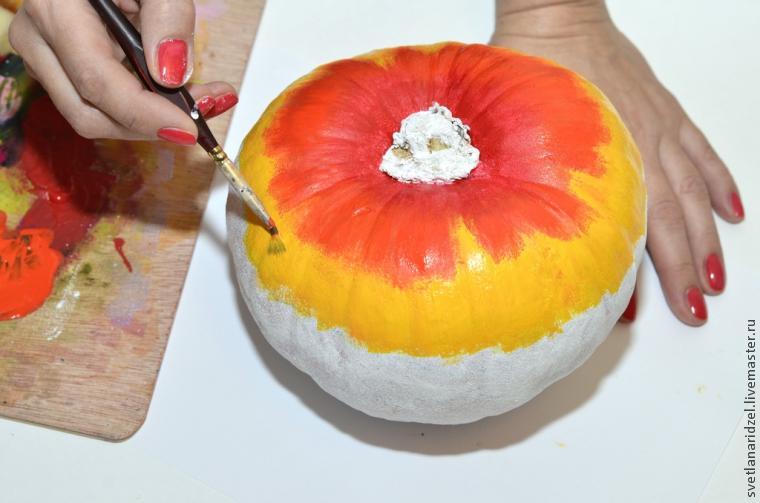
4. Paint the pumpkin with a regular brush, making only vertical strokes.
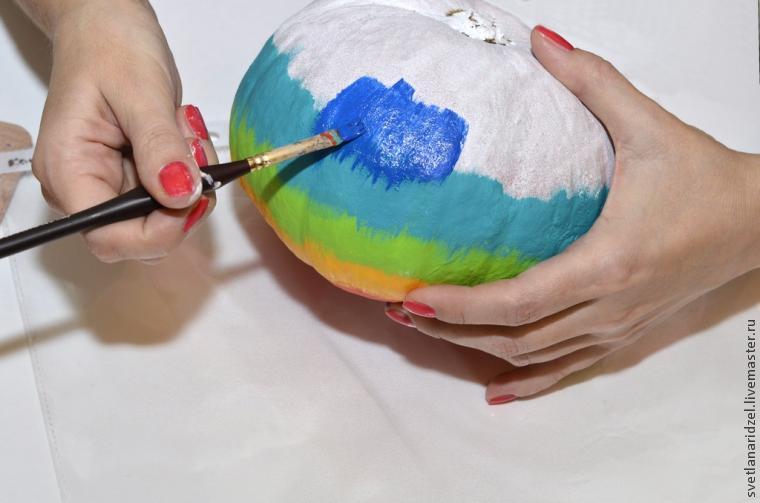
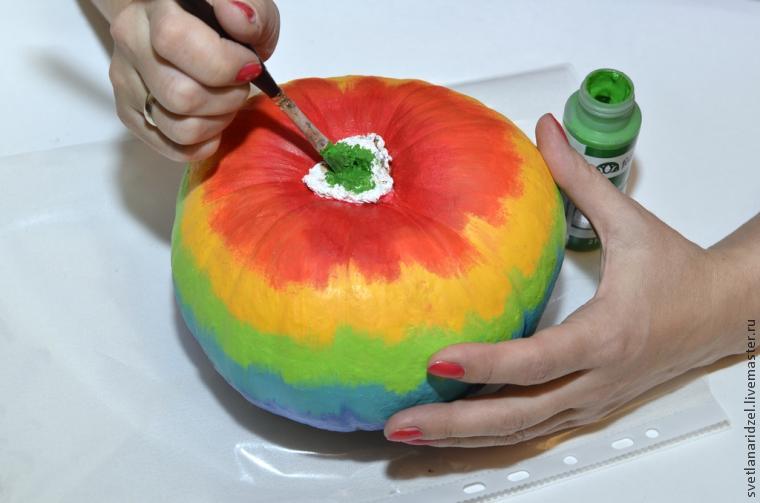
5. Paint the bottom black and the rest of the tail green.
5. Now dry the pumpkin well. Not less than a day! And when it is completely dry, cover it with wax.

6. From corrugated paper or fabric, or maybe felt or foamiran, make twigs, petals and flowers.

7. Using wire, attach them to the tail. Your "beauty" is ready.
I think you will agree with me that this is a real masterpiece! The author is just brilliant!
And a couple of new ideas for creativity. Especially for those who love to craft.
- Kittens in a basket;

- haunted house;

- Autumn candlestick;

- Vessel (pumpkin carving).

Well, of course, this is a difficult level that people who practice such art can do.
Crafts from a decorative pumpkin for the autumn holiday
And you choose what is simpler, and what the kids can handle. So look further and do not cease to be surprised by what you see.
What wise owls from white fruits and seeds. Simple, beautiful and popular.
Another version of a vase for flowers, but with decor. Check it out!

Big and funny spider. But you will need metal knitting needles or wires.

Another spider as a candlestick.

Pumpkin carving. Again, the level is difficult, but I really liked the work, suddenly someone is fond of and wants to make such a product.

Here is a simple work, like a vase, only berries and fruits are added.

And how do you like such a crab-old man. I smile directly at him.

Here are some more interesting and charming baskets. Cut off the top and remove the pulp. Put decorative grass inside, make a handle from twigs and decorate everything with ribbons.

Naughty bun. The kids will be delighted.

Variations of fairy carriages. Cool idea to close up a vegetable.


Houses for fairy-tale heroes. Dream up, take improvised and natural materials and create!


Well, the letter from the fabric looks very original.

Master class on making a pumpkin souvenir: we do it quickly and beautifully
Probably almost all the ideas of crafts I have already shown you. Well, is there really something to choose from? It remains for you to tell in detail how you can make a vase for flowers. As you can see, it is popular and easy to make.
vase

You will need: pumpkin, dried or live flowers, felt-tip pen, knife, spoon, polystyrene.
Work process:
1. Take a flat and beautiful pumpkin. It needs to be stable on the table.

2. On the upper side of the fruit, draw a contour with a felt-tip pen along which you will cut the neck of the vase.

3. Then, with a knife, cut out the “cap” along the contour.

4. Remove grains and pulp with a spoon.


6. Prepare dried plant branches and stick them into the stand. Your ekibana is ready.

In conclusion, a small selection of pumpkin souvenirs for kids. They will be happy to do such work themselves, as it will take a lot of painting and drawing. Look, the products are so light, and how beautiful they look.


Wow, now I don’t even know what to choose to work with my daughter, because there are so many interesting things. Well, if it's not enough for you, then I suggest watching the following video plot. Then you will definitely say, stop, I found it).
Friends, how do you like such wonderful pumpkin works? I am sure that now you will definitely participate with your child in the autumn crafts competition. Because there are a lot of ideas for creating them, and they are made very easily, quickly and not difficult. Just don't be lazy and you'll be fine. Bye bye everyone!
Fairy house made of pumpkins with your own hands. Master ClassFAIRY HOUSE FROM PUMPKIN will always find a place in your home or garden.
Create with children from natural materials, they will be happy to help you ...
PLEASANT CREATIVITY!

DETAILS
- Little Scarecrow Raven
- make fly agaric out of 1 1/ 2 inches of foam balls and teethsource
- twigs
- V pine sheashki
- flower stems
- clay potski
- Staircase made of branches
- Corn stalk is made from Raphia and swordthat
- wood slices glued
- Path of pebbles

To make the door, we used wire, cut small twigs and glue them together with hot glue, but it's better super glue. Hot glue melts in the sun and in the shade and everything falls off. Since the gourd is round, the door cannot simply be glued at ground level. After gluing the door, build a ladder out of wood circles. Hot glue holds them together great. 

We used a thick piece of foam for the base of the composition. Pebbles have been added from the house, this will be a path. Just pour the glue from the container on top of the pebbles. Then pour glue over the rest of the board (except where the pumpkin will sit) and cover everything with moss.

Add some small details - a big cone in the form of a tree, make fly agaric. Cut off about 1/3 of the foam balls, use a smooth top coat to make it easier to paint. Used toothpicks as a base


With the onset of each spring season, I start fidgeting in my chair and hand-scratching))), I also do this on a bench in the garden. I want to switch from needlework for interior decoration to creating crafts that can decorate and add zest to the garden. In terms of the near future, I have a lot of publications on this topic, and now I want to show the work from which to say that I am completely delighted is to say nothing! Amazing fabulous houses for gnomes and forest fairies are created by an American craftswoman - Anna from Missouri. It's just a miracle how polymer clay, pumpkin and cones are combined! I have bumps, polymer clay too (yesterday I published a post of my choice polymer clay), and the pumpkin can be replaced with papier mache if it is not available. I wish you a pleasant viewing, or rather, admiration, and below I am attaching a photo master class from the author. Good luck!


I want to note: for work you will need polymer clay, which requires baking in an oven or oven, especially if you use fairy houses as garden figurines. By the way, about stoves))) Spring is in full swing, and summer is ahead ... but do not forget about the cold season, which will come, and much faster than we think) If you have not purchased a heating stove, then right now it can be bought much cheaper than in winter. On the company website Shulepov & Partners you can buy Termofor stoves, in the catalog of the online store there is a huge selection of heating stoves, of various designs, from the best Russian manufacturers. Take a look)
So, for work we need:
For one fairy house- 2 pumpkins
polymer clay
acrylic paints of different colors for sculpting small parts
golden acrylic paint for decoration
cones and scissors or nippers
water based sealant varnish
sculpting tools

Pumpkins must be emptied and thoroughly dried before starting work. We cut off the pumpkins - at the first we cut off the top, it will be the base of the house, we cut off the second just above the middle from the bottom, we need the top for the roof of the house. We prepare cones for the tiles of the house, cut them with scissors or wire cutters

The author fills the pumpkin with sand in order to give it heaviness and stability. Glue the roof, then glue the cones. Add a polymer clay window. You will need three colors of clay: black, brown and purple. The window, like all other details of decorating the house, is baked in the oven in advance, following the instructions for the clay used.

Here is a closer photo. Please note: the pumpkin is painted and varnished, the leaves are lightly covered with gold acrylic paint


