How to make an original gift with your own hands. DIY souvenirs - a selection of interesting master classes and photo ideas. Japanese packaging "furoshiki"
Comic birthday gifts - ideas and recommendations will help you make your choice in favor of a bright and simple gift.
If you want to wish a woman or man a happy birthday with a hint of humor, do not forget some rules:
- Don't joke below the waist, especially with a woman. She may not understand such jokes in the presence of family and friends.
- Don't give men money hidden in socks or wrapped in inexpensive accessories.
- Universal gifts should carry some meaning, and not be just for the sake of humor. Yet this is a birthday, not a laughing day.
The video in this article will be superfluous, just go through the photo selection in order to understand which gifts are better to choose for donation.
Men more often perceive humorous gifts as something funny and cool. Without attaching importance to many things, even simple trifles can set a genuine mood for the holiday.

With your own hands, you can make a fly swatter from a simple cane and room slippers. The instruction is simple - to glue, dry and put into practice.

Visualization tester - the more you drink, the better you see the letters, however, bigger size... The glass can be used as a regular container, but it is also possible for a joke - to check the eyesight and displacement of the glass.

You can give an unmarried person a T-shirt with a humorous inscription. If he is just going to get married, this little thing will be in place.

A horn with an unforgettable inscription will not only serve as a sound amplifier, but also cool gift... A man will like to feel like a commander, at least in such a simple matter - to give orders and announce the next toast.

An unusual design safe can be placed in a room or hiding place, if there is one. Men will be able to lay out all their tools, hide secrets from their wife, and even carry important and valuable things with them.

Not simple, but "smart" who will tell you how much ash you have collected. Such a birthday joke gift is easy to make yourself, using the skills of a welder and an electronics engineer. It doesn't matter if you didn't hold the welding machine - buy such a souvenir at any joke store.

Yes, yes, such a funny birthday present will delight any man. As you know, a girl with such a lighter will not walk, and just give a man the opportunity to take care of a lady and give a light to such a charm. There will be a lot of reasons for jokes.

If you do not want to play role-playing games, then we suggest playing sports-seductive - mega-sheet for real craftsmen. Which of the men does not want to at least try himself in the role of a strategist, especially in bed.

From the field of souvenirs, such a symbolic gift will be appropriate only as an addition to something more global. You can approach the presentation with humor - give away the basket with goodies and condemn, so that you always eat deliciously and richly.

A miracle mirror that is always pleasant to look into, no matter how you look. Make your man feel like the emperor of the morning awakening.
The price of such sets and presents is not high, and it is a sin not to take advantage of such an opportunity to spend money on a surprise for the sake of fun. Best friend or a friend will appreciate the joke with friends. But the girl is better to pick up something delicate.
Here are some more gift ideas:
Funny gifts for a woman
Cute and cute jokes will be appropriate only among the company of girls. They can discuss among themselves the most different gifts even poorly cooked. If we talk about surprises, it is better for male friends to prepare something lighter in the perception of comic gifts.

Peculiar desk lamp that will look at ease on the table. Her leg resembles two lovers hiding from prying eyes.

Such a rug perfectly attracts the eye and looks good against the background of a naked tanned body. Any beauty will be happy to appear in a beautiful swimsuit.

You can envy the creators of such a postcard, where you can also add words of congratulations. This same item looks like room slippers, of course, which no one will ever wear. But it will always come in handy just in case.

Women's type of watch when it doesn't matter what time it is. Indeed, why bother with time if you will be late for a date anyway.

Such a simple present can be presented to a woman who has no flaws. She will have to eat one only, proving that she is perfect, and no minuses have been identified.

Dishes with funny motivating inscriptions will always delight a girl, especially one who does not need diets. So, for the future, you can keep it for yourself, your beloved, if you suddenly gain extra pounds.

The thing, of course, is useful in the kitchen, but it carries a comic meaning. After all, no one will measure a portion of pasta in order to eat them in the plate above until 6 pm.

If a camouflage uniform is made for camouflage, then an apron for a woman of the same fabric and colors will disguise her as an ideal housewife. And there’s a scout in the house!
Or such funny aprons:


So you have chosen a comic birthday present to congratulate your beloved friend, relative or lover. Now let's move on to the option of creating your own masterpiece - imagine that you are the God of humor, and now make a grand congratulation.
Read also:
Comic gift - do it yourself
Below is a surprise birthday gift that you can make yourself.
For work you will need:
- Pill bottle;
- Small sweets;
- Jelly worms;
- Markers;
- Glue;
- Paper;
- Scissors;
- A printer.
|
|
Open the package of small chocolates. Choose the suitable sweets by color, can be divided by colors them for several jars. |
|
|
Select jelly worms according to the same principle as candies. |
|
|
Take a jar of pills, you can also use an old empty bottle. |
|
|
Clean it from the contents, remove the sticker and glue from the old lettering. |
|
|
Use a printer to print the inscription on paper, or draw the names of the sweet "pills" on the bottles with markers. |
|
|
Alternatively, you can make several jars - divide candies and sweets by structure and colors, place them in jars and sign. The set is ready - sweet help will benefit everyone suffering from a lack of the hormone of happiness. |


Tip: If you want to give gifts to several birthday people, or to congratulate a couple, create two bottles. It is also appropriate to place chocolates and other goodies in syrup jars.
Universal presents
The very gifts that can be given to both men and women. In this case, the main thing is to find a golden mean in the use of a gift.

Sold in joke shops, on the Internet, and you can do it yourself. A box - according to the principle of addition (origami), a printout of the image - the Internet and a printer to help. Filler - sweets and other goodies.

Does he also need her a remedy for fatigue and depression. He and his beloved, and vice versa, will be able to break a plate for happiness, which is offered just for such an occasion. Why beat the kitchen utensils when you really want to fight, as in the movie "Mr. and Mrs. Smith".

A man or woman can be presented with an interesting version of a wall clock. Even if the birthday boy is not a mathematician or a physicist, even if he / she is on "you" with algebra, the present will additionally teach the mind to reason.
When you want to fly on a trip, but you need to have fun the moment you board the plane. Such an indecent sticker in the form of dollar bills on the torn side of a suitcase will surprise many fellow travelers and security services. Also sold are stickers in the form of illegal drugs in bags, weapons and jewelry.

Keychain with a secret that also beeps. It makes a loud sound, and even pleases the owner with a surprise - an unexpected and funny sight if you try the keychain for the first time.

When there is no chance of losing, and the other half will not get rid of the obligation to fulfill the gaming debt. The main thing is that the game should come as a surprise, but in the men's company, for the sake of a joke, you can also try to play a prank on your friends.

Admit it, you wanted to try the experiment with a light bulb? Now it is definitely possible - without consequences and pain, fear and risk. The lamp-shaped lollipop will give you a real adrenaline rush.

A comic souvenir that can theoretically be used. It is made of real red brick, the weight is impressive. So now, with such weighty arguments, hardly anyone else will argue with you. By the way, it is not forbidden to carry it with you, but it is better to leave it at home as a souvenir.
Such comic gifts for a birthday will make any holiday cheerful and bright. Do not forget about alternative gifts, where appropriate, as not always a person with a good sense of humor will be able to appreciate your efforts.
And do not forget, your birthday will be next - get ready for the reciprocal step and stock up on the strength to laugh heartily.
In the video you will find some more gift ideas:
In the minds of many, an unshakable stereotype has formed that gifts are made with their own hands either by children or by those who do not have the finances to buy something really worthwhile. But this is absolutely not the case. No matter how many “shop” gift options are invented, only those that are made by hand carry warmth, attention and care. After all, the giver puts his soul into them, devotes time and creates an exclusive that hardly anyone else will have. To understand that this is not the last century, we offer you interesting selection presents that you can create on your own.
DIY birthday gift
There are tons of options for birthday gifts that you can make with your own hands. And the choice of a particular one depends on the age of the birthday man, his preferences and tastes. A selection different options, which will be appropriate both as gifts and for the role of gifts, and for a wide age category.
Let's start with the fact that gifts can be not only pleasant, but also useful! For lovers of everything practical, we suggest making such a wall key holder. Making it is as easy as shelling pears, and the costs are at the very minimum, and the time for such creativity takes very little. But in the end it turns out very useful thing... The frame itself can be decorated at your own discretion, but it is best to choose a style and color scheme that will be in harmony with the room where this beauty will hang later.
Continuing the theme of frames, there is another option to use it as an interesting idea. Such a "board" can serve as the most in different ways... It can be either a photo holder or act as a stand for "reminders". No matter how the birthday man decides to use it, in any case the gift is not only original, but also very useful in everyday life, and making it is simple and very fast.

Why are simple piggy banks inconvenient? The fact that you never know how much money is there. But this can be fixed by giving the birthday boy such a piggy bank. Firstly, such a piggy bank cheers up, being on the wall and showing its fullness with money, and secondly, the filler itself can use a marker to count directly on the glass, writing down the accumulated amount. By the way, the gift itself can be presented not empty, but with a financial filling.

Candles are an attribute of warmth and comfort, and also romantic. A beautiful candle is a universal gift that will be appropriate both as the main one, for example, a set of candles, and as a present. Making such candles is quick and easy. For decoration, you can use both purchased laces and crocheted do it yourself. Simply brush the glue onto the glass and wrap it in lace. Once everything is dry, place a candle in a glass and you're done!

Another option for candlesticks. You will need to spend more time on it than on the previous one, but it also looks gorgeous. It will be necessary to impose motives of different diameters, but at the same time it is necessary to ensure that they can harmoniously join. After that, you need to inflate the ball, use PVA glue to attach the motifs to the ball and hang the latter to let the glue dry. After complete drying, gently burst the ball, and place a candle inside.

An unusual gift from all sides. He will decorate with his presence any room, and the recipient is unlikely to guess about the materials from which all this beauty was created. But this is nothing more than ordinary toilet paper rolls! Cheap and very pretty. How to make such a picture can be seen in the step-by-step image. Again, nothing fancy, just a little patience.
This work of art is made according to the same scheme as described above, only in a slightly different improvisation.

All the same useful toilet paper sleeves can also decorate a mirror, making it a bright spot on the wall.
DIY wedding gift
What is usually customary to wish for newlyweds on their wedding day? Love, happiness and…. financial well-being. Words are words, but you can present a truly symbolic gift. It can be a financial security umbrella. It's easy to make, but it looks original.

Another option to hint to newlyweds about the importance of the financial side of life is to present an initial family budget. The main thing is to think over the label, you can copy what is written in the image below, or you can connect your imagination and come up with something of your own.
And a young family can take such a wonderful money vase to a new home. This is both symbolic and very beautiful at the same time. It is not difficult to make such a present, but the result is amazing and such a gift looks very expensive.
And, of course, how to do without a wedding album ?! Stores offer formulaic and boring options, so the most skillful needlewomen can try their hand at business. Yes, it can seem very difficult at first, especially for beginners. Calling the lesson a simple language will not turn out to be, but if you try, then you can create such a thing even for those who hear the word "scrapbooking" for the first time. There are a lot of detailed video MKs on the Internet, where the craftswomen show everything step by step, it remains only to repeat. But such work will definitely be appreciated by the newlyweds, especially the bride.

Another idea for a wedding presentation is this tree. Interesting design a gift in the form of a picture will look appropriate on the wall in the apartment and will remind you of memorable date... You can use it as you please. For example, each of the guests will write a wish for the young on a separate heart, or give a gift to the clean ones and let the young people write warm words of love for each other. In extreme cases, you can leave everything as it is, just as a keepsake.

DIY gift for mom
Mom is the closest person. She will always understand, listen and support, she will be on your side even if you are wrong. Therefore, a gift for the most beloved man should be selected especially carefully and responsibly. There are a lot of options for such gifts, we offer only a certain part, which can be realized with your own hands.
Cosmetic bottles can be decorated very beautifully and in an original way. The design style can be very different, from the kanzashi technique to crocheting. And you can combine several types in one. Such a gift will decorate the dressing table and will constantly remind you of the giver.

The homemade photo frame just looks amazing. To make such beauty, you need to purchase the simplest base frame. Such blanks are cheap and you can find them in any store for Hand Made, and collect decorative elements for them. It can be anything: stones, rhinestones, beads, beads, etc. The decorations are fixed on the frame either with the glue of the moment or with hot glue.

The following gift is made according to an absolutely similar principle. Only instead of a frame, any form that can be made of wood and other dense materials will fit the role of a blank.

For lovers of practical gifts, the option with a homemade mug is suitable. You can design it as you like, just rely on your taste and create beauty for your beloved and dear person.
An original gift that will look very nice on a refrigerator or a magnetic board. Homemade magnets are very simple to make, and the whole process can be followed in step-by-step images. Choose the best family photos, scan them to your computer and print them in a smaller format. Next, cut them out in the shape of the stones and glue the photo to the stones, and then the magnet.
DIY gift for dad
Unlike moms, dads never differ in sentimentality, well, or they are very good at hiding it. Therefore, for dads, the gift should be practical and necessary. As a rule, it is precisely this criterion that interferes with the flight of creativity and sharply limits the option of possible gifts. Nevertheless, you can combine business with pleasure and make such a gift with your own hands.
A good option is a watch. Very necessary thing and you can make it in an original way by decorating the frame with decorative elements. For example, coffee beans. These elements are fixed with glue or hot glue.

Another option for a homemade and much needed gift is a calendar. You will have to work hard to create such a presentation, but it's worth it. If time is running out, then you can make the process easier by creating a wall calendar.

What could be more useful in everyday life than a diary or Notebook? And how wonderful it is to create such useful accessory do it yourself. There are a lot of options for diaries that can be made Hand Made, there are variations for both beginners and professionals. And in order not to translate expensive material, you can practice in advance on drafts. The whole process from and to can be viewed in the video MK, of which there are a lot on the Internet.

DIY gift for sister
Sister is the most best friend, therefore, the gift for her should be special. You can please your little sister with a homemade gift, the main thing is to know what is closer to her heart. A variant of a universal gift can be a selection of joint photos, beautifully designed in one single frame. Decorating with a garland will add special warmth and comfort to the present. This amazing gift will give your little sister more than once to feel how dear she is to you.

A pleasant soft, warm and cozy rug that will give you a lot of emotions from touching it. By the way, according to this principle, you can make not only rugs, but whole bedspreads, and what is even better - make a whole set. It will take longer in time, but such a gift will look gorgeous.
Original candlesticks on which your and your sister's photos will appear will be both useful and original. Photos are transferred to glasses, or glass jars and other similar things using glue and water. First, the surface must be degreased and dried. Next, you need to apply PVA glue on the glass with a brush and attach a photo, pressing it harder. As soon as everything is dry, the surface should be moistened with a cloth and carefully begin to remove the photo paper. Do it carefully and then the image from the photo will remain on the glass. After that, you need to put a candle inside and that's it, the gift is ready!
DIY gift for grandmother
Grandma - how much warmth there is in this word! For your beloved granny, you can make a very beautiful knitted lampshade. It is not so difficult to do it, we have already written about the technique earlier.
By a similar principle, you can beautifully arrange jars, which will definitely come in handy on the farm. Or, they can be used as candlesticks. Whatever their purpose, in any case, they will decorate the room with their presence and make it more comfortable.
Another option useful gift for granny - a case for glasses. It is done very simply, but it looks original. You can make such a cover from a variety of materials, but the cover looks "warm" from felt. The cover itself can be decorated with figures of animals, flowers, or embroidered with a nice inscription on it.

DIY gift for a man
The process is not easy. Typically shaving foam and socks come to mind. And despite the fact that all this sounds simple to the point of banality, they can be presented in a rather original way. For instance, gift box, in which pairs of socks will be beautifully rolled, and in addition there will be a bottle of expensive alcohol and candy. Such a set can be composed at your discretion and add whatever your heart desires.

They say that men are now crushed, so it can be presented with a hint. Remind the man of his main tasks in life by presenting a complete set for a "real man" as a gift. This set includes everything you need and nothing more: a nipple, an acorn and a hammer. And all because the main tasks of the stronger sex are to raise a son, plant a tree and build a house.

For needlewomen, the gift option can look like a decorative pillow for interior decoration. Doing it is not as difficult as it might seem at first glance. To make it, you will need the simplest small pillow, a shirt and a tie / bow tie. In fact, you need to sew a semblance of a pillowcase from a shirt, insert the pillow inside and close the seam. Such a gentlemanly present will surely be appreciated by the recipient.

DIY gift for my husband
A gift to a beloved husband should fully reflect the feelings of a loving wife. Such gifts can be very sentimental, but how if not, you can show love in a material way.
One of the options for pleasant gifts for a loved one is a set of tea, but not simple, but with love! You will have to work hard to create such a gift, but how cute it will turn out in the end. You need to carefully remove all the labels from the tea bags, and place miniature envelopes in their place, put a love message or a wish for the whole day in each of them. Now, every time a loved one sits down to drink tea, a radiant smile will shine on his face.
Another option for cute and nice gift- creating such a photo collage. It will not be difficult for even the most inept hands to make it, and it will take quite a bit of time.

A necessary and very warm gift - tie a cover on a mug and place on it pleasant words... Such a present will constantly remind you of you, and will also play a useful function, because with such a cover you can drink even the hottest tea without burning your hands.

DIY original gifts
Very simple in execution and at the same time quite original and very necessary - a pebble rug. The most difficult part of the creation process is to choose the ideal stones that would match in size and fit harmoniously on the selected surface. And then everything is simple - take the carpet, stones and glue. It is advisable that the glue is moisture resistant, because this rug will be washed, and so that it does not fall apart after a couple of cleanings, you need to do everything properly. First, without glue, lay the stones on the mat as they will lie in the finished version, and then, lifting each one, apply glue to the stone and put in place, pressing each element for the allotted time. Such a rug turns out to be very heavy, but it will not crawl on the floor, but will be in one place.

Other things can be done in a similar way. For example, coasters for hot dishes or for plates look very beautiful and original from pebbles. Here is how your imagination will fall.
A homemade pendant is a huge scope for imagination, because it can contain everything you want. From important symbols to photos of loved ones. Such a pendant is made quite simply, but the recipient of the gift will definitely not remain indifferent to such creativity. By the way, blanks for pendants can be easily found in specialized online stores or in departments for Hand Made.
A candlestick of stunning beauty can be made from the simplest materials at hand. The image shows an example of how the lampshade for the glass is made, the main thing is to make sure that it goes exactly along the neck.

An original bowl for sweets or something else light is made from the very minimum - sequins, glue and balloon... To make the bowl as strong as possible, you need to apply several layers, waiting for each to dry. After the last layer has dried, remove the ball. The bowl itself can be trimmed by cutting off everything unnecessary from above, or left as it is, which will also look unusual.
Only the most courageous are not afraid of vaccinations and injections, but hardly anyone will agree to voluntary vaccination. But what if you plan to inject a vitamin "₽"? Nobody will give up this for sure. To give money in this way is a very interesting undertaking, which will surely be appreciated at its true worth. Buy syringes, place bills there, and on a computer print a humorous instruction, which will indicate the dosage and side effects.

DIY gift for a friend
What girl doesn't love jewelry? There are not many of them, so a homemade bezel will be very useful. Moreover, knowing this technique, you can create the most real masterpieces. It is likely that the first time you get it may not be what you expected, but constant practice will certainly bear fruit. The detailed execution step is clearly visible on step by step photos so it shouldn't be a problem.
Mug with delicate design for sure. Such beauty is done very simply. To do this, you will need the simplest nail polishes, a solid mug and fantasy. In the water, alternately drip the varnishes that match the color, and then use a toothpick to create an intricate pattern. After that, just gently dip the mug into the water so that the drawing completely "sits" on the surface of the cup, and lift it up. Let the drawing dry and that's it. To prevent the drawing from tearing, it is advisable to additionally apply a suitable glossy coating on top.
Another original version a gift for a girlfriend - a decorative candle with your joint photo. We have already talked about how to transfer a drawing from a photo to another surface, and this is clearly visible in the photo.
Knowing what kind of phone a friend has, you can present her with an original cover for a smartphone as a gift. You can do it as you like and with anything. The most common option is rhinestones. For work, you will need the simplest plain cover, decorative elements and glue. First, the work surface must be degreased, and then, using a marker or pencil, apply the future arrangement of the rhinestones. You can fix the rhinestones themselves with high-quality glue. A custom-designed case will surely delight your friend.

Despite the fact that each of the gifts in our selection is divided into a certain category of recipients, you can give them to anyone and whenever you want, the main thing is that the present is in the subject and the hero of the occasion likes it. And remember, gifts that were made with your own hands are not only no worse than those that you can buy in a store, sometimes they can even surpass them in all respects.
More and more often, people prefer to give handmade items. When deciding which gift to make with your own hands, you should take into account the preferences of the person to whom it will be addressed and the theme of the holiday. So, for colleagues or friends, you can prepare symbolic souvenirs: these are postcards, sweets or themed fridge magnets. As a gift for Birthday, wedding, February 23, March 8, baby's birth or New Year for family and close friends, it is worth choosing more significant ones.
An original addition to the gift will be a postcard. self made... She can also act as the main one, for example, to congratulate colleagues at work or numerous acquaintances.
Making a postcard is a fascinating process, because in it you can show all your creative potential, and the variety of techniques and materials allows you to make the most different.
Before starting work, you should decide on the theme of the holiday, choose an idea and select materials. Find everything you need at a craft store.
For example, to congratulate Valentine's Day, you can make such a card.

To make it you will need:
- preparation of a postcard with an envelope made of thick white cardboard;
- sheets of scrap paper of various colors;
- curly hole punch;
- scissors;
- white thread;
- glue;
- needle.

Use a hole punch to cut out the required amount, on the basis that each color will require two hearts.

If you do not have a hole punch, then prepare a heart template and cut with it.
Place the prepared elements in two pieces of the same color on the front side of the postcard, secure with glue. This must be done so that they remain in place during sewing.

On a typewriter, sew with white thread in the middle, without going beyond the borders of the hearts. Then sew a few backstitches.
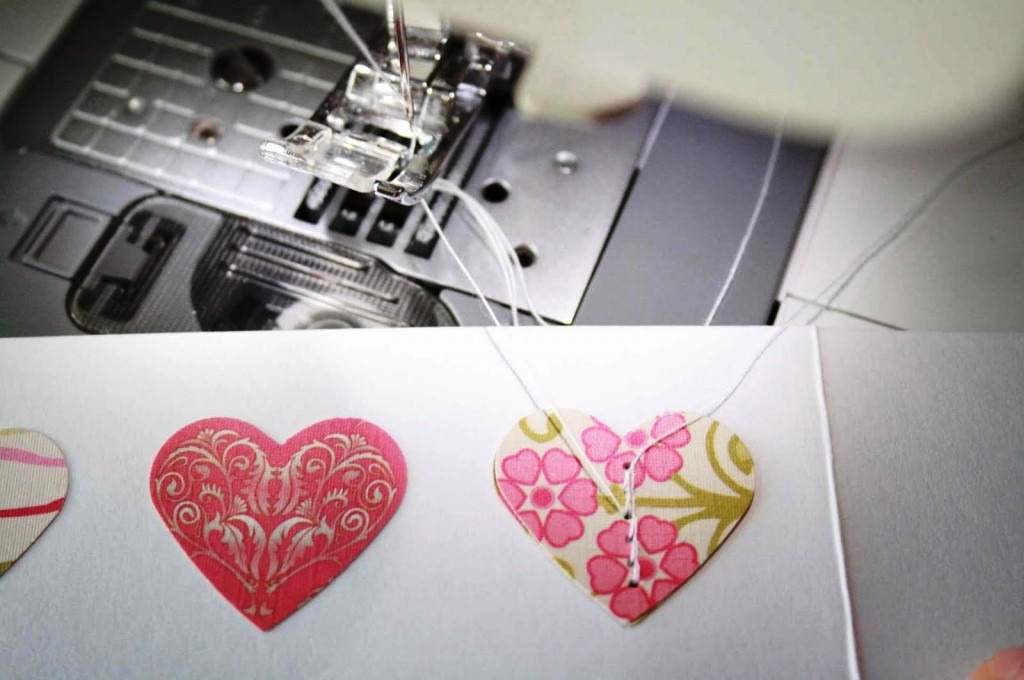
You can sew hearts on your hands. In this case, try to do it as carefully as possible so that the "step" of the stitch is the same.
Cut off any excess threads with scissors.
Bend the sewn-on hearts along the line.

The postcard is ready, you can enter a few lines of congratulation and put it in an envelope.
Postcard-chocolate
Chocolate Girl is a handmade postcard that has a place to put a chocolate bar or other souvenir, such as money. You can present it for any occasion.
In order to make a New Year's chocolate maker with your own hands, you will need:
- kraft cardboard 30 * 30;
- PVA glue;
- scrap paper;
- decorative elements;
- pencil;
- scissors;
- ruler;
- hole puncher;
- ribbon.
The size of the chocolate maker directly depends on the size of the chocolate bar. Having measured it, you can get to work.
Draw the dimensions of the future postcard on cardboard. In our case: height - 21 cm, width - 10 cm + 10 cm, gluing place - 1.5 cm (see photo 2). Cut out the workpiece, and draw along the fold lines with a runner, and gently bend.

Glue the resulting postcard, and try to put chocolate there. It should fit freely inside.


Now you can start decorating. To do this, use 2 cut paper, flowers, chipboard and die cut. In this process, you can show your creativity and use any decorative elements.

Edible gifts
This category of products will appeal to any person, because they are not only tasty, but also original and decorated. You can choose any sweets: chocolate bars, chocolate bars, candies, cookies, dragees or handmade candies.
For packing sweets, use cardboard boxes, glass jars, wicker baskets, wooden crates, tin boxes, or other suitable containers. Their shape, size and color may vary.

Box with sweets
It is very easy to make such a gift with your own hands. This requires only the original box and sweets. Choose any filling of the box.
Assembly will not take much time: sweets must be beautifully folded into a box, you can decorate it if you wish. To do this, tie it with a ribbon or leave a small wish on the box lid.

Delicious gift for men
Prepare such original gift it is possible for men on February 23rd and on their birthday. The composition should be selected based on the preferences of the person for whom it is intended. So, for filling, you can choose: alcoholic or carbonated drinks, coffee, tea, chocolates, meat products, vegetables and other edible products.

Also, invest in a gift and useful things: diaries, pens, or clothing.
To decorate such a souvenir you will need:
- wooden box;
- edible filling;
- cigarette paper;
- filler.
As the latter, you can choose sisal fiber or tissue paper.
The design does not take much time: line the bottom of the boxes with filler and carefully arrange the edibles.
The features of filling and decorating a gift can be found in this video:
Men's bouquet
DIY gift for a man. How to make a bouquet for a strong half of humanity
Sweet box with flowers
An edible gift can be made more complex by slightly changing its composition. For mom, sister or girlfriend on March 8 or birthday, make a box with fresh flowers and sweets. Instead of the latter, you can put a bottle of wine, macaroon cookies or a can of coffee.
To make a box you will need:
- cardboard box (the size depends on the components of the composition);
- flowers - 2 small branches;
- floristic sponge (oasis);
- sweets;
- tissue paper matching the color to the composition;
- cellophane or mica sheet;
- nippers;
- stationery knife;
- container with water.

If you have a small box, then it is better to use flowers with small buds, for example, spray chrysanthemums or roses, gypsophila or alstroemeria. For a large box or medium size, any will do. You can buy them and a sponge at a flower shop.
Before starting work, the floristic sponge must be cut to the desired size and placed in a container of water for one hour so that it is completely saturated. Fulfillment of this condition will allow flowers to delight with their fresh appearance for a long time.
If the height of the oasis coincides with the dimensions of the box, cut off 3-4 cm from above with a knife, this is necessary for a harmonious appearance, and so that you can close the box.
Prepare the flower spot first. Attach cellophane or mica to the box to select the size of the required piece. The cut must exceed the dimensions of the sponge.
Attach a sponge and wrap with tape. The mica protruding from the edges must be trimmed. From above, the oasis should turn out to be open in order to insert flowers there.
Now you can start collecting the composition. Use scissors to cut the flowers from the branch, determine the length of the stem by the height of the box. Insert them into the sponge in random order.


DIY gift
A box with fresh flowers and sweets. How to make a gift with your own hands.
Bouquet of sweets
A sweet gift can also be made in the form of a bouquet. You can give it to your family or work colleague. He will like his appearance and will be a delicious addition to tea drinking. The undoubted advantage of such compositions is that they do not require additional maintenance. And after all the candies are taken out of them, you can leave the bouquet as an interior decoration.

Everything necessary materials can be found in handicraft stores.
To work you will need:
- corrugated paper - 2 rolls of 2 different colors;
- candy;
- basket;
- wooden skewers - packaging;
- scissors;
- a thread;
- glue gun;
- glue sticks;
- green tape tape;
- organza - cut 70 * 70 cm;
- sisal fiber;
- stationery knife;
- decor;
- floral sponge or oasis.
Let's get to work:
When choosing sweets, pay attention to their shape. It is better to choose a rounded shape, they will be easy to use and can be easily removed from the finished flowers. Choose the quantity based on the size of the basket.
Having solved all the organizational issues, you can get to work.
First, let's prepare the material for the buds. Cut the paper into strips about 5-6 cm long and then cut into rectangles. One strip should have about 6 pieces.
Cut rectangles with the same dimensions from green paper. Sepals only need to be cut out of them (see photo 6). Use a skewer to twist the tips slightly. This will make the bud look more alive.
Then, for each rectangle intended for flowers, round off the edges. Stretch the resulting blanks from the center. Before putting in the candy, squeeze one "tail" so that it is not visible from the bud.
This action will not affect your ability to safely remove the candy from the flower.
Put the prepared candy into the paper and twist it so that it is not visible, and the shape looks like a real rosebud. Now use a string to tie at the bottom to secure the candy.
Further work will require a glue gun. It operates on mains power, so be careful to avoid burns.
We continue to create
Let's start assembling the flower. Wrap the "sepal" around the bud and secure with a thread. Use a glue gun to glue the skewer to the base of the bud, before cutting off the excess paper. Cover the joint and the skewer with tape.
The peculiarity of the tape is that by slightly stretching it, it becomes plastic and with its help you can give a neat look. In order to tear off a piece of tape, it is not necessary to use scissors, it is enough to sharply stretch it.
Do this with all colors. And while they can be postponed.

Cut the organza into 5 * 5 cm squares. Roll up, glue to a skewer, and wrap with tape (see photo 13,14,15). With the help of organza, you can close the spaces between flowers so that the bouquet does not look "empty".
Let's start assembling the composition.
From the sponge, you need to cut out the base of the bouquet that matches the size of the basket. Lay sisal on top.
Gently insert the finished flowers and organza skewers into the sponge. Adjust the height of the skewer based on its location, shorten it if necessary with pliers. Try to fit everything very tightly.

Collect a basket of "flowers"
The finished work can be decorated with pearls and other decorative elements, for example: artificial greenery, ribbons or rhinestones.
Corrugated paper is a unique material. You can make completely different compositions from it. Show your imagination and you will get a unique and delicious handmade gift.
Interior gifts
Handicrafts can be not only tasty, but also healthy. If you are invited to visit or to a housewarming party, then you should make a small souvenir for the interior of the house with your own hands.
Topiary
Such a gift will be an interesting addition to the interior of any room. Its main feature is that it does not require additional care, which means that it will be able to please the inhabitants of the house for more than one year.
Topiary Is a decorative ornament in the form of a tree. The tip may have different shape such as round or heart-shaped. And as decoration can be used: coffee beans, sisal fiber, fabric or natural materials.
To make topiary from artificial flowers and sisal you will need:
- workpiece in the form of a ball;
- sisal in a bunch;
- snag;
- artificial flowers and leaves;
- ceramic pot;
- gypsum;
- white thread;
- glue sticks;
- glue gun;
- decorative elements.
The process of creating a topiary
In order for the topiary to turn out harmonious, you first need to check the compliance of the pot and the workpiece. They should be nearly the same size in diameter.
If you have a blank, then you do not need to carry out additional actions with it. If there is none, then you can make a ball out of paper. To do this, crumple up a few sheets and shape into a ball. Do this with all sheets, increasing the volume. When the mold is ready, wrap the thread around it, pressing down on the tabs of the paper, this will help you get an almost even ball.
Better to use white sheets and white thread, so you no longer need to do anything with it. If a newspaper was used, then you will have to additionally glue the ball with corrugated paper.
To make sisal balls, you need to pinch off a small piece from the bundle. Roll it with your hands, giving it the shape of a ball. They should turn out to be quite dense, if you managed to do this, take some more sisal and continue rolling. As a result, you should get dense balls with a diameter of about 3-4 cm.

We continue to work
You can start decorating the workpiece. Use glue to attach the sisal balls and flowers. Glue leaves and decorative elements between them. All spaces should be filled, so the topiary will look more harmonious. Leave a small empty space at the bottom, where the driftwood will be attached.

When you finish decorating the workpiece, you can start securing the driftwood. To do this, make a small hole with scissors, fill in the glue and insert a piece of wood. Hold your hand strictly perpendicular to the workpiece until the glue hardens.
In order for the topiary to be stable, it must be placed in a bucket of plaster.

Gypsum can be immediately poured into a pot, filled with warm water and stirred. As it begins to harden, place a snag with flowers. Keep it upright until the plaster hardens completely.
If you have stained the snag, the plaster can be easily cleaned off with your hand or with a knife.
Decorate the pot on top with sisal and flowers so that the frozen plaster is not visible.

Painting in string art style
This work can really surprise. Her appearance is completely unusual and colorful. And working on it will be interesting and exciting.
You can choose absolutely any image in the picture: it can be an inscription or a symbol.
For work you will need:
- a small sheet of plywood;
- 2 packs of small round head nails;
- hammer;
- template paper;
- floss threads;
- Scotch.
First you need to prepare a template. You can find it on the Internet or make it in one of the photo editing programs. Print and cut.
Before work, plywood can be painted in a neutral beige shade or a decorative panel can be used instead.
Attach the workpiece to the plywood and secure with tape so that it does not move. Now we start hammering in nails. For convenience, it is recommended to put something under the plywood so that the nail does not break through the place where you will be doing this.

Nails should be driven along the contour of the letters and try to keep the distance between them the same. The optimal step is 1 - 1.5 cm. It is necessary to punch along the entire contour of the word.
When you are finished hammering in the nails, the template can be removed. Now everything is ready for decoration.

Use a thread to connect nails that are next to each other in a chaotic order, starting with the first letter. And so do it until the end. Tie the end of the thread around the nail and carefully cut off the tail.


If handicraft is not your topic
Handmade postcard? Floriana or a bouquet of sweets? If DIY gifts are not your topic, then this is what you need! Just a few clarifications about the recipient of the gift and the guys from Ukhtyboks will put together the perfect gift for you. Surprise the birthday boy with your creativity!

Do-it-yourself florarium
For lovers of fresh flowers, such a gift will be to their liking. It differs from simple potted ones in appearance.
Florarium- it is small glass aquarium where the plants are grown. Due to its original appearance, it will become a real living room decoration.
For the florarium, it is better to use small and unpretentious plants: cacti or succulents.
To make it you will need:
- small round aquarium;
- live plants;
- priming;
- drainage - expanded clay;
- live moss;
- pebbles;
- decorative elements;
- fertilizer;
- plastic spoon;
- watering can.
Work process
Wear rubber gloves to avoid getting your hands dirty.
Wash and dry the aquarium.
Fill the drainage at the bottom and add a few spoons of fertilizer. Then add soil.
Now you can start planting the plants. Take them out of the pots first and shake off the roots. Plant them gently into the ground one at a time, helping with your hands and a spoon. Due to the limited space, be careful not to damage the plants.

When finished planting, line the moss and sprinkle with water, decorate with pebbles.
If it turns out to stain the walls, wipe them with a damp cloth.
All additional information can be obtained from this video:
Do-it-yourself florarium
How to make a florarium at home. detailed instructions.
Volumetric letters
Such a handmade gift can be made in the form of a word or one letter, for example, the first letter of a first or last name. Volumetric letters will become bright decoration rooms and will remind you of your attention. They can be made from artificial flowers, paper, fabric or natural materials.
The proposed version of volumetric letters can be prepared for Mother's Day or for her birthday.

To make it you will need:
- artificial flowers;
- cardboard for letters;
- floristic sponge;
- glue gun;
- glue sticks;
- simple pencil;
- ruler;
- stationery knife.
In order for this gift to become a harmonious home decoration, it is worth choosing the optimal size and the appropriate color scheme for the letters.
The frame of the letters will consist of pieces of cardboard glued together. They must first be drawn and cut out. Use a glue gun to glue them together.
Use a knife to cut the sponge into suitable pieces and insert into the indentations of the letters. It is better to do this in small pieces, so it will take up all the space.

When the letters are ready to be filled in, you can start working with colors. They should first be cut from the stems. Now you can insert them in a chaotic manner, filling all the space.

They can be attached to the wall using double-sided tape.
Album accordion
For photography lovers, you can make an original photo album with an accordion. In order to make it you will need
- wooden box;
- thick dark paper;
- satin ribbon;
- glue;
- photos.

First, decide on the number of photos, the number of folds, and hence the paper, will depend on this.
First, you need to cut the paper correctly. To do this, measure the width of the photo and add 1 cm, so you get the required paper width.
Now measure the height and add 1 cm too.
Transfer the resulting dimensions to paper. Now cut to length according to the resulting size.
You need to make several such strips and glue them.
Draw a line according to the height of the photo. Photos will be located here, such places need to be made in accordance with the number of photos.

Now draw along the lines with a runner to make an accordion. Glue the photos, glue a small tape under the first photo, for it it will be possible to pull out the whole accordion.

Attach the eyelet
Any things and products that were created by human hands have a unique energy. Today, the popularity of hand-made goods is gaining momentum.
Enough a large number of people in their free time from work like to make something with their own hands, sew, weave and cut out of wood.

To create a decent source of income from an ordinary hobby, you need to truly love your business and have a competent business plan.

There are many handicraft opportunities that can generate a steady income.
Decoupage technique
Decoupage is a gluing technique different surfaces pieces of paper or cloth, which are then varnished. For this case, very few materials and devices are required: paper and fabric canvases, adhesive composition, scissors, various brushes.

To purchase a starter decoupage set, you will need to pay about 10 thousand rubles. The necessary tissue and paper scraps can be found among friends and relatives.

Precisely because old things are often needed for hand-made creativity, this type of income becomes profitable, since it does not require the purchase of expensive materials.

Decor candles
There is a lot of competition in the decorative candle market, as this type of activity is not new at all. However, having developed your own technology and design, you can create beautiful souvenirs with your own hands in the form of unique candles.

To make the first batch of candles, you will need to spend about a thousand rubles, which will go to:
- purchase of raw materials - as a rule, ordinary candles are melted by the steam method;
- purchase of paint - you can use ordinary children's crayons;
- making molds from tetra-pack packages. Alternatively, the required forms are purchased in stores.
When manufacturing candles, you should follow the rules of safe work, since wax and paraffin vapors released during melting become fire hazardous.

Floristic compositions
Unique individual flower arrangements cost about five thousand rubles today. Moreover, the cost of such a bouquet will be about 2 thousand.

Custom floristic compositions are used for weddings, anniversaries and other celebrations. The only disadvantage of such a case is the search for clientele, since flowers are a perishable product, then the bouquets are made up before the immediate issuance of the order to the client.

Sewn dolls
The female sex at any age loves to teach dolls as a gift. For babies, this is a great toy; for adult ladies, it can be exclusive models for the collection of dolls.

High-quality and unique work among sewn dolls is in great demand.

To start the production of dolls from scratch and make a really high-quality good souvenir doll, you need to organize a small sewing workshop, which will be equipped with:

- a sewing machine of a simple model,
- scissors, a color palette of threads, needles,
- various fabrics and fillers.
On average, the cost of a finished doll is 500 rubles, while the retail price is 2 thousand rubles.

Note!

Wooden souvenirs
Wooden souvenirs can be presented as very miniature ornaments, as well as large carved panels and furniture compositions. The material for production is wood, and it will not be difficult to find it on any construction base. Valuable specimens of wood are more difficult to find.

To start your business in the production of wooden souvenirs, you need to develop and create the first collection. The demand for specific copies is determined by the intensity of its sale. Then the mass production process can begin.

Badges and Keyrings
The manufacture of exclusive key rings can be done by a person who owns locksmith skills.

For this case, it is necessary to have specialized equipment in the form of a vice, a machine tool, blanks and materials. The amount of initial investment will be from 30 to 40 thousand rubles.

Beading
Very beautiful crafts and do-it-yourself souvenirs are obtained from beads and beads. For such a case, a minimum amount of equipment and materials is required: a machine, bead sets, fishing line, beads.

Note!

The total amount of funds will be approximately one thousand rubles. You can create all kinds of jewelry from beads, embroider fabrics with them, create flower arrangements.
Ceramic products
The shops are full of pottery, but they do not have the warmth that is available in hand-made copies. The main thing in this business is the presence of a clay deposit near the direct production.

Even the presence of a special kiln is not necessary, since it is possible to dry a small product in a conventional oven.

Knitted accessories
Any hand-knitted items, be it clothing or accessories, have a unique personality. Therefore, such gizmos are appreciated by the consumer, making this business quite profitable.

To create knitted items, you just need to purchase yarn and crochet hooks or knitting needles. But for industrial production, you will need a knitting machine, the cost of which will be about a thousand dollars.

In addition to the presented hand-made hobbies, photos of souvenirs show that today you can also do:
Note!


- making jewelry,
- weaving baskets and boxes from the vine,
- design of books and covers using the scrapbooking technique,
- production of chocolate souvenirs.
Sale of handcrafted souvenirs
In addition to the question of how to make a souvenir, you need to think about where to sell it. There are two ways to market your hand made gizmos.

The first is the store trade. Hand-made craftsmen sell their crafts in souvenir shops and departments. At the same time, registration of an individual entrepreneur, LLC or certificates for products is not needed here.

However, there is a minus here - a lot of competition and the division of income with the owner of the shop.

The second option is internet marketing. To do this, you will also have to spend a lot on creating your own website (about 10 thousand rubles). Promotion and organization of the group in in social networks will also cost money.

However, there are websites that allow buyers and manufacturers of han-maid souvenirs to meet.

Here you will have to pay for sending the goods by mail, since the consumer can be absolutely in any city in our country.

DIY souvenir photos


A friend is the person who knows a part of your life and has fun when you are around. On her birthday, I would like to emphasize the peculiarity and importance of the attitude towards her. In this article we will look at: how to make a birthday present for a friend with your own hands.
You will need: pot, styrofoam, skewers, artificial grass, glue gun, candy bars, gum, gift cards, etc.
Master Class

The creative indoor flower is ready!
Coffee mug
You will need: mug, coffee beans, cotton pads, thick white thread, acrylic paint Brown, Super glue.
Master Class

Heart of coffee
You will need: coffee beans, paper, wire, thread, glue, cardboard, jute thread, sponge, iron can, brown paint, ice cream sticks, decoration elements - flowers, ribbons ...
Master Class
- Fold a piece of paper in half and draw a half heart, then cut out.
- Circle the heart on cardboard and cut out 2 copies.

- Wrap 2 pieces of wire with paper and glue to one heart. Repeat this process for the second heart.
- Glue cotton pads in several layers between the hearts to make the design three-dimensional.

- Cover the whole heart with cotton pads and wrap with thick thread.
- Color the heart.
- Glue the coffee beans in 2 layers.

- Place ice cream sticks over the jar.
- Wrap the wires with jute thread.

- Insert the coffee tree into the sponge, then place in the pot.
- Decorate to your liking.
The coffee heart is ready!
A ship made of money
You will need: 7 sheets of A4 format with the image of different banknotes (euros, dollars, hryvnia, rubles), white sheets of A4 size, silicate glue, scissors, glue gun, thick cotton threads, skewers 20-30 cm long, polystyrene, flat box on half as wide as the bottom of the ship.
Master Class
- Fold the boat out of a piece of paper as shown in the photo.

- Gently turn the boat inside out to avoid tearing.
- Fold and iron the boat.
- Trace the boat around on another sheet, then draw a dividing line and cut out 2 pieces.

- Coat them well with glue and glue them to the inside of the boat to create double-layer sides.
- Cut the money sheets into strips 1.5 cm wide.

- Cover the boat with cash stripes.
- Thoroughly coat the entire boat with glue for strength and let it dry completely for 2 hours.
- Fold the same bills side by side and glue them together. Make 3 of these - from five, from three, and from four bills. These will be the sails.

- Gently string the sails onto skewers and fix the joints with glue so that they do not slip.
- Take the boat and glue 3 pieces of Styrofoam inside.
- Insert skewers into the foam for the front and back yards. The front yard should be 1/3 longer than the back one. Make sure the lines are flush, then secure with a glue gun.
- Insert the sail skewers, evenly spaced. It is worth noting that the deck should be smaller aft.

- Fold the threads in 2-3 layers of sail length and additional centimeters for the strings.
- Tie the threads to the skewers as shown in the photo.
- Cut 2 bills diagonally and fold back the edges 0.4 cm.
- Glue the bills (sails) to the rail threads.

- Make the sails aft in this way: do not twist the bill into a tube too much, fold the edge, then glue it.
- Fold 3 bills in half, shape them into flags, then glue them.
- Line the deck with bills.

- Make a boat stand out of a flat box.
- Glue the background you want to the box.
- Glue the ship.
You will need: seashells of the desired size, cardboard, scissors, glue gun, a simple pencil, an awl or a hole punch, twine or rope, sesal, burlap decoration elements as desired - beads, beads, starfish ...
Master Class
- Draw a heart on the cardboard.

- Cut it out.

- Punch 2 holes for hanging using a hole punch or awl.

- Glue the sesal to the front of the heart.

- Cut the burlap heart 1 cm larger than the cardboard.

- Stick it on the other side.

- Insert the rope into the holes.

- Tie double knots on the seamy side of the heart.

- Cover the side of the heart with the sesal with shells.

- Glue the starfish in the center.

- Glue the contours of the heart with twine.
You will need: corrugated paper of your favorite flowers for buds, green corrugated paper for leaves, Raffaello sweets, double-sided thin tape, green tape, satin ribbon, packaging material for a bouquet, scissors, wire, pliers, a wooden stick, if desired, to create dew - transparent beads , glue gun, tweezers.
Master Class
- Prepare the wire by making the required number of stems of equal length.

- Cut long strips corrugated paper, cut the long strip of corrugation into 2 pieces, then cut into 4 pieces. You should get 8 strips, 6 of them will be needed for the tulip bud.
- Rotate each strip in the center, bend in such a way that the front sides of the strip are directed to one side.

- Make 6 blanks in the same way.
- Attach double-sided tape to the end of the wire.

- Attach a piece of candy to the end of the wire.
- Assemble the tulip bud in this way: take the first petal and attach it to tape. Place the second and third petals near the candy and, holding them with your fingers, fix with tape.

- Attach the remaining petals in the same way, forming a tulip bud and securing with tape.
- Trim off excess corrugated paper ends at an angle at the base of the bud.
- Wrap tape around the stem.

- Cut a strip of green crepe paper.
- Cut into two nearly equal pieces.
- Fold each piece 4 times and cut out the leaves.
- Pull each sheet out in a spiral pattern using a wooden stick.

- Place a short leaf, and below it is longer. Fix each leaf with tape. The tulip is ready! Make the required number of tulips in different colors.
- Collect tulips in a bouquet in this way: connect 2 tulips and tighten them with tape, then add tulips one at a time, placing the colors in a checkerboard pattern.
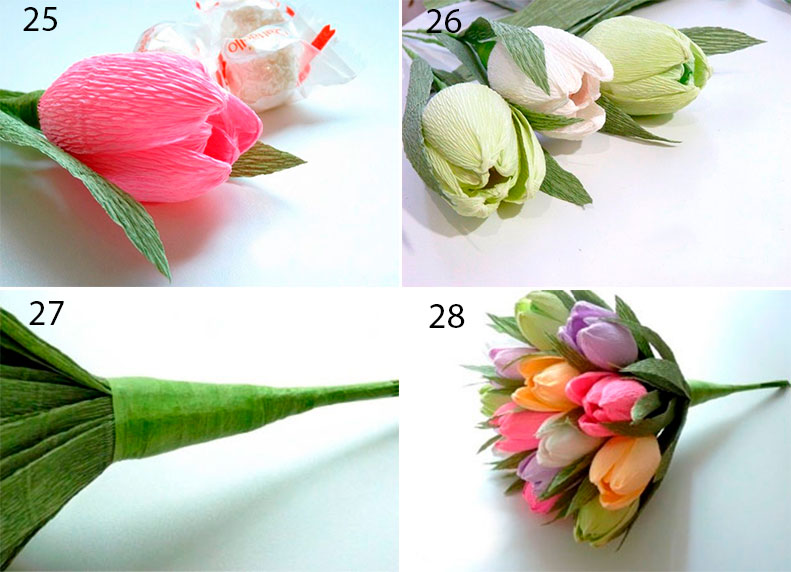
- Cut 20 leaves and place them around the perimeter of the bouquet, fixing with tape.
- Wrap the bouquet in wrapping paper and tie with tape.

- Create dew drops on the tulip buds by gluing the clear beads using tweezers and hot glue.
Spectacular bracelet made of ribbon and beads
You will need: ribbon, beads, thread and needle.
Master Class

You will need: 18 hex nuts, rope.
Master Class

Foamiran head wreath
You will need: foamiran 0.5 cm thick (orange, yellow, cream, light green, dark green and red), scissors, toothpick, curly scissors, oil paint of autumn shades, sponge, sheet of paper, iron, floral wire, ruler, super glue, lighter, lilac clay (for blueberries) or beads, tape tape, foil, wire at least 2 mm thick and 60 cm long, ribbon or string, mold (leaf shape).
Master Class
- Print or redraw the leaf patterns, then cut them out.
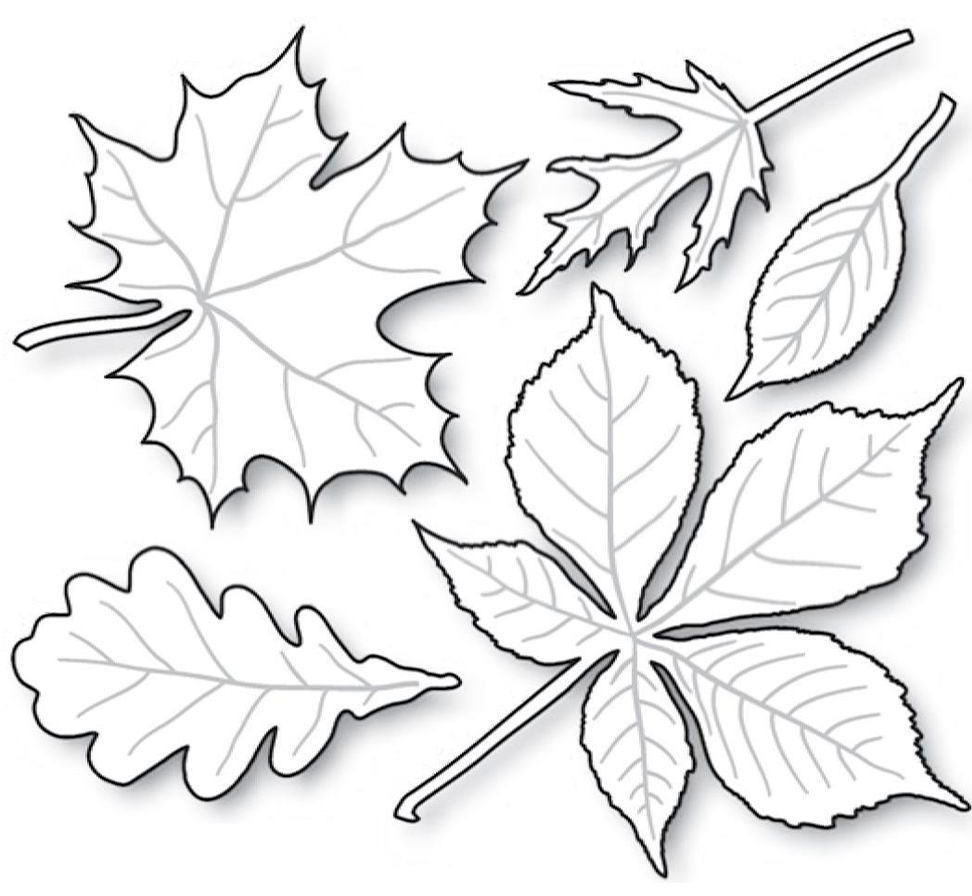
- Circle the patterns on the foamiran with a toothpick, then cut them out.
- Make a sufficient number of multi-colored leaves, for example 60, remember that the more there are, the more magnificent and beautiful the wreath will look.

- Give some leaves a realism by cutting off the edges with curly scissors.
- Scratch a small part of the leaves with a toothpick.
- Tint the leaves in this way: apply a little oil paint on the sponge, blot a leaf of foamiran, then remove the excess with a piece of paper.
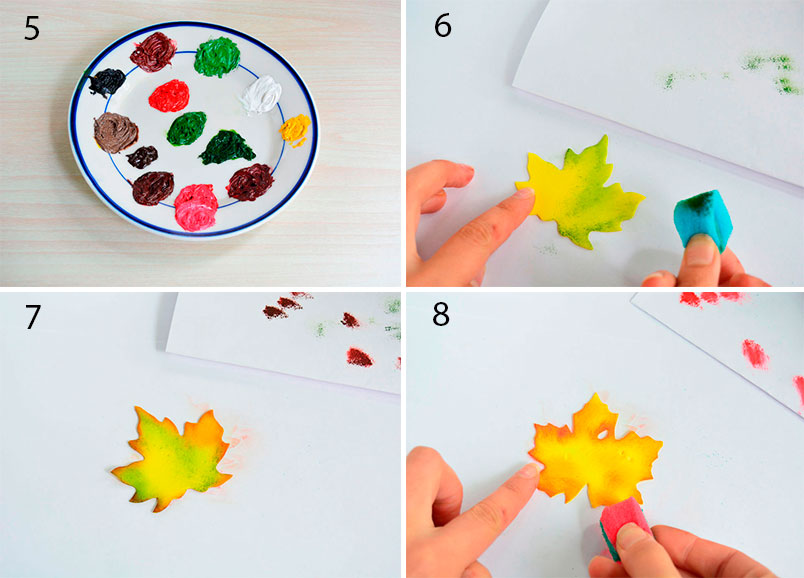
- Color combination: tint the yellow foamiran leaf with light green and brown paint. Also, tint some yellow leaves with orange, red and light green paint. Tone red leaves with brown color, green leaves with burgundy, brown and dark green colors.

- Preheat the iron in the second mode, hold the sheet for 2 seconds, remove and press it against the mold to get an imprint of the sheet. Repeat this process with all the sheets. Please note that this should be done quickly and very carefully, as foamiran is highly flammable. If you are new to this business, it is better to skip this point and get down to work further.

- Cut the floristic wire into 7 cm pieces and make a loop at the end.
- Glue the florist wire to each sheet from the front using super glue.

- Treat the edges of the leaf with fire using a lighter. The edges should come out realistically curved. Repeat this process with all the leaves. Do it carefully, I remind you that foamiran is highly flammable.

- Roll a purple clay ball about the size of a blueberry. Blind 15 berries, place each blueberry on a wire with a loop, greased with super glue. Scissor the top of the blueberries with scissors and set aside to dry. Beads can be used as blueberries.

- Start assembling the wreath in this way: form small bouquets of leaves and berries, fasten them with tape.
- Cut rose petals in a teardrop shape from red foamiran. For one bud, 10-15 petals are required. The number of buds depends on your desire, you can make from 3 to 7.

- Tint the edges of the petals with brown oil paint.
- Thinner the petals in this way: heat the petal on the iron for 2 seconds, then fold it into an accordion and rub the petal with your fingers. Open the petal and create a depression and curl the edge of the petal outward. Repeat this process for all the petals.

- Finish the edges of the petals using a lighter.
- Roll up a drop of foil, make a loop on the wire, apply super glue and put on a drop of foil.
- Glue 2 petals opposite each other, and form a bud by glueing the petals in a checkerboard pattern, opening the flower slightly. Form the required number of roses in the same way.