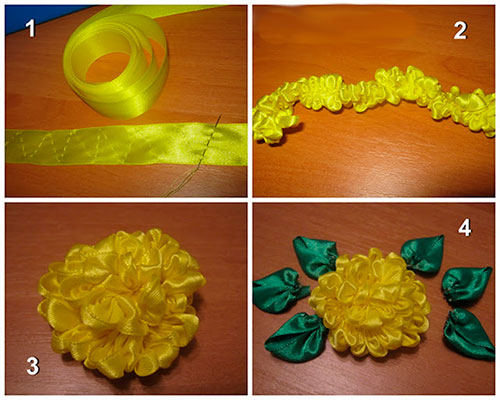
Kanzashi needlework technique. DIY satin ribbon flowers. Master class for beginners, step-by-step instructions for kanzashi. Lush satin ribbon flower
You may have seen the delightful hair and clothing decorations made from silk flowers more than once. This beauty has a name - KANSASHI TSUMAMI.
Hairpins and combs are traditionally used in Japanese hairstyles, but nowadays Kanzashi jewelry has gained its popularity far beyond the borders of Japan. The so-called "kanzashki" now serve not only as an ornament for hair, they are used to make brooches, used as interior decor, etc.


Kanzashi candlesticks

Box in Kanzashi technique
If you figure out how to do Kanzashi, it becomes clear that this is not at all difficult.
Materials and tools
In order to make products using the Kanzashi technique, you will need the following materials and fixtures:
You can cut fabric or ribbons with scissors, as well as with a soldering iron. To do this, you need a surface on which we will cut. It may be an old unnecessary kitchen board, but I preferred the usual wall tile (remained after the repair), its soldering iron does not burn through and it is easier to clean. Some petals can be burned with a candle or a lighter.
Glue is better to use thick and transparent, so that after drying it does not leave marks. I opted for "Moment-gel": transparent, does not flow, glues well.
Many advise using tweezers when folding the petals.
I use tweezers when I fire the fabric over the candle.
- satin ribbons of any size, optimally 5 cm and 2.5 cm, but you can take any fabric: silk, satin, organza, etc.
- ruler
- pencil or chalk for marking even squares
- scissors (any, most importantly - sharp)
- lighter and candle or soldering iron (if you know how to use it)
- glue "Moment-gel" or glue (hot) gun
- tweezers (preferably long)
- long and not thick needle
- strong thread (such as monofilament)
- beads, sequins and any beautiful trifle
I think over time you will decide for yourself how and with what it is more convenient for you to work.
Types of Kanzashi petals
The Kanzashi technique is as follows: many small even squares of fabric are folded in a certain way and gathered into a flower. The petals themselves are sewn together or glued together.
No matter how strange it may sound, but there are only 2 types of kanzashi petals: round and narrow, and the rest is room for your imagination.
Using the example of such a flower, we will learn how to fold narrow and round petals:

Narrow kanzashi petal - master class
We use the same materials and tools as listed above.

We cut with a soldering iron or scissors even squares. I have a satin ribbon 5 cm wide, which means the squares are 5 by 5 cm. Their number depends on the size of the flower that you will collect. There are 7 yellow and 5 green.

Very often it is advised to fold the leaves with tweezers. To be honest, it’s more convenient for me with my fingers, but who likes it better.
We fold into such an even triangle. The fold itself is on top.

We apply the right corner of the triangle to the left.

And fold it again, from right to left. Align the fold points.

We cut the ends of the fabric evenly:

And we burn a little over the candle, fastening the edges at the same time. This is done as follows: holding the edges with tweezers, quickly draw a petal over the flame.

It is better to burn at the very bottom of the fire, then the fabric will melt, and not burn.
The bottom edges are also cut off and melted. Here you can not glue them together, but simply melt the fabric so that it does not crumble.

Here's what we got:

Back view
By the same principle, we fold the rest of the green leaves.

For clarity, watch the video tutorial on narrow Kanzashi petals:
Front view
Round kanzashi petal - master class
Fold the yellow square into a triangle.

And now we collect the side edges in the middle, to the bottom corner. Folds are obtained from the top, on the sides.

We take the side corners back, check that the edges are evenly folded.

We also cut off the ends and melt them.

The bottom edge is also cut off evenly and melted.

Only here the edges must be burned and be sure to glue together.
While the fabric is warm, I simply pinch the edges with my fingers.
Here's what we got. On this side, drip a little glue inside and glue the sheet.

Back view

Front view
Here are the blanks we got. Here you can clearly see where the yellow petals stick together.

In the video master class, you can once again see how round petals are made, and also learn how to collect beautiful hair ties:
How to make kanzashi flowers
Let's start collecting the kanzashi flower. We string yellow petals on a needle and thread. I prefer monofilament because it is not visible.

And we knit in such a flower:

We cut out circles from cardboard and tape, put a cardboard circle on the tape, grease it liberally with glue.

And, turning the edges, glue the fabric to the paper. Let the glue dry a little and smear the surface with glue again.

Then glue the blank to the flower with reverse side.

It is better to use glue here, and not a glue gun. Since our flower is voluminous, it is very difficult to immediately glue it evenly. And while the glue dries, you can correct the leaves to make it even. It is difficult to do this with a glue gun - the glue hardens very quickly and it is rather problematic to peel it back.
Here's what we got:

We apply glue to the tip of the green leaf (here I already use a glue gun)

And we connect it with the second leaf.

We make two double leaves.

We also grease a single leaf with glue and glue it between two already connected leaves.

In the same way, we glue already three leaves to the double.

This is what the thread should look like:

Lubricate the tip of the branch with glue

And glue it between the leaves of the flower.

Glue a bead or rhinestone in the middle of the flower.

With this kanzashi flower, you can decorate a brooch, a hairpin, and an elastic band for hair. And if you dream up a little, then you can create a lot of things from the 2 simplest kanzashi petals!
CategoriesThe specificity of this skill
What do you imagine when you hear or read about beautiful flowers satin ribbons? Someone represents unpretentious gerberas, collected from a crossed narrow ribbon, and someone - an imitation of live roses, which is made by hand and collected by petals. As always, the truth is somewhere nearby - few people make a completely realistic copy of fresh flowers, for this there are still artificial ready-made floristic compositions, but it’s not worth learning to make very simple daisies - you can collect them simply by inspiration.Making flowers from ribbons is an interesting process. He attracts me with the fact that despite the apparent complexity, in half an hour you will definitely get a flower. Yes, perhaps a little ridiculous (you won’t look at my first roses without pity). But - it will work. This is not knitting, for which you will kill a couple of days, and not a miniature painting, which obviously needs talent, but here it is enough to look at the master class about creating flowers from ribbons with your own hands and you will get a finished flower.
Almost all silk ribbon flowers are made in such a way that they are durable. Of course, if you plan to make just decorative bouquets, then special strength is not needed, but if you suddenly want to make a beautiful headband as a gift for your child, on which fabric flowers act as a decor, then I advise you to make every effort to ensure that the flowers do not frayed in the first couple of days.


How is it done
I will tell you several ways to make flowers. I must say right away that the methods are basic, on their basis you can make any other flowers that are visually similar to those described by me. By the way, I advise you to try to make fantasy compositions without trying to embody any living flowers - this way you can better feel the technique and its features.Preparing for production
So where do we start preparing? What is required for work? Write down:- tapes of different widths and different colors, I prefer satin, they look very elegant;
- good sharp scissors (I have ordinary tailor's ones);
- needles and threads of different thickness;
- glue gun and several sticks of transparent glue;
- a pair of tweezers (those for eyebrows will do, but it's better to have a good one if you are going to be making flowers seriously).
I prefer to work at a clean desk table lamp, and I advise you to prepare your workplace - remove all unnecessary, adjust the light.
Kanzashi
My first acquaintance with flowers took place just when I came to the kanzashi master class. This MK became my starting point, and I am grateful to the girls who, in just a few hours, taught me and a bunch of other girls how to make amazing kanzashi flowers from a narrow ribbon, chic kanzashi from wider satin ribbons, and gave a deep understanding of this technique and its capabilities.What is kanzashi? This is the art of decorating hairpins, which came to us from Japan. Pieces of fabric were folded into the shape of flower petals, and amazing flowers bloomed on hairpins that could decorate any hairstyle. Now kanzashi is in vogue, so it is not surprising that many girls have mastered this technique.
To work in the kanzashi technique, in addition to the tools described earlier, you will also need a ruler, a chalk pencil for cutting (you can replace it with a simple pencil or a sharpened piece of dry soap) and a candle for singeing.
Some girls use a lighter, but it seems to me that a candle gives a more even flame, and you can fold the fabric much more accurately when your hands are free.
In total, three types of petals are used in the kanzashi technique: 
A kanzashi flower from a ribbon 5 cm wide will turn out to be of medium size - they can decorate clothes or a hairpin, decorate a headband or make beautiful decor for home.
How to make different petals:
And how to make kanzashi leaves:
Let's start manufacturing 
How to make a kanzashi flower from a 5 cm wide ribbon? The wider the ribbon, the larger your flower will be in diameter.
If you want to make a magnificent flower from ribbons, then I advise you to look at this MK:
And these videos show how to combine different forms petals, make double petals from satin ribbon with your own hands, and how you can collect not only flowers, but also plants, insects and even small animals using the kanzashi technique. By the way, it is kanzashi that is suitable for making snowflakes - watch the video to make sure.
melted petals
The following method of making flowers from satin ribbons is suitable for those who want to make a large composition at once, for example, I made a basket of flowers for my mother's anniversary using this technique. However, there are some nuances:- melted petals look less neat than kanzashi, so you should not use these flowers next to a formal outfit;
- be prepared for the fact that it will not work right away;
- not every ribbon is suitable for the manufacture of these colors, it turns out only by experience.


Step-by-step instruction
- From cardboard we cut out a pattern in the shape of a plump half-heart (as in the photo below).
- We cut out the petals (you will have to tinker) - at least 6 pieces of large ones and the same number of smaller ones and even less, you can double each size.
- Each petal needs to be processed with the help of fire - the edge will gather a little, and the petal will become voluminous.
- Then the petals are collected on the central thread, arrange them symmetrically, with a slight overlap, so that the flower looks voluminous, and best of all, collect them in a checkerboard pattern (see photo below).
- A few beads are attached to the center on a string to imitate the middle.
- Your flower is ready.
simple flowers
Very simple and at the same time expressive fabric flowers can be made in just a few minutes. If you have never tried to make flowers from ribbons, then this way you will definitely succeed.How to make flowers in five minutes?
- Cut the tape - into pieces of 5-10 centimeters. You can take the same pieces, or you can use segments different lengths, then the flowers will be more natural.
- Slices are carefully melted on a candle - so as not to fray. Make sure that you do not get dark sloppy influxes.
- On the bottom, we make a free line with a strong thread (it is better to take a medium-sized needle so as not to make too large holes.
- We tighten each segment to get a petal.
- From the resulting petals we collect in color - in the middle we use small segments, closer to the edges are larger.
- Glue the middle into the center.
- You can decorate flowers with narrow white ribbons - for example, make stamens or centers.
- The collected flowers are folded into a composition and glued to the base.
A few words about embroidery
Since we are talking about crafts from ribbons, it is worth mentioning such a type of needlework as embroidery with ribbons for beginners. To be honest, before I became interested in this type of needlework, I thought that simple patterns were embroidered from a narrow satin ribbon. No matter how! Embroidery is done not only with the use of thin ribbons, very wide ones are also used - they drape beautifully and allow you to get volume.

What I like about this technique:
- it is easy to achieve the desired result thanks to beautiful materials;
- ribbon embroidery is highly valued among admirers;
- bulk embroidery turns out very quickly.
Why are schemes good? Despite the fact that all needlewomen embroider the same pictures at first, the embroidery you make will be unique - firstly, because you will choose the colors yourself, and secondly, because the ribbons are the material that needs to be draped. Well, see for yourself - there are more than five shades in each picture, and each one will have to be draped in its own way, which means that the volumetric elements will be different. Don't want to do what someone else has done before you? Embroider small flowers according to your own sketches.
Unusually delicate and airy ribbon embroidery wild flowers - I'm sure it's best gift for any holiday, especially if meadow grasses are also added to the wild flowers.
I really like the wild flowers embroidery with ribbons - the pictures are not too large, smaller than a landscape sheet, but very delicate and expressive. And for the first embroidery, I advise you to take a simple pattern and ribbons less than a centimeter.
Lessons and workshops for inspiration
How to make cute flowers from ribbons: a master class for the little ones - according to this master class, we made flowers with our daughter, she really liked it.Festive flowers from satin ribbons: a master class of medium complexity - make chic decorative flower arrangements for the holiday, decorate your home and gifts for loved ones.
And a few more simple microns: Now you know how to make a flower from a ribbon - even for a headband, even for a dress, even for gift wrapping. Experiment with different techniques, share your results and collect whole hand-made bouquets!
Today we will make a hair ornament. This will be a kanzashi flower made of satin ribbons - a master class for beginners in step-by-step photos.
Even if you are hearing about kanzashi for the first time, you will definitely succeed. For understanding - we will make a hair ornament from satin ribbons.
You will make the first hairpin, then the second one and you will become a kanzashi master with your own hands. And there will be no need to puzzle over what to give to a friend, sister or daughter.
About the kanzashi technique
Kanzashi jewelry is very popular. They are traditionally made from satin ribbons. The technique lies in the fact that small identical squares are folded in a certain way and assembled into a beautiful flower.
In addition to decorative bouquets, this technique can be used to make jewelry for dresses, hairpins, bags and wedding dresses.
There are only 2 types of kanzashi petals - sharp and round. We have already said that very nice-looking flowers can be used as a decoration for a hairpin, headband, comb, rubber band, as well as for interior decor and so on.
Materials and tools for kanzashi hairpins

To make a hairpin - a flower using the kanzashi technique, we need:
- yellow satin ribbon 5 centimeters wide;
- pink satin ribbon 5 centimeters wide;
- scissors;
- barrette;
- bead;
- stamens for a flower;
- tweezers;
- lighter;
- glue (hot) gun.
Kanzashi flower master class with sharp petals
To begin with, cut the pink ribbon into 9 equal squares 5 * 5 centimeters, since our flower has 9 petals. Bend one edge of the tape to the other to form a triangle, and cut with scissors.

From the yellow ribbon, cut out 9 of the same squares in the same way.

Next, take one yellow square and fold it into a triangle.

Then fold the resulting triangle in half.

You do exactly the same procedure with a pink square. Add the resulting triangles together to yellow was on top and pink on the bottom.

Now wrap 2 corners of the triangle towards each other.

Trim the edges of the petal so that it has elongated shape side, not the shape of a triangle.

Gently melt the edges of the fabric with a lighter or candle.

By this principle, make 8 more petals.

Now you need to collect the flower. Using a glue gun, glue one petal to another.

And so in a circle so that the petals close into a flower.

From a yellow satin ribbon, cut out a small circle with a diameter of 1.5-2 centimeters.

Having slightly melted the edges of it, glue it on top of the flower to cover all the irregularities.

Cut out a circle with a diameter of 4.5 centimeters from a pink ribbon and glue it on the back of the flower. We do everything carefully and diligently. Untidy adhesive traces should not be allowed.

Thread the stamens for the flower into a bead and glue it together in the middle of the flower. A very convenient method is the gluing method, for those who do not like to sew with their hands.
For those who know how to handle a needle and thread, there is a field for activity. Sew discreetly and very firmly. All this beauty will fall off at the most inopportune moment has no right.

It remains only to glue a magnificent flower to the hairpin. To do this, wrap the fixed part of the hairpin with a pink satin ribbon and glue our decoration to it.
Now we know how to make a kanzashi flower and decorate a simple hairpin with it. We really hope that our kanzashi flower from satin ribbons according to the master class for beginner craftswomen will turn out right away and you will like this technique. With it, you can decorate the house, outfits or make them as a gift.
And it's even better to do everything together with the girls. Every skill is useful in life. Who knows what talents you will find in your daughter or granddaughter. Can still be done.
A beautiful bright hairpin can be presented to a little fashionista who will be very pleased with such an ornament. Do-it-yourself kanzashi for beginner craftswomen is very understandable, especially since each stage is illustrated with photographs. Everything should be clear.
Greetings to all gathered on my blog on this sunny (or maybe not so) day. If you want to learn how to make cool ribbon flowers, then I highly recommend reading this article to the end.
Flowers made of satin (and not only) ribbons can be used both for decorating gift wrapping and as a gift itself.
Especially if you collect such flowers in an elegant bouquet.
The most amazing thing is that sometimes the most beautiful of these plants are so easy to make with your own hands that it takes 10-15 minutes even for a beginner (believe my experience).
Recently, I have been making different flowers quite often and now I will share with you excellent workshops on making them.
DIY satin ribbon flowers
I'll show you 15 cool (and easy) ways to create amazing flowers. You can “take away” each of the photo master classes with you by copying the corresponding image.
Let's start, perhaps, with the most romantic and popular plants among girls - roses.
Ribbon roses
Stop buying expensive roses from the store! Let's learn how to make them ourselves and save the lion's share of the budget.
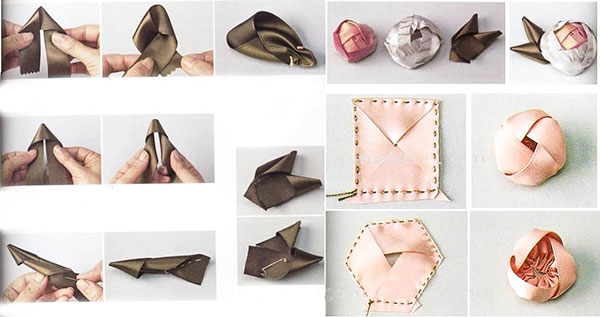
We have several roses today. The first of these is a rose, obtained by folding triangles as you progress. To make it, prepare a piece of ribbon at least 2 cm wide and at least 50 cm long.
unblown
Form the center by bending one tip as shown in the photo. Roll it up, fasten it up.

twisted rose
Remotely, in terms of the way it was created, it resembles the previous one (at least the beginning). After forming the center, alternately turn the ribbon, twisting it and applying layer by layer. Fasten at the end.

Kanzashi
The peculiarity of this rose is that all the petals are processed separately.

From braid
Finally, a rose, which is obtained by interweaving two wavy ribbons. After weaving, they need to be swept along the edge so that they do not fall apart. And then just roll over.

Flowers from kanzashi ribbons
In general, kanzashi is originally a “hair decoration” from Japanese. It has gone since the time of geishas, who differed, among other things, in the ability to skillfully needlework.
There are two forms of petals in kanzashi - round and sharp. The rest is subspecies. So all flowers to some extent can be attributed to this type of art.
Hibiscus
An exotic guest for which you will need a wide ribbon (about 5 cm wide), base and stamens.

Just a flower with 5 petals
To make spiky elements, sew the center. Fold the future petal in half and hem the inside. Prepare 5 pieces, then string on a thread. Decorate the center.

Bell
For the bell, prepare the petals according to the photo. To roll them, fold the petals with high straight edges to each other and sew the edge (glue the top a little). Pull the thread, collect the resulting parts, decorating with stamens or beads.

Semitsvetik
For it, you need to prepare 7-9 petals using the classic method used in kanzashi. Then all the petals are collected on a thread, if necessary, glued together on the sides.

Aster
Just a dream, not a flower in terms of ease of execution. To make an aster, take your ribbon and sew a line of running stitches in a zigzag across the entire width. Pull up, roll up. Everything
Peony
For a peony, take three ribbons: two for the petals, one for the green leaf.
Please note that the peony consists of two parts - a more closed bud and opening petals.
Master classes on flowers in video format
Not everyone likes to study photography, so I have prepared for you some flower-making tutorials in video format.
I do not claim to be an expert in this area, my article is more for beginners. I will try to tell you about all the nuances of this needlework and teach you several techniques for creating flowers from ribbons.

The uniqueness and simplicity of this needlework
If you look at photographs of flowers from ribbons, the beauty and sophistication of flower arrangements, then this skill will seem incredibly difficult. I hasten to please you, this is not so.
The flower you have conceived will always work out, of course, depending on the experience and skills gained, the end result will be different.

Artificial flowers are made from various materials, knit, weave from macrame, mold from polymer clay All these methods require talent and special skills.

In our case, it will be enough to carefully study the step-by-step instructions for beginners on how to make flowers from ribbons and you will succeed.

I will say a few words about the strength of products made of nylon tapes. It all depends on the functionality of the future product, if the flowers decorate the interior, then special reliability is not necessary here, but if the flower decorates a children's headband or headband, then you need to try to make a very high-quality thing.
Methods for making flowers from ribbons
I want to tell and show you some basic ways to create flowers from ribbons. Having mastered this simple science, you can create any kind of flowers.

My advice to you, try to make any fantasy copy using one of the techniques, and you will feel all the nuances of the method you have chosen and master it faster.
Preparation for needlework
- Any ribbon you like in different colors and sizes
- Needles and threads
- sharp scissors
- glue gun
- Tweezers
- Centers for flowers or beads, sequins
- Floral sleeve (or tube to thicken the stem).

Also prepare a desktop with a table lamp.
Kanzashi
With the kanzashi technique, my acquaintance with flowers from satin ribbons began. This technique came to us from Japan, kanzashi are decorated with hairpins or hairpins.

Girls' hairstyles bloom with chic flowers, thanks to such hairpins. Due to the fashion for kanzashi, more and more needlewomen are mastering this completely simple technique.

In addition to the prepared materials mentioned above, take a ruler, pattern chalk and a candle for singeing the tips.

Three types of leaves are used in kanzashi: round, long and sharp.
- First, cut a 5 cm wide satin ribbon into squares, naturally the same.
- We take a square and fold the corners to each other, as shown in the photo and lower the extreme corners to the lower central corner.
- Then we wind the side corners back and clamp with tweezers.
- The lower cut, if necessary, is cut off and melted over the candle.
- Thus, a round petal is obtained, of which several pieces need to be made.
- We collect the finished petals on a thread, fold them into a flower and glue them to the base, attach a bead to the middle with a glue gun.

Congratulations on your first kanzashi flower!

I present to you a few video tutorials on how to make flowers from ribbons.

Creating a more lush flower.
Note!


Creating double petals using the kanzashi technique, from which the cutest butterflies and beautiful snowflakes are obtained.
melted petals
Another way to create flowers from ribbons is melted petals. This method is good for making large flower arrangements, for example, I made a basket of roses.

However, there are some nuances here:
- Not all ribbons are well suited for such colors;
- Melted petals do not look as neat as kanzashi;
- It may not work right away, you need to “fill your hand”.

A more suitable material for creating these colors is nylon ribbons.

Manufacturing instructions.
- We make a pattern in the shape of a half heart, as shown in the photo;
- Next, cut out the petals of 7 large pieces, 7 medium pieces and the same number of small ones;
- The edges of each petal you cut are melted over the candle, after such processing the petals become voluminous;
- We collect the petals on a thread in a checkerboard pattern, with a slight overlap, then the flower will be lush;
- We attach beads to the core.
- The flower is ready.

Note!


Charming ribbon embroidery
Yes, they also embroider with ribbons! In embroidery, ribbons of different widths are used, which, with proper drapery, creates volume and beauty of the embroidered picture.

This technique is good for several reasons:
- Quick result;
- Ribbon embroidery looks very rich and is appreciated among lovers;
- Not complicated schemes, if desired, everyone can do it.

I have prepared several master classes, watch and learn.

Now they sell a lot of kits for embroidery with ribbons, such kits are very good for beginner needlewomen, there is a pattern, a canvas, a set of ribbons, threads and everything that is used to create a picture.

If you want exclusive work, you can draw up schemes, choose colors and textures yourself.
Note!


Photo of flowers from ribbons with your own hands


