Shorten the bottom of the dress. How to shorten a dress. Shortening knitwear
If the dress is too expensive and you don’t want to trust someone else to shorten the product, you will have to do the work yourself. Hemming options will depend on what fabric the product is sewn from.
Knitwear is considered a difficult material to process, so a knitted dress cannot simply be overcast with a classic seam. To shorten the dress, you will need a cover-seam machine that processes the hem of the dress with a double seam.
But not everyone has such a machine, so to shorten a knitted product, you can use parallel stitches performed on sewing machine
For products made of thin and flowing fabrics, you can use the invisible hem method. Such a seam requires additional time and materials, gives some thickening to the hem, but is well hidden.
To hem the hem with this method, you need to take a lining (organza or soft knitted fabric), make a pattern resembling lower part dresses, sew the bottom of the dress and the lining pattern together, turn the seam inside out and iron. Next, sew the top of the lining to the seam on the product belt.
It is important to make the lining longer than the product itself (by a couple of millimeters) so that it does not “pull”
And here's how to hem a dress without a machine: when bending woolen and suit fabrics, a blind seam is used. On such products, punctures with a needle will not be noticeable. You need to hem in this way with a thin needle in one thread. Work should be carried out from right to left, with stitches of about 0.7 cm. The thread should be carried out below the overlock stitch, then the hidden seam will be strong and securely hidden from prying eyes.
Also for products made of dense and woolen fabrics, you can use the method of processing the hem with a special braid (kosobeyka). It is only necessary to sew one edge of the braid from the wrong side, and from the front side, fixing the braid with pins, sew it, retreating from the edge of 1 mm.
These are the ways you can bend the hems of various dresses. And if you are wondering if it is possible to hem a wedding dress, then folk signs do not advise doing it yourself. Especially since Wedding Dress is a very complex product, so it is better to entrust its shortening to professional craftsmen in the studio.
Shrinking and trimming the bottom. The product is turned inside out, laid out on the table, bending in the middle of the front and back, side seams, darts, seams of the bodice with the skirt on the right and left sides of the product are combined. Then, having specified the length of the product, along the auxiliary pattern with chalk, the lines for cutting and bending the bottom are outlined. Trim excess fabric.
In products made of thick fabrics, the side seams and the seams of the connection of parts of the skirt panels are notched at a distance from the bottom; equal to the width of the hem plus 2 - 4 cm, and the seams in the area from the bottom to the notch are ironed out.
Processing the bottom on a sewing machine. In products made of cotton and linen fabrics, the bottom of dresses and blouses is processed on a sewing machine (Fig. 87, a) with a device that provides a certain width of the bottom hem. When processing the bottom without a device, the bottom is bent along the intended line towards the wrong side, the bottom cut is folded inward by 0.7 - 1 cm and sewn at a distance of 0.1 - 0.2 cm from the folded edge. When processing the bottom on a grinding machine with a device, the hem line is not marked.
The bottom of dresses and blouses extended downwards, which are worn under a skirt, are processed on a sewing machine with a narrow hem seam with a closed cut with two lines or using a special device - a knife switch (Fig. 87, b). The width of the finished seam is 0.2-0.3 cm.
Processing the bottom of the blouse on a special machine. The cut of the bottom of the blouse is bent towards the wrong side by 0.5-0.7 cm, when making products for individual orders, the folded edge is ironed. Then the folded edge is built up on a special machine (Fig. 87, c). Excess fabric near the line is trimmed.
Processing the bottom in products made of dense fabrics. In products made of thin woolen and silk easily crumbling fabrics, the cut of the bottom is overcast on a special machine, then it is folded towards the wrong side along the intended line, folded inward and swept up.
In products of a direct silhouette, the bottom is covered with one line.
In products slightly expanded downwards, the bottom is covered with two lines: the first at a distance of 1 cm from the fold of the bottom, and the second is attached with a folded edge.
In products expanded downwards and having a hem allowance, the bottom is covered with three lines: first, the cut is folded and it is folded at a distance of 0.5 cm from the fold, and then the bottom is folded along the hem line and folded at a distance of 1 cm from the bottom fold and the last line attach the folded edge.
The swept bottom is hemmed on a special blind stitch machine. In products with a straight silhouette, it is allowed to hem the bottom on a special machine without preliminary swaging. In the manufacture of individual orders, the swept edge is hemmed by hand with blind stitches (Fig. 87, d), invisible from the front side. In products made of thick woolen fabrics, thick cotton fabrics (such as velveteen cord and velveteen rib), as well as in skirts with pleats, pleated and corrugated, the cut of the bottom after chalking and trimming of parts is overcast on a special machine. Then the bottom is bent towards the wrong side along the intended line and hemmed on a blind stitch machine without bending the edge inward (Fig. 87, e).
In products made of dense, easily crumbling fabrics of high groups, it is recommended to edge the bottom cut (Fig. 87, e) or process it with a special braid (Fig. 87 g).
For edging, take a strip of thin silk fabric, put it on the front side of the product, equalizing the cuts, and stitch at a distance of 0.3 - 0.5 cm from the cuts. The strip wraps around the seam, forming a piping. The edging is fixed with a line in the seam of attaching the strip. Then the bottom is folded towards the wrong side along the intended line, swept up and hemmed on a special blind stitch machine or manually with stitches that are invisible from the front side.
When processing a cut with a braid, it is applied to the front side of the hem allowance with a 0.7-1 cm approach (depending on the width of the braid) and adjusted at a distance of 0.1-0.2 cm from the edge of the braid. Then the bottom of the product is folded towards the wrong side along the intended line, swept up and hemmed on a special machine with blind stitches or manually, the sewing threads are removed. The processed bottom of the product is ironed.
Processing the bottom of blouses with a stitched belt(Fig. 88, a). Before connecting the belt to the blouse, darts or gathers must be processed along the bottom of the blouse. The processing of darts and assemblies is described in Ch. 1, §4 and 6.
If the belt is closed according to the model, then it is folded across in the middle and folded with the front side inward. Sections equalize and grind the ends of the belt. The width of the seam is 0.7 - 1 cm. The seam is laid out, the belt is turned inside out, folded along the middle inside out and ironed.
If the belt has a fastener according to the model, then the processing of the belt is similar to the processing of the stitched cuffs in the sleeves (see Ch. 1, § 18). In the side seam of the blouse, a cut can be processed along the continuation of the seam. The processing of the fastener located on the continuation of the seam is described in Chapter 1, § 8.
The belt is placed on the wrong side of the product with the lining down and stitched from the side of the blouse, evenly distributing the gathers and aligning the control notches.
The width of the seam is 0.7 - 1 cm. The belt is folded, the seam is directed towards the belt, the cut of the belt is folded in by 0.5 - 0.7 cm and adjusted at a distance of 0.1 cm from the folded edge. In this case, the line from the inside of the blouse should pass along the main details at a distance of 0.1 cm from the seam of attaching the belt (Fig. 88, 6).
In the manufacture of products from woolen fabrics according to individual orders, it is allowed to stitch the belt, and bend the section of the subbelt and hem it with blind hemming stitches, closing the seam of attaching the belt (Fig. 88, c).
Binder
The problem of quickly shortening the hem of a new dress or skirt, just bought trousers or jeans) often arises before us. After all, there are situations when we really need these things immediately after the purchase. How to do it quickly and efficiently?
You will need: contrasting thread for basting, "centimeter", a narrow piece of dry soap (if the product is dark) or colored crayons, adhesive tape with double-sided adhesive coating, gauze (approximately 30x30 mm) folded in half.
Adhesive tape has been used for a long time (15 years), which means that it is easy to purchase at any Fabric or Sewing Accessories store. Naturally, a specialized sewing accessories store http://www.atelyefaina.ru/shveinaya-furnitura.php is preferable - since there is always a choice.
So what kind of adhesive tape do we need? Single sided or double sided?
I will give several types of double-sided adhesive tapes that give the necessary effect for bending the bottom of products, as well as for minor repairs (repairing torn clothes and eliminating small holes, for example, when damaged by cigarette ash).
Since the result of their use is the same, and the store may not have the adhesive tape you need, I will give options for the most common adhesive tapes. The glue gossamer is a thin melt of glue in the form of a gossamer web of various configurations, on paper and without paper, of various widths.
Feel free to purchase any of the following:
1 Gossamer hotmelt. Width - 10, 15, 20, 25, 30, 32, 50, 70 mm. white.
2. Gossamer "Grid". Width - 7, 10, 15, 20, 25, 30, 40 mm. "Grid" is also on a paper basis, which is very convenient for use and storage. It is transparent due to its design.
To hem the bottom of a dress, skirt or trousers, you need an adhesive tape 10-15 mm wide. But this technology is used only for loose fabrics (silk, various synthetic fabrics, knitwear). This technology is not suitable for hemming dense coat fabrics and leather products.
Sequencing
1) We measure the exact length by which we need to shorten the product, and add 15 mm. This will be the cutting line for the excess fabric. We cut off. Then, we measure with a “centimeter” around the entire perimeter of the bottom of the product 15 mm up and draw a hem line.
Don't forget to take into account 15 mm for the hem.
We draw a hem line either with a dry piece of soap or chalk. I recommend using chalk in extreme cases, because after finishing work, it is not always completely removed from the fabric. Modern fabrics have a different structure and can retain chalk residue.
2) Lay a basting along the drawn hem line with a contrasting thread.
3) We bend the fabric 15 mm to the wrong side of the product and smooth it with an iron. All - preparation for gluing the hem of the product is carried out
4) Then we lay the adhesive tape between the main fabric and the hem line smoothed with an iron. Through a damp gauze fabric applied over the hem, gradually moving along the hem line, iron it to the main fabric, holding the iron on the gauze for 2-3 seconds. Under the action of steam, a tight connection of the hem with the main fabric occurs.
It is important not to forget that a double-sided adhesive web is placed between the hem and the main fabric, and even then it is heat-treated (glued) from the side that will be on the wrong side.
Minor product repairs
The elimination of small tears and holes on the product is achieved by applying a patch either from a flap of the fabric of the main product or from a fabric that is similar in color.
How it's done:
a patch is cut out of a tissue flap in size, repeating the shape of the damage, but increased by about 5 times (it can be less, but it depends on the size of the damage and the density of the fabric of the product). A contour is cut out of the adhesive tape, repeating the size of the patch.
In this case, it is better to use a wider adhesive tape.
The product is turned inside out and a patch is applied to the damaged area, an adhesive tape is placed between the fabric of the product and the patch, repeating the shape of the patch. Wet gauze is applied on top, and the patch is ironed to the product (time 2 - 3 seconds). If necessary, ironing is repeated.
Quite often it is necessary to hem the bottom edge of the product when sewing new clothes or during renovation.
Today we’ll talk about how to hem the bottom of a skirt, dress, trousers, coat, what types of manual stitches exist for hemming the bottom of a product and how to do them. Also, you can watch video tutorials on this topic.
Bottom hem
Hemming is often done by hand, even when the rest of the garment is machine-sewn.
When sewing dresses or skirts obliquely, the bottom is hemmed in several stages. The first thing to do is hang the item on a hanger for a day, then hem the bottom and tuck the raw cut to the wrong side. Moreover, the bottom line is planned by necessarily putting the product on a person and evenly measuring the same distance from the floor to the desired bottom line with patience. And only after that they cut off the excess, leaving allowances for the hem in the chosen way.

If the fabric frays a lot or is too thick, sew on the right side of the raw cut and sew it narrower as a hem.
Classic allowances on a flat line of the bottom of the skirt, coats are 4 cm, and if the bottom has a curved look, then 2 cm. But that's about. It all depends on the fabric itself and your wishes.
How to hem the bottom of a dress skirt if the fold is rounded
If you are hemming a flared or rounded hem, gather the fabric a little using the basting line. Place the gathering sections at regular intervals, pin them down, and then baste them in preparation for hemming. You can also, having gathered the fabric, sew an oblique trim to the edge of the product.
When working with a thick woolen fabric, you can iron the hem, which helps to slightly reduce its thickness. To prevent a bulge on the front side of the product, iron the hem on a fabric or thick sheet of paper. Press the iron very lightly against the fabric and then immediately lift it up - never pull the iron over a damp cloth.
Hemming seam
In the hemming seam, the second hem of the fabric should be narrower than the first, its width should be 7-10 mm. Secure the thread with two small stitches at the edge of this fold. Start attaching the hem by picking up two or three threads of the main body of the fabric, then stick the needle back into the fold. This seam can be done from right to left or, conversely, from left to right.
Blind hem
A blind hem is very similar to a blind hem. Pick up a few threads of fabric with the needle, poke it into the fold and bring it out at a distance of 1 cm from the point of injection to make the next stitch. In the article about hemming the bottom of the trousers, you can watch the video on how to make a blind seam manually - link at the bottom of the page.
Seam "Goat"
This stitch allows you to attach thick, fray-resistant hemlines without a second hem. In fact, the seam consists of large crosses, which are obtained by alternately sewing back-the-needle seam stitches on one layer of fabric, then on another. Suitable for hemming loose fabrics and coats made of woolen and bouclé fabrics.
This type of hand stitch is also very often used in sewing clothes when hemming the bottom. And if you do not own a secret stitch, then master this type of hem, and then the question of how to hem a dress or skirt will disappear by itself.
Seam "American"
How to hem the bottom of a skirt, blouse, dress made of chiffon, silk or other transparent fabrics? Use the seam "American"!
This type of hemming is performed on very thin fabrics. Using a very fine needle, sew a basting stitch along the marked fold line. Then cut the fabric 5 mm from this line and begin to roll the cut with your thumb and forefinger over the seam line. Insert the needle into the resulting roll, pick up one or two threads of the main fabric and stick the needle into the roll again. Pull the thread up every few stitches to secure the roller to the fabric.
The method and choice of the type of stitch for hemming the bottom of the product depends on the density of the fabric and the shape of the hem line.
Knowing these basic hand stitches and types of seams, you will always know how to hem the bottom of a skirt or trousers, dress or coat. It will always come in handy in your life. Because we all come across from time to time with the need to shorten a coat or skirt, trousers and other clothes.
Regardless of the style and composition of the product, you can shorten the dress for a short time without experience and special equipment. The tips below are especially relevant if you are suddenly invited to a party or other event, and your favorite dress seems old-fashioned. Thanks to our recommendations, you can modify the outfit in just 15 minutes, emphasizing the dignity of the figure.
Fittings and tools
For work you will need:
- threads to match the fabric;
- tape measure;
- crayon, remnant or special water-soluble pencil;
- ruler;
- pins;
- scissors;
- sewing needles for handmade;
- sewing machine and overlocker (if possible).
Lace dress
This method is suitable for dresses made of suit or other dense fabric with a straight cut. The braid will give density to the cut, forming straight, even edges. Mark the desired length and secure the hem with a pin. Make a mark with crayon or remnant, draw a fold line. Don't forget the allowance. In this case, it is in the order of 1 cm. Sew the trouser tape along the upper edge on the front side of the dress. Then perform a hem and carry out a wet-heat treatment of the seam. Secure the bottom with a straight machine stitch on the wrong side or right side. Similarly, you can process the bottom of the dress with an oblique trim if the fabric is thin.

Knitted dress
If your outfit is a dress on the floor, then the bottom of the product can be processed in two ways: the first - with a cover stitch, the second - with an overlock stitch. In the first version, the seam is performed by a special machine, which is not available in every studio. But it can be done at home, spending a little more time.

Cover stitch
Measure the length of the product, setting aside 2.5 cm for the allowance. Process the cut on the overlock, hem along the intended line and lay the first line along the wrong side 1 cm from the edge of the product. The second line must be done to the width of the foot (0.5-0.7 cm) from the first line. When finished, iron the product using the steam function.

Overlock stitch
Everything is very simple here. Measure the length of the product, adding 0.5 cm. Cut off the excess fabric along the marked line and sew a medium-width overlock stitch.

Dress by occasion
The lower cut of the dress can be processed with lace. This method is relevant for elegant products or clothes where there is already a finish. Measure the length and cut off the excess fabric along the marked line. Lace can be sewn in two ways:
- First: overcast the cut on the front side and stitch the lace.
- Second: place the lace on the fabric “face to face” and sew on 0.5-1 cm. Overcast the lace, iron the seam. Lay the finishing line along the front side of the dress by 0.1-0.2 cm.

Dress with pleated skirt
It happens that you need to shorten a dress, the bottom of which is embroidered with stones, decorated with lace, embroidery, or is a complex technological process. In such situations, shortening occurs at the expense of the waist. Step by step instruction:
- Determine the length.
- Rip out the skirt.
- Measure your current waist circumference.
- Mark up with a seam allowance.
- Cut off excess fabric.
- Measure the circumference of the skirt at the waist.
- Subtract the smaller one from the larger one.
- Divide the final number by 2.
- The result is the number of centimeters you need to remove at the side seams.
- Align the seams and sew the skirt to the top of the dress.
- Overcast the seam and perform the WTO.

Universal way
Most common method is hem and straight machine stitch. For this:
- retreat 1.5-2 cm from the intended length;
- cut the fabric
- make a mark;
- fold the edge to the marked line and sew a straight stitch along the right side of the product by 1-1.5 cm.

impromptu method
If you do not have sewing and cutting skills, and you do not have a sewing machine, then use this method. Determine the length of the dress as above. Leave an allowance of 2.5 cm from the marked line. Double hem, iron or baste the seam. Take a needle and sewing thread of the desired color, then secure the fabric with blind stitches. The hidden seam is done carefully, prying the top threads of the two parts of the fabric with the needle. Stitches should be made oblique, small in size and at the same distance.

Remember: it is very important to visualize the whole process (sequence of actions), and then get to work. Thus, you can avoid mistakes and shorten the dress correctly.
Sometimes the purchased dress is too long and you need to shorten its hem. To do this, you can contact the studio or do the work yourself. In this article, you will learn how to properly hem a dress, whether it can be done without a sewing machine, and what methods of hemming the hem can be used for products made from various fabrics.
How to hem a dress?
How to hem a dress
If the dress is too expensive and you don’t want to trust someone else to shorten the product, you will have to do the work yourself. Hemming options will depend on what fabric the product is sewn from.
Knitwear is considered a difficult material to process, so a knitted dress cannot simply be overcast with a classic seam. To shorten the dress, you will need a cover-seam machine that processes the hem of the dress with a double seam.
But not everyone has such a machine, so you can use parallel stitches performed on a sewing machine to shorten a knitted product.
For products made of thin and flowing fabrics, you can use the invisible hem method. Such a seam requires additional time and materials, gives some thickening to the hem, but is well hidden.
To hem the hem with this method, you need to take the lining (organza or soft knitted fabric), make a pattern resembling the bottom of the dress, sew the bottom of the dress and the lining pattern together, turn the seam inside out and iron. Next, sew the top of the lining to the seam on the product belt.
It is important to make the lining longer than the product itself (by a couple of millimeters) so that it does not pull
And here's how to hem a dress without a machine: when bending woolen and suit fabrics, a blind seam is used. On such products, punctures with a needle will not be noticeable. You need to hem in this way with a thin needle in one thread. Work should be carried out from right to left, with stitches of about 0.7 cm. The thread should be carried out below the overlock stitch, then the hidden seam will be strong and securely hidden from prying eyes.
There are frequent moments when the issue of too long a dress worries women. Perhaps, when buying a little thing, they took it without a careful measurement, or the model lost its originality and style over time, but it is somehow expensive and you don’t want to throw it away. There are several ways to resolve the issue of how to shorten a dress.
Shortening the dress, you need to determine the new length of the product so that it retains its originality, a new zest appears, but at the same time everything does not look vulgar. When altering clothes, you need to remember the simplest rule: everything should be well thought out, calculated, and only then do what was planned.
Long dress, shortening
When removing the length, it is important not to do stupid things with the chosen model, for example, cutting off a maxi skirt and calculating the length incorrectly, clothes can be turned into a tasteless thing. WITH evening dress there is a risk of saying goodbye: it can lose elegance and charm. To correctly determine how to make a short dress out of a long dress, it would be useful to learn a few professional secrets used by fashion designers in their work.
When shortening clothes, it is recommended to pay attention first of all to the material from which the product is made. If the event for which the dress is being prepared has a special meaning, for example, it is a wedding or prom, then you need to work especially carefully. When shortening an outfit, you can easily spoil the excellent work of a professional, which, due to the length, did not fit a little.
- The tool you need to get the job done.
To properly shorten the dress, you will need some tool and certain skills in owning it.


- The required number of threads of the corresponding tone.
- Devices for marking on the surface of the fabric: pencils with water-soluble properties, chalk or a remnant of a light tone.
- A set of pins and special needles, it is better to use small ones.
- Scissors (this tool must have a high quality blade sharpening).
- Sewing machine and, if possible, an overlock device.
- Sewing needles, which are useful for handicraft.
- A special eyelet that will help you quickly thread the needle.
And, of course, knowledge and possession of sewing techniques are necessary. If a woman has not been engaged in such work up to this point, it is difficult to count on high quality work in advance. The experience of such work can be obtained when repairing household items that are not afraid to spoil, but at the same time the necessary skills will appear, and the sewing technique will develop.
Shortening knitwear
To shorten a knitted dress, you can use the two most popular methods:
- Open the product at the seams.
- Turn lines.
How to shorten a dress - video
The first method will require not only skills, but also a special device, which is not always available in the studio. The absence of it is not a reason for abandoning the plan, all the work can be done manually, spending a little more time.

After the operation is completed, the seam is smoothed with a steam iron.
With an overlock, work is much easier:
- The product is measured and a margin of 0.5 cm is left from the edge.
- Excess material is cut off along the marked boundaries.
- The line is executed using an overlock.
Shortening knitwear
Difficulty shortening knitted products is that the work requires special attention, since the thing is easy to spoil if you do not know the knitting technique. To shorten knitted dress, you can use one of several methods.

How to shorten a knitted thing - video
Along with shortening the dress along the length of the hem, you can also shorten the sleeves. The principle of operation is preserved, but the execution time is reduced.
When forming the length of the dress, it is important not to cut the fabric immediately along the line, but to use a minimum margin of about five centimeters, this will provide the necessary distance for the formation of fixing seams.
Shortened dress. What are they wearing with?
Why are women so eager to use dresses for everyday outings, which, by their type, are classified by fashion designers as mini-dresses? First of all, of course, these products are able to show the graceful lines of the hips and legs in a favorable light. 
Cropped dresses - what to wear and what accessories to use in addition? Stylists and fashion designers will answer these questions, since it is they who are engaged in the formation of the image of a woman.
- Stylists offer as a supplement to short dress use a shortened model of the jacket, it will help to visually enhance the correction of the woman's figure. Cropped jackets emphasize the girlish fragility and slimness of the body.
- With the choice of shoes, everything is also simple: almost any type of shoes that matches the model in color and other parameters can be combined with a dress.
- With the onset of cold weather, many women of fashion are worried that their favorite outfit will have to be put aside for a while in the wardrobe. This is a completely unfounded concern: cropped dresses look elegant and beautiful with low, tight-fitting boots.
- Many of the women unfairly believe that shoes for such an outfit should have high heels. This is not always the right decision: short stature combined with huge heels will break the harmony.
Selection of makeup, accessories and jewelry
Properly selected cosmetics are aimed at completing the image of a woman. In this case, taking into account the fact that shortened models open more areas of the female body.
It is important not to use tones that can provoke conclusions about vulgar taste. When adding shadows, blush and powder, it is important not to overdo it: with enough skillful movements, mark the desired areas of the skin of the face and neck.


There are no restrictions regarding hairstyles for such clothing models. Styled hair, loose or short hairstyles will look equally good.
Accessories that are used to complement the image should not hurt the eyes. If it is a belt, it should not be too wide and contrast in color. Handbags should not be too voluminous; purses with latches made of various materials are best suited.
As jewelry, you can use several jewelry at the same time, but they should not be very large. Suitable, for example, earrings, rings and a brooch from the same collection or a separate jewelry from gold with the addition of stones. 
When choosing underwear, every woman must decide for herself what color scheme and the model she chooses, the main thing is to remember that excesses or minimization are not always welcome.
When shortening a dress, it is necessary to take into account not only your tastes and preferences, but also those factors that nature has endowed: height and body build. If you picked up a thing for yourself in the store, but decided to shorten it at home, then think about how profitable this decision is. The most important thing is to know the measure in everything and try to make your outfit more beautiful in every way.
Regardless of the style and composition of the product, you can shorten the dress in a short time without experience and special equipment. The tips below are especially relevant if you are suddenly invited to a party or other event, and your favorite dress seems old-fashioned. Thanks to our recommendations, you can modify the outfit in just 15 minutes, emphasizing the dignity of the figure.
Fittings and tools
For work you will need:
- threads to match the fabric;
- tape measure;
- crayon, remnant or special water-soluble pencil;
- ruler;
- pins;
- scissors;
- sewing needles for handmade;
- sewing machine and overlocker (if possible).
Lace dress
This method is suitable for dresses made of suit or other dense fabric with a straight cut. The braid will give density to the cut, forming straight, even edges. Mark the desired length and secure the hem with a pin. Make a mark with crayon or remnant, draw a fold line. Don't forget the allowance. In this case, it is in the order of 1 cm. Sew the trouser tape along the upper edge on the front side of the dress. Then perform a hem and carry out a wet-heat treatment of the seam. Secure the bottom with a straight machine stitch on the wrong side or right side. Similarly, you can process the bottom of the dress with an oblique trim if the fabric is thin.
Knitted dress
If your outfit is a dress on the floor, then the bottom of the product can be processed in two ways: the first - with a cover stitch, the second - with an overlock stitch. In the first version, the seam is performed by a special machine, which is not available in every studio. But it can be done at home, spending a little more time.
Cover stitch
Measure the length of the product, setting aside 2.5 cm for the allowance. Process the cut on the overlock, hem along the intended line and lay the first line along the wrong side 1 cm from the edge of the product. The second line must be done to the width of the foot (0.5–0.7 cm) from the first line. When finished, iron the garment using the steam function.


Overlock stitch
Everything is very simple here. Measure the length of the product, adding 0.5 cm. Cut off the excess fabric along the marked line and sew a medium-width overlock stitch.


Dress by occasion
The lower cut of the dress can be processed with lace. This method is relevant for elegant products or clothes where there is already a finish. Measure the length and cut off the excess fabric along the marked line. Lace can be sewn in two ways:
- First: overcast the cut on the front side and stitch the lace.
- Second: place the lace on the fabric “face to face” and sew on 0.5–1 cm. Overcast the lace, iron the seam. Lay the finishing line along the front side of the dress for 0.1–0.2 cm.
Dress with pleated skirt
It happens that you need to shorten a dress, the bottom of which is embroidered with stones, decorated with lace, embroidery, or is a complex technological process. In such situations, shortening occurs at the expense of the waist. Step by step instruction:
- Determine the length.
- Rip out the skirt.
- Measure your current waist circumference.
- Mark up with a seam allowance.
- Cut off excess fabric.
- Measure the circumference of the skirt at the waist.
- Subtract the smaller one from the larger one.
- Divide the final number by 2.
- The result is the number of centimeters you need to remove at the side seams.
- Align the seams and sew the skirt to the top of the dress.
- Overcast the seam and perform the WTO.
Universal way
Most common method is hem and straight machine stitch. For this:
- retreat 1.5–2 cm from the intended length;
- cut the fabric
- make an overlay;
- fold the edge to the marked line and sew a straight stitch along the right side of the product for 1-1.5 cm.
impromptu method
If you do not have sewing and cutting skills, and you do not have a sewing machine, then use this method. Determine the length of the dress as above. Leave an allowance of 2.5 cm from the marked line. Double hem, iron or baste the seam. Take a needle and sewing thread of the desired color, then secure the fabric with blind stitches. The hidden seam is done carefully, prying the top threads of the two parts of the fabric with the needle. Stitches should be made oblique, small in size and at the same distance.
Remember: it is very important to visualize the whole process (sequence of actions), and then get to work. Thus, you can avoid mistakes and shorten the dress correctly.
The hem of T-shirts, dresses, pullovers bought in the store is made on a sewing machine. You can buy such a household assistant, but not everyone can afford it.
In one of the master classes, we talked about. Today you will learn how to properly hem the bottom of knitwear without the help of a sewing machine.
The hemming of the bottom and sleeves on knitwear can be hemmed, on a sewing machine or on an overlock.
On an overlocker, this can be done using a special foot for a blind stitch. See the video tutorial "" for details.
A blind seam, made on a typewriter or overlocker, will practically not be noticeable on bulky, knitwear with a relief pattern and printed fabrics.But if, on the contrary, you want to make the hem seam noticeable, you can highlight it with a double or triple decorative stitch. Moreover, it is fast, beautiful and reliable, as the line is strong. The optimal stitch width for this hem is 2.5 mm.
Hand blind stitch
Work the bottom of the product and sleeves on an overlock.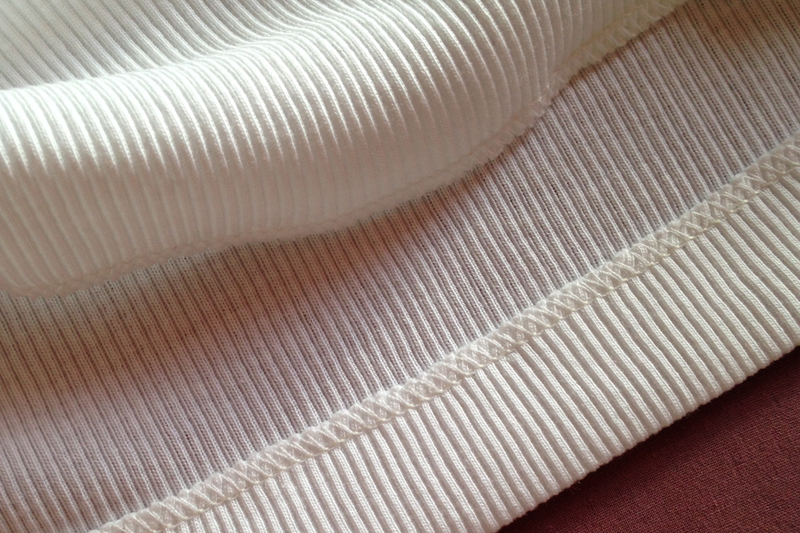
Turn the hem allowance to the wrong side and iron. Sew with a cross stitch "goat". To do this, grab with a needle one or two threads of the fabric above and below the cut of the allowance (edge of the overlock stitch). Make sure that the stitches do not go to the right side of the fabric. The distance between the grips should be no more than 1 cm. Before you finish the line and secure the thread, slightly stretch the fabric.

The “goat” finishing seam is most often used to hem the bottom hem allowance for products made of thin, delicate, silk and elastic fabrics.
Machine blind stitch

Turn back the hem allowance to the right side so that the seam allowance protrudes 0.7 cm from the wrong side. Set the blind stitch on the sewing machine and adjust the stitch width so that the needle only slightly catches the fabric at the fold. Try it on a patch.

Then lay a line along the protruding cut of the hem allowance of the product. Optimal length stitch - 1 mm.
Finishing stitch or double needle stitch
Work the bottom of the product and sleeves on an overlock. Turn the hem allowance to the wrong side and iron.
Stitch with a double or even triple needle. The use of these needles allows you to maintain the elasticity of the finished seam.

If you are sewing from dense or low-stretch knitwear, you can lay one, two or three parallel straight lines with one needle.
The raw edge should be cut close to the stitching on the wrong side.
- On knitwear, the hem is ironed by raising and lowering the iron to prevent stretching of the fabric.
- If the stitching gathers or is uneven, adjust the thread tension and loosen the pressure of the presser foot on the fabric.
- To ensure that the needle from the right side hits exactly the edge of the allowance, lay a basting stitch along it with contrasting threads.