New Year's boot sample. New Year's boot: the best ideas. Striped stocking with pom-poms
Such a handmade New Year's felt boot can be filled with sweets, nuts, cookies, mini-tangerines and small toys. Put it under the Christmas tree or put it on a child's pillow. This will especially please the kids, when there is still a week before the new year, and it is very difficult to wait for the holiday.
You can take such a souvenir with you when you are going to congratulate friends and relatives on the New Year. It can become an independent small present or an addition to the main gift.
Are there many guests expected? Place this cute boot next to each plate and everyone will leave you with pleasant memories and positive emotions. And sewing such a New Year's boot with your own hands according to the master class described below is very simple.
Materials for making a souvenir:
- red felt - 1 sheet (thickness 1 mm, size 20 * 30);
- white felt - leftovers are possible (thickness 1 mm);
- floss threads red and white;
- metallized silver thread.
Instruments:
- safety pins;
- sewing needle;
- scissors;
- tailor's chalk.
Product height - 15 cm.
Tailoring time - 1 hour. 30 minutes - 2 hours (depending on handicraft experience)
We print out a pattern for a New Year's felt boot.
In general, felt is a beautiful and versatile material from which you can make a lot of New Year's crafts, for example, it turns out very pretty.

Cut out the details. Carefully cut out the stars on a paper boot with scissors or a craft knife. We pin the paper blanks with pins to the red felt. We circle the contour with a tailor's chalk, draw the stars.


Once again we circle the boot blank, this will be the back, without stars. Cut out the details.
Now we embroider stars on the front of the future product with a back seam needle. To do this, take one thread of red floss and two silver threads. The metallic thread is very tangled, when embroidering it must be held with your fingers so that the stitches lie evenly and there are no knots.


Place the front and back of the candy felt boot together. We thread a single red thread into the needle. We lay the seam back with a needle along the contour of the product, stepping back from the edge of 3-5 mm. It is better to start from the top of the boot, then the details will not move, and the work will turn out neat.

The next step in our master class on making a New Year's felt boot with your own hands is a white trim. To do this, we pin a blank of paper to the material with safety pins. Cut out.


Wrap the piece around the top of the boot, secure with a pin. We remove it, sew it with a white thread at the place of fastening, put it on the boot again so that the upper part of the white felt is 0.5 cm higher than the boot.

We sew the trim to the main part of the red material with a single white thread.

We lay a long stitch inside the product, outside the stitch should be very small 0.5-1 mm so that it is almost invisible. We make a seam only on the front and back of the New Year's boot for sweets, we do not sew the sides, as this will look rough.

We take 1 red thread and 2 silver ones, thread it into the needle and sew the upper part of the edging with a seam over the edge. We make stitches about 5 mm high.


Our New Year's felt boot for sweets is ready.
New Year's boot for gifts you can do it yourself different ways. Check out some of them and choose the most beautiful one. The sock for gifts in Russia is not as popular as in the West. However, we are increasingly using it not only for its intended purpose, but simply as a decoration.
We have selected three for you. simple master class sewing a Christmas boot. The first is a simple decorative sock. The second is denser, it is suitable for gifts. The third is a boot from plastic bottle(you can put sweets or pleasant things in it). Browse all and choose any. In the article you will also find the necessary patterns and stencils.
patterns
A New Year's boot can be sewn from felt, fleece, as well as from quilted or any other dense fabric. Whatever you choose, you will need a pattern. Below are the sock templates for Santa Claus (print or just draw them).

With a small heel

The classic version, for the Victorian Santa and for the elf

New Year's sock pattern with sizes

Convenient boot template with cell markings

Ready-made pattern of Santa Claus's sock for printing and cutting
Choose the template you need. You will need it for two of the three workshops below.
Method number 1: decorative sock
This New Year's boot is not intended for gifts. It can be made single or double and be sure to decorate with appliqué. Felt sock looks best. Fleece is softer, so you can additionally seal it with cardboard or a double layer of fabric. You can also use velvet, velor, thick cotton fabric.
To decorate a New Year's boot, take felt, fleece, floss threads or yarn, beads, and ready-made stripes.
We advise you to look into our section "Stencils" - in it you will find selections of different templates with New Year's heroes. They will be useful for you to create applications. They can simply be printed and cut out first from paper, and then from fabric. Or take it as a basis and just draw.
Watch this simple video tutorial showing how to make a decorative Christmas sock with your own hands.
Use it as a support, and come up with your own design.
Here are some ideas for different DIY Christmas boots. Use them for inspiration or just repeat.
Use acrylic paints and white thread to embroider and pattern on the sock.

Lay the two patterns together and make decorative seam along the edge (make a markup in advance). Decorate the boot with pompoms.

Cut out a few decorative elements from felt or fleece according to the templates, sew them to the outside of the Christmas sock. Complete with beads, rhinestones and decorative buttons.

Make a sock pattern using an unnecessary sweater or scarf. Decorate with Santa Claus, made from a cotton pad, a piece of felt and a hat (use the same fabric for it). Do not forget to make a white border and sew on buttons. You can decorate the sock with embroidery.

These are just a few options, you can choose any of them. A decorative Christmas sock does not have to be doubled at all - a single one will do just fine.
Any of these crafts can decorate a door, a Christmas tree, windows, or simply hang on the walls on the eve of the New Year.
Method number 2: a sock for gifts
The New Year's boot for gifts needs to be sewn tighter so that it is reliable. Use the patterns above. Take them as a basis, but the sewing technique will be a little more complicated than in the first master class.

Choose a suitable thick fabric (in the departments for creativity you can find interesting decorative options). Choose your filler. Batting, thin synthetic winterizer or even fleece will do.
We cut out two identical blanks for the New Year's sock according to the template. Also make two parts for the lining using these stencils (the ones from which you will sew the inside of the boot).

The filler can only be sewn to the front of the sock, because the decor will be located on it.

Sew the loop right away. First, cut out a rectangular piece from the fabric, then wrap the ends inward, iron and fold in half.
Fold up front part sock and filler. Sew back about 0.5 cm from the edge.
Place the lining piece right side up. Sew on the loop, stepping back about 2-3 cm from the edge on the heel side.

Then repeat the procedure for the second inner (a loop is sewn to it) and the second outer part of the sock. Fold them right sides towards you, and then sew along the top (the seam must also be inside).
Take two blanks and straighten them so that the outer (the part that will be visible when the sock is ready) is inside.
Sew the details around the perimeter on a typewriter. Step back from the edge about 1 cm. Do not forget to leave a hole in the lining so that the sock can be turned inside out.

On the rounded parts of the toe (or around the entire perimeter), make small serifs in the form of zigzags or triangles. This is necessary so that the turned-out boot does not puff up due to the gathered fabric.

Turn the Christmas sock inside out and mend the hole you made it through. Then tuck the lining into your boot. That's it!

Decorate the resulting New Year's sock with any stripes, appliqués or voluminous figures of Christmas characters - sew or glue them on. Complete the craft with fur, pompoms, sequins, rhinestones and other decor.
Method number 3: a boot from a plastic bottle
Santa's boot can not be hung from the fireplace or on the wall, but simply placed under the Christmas tree. Put a gift or something tasty in it. In addition, this stable sock can be put on festive table and make it a vase, napkin holder or "hat" for forfeits.
We offer you to watch this simple video master class, in which the author talks in detail about how to make a New Year's slipper from a bottle with your own hands. Repeat turn-by-turn work using the same materials. Everything is shown very clearly, so you can't go wrong.
Views: 7 136
First you need to make a template for the boot. It can be traced directly from your screen monitor, enlarged to the desired size or printed finished pattern using a printer. If you know how to draw, then it will not be difficult to draw a contour.
We prepare two parts of the same size. 
We put the two layers together so that the edges match and turn the boot towards us with the toe. top, through which the boot is usually put on, we leave it not stitched. We begin to sew both parts with a buttonhole seam, retreating from the edge of 1 cm. We thread the needle through the felt away from ourselves and tighten the loop, which must immediately be moved to the left. 

Then we pierce the needle again in the same hole and form a loop, which we leave in the middle.
Again, we perform a buttonhole seam through the same hole, only move the loop to the right. Then we retreat 1 cm from the hole through which all three loops pass and again repeat all three steps. We make sure that the loops are the same length and at the same distance. Since the stitches are quite large, the product will look very original. 
After we sewed 6 cm from the corner, we begin to weave the seam with beads. The bead should be strung on a thread immediately after tightening the second loop. Thus, we flash the entire contour, except for the upper part of the boot. 
In the heel area, draw an arc with chalk and sew with a “needle forward” seam. We try not to hurt the bottom layer of felt. We always hide the ends of the thread inside the boot. 
This is how the stitched and beaded edge of the boot looks like. 

We cut off a red ribbon with polka dots 20 cm long. It is better to take a ribbon with a width of 2 cm or more, since a gift in a boot can be heavy and a simple ribbon will not withstand such a load. We fold it in half, and glue the ends inward on the bottom layer right up to the edge. 
We cut off a strip of 6 cm wide from the synthetic winterizer, and the length should be two boot widths with allowances of 1 cm on each side. We glue the boot on the right side of the synthetic winterizer, retreating from the edge by 1 cm. 
Glue the second layer of synthetic winterizer on top. We take a needle with a large eye, red threads for embroidery folded in many layers (6 threads in the master class), we thread the threads into the eye and tighten the ends to the same length. We hide the knot in the middle and sew with a regular seam and large stitches the edge of the boot, where the cut synthetic winterizer is. Thus, we imitate lacing. 
When we reach the edge we string four beads. 
We form a loop with beads 8 cm long and tighten the knot right up to the place where the seam ends with red threads. 
Distribute the beads in 2 pcs. in different directions and cut the loop in half. Tie knots at the ends. 
We again string two beads onto a free thread, cut it off, leaving a length of 8 cm. Pull one end out of one bead and tighten the knots again. 
It turns out here is such a decor for lacing. 
We collect a bunch of artificial decor, tie it with a ribbon. 
We fasten this bouquet to the top of the synthetic winterizer boot. 
We get such a beautiful and neat New Year's felt boot, which is very easy to do with your own hands. Such an addition to New Year's gift will definitely please a loved one. 
It is much more pleasant to receive a New Year's gift in an elegant boot than in ordinary paper packaging. Making such a boot does not take too much time.
To make an elegant New Year's boot, we need:
- — colored fabric with a pattern for lining, for example, pink;
- – white soft fabric for the outer part of the boot, for example, fleece;
- - felt blue, green, blue, red, pink and yellow flowers;
- - satin ribbons different colors;
- - red decorative lace;
- - sewing threads of different colors;
- - bright sequins and beads;
- - a needle;
- - scissors.

The procedure for making a New Year's boot
1. Draw a boot on paper. According to this pattern, we will sew our gift boot. Next we will draw a Christmas tree - according to this pattern we will make an ornament for the boot. Cut out the details of the boot and Christmas trees from paper.

2. According to the pattern of the boot, we will cut out two parts of the lining from colored fabric with small allowances for the seams.

3. According to the same pattern, we will cut out two parts of the boot from white fabric, also adding allowances for the seams.

4. Fold the details of the white fabric boot with the front sides and sew by hand or with a sewing machine.

5. Now we will fold the details of the lining from colored fabric and also sew it by hand or on a sewing machine.

6. Turn the lining inside out and straighten it.

7. We will not turn the part sewn from white fabric. We put the lining part in it in the order shown in the photo.

8. Sew the lining of the boot and its outer part along the upper edge, leaving a small segment unsewn. We turn the boot through the unsewn hole and straighten it.

9. Tuck the lining into the outer part of the boot. Sew up the unsewn area using a hidden seam.

10. On a paper pattern, cut out a Christmas tree from green felt. And from the blue felt we cut out a decorative strip 17 cm long and 2.5 cm wide. Cut one edge of this strip so that we get a wavy line.
Now you need to sew these details to the boot. To make sewing more convenient, you can cut out the cardboard part of the boot according to the paper pattern and insert it inside. It is more convenient to sew small parts with a cardboard piece - this way you do not accidentally sew the back of the boot to the front.
With green threads, sew a Christmas tree to the front of the boot. And with blue threads we sew a decorative strip at the top of the boot.

11. Cut out small rectangles of arbitrary shape from blue, yellow, pink and red felt. From them we will make gifts under the Christmas tree.

12. Sew the felt rectangles to the front of the boot. It is better to arrange the gift rectangles so that they slightly overlap each other. We will sew with a basting seam, small stitches.

13. Take narrow satin ribbons of different colors and cut them into small pieces. Fold each segment into a bow and secure with a few stitches. Sew a bow to each gift.

14. Let's decorate our Christmas tree - sew bright sequins to it, and sew a bead in the center of each sequin.

15. Take a red cord about 45 cm long. Tie a knot at the ends of the cord. Sew a lace in the upper part of the boot with red threads. You need to sew in small stitches so that they are invisible.
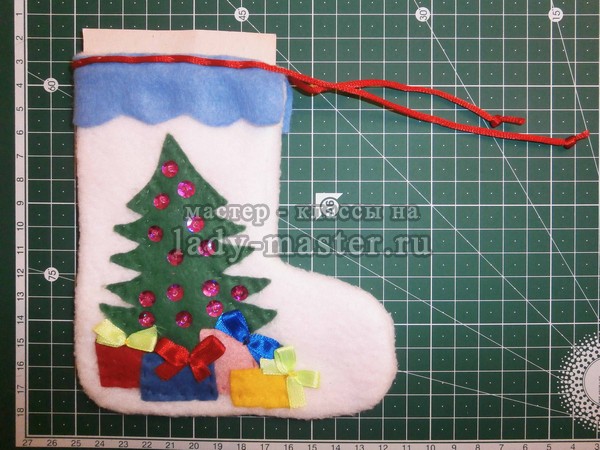
16. We take out the cardboard part from the boot - we no longer need it. And we'll tie the string into a bow.

An elegant New Year's boot is ready. It remains to hide a gift in it and put it under the tree. And if your gift is large, then the boot can be sewn more.

Do something extraordinary Christmas decorations for your green fluffy beauty! And a master class will help you make a New Year's boot from felt on a Christmas tree with your own hands, in which everything is described in detail and shown in the photo.
For sewing toys we need the following materials and tools:
- red or burgundy felt;
- white felt
- red and white threads for embroidery;
- silver acrylic tape;
- silver rhinestones;
- synthetic winterizer;
- cardboard;
- pencil;
- a piece of chalk;
- tweezers;
- pins with ears;
- glue gun.
How to make a Christmas boot from felt on a Christmas tree with your own hands
We will make two templates from cardboard. They can be drawn by example directly from the monitor or printed in right size and cut. You can also draw by hand.

We fold the felt in half, fasten it with a pin and trace the outline of the template with chalk. In the case when you need to trace the outline on white felt, you need to use a pencil, but then the line from the pencil needs to be cut off so that the original Christmas tree felt boot does not look dirty along the edge.
By the way, this year it will also be relevant, which you can easily do according to our instructions.

Cut out blanks for the New Year's felt boot. We check that the edges of the two layers of burgundy felt match. We skip the upper part of the boot and begin to sew with a “forward needle” seam along the contour. We retreat 0.5 cm from the edge, and the stitches are very short. So the product will look neater.

We fill the felt boot with synthetic winterizer. No need to fill so that it is too large. You just need to shape it so that it is not flat.

Now we take one detail of the upper part of the boot, cut off a silver ribbon 15 cm long and glue its ends together. These ends need to be attached to the left edge of the workpiece and we will hide them under the second layer of felt.

We glue two layers of felt on the side of the boot that was not stitched. We glue the boot on the blank with a tape in the center. It is important to apply glue to the central part of the white felt, since we will sew along the edge and if there is glue, it will not be very easy to pierce it with a needle.

We apply glue along the edge of the non-stitched part of the New Year's felt boot and glue the second piece of white material on top so that the edge coincides with the first piece. We sew both parts with red threads with the same seam that sewed the base of the entire boot.

With tweezers lay out rhinestones in the shape of an arc. This will be the heel side. You will get a glamorous New Year's boot made of felt on a Christmas tree with your own hands. Instead of rhinestones, you can use half beads.

The top part is decorated with a silver ribbon bow.