Making crafts a magic flower. Master class “Magic flower. The simplest bouquet of colored paper
Tatiana Zhmurova
Dear colleagues and guests of my page! The holiday of all women is coming soon! On this wonderful day, we want to surprise and delight children and parents. And we surprise, of course, with a concert and decoration of the hall. Our garden "Private" and, like many, there is no money to decorate the hall. We don't have a music director yet. But we are teachers! We, of course, can do everything! Our creative team decided to decorate the hall this year flower arrangements... Each of us brought his own ideas, agreed on everything and started preparing. I suggest you see my « magic flower» It is easy and simple to do. Looks very nice! It can be made in any size, colors and shapes(flat, three-dimensional, from candy wrappers, wrapping paper, etc.) Older children can do this job too. I will do voluminous and from the usual colored paper.
We need to work: any glue, I have a pencil. Cardboard - any, I have ordinary, white, format A-4. Kit colored paper, scissors.
Cut a circle out of cardboard. We determine the size ourselves, I have A-4. For symmetry, I divided the circle into several parts with a simple pencil.

Cut out from colored paper squares, mine is 10 by 10.


From them we glue "little bags".

Then we begin to stick them, row by row.


The middle is generally easy! We fold thinner "Little bags" and insert them in the middle.


When there are many of them, they do not even need to be glued. They look beautiful on the wall.

Well, these flowers and butterflies will also complement our flower meadow... Many of you already know how to make them. I would be glad if someone will use mine flowers!


Related publications:
Hello, guests of my page. I bring to your attention flowers from disposable cups, it is very easy to make them. We select multi-colored ones.
Master class: Seven-flower flower. Magic flower for a fabulous matinee Dear colleagues! Every matinee in kindergarten- is not.
To make a flower, you will need: a small sock of any color, green paper, scotch tape, a wooden stick, a ribbon 7-10 cm long.
Material: Colored cardboard, glue stick, colored paper, scissors, openwork napkins Happy Mother's Day, we hasten to congratulate everyone, Who is called beautiful.
The sun is already gently warming the earth. Spring is coming. Is coming spring holiday our beloved women - March 8th. The groups are preparing.
Who among us at least once did not look fascinated at the beauties that nature has endowed us with. Quite often we admire the sunrise or.
The holiday on MARCH 8 is approaching. Everyone is busy with pleasant cares associated with this holiday, songs, dances, gifts, and of course everyone.
Ecumenical choice gift ideas for any occasion and occasion. Surprise your friends and loved ones! ;)
Hello dear readers and visitors! I have already written many times that I really love to decorate gifts in the most unexpected ways. And today I suggest you make paper flowers with your own hands. As many as twenty-odd methods, by the way.
Now, unfortunately, I rarely get to the mass packaging of gifts. Moreover, every year more and more acquaintances and friends appear, who should be congratulated along with their relatives. This is very joyful! I love giving presents. But if I choose them very carefully, then I pack them in Lately in organza bags, since I decide on detailed packaging only for single holidays (like birthday).
However, it is difficult to defeat my passion for all kinds of packaging beauty, so today I will practice with you to make beautiful flowers according to step-by-step schemes.
DIY paper flowers: simple and with a hitch
There will be a bunch of master classes, get ready. Good news for all rose lovers: there will be as many as 4 of them.
Aster
Guys, honestly, I'm not very good at naming colors. So if you see an obvious discrepancy for you - write in the comments.
So, the first in line is the aster. For her, cut out five circles: two large, two medium and one very small. Fold each circle in half three times, then arrange the edge as in the 4th photo. After expanding the structure, squeeze each petal to add volume. Fold all circles into each other and decorate the middle.
Almost calendula
This flower looks much more like a packing bow. Prepare a square of paper for it of the desired length and cut the edges according to step 2. You will need several such blanks. Lay them one on top of the other and squeeze in the center, pulling together with a wire or thread.
Now the most important thing is to spread the petals so that you get a beautiful semblance of a flower. Accordingly, the more layers, the more petals and the more magnificent the flower as a result.
Tip: make several of these flowers of different sizes and glue them on the packaging next to each other, then you get a beautiful semblance of a bouquet.

Calla
To create calla lilies, you can use both ordinary double-sided paper and foamed rubber (I wrote what it is in the section about the minion).
For calla lilies, take a stamen (you can crumple out of paper or blind out polymer clay) and a petal made in the shape of a heart. Place the stamen in the petal, fold the edges of the petal over the stamen, gluing together. It remains only to unscrew the edges to get the maximum resemblance to calla lilies.
Such flowers are well suited for decorating postcards, and for decorating packaging, and as an independent gift in the form of a bouquet.

Bell
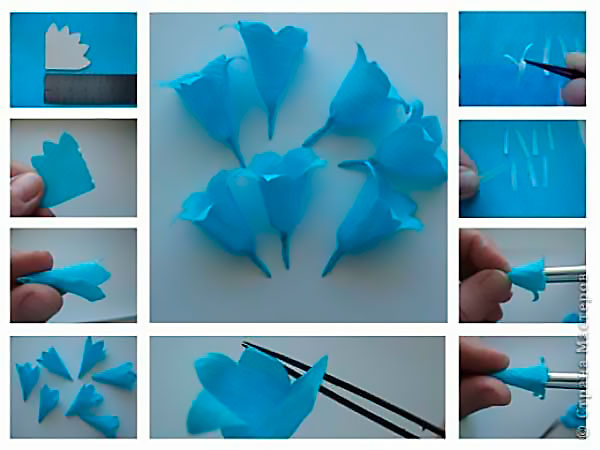
The bell master class is very simple and straightforward. Cut out the workpiece according to the first photo. Glue the edges of it, and gently straighten the ends. To make everything look natural, make the middle of several oblong stamens, which will need to be glued inside the flower.
By the way, it will be great to make a decoration of packaging for March 8 or just a spring birthday from such bells.
Lilies of the valley
Well, or something similar. For one flower, take a long rectangle and peel back the edge of it, as in the photo. Cut the wide part so that you get many small stripes. Use scissors to twist the stripes (to do this, you just need to run the sharp side of the scissors along these stripes, slightly pressing the blade against them).
To prevent the flower from falling apart, take a rod around which wind a green strip. Then, on top, begin to gently twist the "flower" part, previously coated with glue. Lay the layers tightly so that no greenery appears from under them.
But making green leaves is not at all difficult - for them, just fold a rectangle of green paper with an accordion and cut off the edges with a "triangle". When unfolded, you get a lot of green leaves ready to be glued to the base.

Poppy
Now we use the corrugated paper. Cut out about ten teardrop-shaped petals from it. Stretch the wide part so that the blanks resemble mushrooms.
Take a thin wire and wrap some paper around it - this will be the core. Wind the petals onto this core so that each slightly overlaps the previous one. When everything is ready, the structure can be pulled down at the bottom so that it does not disintegrate.
The master class shows how this flower can be attached to a festive cap, but believe me, a poppy will look great on a gift box.

Red flower
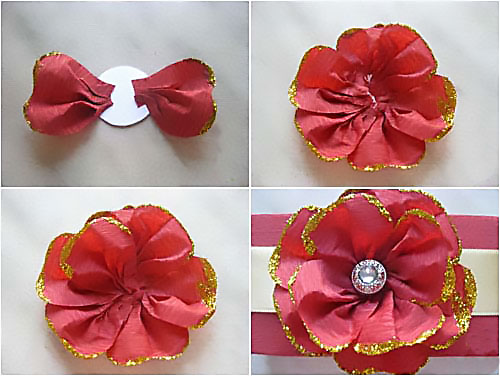
Here is what species belongs to him? No associations came to mind. But this is not the point - to create it you will need about ten petals (by the way, corrugated paper is used). Their shape is almost teardrop-shaped. but with a cut end.
Cut a base circle out of thick cardboard. Glue all the petals in layers to this circle, slightly crushing (doubting? God, how right is it: _D) the bases, thus forming folds - then the flower will be more voluminous and "fluffy". Decorate the center with a button or bead.
Such a flower, by the way, will look great from soft felt- so it will acquire durability. And if you attach the base for the brooch on the back, then you get two in one - the decoration of the gift and the gift itself.
Extravaganza of color
There are only two flowers here, but due to the bright combinations, it turns out very unusual effect... Take the crepe paper again, cut out a circle and fold it into a "doll" shape. Cut a "skirt" to it and wrap it around the doll. Attach the petals on top, gluing them in a circle. Glue two wide leaves at the base.
The second flower is quite simple - cut the fringe and twist it in several layers. The flowers are very simple, they can make a very interesting gift arrangement.
Unseen flower
To prepare the base for this flower, I advise you to look here - here for the second Christmas tree, the base is created in the same way. But then the differences begin - each of the corners must be wrapped with a thick wire or knitting needle so that a spiral is obtained.
You can leave such a structure alone, but I suggest that you connect several (say, three) pieces using the existing spirals - the wow effect is ensured. Then you can also experiment - connect elements with spirals into unprecedented structures.
Tip: going to a party in japanese style? Then make such a flower very big size and take it with you - it will serve as an excellent decoration for the chandelier.

Peony
“Pio-, pio-, peonies are given by a new acquaintance ...” - words from the song of the underground group “My Michelle” (lately I have often listened to it, inspired by it). We will craft from corrugated paper... You will need five sizes of petals, about five copies of each ( appearance as in the photo).
Stretch the petals so that you get a semblance of a wave (for both large and small). Then, from the same corrugated paper, form a stamen by rolling the paper with further compaction. You can do this with a wire skewer, or without it.
Glue the petals on the finished stamen, overlapping each subsequent previous one. Do not pull the petal too tightly. In the end, all that remains is to cut the green leaves and stick them around the peony.

4 in 1: dandelion, carnation, aster, chamomile
All these wonderful creations of nature are made according to the same principle - cutting the edge of the strip from which the flower will be made. The final shape of the flower also depends on the shape of the cut. Keep in mind that some require a core while others do not.
Please note: despite the very simple design, the flowers are very realistic. If there is very little time to manufacture, then this is ideal.
Experiment and discover your unprecedented plants - be sure to tell us what happened.

Paper roses
Magic roses are some of my favorite flowers
Rose with twisted edge
The main difficulty here is to carefully twist the edge of the corrugated paper, straightening the folds. Make sure that the folds are even. Now twist the strip so that the layers fit snugly against each other. At the end, fasten with a thread, cut off the excess.

Simple rosette
Need to make a plant in five minutes? Then this rose is for you! Just cut out a circle in which to draw a spiral. Cut out the spiral as in the photo and twist the rose, starting from the longest link of the spiral (the central part will serve as the base).

Big rose
Even gigantic, if you follow exactly this size. Heart petals stretch and overlap each other in a circle with glue fixing. At the end, green petals are attached. Of course, the flower does not have to be made as large as in the photo - start from your preferences.
Twisted paper rose
Once I have already described this way of creating a rose (here is the second). The principle is exactly the same, but the dimensions of the triangles obtained by twisting must be the same along the entire length of the ribbon, otherwise the flower will not be very neat.
Once she even made a Rosemary doll, which took part in the city exhibition. Her whole body was covered with roses, made just in this way (the roses were from ribbons, really).

Clover
I will only show you how to make a base for a four leaf clover. To do this, take a square of paper and fold it in half lengthwise and in half again. Bend the ends towards the center. Cut a heart out of the resulting design. The result will be exactly what we wanted - a happy flower.

Nameless
No matter how puffed up I was, I could not give an intelligible name. As a result, the comrade remained just a beautiful flower, reminiscent of kanzashi motives ( Japanese art production of jewelry from satin ribbons).
The beginning here is the same as in clover. But after folding the edges, you will need to bend the ends so that the length of the bent part is equal to the length of the visible side in the middle. Then these parts are straightened and their edges are already bent so that the sides are even. They are bent again and glued together to form three stamens. There should be three such petals.
Most of all, such a flower is suitable for decorating a gift in the Japanese style.

And again aster
This time, you already need to glue the petals along the edge until you reach the desired volume. Decorate the center as you wish, or simply fill in as many petals as possible.

On this I declare a large flower review closed. I hope you have found exactly the option that will help you decorate your gift the coolest. See you soon, subscribe and share with your friends!
Best regards, Anastasia Skoreeva
Do you want to learn how to make paper flowers with your own hands? You have come to the right place! 🙂 Here we have prepared for you an excellent selection of photos and master classes, including the new ones for 2019, designed for different skill levels: for beginners and for more experienced craftswomen. After all, flowers can be made from paper, both simple (children's crafts) and complex ones that cannot be distinguished from real ones.
First, of course, you need to decide what kind of paper and what techniques you plan to use for your crafts.
Let's take a closer look at all the possible homemade paper flowers. Following step by step photos in master classes, as well as videos from YouTube, you will learn how to make the same beautiful 3D flowers as a gift for your birthday, March 8, teacher's day or compositions for decorating a hall, classroom, room, photo zone and other premises decor for the holiday.
Corrugated paper flowers
Corrugated or crepe - this is the name of the thin crinkled paper from which various crafts... It is good in that the elements of the flower can be made voluminous, slightly pushing the micro-folds of the texture with your fingers, and you get flowers with curved, convex petals.
The simplest corrugated paper flower:
Pansies, buttercups
Cute and uncomplicated buttercups and pansies: to create wildflowers, you need to cut out the same petals, which are combined and fixed with a wire or glued to a wooden skewer, the stalk is wrapped with a strip of green paper.


Rose and rose hips
The most simple craft — corrugated paper rose that even children can do.
Cut out 3 circles from red crepe paper, put them on top of each other, then fold them into a cone, fasten them with a stapler approximately in the middle. Then we turn it out halfway and straighten the petals. We fasten it on a skewer, which we wrap with green crepe paper. We glue the leaves. A simple rose is ready.


Here is such a scarlet flower:

Volumetric roses more puffy are done like this -:

Simple small roses in 10 minutes (how to make a flower out of paper -):


"Roses for Mom". Christina Matishina.
Made from corrugated paper.

And detailed instructions on how to make a basket of flowers with your own hands -
 Here is such beautiful bouquet it turns out:


Hyacinths
Spring paper flowers - hyacinths- also the simplest crafts.


"Flowers in a vase. Corrugated paper hyacinths ”. Senior group No. 5 MBDOU No. 267 of Izhevsk. Educator Kochurova G.V.

Peony

Beautiful and naturalistic peony It is obtained from tinted crepe paper: to obtain large voluminous petals, put a white blank made of corrugated paper on a cup, sprinkle with water from a spray bottle, straighten it in the shape of a bowl. We tint with yellow and pink paint, let it dry. We take a ready-made core or make it from yellow crepe paper, glue it over with our lush petals.
Application "Basket of peonies" - a very beautiful volumetric postcard -

Narcissus
Daffodils and lotus —


Please note that the technique for assembling flowers is the same, but the shape and number of petals are different for everyone, this photo shows the patterns and patterns of the petals and the shape of the core of different flowers:

These cutting stencils are easy to do with your own hands.
Such simple paper flowers were sent to us by Tatiana from St. Petersburg. The manufacturing technology is simple, but how wonderful the bouquet looks in this children's craft.

Paper carnations from Masha Shevtsova.

Large growth flowers
Large flowers made of corrugated paper are simply gorgeous, with them even an adult woman can feel like a Thumbelina. From it can be used to decorate the hall with your own hands for the holiday, photo zones for taking beautiful memorable photos, you can hang it on the wall or give it to the hero of the occasion. How to make volumetric growth peonies with your own hands is shown in this video:
Just giant roses:
There is also a faster option - huge, but simple flowers that can be hung on the wall of the photo zone:
As you can see, the size of flowers is limited only by the original size of the paper, real giants are made from huge paper.
Little flowers
You can also make miniature charming spring bouquets - apple or cherry blossoms corrugated paper:

pink buds, snowdrops, mother-and-stepmother,

crocuses and daffodils,

small poppies, cornflowers,

forget-me-nots ... It all depends on your imagination.


Making a flower with a lollipop
Using a small ball (we took a chupa-chups), you can get a fantasy flower with very lush petals that will keep their shape, only it is advisable to grease the ends with PVA glue so that they do not unwind.

We cut out 5 squares from corrugated paper and screw them onto the chupa-chups, so that the “tail” is longer on one side than on the other.


For the core, fold a strip of red crepe paper several times, cut the ends - these are "stamens".


We put the core between the long tips of the petals, we tie everything to the stick-stem. We wrap the stalk with a strip of green corrugated paper.

It turns out such an original flower with lush petals.

Snowdrops
Delicate first spring flowers of snowdrops -


Swimsuit
Delicate lights (swimwear)... For the petals, you need to cut out several identical circles, in which one edge twists into a tube, and the other expands and bends. For the core, a strip of paper is cut and rolled into a roll. By the way, see how to make a swimsuit from foamiran.

Chrysanthemums, daisies, carnations
All master classes on making these flowers from crepe paper on a separate page


Sunflower
Craft made from crepe paper and real seeds. :


Poppies
Charming flowers - crepe poppies -:

Crocuses
Crocuses are spring flowers, so very often they are made by March 8th. You can make a simple and cute bunch of flowers -.


Corrugated paper flowers with sweets
Corrugated paper produces excellent
Simplest children's option corrugated paper tulips with sweets... On March 8, we decided to make tulips for our teachers, because these are the most spring flowers. We chose truffles from sweets, and decided to try to make the stems without skewers. For this we needed:
- thick green double-sided paper,
- corrugated paper of red color,
- red threads,
- glue (stationery or PVA),
- as well as packing tape for flowers and ribbon(the bouquet should look like a real one).
For the stalks, cut green paper into strips and twisted them into spirals.
Petals were cut from red corrugated paper elongated shape, pointed on one side, six pieces for each flower. With your fingers, you gently parted the fibers in the middle of the petal so that it turned out to be slightly convex.

The candy was inserted into the spiral of the stalk, twisted tightly and glued.

Then they wrapped the candy in petals, like in a real tulip - three inside and three outside. In order not to bother with glue (such a thin paper under liquid glue, one might say, melts), they simply tied it with a red thread to match the paper.

Leaves, similar in shape to long tulip leaves, were cut out of green paper and glued to the bottom of the stem.

Two more such flowers - and the bouquet is ready. It remains only to wrap it with foil and tie it with a ribbon.

Paper tulips are ready, we got three bouquets.

You can take it to the kindergarten and hand it over.


Simple carnation
Another option to collect a flower from corrugated paper without glue is to string the edge of a long strip on a thread, like pom-poms, but here you need to be very careful so that the thin paper does not break.


The result is a carnation flower - quickly and easily.
Flowers from napkins
Quite easy to do crafts - flowers from paper napkins.


Such crafts are very simple and easy for children. Photo and step by step description Ermasheva Elena on how to make a bouquet of napkins do it yourself.

For so original bouquet will be required:
- paper napkins: yellow and pink (35 pieces);
- bamboo sticks for barbecue (13 pieces);
- PVA glue;
- bronze acrylic paint with sequins;
- green paint;
- brush;
- scissors;
- felt-tip pen or pencil;
- plastic jar;
- decorative shavings;
- satin ribbon;
- linen fabric;
- 0.5 liter plastic bottle;
- small pebbles.

Paint the sticks with green paint, let dry.

For a bouquet of 13 roses, you will need 117 circles of 8 cm in diameter, 9 pieces per flower. Cut out the required number of petal blanks.

For 1 flower, you need to fold 7 circles in half.

Grease the edge of the fold of each circle with glue. Put the stick on a semicircle and wind the petal on the stick.


In this way, carefully glue the rest of the petals.


Pierce two circles in the center with a stick.

Grease the upper circle with glue in three places. Glue to ready-made petals.

Glue the last circle in the same way, the flower is ready.

Let's make a vase for a bouquet.


Flowers from colored paper


For voluminous flowers, you will need special double-sided paper. Ordinary colored school paper is also suitable for appliqués.
The simplest bouquet of colored paper
Making such a bouquet of colored paper with your own hands is quite simple. Even a kid can cope with this task. That is why the craft is an excellent gift for mom.
If the child is still not doing well with scissors, parents can help him. And you should not interfere with the rest of the process. Creativity with children is an important part of parenting. It develops creative thinking, a sense of beauty. In addition, the child sees the mother's joy from the received gift and becomes happy himself.

Materials:
glue;
colored paper;
scissors;
pencil.

Colored Paper Bouquet Guide
Take a whole sheet of green colored paper. Long edges grease with glue. Fold the sheet horizontally in half so that the edges stick together. We cut the paper from the fold to the gluing point at a width of 1 cm.
 We grease the base of the workpiece with glue.
 We roll up the paper with a tube. Fasten with paper clips until the glue dries.
 Cut out the blanks of the flowers. We use several shades. It will be more convenient to first draw a template, and then cut flowers along the contour. Several yellow circles will serve as cores for the flowers.
 We glue the middle to the flowers.

We glue each flower to a separate piece of colored paper.
 Distribute the flowers evenly over the bouquet. We straighten the leaves. The baby bouquet is ready:

Making a flower with a child
Paper flowers - great option gift for mom. Such a craft is simple to perform and looks much better than fresh flowers. In this step by step lesson the manufacturing process is described paper flower.
For a flower arrangement, you will need the following materials and tools:
1. Cardboard (yellow and green).
2. Corrugated paper of red color (can be replaced with a napkin).
3. Stationery glue, pencil, scissors.
4. A small piece of plasticine.
5. Bottle cap.

Step 1:
The flower will consist of three different sized flower blanks. Made of cardboard yellow color you need to cut three flowers of the same shape, but different in size (from larger to smaller). For convenience, you can first draw the shape of the flower with a pencil and then cut it out. Glue the blanks together. Most larger flower should be at the bottom.


Step 2:
Using a pencil, twist each petal down: place the pencil under the petal, press with your finger and stretch down to the tip, twisting slightly. These actions will make the flower lush and voluminous.

Step 3:
For the middle of the flower, you will need corrugated paper or a red napkin. You need to cut a strip about 3 cm thick, then cut many narrow strips to the middle. Roll the workpiece into a roll and cut again. Another way is to simply cut the paper into small pieces. Apply glue liberally in the middle of the flower and glue the red pieces of paper.


Step 4:
You can make the leaves like this: fold the green cardboard in half, draw half of the future leaf in the place of the fold and cut it out. There should be two such leaves.

 Step 5:
You will need green cardboard to make the stem. From it you need to cut a strip 2-3 cm wide, twist it into a narrow roll and fix it with glue. Cut the upper part of the stem into four parts.

Step 6:
All the details are ready, it remains only to connect them together with the help of plasticine. It needs to be applied to the top of the stem and the flower is secured. The leaves are attached according to the same principle. Glue the flower on plasticine to the bottle cap. This will be a craft stand.

The paper flower is ready.

"Postcard for March 8!" Safonova Svetlana Alexandrovna.
Application from colored paper. Gift card for March 8.
We need colored paper of red, purple, light green, yellow, green. It is advisable to take glossy colored paper. Cut out three flowers of different shapes. Large, medium and smallest, and so on three times. Then on the overthrown cardboard we glue first a large flower, then a smaller one, and so on three times. Cut out a vase from purple paper, glue it on a postcard. We make three yellow circles, make the middle in our flowers and glue them. Then we cut out three stalks and glue them from the flowers to the vase. Cut out the green leaves and glue them. Here's a postcard!

This video shows how to make daisies out of paper, they look very naturalistic, almost like living ones:
The flowers are so realistic that it is difficult to distinguish them from real plants.
Daffodils. Master Class
This workshop describes how to fold daffodils from colored double-sided paper.

To work you will need:
· A simple pencil;
· School line;
· scissors;
· Double-sided colored paper of orange, yellow and green shades;
· PVA glue;
· Wooden thin sticks;
· A small vase.
Work description
Take half a standard sheet of yellow double-sided paper. Prepare a ruler and pencil.

Draw 5 cm squares on a piece of paper. Use scissors to cut them out according to the graphic pattern. For 5 colors, you need to prepare 10 squares.

Take 1 square and make 4 cuts on it, as shown in the photo. Then take 1 wooden stick or rod from the handle and slightly twist the corners of the paper blank.

This will form the petals. For one flower, you need to prepare 2 identical blanks.

Glue them so that the petals of the upper blank are between the petals of the lower one.
To make the center of the daffodil, you need to cut a circle out of orange double-sided paper. After that, bend the circle with a rod, as shown in the photo.

Glue the middle to the center of the yellow blanks. One flower is ready.

Make 4 more flowers using the same principle. These are the daffodils.
To make the stems, prepare thin wooden sticks and strips of green double-sided paper.

Just cover the sticks with green stripes and the stems are ready.

Cut thin, long pieces of green paper. Using scissors, twist one end of each leaf slightly.

Glue 2 leaves on the stems.

Now all that remains is to fix the buds at the top of the stems.
Beautiful artificial flowers look as good as live ones.
Collect them in a bouquet and place them in a low, narrow vase. They look amazing!
The advantage of such a bouquet is that you can admire its beauty for more than one day, because the paper will never fade.
Daffodils aren't the only flowers you can make. Experiment, and your home will be decorated with a variety of flowering plants. For example, tulips are a faithful companion of spring daffodils, how to make them out of paper is easy and simple, watch the video:
Blue forget-me-not flower made from watercolor paper
Lovely volumetric flowers for decorating postcards and gift boxes you can do it yourself. There is such a wonderful direction in needlework - paper plastic, which allows you to create incredible beautiful flowers and bouquets. Thanks to the plasticity of watercolor paper, making flowers for scrapbooking is not difficult.
Necessary tools and materials for forget-me-nots:
- Blue watercolor paper;
- Scissors;
- Stencil in the form of a flower with 5 petals;
- Capacity with water;
- Ball tool;
- Sponge;
- Soft cloth;
- PVA glue;
- Pearl half beads.
Work description
First you need to make a stencil of a flower with five petals: you can draw it by hand or print it on a printer. Cut out an even number of flowers from the watercolor paper with a stencil.

Place the flowers in water for 5-10 minutes. Do not be afraid to overexpose; watercolor paper is thick enough and will soak in water for a long time. After the allotted time, blot the blanks with a napkin to remove excess liquid. If you haven't found colored watercolor paper, you can paint plain white with food dyes, gel pens, felt-tip pens, or gouache. This should be done while the paper is damp.

Place the flower on a damp, soft cloth. Using a tool with a ball at the end or any other object with a rounded end (for example, the tip of a pen, brush), press on the edge of the petal and drag it with force towards the center. Do the same with all the petals. So the flower will take on a relief.


Now place the flower on a thick sponge and push through the center of the flower. The indentation should be larger here than in the petals.

After squeezing out the petals, turn the second flower on the wrong side and push it in the center in the same way.


You should get these two types of flowers: with petals bent up and down.

Place the flowers on a flat surface and leave to dry completely. Dried flowers turn out to be very tough, reminiscent of cardboard.
Now it's up to the assembly. In a flower with petals bent outward, glue a flower with petals inward. PVA glue is great for watercolor paper.


Glue a half-bead in the middle of the flower.

Embossed flower from watercolor paper is ready! These flowers were used for decoration. Flowers made of watercolor paper are quite tough, so they can be used to decorate wicker boxes and baskets, as well as use them as interior decoration.

Easter bouquet of snowdrops. Zabrodina Anna.

"Snowdrops". Klementyeva Polina and Aleksandrova Oksana.
A very cute picture, but despite this, it is not at all difficult for children from 5 years old. To make it, you will need half a sheet of blue cardboard, a white sheet, a green pencil or felt-tip pen, green plasticine, a napkin, and glue.

DIY simple paper flower
From ordinary white paper, using a very simple technique, you can make beautiful, elegant flowers, which will surely find application in creativity. First of all, it is creation volumetric postcards in a technique that is often practiced by needlewomen, as well as these flowers can be collected in a bouquet or simply supplemented with a floral arrangement. A small lush accent is sure to draw attention to a wall newspaper or ad, a beautiful box or bag.

What needs to be prepared to create such a flower:
White office paper;
water and a brush;
gouache or watercolors;
scissors;
glue;
decorative stamens;
a piece of thin wire.
How to make a lush flower with your own hands in stages
1. The list of materials used intentionally does not indicate the colors of paint and decorative stamens that can be used to create a flower, because they can be chosen at your will. The base of the flower is ordinary white office paper, and then you can paint the product with any paints you like or need. First you need to take scissors and a sheet of white paper.
2. Cut out the first flower with oblong petals in the amount of 6 pieces from paper. But the shape of the flower may be slightly different, it is only desirable that the petals are oblong.

3. Using the first flower as a template, cut 6 identical layers of white paper. The more layers you use to create your list, the more curvaceous your product will be. You don't need to worry about evenness and accuracy.

4. Using a brush and plain water, wet the petals. Dip the tip of the brush into water and run over the petals as if painting over them.

5. While the paper is still wet, squeeze each petal, while it is convenient to use the same brush or pen, applying to the rounded surface. Thus, you will not only bend each petal into a kind of accordion, but also make them turned outward.

6. Repeat the same procedure for all other petals, leave all layers to dry.

7. While the layers of the flower are drying, prepare a bunch of stamens. Since a white-yellow flower is shown here, the appropriate stamens were also chosen. Take 6 or 7 double-sided white and yellow stamens, use a wire to find the middle and bend in half to get a bundle. Twist the end of the wire so that it becomes sharp. In the future, the wire will help secure the stamens in the center.

8. Dried flower layers white start stapling. Stick the second layer on the first layer, moving it.

9. Then glue all other layers in the same way. Before you is a blank for lush flower.

10. In the center of the flower, make a small hole with scissors and extend the end of the wire to fix the stamens. Cut the bottom of the bush and coat with glue.
11. Pick a paint color and casually paint over the top of the flower, leaving white gaps to make it look even more elegant.

12. Beautiful flower handmade paper is a great addition to.

Simple autumn bouquet - aster
An autumn bouquet made of paper will become an interesting DIY handicraft for children. It is autumn that is the time of the year that gives us colorful colors and incredible materials for creativity. The craft is a bright bouquet decorated with flowers that look like asters, autumn leaves and a bow.

- a set of cardboard and paper;
- scissors;
- glue;
- black capillary pen;
- half-beads-crystals;
- brocade bow;
- maple leaf template (or a special hole punch in the form of any leaf).
How to make autumn bouquet step by step
Prepare cardboard and paper for the job. Thick paper (in this case, we used green color) is needed to create the base. You can also prepare for this purpose waste cardboard from packaging or colored plastic. Bright sheets from the set are needed to create flowers and leaves. If you use single-sided paper for flowers, the back of which is white, you will get interesting two-color buds.

From a dense sheet prepared for the base, cut out a detail that resembles a bouquet. Top part will expand, and on the bottom there will be a tail, like a bouquet.

Cut out some maple leaves (or you can prepare blanks of a different shape, such as oak, chestnut, or birch leaves). It is best to use yellow, orange, brown, or red paper for this work. Apply streaks with a capillary pen. The leaves should be small - this is an addition to the bouquet that echoes autumn theme... Make 5 or more blanks.

Stick the prepared leaves onto the base. You can glue four on top, one on the bottom, or distribute them as you like.

Additionally, cut out the oblong leaves. These are the aster leaves themselves, which will become the central decoration of the postcard. Curl each leaf with the same scissors. Long details are the decoration of the bouquet.

Prepare a thin brush of pink paper to create the buds. Cut the leaf into thin strips and divide each of them into segments approximately 10 cm or so long.

Fold each section into a loop, overlapping the edges. The back of the paper may be white.

Cut flower circles from paper of any color. Lubricate the circles with glue and start applying loops around the circumference, forming flowers.

Glue two or more rows of eyelets to create lush buds. Decorate the middle with half beads. You can choose half-beads to match the flowers or use yellow details.

Model three or more aster flowers to decorate the bouquet.

Glue autumn flowers in the center of the bouquet.

Decorate the lower part of the composition with a brocade bow to mask imperfections, and the bouquet looks complete.
Interesting autumn craft made of paper is ready.
chamomile
For example, to do paper chamomile, cut two blanks from white paper and several from yellow, glue the core to the main shape:

the Rose
For roses You will need more blanks and efforts, but the result will be impressive: fold the square of scarlet paper twice in half and once diagonally. Cut off the tip and wide edge in a semicircle, make 4 such blanks of layers with 8 petals. To create volume, cut one side of the workpiece and glue it together to get different widths of the workpiece: 6, 5, 4 and 3 petals. Twist the petals, insert layers into each other and glue. Fold green paper sheets like an accordion.
"My scarlet rose." Sivolapova Polina.
It took red double-sided paper (colored printer paper) to make this rose.

Another interesting option is two-color: here you will need not only scissors and glue, but also stationery knife for cutting.

A simple way to do it quickly. Fold 2-3 sheets of paper with one accordion, tie in the middle, cut the edges in a semicircle. It remains only to gently fluff the petals:

Simple flowers
Simple flowers can be done in a spiral way: a classic spiral is drawn on a sheet of colored paper or wavy, with petals, cut out and curled into flowers.


Dahlia
And even if you make circles of different diameters out of paper and cut petals in them, you get a very lush flower - a dahlia.
A flower made from curled strips of paper.
Another option how to do rose from ribbon, paper or fabric, simply bending the petals at the desired angle and rolling into a roll:
YouTube video:
Hyacinths by Elizar Polyakov:


Large flowers for the photo zone
Flowers for office Photoshoot locations can be made from double-sided colored paper.
For example, in this video, 160g paper was used, 15 - 24 pieces were needed. Templates can be taken, for example, here: //pl.pinterest.com/pin/789818853371506785/. How to make a photo zone from paper flowers:
For the photo zone, you need a frame on which the canvas is stretched, and then flowers are attached to it on wire and hot glue:
Another option is to make beautiful hanging compositions, for example, the following:
Paper flowers opening in water
You can spend interesting time with a small child at home. This simple but exciting wonder-craft will interest the kid. Making flowers together will bring pleasure to everyone.

You will need:
- colored (on both sides) xerox paper;
- office white paper;
- colour pencils;
- glass of water;
- shallow white plate;
- stapler,
- circle templates with a diameter of 6, 10 and 12 cm (for more difficult options colors).


Simple option
Draw several color options on a white sheet of paper, about 4-5 cm in diameter with not very large petals. It can be in different colors and shapes of petals. Now you need to cut them out. Bend the petals of each flower in the center in a circle, one on top of the other.


 When the flowers are ready, place a plate and pour some water into it. Now you can lay out paper flowers with bent petals up. And then an amazing transformation will take place. All the petals will open and flowers will bloom on the water.
This action occurs because the paper absorbs water and tries to return to its original form. This means that it straightens at the fold. It turns out that the flower is blooming.

 Flowers can be immediately cut out of colored xerox paper. You can glue or draw something funny inside the flower. Optional.
More complex option
Option number 1. The original flower can be made large in 3 layers. Take xerox paper, connect it with a stapler in the middle. Using the template, draw two circles with a 2cm difference between them. In the resulting donut, depict the petals. The finger will serve as a template. Cut the flower by grabbing three layers at a time.
Now fold the petals correctly in the center. One by one, overlapping. And so all three circles. It remains to launch it into the water and see. The flower will open layer by layer. The kid will like it.


 Option number 2. This flower can also be made in 2-3 layers. Only now the difference between the circles will be 4-5 cm. Long petals will turn out. Now each petal must be twisted with a pencil inward. A thinner diameter can be used.

Origami flowers
Flowers in the origami technique, of course, are not so similar to real ones, but they have their own charm. In addition, this technique helps to develop fine motor skills, which is very important for children and adults too. How do you get such original things from an ordinary square of paper?
Callas
For the manufacture of children's applications, paper is most often used. We suggest adding some chenille wire to it and making beautiful flowers that look like elegant calla lilies. And when creating the flower themselves, the child can be introduced to the basics of the origami technique. The whole process of making such an applique is given in this master class.

To create such a craft, we have prepared:
- white cardboard;
- red, orange, pink and green paper;
- glue;
- chenille wire;
- pencil;
- scissors;
- ruler.

Flowers for this applique will be made of colored paper using origami technique. Therefore, we initially prepare a square blank. In our case, there will be a square with a side of 8 cm.
 Fold it in half diagonally.
 Now we will expand the blank of the future flower and begin to bend the sides to the middle line.
 It is necessary to bend symmetrically on both sides.
 Next, bend the upper parts of the bent elements back. We try to do it symmetrically. We get such a blank for a flower.
 The middle of the flower will be a piece of chenille wire. It is enough to take about 4 cm. We use orange chenille wire, but if desired, such a center can be made of chenille wire of any color. We fix this piece with PVA glue.
 We bend the bottom corner of this flower into reverse side and glue.
 In a similar way, we make flowers from pink and orange paper.
 Now we distribute the flowers on white cardboard, after which we fix them with glue.
 Cut out narrow strips from green paper, which will become stalks on our applique.
 We also make leaflets for flowers from green paper. To do this, fold it in half, and then cut out the outline of the half of the leaf. We cut 3 different sized leaves. We glue them to our craft. The applique with flowers made of paper and chenille wire is ready.
Video how to make spring lilies of the valley. Valeria uses big leaf paper to make it clearer, but for miniature flowers you need to take 5 x 5 cm squares and repeat after the author:


Good afternoon, today I finally unload large selection master classes on paper flowers. Here are the most interesting ways to make paper flowers. We will do the most different flowers- flat and voluminous - from corrugated paper and from thick colored paper. I will show each craft step by step in photos and I will give as much as possible detailed instructions to each flower made in one way or another. And also I will stencils- templates of silhouettes of flowers. All the crafts I have collected are laid out in order from simple to complex... First of all, we will take on the study of the techniques of folding paper flowers the MOST CLEARED (those that are easy to understand and repeat ourselves) ... and gradually move on to MORE COMPLEX and painstaking instructions (to prefabricated detailed flowers and to the origami technique). I also uploaded a special article dedicated to different ways make a paper rose - here is the link to it
As well as, for teachers (teachers and educators) I made an article with simple children's handicrafts COLORS, which can be done in the classroom at school and kindergarten from paper and other materials:
I deliberately decided to do so big a selection of paper flowers in one place - so that you can immediately find a suitable flower assembly scheme for THAT PAPER YOU HAVE, and for the task that you want to solve with the help of paper flowers (flower craft as a gift for mom, decoration children's day birthday with voluminous flower arrangements, wedding decoration, decor for cards or gift bags).
The only thing that I did not write in the body of this article is ROSES FROM PAPER. I found ways to make a voluminous rose so much that I had to put these crafts in a separate article on the same site, it will be called so "Roses from paper - 20 ways to make yourself."
But before proceeding to the master classes themselves, I want to make you fall in love with the very idea of paper flowers. I want even casual visitors to this web page to have itching hands and catching fire in their eyes. And I want to awaken in you delight and a burning desire to make a flower with your own hands. For this magic to arise ... so that your soul also spreads its petals and blooms ...
Let's see what piece of life a flower you make can decorate. Here are examples of how a casual table setting can become very beautiful and solemn with lush floral crafts.

Also, large paper flowers made of crepe or corrugated paper are used for decorative purposes. for decoration of the celebration – wedding hall, children's birthday, incendiary party. They are mounted on the wall or on the backs of chairs, tied to window handles.

But such large flowers can be made from A4 paper (office format) or from a roll of corrugated crepe paper.
Photographers and photo studios also use voluminous large paper flowers as exclusive props for staged photographs.

And you can make such a large paper flower simply - as a gift for Mother's Day, or for March 8th. Nobody has ever given your mom such a gift. Will be remembered for a long time. And you can take a picture of your mother right away with this flower - she will proudly post this photo on her page in the social network.
Ordinary plastic combs, headbands and metal hairpins can also be decorated with voluminous paper flowers. This is how we get dressed up jewelry for hairstyles for a wedding or a party.

Miniature paper flowers can decorate postcards self made , and other crafts using the scrapbooking technique (such as these delicate corrugated paper pansies).

Also, a DIY paper flower is the best decoration for gift box ... And not expensive in terms of money. Curvy gift ribbon costs much more than a couple of sheets of colored or white office paper - a few scissors and a paper orchid or a delicate pink wild rose bloom on your package.

And the flowers themselves can be great independent gift... If you arrange your work in the form of a basket, or decorative panel(as in the photo with colored paper poppies).

If you learn how to make paper flowers with your own hands, you can use this talent. in many areas of life. It will become simple and easy for you to decorate a hall for any holiday, decorate a family celebration at home or beautifully arrange gifts for loved ones and friends, or entertain neighbour's kids by organizing interesting craft with a master class.
METHOD # 1
FLOWERS-LAYERS made of paper
Flowers made in this way, I decided to call "Puffs" because their construction principle is the same as that of puff pastry... Thin layers of floral silhouettes overlap... And each layer is given convex volume(or faceted relief), and due to this, the flower looks lush and voluminous.
Here in the photo below we see step by step master class for beginners to create such a voluminous dahlia flower... It is the dahlia - not to be confused with the aster, the petals of the aster are narrower and each has a facet (a relief fold like on trousers).
So ... let's take a closer look at the photo of the flower craft below. Here the trick is that paper is cut layer outlines- each circuit has six petals, and differs from its counterparts only in size. That is, the shape of the stencil is the same - only the size is different.
Before gluing, each cut paper bend the silhouette in order to give him a natural form. We start gluing and assembling the paper dahlia from small middle layers to bigger and bigger ones.

Of course, you have a QUESTION:“And how to cut such even size petal circles-layers.
ANSWER: Here is the most simple and quick way make such a flower with your own hands of a novice master. It does not require searching for a stencil template, but allows you yourself, without any measuring instruments (compasses and rulers), to get geometrically even petal details for a paper flower.
- We take a sheet of paper and glasses and glasses different radius... We outline them on a piece of paper.
- We cut out the resulting rounds, fold each round in four and again in half (as when cutting out a snowflake). And on such a folded into a triangle we draw the outlines of two petals (like a heart).
- We cut this contour with scissors (see photo below) - deepen the cutout in the middle of the heart - unfold it and get a petal layer.
Because our circles are of different sizes - then we will get the petal layers different in size... We set the relief, add it together, add a yellow middle stamen (we will talk about stamens just below).

Such a delicate flower can be strung on a wire (make a stalk) and give a paper bouquet for Mother's Day to your mother.
ANSWER: An ordinary round stick (pencil or pen, or knitting needle) can serve as a stamp for imprinting relief on the petals. Here's how you can do it yourself, you can clearly see in the photo-craft of the flower below.
The flower assembly scheme is the same as in the previous one (see step-by-step photos).

In the technique of PAPER LAYER you can make a variety of voluminous flowers (anemones, poppies, asters, dahlias, roses). The evidence is in the photo below.
You see - the same "puff" method - but completely different flowers are obtained. And all due to the fact that silhouettes of paper petal layers DIFFERENT IN ITS OUTLINE.

And do not forget that not only the contour (silhouette, shape of the petal) is important ... but also the RELIEF of the petals is also important. It is precisely the correct relief that turns flat outlines into living convex layers of a future flower.
For relief we need round sticks of various thicknesses (thin knitting needles, toothpicks, thick round-side markers, felt-tip pens, spherical perfume caps, or chupa-chups). Any items that will help set the shape.
So that the relief fits neatly on thick paper- it may need to be slightly moistened before work (sprinkle from a pultivizer or hold on a wet towel). Try it and see how it works best - dry or wet.

And here for you ready-made templates paper puff flower. Flower stencils are already of several sizes. Can you right now put a sheet of paper on the glowing screen and trace with a pencil these silhouettes, which are visible from the screen onto your sheet of paper (this is my favorite way copy the template without any printer - not every home has a printing device).


You can also resize any template using a computer mouse.
Look - in the photo below, I give you a template silhouette. Silhouette ONLY ONE size... Do you want to get this silhouette different sizes - to make a multi-layered paper craft flower.

To resize this silhouette, you press with one hand on the keyboard buttonCtrl, and while holding this button down, turn the mouse wheel with your other hand - here and there. And from this action of yours, everything that is now drawn on your screen increases or decreases, depending on where you turn the wheel - from yourself or towards yourself.
Try it now- press and twist. See how the stencil-art image below is resized? In this way you can fit the template to any size right on the computer screen and trace it with a pencil on a piece of paper placed on your monitor screen. This is the fastest way to get the outlines of any flower stencil at once in any size we need.
Here are curly templates for future paper flowers - and you can change the size of the picture yourself. And you yourself can design and create any flower from paper with your own hands. 
Let's also take a closer look at interesting additions to such flaky colors.
How to make a stump
in flaky paper flowers.
Here is an interesting step-by-step lesson below where we see how a stamen is created step by step for a multi-layered paper flower.

How to arrange
large inflorescence
on one stalk.
And I would also like to show here another one tricky and simple trick which allows you to do a whole inflorescence of flowers on one stem... In nature, such flowers are often found where many cups of flowers nest in one place and have common central stem.
It is such a craft flower that will now demonstrate the step-by-step master class in the photo below.
- Cut out a mop of stalks with a common round base from green thick paper (or cardboard). On this round base we glue double-sided tape.
- We twist a tube from a newspaper and wrap it with green paper. We glue the stem-tube to the round base - twisting it around the stem.
- We make flowers (from two red layers and one black stamen). We glue each flower on its stem. We glue wide leaves to the central stem-leg. It turns out a very beautiful stem-bouquet made of paper.

How to make a layered flower
WITH ASYMETRICAL petals.
But in the photo below we can see from which layers the ORCHID paper flower is created with our own hands.
In a glass of water dilute a drop of green paint- we get light green water. We moisten the white parts of the orchid with this water, they become white-green (just like in nature).
Further while the pale green petals are still wet, we apply lines of purple paint on them - on wet paper the lines themselves slightly blur - an uneven blurred color is obtained (exactly like a real orchid).
The middle part of the orchid - upper layer we also make it green ... and along the very edge (right along the cut of the paper) we paint it in bright purple. Thus, when we lift this top layer up, the violet edges just stick out with their color upward, imitating the position and color of the shaggy central petals of the orchid.

The same principle is used to create various asymmetrical craft flowers... Let's remember what other flowers do not have circular symmetry in their cup ... that's right, these are ANYUTIN'S EYES (photo below).
- Lower layer of blue petals (only 2 pieces with the location in the upper side).
- Later layer of blue petals (also 2 pieces spread out to the sides).
- And the third top layer in the form just one white petal.
- Then we smear the central part of the flower with yellow, draw the central lines with a pencil. From crumpled paper we make yellow balls of stamens (or from plasticine).

A simple hand-made craft that even a child can do. The main thing is to prepare in advance the templates that the child will circle on colored paper.
Volumetric puff flower
from THIN paper.
We do such techniques as "different sizes of layers" and "work on folding the relief on paper petals" only when we use ordinary DENSE COLORED PAPER
But if if you make handicrafts-flowers from CREPE, CORRUGATED MINT PAPER, then you don't have to set the relief there. The very texture of the paper will allow you to make a fluffy volumetric flower.
Moreover, the corrugated structure of the paper allows you not to even bother getting DIFFERENT SIZE LAYERS. That is all layers of a flower can be the same size... Here are the workshops on paper flowers below just clearly prove this.
See? All layers of the flower are the same size. We pierce the middle of the layers folded in half with a hole punch (or a needle and thread, or fasten it with a stapler). Expand the flower and fluff its layers into a fluffy pompom. These are very beautiful large paper flowers.

This is perhaps the easiest and lightning-fast way to make a flower with your own hands. It turns out to be big, lush, rich and expressive.
If we choose napkins of two colors - and apply them with alternating colors, we will get a play of halftones in each layer, and our flower will look like a rose.
You see, in the method below, we make identical silhouettes from napkins of two colors (in shape and size like twin brothers). Put a piece of cardboard with two holes under the bottom (like a button ... however, cardboard can be replaced with a button). And we thread the threads into the holes and pierce through all the layers of the napkin. We tie a knot in the middle of the flower - and with our hands we fluff up all the corrugated layers of the craft.

Think for yourself how you can diversify and complement this airy napkin flower. You can also add border color- to do this, slightly stain the cut napkin silhouettes around the edges with an office marker.
Turn on your imagination ... and give her plenty of fun over the napkins. No one has a shortage of tea and napkins. And suddenly you will give birth to your own designer flower.
And in the same way, red carnations are made. Also cut out from the napkin are identical rounds with a scalloped edge - and deep cuts on the petal parts. And then they just lay on top of each other with a drop of glue in the center ... or instead of glue in the center we pierce them with a stick (it will be a stalk. Beautiful craft- do-it-yourself flower for dad on February 23, or grandfather on Victory Day.

And exactly according to the same principle as carnations (in the step-by-step lesson above), Lingieri's terry daffodils are also made. Here they are in nature - lush and voluminous.

Spring paper flowers - good gift mom on March 8th. And now you will find out how easy it is to make them yourself.
And here's how you can make them from dyed paper napkins. We put a stack of napkins on top of each other - fold in a quarter - in a triangle - cut off the edges with a serrated semicircle. We paint the top napkins in a bright yellow color, and the middle layers of napkins in a light yellow color, leave the bottom layer white.

Now about the material. Daffodils are gorgeous, you say, but where to get these paper colors (pale yellow and bright yellow) ?. Here, I tell you, there are 2 ways at once - 1) paint white paper napkins in 2 shades of yellow ... or 2) get a pale shade of yellow from bright yellow crepe corrugated paper.
INSTRUCTION No. 1. How to paint a white paper napkin.
ANSWER: We paint the napkin in a straightened form - tinted water. We paint in a glass of water and pour it on a straightened napkin. We are waiting for the natural drying of the napkin (about a day).
INSTRUCTION No. 2. How to make light yellow from bright yellow corrugated paper.
ANSWER: Take crepe yellow paper - put it on a wet towel - put a dry white napkin on top. We iron it with a flat iron - bright crepe paper gives off its moisture to a dry napkin, and, together with moisture, gives off part of the color. And we get already PALY YELLOW crepe paper. This way we can change the shades of crepe corrugated paper.
As you can see, everything is solvable - if you turn on your head and think ... and try to experiment. Knowledge often comes from experience (even if this path is jumbled). One failed experience can be the source of several ideas at once. I somehow got the crepe paper wet, ruined the craft - but then I saw that when soaked the crepe paper loses its color. And once I spilled some water for washing brushes on paper napkin- and she turned into a gentle solid color... So from two jambs - I got 2 color change experiments for delicate and thin paper textures.
Well, it was all about the FIRST WAY of making paper flowers with your own hands. I deliberately made this first chapter of our article so detailed and detailed so that you immediately understand a simple and important truth:
Even one the only way can have MULTIPLE CONTINUES ... numerous options ... endless designs. And you yourself can become an author - and create your own flower from paper, made in the same way of "curly layers, superimposed on each other ».
Now let's look at the next way to make flowers from colored paper with our own hands.
METHOD # 2
Paper flowers
TWISTED IN A PIPE.
We have been familiar with this method of creating flowers since childhood. We all made classic flower crafts in school or kindergarten. by February 23 - red carnations made from crumpled crepe paper... They twisted a strip of paper around a toothpick, wrapped the twist with a piece of green paper and fluffed up a bunch of flowers.

And it never occurred to us that inside this primitive method there is a recipe for not only a modest clove.
This way " twisting crepe paper into a roll " can give birth to completely different volumetric and flat flowers. It all depends on how we changed the PAPER STRIP EDGE SHAPE. Depending on its pattern, we get paper flowers that are completely different in design.
Here's a photo proof. See?
Different edge gives different flowers- disheveled aster, neat chamomile, chrysanthemums. Even roses can be made in this way (but roses will be discussed in a separate article - in detail and in detail as befits a queen of flowers).

And not only from soft corrugated (crepe) paper, you can make craft flowers using this ROLL technique.
Here you are in the photo below - an example of paper flowers in the same roll-up technique FROM CONVENTIONAL HEAVY COLORED PAPER (office double-sided colored paper).

Here's a simple job and a very simple instruction.
- A narrow strip of paper was twisted onto a thin rod (or toothpick) (to make the middle of the flower).
- And then to this roll center was added a wrapping of a wider tape, already cut along the edge into strips-petals.
- And the petals are folded to the side - like a spreading umbrella.
AND IF THIS SIMPLE TWISTING TECHNIQUE ADD TRACTION TO THE EXPERIMENT, THEN YOU CAN GET NEW PAPER COLOR DESIGNS.
For example, what if ... not just bend these petals to the sides with a flat chamomile-spread, but slightly twist the tip of each petal inward (as we cover the curls in the morning) - and we will already get a voluminous lush ASTRA.

And what if ... to make a strip for twisting with DIFFERENT WIDTH SECTIONS. We see the result of this idea in the photo-diagram below.
- A narrow strip (1 cm wide) for the middle stamen (we wind it in a tight roll on a toothpick).
- Next, we wind a petal strip (with a fringed edge) 2 centimeters wide on this roll.
- And then we wind a petal strip 2.5 cm wide ...
- and then a petal strip 3 cm wide.

And thanks to the different widths of the stripes, we get a flower-roll in which the height of the petals increases from the center to the edges.
As you can see, in this simple roll-to-roll technique, you can and should do EXPERIMENTS. Let's continue to encourage our inquisitive mind and decide on another dashing idea ...
WHAT IF, cut the fringe not straight, but INSERT... And what if ... this oblique fringe is not cut along the edge SECTION, and along the edge of the FOLD (that is, bend the strip in half along its entire length, and cut this fold line obliquely into the fringe, and then twist it in this form.
We see the result in the photo below - an amazing aster with spirally twisting carved perforated petals. A beautiful hand-made flower - it looks like a difficult job, but making it with your own hands is simple and quick.

These shaggy flowers with oblique petals can be used as shaggy stamens for other flowers.
Here's how, for example, in this master class in the photo below. See?
There, too, a cut of a bent strip is made along the OBYE FINGER ... and an orange shaggy stamen is formed - which is needed to decorate the center of the paper aster.
By the way, the paper aster itself with the photo below is made in a very original way in its simplicity.
- The base of the aster is a puff (a multi-rayed star with chopped rays).
- Each ray in the puff is bent with a slate ruler into a sharp arrow (like on trousers).
- Layers are superimposed on each other - we get a lush flower.
And just the stamen inside this voluminous flower is made using the SCIED FINGER technique, which we just talked about.

This roll-to-roll technique can be combine with a regular petal puff (Method # 1 from this article).. Yes - you can - because it occurs in nature. God Himself once came to this idea - and created the flowers of the VELVETS. And we will embody this method of combining a roll and a puff on paper. (see how this is done in the infographic below).
In roll technology the fluffy center of the flower is performed. And in the technique "Puff»The lower petal part of the marigold flower is made of paper (templates with five-leaf silhouettes). Photo-instructions for assembling a flower below.

And here is a rosehip flower - where the stamen-middle is also combined using the roll-twist technique and 2 petal layers. By the way, they can be made and large sheets of A4 format and pasted on the wall - and your living room will be transformed. Buy a pack of red office paper in stationery and play interior designer. All the neighbors will run to plow with delight.

And here is a flower craft where the roll technique is also used to create a fluffy stamen panicle, and the side petals are simply glued separately to the lower layers of a fluffy stamen panicle.

It produces large sunflower-like flowers made from crepe paper.
In a similar technique, ROLL-BUNDLE + SEPARATE PETALS, a daffodil flower is also made with your own hands.

But these flowers are EITHER LILAC, EITHER SALVIA - with a long stem of inflorescences are also made using the roll technique.

Yes, yes, this is also a common roll-to-roll technique, with the only difference that a strip of paper is not rolled up into a tube, but wrapped around a spiral roll around a long stick.
Here in the photo below is a master class of this lush paper flower.
- A wide strip of crepe (corrugated) paper cut into a long fringe.
- We wrap the fringes with a toothpick(or a knitting needle) - and we get curly hair along one edge of the tape.
- We take a long wooden skewer and wrap our paper tape with a curly fringe around it - the wrapping begins from the upper end of the wooden skewer and goes down in a spiral.
- Under the flower we do green winding stalk-skewer and glue wide green leaves to this stem.
Paper rose flowers
ROLLING method.
In the roll technique, you can quickly roll a rose out of paper. We will have a separate article on paper roses. But I will give two master classes right here - because they touch on the roll technique of creating flowers.
Here is the first step-by-step paper rose master class... Thick paper is used here and in order for the petal parts to have the geometry of broken pink petals, you need this dense paper strip, in the process of rolling into a roll, MIND AND ROLL around itself.
And don't mind these centimeters... Just take the very essence of this manual. Cut a strip of paper from the draft and try to twist it into a rose, just bending the strip as God wants you to - the paper itself will tell you where to bend and turn it.

Many other options for making a paper rose from different types paper you will find in the article
And here's another way roll a roll of paper so that it looks like a rose. For a roll like this we need paper strip NOT A STRAIGHT SHAPE, but make a strip of paper IN A SPIRAL SHAPE.
It is enough for this draw a snail on a sheet of cardboard(the curve is uneven, it doesn't matter which one). This drawn spiral will be the template for our paper flower.
Now this spiral line need to be cut, and then start rolling the roll NOT FROM THE MIDDLE OF THE SPIRAL ... but, on the contrary, FROM ITS EDGE. And in our hands a paper rose will appear by itself.
My advice is, do not take lacquered slippery glossy paper for such a craft.- such an elastic rose will strive to turn around or the spiral circles will slip out of the flower bed. It is better to choose rough paper or not very thick cardboard - this way the rose will better keep its shape.

Paper flowers
Method number 3
In the POMPONA technique.
Here's an even faster way to create a fluffy volumetric flower. It is made using the "pompom" technique - from corrugated crepe paper
The good thing about this technique is that it allows you to make large flowers out of paper very quickly - since crepe paper is sold in large rolls (like wallpaper). And each roll can turn into a large flower for the decoration of the holiday.
The master class in the photo below shows how to make such a lush paper flower with your own hands. We fold a wide (20 cm wide tape) several times to get a layering in many layers. Cut the folded tape into a fringe WITH TWO EDGES, leave the middle intact.


We fluff the fringe of the flower in all directions - achieving the shape of a perfect circle. And we decorate the central part of the flower with a lump of black paper - and we get the resemblance of a flower with a disheveled poppy.

As you can imagine, the height of the petals depends on the length of the fringe. And the shape of the petals depends on the shape of the fringe.
Below (a paper flower master class) we make anemones using exactly the same pom-pom technique. The difference is that we slightly changed the shape of the fringe - it's not even a fringe cut at all, but just a beautiful curly petal edge of the napkin.
As a result, the fluffed flower no longer becomes a poppy - but a delicate paper anemone.

And you can absolutely do not reshape the edge- that is, do not cut or fringe it at all. Leave it straight, as it is on the napkin. Just lightly paint over with a marker.
And in the same technique, we make a pom-pom with our own hands. They pinched it with wire, folded it in half - fluffed it up and got a carnation on a wire leg.
It remains to add elements from green paper - receptacle(wrap the toothed roll around the flower bowl), stalk(a long green strip for wrapping the flower stem), leaves (long oval glued to the stem).

And you can also make such a pompom flower in two colors. with a middle of a different color (see photo below)... To do this, we need paper strips of two colors - one wide (yellow), and the second 2 times narrower (black).
We prepare the strips - first we cut a wide strip into a double-sided fringe (or a patterned edge also on both sides), then we make patterned edges from two on a narrow strip.
To make a patterned petal edge- you need to fold the strip into an accordion (as in childhood fans were made) and on both sides of this folded fan we make a rounding with scissors.
Later expand the strips and put a narrow black strip in the middle of the wide yellow stripes. We fold them again with an accordion (already two-tone).
Tying the string or wire. And we unfold the sides of the fan in a circle - a flower is formed. If desired, the middle of the flower can be decorated with crumpled paper or cut fringe, glue it between the blades of the black center.

And here is a master class, where it is shown how to make a paper flower-pompom WITH FINGER-STYLE with your own hands (photo instruction below).
The principle of creating this flower from paper of two colors is the same as in the previous master class. Only here the middle strip is shredded on both sides into small fringes. This is another way to make large crepe paper flowers.

Method number 4
Paper flowers
Twisted on a ball.
Here's another way to create flowers from crinkled crepe paper.
To make such flowers out of paper, you need wide short strips of crepe paper and balls of different sizes (lollipops, balls). We put the ball on the strip and hug the ball on both sides with the strip - twist the tails-ends of the strip into a tight flagellum. Carefully take out the ball, trying not to crush the inflated petal template. We make several of these petals and collect them into a lush flower.

By the same principle, rounded crocus petals are made from corrugated paper (photo below). Here you need a paper strip that is already longer - it is put on the ball with one of its halves. The other half is twisted at the top of the ball and goes back behind the back of the ball and rests on top of its first half. It turns out a rounded petal.

If you fold such a petal close to each other, you get a cup of a closed crocus flower (as in the photo below). Excellent hand-made flowers for March 8 for mom.

A lot of bouquets can be made from crepe corrugated paper. Including bouquets of sweets.
Method number 5
FLOWERS made of paper
In ORIGAMI technique.
And now we will talk about folding paper flowers - without any cutting with scissors. That is, about the art of origami.
The first model is flowers with conical petals. Here they are, how handsome they are. Each petal of such a flower is made from a simple square of paper. In simple origami technique.
All ready-made petals are glued to each other - and we put a beautiful rhinestone-pebble in the center from the gluing.

Such craft flowers are very easy and quick to make yourself - and they look very elegant on gift wrapping... They can even decorate a Christmas tree.

As soon as you pick up a square of paper and look at the master class below, you will immediately make the same petal. It's very simple - you start doing it and you understand everything along the way. And you are surprised that this is not taught in kindergarten - everything is so simple and accessible to an ordinary person. After module 10, when the whole flower pattern has already been absorbed into your subconsciousness, your hands are already doing everything almost blindly - on the machine.

If you take a roll of plain wallpaper as paper and cut it into large squares, then you can get large-sized flowers for decorating a hall or decorating a home celebration.
And also due to the fact that these flowers have the shape of a CONE, it is convenient to collect them in one large ball. And use it as a pendant. Or as a crown of a decorative tree (which usually decorate weddings).

And here is a master class of a large water lily and the technique of folding from paper without cutting.

But interesting way where the petals-modules are made separately, and then each module is not glued, but simply inserted into the grooves of the adjacent module.
These do-it-yourself paper flowers can be an excellent craft for any occasion. You can now make paper flowers in different techniques and teach this to children. You can use these ideas to decorate your party or practice in the Skillful Pens class. Such flowers are suitable as crafts for the Spring contest at school or kindergarten. Or these flowers can become a gift for the day of March 8 for mom - a handmade bouquet of paper flowers.
Lot simple ideas
for children's crafts on the theme of flowers you will find in our other articles:
Successful crafts.
Olga Klishevskaya, specially for the site
This paper color tutorial uses photographs from the following sites: http://www.wikihow.com http://www.instructables.com http://tipnut.com http://www.twopinkcanaries.com http: // www.marthastewart.com http://vivatunisie.com http://www.linazlina.com