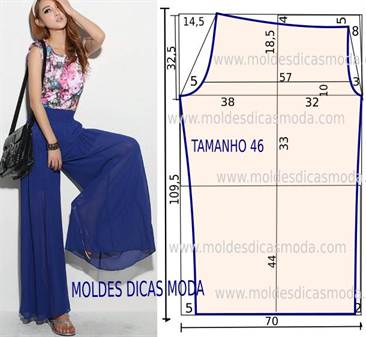
Step by step pattern of trousers size 46. Basic pattern of women's trousers - step by step construction. Now you need to make the front cut line
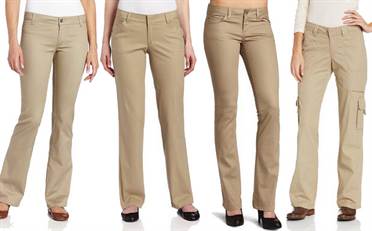
Happy owners of an ideal figure are unspeakably lucky. Choosing a new wardrobe for them will not be a difficult task. But what about those who have non-standard proportions, and every trip to the store ends with endless fittings and leaving empty-handed. An ideal way out for such girls is a pattern of women's trousers according to individual sizes. This task is not easy, but solvable.
How to take measurements
To complete the construction of a pattern of women's trousers, the first step is to take measurements:
- Waist circumference FROM - the thinnest part of the lower back is measured.
- Hip circumference ABOUT - determined by the widest part of the buttocks, strictly horizontally.
- Hip height WB - from the waist line to the hip.
- BC seat height - the measurement is made in a sitting position, from the waist to the surface of the chair.
- Knee height VK - the distance from the waist to the center of the knee.
- Knee girth OK - measured in a sitting position with the knee bent perpendicular.
- The length of the DB trousers is from the waist to the heel.
In order for the trousers to sit freely, when cutting, it is recommended to make an additional increase in the waist by 1 cm and an increase in the hips - 2 cm.
To begin with, consider the basic construction of a pattern of women's trousers. This base can be easily modified into any model. The construction is best drawn on graph paper, but you can take any sheet that is suitable in size.
Open the front part

Work should start from the upper right point A. From it, put down the height of the thigh - point B, and the height of the seat - point C. From point B to the left, measure ¼ of the hip circumference and increase on the hips - point B1, and 1/2 cm to the right - IN 2. From point C, lay down a line parallel to B-B1, and to the left 1/20 from the hip girth - C2. Connect points A, B2 and C2 with a smoothly flowing line. From point A, set aside a quarter of the waist circumference plus 3 cm - A1, from it up 1 cm - A2. Connect points A1, B1 and C1 using a pattern.
In the middle of the segment C1-C2, put point D, from it up to the line A1-A, point E. From it down, measure the height of the knee - point D1, and the length of the trousers - F. From point D1 in both directions we draw a line equal to ¼ of the circle knee, - points D2 and D3. Below, through point F, draw exactly the same segment. Now you can connect the side points to get a line of seams.
To build a tuck from point E, it is required to set aside 1 cm in both directions and 10 cm down - E1, E2, E3. Connect the dots with a triangle. Finally, connect points E1 and A2. The front pattern of women's trousers is completed.
Rear part cutting
The easiest way is to start right on the finished drawing, using the same points, just highlight the lines with a different color. You need to start again from point A, from it to the left put off half of the segment A-E plus 2 cm, you get point H. From it, the perpendicular upwards by 2 cm is H1. From point C, set aside 1/48 of the circumference of the hips - C3, which is connected to H1. To the right of C3, measure 1/10 of the hip circumference - C4. To the right, draw a line from point H, equal to 1/4 of the waist circumference minus 1 cm - H2, from it up 1 cm, H3, and H3 connect with H1.
Call the point of intersection of segments B and H1-C3 L. Draw a line from it to the left equal to ¼ of the circumference of the thigh - L1. Using the template, connect H3-L1 and L-C4. Next, we build the seam lines, marking 1.5 cm from the lower points in different directions. For a groove on the segment H1-H3, put a point M in the middle, set aside 1 cm from it to the sides and a perpendicular 14 cm long, connect into a triangle. The pattern of women's trousers is ready.

How to insert a rubber band
Trousers with a stiff waist look great, but lovers of a looser style give their preference to an elastic band. Such clothes fit more comfortably and better adapt to the features of the figure. How does the pattern change? There are many different models of women's trousers with an elastic band, but the construction of the drawstring is the same for everyone. You will only have to work on the upper part of the drawing.
First of all, you need to erase the tucks, they will not be needed here. From the hip, draw a line straight up, the width of the waist will turn out to be larger than the real one. Add 2 cm of elastic band on top and 2 cm for seams. If the pattern of women's trousers with an elastic band suggests a low waist, you first need to measure the height from the hip, and build a drawstring from this line. Trousers with an elastic band do not fall off and do not cause additional discomfort, they are especially convenient for office work or a long feast. Such a looser cut will hide minor figure flaws at the waist and hips.

Bananas are back
More and more gaining momentum returned from the eighties "bananas". The peculiarity of this pattern of women's trousers is the legs narrowed down and a wide femoral part. They are also easy to cut on a standard base. As with skinny pants, the hem should be shortened to the ankle and narrowed a little, only the bananas should be a little looser in this part. The hips, on the contrary, are moved apart by 5-7 cm in each direction. We increase the waistline by 3 cm, remove the tucks, instead of them there will be folds. A wide sewn belt will look logical.
The pattern of women's trousers in the style of the eighties will delight any fashionista. But for curvaceous girls, it is better not to choose bananas, but for thin people, on the contrary, they will help to add the necessary volume on the hips.

Skinny trousers
Skinny has been a popular summer trouser pattern in recent years. This model has already conquered many women's hearts. And men are crazy about slender ladies' legs in tight trousers. Only elastic stretch is suitable for sewing skinny, but the color and pattern leave room for inspiration and style.
To adapt the patterns, you need to take two additional measurements:
- girth of the knee with a straight leg;
- ankle circumference.
The length of the trousers will also have to be changed, this style only reaches the ankle. When building, you will have to shorten the length and reduce the width to fit new measurements in the knee area and along the bottom. Connect new dots. You can do it easier: in the knee area, reduce on both sides by 1.5 cm, and along the bottom - by 4 cm. But in this case there is a risk that the size will not fit. A spectacular pattern of women's trousers is ready to go.

Color and fabric
Summer brings a lot of rich colors and bright moods, and this is fully reflected in the summer wardrobe. The warm season allows you to experiment a lot with the choice of fabrics. Jersey, denim, cotton and linen, light chiffon and delicate silk - you can use anything.
Based on the pattern for "bananas", you can sew light summer trousers in an oriental style from thin flowing fabrics. Choose for this bright colors, intricate ornaments or a classic oriental paprika and curry pattern.
Skinny trousers in warm pastel colors are perfect for work and school, while bright marker shades will set you apart from the urban crowd.
The pattern of women's trousers is not an easy task, you will have to put in a lot of patience, but the result will exceed all expectations. Tailor-made clothing is incomparable to store goods, and the sewing process itself is a lot of fun. A happy owner of unique trousers can safely go for a walk without fear of meeting a competitor.
Today, trousers are a universal type of clothing that is in the wardrobe not only for men, but also for women. Depending on the model and cut, they can be worn to work, to the gym, to a nightclub, to be at home or used as a beautiful outfit for some holiday. If you decide to sew trousers yourself, then remember one rule - the pattern of women's trousers must be correct, then how to make a pattern of women's trousers is always of interest to needlewomen. Only in this case, your product will be successful and beautiful. Do not be afraid to fantasize and experiment, only in this case you will be able to choose and sew for yourself just such trousers that will hide all your flaws, and vice versa, emphasize the dignity of your figure.
Of course, now you can buy any pants. But will the models be original? Most likely no. But by sewing it yourself, you make an individual cut that will suit only you. You can also decorate the pants the way you want. So, let's figure out how to make a pattern of women's trousers. Let's get started.
But before proceeding with the analysis of the question of how to build a pattern, you need to decide on the size.
Deciding on the size
Before you start sewing, you need to find out your size, namely, take such measurements as: waist circumference (1) and hip circumference (2). So, let's look at the main indicators:
- 42 size: 1 - 66 cm, 2 - 92 cm;
- 44 size: 1 - 70 cm, 2 - 96 cm;
- 46 size: 1 - 74 cm, 2 - 100 cm;
- 48 size: 1 - 78 cm, 2 - 104 cm;
- 50 size: 1 - 82 cm, 2 - 108 cm;
- 52 size: 1 - 86 cm, 2 - 112 cm;
- 54 size: 1 - 90 cm, 2 - 116 cm;
- 56 size: 1 - 94 cm; 2 - 120 cm.


After determining the size, it is necessary to take the following measurements:
- Front length;
- Side length;
- First stride length;
- Second stride length;
- knee length;
- thigh circumference;
- seat height;
- The width of the bottom of the legs.
Main types
The correct construction of the pattern indicates how successful the sewing process will be. We bring to your attention several options for ready-made patterns, which you can easily download for free, and, already based on your measurements, modify them, sew a model of trousers that you like.
The main pattern of all trousers is the classic cut. It was by making their own changes that famous fashion designers at one time came up with other styles of trousers. So, as you already understood, we are talking about patterns of classic trousers.


Next, consider skinny pants and their patterns. This type of trousers is perfect for girls who have a model figure. But, as the designers say, it doesn't matter what parameters you have, the most important thing is how and with what you wear them.
When choosing tight trousers, it is necessary to select more voluminous sweaters for them. It can be a tunic, a sweater or a voluminous T-shirt.


Trousers breeches - a very fashionable style today. We are sure that patterns of this style will definitely come in handy for every needlewoman. It is recommended to wear such trousers with a romantic and feminine top. In no case should you wear them with sports sweaters or T-shirts. They are perfect for you if you have a model figure. In other versions of the figure, such trousers will look ridiculous.


Wide trousers with elastic. This type is suitable for almost any figure. They are not only beautiful because of their cut, but also stylish. An important aspect when choosing this type of trousers is their length. Now the floor length is in fashion, as well as the style and fit of them should be free and not hinder movement.


Pants styles can be very diverse: classic and sports; voluminous in the hips and more adjacent; expanded to the bottom and narrowed; with cuffs and without cuffs; with different types of pockets and without them; length, which varies from the knees to the level of the foot; with slits in the side seams and without slits; with various finishes: braid, lace, lacing and other decorative elements. Pants are made with or without lining. A wide variety of fabrics are used for sewing trousers: from guipure to drape.
The starting point for all this abundance is construction of the main drawing of trousers. And already on its basis, all styles that you can imagine are constructed.
And here's something else I would like to remind you: If you think that it is difficult, you will see that you were right. If you think that it's easy, you will again be convinced that you are right. So before you think - think! I wish you courage and self-confidence.
Let's take the first step.
We do not claim to be the author of the technique for constructing the main drawing of trousers, but only use it as an example. You can use any other. Better yet, try several techniques to determine which is more suitable for you. After all the main thing is to adjust what happens to your individual standard.
To build a drawing of the base of the trousers, the following measurements and increases are required (the figures given correspond to size 48:
Waist circumference (St) = 38cm,
Semicircumference of the hips (Sat) = 52cm,
Pants length to the knee (Dk) = 56cm;
Pants length on the side (db) = 100cm;
Pants width at the bottom (Wn) = 24cm;
Allowances for loose fit at the waist (Pt) and hips (Pb) are selected depending on the degree of fit of the trousers: Pt - from 0 to 1.5 cm, Pb - from 0.5 to 4 cm. For our construction, we take the minimum allowance for the waist, i.e. zero, and for the hips - 1 cm.
Fri = 0cm;
Pb = 1cm;
We need three more control measurements: knee circumference, ankle circumference and thigh circumference.
Construction of a drawing of the front half of the trousers.
We begin the construction of the drawing by drawing two mutually perpendicular lines.
The point of intersection is designated T1.
Seat height.
There are two options for determining the height of the seat: by taking measurements and by calculation. In our example, we use the second option, i.e. we determine this value by the formula T1R1 \u003d 0.5 x (Sb + Pb) + 1cm. Substitute the values, we get = 0.5 x (52+ 1) + 1 = 27.5 cm.
Set aside 27.5 cm from the point T1 down the vertical and put the point Y1. From point R1, left and right, draw a horizontal line.
Hip line.
Then everything is similar - the formula, we substitute the appropriate values, we get the desired result. Ya1B1 \u003d (T1Ya1): 3 \u003d 27.5: 3 \u003d 9.1 cm.
Set aside 9.1 cm from point I1 upwards vertically and put point B1. Draw a horizontal line through point B1 to the left and right.
The width of the front half along the hip line.
Formula, values, result. We move on.
B1B2 \u003d 0.5 x (Sb + Pb) - 1 \u003d 0.5 x (52 + 1) - 1 \u003d 26.5 - 1 \u003d 25.5 cm.
From point B1 to the right horizontally set aside 25.5 cm and put point B2. Through point B2, draw a vertical up and down, mark the intersection points as T2 and R2.

Rice. 2
Step width.
R2R3 \u003d 0.1 x (Sb + Pb) Carefully substitute the values \u003d 0.1 x (52 + 1) \u003d 5.3 cm (see figure below).
Set aside 5.3 cm from the point R2 to the right horizontally and put the point R3.
The position of the fold line.
I1I=I1I3: 2.
Divide the segment Y1Y3 in half and put a point Y.
Draw a vertical line through the point I up and down, mark the points of intersection with the auxiliary lines as T and B.

Rice. 3
Knee lines.
The distance TK is equal to the taken measure Dk = 56cm.
From point T down along the fold line, set aside 56 cm and put point K. Through point K, draw a horizontal line to the left and right.
Length trousers.
TN = Db = 100cm.
From point T down along the fold line, set aside 100 cm and put point H. Through point H, draw a horizontal line to the left and right.
The width of the front half of the trousers along the bottom line.
HH1 \u003d HH2 \u003d 0.5 x (Shn - 2) \u003d 0.5 x (24 - 2) \u003d 11 cm. Set aside 11 cm from point H to the left and right and put points: on the left - H1, on the right - H2.
The width of the trousers at the bottom should not be less than the measurement of the ankle girth.

Fig.5
The width of the front half of the trousers along the knee line.
KK1 = KK2 = HH1 = 11cm.
It should be noted that the width of the trousers along the knee line may be greater or less than the width of the trousers along the bottom line, or be the same, but should not be less than the measurement of the circumference of the knee (Ok) plus an increase of 2 cm for a loose fit. We take the width of the trousers along the knee line to be equal to the width of the trousers along the bottom line. From point K to the left and right horizontally, set aside 11 cm and put points: on the left - K1, on the right - K2.
Auxiliary points for the design of the step cut line.
The point R21 is obtained by dividing the segment R2R3 in half.
Connect points R21 and K2 with a straight line, divide this segment in half and connect the dividing point with a smooth concave line with point R3.
Draw a step cut line below the division point through points K2 and H2, connecting them with a straight line.

Rice. 6
Decoration of the "bow" line (line of the middle cut of the front half).
T2T0 = 0 to 1cm;
The distance T2T0 is taken equal to zero for figures with a convex belly, and also when trousers are supposed to be sewn from a fabric with a checkered pattern and stripes, although the latter condition is not necessary.
In our example, the distance T2T0 is 1cm.
Set aside 1 cm from the point T2 to the left horizontally and put the point T0. Connect points T0 and B2 with a straight line. Connect points B2 and R3 with an auxiliary straight line, divide the segment in half and put point D. Connect point D with a straight line to point R2. Divide the segment DYA2 in half, mark the division point as D1. Line the "bow" through the points T0, B2, D1, R3 with a smooth line.

Rice. 7
Waist width.
T0T4 \u003d 0.5 x (St + Fri) + two darts. The width of each tuck is 2cm. We take the minimum allowance along the waist line, i.e. zero. We substitute the values \u200b\u200bin the formula \u003d 0.5x (38 + 0) + 2x2 \u003d 23 cm.
Set aside 23 cm from the point T0 to the left horizontally and put the point T4.
The position of the darts on the waistline.
The first tuck is located along the fold line, set aside 1 cm from the T point to the left and right. The length of the tuck is 8-10 cm. Draw the sides of the tuck with straight lines;
The second tuck is located in the middle of the segment from point T4 to the solution of the 1st tuck. From the division point, lower a perpendicular 8-10 cm long - this is the center line of the tuck, set aside 1 cm to the left and right from it and draw the sides of the tuck.

Rice. 8
The line of the side cut of the front half of the trousers.
Connect the points R1 and K1 with an auxiliary straight line, divide it in half, and from the division point to the right along the perpendicular, set aside a deflection of 0.5-0.7 cm. Line the side cut through the points T4, B1, R1, the deflection point, K1, H1.

Rice. nine
Bottom line.
The bottom line of the front half is drawn with a straight line H1H2.
The construction of the drawing of the front half of the trousers is completed.
Construction of a drawing of the back half of the trousers.
The width of the back half of the trousers along the bottom line.H1H3 = H2H4 = 2cm.
Set aside 2 cm from points H1 and H2 to the left and right and put points H3 on the left and H4 on the right, respectively.
The bottom line of the back half: from point H, lay down 0.5 cm vertically and put point H5. Draw the bottom line with straight lines, connecting the points H3, H5, H4.

Rice. eleven
The width of the back half of the trousers along the knee line.
K1K3 = K2K4 = 2cm. From points K1 and K2 set aside to the left and right 2 cm each and put points K3 and K4, respectively. Connect points K3 and K4 with straight lines to points H3 and H4.

Rice. 12
Step Width (See the picture below).
R2R5 \u003d 0.2 x (Sb + Pb) + 1. Substitute the values \u200b\u200bin the formula \u003d 0.2 x (52 + 1) + 1 \u003d 11.6 cm. Set aside 11.6 cm from the point Z2 to the right horizontally and put the point Z5
Stepping line.
Points H5 and K4, connect with a straight line. Divide the Y5K4 segment in half, set aside 0.5-0.7 cm at the point of division along the perpendicular to the left - we get an auxiliary deflection point. From the point R3, drop down a perpendicular 1 cm long and put the point R31. I3 I31 \u003d 1cm. From point R2 through point R31, draw a straight line to the right until it intersects with the auxiliary line. Designate the intersection point R51.
Draw a step cut line through points R51, a deflection point and a point K4 with a smooth concave line, and through points K4, H4 - a straight line.

Rice. 13
Middle cut line.
Auxiliary points:
D1D2=D1Y2: 2
The balance of trousers is the ratio of the levels of the cut tops of the front and back halves.
TT21=TT2: 3
From point T to the right, set aside 1/3 of the length of segment TT2 and put point T21. From point T21, draw a vertical upwards, set aside 4.3 cm on it and put point T5:
T21T5 \u003d 0.1 x (Sb + Pb) - 1 \u003d 0.1 x (52 + 1) - 1 \u003d 4.3 cm.
Connect points T5 and R2 with a straight line, mark the point of intersection with the line of the hips as B3.
Line the middle cut through points T5, B3 with a straight line, then through points D2, R31, R51 - with a slightly concave line.

Rice. fourteen
The width of the back half of the trousers along the hip line.
B3B4 \u003d (Sb + Pb) - B1B2 from the front half \u003d (52 + 1) - 25.5 \u003d 27.5 cm.
Set aside 27.5 cm from point B3 to the left horizontally and put point B4.
The width of the back half of the trousers along the waistline.
T5T7 \u003d 0.5 x (St + Fri) + 2 darts. The width of the solution of each tuck is taken 2 cm = 0.5 x (38 + 0) + 2 x 2 = 23 cm.
From point T5 to the left, make a notch on the waist line with a radius of 23 cm and put point T7. Connect points T7 and T5 with a straight line.

Rice. 15
The position of the darts in the back half of the trousers.
Divide the segment T5T7 into three equal parts, lower the perpendiculars 8-10 cm long from the division points - we get the axial lines of the tucks, from which to the left and right put aside half of the tuck solution, i.e. 1 cm. Draw the sides of the tucks with straight lines.

Rice. 16
The line of the side cut of the back half of the trousers.
To ensure the smoothness of the side cut line, the distance B4K3 must be divided into three equal parts. From the division points along the perpendicular, set aside 0.5 - 0.7 cm. Moreover, at the top point of the division to the left, and at the bottom point - to the right.

Rice. 17
We make out the line of the side cut.
Connect points T7 and B4 with a slightly convex line, points B4 and K3 with a convex-concave line, through auxiliary points (see figure). We connect points K3 and H4 with a straight line.

Fig.18
The construction of the drawing of the back half of the trousers is completed.

Rice. 19
You have completed the drawing of the trousers pattern.
Any style can be constructed from this base and, of course, it can be used as a pattern for sewing dress pants. By making minor changes to the design, for example, expanding at the knees or narrowing the bottom, you get a completely new model. By experimenting, you gain invaluable experience.
We will lay out detailed instructions on design and sewing technology with illustrative examples in the relevant sections.
I wish you all creative inspiration!
Download in one file | turbobit | |
The rights to this article belong exclusively to the author. Full or partial use of the materials of this article in electronic publications on the Internet is possible only if the following conditions are met:
Author information must be saved. In the title or at the end of the published reprint, the source www.website of the Internet resource "Sewing Master" with a direct, active, visible to the user, not closed from indexing by search engines hyperlink to this article should be indicated.
The publication of texts by newspapers, magazines or other replication outside the Internet is possible only with the written consent of the author.
Pants are one of the most comfortable and versatile wardrobe items not only for men, but also for women. Depending on their color, fabric, cut, style, they are put on at work in the office, in the club, they relax at home and in nature, trousers can also become part of the festive look.
Comfortable and beautiful trousers can be chosen for any type of figure: somewhere you need to add centimeters, somewhere shorten, maybe supplement them with pockets or stitching. And in tailoring, the pattern plays a major role. "Playing" with the basic pattern, experimenting with details, fabrics and colors, you will definitely be able to find your model, which will only emphasize all the advantages of the figure, hiding the flaws.

Of course, good trousers can be bought. But it is so rare to find something truly unique in stores, and mass production is focused on typical figures, while there are a lot of options for various proportions. And then sewing comes to the rescue, helping both to make an individual cut to fit the figure, and to complement the model with small details that help reveal your individuality.

Dimensions
Both for choosing women's trousers and for tailoring, it is important to know your sizes and, first of all, this is the waist circumference (FROM) and hip circumference (OB).
- Pants size 42: FROM 66 cm, ABOUT 92 cm;
- Pants size 44: FROM 70 cm, ABOUT 96 cm;
- Pants size 46: FROM 74 cm, ABOUT 100 cm;
- Pants size 48: FROM 78 cm, ABOUT 104 cm;
- Pants size 50: FROM 82 cm, ABOUT 108 cm;
- Pants size 52: FROM 86 cm, ABOUT 112 cm;
- Pants size 54: FROM 90 cm, ABOUT 116 cm;
- Pants size 56: FROM 94 cm; ABOUT 120 cm.
You also need to take measures such as:
Front and side length, first and second stride length, knee "waist" length, thigh circumference (do not confuse with hip circumference), seat height, bottom width.
Pattern of women's trousers
A correctly constructed pattern provides more than half the success in sewing any product. We add for you various variations of trouser patterns that you can download and build patterns with your own sizes.
Pattern of classic women's trousers. It is by modifying it that you can get other styles.


The breeches are still in fashion. Therefore, a pattern of such a model of trousers will definitely come in handy.


As well as a pattern of sports trousers, because sports and a healthy lifestyle are always at the peak of popularity.

Skinny pants are also versatile. They are suitable for both casual and formal wear. Add a pattern of tight pants.


Fabric choice
First you need to decide what kind of pants you want to sew. If these are wide trousers, harem pants, then, as a rule, they have no problems with fit and almost any fabric is suitable for them. But if your choice fell on trousers that are rather narrow in the upper part, then the selection of fabric should be taken responsibly.
In this case, light fabrics such as "raincoat fabric", velveteen, denim synthetics, kapron, fabric with metanit, etc. will not work. However, they are suitable for sewing not tight trousers, but wide ones, such as bananas, trousers with elastic, with increases at the waist and on the hips, with all kinds of folds, tucks.
Product length and width
If you decide to create a pattern from scratch, then before you build it, you should pay attention to some of the nuances of different models.
Classic trousers:
- The width of the trousers at the bottom is determined by the length of the foot.
- The width of the trousers at the knee is equal to the width at the bottom.
- The length of these trousers is up to the middle of the heel.
- Accordingly, we try on only in the shoes with which we will wear them.
Skinny pants:
- At the bottom, their width is less than in the classic ones.
- In the knee, of course, more than at the bottom.
- Pants are tried on barefoot, the length should be to the floor.
Flared trousers:
- The width at the bottom they have more than the classic.
- Less at the knee than at the bottom.
- In shoes, the length of such trousers is 1 - 1.5 cm from the floor.
A selection of useful videos
Pattern-basis of women's trousers. Step-by-step construction of a pattern drawing
The styles of trousers can be very diverse: classic and sporty; voluminous in the hips and more adjacent; expanded to the bottom and narrowed; with cuffs and without cuffs; with different types of pockets and without them; length, which varies from the knees to the level of the foot; with slits in the side seams and without slits; with various finishes: braid, lace, lacing and other decorative elements. Pants are made with or without lining. A wide variety of fabrics are used for sewing trousers: from guipure to drape.
The starting point for all this abundance is construction of the main drawing of trousers. And already on its basis, all styles that you can imagine are constructed.
And here's something else I would like to remind you: If you think that it is difficult, you will see that you were right. If you think that it's easy, you will again be convinced that you are right. So before you think - think!
I wish you courage and self-confidence.
Let's take the first step.
We do not claim to be the author of the technique for constructing the main drawing of trousers, but only use it as an example. You can use any other. Better yet, try several techniques to determine which is more suitable for you. After all the main thing- this adjust what will happen to your individual standard.
To build a drawing of the base of the trousers, the following measurements and increases are required (the figures given correspond to size 48):
Waist circumference (St) = 38 cm,
Semicircumference of the hips (Sat) = 52 cm,
Pants length to the knee (Dk) = 56 cm;
Pants length on the side (db) = 100 cm;
Pants width at the bottom (Wn) = 24 cm;
Allowances for loose fitting at the waist (Pt) and hips (Pb) are selected depending on the degree of fit of the trousers: Pt - from 0 to 1.5 cm, Pb - from 0.5 to 4 cm. For our construction, we will take the minimum allowance for the waist , i.e. zero, and on the hips - 1 cm.
We need three more control measurements: knee circumference, ankle circumference and thigh circumference.
Construction of a drawing of the front half of the trousers.
We begin the construction of the drawing by drawing two mutually perpendicular lines.
The point of intersection is designated T1.
Seat height.
There are two options for determining the height of the seat: by taking measurements and by calculation. In our example, we use the second option, i.e. we determine this value by the formula T1R1 \u003d 0.5 x (Sb + Pb) + 1 cm. Substitute the values, we get \u003d 0.5 x (52 + 1) + 1 \u003d 27,5 cm.
Set aside 27.5 cm from the point T1 down the vertical and put the point R1. From point R1, left and right, draw a horizontal line.
Set aside 9.1 cm from point R1 upwards vertically and put point B1. Draw a horizontal line through point B1 to the left and right.

Hip width.
Formula, values, result. We move on.
B1B2 \u003d 0.5 x (Sb + Pb) - 1 \u003d 0.5 x (52 + 1) - 1 \u003d 26.5 - 1 \u003d 25.5 cm.
Set aside 25.5 cm from point B1 to the right horizontally and put point B2. Through point B2, draw a vertical up and down, mark the intersection points as T2 and R2.

Step width.
R2R3 \u003d 0.1 x (Sb + Pb) Carefully substitute the values \u003d 0.1 x (52 + 1) \u003d 5.3 cm (see figure below).
Set aside 5.3 cm from the point R2 to the right horizontally and put the point R3.
The position of the fold line.
I1I=I1I3: 2.
Divide the segment Y1Y3 in half and put a point Y.
Draw a vertical line through the point I up and down, mark the points of intersection with the auxiliary lines as T and B.

Knee lines.
The distance TK is equal to the taken measure Dk = 56 cm.
From point T down along the fold line, set aside 56 cm and put point K. Through point K, draw a horizontal line to the left and right.

Length trousers.
TN \u003d dB \u003d 100 cm.
From point T down along the fold line, set aside 100 cm and put point H. Through point H, draw a horizontal line to the left and right.
Pants width at the knee.
KK1 \u003d KK2 \u003d HH1 \u003d 11 cm.
It should be noted that the width of the trousers along the knee line may be greater or less than the width of the trousers along the bottom line, or be the same, but should not be less than the measurement of the circumference of the knee (Ok) plus an increase of 2 cm for a loose fit. We take the width of the trousers along the knee line to be equal to the width of the trousers along the bottom line. From point K to the left and right horizontally, set aside 11 cm and put points: on the left - K1, on the right - K2. The width of the trousers along the bottom line.
HH1 \u003d HH2 \u003d 0.5 x (Shn - 2) \u003d 0.5 x (24 - 2) \u003d 11 cm. Set aside 11 cm from point H to the left and right and put points: left - H1, right - H2.
The width of the trousers at the bottom should not be less than the measurement of the ankle girth.

Auxiliary points for the design of the step cut line.
The point R21 is obtained by dividing the segment R2R3 in half.
Connect points R21 and K2 with a straight line, divide this segment in half and connect the dividing point with a smooth concave line with point R3.
Draw a step cut line below the division point through points K2 and H2, connecting them with a straight line.

Decoration of the "bow" line (line of the middle cut of the front half).
T2T0 = 0 to 1 cm;
The distance T2T0 is taken equal to zero for figures with a convex belly, and also when trousers are supposed to be sewn from a fabric with a checkered pattern and stripes, although the latter condition is not necessary.
In our example, the distance T2T0 is 1cm.
Set aside 1 cm from the point T2 to the left horizontally and put the point T0. Connect points T0 and B2 with a straight line. Connect points B2 and R3 with an auxiliary straight line, divide the segment in half and put point D. Connect point D with a straight line to point R2. Divide the segment DYA2 in half, mark the division point as D1. Line the "bow" through the points T0, B2, D1, R3 with a smooth line.

Waist width.
T0T4 \u003d 0.5 x (St + Fri) + two darts. The width of each tuck is 2 cm. We take the minimum allowance along the waistline, i.e. zero. We substitute the values \u200b\u200bin the formula \u003d 0.5x (38 + 0) + 2x2 \u003d 23 cm.
Set aside 23 cm from the point T0 to the left horizontally and put the point T4.
The position of the darts on the waistline.
The first tuck is located along the fold line, set aside 1 cm from the T point to the left and right. The length of the tuck is 8-10 cm. Draw the sides of the tuck in straight lines;
The second tuck is located in the middle of the segment from point T4 to the solution of the 1st tuck. From the division point, lower a perpendicular 8-10 cm long - this is the center line of the tuck, set aside 1 cm to the left and right from it and draw the sides of the tuck.

Side cut line.
Connect the points R1 and K1 with an auxiliary straight line, divide it in half, and from the division point to the right along the perpendicular, set a deflection of 0.5-0.7 cm. Draw a side cut line through the points T4, B1, R1, the deflection point, K1, H1.

Bottom line.
The bottom line of the front half is drawn with a straight line H1H2.
The construction of the drawing of the front half of the trousers is completed.

Building a drawingthe back of the pants.
Bottom line width.
H1H3 = H2H4 = 2cm.
Set aside 2 cm from points H1 and H2 to the left and right and put points H3 on the left and H4 on the right, respectively.
The bottom line of the back half: from point H, lay down 0.5 cm vertically and put point H5. Draw the bottom line with straight lines, connecting the points H3, H5, H4.

Width at the knee line.
K1K3 \u003d K2K4 \u003d 2 cm. Set aside 2 cm to the left and right from points K1 and K2 and put points K3 and K4, respectively. Connect points K3 and K4 with straight lines to points H3 and H4.

Step Width(See picture below) . R2R5 \u003d 0.2 x (Sb + Pb) + 1. Substitute the values \u200b\u200bin the formula \u003d 0.2 x (52 + 1) + 1 \u003d 11.6 cm. Set aside 11.6 cm from the point R2 to the right horizontally and put the point R5.
Stepping line.
Points H5 and K4, connect with a straight line. Divide the Y5K4 segment in half, set aside 0.5-0.7 cm at the division point along the perpendicular to the left - we get an auxiliary deflection point. From the point R3, drop down a perpendicular 1 cm long and put the point R31. R3 R31 \u003d 1 cm. From point R2 through point R31, draw a straight line to the right until it intersects with the auxiliary line. Designate the intersection point R51.
Draw a step cut line through points R51, a deflection point and a point K4 with a smooth concave line, and through points K4, H4 - a straight line.

Middle cut line.
Auxiliary points:
D1D2=D1Y2: 2
The balance of trousers is the ratio of the levels of the cut tops of the front and back halves.
From point T to the right, set aside 1/3 of the length of segment TT2 and put point T21. From point T21, draw a vertical upwards, set aside 4.3 cm on it and put point T5:
T21T5 \u003d 0.1 x (Sb + Pb) - 1 \u003d 0.1 x (52 + 1) - 1 \u003d 4.3 cm.
Connect points T5 and R2 with a straight line, mark the point of intersection with the line of the hips as B3.
Line the middle cut through points T5, B3 with a straight line, then through points D2, R31, R51 - with a slightly concave line.

Hip width.
B3B4 \u003d (Sb + Pb) - B1B2 from the front half \u003d (52 + 1) - 25.5 \u003d 27.5 cm.
Set aside 27.5 cm from point B3 to the left horizontally and put point B4.
Waist width.
T5T7 \u003d 0.5 x (St + Fri) + 2 darts. The width of the solution of each tuck is taken 2 cm = 0.5 x (38 + 0) + 2 x 2 = 23 cm.
From point T5 to the left, make a notch on the waist line with a radius of 23 cm and put point T7. Connect points T7 and T5 with a straight line.

The position of the notches.
Divide the segment T5T7 into three equal parts, lower the perpendiculars 8-10 cm long from the division points - we get the axial lines of the tucks, from which to the left and right put aside half of the tuck solution, i.e. 1 cm each. Draw the sides of the tucks in straight lines.

Side cut line.
To ensure the smoothness of the side cut line, the distance B4K3 must be divided into three equal parts. From the division points along the perpendicular, we set aside 0.5 - 0.7 cm each. Moreover, at the upper division point to the left, and at the lower point to the right.

Making a side cut line.
Connect points T7 and B4 with a slightly convex line, points B4 and K3 with a convex-concave line, through auxiliary points (see figure). We connect points K3 and H4 with a straight line.

The construction of the drawing of the back half of the trousers is completed.
Cut details

You have completed the drawing of the trousers pattern.
Any style can be constructed from this base and, of course, it can be used as a pattern for sewing dress pants. By making minor changes to the design, for example, expanding at the knees or narrowing the bottom, you get a completely new model. By experimenting, you gain invaluable experience.
We will lay out detailed instructions on design and sewing technology with illustrative examples in the relevant sections.
Wish you luck!