I want to collect beads from natural pearls. Learning how to collect beads on a string correctly. Master class for beginners How to assemble pearl beads correctly
Gathering pearl beads withnodular technique of stringing pearlsyou will get a very delicate and flowing decoration. The knots between the beads will not only add flexibility to the product, but also protect the beads from hitting each other, and the jewelry itself will look stylish and professional.
For work you will need:
- http://magic-beads.ru/bitrix/templates/magic-beads/images/list_marker.gif); background-attachment: initial; background-origin: initial; background-clip: initial; background-color: initial; background-position: 0% 0%; background-repeat: no-repeat no-repeat; ">
Thread for stringing pearls Griffin; - http://magic-beads.ru/bitrix/templates/magic-beads/images/list_marker.gif); background-attachment: initial; background-origin: initial; background-clip: initial; background-color: initial; background-position: 0% 0%; background-repeat: no-repeat no-repeat; ">
Swarovski pearls (11 beads 12 mm, 20 beads 10 mm, 40 beads 8 mm); - http://magic-beads.ru/bitrix/templates/magic-beads/images/list_marker.gif); background-attachment: initial; background-origin: initial; background-clip: initial; background-color: initial; background-position: 0% 0%; background-repeat: no-repeat no-repeat; ">
Lock, callots; - http://magic-beads.ru/bitrix/templates/magic-beads/images/list_marker.gif); background-attachment: initial; background-origin: initial; background-clip: initial; background-color: initial; background-position: 0% 0%; background-repeat: no-repeat no-repeat; ">
Tweezers or thin pliers; - http://magic-beads.ru/bitrix/templates/magic-beads/images/list_marker.gif); background-attachment: initial; background-origin: initial; background-clip: initial; background-color: initial; background-position: 0% 0%; background-repeat: no-repeat no-repeat; ">
Tablet for jewelry design (optional).
In order not to get confused in the order of stringing the beads and to see in advance how the finished product will look, it is very convenient to lay out the beads of the future necklace on a jewelry design tablet before starting work. In the center we lay out 11 pearls measuring 12 mm, then on each side 10 pearls measuring 10 mm, and then 20 pearls measuring 8 mm. If the beads are too long for your needs, you can symmetrically remove the beads on each side and make the decoration shorter.
After the length of the jewelry and the order of the beads are determined, you can start lowering. For this piece of jewelry, I decided to use #04 white Griffin thread, because #08 thread turned out to be a bit thick for 8 mm beads, which are the vast majority in the jewelry. We will later attach a lock to the end of the thread, so step back from the end of the thread about 10 cm and tie a simple single knot, and then use the needle built into the thread to string the first (most extreme on the tablet) bead:
Tie a simple knot close to the bead, but don't tighten it yet:
To tighten the knot, it is best to use tweezers, but if you don’t have it, you can do with pliers / round nose pliers with thin ends. Insert the tool into the knot and grab the thread right next to the bead:
With one hand, continue to hold the thread with the tool, and with the other hand, pull the tip of the thread, tightening the knot around the ends of the tool:
Grab the thread with pliers or tweezers right after the knot and pull it closer to the bead:
String the next bead and in exactly the same way make a knot immediately after it. The knots should be tied close to the bead. If you see that the knot is getting a little too far, it's best to untie it before it's too tight and redo it. Continue stringing bead by bead until you reach the last one.
At the ends of the decoration, attach the fittings for attaching the lock, in this case, callots:
Tie a knot (preferably two, if you see that the hole in the fittings is large and the knot can fall out) so that it is inside the cup.
Collecting beads from pearls using the knotted technique of stringing pearls, you will get a very delicate and flowing jewelry.
The knots between the beads will not only add flexibility to the product, but also protect the beads from hitting each other, and the jewelry itself will look stylish and professional.
We already know . However, it is easiest to consider the use of a simple knot in beading using the example of collecting beads using the knotting technique.
For work you will need:
- Thread for stringing pearls Griffin;
- Swarovski pearls (11 beads 12 mm, 20 beads 10 mm, 40 beads 8 mm);
- Lock, callots;
- Tweezers or thin pliers;

In order not to get confused in the order of stringing the beads and to see in advance how the finished product will look, it is very convenient to lay out the beads of the future necklace before starting work. In the center we lay out 11 pearls measuring 12 mm, then on each side 10 pearls measuring 10 mm, and then 20 pearls measuring 8 mm. If the beads are too long for your needs, you can symmetrically remove the beads on each side and make the decoration shorter.
 |
After the length of the jewelry and the order of the beads are determined, you can start lowering. For this piece of jewelry, I decided to use #04 white Griffin thread, because #08 thread turned out to be a bit thick for 8 mm beads, which are the vast majority in the jewelry. We will later attach a lock to the end of the thread, so step back from the end of the thread about 10 cm and tie a simple single knot, and then use the needle built into the thread to string the first (most extreme on the tablet) bead: |
 |
Tie a simple knot close to the bead, but don't tighten it yet: |
 |
To tighten the knot, it is best to use tweezers, but if you don’t have it, you can do with pliers / round nose pliers with thin ends. Insert the tool into the knot and grab the thread right next to the bead: |
 |
With one hand, continue to hold the thread with the tool, and with the other hand, pull the tip of the thread, tightening the knot around the ends of the tool: |
 |
Grab the thread with pliers or tweezers right after the knot and pull it closer to the bead: |
 |
String the next bead and in exactly the same way make a knot immediately after it. The knots should be tied close to the bead. If you see that the knot is getting a little too far, it's best to untie it before it's too tight and redo it. Continue stringing bead by bead until you reach the last one. |
 |
At the ends of the decoration, attach the fittings for attaching the lock, in this case, callots: |
 |
Tie a knot (and preferably two, if you see that the hole in the fittings is large and the knot can fall out) so that it is inside the cup: |
 |
Cut off the rest of the thread immediately after the knot: |
 |
And put a drop of glue on the knot so that it does not untie: |
 |
Close the hardware doors, leaving the knot inside: |
 |
Now attach any lock you like to the loops. |
Pearls are a stone that suits almost all women of any age. This is a classic that never goes out of style, but this classic can be made unique and not very expensive. How? Make your own.
In order to make beads from pearls with your own hands, you do not need much. Let's try.
- You will need: pearls - different to your taste (maybe a set of glass, golden, etc.), pins 3.5 cm long - more than 50 pieces, carnations 3.5 cm long - about 20 pieces, up to 20 rings (0.7 mm in diameter), metal cord holders (2 pcs.), carabiner.
- For the base: wire - gold thin 1 meter (0.2 mm thick) and black 15 cm (1 mm). Gray and brown polyester cords - 2 and 0.45 m, respectively.
- Instruments: Pliers
Step by step instructions
- First of all, you need to take 7 polyester cords (35 cm each) and wrap them in a bundle.
- Pass the clip on the tip and on the cords.
- The wire must be cut with wire cutters, further 1 cm from the clamp
- Bend both ends with round nose pliers to make an eyelet on both sides.
- We wind the wire (0.2 cm wide) to the cords, retreating from the clamp 10–12 cm.
- We string pearls on the wire and wrap the cords with wire with beads. Do 32 turns.
- You can thread a golden and glass bead over a pin, and a carnation on the last one. We cut off all the ends.
- We make ears on each bead. We grab the tip of the pins and the carnation with round-nose pliers and wrap it all the way.
- Having slightly opened the eye of the pearl, we cling to it the eye of the pin with a glass pearl. Add the rest of the beads to the second ear of the glass pearl. We attach this chain of pearls to the center of the jewelry with a ring.
- We add five pearls to the pins, and we cling one to the carnation. We make ears on them, fasten them to each other. We fasten the chain with the base with a ring, retreating slightly from the attached chain.
- We make 7 chains of gold and 8 of glass pearls (as you like). We attach the structure to the base.
- We make the lock with the help of a ring on one side and a ring with a carabiner on the other.
Master class: how to make pearl beads with your own hands?
And this video shows how beads are collected in Hong Kong. Learning from professionals :)
Thus, we get very original and unusual jewelry without spending much time and money. It would be much more expensive to buy such beads. Their average price varies from 900 rubles and above.
Repair of pearl beads is also quite possible to do with your own hands. If the lock is broken, you can use the same one from another piece of jewelry or buy it in a jewelry store. A torn fishing line is easy to replace with another, it is only important not to lose pearls.
Thus, your imagination and desire can work wonders, and your jewelry box will always have a large selection of unique, original and priceless jewelry!
... I love tender pearls,
pure gift of the seas!
Everyone knows about the female love for pearls - from ancient times. There was even a recipe for beauty - "pearl water" - this is the water in which several pearls lay during the night. It is useful to drink such water in the morning, it has anti-inflammatory and antimicrobial effects. Contemplation of pearls calms the psyche, pacifies and gives spiritual harmony.
Pearl has positive energy. A string of pearls around the neck is a sign of good taste, a symbol of elegance. Let's try on our own make a necklace handmade from this noble material. The planned length is about 50 cm. 
Necessary materials:
freshwater pearl 
Accessories - metal cable (lank) - 55 cm, one fastener-lock, two crimp-clamps: 
By the way, a variety of accessories for creating jewelry with your own hands - on the MaryLine website. Here you can, for example, buy a leather cord for assembling original bracelets and fashionable necklaces.
Useful tools - wire cutters, mini round nose pliers, mini pliers: 
We thread the elements at one end of the wire in the following order: crimp - pearl - clasp, bend the tip at a distance of about 2.5 cm and return it, thread it in the reverse order - from the clasp into the pearl and into the crimp hole. We adjust the size of the loop and carefully clamp the crimp with pliers 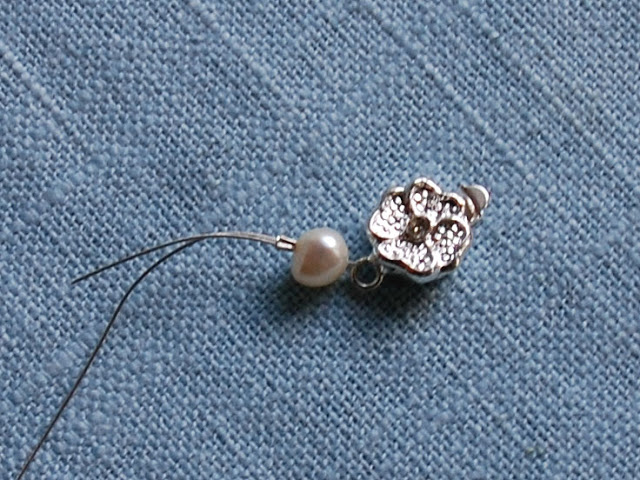 We string 2-3 beads, hide the remaining end of the cable, threading it into pearls. The excess part is removed with wire cutters:

We continue to string the pearls to the desired length: 
We make out the second end in the same way as the beginning of work, only in the reverse order: after the pearl - crimp - pearl - the second end of the lock. 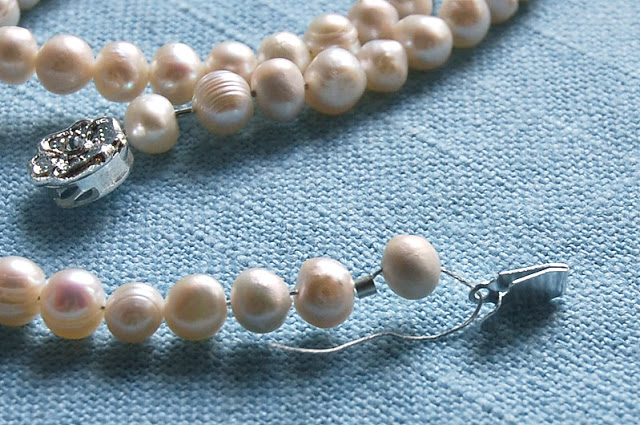
We bend the wire and make the opposite way with the tip: pearl-crimp - two or three pearls, cut off the rest with wire cutters 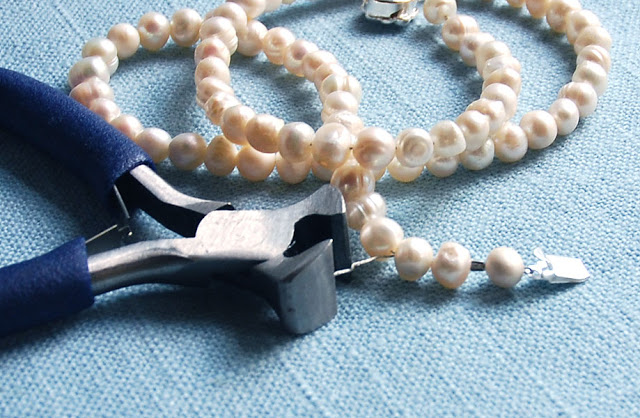
Thus, we designed the clasp for the necklace: 
The length of the resulting – about 50 cm: 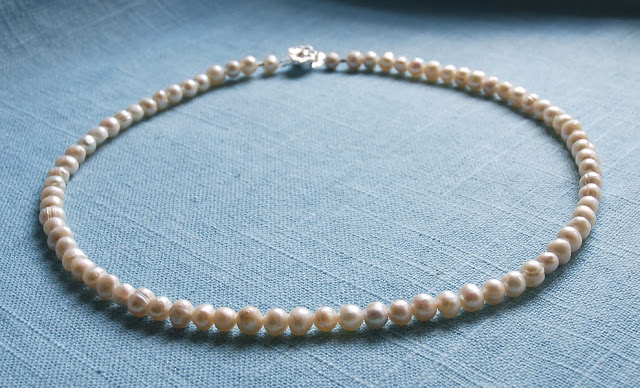
Beautiful pearls, an original lock - such a clasp can be worn "forward", it will look like an element of decoration: 

In a similar way, you can collect stones and beads. You can try to make it for the decoration that you are going to give.
The malachite beads and pearl beads in this article are very old pieces of jewelry that have crumbled for quite some time and the torn beads were folded in bags. But malachite is one of my favorite stones, and I really wanted malachite beads. If there weren’t these, it would be possible to buy new ones (see in the gallery below which ones are being made today).
But they are not cheap, and buying the second one when one is lying ... I had to get it and do repairs.
At first I thought about making them fastened - from old beads and from sets with beads there were both fishing line and several types of fasteners. So I started collecting, but - one side of the clasp was done neatly, the second - not very much, so I took it off on both sides, and just tied the ends of the fishing line tightly into many knots - the length of the beads allows you to wear them over your head.
The repair is very far from ideal - you can wear it, and I still wear it, but - apparently this is temporary. I like it much more when the beads (or at least the front part, where the beads are large) are collected through knots - then, even if the beads break, they will not crumble. Well, with a clasp, of course, it’s also more familiar.
I left a few malachite beads - the smallest - for dolls.
At the same time, I repaired the same scattered old pearl beads. Here already - with a clasp, otherwise you can’t dress it in any way - they are under the neck. I had to redo it twice - the first time at the fastener I overdid it with glue - when it dried, it did not fasten. I collected it on another, large clasp - there you tie the fishing line with hooks, you can pull on what does not hang out.
In general - also not 100% joy, of course, but - on the other hand, two beads are again "in the arsenal". And where and how to fix it is still a question.
Do-it-yourself bead repair

"source" - torn beads, natural malachite - new ones cost about 3000, I had to do repairs :-)

at one end the clasp was held, at the other it was torn - and the thread is very old, dilapidated

above - the source, below - I collect on a fishing line

ready-made version (apparently temporary) - the fishing line was simply tied tightly, dressed over the head, well long

torn pearl beads, also old

fishing line and various fasteners

finished beads assembled on a new fishing line

bags with pebbles, clasps, etc. small things - for dolls, repairs, etc.

and these beads are modern versions, all are natural malachite Round beads made of natural malachite. Bead diameter 11 mm, product length 48 cm.

Round beads made of natural malachite. Bead diameter 10 mm, product length 47 cm.

Beads made of natural malachite. Product length 44 cm.

Beads made of natural malachite. Product length 45 cm.
A separate article about malachite beads:
www.site/article/pomo/gems/Beads_from_natural_malachite
I myself have been doing repairs for a long time (customers often bring their old beads to the section to be repaired), so I want to share some tricks. Firstly, NEVER use a fishing line, it tends to shovel with constant kinks (in the fastener area, for example), instead take a thread on a silk or nylon base (there are now a lot of them in departments with all sorts of sewing accessories, and there are different colors and thicknesses, and the color thread is important if there is a search through the knot). Such threads are very strong (if you try to break them faster, you will hurt your finger :) plus the beads lie down softly even if they are not sorted through the knot (in the case of fishing line, they usually stand with a stake, especially if the fishing line is thick). Well, making knots with them is also quite simple. Take a double thread and, after tying the knot, pull the ends apart in different directions, tightening the knot as close to the bead as possible. the thread is silk, smooth, then the knot will “pull up” to the bead without any problems (the only thing we take into account is the thickness of the thread in accordance with the hole: the bead should not “fly” through the resulting knot). That's all, we choose the color thickness we need and repair the beads without any problems! By the way, pomoymu fasteners should also be sold in such stores with accessories !!
Irisha, thank you very much, I did not know how to assemble them correctly. And so it happened - I really have them standing with a stake, I don’t like it, they don’t lie evenly, well, plus with the clasp, I didn’t succeed the first time. Now I'll change it.
And the threads do not deteriorate from moisture? ..
The fact that they are strong - yes, I know such ones, they can’t even break thin ones in ANY way, but in 2 additions, or if you buy thicker ...
In general, you have to go to a sewing store. :-)) I will redo it, otherwise my favorite malachite, but not happy. :-) More precisely pleases, but not as we would like. :-)
But that the fishing line is torn - I didn’t even know, I thought its drawback was only “rudeness” and the fact that the shape of the beads is not “soft” ...
Well, the fishing line is not something that breaks, it's just that, like aluminum wire, it will burst after many bends (but this mostly applies to a rather thick fishing line). From moisture, if they deteriorate, they can just get dirty (and sometimes they bring beads 50 years ago, so there is so much dirt in the holes of the beads that you have to clean it with a needle !!), but in general, periodically (once every 2-3 years) the thread is recommended to be changed if it gets very dirty (for example, on pearls, the thread is white and the knots can get dirty over time), but if you have a whole spool of thread, this is all done on your own without any problems !!
In general, look at your purchased beads there you will immediately understand everything! Take a longer thread, fold it 2 times and flip it through the lock on one side, and then completely assemble the beads and tie a knot on the other side of the lock, be sure to leave the tails somewhere 1 cm and gently set them on fire with a match. The ends will melt and a fused droplet will form that will not let your knot untie! And with the knots, be sure to try it, there are no problems, the main thing is to fill your hand! Nobody taught me either, at first it didn’t seem to work out, and then, as I understood it, it was right and everything went, and it’s not difficult! Now I’m sorting out all the beads for myself, I collected white pearls through a knot for myself, and long agates with a photo in general from two short beads I collected through a knot! The whole trick is in the threads, they must be nylon, silky only on a tight knot can be adjusted close to the bead!
Well, if the holes in the beads are very large (there are such that any knot flies by), then you can insert the beads between the beads and it also looks good!
I have very small holes in my malachite, the knot will not fly by, I think it remains only to get good nylon threads. I have an Iris coil - this is cotton, although it doesn’t tear, they don’t collect on such? ..
I considered knots on beads, but I didn’t try to do it, I’ll just practice on a thread at first, until it’s not very clear how to do it.
But it’s interesting - I have these malachite beads only in front of large balls, then small ones - small ones are also collected through a knot, or do they also make large ones through a knot, and then just? ..
I think it will be beautiful to do everything through the knot, I think it will be beautiful! As for the iris, I don’t know, try it, but it seems to me that it’s not slippery enough to pull the knot to the bead and there will be ugly distances! I think it’s better for you to go to the store and go straight with the bead Choose the thickness and color you want! I have always collected on nylon on iris, I have never tried it! And as for how to make knots, I will try to post pictures or photos!
Well, I can’t post photos yet. there is no repair at the moment but here is a picture:
THANKS!!! From the diagram, everything is clear. So - a kapron thread, and the ends of the thread - to the sides! I understand, it seems really easy, then I will make a knot after each bead!
True, I’ll probably get out to the store only that week, or even later ... Everything skidded - there is no road! :-) And cold to boot. :-))
Malachite has already been put aside, it is very interesting to reassemble it humanly! :-)
Well good luck to you!! :) As you collect, write! I hope everything will work out! Just unwind more threads, the knots "eat up" a lot of thread!
Yeah, as I understand it, every 2 times you need to take more thread, or even more ...
As I rebuild - I will publish! :-)
I bought dark green threads, I'm getting ready to reassemble the beads, it remains only to find the time ... :-)
Well, how are the beads? haven't picked it up yet??