Applications of flowers from fabric by hands. Floral appliqués on fabric. Children's flower applique
An applique is considered an ornament already finished product from fabric by gluing or sewing figures from fabric, i.e. this technique performs a decorative function. The schemes proposed in this article will help you make applications in the form of a flower and an owl. Exist different techniques execution, choosing one of them, the needlewoman will get a beautiful applique.
One of the most famous and common ways is to draw the details on cardboard, transfer them to fabric, and then cut out the details with scissors with a margin for bending the seams. Further, it is desirable to attach the cut out parts to the product with pins.
When making seams, it is important to fold the edges correctly so that there is not too much fabric, and keep in mind that the stitches should be held at the very edge of the part. If the parts are not attached to the product manually, but with the help of a sewing machine, then the cut parts must first be glued, then the edges should be processed with a zigzag.
There is a way to make an applique without the need to tuck and process the seams, for this you need to cut out two blanks of each part, fold them with their right sides inward, and then stitch them. Next, you need to make a cut to turn out the parts and then you can sew them to the product. In order for the pictures to turn out to be voluminous, it is worth using a dense fabric for the manufacture of parts.
Do-it-yourself fabric appliqué "Flower"
Even children can make an application from fabric, there is nothing difficult about it. For example, you can make an application in the shape of a flower, for this you need to think over the idea, purchase cardboard, scissors and threads with a needle. For convenience, you can prepare templates for children in advance. To do this, draw the outlines of future parts on a sheet of cardboard, and then cut them out. Then ready-made templates can be applied to the fabric and cut out the desired details.
In order to get a flower, you need to cut out five parts with a supply of fabric for hem and edge processing. Working with each detail, you must first bend the edges and iron them, then attach the part with the wrong side to the product, secure with pins and baste. After that, the part should be sewn to the product using an invisible seam. The same principle of working with other cut parts. The result of the work is shown in the photo.


Owl
An owl made of felt can be an excellent addition to the interior of a children's room. In order to perform such an application, you will need felt different colors, thermal gun, as well as scissors and a needle and thread.
Thanks to the master class, it will become clear how to make an appliqué out of fabric. First you need to prepare the base, then cut it out of felt Brown tree trunk and branches. Then, according to the template, you need to cut out all the details of the owl, not forgetting that a certain color corresponds to each detail.
Then all the parts should be connected with a thermal gun. First you need to glue the eyes to the body, then the nose, then the feathers and, finally, sew the wings. After this, the edges of the resulting product must be processed. You can also cut out leaves, flowers from felt, be sure to process the edges of the parts, and after that, first glue the tree, then the owl, then all the other details onto the base.


Other do-it-yourself fabric appliqué options
The applique can be done by hand, or it can be made with a sewing machine. The video tutorials presented in this article will demonstrate workshops on making appliqués from fabric by hand and using a sewing machine, explaining how to make stitches correctly.
Fabric applications: how to do?
Schemes and sketches for work
Applique on fabric is a technique for creating a variety of ornaments and patterns by sewing fragments of fabric on clothes, bags, etc.
There are 2 ways to fix applique details: sewing and gluing. If paintings and panels are made, the pattern is glued onto the base, and if they want to decorate clothes, they are sewn by hand or with a sewing machine.
The application can use 1 or more colors, as well as combine different techniques.
What materials and tools are needed for the job?
For applications of varying complexity, the same set of materials is required.
Prepare natural as well as synthetic fabrics of different textures. Textured options are beautifully combined: fleecy, shiny, smooth. You can use natural and artificial fur, leather and silk. Applications made of velvet, velveteen, burlap and cloth look good. The most convenient material is felt, it is best to make paintings, panels, decorate bags and backpacks from it. The background or base material must be selected depending on what fabrics you plan to use for decoration. The base should be denser and harmonize well with the colors.
It is recommended to starch the bases for paintings so that the fabric keeps its shape, it is convenient to work with it. Also, starched matter will crumble less. Thick and synthetic fabrics do not need starching. This processing method is more suitable for natural thin materials such as chintz, satin, burlap, linen. Very thin fabrics, such as silk and lace, are recommended to be compacted with potato paste or gelatin. The material is dipped into a paste solution, and then ironed with a hot iron from the wrong side. Fabrics treated with gelatin cannot be ironed; it is recommended to simply dry them.
Required tools:
Large and small scissors may also require scissors with curved ends.
A set of needles of various lengths and thicknesses.
Thimbles.
Embroidery hoops.
English sewing pins.
Carbon paper and tracing paper for transferring the image to the base fabric.
How to make a fabric appliqué: step by step instructions
The principle of making applications is the same, regardless of whether you are doing it on clothes or decorating some products.
Before starting work, you need to select a plot. You can come up with a drawing yourself or use ready-made schemes. The plot should match the style of clothing, and the materials blend well with each other. It is not recommended to make applications on clothes made of very thin fabrics.
After you decide on the plot, proceed to the selection of fabrics and other materials. This is a very responsible step, because the wrong combination of color or structure can spoil the whole work.
It is impossible to glue decorative elements on clothes, they will not withstand washing and ironing. It is best to sew applications on sewing machine but you can do it manually.
Children's fabric applications will decorate the child's clothes and accessories, with the help of this decor you can make even the most simple thing elegant and beautiful.
Also old clothes You can not throw it away, but use it to decorate various products.
Fabric applications are divided into 2 main types: flat and voluminous. In order to get volumetric work, they put under the fabric a small amount of cotton wool or foam rubber. Volumetric decoration looks beautiful and original, but it makes washing and cleaning clothes more difficult. Also, over time, volumetric images may lose their original shape, and they will need to be corrected.
To make an application, draw or print sketches of future work. First you need to adjust the dimensions of the finished scheme to the dimensions of the product that you want to decorate. As a model for sketches, you can use drawings in newspapers and magazines, postcards, and other materials.
Most often, the drawing has to be enlarged or reduced, it is most convenient to do this in special programs on a computer.
Decor elements should not contain superfluous and very small details, otherwise the pattern will turn out to be somewhat blurry, and it will be difficult to sew it on. You need to immediately make a sketch in 2 copies.
One of them will serve to make a pattern, and the other is used to control the correct location of the elements on the fabric. The drawing for control can also be transferred to the base using carbon paper.
Attach the pattern to pieces of fabric, secure with pins and circle with chalk. The direction of the threads on the elements of the pattern and on the main fabric should match. This is especially important for large parts. Some patterns require an increase in those places where the parts overlap each other. For example, if you need to connect a skirt and a jacket, you will need to add 3-5 mm of fabric to the bottom edge of the jacket. If there are several identical parts in the application, cutting work can be accelerated and shortened. Fold the fabric in several layers and cut out all the elements at once.
Baste finished parts to the base with a classic basting seam. If the fabric is fraying a lot, make small stitches. The seam is best placed along the edge of the parts, stepping back 2-3 mm. It is recommended to make oblique stitches, then the threads that have come out of the fabric will be easier to grab. Sew on the decorative elements on the sewing machine with a special thick seam or manually with satin stitches, tambour or buttonhole stitches. You can finish the edges of the entire applique with a decorative cord that will decorate your work and emphasize it.
If a thin fabric such as silk or chiffon is taken as a base, it is recommended to sew an additional layer of material on the wrong side. It is best to take exactly the same fabric from which the product itself is sewn. The sketch must be transferred to the wrong side of the base and tucked into the hoop, securing it with sewing pins. Place the pins on the side where you will sew. Carefully cut the rest of the fabric with sharp scissors and stitch the appliqué with a double stitch or a special “roller” stitch. You can use a stitch for embroidery stitch.
Inside large elements, you can make embroidery, openwork nets and patterns. Decorating with beads, beads and sequins also looks beautiful.
If you plan to make a picture with an application, it is most convenient to use glue to fix the elements of the picture. The following types of glue are considered the best for such work: PVA, BF-2 and potato starch paste. Rubber and silicone glue is not recommended because they do not hold the fabric firmly and some elements may peel off over time. Also, these types of glue can deform applications made of thin materials. A convenient and interesting way to fix the elements on the base with an iron. To do this, from a film or ordinary plastic bag you need to cut out the application and put it on the base. All the elements for decor are already placed on the film in the right order and smoothed with an iron. You do not need to heat up the iron much, it all depends on the type of fabric from which the parts are made.
Applications are always exciting and interesting, so many children are happy to take on the creation of such crafts. Most often on children's applications flowers are depicted: both in the kindergarten and at school, they often make postcards for Mother's Day with the image of flowers, and also invite children to decorate flower meadows or spring landscapes.
Floral appliqués amaze with their diversity; in different paintings, the design is made in a wide variety of styles: from a simple flat cardboard flower to a lush fabric bud. It is this variety of types of floral applications that gives the already familiar paintings and postcards a little originality, and different level of difficulty for crafts makes them accessible not only to small children, but also to adults interested in creativity and needlework. To make an interesting appliqué using three-dimensional fabric flowers, use the master classes given in this article.
One of the classic children's applications, familiar to everyone from kindergarten, is a vase of flowers. Such crafts are usually made specifically for mothers, sisters, grandmothers, or simply to replenish children's albums, room decoration. To make such an application, you just need cardboard for this, colored paper, scissors and glue (pencil or PVA). The next master class will tell you how to make a picture with your own hands.
- Draw a vase on a sheet of colored paper or use a pre-prepared stencil. Cut out the shape.
- Also draw on paper in different colors loose buds. Cut them out and put them in a vase.
- Cut out thin green lines (stalks) and leaves from green paper.
- Start painting. Take a sheet of cardboard as a base and lay it vertically. Glue the vase onto the bottom half of the sheet. At the top, attach the stems peeking out of the vase. Scatter the flower buds and leaves evenly over the stems.
Gallery: application "Flower" made of fabric and paper (25 photos)


 originality ordinary paper picture or a postcard can be given with the help of volume. Volumetric applications "Flowers" look more interesting than the usual flat counterparts, so getting them, and even more so doing it yourself, is much more fun. The next master class will tell you how to make a postcard with voluminous daisies in a pot.
- From a sheet of colored paper, cut out a pot in the shape of a semicircle.
- Cut out some green stripes. Set aside three of them for the stems, and for the remaining two or three pieces, fold the ends, forming small loops - chamomile leaves. Glue the ends.
- Now you need to make the buds themselves. Use a yellow circle of paper as the core, and cut out a few thin white stripes for the petals. With each of them it is necessary to do the same work as with the sheets. Having made the petals, glue their bases to the wrong side of the yellow circle. To make the parts glue evenly and turn out to be the same size, you can draw a smaller circle on the core and glue the petals along this line. In the master class, it is proposed to make three such flowers.
- Collect all the details in one application. per sheet Glue the pot on cardboard, place green stems with leaves in it, and then arrange the chamomile buds.
simple fabric flowers
 If ordinary paper applications already tired, I want something new and unusual, you can try yourself in fabric crafts. They are no more difficult than paper and cardboard products, especially if a child or an adult who decides to do needlework has some sewing skills or ordinary work with a needle and thread. Next voluminous flowers fabric nor can be easily done with your own hands, even for beginners in the world of needlework.
- First, make a cardboard base: cut a circle of small diameter (maximum ten centimeters). Wrap the base in fabric.
- Sew the edges of the resulting figure using a regular seam. In this case, the thread must be tightened more tightly to get a bag.
- We sew a large button into the very center, and put a smaller button on top and also attach it to the product, fully forming the core for the flower.
- When finished with a button, bring the thread to the wrong side , and then sew the resulting flower to a piece of fabric or clothes e.
 Such lush and airy flowers will help not only to create a beautiful application, but also to decorate clothes in an interesting way. Many needlewomen use this technology for sheathing dresses, skirts and all kinds of tops, trying to give this piece of clothing tenderness. Meanwhile, such beautiful flowers DIY is very easy, if you make every effort. A master class on creating an application "Flower" from fabric is provided below.
- Make a round template out of cardboard. You can make several different sizes if you need a variety of flowers.
- Attach the templates to the mesh fabric (can be replaced with guipure or soft tulle) and circle, and then cut out. For each flower, you need to make five or six such circles of fabric.
- Take a bunch of fabric parts and sew them to a piece of fabric for appliqué or to a piece of clothing by the inside edges, tightening the fabric a little and thereby preventing it from puffing up. In the same way, do the work with the second row of petals, shifting them a little. Some of the petals in this row can be left loose to make the flower appear natural.
- Last layer of petals form from petals smaller or the same size, but bent in half to make the bud as natural as possible.
- When you're done, take beautiful button or a few beads and sew on as a core for a flower.
Buds from fabric flagella
 This master class is one of the easiest among the possible options for creating flowers from fabric. You won’t have to spend a lot of time and effort on it, so any beginner in the world of needlework will be able to create an interesting detail for an appliqué or clothing accessory.
- Take your fabric and cut it into long strips.
- Sew one end of the ribbon firmly with thread to the garment or appliqué base. Now start twisting the fabric into a bundle and wrap it around the attached tip, forming a round flower. As soon as the flagellum ends, take a new strip and sew its end to the previous one, and then start twisting another tourniquet.
- When the flower is formed, finish the work by hiding the tip of the fabric behind the flagella from the previous circle. The core is decorated at the request of the needlewoman and needlewoman, can be sewn to the center bud beautiful bead.
Children's flower applique
 Such a picture can be done in the classroom in primary school, but it can be suitable for children more younger age if you teach them all the skills needed here. The result is a bright picture that is sure to attract the attention of guests and decorate the interior. Volume application from fabric is performed according to the following scheme:
- Draw the petals on cardboard or a piece of paper (it is better to take a thick one, as plain paper easily torn, it is not always convenient to use it as a template). You can find what you need petal images, print them out, and then cut them out.
- Trace the resulting templates on paper and cut out the petals in such a way that there is a margin that can be folded.
- Fold in the edges of the petals to make them look bigger, and then iron every detail. Lay the petals in turn on the base for the picture and attach them there with large stitches.
- Now that the application has been formed, all that remains is how to fix the result and sew all parts with a hidden seam.
 Skilled craftsmen and craftswomen will surely cope with the next craft. The master class explains in detail how to make a satin rosette with your own hands, so even beginners can try their hand at this business.
- Cut five squares out of paper so that each next one is about a centimeter larger than the previous one. Fold each pattern in quarters, then round off the top. Having straightened the figures, you will get squares with round corners.
- Attach the templates to the atlas, transfer the drawing there, and then cut it out. Three or four copies are needed for each petal.
- Using an ordinary candle or lighter, burn the edges of the petals a little.
- Start collecting the whole flower. For each bud, you need two parts from each pile. The largest parts are located at the bottom, and the smallest ones are at the top. All petals are stitched together.
- The core can be optional decorate with a beautiful bead.
Here are such beautiful flower applications you can make with your own hands from paper and fabric. Crafts can be used as a gift to relatives or home decoration.
Gorgeous fabric flowers, fortunately, are back in fashion. In the last century, every girl knew how to make such flowers and decorate her hat, dress or jacket lapel. Making fabric flowers is not easy, but very simple. Every day with a new flower, you can change your everyday look. Today we will try to make chrysanthemum and dahlia.
To make flowers you will need:
- long pieces of fabric. For chrysanthemums, organza is needed, and for dahlias, a less loose fabric is better;
- disappearing marker;
- scissors;
- needle with thread;
- template cardboard.
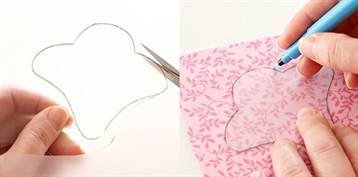
Step 1. The principle of making flowers of two types is the same. We make a template from cardboard. For chrysanthemums with sharp ends, for dahlias - with round ones. We advise you to save the templates, you will need them, you will probably want to make more than one flower. You can experiment with the shape of the petals and the fabric, it will be fun.
Step 2. Outline the template with a disappearing marker or any pencil. How good is a marker? You don't have to worry about lines being visible on the product, they will disappear after a while.

Step 3. Cut out the workpiece and pick up its base with a seam forward needle. Can be sewn with a machine seam with a large step.
Step 4. We tighten the thread and pick up the workpiece. We fix the end of the thread on the wrong side. Do not worry that the edges of the fabric begin to crumble a little, this will give the flower a natural look.

If you do not like the middle of the flower, then it can be embroidered with beads, rhinestones, etc. Glue or sew on reverse side pin or clasp and use as a brooch. And if you sew on an elastic band, you can decorate your hair with such a flower. Although not only yourself can be decorated with flowers. Use them to decorate home textiles, interior elements, etc. Collect a whole bed of flowers, let them bloom on your bag or hat.
Flowers are already a classic when choosing a plot in any kind of art, be it painting or needlework. And this is not surprising, because images of flowers always look elegant and attractive. There are many options for embodying these landscapes, they can be very simple, not difficult for children, or they can be such that adults will also be forced to try. This article will show you how to make flower appliqués out of fabric. This is a very unusual type of creativity that can be performed in several techniques. Some of them will be presented to your attention.
Let's try the simplest option first and decorate the pillowcase with a pretty tulip. This option is ideal for those who have a few shreds of fabric lying around, but it's a pity to throw them away. And you don’t have to do this, because with their help you can make such a charm:
Easy lesson
For work you will need:
- Cardboard sheet;
- Scissors;
- Threads;
- Needle;
- Well, the fabric.
First, prepare the templates, then, attaching them to the fabric, cut out the necessary details. We should get a flower, for this we need to cut out 5 parts, do not forget to leave space on the fabric for folding and finishing edges.
For each part, you need to bend the edges and iron them. Then we attach the blanks with the wrong side to the pillowcase, secure with a pin or light stitches.

Now, using an invisible seam, we sew the details to the product.

We process other elements of the application in the same way. The photo below shows what you should get:

Other schemes for this type of applications will be presented below.


Flowers from flagella
Let's consider another interesting way creating an application, the flowers will turn out to be voluminous.
You will need:
- Fabric (it is recommended to take a thin material, because a dense material will look sloppy);
- Scissors;
- Needle;
- Threads;
- Base fabric;
- Beads or buttons (for the core).
Let's get to work:
- To begin with, you need to cut long narrow stripes from the fabric.
- We sew one of these strips by the edge to the main fabric, this will be the middle of the flower.
- Now let's proceed to the most important thing - the formation of the bud itself. We take the sewn strip in our hands and twist it around its axis, while wrapping it in a circle. If you want to make the flower more magnificent, you can add more stripes by sewing them on with inconspicuous stitches.
- We hide the ends of the patches under each other. The middle of the flower can be decorated with a bead or a neat button.
Here are some cute flowers we got:

Volumetric and airy
To perform such work, guipure materials, mesh fabric or tulle are best suited. Flowers will be airy and very unusual.
For work you will need:
- Textile;
- Cardboard sheet;
- Scissors;
- Simple pencil;
- Threads;
- Needle.
When everything is ready necessary materials, you can safely get to work:
- Draw a circle on the cardboard of the size you want to make a flower petal.
- Now we apply the resulting templates to the fabric, circle and cut out. The more blanks you make, the more magnificent the flower will turn out.
- Now we take a few petals and sew them to the main fabric by the inner edges. Pull off the fabric, otherwise it will puff up, and this will greatly spoil the look of your product.
- Now we give the shape to the flowers, sew the remaining petals to the base, creating a bud the way you want.
- At the end of the work, we make the core of the flower from a bead or button.
Thus, you can create a picture, decorate the interior, curtains, a niche in the photo shows an option for decorating a T-shirt with such flowers, it turned out very interesting.

Decorate the pillow
Flower-shaped fabric applications can be used not only to improve clothes, but also to add zest to the interior, for example, to diversify it with such an interesting pillow.

Unusual, agree. Do you want the same? It is very simple, below your attention will be offered step by step master class to create such a pillowcase.
For work you will need:
- Scraps of multi-colored fabric;
- Buttons;
- Needle;
- Threads;
- Scissors;
- An unnecessary pillowcase that you decide to "upgrade".
We start creating.
To begin with, we will make blanks: cut out circles with a diameter of about 6-7 centimeters from the fabric. Make them as many as possible, because that's how many flowers you will have.

Now tighten the thread and fasten. You should get something like a bag, see how it should look in the picture below.

Now, without cutting the thread, we thread the needle into the button and sew it to the “bag”. Fasten the button securely.

We do not cut the thread with the needle again, it should be on the back of the flower. We sew it to the pillowcase in the place that you have chosen for it. We make the rest of the flowers in the same way.
As you can see, the process is quite simple, but the result is simply excellent.
Who would have thought that small masterpieces can be made from such simple things, flowers are always a relevant element of decor, because we always want to let a little summer into our souls, and what better than a beautiful flower symbolizes this warm season. One has only to turn on the fantasy, and you can give an unusual look to familiar things.
Video on the topic of the article
Perhaps this collection of videos will help you get inspired.