How to crochet a finger on a mitten. Master class: Crochet woolen mittens. Crochet mittens for a girl: a diagram with a description
Knowing how to knit, you can pamper yourself and your loved ones with unique novelties. It is no coincidence that Coco Chanel considered handmade things to be a luxury. For example, crocheted Mittens are an original and practical accessory that will add zest to any look.
They are knitted in several ways: with a continuous fabric around, with a side seam, from two halves, using the patchwork technique. To make crochet mittens, the description of the work must be specified according to the diagrams and your own sizes. The most popular knitting options are: in the round and from the middle of the fabric.
Knitting mittens in the round. Method 1
Work begins from the cuff:
- Having typed a chain of air loops, it is closed in a ring. The hand should pass freely into it. Do not forget that the chain always stretches more than the finished canvas.
- The mitten is knitted from the base of the palm to the base of the thumb. The transitions between rows will not be noticeable if you use the spiral knitting technique. At the same time, you need to carefully count the rows in order to tie the second mitten absolutely symmetrically.
- From the leading loop, several air loops are recruited (depending on the thickness of the thread). The same number is omitted in the base row. The next loop is knitted from the base. At this stage, it is better to try on the workpiece. The thumb should fit into the hole without difficulty.
- Next, the mitten is knitted to the end of the little finger. Decrease is done evenly, two loops in a row.
- Along the edge of the hole for the thumb, they begin to knit the last detail. For female models the finger on the mitten is evenly reduced in the last third. For men - in the last row.
- The cuff is knitted with an elastic band or some embossed pattern in a straight line. Rolls into a ring and connects. The main part of the mitten is sewn to the cuff so that the seam of the cuff connection falls on the inside of the wrist. Cuffs are not needed if you immediately knit more rows to the base of the thumb. A smaller hook will make the edge of the mittens more elastic.
- The ends of the thread must be pulled inside out and secured so that they do not come out during wear and washing.
The scheme for crochet mittens No. 1 is presented below.

Knitting in the round. Method 2
The toe will turn out more accurate if you start working with it:
- A chain of six air loops closes in a ring. Twelve loops of the first row are knitted from it. In the next row, twelve more loops are added and so on until a circle of sufficient size is obtained. When bent in half, it covers four fingers.
- Then knit without additions to the bend of the thumb. Although a clear transition was made on the toe from row to row, it is better to continue knitting in a spiral way.
- The hole for the finger is formed using a chain of air loops (as in the previous description).
- Continue knitting to the base of the palm or further (to the desired length). The cuffs are sewn in accordance with the intended model.
- The finger is tied in the same way as in the previous case.
Knitting from two halves
For beginners, crocheted mittens crocheted in this way are a real find.
The back side is knitted with a solid fabric:
- The length of the initial chain of air loops should be no less than the distance from the base of the palm to the last phalanx of the middle finger.
- At the end of the first row, eight loops are knitted from last loop grounds. The work is turned upside down, and not inside out as usual. Continue the same row, knitting loops from the other half of the air chain.
- Performing lifting loops, the work is turned over. In the second row, four loops are added evenly for rounding.
- Knitting continues until the part reaches the desired width.
On the inside, a hole for the thumb is knitted using a chain of air loops. Details for the right and left palm should not be symmetrical. Holes are located on opposite sides.
The scheme for crochet mittens No. 2 is in this photo.

You can not make a special hole for the finger in the part. Sometimes the side seam is left partially free. The part begins to be knitted on the edge loops.
The seam on such a model is made on the front side; if possible, it should be decorative. It stands out with contrasting threads or large connecting posts.
Crochet mittens for children
Babies are not knitted separately for the thumbs. Such mittens-bags are called "scratches". They are worn not only for warmth, but also so that the baby does not injure himself. A one-year-old child can, with the help of adults, put on a mitten with a special compartment for the finger. So it is much more convenient to hold objects in your hands and play. Often, for children and teenagers, mittens are connected with a long ribbon or elastic band so that they do not get lost. Baby (crocheted) mittens for beginner knitters will be a great workout.

You can decorate an accessory for a child in absolutely incredible ways. You can use all your imagination. For example, make cute little animals out of mittens.

Crochet men's mittens
This accessory should be particularly durable, warm and comfortable. You can make a fleece lining or knit double mittens. This option is better to knit in the round. First, the inner part is knitted without the cuff. Top part a little more is done to freely put on the inside. The cuff is sewn immediately to both parts. Parts for the finger can be knitted separately or one by starting work from two bases at once. A double mitten is much warmer and softer than a regular double mitten.
Needlewomen come up with various tricks so that mittens provide maximum freedom of action. To do this, you can, for example, separately knit the details for the thumb and forefinger. In such a mitten, it is more convenient to hold small objects in your hand or get them out of a narrow pocket.
Popular touch screens do not respond to touch through fabric. But if you leave small slots in the product for the index and thumb, then you can leave the mitten on to use your phone or e-reader. Holes are made using an air chain at the beginning of the reduction of the toe and finger detail.
Foldover mittens
A very common option is crocheted mittens with a separate toe. Such an accessory is appropriate in the wardrobe of a man, woman and child.

A mitt is knitted. You can knit the beginning of the fingers (as on gloves) or leave a smooth edge at the level of the first phalanx. The toe is knitted separately. The part is lengthened so that it reaches the base of the index finger. Both parts are connected on the back of the mittens. Be sure to sew on a button to secure the removed toe.
How to decorate women's mittens?
You can add decorative elements to the finished workpiece. Applications, beads, sequins, knitted items, embroidery and other techniques are always at the service of the craftswoman. If you don’t want to overload mittens with details, but at the same time you need a spectacular thing, you need to think over the decor before starting work. Knitted mitten beautiful pattern or gradient, in itself is a work of art and does not need additions.

This pattern works well with fluffy yarn.

Crocheted mittens using the patchwork technique are very effective. Yarn sectional dyeing can also create a successful pattern resembling jacquard.
funny ideas

Crocheted mitten unusual shape can be a good joke and a wonderful, completely extraordinary gift. For example, mittens for walking are a set of three pieces. One common, and two - male and female - on different hand.

Drink mittens are perfect for football fans and all other outdoor enthusiasts.
Crocheted mittens are a very interesting wardrobe detail. Unlike knitting, these products always turn out to be very peculiar due to the knitting method. Mittens for newborns are very comfortable to read, as it will be a very difficult task to put gloves on small hands. There is enough material on the Internet on the topic of how to crochet mittens, however, we want to offer you an exciting master class "Crochet Baby Mittens for Beginners".

Let's move on to knitting
In order for the knitting pattern of mittens to be the most concise and clear in understanding, special conditional abbreviations are used. In our master class, the following notation will be used:
- st - column;
- s.s.n. - double crochet;
- air n. - air loop;
- s.b.n. - single crochet;
- r.l.s.s.n. - embossed front columns with a crochet;
- r.i.s.s.n. - embossed purl with a crochet.

What you will need to create mittens for babies:
- yarn;
- hook.
The composition of the yarn is 100% acrylic, 100 g. For a very warm version of mittens, you can use wool. Hook size 5.
How to crochet mittens. It is necessary to dial 15 air loops. Then you should knit in half of each loop of the chain 1 single crochet (hereinafter s.b.n.).
At the end of the row you need to knit one air loop, after which we turn the product over and begin to knit in half of each loop of the previous row 1 s.b.n. So we knit to a certain length of gum. This length should be equal to the girth of the hand. In our case, the length will be 16 centimeters.


After the completed stage of work, it is necessary to connect the resulting gum. This is done by inserting the hook under one half of the loop, grabbing the thread and pulling it through two loops.
We do the same on the other side of the future mittens. All these actions should be repeated until the end of the connecting row.

We turn to knitting the middle part of the mittens for children. To do this, you need to knit using circular rows in a spiral. In each vertical row and to the end of the entire row, you need to knit 1 single crochet. Thus, you need to knit 8 more rows. Here you can use the trick, namely to fix the pin in order to avoid losing the beginning of the row.

The subsequent rows of the product in the same way continue to knit s.b.n. until we knit to the place where the thumb is formed.
Working on the thumb
We do not knit ten loops to the corner and knit ten air loops. Then, you need to skip 10 loops of the connected row and begin to knit a single crochet in the 11th loop.


Absolutely according to the same scheme, it is necessary to knit a hole for the thumb of the left mitten. We continue to create the middle part with a single crochet until its length reaches the little finger of the hand. After that, usually, they begin to create the toe of the mittens.
The toe of the mitten is different - the reduction of the loops of the product within certain four points. The reduction takes place as follows: it is necessary to insert the hook into the loop of the previous knitted row, then grab the thread and pull it onto a new loop. There are now two loops on our hook, respectively, we must insert the hook under the loop following them, grab the thread and pull out a new loop. There are already three loops on the hook. We do similar actions, after which, we begin to knit with a single crochet to the next of four points. Again we make a decrease in the loops. Such actions are carried out until the end of the series.

Similar decreases of loops are done until about 6-7 loops remain on the hook. The loops that remain can be pulled together with a needle by cutting the working thread, leaving a small tail. The resulting tail must be threaded into the needle. The needle must be threaded into each of the loops and pulled off. From the wrong side of the future mittens, the thread is fixed.
The thumb is knitted by fastening the thread from the side of the thumb inside. We knit 2 lifting air loops, 2 n.s.b.n. In order not to form holes or holes, it is necessary to monitor the insertion of the hook. Next, we continue to knit a single crochet in a circle to the next sidewall of the mittens. Again, it is necessary to knit 2 n.s.b.n., trying not to provoke holes in the product.
Be sure to watch the position and insertion of the hook! There should be three loops left on the hook that need to be knitted together.
The next step is to knit to the end of the circular row using a single crochet. Then you need to close the row with a connecting column. This is done by inserting the hook into a common top, consisting of two unconnected columns. In a spiral, we continue to knit circular rows until we reach the length we need.
The last step in the master class for knitting mittens for children will be the steps we already know to reduce the loops.


Step 1
Loop set.For the upper part of the mitten, make 8 half-columns into the thread ring, while instead of the 1st half-column, tie 2 lifting air loops. Finish this and each subsequent circular row with 1 connecting column in the uppermost lifting air loop.
In the next circular row, increase the number of loops to 16. To do this, knit 2 half-columns
on one base loop.
Divide these loops as follows: 1st loop is the right middle loop, the next 7 loops are the upper side of the mitten, the next loop is the left middle loop, the remaining 7 loops are the inside of the mitten.
Starting from the 2nd round, work in rounds back and forth so that the beginning of the round does not move. To do this, after each circular row, turn the work.
Then, to expand the upper part, work in each 2nd circular row in a loop before and after both middle loops, respectively, 2 half-columns = 4 increases for 1 circular row.
The number of loops to achieve the girth of the brush, as well as the length, are given in the table (see below) or in the instructions.

Step 2
Inner side.After reaching the indicated number of loops, knit further without increments to the jumper of the thumb.
For the jumper of the thumb, work in the loops before and after the left middle loop 2 half-columns each = 2 added loops of the jumper. Then leave the loops untied.

Step 3
Thumb and thumb wedge.Start knitting as follows: run 8 half-columns into a thread ring, with
In this case, instead of the 1st half-column, tie 2 lifting air loops. Finish this and each subsequent circular row with 1 connecting column in the uppermost lifting air loop. On the next round, increase the number of loops to the number of loops corresponding to the circumference of the finger. To do this, evenly distributing, tie 2 half-columns on one loop of the base. The number of loops, as well as the length of the finger, are given in the table or instructions.
Starting from the 2nd round, work in rounds in the forward and back directions so that the beginning of the round does not move. To do this, after each circular row, turn the work.
Upon reaching the appropriate length of the thumb, work for the jumper of the thumb in the first and last loop 2 half-columns = 2 added jumper loops.
After that, knit on all loops, while in the 1st circular row, knit together the first two loops of the inside of the mitten, the last 2 loops of the outside of the mitten, and the first and last 2 loops of the thumb. Thus, the added loops for the jumper of the thumb will be reduced again.
Next, for the thumb wedge, knit together in each circular row the last loop of the outside of the mitten with the 1st loop of the thumb and knit the last loop of the thumb together with the 1st loop of the inside of the mitten. Repeat these decreases in the same places until the loops of the thumb are reduced. Now in the work the same number of loops as before starting the jumper of the thumb.
After that, knit for the length of the mitten indicated in the table.
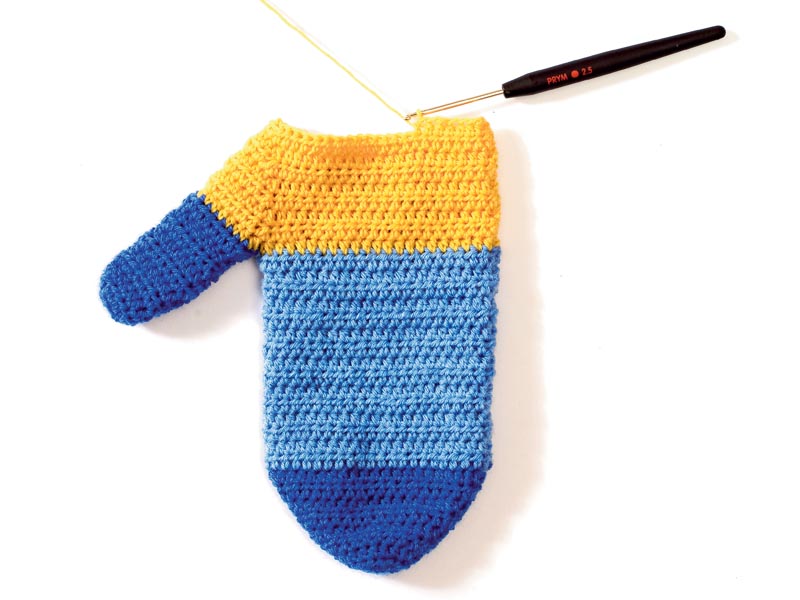
Step 4
Cuff.Most often, it is knitted with embossed double crochets so that it is slightly pulled together. If the number of loops is not suitable for the pattern, then in this case, in the 1st circular row, you can easily reduce 2-3 loops. At the desired cuff length, leave all loops untied.
Use the end of the thread of your thumb to stitch the jumper and sew it up.


Photo: magazine “Little Diana. Special Issue" No. 9/2015
Knowing how to knit, you can pamper yourself and your loved ones with unique novelties. It is no coincidence that Coco Chanel considered handmade things to be a luxury. For example, crocheted mittens are an original and practical accessory that will add zest to any look.
They are knitted in several ways: with a continuous fabric around, with a side seam, from two halves, using the patchwork technique. To make crochet mittens, the description of the work must be specified according to the diagrams and your own sizes. The most popular knitting options are: in the round and from the middle of the fabric.
Knitting mittens in the round. Method 1
Work begins from the cuff:
- Having typed a chain of air loops, it is closed in a ring. The hand should pass freely into it. Do not forget that the chain always stretches more than the finished canvas.
- The mitten is knitted from the base of the palm to the base of the thumb. The transitions between rows will not be noticeable if you use the spiral knitting technique. At the same time, you need to carefully count the rows in order to tie the second mitten absolutely symmetrically.
- From the leading loop, several air loops are recruited (depending on the thickness of the thread). The same number is omitted in the base row. The next loop is knitted from the base. At this stage, it is better to try on the workpiece. The thumb should fit into the hole without difficulty.
- Next, the mitten is knitted to the end of the little finger. Decrease is done evenly, two loops in a row.
- Along the edge of the hole for the thumb, they begin to knit the last detail. For female models, the finger on the mitten is evenly reduced in the last third. For men - in the last row.
- The cuff is knitted with an elastic band or some kind of embossed pattern in a straight line. Rolls into a ring and connects. The main part of the mitten is sewn to the cuff so that the seam of the cuff connection falls on the inside of the wrist. Cuffs are not needed if you immediately knit more rows to the base of the thumb. A smaller hook will make the edge of the mittens more elastic.
- The ends of the thread must be pulled inside out and secured so that they do not come out during wear and washing.
The scheme for crochet mittens No. 1 is presented below.

Knitting in the round. Method 2
The toe will turn out more accurate if you start working with it:
- A chain of six air loops closes in a ring. Twelve loops of the first row are knitted from it. In the next row, twelve more loops are added and so on until a circle of sufficient size is obtained. When bent in half, it covers four fingers.
- Then knit without additions to the bend of the thumb. Although a clear transition was made on the toe from row to row, it is better to continue knitting in a spiral way.
- The hole for the finger is formed using a chain of air loops (as in the previous description).
- Continue knitting to the base of the palm or further (to the desired length). The cuffs are sewn in accordance with the intended model.
- The finger is tied in the same way as in the previous case.
Knitting from two halves
For beginners, crocheted mittens crocheted in this way are a real find.
The back side is knitted with a solid fabric:
- The length of the initial chain of air loops should be no less than the distance from the base of the palm to the last phalanx of the middle finger.
- At the end of the first row, eight loops are knitted from the last loop of the base. The work is turned upside down, and not inside out as usual. Continue the same row, knitting loops from the other half of the air chain.
- Performing lifting loops, the work is turned over. In the second row, four loops are added evenly for rounding.
- Knitting continues until the part reaches the desired width.
On the inside, a hole for the thumb is knitted using a chain of air loops. Details for the right and left palm should not be symmetrical. Holes are located on opposite sides.
The scheme for crochet mittens No. 2 is in this photo.

You can not make a special hole for the finger in the part. Sometimes the side seam is left partially free. The part begins to be knitted on the edge loops.
The seam on such a model is made on the front side; if possible, it should be decorative. It stands out with contrasting threads or large connecting posts.
Crochet mittens for children
Babies are not knitted separately for the thumbs. Such mittens-bags are called "scratches". They are worn not only for warmth, but also so that the baby does not injure himself. A one-year-old child can, with the help of adults, put on a mitten with a special compartment for the finger. So it is much more convenient to hold objects in your hands and play. Often, for children and teenagers, mittens are connected with a long ribbon or elastic band so that they do not get lost. Baby (crocheted) mittens for beginner knitters will be a great workout.

You can decorate an accessory for a child in absolutely incredible ways. You can use all your imagination. For example, make cute little animals out of mittens.

Crochet men's mittens
This accessory should be particularly durable, warm and comfortable. You can make a fleece lining or knit double mittens. This option is better to knit in the round. First, the inner part is knitted without the cuff. The upper part is made a little larger to fit freely on the inside. The cuff is sewn immediately to both parts. Parts for the finger can be knitted separately or one by starting work from two bases at once. A double mitten is much warmer and softer than a regular double mitten.
Needlewomen come up with various tricks so that mittens provide maximum freedom of action. To do this, you can, for example, separately knit the details for the thumb and forefinger. In such a mitten, it is more convenient to hold small objects in your hand or get them out of a narrow pocket.
Popular touch screens do not respond to touch through fabric. But if you leave small slots in the product for the index and thumb fingers, then you can not remove the mitten to use the phone or e-book. Holes are made using an air chain at the beginning of the reduction of the toe and finger detail.
Foldover mittens
A very common option is crocheted mittens with a separate toe. Such an accessory is appropriate in the wardrobe of a man, woman and child.

A mitt is knitted. You can knit the beginning of the fingers (as on gloves) or leave a smooth edge at the level of the first phalanx. The toe is knitted separately. The part is lengthened so that it reaches the base of the index finger. Both parts are connected on the back of the mittens. Be sure to sew on a button to secure the removed toe.
How to decorate women's mittens?
You can add decorative elements to the finished workpiece. Applications, beads, sequins, knitted items, embroidery and other techniques are always at the service of the craftswoman. If you don’t want to overload mittens with details, but at the same time you need a spectacular thing, you need to think over the decor before starting work. A mitten knitted with a beautiful pattern or gradient is a work of art in itself and does not need additions.

This pattern works well with fluffy yarn.

Crocheted mittens using the patchwork technique are very effective. Section-dyed yarn can also create a successful jacquard-like pattern.
funny ideas

A crochet mitten of an unusual shape can be a good joke and a wonderful, completely extraordinary gift. For example, mittens for walking are a set of three pieces. One common, and two - male and female - on a different hand.

Drink mittens are perfect for football fans and all other outdoor enthusiasts.
Winter is already slowly waking up, reminding us of its imminent visit on increasingly cooler nights and an ever-growing desire for a cup of hot tea. It is difficult to think of a better pleasure after a walk on the street than to take a cup of hot tea with both hands and feel how your whole body is filled with warmth through your hands. So homey and cozy...
Probably, each of us can remember many such moments - to warm up from a cup of tea or, chilled, to take the hand of a loved one. It is through the hands that we receive so many sensations that are transformed into emotions that are pleasant to the heart ...
That is why today I present you a master class from which you will learn. beautiful, warm mittens will gently warm your hands and the hands of your loved ones this winter.
After all, it's so nice to wear a thing knitted by one's own hands, and it's even more pleasant to receive mittens personally knitted for you. Give your family such joy by knitting for them crochet mittens.
So, stock up on inspiration and get started!
For work, I used Pekhorka "Australian Merino" yarn (100% wool, 100 g / 400 m) in two colors and hook No. 3.5.
We start knitting mittens according to this pattern:

Air lift loop (c.p.p.)
Connecting post (connection st.)
Double crochet (st. s / n)
Embossed front column with a crochet (rel. persons. st. s / n)
Embossed purl double crochet (rel. st. s / n)
Thread gray color making a ring from a loop (more info)
1 row: we knit 3 chp,


we close the circular row of connections. Art. thread white color, introducing the hook into the 3rd ch.p.p.

2 row: we knit 2 v.p.p.,

in the same loop (introducing the hook under the ch) we knit (convex) st. s / n,

* in the next loop we knit 1 tbsp. s / n, introducing a hook into st. s / n before. row

and rel. persons. (convex) art. s / n, introducing a hook under the same art. s / n before. row*.

We repeat from * to the end of the row, in this row we have 24 columns (2 chp count as a column).

We close a series of connections. Art. with a gray thread, introducing the hook into the 2nd ch.p.p.

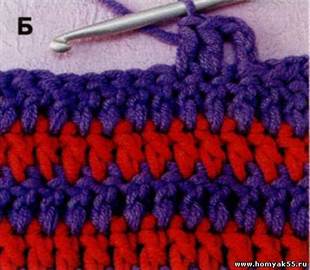
3 row: we knit 2 v.p.p.,


*following we knit a loop 1 tbsp. s / n in Art. s / n before. row,

and then rel. persons. (convex) art. s / n, introducing a hook under the same art. s / n before. row*.

We repeat from * to the end of the row, in this row we have 48 columns (2 chp count as a column).


4 row: we knit 2 v.p.p.,


in a trace. loop knit rel. out. (concave) art. s / n *.

Repeat from * to the end of the row, ending the row of rels. persons. Art. s / n.

We close a series of connections. Art. gray thread.

We knit all subsequent rows without increments, similarly to the 4th row, alternating relief columns according to the pattern, we knit 2 chp,

in a trace. loop knit rel. persons. Art. c / n, in the next. loop knit rel. out. Art. s / n,

and so on to the end of the row.

We close a series of connections. Art. white thread.

We knit the number of rows we need, up to the thumb.

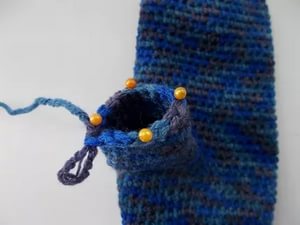
We will knit the hole for the thumb according to this pattern (for the right mitten):


in a trace. knit loop st. b/n,


skip 11 st. and in the 12th rel. out. Art. s / n before. row knit Art. b/n,


So we knitted a hole for the thumb of the right mitten.

For the left mitten, we knit a hole symmetrically, i.e. we knit 2 chp, then we knit 33 embossed stitches,

then knit st. b / n in rel. out. Art. s / n before. row,


11 art. we skip in the 12th rel. out. Art. s / n before. row knit Art. b/n,


in Art. b/n prev. row knit rel. out. Art. s / n,


in Art. b/n prev. row knit rel. out. Art. c / n, and then next. relay loop. persons. Art. s / n, we close a number of connections. Art.


So we knit to the length of the mittens we need.


Here are my 2 mittens. I have it located in the middle of the palm, it is almost invisible.

Trying on!


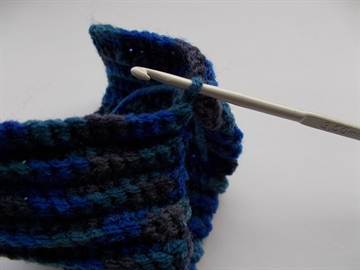
Let's start knitting a finger. We fix a new thread of gray color, on the inner side of the thumb. Next, we knit 2 v.p.p.,


We leave long end threads for stitching the finger.

We thread the end of the thread into a needle with a thick eye and start capturing all the ch. sew a finger.

It turns out like this:

We hide the end of the thread on the wrong side, and also carefully hide all the tails of the threads and now our mitten is ready!


We knit similarly thumb at the second mitten!
Thanks to this pattern and woolen threads, incredibly warm mittens are obtained, so that your hands will not freeze even in the most severe frost.

VIDEO master class on crocheting mittens.
Happy knitting and see you soon!
Full copying of site materials is prohibited!
Only partial copying (announcement) with an active link to the site is allowed!
If you want to receive fresh articles, lessons and master classes from the site site to your mailbox, then enter your name and e-mail in the form below. As soon as a new post is added to the site, you will be the first to know about it!