Decoupage. Master classes for beginners step by step with a photo: from napkins on a bottle, box, plate, chair, wood, wallpaper, photography, eggshell. Decoupage for beginners - step by step instructions. Decoupage bottles or a master class on converting usually
When, after the next holiday, you cannot throw out the bottle because the shape of the vessel is very interesting, it means that the feeling of beauty has won over the arguments of reason, or there is already an idea for decoration.
Your soul needs a creative act - do-it-yourself bottle decor.
At your service there is always a master class in the company of a master or an Internet version of the work process. Ideas for decoration can be seen on forums where needlewomen share their achievements. A simple way to decorate is decoupage with a photo. After processing, a picture, photograph or postcard is glued to the bottle. There are many techniques and master classes where bottles are decorated with twine, salt, leather, ribbons and even tights.

Paint the bottle
In order to get a taste for decorating, simple manipulations with the object are enough. Do-it-yourself elementary decor of glass containers is done using paint. The transparent item can be painted from the inside or outside.
For internal staining, pour acrylic paint into the bottle, using a syringe without a needle, and rotate the bottle to achieve a tight internal coating.

As interesting idea you can paint the container from the inside in several colors. To do this, each color layer should not cover the entire surface, but only a part. The colored bottle decor adds a touch of mood to the interior.

The outside of the bottle is painted with a sponge or brush. Pre-treat the vessel with alcohol and apply acrylic paint with tangential movements. For white acrylic paint, purchase several toners or use gouache - mixing color toners with a white base, get the desired shades and make a colored bottle decor.

Painted bottle - the basis for decor
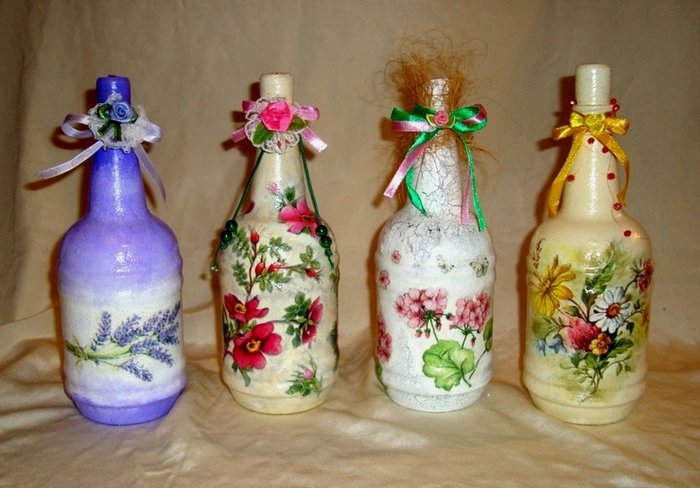
You can quickly decorate a bottle of an interesting shape with your own hands with ribbons and lace. Make a small bow from ribbons, sew them onto a lace base, add a brooch, beads and put on the neck of the vessel - an exclusive decor item is ready!

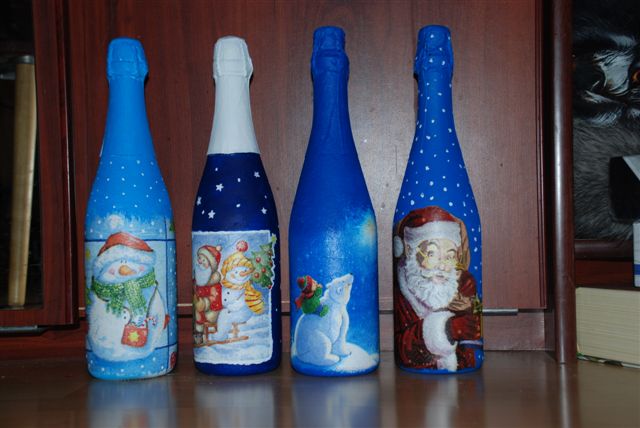
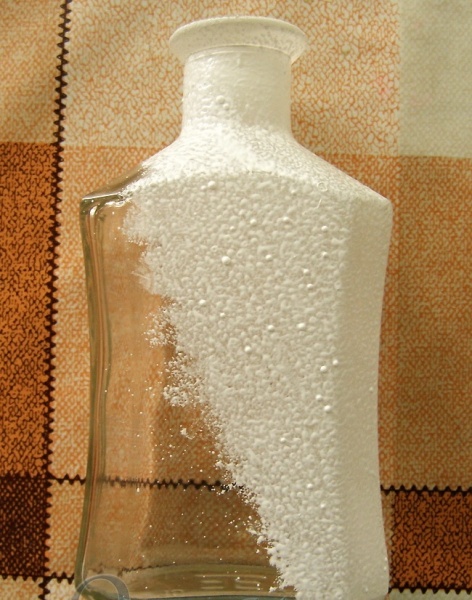
A bright and sparkling effect is achieved with improvised materials, for example, salt. Treat the prepared bottle from the outside with glue and sprinkle with salt with large crystals, carefully place it on a flat surface until it is completely dry. Decorating an item with salt is appropriate for a winter interior or a themed one for the New Year.
If a solid layer of salt seems boring or you need to decorate several areas with salt, then glue only those areas where sparkle is needed and cover with salt. A master class on this topic will help in mastering the technique.

Once again about the decor
Even just by painting the bottle with your own hands, you can achieve incredible effect silver or gold gloss, shimmering with lights New Year's fairy tale a sequined carnival or vintage treasure.

To get a stylish effect of gold / silver plating on the future art object, it must be prepared. Preparation of glass for subsequent decoration with your own hands, at the initial stage, is the same for any method of painting: the object should be washed, dried, degreased and treated with a universal primer.

The prepared glass container can be stained. For these purposes, automotive paint in a spray can is suitable. It should be sprayed at a distance of 15 centimeters from the object, outdoors or on a balcony.
If you don't have a spray can, purchase gold / silver acrylic paint from hobby stores or home improvement stores. Use a foam sponge to apply. It should be painted with point (tampon) movements, leaving a mark on the surface, not a strip, the surface will turn out to be smooth, without streaks.
Gold, like silver, can be colored, i.e. has several shades, which makes working with these paints exciting.

There are several ways to complement the decor. For example, wrap the thick part of the container with lace, securing it with a glue gun. Or partially wrap with twine, colored thread, beads. Stick on hearts or ribbons. Decorating bottles is a fun activity, besides, you can use all the materials at hand for every idea.
Decoupage bottles with napkins (master class)
Decoupage is a popular technique for decorating bottles. Visit a decoupage master class and you will appreciate the technique in full.
Simple manipulations with napkins, decoupage cards or printed pictures allow you to get a charming decorative item of exclusive design.

The easiest way to decorate an object is to paste a cutout picture. To get a taste for handmade attend a master class on the technique you are interested in and find ideas. Prepare the container, as mentioned above, select the plot you like (from a postcard, magazine, decoupage card), cut it out and stick it on the surface. Add accessories, brooches, beads, ribbons by gluing them with your own hands using a glue gun. Sometimes that's enough.

Decorating bottles with a more fundamental approach requires preparation, a master class will always come in handy. For technique in the classic version, a colored napkin layer is used. That is, only a layer with a pattern is required from a three-layer napkin, the class of the napkin is also important - it should be with a bright pattern.
To work you will need:
- decoration object;
- universal soil;
- acrylic paint, white and colored;
- toners or artistic gouache;
- acrylic varnish (art or construction;
- brushes, tampon sponge;
- napkin with a pattern.

Stages of the master class:
- Prepare a glass container (wash, degrease, prime).

- Paint the bottle to be decorated with white acrylic in two layers using the swabbing method with a sponge. Dry after each application.

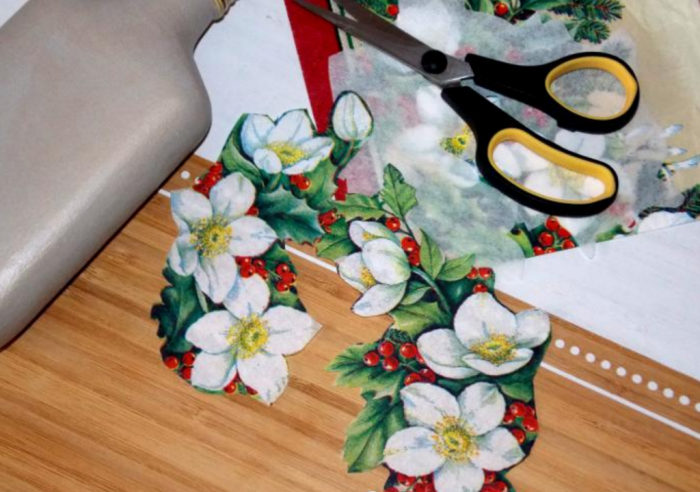
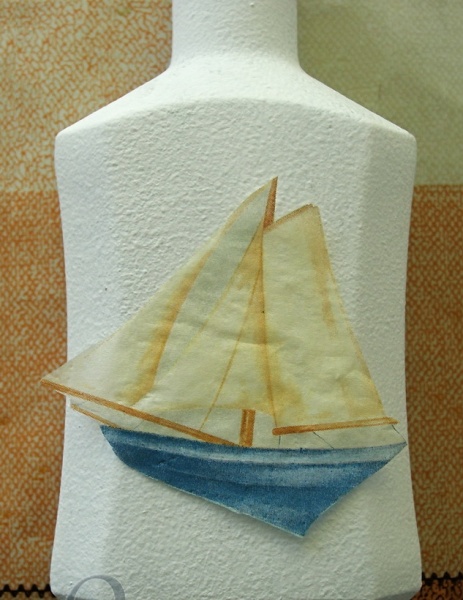
- From a napkin, with nail scissors, cut out the drawing or tear along the contour. If the drawing is on a white background, you can step back from the outline, the white part of the napkin will merge with the background on the subject.

- White is not always suitable for your idea and therefore any other color can be applied to a white surface. If you're new to decoupage, use light, creamy shades to add color. With a dark background, the napkins require extra work... Dry the surface.

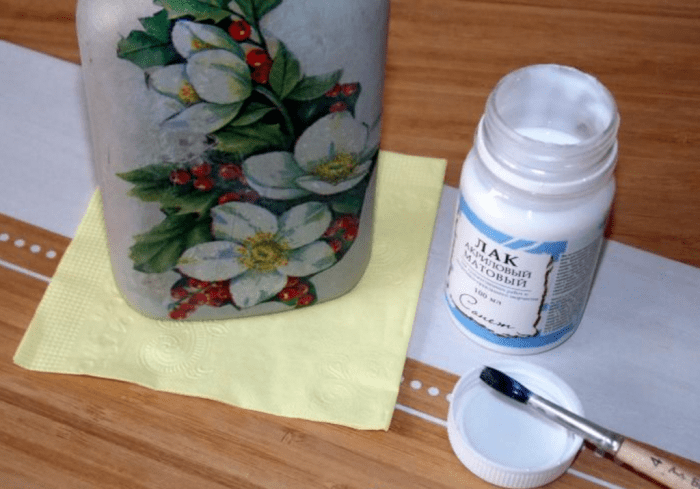
- Attach the drawing with a colorful layer up and apply acrylic glue on top of it with a brush (you can use acrylic varnish), try not to allow wrinkles and bubbles. You must act quickly and carefully. Dry.

- When you have pasted all the drawings, you can proceed to the final design. The decoupage of the bottles is completed by applying three layers of varnish with drying. Sand the surface with fine emery cloth and cover with a final layer of varnish. DIY bottle decoration is complete!

Not only decoupage
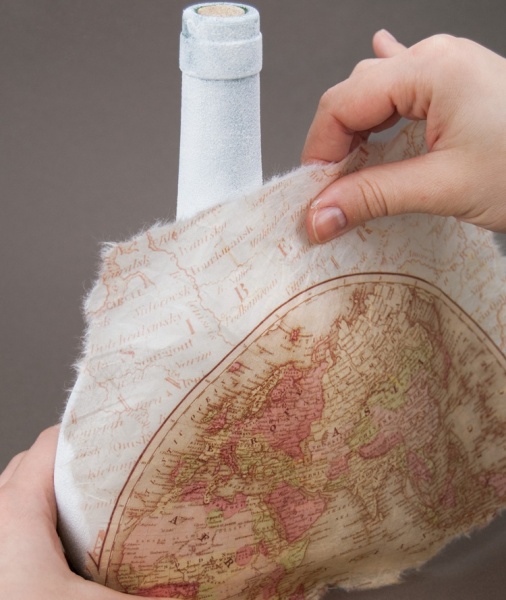
Having mastered the simple decoupage of bottles with napkins, you always want more. The smooth surface of the bottle does not give the texture, with the help of which a more interesting effect is achieved. You can create an interesting surface with tights or stockings. A master class on this type of decor can be found on the Internet.

To do this, cut one part from a pair of tights, saturate it with a mixture of PVA glue and water (1 to 1 ratio) and put it on the bottle. Lay out folds, waves, any texture.
Instead of tights, you can use decoupage with a cloth; the procedures for materials and technique are similar.

Leave a few places flat to stick on the napkin. Dry completely, prime with special compound or acrylic paint... Now you can decoupage bottles, tint, embody your ideas or leave it as it is.

Another way to get texture: wrap the bottle with threads; colored threads for sewing of different thicknesses are quite suitable. Colored thread decor is also quickly produced when using cotton yarn for knitting.
Using alternately threads different color you can get a very stylish decor item, fix the threads with PVA glue. The decor of bottles with twine, threads should be varnished and used as a vase, or you can prime, paint and stick napkins.

Leather for decoration
Making bottles with leather is one of the most beautiful ways to dispose of leftover leather or outdated jackets, tops of boots and get an interior item for decorating your home. You can decorate any glass surface with leather. For work, you need glue like "Moment", tweezers, scissors and a knife, as well as imagination.

To make the folds, the pieces of leather need to be soft. A detailed master class can be found on the Global Network. Smear the bottle and a piece of leather with glue, apply the leather to the surface and form folds.
Leather is a little more difficult to work with than decoupage bottles with a cloth, but folds are also formed directly on the glass bottle.

The formed decor must be given time for final drying and, if desired, additionally painted, gilded, other elements must be glued - it all depends on the idea.
In the design for the piggy bank, coins are suitable, a beautifully made dense cork will not interfere with a gift wine container, it is also trimmed with leather.

Don't throw away empty ones beautiful bottles, with their help you will create a unique art object for your home with your own hands. And it doesn't matter whether it is bottle decor using decoupage technique, leather trimming or coloring, uniqueness and creativity are the most important in decoration.
Video gallery
Decoupage direction is somewhere in the middle between Hand-made and art. The word decoupage came to us from the French language and literally means "cut", but in fact is a kind of applique. It is based on the technique of gluing various patterns on paper, napkins, fabrics on hard surfaces. Decoupage is actively used in decorating art, techniques are actively developing, the list of materials and objects used for decoration is expanding.
Passion for this technique is becoming rampant in Lately, all more people are fond of this type of creativity, bring their ideas. On the this moment there are entire schools that, on the Internet, and not only, are engaged in promotion and training.
Decoupage bottles photo
During the formation of the passion for decoupage in Russia, one of the first items that literally all masters began to decorate were bottles of wine and champagne. Particular attention was paid to bottles with non-standard form, volumetric texture. They were not thrown away, but turned into a real interior decor.
Various materials and techniques are used for decoupage bottles - napkins, putty, decorative elements, or in general, everything that was at hand.


What you need for decoupage, a list for beginners
As mentioned above, there are many execution techniques in decoupage, while they are actively developing - new materials, techniques and directions appear.
But still, there are main directions that we will give:
Classic decoupage - gluing napkins, decoupage cards, rice paper on a flat hard surface;

Artistic decoupage - differs from the classical one in that artistic techniques, painting, painting, aging and more are added to the main image;

Reverse decoupage - gluing a picture on the back surface of a transparent base;

Volumetric decoupage - when decorating, various volumetric pastes, putty and decorative elements are used.

In order to work in certain techniques, a set of materials is required - different in each specific case, but there is a necessary set that should be available to any novice craftswoman:
Napkins, rice paper, decoupage card- the necessary components for almost any technique, the basis of any composition. You can buy these materials now at any art store, stationery store, or on the Internet. You can use regular table napkins if you find interesting and with good image quality, a suitable subject.

Sandpaper- should always be in the arsenal for polishing surfaces, as a rule, there should be several types of granular - medium and fine, since there are several polishing stages.

Alcohol or any alcohol-based surface degreasing liquid, you can also use nail polish remover.

Primer- special acrylic material, applied as a base for decoupage for good adhesion to the surface.

Acrylic paints- in decoupage, only acrylic materials are mainly used, this is due to the fact that they dry quickly and are easy to apply. In the arsenal, it is better to have a range of colors, since they are often used for painting.

Decoupage glue- as a rule, it is acrylic, but ordinary household PVA glue is widely used.

Acrylic lacquer- there are many varieties of acrylic varnish - matte, glossy and chameleon. Many needlewomen use ordinary high quality construction acrylic varnish, but for beginner craftswomen it is recommended to use professional varnish for decoupage.

Brushes- The most used in decoupage are synthetic brushes, mostly flat. Sizes could be different, as they are used for different purposes.

Stationery file- in some cases it is used for gluing napkins.
Scissors- used when cutting images, many craftswomen use manicure.
Roller- a small construction roller is quite suitable; it is used to smooth out the pasted image.

Stack Is an artistic tool, very good for mixing paints.

What varnish is needed for decoupage
One of the most important materials is decoupage varnish; the overall result often depends on it. As a rule, varnish is applied at the very end to secure the image. Likewise, the quality and composition of the varnish affects the final appearance.

Varnishes are divided into several types according to their composition and purpose (decorative and finishing).
Acrylic lacquer- the most popular, it is non-toxic, odorless and non-flammable, as it is water-based. Due to its composition, it dries quickly and does not turn yellow over time.
Acrylic lacquer they are used not only as a finishing, but also as an intermediate one - to fix the next layer. The intermediate varnish is then used as a basis for further decoration.
Due to its wide compositional possibilities, there is a line of varnishes with decorative effects.
In order to be fully prepared, take care of the presence in your workshop of several types of varnish - regular acrylic (matte and glossy) and finishing.
What glue is needed for decoupage
Acrylic glue is mainly used for decoupage. In art stores, special decoupage glue is sold; it is sold in small jars and is quite expensive.

Most brands specializing in the production of goods for arts and crafts have glue in their rulers. In addition, most professional craftswomen actively use PVA construction glue of various brands.

If you are a beginner master, it is better to use professional glue, but if you do not have the opportunity to purchase glue in an art store, we will tell you about the most important characteristics glue necessary for it to be used in decoupage works:
- Colorless when dry;
- Medium consistency;
- Should not dry out quickly;
- Should not turn yellow over time;
- Must not smell.
Decoupage bottles with napkins step by step, master class
If you have a desire to diversify your interior, we suggest decorating an ordinary glass bottle. It can be used as a decorative piece of furniture, or as a vase.

To decorate the bottle with napkins, you will need:
- Glass bottle.
- Decoupage napkin or card, rice paper is also suitable, the drawing can be any.
- Alcohol, vodka or solvent for surface degreasing.
- Acrylic paint.
- Decoupage glue or PVA glue.
- Acrylic varnish.
- Brushes, sponges (you can use a dish sponge), scissors.
First you need to prepare the bottle - peel off the labels and degrease the surface.


Before gluing the napkin, let's make the background with acrylic paint. Do the background color at your discretion, the main thing is that it matches the pattern on the napkin. Dilute the background paint with water to make it translucent like a haze. For relief, make several layers. Leave some space for the drawing not painted over.

You need to cut a drawing out of a napkin, but you can simply pull it out with your hands. Separate the bottom two layers of napkin.

Apply a napkin to the surface remaining under the drawing and coat with a layer of glue on top. Try to work the bubbles out and gently smooth out the wrinkles. Let the glue dry. Try to work carefully as the napkin is very thin and can tear easily.

Now you need to fix the drawing, for this you need to cover the bottle with a thin layer of acrylic varnish.

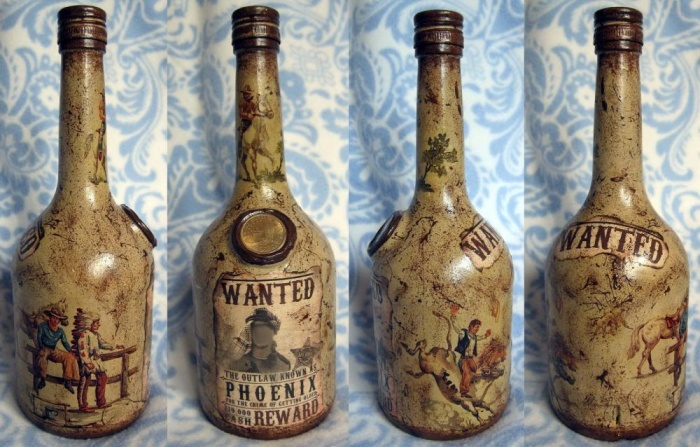
After the first layer of varnish dries, you can make the bottle aged. To do this, dilute black or other dark paint water and spray with an old toothbrush. Beforehand, it is better to practice on an unnecessary surface. It must be borne in mind that when sprayed, paint can scatter in all directions, so it is better to do this over a basin or a bucket so as not to stain everything around.

After the paint has dried, apply two more coats of varnish.

As a result, we got a full-fledged piece of furniture from an unnecessary bottle.
Decoupage bottles with pantyhose with your own hands step by step with a photo
Volumetric decoupage- one of the most popular techniques, for its implementation various auxiliary materials are used to create volume. Texture is achieved by decorative staining with contrasting colors.
We offer a master class in which ordinary women's tights act as a material for creating volume.
Materials used:
- Glass bottle with screw cap.
- PVA glue.
- Nylon tights.
- Hot glue gun.
- Peas.

Cut off the hosiery from the pantyhose.

Pour glue in a deep container and saturate.

Place on bottle and form a drape, leave to dry.

Use a metal cap for the hat. Slide a small piece of glue-soaked stocking over the lid. Connect the ends and screw onto the top of the lid. Bend the edges of the lid to create the shape of the hat and leave to dry.

Cut the strips from the stocking part of the tights.

Gather each strip with a string.

Form roses.

Saturate the roses with glue and also send them to dry.

Glue the dried roses on the dress and on the bottle.

Glue the bottle cap to the bottom of the hat.

Glue decorative elements in the form of beads and earrings.

Paint the finished composition with spray paint, first brown and then gold, while painting only the protruding parts with gold paint.

Decoupage of bottles with paper master class
Another available material for decorating a bottle using decoupage technique is toilet paper. With its help, you can create any volumetric elements.
You will need:
- Glass bottle.
- Degreasing liquid - alcohol, solvent, etc.
- Any PVA glue.
- Foam sponge.
- Stationery clip.
- Synthetic brush.
- A sponge with large pores.
- Toilet paper.
- Napkins.
- Acrylic paints.
- Acrylic varnish.
Remove labels from the bottle and degrease with an alcohol-based compound or tissue.

Prime the surface with white paint or a special primer, do not paint over the neck yet. Let dry.

Attach a napkin to the bottle and cover with glue, with a brush, try to gently smooth out all the folds from the center to the edges.

Cover the rest of the bottle generously with glue.

Lay the pieces of toilet paper textured on the glue-coated surface. Leave the bottle to dry.


After the paper dries well, cover the entire surface of the bottle with varnish.

Paint the bottle with a color that matches the napkin.

Draw the picture, where necessary.

Dip a dry sponge into the paint, beat thoroughly and walk over the convex places - this will add additional volume.

Dry the bottle thoroughly again and cover with varnish, possibly in two layers.


The original decorative bottle is ready.

Decoupage of eggshell bottles master class
Decoupage with eggshells in the final result is similar to the craquelure effect - aging by simulating cracks in the painting. The difference is that the surface becomes more embossed.

The advantage is that not expensive art material is used as a material, but ordinary eggshell.
Another plus is that with the help of the shell, we can hide various minor imperfections of the decorated surface, for example, chips.
Many people may have a question - what to do first: stick the shell or stick a napkin. In principle, there is not much difference, act according to the situation. The main thing is if you have already glued on the napkin, before you start sticking the shell, cover the drawing with varnish, since when you are gluing, there is a high probability of glue getting on the napkin - it will get wet from this.
Start by covering a small area with glue and sticking on the pieces of the shell as shown in the picture. Work on small areas.
Below we offer step-by-step detailed photos.


Decorating with eggshells helps a lot to hide various inscriptions and therefore I often use them for decorating bottles. If you already have an idea of how the bottle or object will be decorated, you can start by sticking the shell, if not, first do the decoupage, then stick the shell.
After covering the entire surface according to the plan, leave the bottle to dry. This can take a long time, but be patient.

Decoupage of a bottle by February 23
With a huge number of gift options for men by February 23, a decorated bottle is probably one of the most winning. You can use the contents and leave the packaging as a souvenir.
We offer several ideas for decorating a bottle with the symbols of the holiday.


Decoupage of a bottle by March 8


Bottle decoupage with fabric and lace master class
Decoupage using textile materials - fabrics, lace - gives a wonderful decorative result. The relief is voluminous and unpredictable. With the help of paints, you can give the effect of aging and antiquity.

Decoupage using fabric is done by analogy with tights. The material is impregnated with glue and laid out on the bottle in the form of a drapery. See what great results you can get.
No less beautiful bottles are obtained using lace.
We offer a master class on bottle decoupage.

You will need:
- Glass bottle.
- Liquid for surface degreasing.
- Napkin or decoupage card.
- Acrylic primer.
- Acrylic paints.
- Lace.
- White outline.
- Brushes.
- PVA glue.
Apply the primer to the surface of the bottle with a lumping motion, after degreasing it. Dry, a layer of acrylic paint can be applied over the primer.


Glue the laces with PVA glue.

Cut out additional decorative elements and glue too.

Cover the lace with acrylic paint.

With an acrylic contour, you need to apply points at the base and on the neck of the bottle.

Paint the top of the bottle in a suitable color.

You can dim the color a little with white paint if it is too bright.

Peel off the top layer of the patterned napkin, tear out the picture with your hands around the edges of the image.

Glue the picture on the bottle with a brush and glue, apply glue over the picture.

Stick a picture on the back, too, you can do the same.

In order to combine the images, do some painting.

The bottle can be coated to consolidate the result. acrylic varnish in several layers.


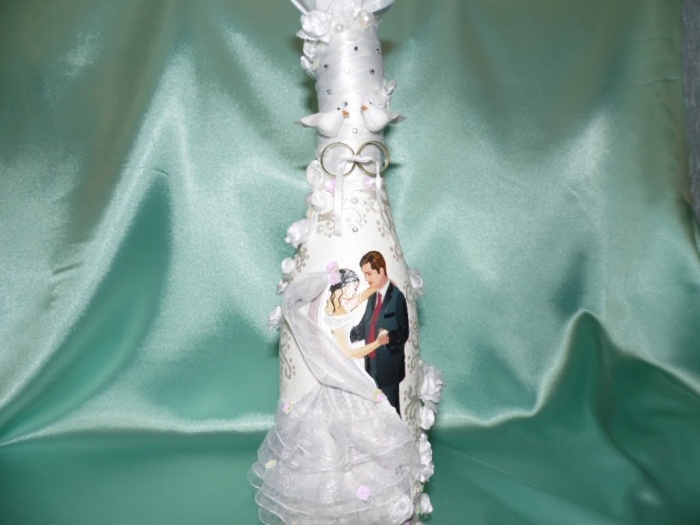
Decoupage wedding bottles
Decoupage is widely used in preparation wedding accessories, including wedding bottles and glasses.


Champagne bottle decoupage
When we go to visit friends to celebrate an important event or just chat as a present, an elegant bottle of champagne is quite suitable, try decorating it yourself.


Decoupage material from Aliexpress
Decoupage materials can now be bought freely, there are a lot of offers in retail stores. On the Internet there is a large number of specialized sellers - you can buy any materials in one place - from paints to molds. But still, the prices, today, are quite high.
Many experienced shoppers have long chosen an online store. This is a Chinese store that has united a huge number of Chinese manufacturers on its resource.
Napkins
 /category/202001947/rhinestones.html?spm=a2g0v.search0302.109.10.3d5f76fbdxFa27&g=y
https://ru.aliexpress.com/wholesale?catId=0&initiative_id=SB_20180506034116&SearchText=%D0%BA%D0%B8%D1%81%D1%82%D0%B8+%D0%B4%D0%BB%D1%8F+ % D1% 80% D0% B8% D1% 81% D0% BE% D0% B2% D0% B0% D0% BD% D0% B8% D1% 8F
The beautiful French word decoupage today is called the decor technique. different surfaces using paper-cut drawings. In fact, this is an applique, by the way, and the term decoupage itself is translated as "cutting".
The decoupage technique is quite simple in execution, but it gives an amazing effect - with the help of ordinary drawings, you can transform not only old bottles, various containers, vases or bread bins. Craftswomen decorate even pieces of furniture or wooden doors with decoupage, making them no worse than vintage or antique interior details.
 1
1
The easiest way to learn decoupage is to start small. For the first experiment, you can use empty containers and decoupage on glass or plastic bottles.
What you need for decoupage
Craftswomen use a variety of elements as a material for decorating the surface. It can be:
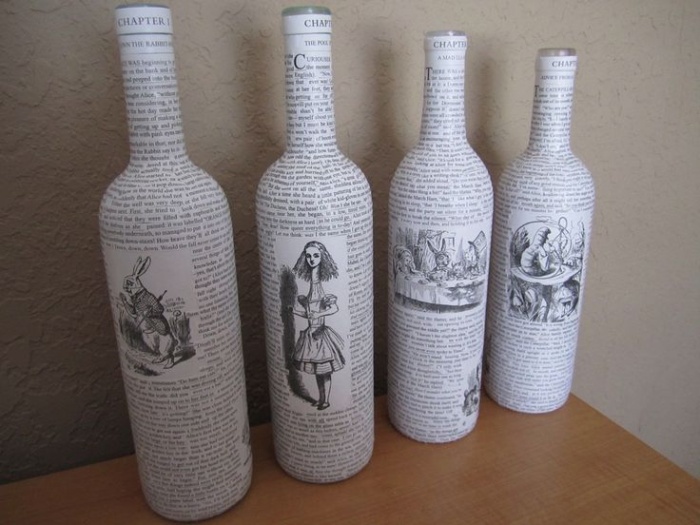
- clippings from newspapers or magazines;
- three-layer patterned table napkins;
- special decoupage cards that are sold in handicraft stores;
- thin fabrics with an interesting pattern or texture.

Attention! To transfer a newspaper or magazine clipping to glass, you will need preliminary preparation of the paper and the drawing itself.
To begin with, the picture is cut out, then it is covered with several layers of acrylic varnish. Now the paper needs to be soaked in warm water for 20 minutes. After swelling, the paper backing should peel off easily, and the image itself should remain on the varnish layer. It is in this form that the drawing is glued to the base.
The magazine clippings option is quite difficult to perform; good skills are required for such work. Decoupage cards are not cheap, and handicraft shops are not everywhere. Working with fabric is a priori more difficult than with thin paper, it also requires practice and a certain skill of the master.
That is why it is best to start mastering the decoupage technique with table napkins. For these purposes, the napkins already available in the house are quite suitable, or the hostess can specially buy material with the pattern she likes. The main thing is that the cost of napkins is available to everyone, besides, the remnants of the material after decoupage will definitely come in handy on the farm.

Important! The napkin for decoupage bottle must be multi-layered so that the master can separate the upper part of the paper with the pattern applied to it. The thinner the picture, the easier it is to stick it, and the less noticeable the joints and other flaws of the decoupage work will be.

For work, you will need a number of tools, but these do not have to be purchased materials, they can be easily replaced with improvised means. So, for decoupage a plastic or glass bottle you will need:
- The bottle itself - it is better to choose a volumetric container, it is more difficult to work with thin and narrow vessels, and the result will not be so bright.
- Degreaser: acetone, nail polish remover, alcohol, window cleaner, and other solvents.
- Drawing for decoupage.
- Acrylic paint for painting the entire surface of the bottle (building paint is suitable for walls or other surfaces).
- Colors for paint (if provided by the idea of the project).
- A special foam rubber brush for decoupage can be easily replaced with a regular kitchen sponge or a piece of foam rubber clamped with a clothespin.
- Acrylic glue for decoupage is not much better than ordinary PVA diluted with water in a 1: 1 ratio.
- A wide brush made of synthetic fibers (so that no hairs are lost during work) for applying glue.
- Glitter or acrylic marker, with which it is convenient to trace the contours of the picture on the bottle for greater brightness and effect.
- Various beads, ribbons, shells, twine or burlap - this decor is selected in accordance with the theme of the bottle design and should correspond to the general concept of bottle decoration.

Advice! It is not at all necessary for the first experience of decoupage to buy special tools and materials - they can be easily replaced.
But, if the master constantly works in this technique, it is better to purchase a professional set after all, then the finished decor items will be more accurate, and the decoupage process itself will become easier.
Decoupage bottles with your own hands
The first thing a novice master should do is to visualize the idea, that is, to imagine how the bottle will look after the decor. Numerous photos can help a beginner finished works, various master classes or visiting a hand-made exhibition. In accordance with this, paints of the desired shade, pictures, various decorative elements are selected.

Now you need to find a beautiful vessel - a plastic or glass bottle of an interesting shape. Although the bottle will stain during use, it is best to choose a transparent container for the first time.
Armed with the necessary tools, you can get to work.
Preparing a bottle for decoupage
First, you should try on the selected picture for the existing bottle - they must match in size. Applying the rest of the decor items, you can understand how the bottle will look after decoupage, and how best to arrange all the decor details.
Now the bottle needs to be prepared for staining:
- first, the bottle is soaked in warm soapy water so that all labels get wet and easily separate from glass or plastic;
- with a metal brush, not only paper labels are removed from the bottle, but also all the glue on the surface of the vessel;
- a bottle that has been wiped dry is degreased by wiping with a cotton swab dipped in alcohol or acetone.
After that, you need to apply a primer to the bottle, which in this case is acrylic paint. But this is far from the only way preparing the base for transferring the picture. The bottle is often coated with various texture materials, such as sand, eggshells, seashells and many many others. However, it is easiest to work with smooth surfaces, so it is recommended that a beginner decoupage master still paint the bottle with acrylic-based paint.

The easiest way to apply the dye is with a brush, but with this technique, streaks will certainly remain on the glass, and the paint itself will lay down unevenly. Therefore, experienced decoupage masters suggest using a foam sponge.
In this case, the paint is, as it were, tamponed, that is, it is applied to the bottle with short pressing movements. This staining must be repeated 2-3 times - it depends on the master's idea and the desired degree of toning of the existing base.
Advice! The color of the base should be one or two shades lighter than the selected decoupage pattern. This makes it easier to hide flaws in the work, and the edges of the design will be less visible.
Each layer of paint should dry thoroughly. While the bottle is drying after the last staining, you can do the picture.
Preparation of a drawing for decoupage
It was decided to use an ordinary table napkin with a favorite pattern for the first experiment. From this napkin, you need to very carefully separate the topmost layer - the one on which the pattern is applied.
Now it is necessary to somehow separate exactly that part of the picture that is needed for decoupage. There are two ways to do this:
- small sharp scissors (often craftswomen use a tool from a manicure set);
- just tear off thin paper, highlighting the desired fragment of the drawing.
As practice shows, the first method is more convenient to use on large patterns with clear lines and borders, for cutting out geometric pictures, or in the case when the background is very different from the shade of the picture.
The method of tearing off the pattern with your fingers allows you to better mask the line where the paper and paint meet, but this will only work if the base is matched to the color of the picture itself. It is this method that is best used by those who are just learning the art of decoupage. How to do it correctly is shown in the photo below.
Important! To make your work easier, it is recommended to split large drawings into smaller pieces. This makes it easier to glue thin paper to the glass, and the likelihood of air bubbles in the decoupage process will be less.
Bottle decoupage: process
Pasting a picture on a base (in this case, a bottle) is called decoupage. In essence, this is the transfer of the pattern to the surface.
And it is performed quite simply:
- A special glue for decoupage or PVA stationery glue diluted with water is taken. The required amount of glue is poured into some container.
- A drawing cut from a napkin is applied to the designated place on the surface of the bottle.
- A wide and flat brush is dipped in glue and smeared with a napkin with quick movements. Here you need to be very careful, since the picture will be quite thin and tear easily after it gets wet, so you need to brush it over the surface no more than a couple of times. The movements of the master's hand should be directed from the center of the applique to its edges. The main task is to prevent paper wrinkles and expel all air bubbles from under it.
- In this form, the bottle is left until the glue is completely dry.
- So that the bottle can be used and the picture is durable, the surface is covered with acrylic varnish in three layers. Each layer of varnish should dry well.
Attention! Recently, PVA stationery glue is already being sold so liquid that it is not necessary to dilute it - you can work right away.
There is another option: use building PVA for decoupage, but such a composition must be diluted with water, choosing a proportion based on the desired consistency of glue.
Finishing touches
There are several ways to create decor:
- glue beads or sequins;
- tie a satin ribbon around the neck of the bottle;
- wrap the neck of the bottle with twine or knitting threads;
- use a glitter (dense acrylic contour of a contrasting color) or a special marker to circle the picture, make thematic inscriptions on the bottle, add sparkle;
- make the decoupage brighter using artistic acrylic paints and a thin brush.

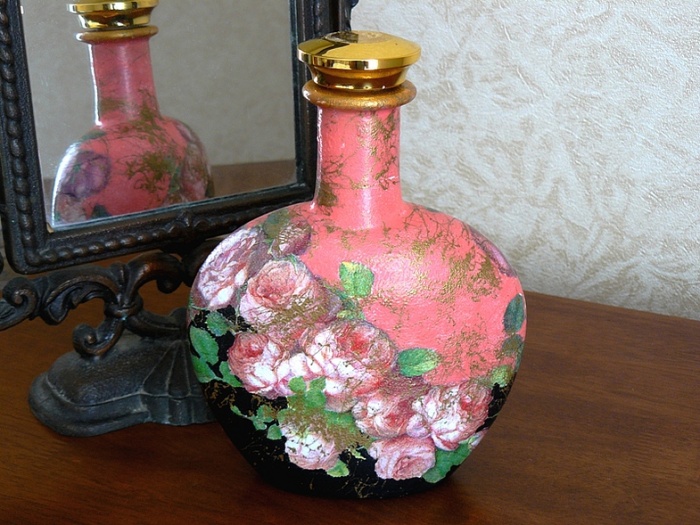
There are a lot of ways to decorate a bottle after decoupage, and this is evidenced by photos of finished works by both novice craftsmen and professionals in their field. It all depends on the skills of the performer and the range of decorative elements.
Decoupage of bottles is one of the varieties of this technique, and the most popular one. Just remember how many souvenirs, gifts and decor items are made from an ordinary bottle. Perhaps acquaintance with this interesting type of needlework, you can start by making a decoupage of bottles with your own hands.
How to make a bottle decoupage with your own hands
Decoupage bottles sounds much worse than it actually is. A little time and patience and you will succeed original thing made by hand.
To begin with, we will consider the general principles of how to make decoupage on a bottle, and then we will begin to practice. After all, without practice, nowhere. And if you do not have experience yet, we recommend that you familiarize yourself with the basics in the article what decoupage is, there are collected different types handicrafts, so you can pick up something to your liking.
And so let's get back to the question of how to make decoupage on a bottle, as well as what methods are there and how to apply them.
What you need to decoupage a bottle
You probably already have all the necessary materials at home. Well, if you want to do something more advanced, you will have to visit a handicraft store, which you probably have in your city. You will need:
- Glass or porcelain bottle(preferably without drawings and embossed surfaces)
- Drawing on paper(napkins, drawing or clipping from a book or magazine, pictures from the Internet, decoupage cards)
- Solvent(for surface cleaning)
- Acrylic paint
- PVA glue
- Varnish(acrylic varnish for fixing the picture on the bottle or craquelure varnish if you want to make antique decoupage of bottles)
- Additionally may be needed (brushes, sponges, sponges, paint containers, etc.)
Decoupage bottles with napkins
Perhaps this is the most common type of this technique. Therefore, I recommend that you first do the decoupage of bottles with napkins with your own hands in order to get acquainted with the process and materials for work. After all, the easiest way is to go from easy to difficult, gaining experience.
How to decoupage a bottle with napkins
The name speaks for itself. As a basis, we will use an ordinary table napkin with a pattern and it does not matter what it will be. Go! Let's make our first decoupage of bottles with napkins step by step.
Step 1: preparation. Choose a glass bottle (do not forget, preferably without inscriptions and embossed elements). First you need to remove the label and stickers. To do this, soak it in warm, slightly soapy water. After a while, go over with a metal mesh to remove the remaining glue.
Step 2: priming the base. Degrease the surface using a solvent. Then use a sponge to apply acrylic paint that will act as a base.

If you have a transparent beautiful bottle and you think that the picture on it will look “great” without a background, then skip this step.

The color of the paint must be chosen a tone lighter or darker than the picture so that it does not merge with the background and the decoupage on napkin bottles looks contrasting. Apply several coats of paint to give the background relief and deep color.
![]()
Step 3: preparing the drawing. Choose a patterned table napkin you like. A napkin usually consists of two layers: the top - the picture and the bottom - the paper itself. We will work with the top layer, so carefully separate it from the bottom one.


Step 4: secret. This step optional... But if you want to get the effect, as if the drawing is drawn on a bottle, you need to glue the picture from the napkin on the paper and apply several layers of varnish over the motif. Allow to dry and then put in water to soak the paper. Rub the soaked paper with your hands and remove. This leaves only the drawing on the lacquered surface.

This step is useful for those who know how to make decoupage from napkins on a bottle, but do not know all the intricacies of this technique.
Step 5: drawing the picture. Put the dried pattern from the napkin on the previously primed surface. Then we coat it on top with PVA glue. Carefully expel air bubbles from under the paper and level the picture so that there are no folds. And let the glue dry.

This step must be approached with extreme care so as not to tear or ruin the picture. The first time, not yet knowing how to make decoupage from napkins on a bottle, I ruined more than one bottle. But it's easier to learn from other people's mistakes, which is why I wrote a bottle decoupage lesson step by step from a napkin.

Step 6: apply varnish. The picture is already on the bottle, but it must be protected from the effects of air and moisture, in this state it will not survive for a long time.
Apply acrylic varnish in small portions to the surface of the bottle and spread it with a brush. It is necessary to completely cover the surface. It is much easier to apply from top to bottom. For full protection, you will need to apply the varnish three times.


For this tutorial I am using a regular clear acrylic varnish. But you can also make decoupage of bottles with do-it-yourself napkins with craquelure to give the craft an aged look. This varnish creates the effect of paint cracked from age.

In this example, we looked at decoupage of a glass bottle. But there are also other types of bottle technology. Let's talk about them, because you already know how to make decoupage of glass bottles with your own hands.
How to decoupage a plastic bottle
This type of technique is very similar, but has one distinctive feature... Before starting, the surface of the item must be carefully prepared. Namely, "sand" the surface of the plastic with fine sandpaper so that roughness appears and there is adhesion to the pattern.
Step-by-step decoupage of a plastic bottle
- Remove label
- Degrease
- Sand with sandpaper and degrease again
- Paint with acrylic paint (several times)
- Stick on the motive and let it dry
- Apply acrylic varnish (several layers)


In fact, this is the same decoupage. plastic bottles napkins, but with preliminary preparation of plastic.
Decoupage bottles for beginners
For those who want to master this type of needlework, I would recommend just decoupage for beginners from napkins on a bottle. In my opinion, this is the easiest and most affordable way to try yourself in something new. The decoupage of the bottle for beginners is described in detail above step by step and there should not be any difficulties. And you can safely recommend it to beginners, since you do not mind ruining the bottle, and the cost of decoration is very minimal.

For beginners, I also want to throw an idea. It is not necessary to use napkins or decoupage cards. Using the printer, you can print a photo on paper and make decoupage with a photo on the bottle... It will look cool when you give your friends a soda bottle with your photo on it. So go ahead, the more you know where to start decoupage bottle with photography. It can also be a great gift for a birthday or wedding. In this way, you can make your gift champagne unique.

Now you know what you need to decoupage a bottle for beginners. So go ahead, take everything that is badly worth it and " decoupage«!
Decoupage bottles design ideas
This section contains a selection of finished works. Perhaps some of this will help determine how your work will look. We have selected the best ideas for decoupage bottles so that you know what you can do with it.

New items in decoupage bottles
Even handicraft does not stand still and develops. More and more examples of works that boggle the imagination appear on the network. Here are some of them.


In this article, we covered the basics of the technique, and also made decoupage and bottle decoration. Practice and create masterpieces.
People of all ages are engaged in creativity. Decoupage for beginners is considered an inexhaustible topic. Step by step from the photo of the bottle, you can start making your first craft. Having tried it once, you can easily arrange a wicker basket, any piece of furniture and renew an old lamp.
The advantage of this technique is that it can be applied to different surfaces... Decoupage resembles an old technique. This decor is especially popular when creating objects in a vintage style. The original solution is the use of retro accessories in the interior design.
The usual interior diversifies the original decor
How to make decoupage of a bottle for beginners: step by step with a photo and detailed instructions
Decoupage of bottles with tights is considered an unusual technique of craftsmanship. The master class involves the creation of volumetric forms. This produces an imitation of waves or beautiful embossed patterns.

Decoupage is of the following types:
- direct method, in which the drawing is glued from the front of the object;
- the opposite is used to decorate glass surfaces, in which case the picture is glued from the inside;
- volumetric technique, when the drawing rises above the rest of the surface;
- smoky method is a variant of artistic painting;
- decopatch is a method when an object is pasted over with pieces of various material: from napkins, or ordinary colored.
Helpful information! The preference for a particular technique depends on the style of decorating the room, on the capabilities and design of the product. For decoupage, you can use any pictures you like, newspaper clippings, bright magazines and labels. Also used napkins, textured paper and special cards for decoupage.
You can start a step-by-step decoupage for beginners with a photo of a bottle and the preparation of certain elements and materials. You will need any bottle with a smooth surface, acrylic paint, glue, varnish, scissors and alcohol solution. An ornament on a napkin, newspaper photos or printouts from websites are suitable for decor.
| Image | Stages of work |
|---|---|
| Remove all paper stickers. To do this, the dishes are placed in a soapy solution, and then remove all unnecessary from it with sandpaper. Then the surface is wiped with a solvent. |
| For a more beautiful drawing, prime the surface. Paint can be applied with a sponge or brush. For a rich color, apply the paint in several coats. |
| You can cut the image out of a napkin. In this case, the part with the pattern must be separated from the rest of the paper. If you use a newspaper clipping, the pattern is covered with several layers of varnish, dipped in warm water, and then the varnished area is separated from the wet paper and glued to the bottle. |
| To glue the image, a pattern is applied to the dry surface of the bottle and varnished on top. |
| The drawing is strengthened with varnish. |
 | Leave the craft to dry. |


Master class for decoupage furniture in Provence style
Provence style is often present in original ideas for decoupage kitchen furniture with your own hands. Photos of interesting solutions can be seen on the website. If you have preserved old pieces of furniture from your grandmother's times, then using this technique you can give them a second life.

The Provence style interior is distinguished by its extraordinary beauty. To decorate a room in a similar style, you do not need to spend a lot of money; you can make a stylish thing with your own hands from scrap materials. To decorate furniture in a similar style, motives typical of the French province are used. These are flower gardens, lavender fields, picturesque streets and vineyard plantations.
You can see how to make a masterpiece in Provence style in our master class using a chest of drawers as an example.
| Image | Description of actions |
|---|---|
 | Prepare a chest of drawers, beautiful napkin ornaments, paint, glue, roller, brush, sandpaper and scissors. |
 | The piece of furniture itself is painted over. Apply layers with a roller, and after drying, sand the imperfections with sandpaper. |
 | While the dresser is drying, you can cut out elements of napkins for decor. |
 | The glue is distributed over the place where the pattern is placed and over the image itself. To create the effect of scuffs, sandpaper is used. |
 | The surface is varnished. You need to apply 10 to 15 coats. |
 | Every fourth layer is recommended to be sanded with varnish. |
 | Excess paint is removed. |
 | At the end of the work, you need to wait until the chest of drawers is completely dry. |
How to make decoupage on glass from napkins: step by step instructions with a photo
You can use interesting technique decoupage from napkins on glass. To do this, you need to prepare coloring compositions, thematic napkins, varnish, glue and brushes. Choose a suitable glass container. Its surface must be treated with alcohol.
| Image | Work |
|---|---|
| The glass must be tinted using the chosen method: paint, primer or rice paper. |
| Beautiful decorative elements are cut from napkins. |
| Prepared paper with patterns is applied to the surface and smeared with glue. After drying, the drawing is varnished. |
 | You can trace the drawing with the glass path and finish off the small details. |


Helpful information! If you want to apply decoupage to dishes that are used for eating, then use a special glue for glass and porcelain. The finished product needs to be dried for a day, and then baked in the oven.
Decoupage on boxes
It is worth trying to repeat a simple master class for decoupage a shoe box. As a material, you will need a dense box, napkins, acrylic paints, glue and brushes.
| Image | Stages of work |
|---|---|
| Apply paint to the box white, and then dry thoroughly. |
| Cut out a pattern from napkins. In this case, we separate the top layer. The glue is applied to the part that is glued to the box. |
| The glue is applied from the middle to the edges with light pressure. |
| After the image is dry, you can decorate the surface with decorative stamps. |
| To give an aged look around the edges, you need to walk through with dark paint. |
| Above, the drawings are fixed with acrylic varnish. |
| This is the view obtained after the work done. |


How to glue without folds correctly?
It is necessary to familiarize yourself with some rules before creating decoupage for beginners. Step by step with a photo of a bottle and napkins, you can create unusual compositions. Napkins are especially difficult. Some types of napkins cannot be applied wet, as they begin to creep immediately. To glue evenly and without wrinkles, you can use the hot method. PVA glue is applied to the surface. Then, after drying, the napkin is applied to this place and ironed with a hot iron through the paper. In this case, the napkin will be glued without wrinkles. On a napkin glued in a similar way, you need to carefully apply varnish, especially the first layer.
Design ideas for the kitchen
There are many ideas for decorating a kitchen using decoupage techniques. It is worth trying to make the following options:

Decoupage can be combined with gilding, toning, the effect of artificial aging and the craquelure technique. To decorate the kitchen, a style such as ethno, shabby chic and country is used. For decoration, you can use all kinds of gastronomic motives: berries, muffins, cakes and fruits.
Ideas for decorating the kitchen:


You don't have to spend a lot of money to create a unique interior. From the available tools, you can create great accessories and pieces of furniture for any design idea.
Article
When, after the next holiday, you cannot throw out the bottle because the shape of the vessel is very interesting, it means that the feeling of beauty has won over the arguments of reason, or there is already an idea for decoration.
Your soul needs a creative act - do-it-yourself bottle decor.
At your service there is always a master class in the company of a master or an Internet version of the work process. Ideas for decoration can be seen on forums where needlewomen share their achievements. A simple way to decorate is decoupage with a photo. After processing, a picture, photograph or postcard is glued to the bottle. There are many techniques and master classes where bottles are decorated with twine, salt, leather, ribbons and even tights.
![]()
Paint the bottle
In order to get a taste for decorating, simple manipulations with the object are enough. Do-it-yourself elementary decor of glass containers is done using paint. The transparent item can be painted from the inside or outside.
For internal staining, pour acrylic paint into the bottle, using a syringe without a needle, and rotate the bottle to achieve a tight internal coating.

As you can paint the container from the inside in several colors. To do this, each color layer should not cover the entire surface, but only a part. The colored bottle decor adds a touch of mood to the interior.

The outside of the bottle is painted with a sponge or brush. Pre-treat the vessel with alcohol and apply acrylic paint with tangential movements. For white acrylic paint, purchase several toners or use gouache - mixing color toners with a white base, get the desired shades and make a colored bottle decor.

Painted bottle - the basis for decor
You can quickly decorate a bottle of an interesting shape with your own hands with ribbons and lace. Make a small bow from ribbons, sew them onto a lace base, add a brooch, beads and put on the neck of the vessel - an exclusive decor item is ready!

A bright and sparkling effect is achieved with improvised materials, for example, salt. Treat the prepared bottle from the outside with glue and sprinkle with salt with large crystals, carefully place it on a flat surface until it is completely dry. Decorating an item with salt is appropriate for a winter interior or a themed one for the New Year.
If a solid layer of salt seems boring or you need to decorate several areas with salt, then glue only those areas where sparkle is needed and cover with salt. A master class on this topic will help in mastering the technique.

Once again about the decor
Even just by painting a bottle with your own hands, you can achieve an incredible effect of silver or gold gloss, shimmering with the lights of a New Year's fairy tale, a carnival sprinkled with sparkles or a vintage treasure.

To get a stylish effect of gold / silver plating on the future art object, it must be prepared. Preparation of glass for subsequent decoration with your own hands, at the initial stage, is the same for any method of painting: the object should be washed, dried, degreased and treated with a universal primer.

The prepared glass container can be stained. For these purposes, automotive paint in a spray can is suitable. It should be sprayed at a distance of 15 centimeters from the object, outdoors or on a balcony.
If you don't have a spray can, purchase gold / silver acrylic paint from hobby stores or home improvement stores. Use a foam sponge to apply. It should be painted with point (tampon) movements, leaving a mark on the surface, not a strip, the surface will turn out to be smooth, without streaks.
Gold, like silver, can be colored, i.e. has several shades, which makes working with these paints exciting.

There are several ways to complement the decor. For example, wrap the thick part of the container with lace, securing it with a glue gun. Or partially wrap with twine, colored thread, beads. Stick on hearts or ribbons. Decorating bottles is a fun activity, besides, you can use all the materials at hand for every idea.

Decoupage bottles with napkins (master class)
Decoupage is a popular technique for decorating bottles. Visit a decoupage master class and you will appreciate the technique in full.
Simple manipulations with napkins, decoupage cards or printed pictures allow you to get a charming decorative item of exclusive design.

The easiest way to decorate an object is to paste a cutout picture. To get a taste for handicraft, visit a master class on the technique of interest and find ideas. Prepare the container, as mentioned above, select the plot you like (from a postcard, magazine, decoupage card), cut it out and stick it on the surface. Add accessories, brooches, beads, ribbons by gluing them with your own hands using a glue gun. Sometimes that's enough.

Decorating bottles with a more fundamental approach requires preparation, a master class will always come in handy. For technique in the classic version, a colored napkin layer is used. That is, only a layer with a pattern is required from a three-layer napkin, the class of the napkin is also important - it should be with a bright pattern.
To work you will need:
- decoration object;
- universal soil;
- acrylic paint, white and colored;
- toners or artistic gouache;
- acrylic varnish (art or construction;
- brushes, tampon sponge;
- napkin with a pattern.

Stages of the master class:
- Prepare a glass container (wash, degrease, prime).

- Paint the bottle to be decorated with white acrylic in two layers using the swabbing method with a sponge. Dry after each application.

- From a napkin, with nail scissors, cut out the drawing or tear along the contour. If the drawing is on a white background, you can step back from the outline, the white part of the napkin will merge with the background on the subject.

- White is not always suitable for your idea and therefore any other color can be applied to a white surface. If you're new to decoupage, use light, creamy shades to add color. The dark background for the napkins requires some extra work. Dry the surface.
![]()
- Attach the drawing with a colorful layer up and apply acrylic glue on top of it with a brush (you can use acrylic varnish), try not to allow wrinkles and bubbles. You must act quickly and carefully. Dry.

- When you have pasted all the drawings, you can proceed to the final design. The decoupage of the bottles is completed by applying three layers of varnish with drying. Sand the surface with fine emery cloth and cover with a final layer of varnish. DIY bottle decoration is complete!

Not only decoupage
Having mastered the simple decoupage of bottles with napkins, you always want more. The smooth surface of the bottle does not give the texture, with the help of which a more interesting effect is achieved. You can create an interesting surface with tights or stockings. A master class on this type of decor can be found on the Internet.

To do this, cut one part from a pair of tights, saturate it with a mixture of PVA glue and water (1 to 1 ratio) and put it on the bottle. Lay out folds, waves, any texture.
Instead of tights, you can use decoupage with a cloth; the procedures for materials and technique are similar.
![]()
Leave a few places flat to stick on the napkin. Dry completely, prime with special compound or acrylic paint. Now you can decoupage bottles, tint, embody your ideas or leave it as it is.

Another way to get texture: wrap the bottle with threads; colored threads for sewing of different thicknesses are quite suitable. Colored thread decor is also quickly produced when using cotton yarn for knitting.
Using alternately threads of different colors, you can get a very stylish decor item, fix the threads with PVA glue. The decor of bottles with twine, threads should be varnished and used as a vase, or you can prime, paint and stick napkins.

Leather for decoration
Making bottles with leather is one of the most beautiful ways to dispose of leftover leather or outdated jackets, tops of boots and get an interior item for decorating your home. You can decorate any glass surface with leather. For work, you need glue like "Moment", tweezers, scissors and a knife, as well as imagination.

To make the folds, the pieces of leather need to be soft. A detailed master class can be found on the Global Network. Smear the bottle and a piece of leather with glue, apply the leather to the surface and form folds.
Leather is a little more difficult to work with than decoupage bottles with a cloth, but folds are also formed directly on the glass bottle.

The formed decor must be given time for final drying and, if desired, additionally painted, gilded, other elements must be glued - it all depends on the idea.
In the design for the piggy bank, coins are suitable, a beautifully made dense cork will not interfere with a gift wine container, it is also trimmed with leather.

Do not throw away empty beautiful bottles, with their own hands you will create a unique art object for your home. And it doesn't matter whether it is bottle decor using decoupage technique, leather trimming or coloring, uniqueness and creativity are the most important in decoration.
Video gallery
Using the techniques discussed in this article, high-quality images are applied to decorative interior decorations and functional things. The main advantage here is not so much cost savings as the ability to create unique products with your own hands. It will be easier to show talents if you carefully study decoupage for beginners step by step, with a photo of the bottle, descriptions of tools and materials. This article provides information on how to reproduce technology at home without errors.
Not every person has the skills of an artist. But you can use ready-made pictures on paper. If you transfer them to a suitable base and protect them from adverse external influences, you will get the desired result.
Such techniques have been used in practice for hundreds of years. But nowadays, consumables are more readily available with tools. It will not be difficult to find a suitable illustration in a magazine, or create a unique picture using a printer. But the most convenient - napkins, or other ready-made printing products with repeating patterns. They are used to decorate, for example, a set of a table and several chairs.
There are the following types of decoupage:
- Classic is cutting along the contour of pictures, fixing them on the surface and applying a layer of transparent varnish on top.
- The "reverse" technique improves the protective performance. Here, the pattern is attached face-down to glass, which prevents damage.
- 3D images form real ones. To do this, glue small shells, other objects, create a relief by molding from paste.
The techniques listed are optional. After mastering the skills, they are used together, in different combinations.

Below is the standard napkin decoupage technique:
- The surface is cleaned of dirt, degreased.
- It is painted evenly in one color, waiting for the layer to dry.
- At this time, a blank is made. A drawing from a napkin is cut out neatly along the contour.
- Having dipped in water, the layer with the picture is separated. Drain it.
- An adhesive composition is applied to the base. Apply and level the workpiece from above. Remove bubbles and unevenness. Cover with glue on top.
- After another break, several layers of varnish are created.
Important! If an air bubble is too large, it is punctured in the center. Irregularities are removed with movements from the edges to the middle.
Training
Before studying decoupage for beginners step by step with a photo of a bottle, you need to clarify the following positions:
- This technology is suitable for a variety of materials. But when working with a specific project, the wizards take into account the peculiarities of the basis. From a tree, for example, the smallest lint is removed with "zero" sandpaper.
- To make things easier, you can purchase a special kit. In the retail network you can find special cards in different styles, sets for plates and other products.
- The appearance of new specks in the process of work should be excluded. High-quality brushes are used to apply paints and other technological compounds. Experienced hair professionals prefer natural hair.
- According to the complex of consumer characteristics, adhesives and dyes, varnishes and primers on an acrylic basis are better suited.

Important! It is easier for a beginner to deal with the nuances of technology if you purchase decoupage cards on thicker paper.
Assistive technology
The following professional techniques are used to obtain special aesthetic parameters:

Is there a way to turn an ordinary bottle into a decorative vase and decorate with it, for example, a windowsill in the kitchen? Undoubtedly. And this kind of decorative creativity like decoupage will help in this. Of course, without basic knowledge, it is difficult to carry out decoupage of bottles on your own, a master class in this case helps a lot. Although the technique itself is quite simple and does not require special skills and talents. It is enough to be able to work with paper, scissors and glue and find free time for this. The scope of imagination has no boundaries.
Decoupage - what is it?
French words always sound beautiful and mysterious, although sometimes they mean the most ordinary things. The same is the case with decoupage, which translates as "cutting". In fact, this is an applique that is glued to a wide variety of surfaces.

Anything can serve as a material for decoupage, as long as it embodies the creative intention of the master. The most commonly used pictures are cut from paper. After all, it easily takes any shape and can be fixed on glass, wood, stone and any other surface that you want to decorate.

For example, using the decoupage technique, you can turn an old porcelain teapot into a gorgeous flower pot and complement your kitchen interior with it. The old sideboard, prepared for exile to the dacha, may well compete with its antique counterparts, if its doors are covered with a floral ornament in the style of the 18th century, artificially aged with the help of a special craquelure varnish, which gives the product an antique look. But the most popular is napkin decoupage, when the image you like is cut out of ordinary paper napkins and fixed on glass or stone with a layer of varnish.


Materials for decorating a bottle using decoupage technique
In general, the decoupage technique for beginners and for more experienced craftsmen is no different in work. Before starting, it is better to have patience and the necessary tools and materials for creativity.
In the first place is the glass bottle itself - its surface should be as even as possible, without embossed decorations.

This is followed by a drawing, chosen either on paper napkins or on decoupage cards, magazine clippings downloaded from the Internet and printed pictures, etc., can be used.

To remove grease stains from glass, you will need any liquid capable of this.
Degreased glass must be primed. Any acrylic paint that matches the color of the main pattern is suitable for this.

Primer sponges
As an adhesive, both special glue for decoupage and school PVA are usually used.
Of course, you will also need brushes, preferably flat and made of synthetic bristles, which do not lose hairs in the process.

Fan brush for decoupage
In addition to paint for the primer, you should have at hand just colored acrylic paints for decoration, and the same varnish for fixing the image on the glass.

To give the product an antique look, craquelure varnish will become indispensable, it will also fix the drawing. After applying it, the item acquires the features of antiques.

And, of course, you cannot do without a number of things - small scissors, masking tape, foam rubber, containers for paints and varnishes, sandpaper, cleaning rags.
Napkin decoupage bottles: step by step instructions
Glass surface preparation
Any bottle that was in use is pasted over on all sides with various labels and tags. Getting rid of them is not easy, but quite possible. The bottle should stay in soapy water for a while, then all traces of paper and glue are peeled off with the help of emery. Only after that comes the turn of the solvent, which removes fat residues from the glass surface.
Primer
In principle, you don't need to prime the bottle, but choose such a pattern that decoupage on glass will look great on a transparent surface. But to enhance the brightness, relief, it is better to cover the bottle with acrylic paint that matches the color of the selected pattern, and at least one tone lighter. This is where you need a foam roller or sponge. Dipping it into a wide jar of paint, carefully primer either the entire bottle or that part of it to which the drawing will be applied. To create a rich color, it is better to apply two or three coats of paint.

Carving ornament
To work with thin elements of the napkin, it is better to use scissors from the manicure set, or just carefully separate the drawing from the rest of the paper. This will make the image look more natural.

Not only napkins are suitable for application, but also magazine clippings on thicker paper. To obtain the effect of an image drawn directly on the glass, a cut of thicker paper should be covered with two or three layers of varnish, dried thoroughly, and then put this picture in water for twenty minutes. If the layers of soaked paper are carefully removed, then a transparent picture will remain on the varnished surface, which is glued to the base. Not every master class will teach such decoupage of bottles.
Gluing a picture on a bottle
The same dry napkin is applied to the prepared dry degreased surface of the bottle, and then a brush with pre-selected glue begins to "walk" on its surface. Very neatly and carefully all air bubbles are squeezed out from under the napkin, the wrinkles formed inadvertently are smoothed out. If you are afraid to ruin your first masterpiece, then you can practice on a backup bottle.
If decoupage cards are used, they should first be soaked in warm water and then laid out to dry on a towel.
This work is painstaking and very accurate, you cannot even accidentally tear the card. It is carefully smeared with glue, first with back side, and then, laying on the glass, gently straighten and smear on the outside, expelling the remaining air and eliminating the folds. If it was conceived to use more than one picture for decoupage a bottle, then all other images are glued in the same way.

Securing the result with varnish
After gluing the image to the bottle, there should be enough time for the paper to dry completely. But in this form, the drawing is completely defenseless against air, light, water and sharp objects. To keep the surface intact, it is fixed with a varnish layer. And so that the bottle is not afraid of water either from the inside or outside and is used for its intended purpose, this varnish layer must be applied at least three times. But the result will be a thing that you will not be ashamed to show your friends.

If you fix on a camera what the decoupage of bottles looks like in stages, the photo can then be shown to friends or other needlewomen.

Decoupage the bottle using rice paper
Among all types of decoupage, a special place is occupied by the use of rice paper in the process. To conduct a master class, it is advisable to determine what exactly is needed for this.
- A glass bottle, if possible, not very narrow, so that there is something to roam on and the decoupage turned out to be noticeable and bright.
- Sheets of rice paper in two colors - light green and white. It will be used as a basis for decoupage.
- Printed paper napkin. Floral ornaments will add elegance and tenderness to the decor.
- Glue and a synthetic bristle brush to prevent hairs from remaining on the bottle.
- Special white acrylic-based marker that leaves a line on any surface, and varnish to fix the picture.
- Scissors, glass degreaser, napkins or towels for applying the product, decorative tape.

So, let's try to figure out why you still need rice paper for decoupage and how to use it correctly.
The most important process is degreasing the glass surface. After all, the quality of image fixing depends on this. We will do this using any cleaning agent and a regular napkin or cloth.
You need to prepare rice paper.
ATTENTION!!! It cannot be cut with scissors, it just needs to be carefully torn into small fragments. Scissors will create a smooth edge, and if the rice paper is ripped, the fibers will give the surface the naturalness it needs.
It is not for nothing that the Chinese came up with the idea of making paper from rice. It is more flexible than normal and much easier to work with. This is the opinion of everyone who happened to take this paper in their hands.
There are two different ways to apply rice paper to glass:
- Press the pieces of dry paper against the bottle and soak the paper through with glue. Then dry and treat with acrylic varnish.
- Alternatively, also attach the rice paper pieces to the bottle and moisten them thoroughly with water. Having dried almost to the end (for speed, you can use a hairdryer), then also cover the pieces of paper with acrylic varnish.
In this master class, it is presented how, using the first method, you can make a completely cute and original vase from an ordinary bottle. From rice paper of green color, select three long pieces with pointed ends, glue them with a narrower edge upward around the entire bottle, carefully pulling and straightening all the folds and wrinkles.

Carefully fill all loose pieces of glass with white rice paper edge to edge. It is allowed to slightly overlap the edges, it is still in finished product nobody will see these roughness. But only if the fragments were torn off, not cut off.
Having thoroughly smeared all the rice paper with glue, set the bottle aside to dry completely, and at this time we are carefully cutting out the ornament from the napkin prepared for decoupage.
Once again we grease the whole bottle with glue, gently press the drawing and carefully pass over it with a brush, carefully removing air bubbles and excess glue from under the napkin.

The bottle is once again sent to dry, and then the entire surface is covered with acrylic varnish. To fully protect the image, you will need to repeat this procedure 2-3 times.
After complete drying, the contours of the drawing are outlined with a white acrylic marker. This will add brightness and expressiveness to the whole product.
The decorative tape also came in handy. The neck of the bottle, left without decor, is very cleverly hiding under it.
