Crafts from pumpkin seeds do-it-yourself sunflower. Paintings from cereals with their own hands. Watermelon - craft from watermelon seeds
Crafts from cereals and seeds are panels, applications, decorative elements, and bird feeders. See how to make a topiary, a wreath of peas, a Christmas tree from seeds.
The content of the article:
Children will love crafting various crafts from cereals and seeds, if adults show how to create them. Such fruits of joint work will not only help the development of the child, but also teach him kindness. Indeed, in this technique, original bird feeders are created, which the child will gladly hang on the street. He will rejoice when the birds flock to the treat.
How to make a feeder from a cone, gelatin, from a bottle with your own hands?

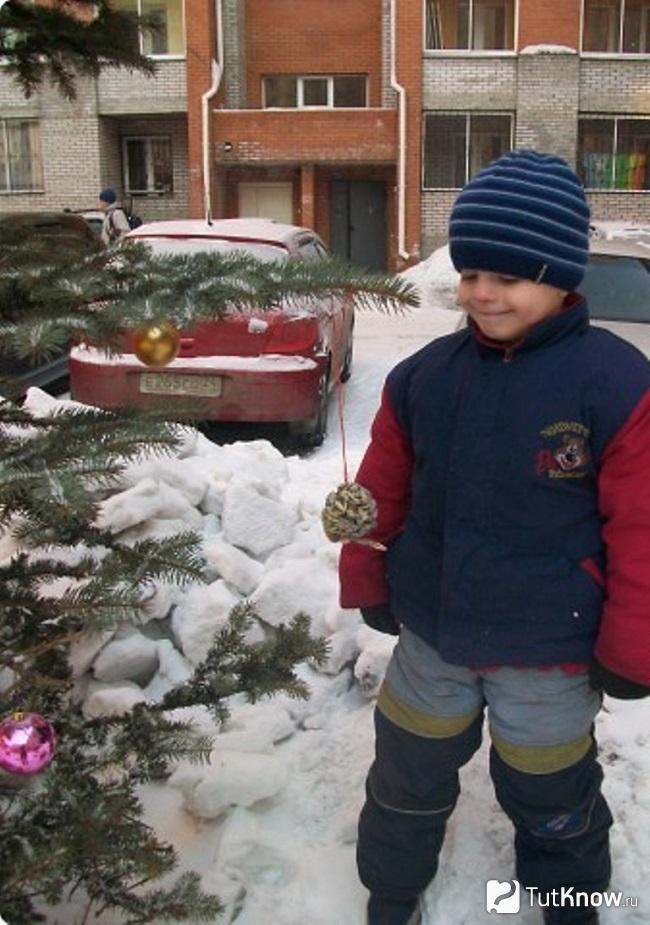
Often in the city or countryside on the New Year decorate growing Christmas trees. Having made bird feeders, the child himself will decorate the forest beauty with them and get a lot of pleasure from it. To carry out your plan, put next to the children:
- cones;
- a tall small bowl;
- cereal seeds;
- seeds;
- brush;
- a thread.
- If the honey is thick, first melt it in a water bath, when it cools down, pour it into a bowl. Pour cereals, small unroasted seeds into another similar vessel.
- Have the child smear the bump with liquid honey, then roll it in another container so that the seeds stick to the sweet surface.
- Now he will put his creation on a spread paper or a tray so that the honey dries up, and the treat for birds is better attached to the cone.
- After that, it's time to tie a thread to the feeder and go for a walk with the child to hang crafts on a tree.
Instead of honey, you can use a thick paste. To make it, pour 1 tbsp. l. flour, dilute with a glass of water. While stirring, bring to a boil.
Remind the children that birds should not be given salty, black bread so that the kids do not use such products when making bird feeders.
Invite the children to make bird feeders that look very original. Take first:
- 1.5 cups of bird food;
- 0.5 cups of water;
- 2 small bags of gelatin;
- leg-split;
- cookie cutters;
- straw;
- baking paper.

- Soak gelatine for 20 minutes in water if instructed to do so. But usually one is sold in small bags that does not need to be soaked, immediately dilute it with water and put it on fire.
- When the solution boils, remove from heat, cool slightly and mix with bird food.
- Lay baking paper on the table, place cookie cutters on it, fill them with the prepared mixture.
- Insert a loop of twine or ribbon inside, knot inward. Remove for half an hour in the freezer.
- After that, the forms are taken out of there and left on the table so that the contents dry out during the day. Then the bird food is removed and hung out the window, on the trees in the yard.

It can be crafted from:
- empty 5-liter canister;
- large wooden spoon and fork;
- straw;
- hot glue;
- twine;
- accessories.
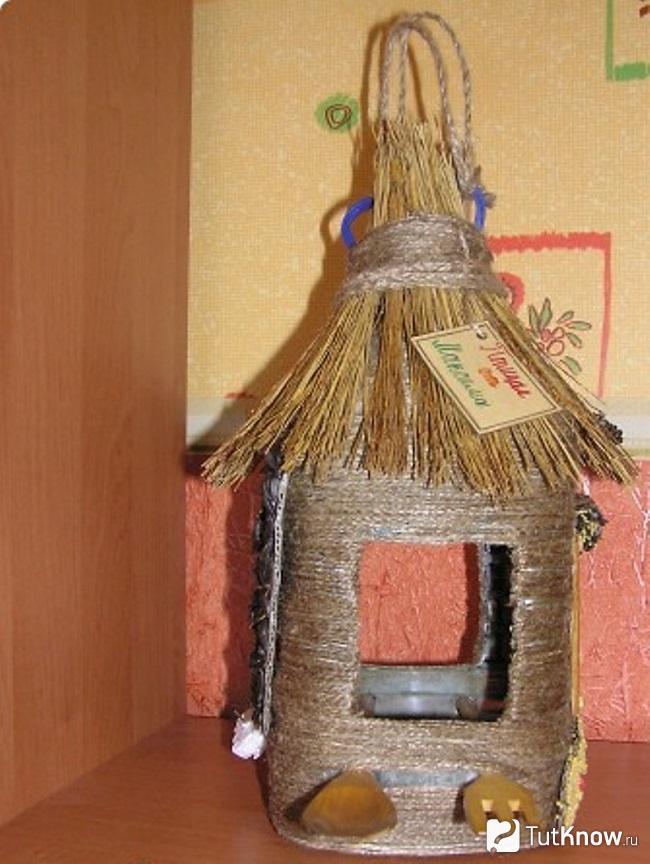
- From one and the opposite side, cut out the windows. Below them, make 2 paired cuts. Insert two wooden spoons here. Or the second can be a large fork of the same material.
- But first, using a hot gun, attach the twine, and upstairs - the straw, after tying it in a bundle. If you do not have such material, then use a natural washcloth.
- It remains to decorate the bird house. From the yellow and white rope, gluing it, make frames for the windows. Fabric flowers glued to the bottom of the bird house will also make a wonderful decoration for the bird dining room.
How to make a butterfly with your own hands?
You will turn the following items into it:
- transparent plastic bottle;
- plasticine;
- small foam ball;
- plastic straws from a cocktail;
- beads.
- hot gun with silicone rods;
- scissors;
- waterproof marker.
- You need to remove the label from the bottle, cut off the middle part to get a fairly large canvas. Cut it in half. Attach the butterfly wings template to one and the second part, circle with a water-washable marker. Cut out according to these outlines.
- Now you need to decorate the wings. Use a hot gun to attach beads as a decoration. Cut the straws into small pieces, glue them along the edge of the wings.
- Let the child wrap plasticine around the ball, using the same material, you can attach decorative elements. To continue children's creativity, the kid will mold the body of an insect from plasticine, help the child put both wings here and fix them.

Crafts from cereals and seeds: master classes
Under your guidance, the child will be engaged in the creative process and make a wonderful palm tree. This will require:
- bowl;
- rod from the handle;
- pumpkin seeds;
- plasticine.
The tree trunk is stuck into it and fixed, which must be coated with plasticine.

Now let the child roll a “sausage” out of brown plasticine and begin to wrap it around the bottom of the trunk, moving up.

Here's how to make similar crafts from seeds and cereals. The turn has come pumpkin seeds. These will be the needles of a lush Christmas tree. They need to be thrust into the tree trunk, also starting from the bottom. Try to place the elements of subsequent rows between the seeds of the previous ones.

What a wonderful Christmas tree made from seeds! Doing the next job is no less exciting. To create a round panel, take:
- cucumber or melon seeds, as well as apples;
- semolina;
- gouache;
- glue;
- pencil;
- round disposable plate.

Semolina is rubbed with gouache - half with green, half with yellow. On a plate you need to apply a drawing with large features, for example, such a goose.

Starting from the tail, grease parts of his body with glue and attach cucumber or melon seeds. And the wing needs to be highlighted with black apple seeds, but quince seeds can also be used.
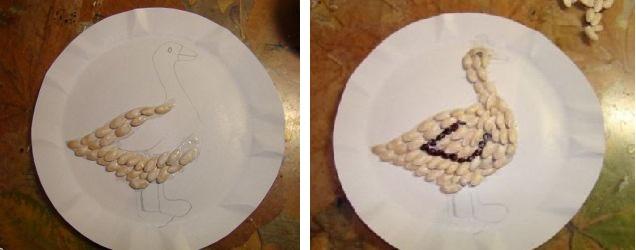
To make paws and a beak, melon or cucumber seeds are covered with red gouache and allowed to dry. Now they need to be glued to the markings.

To make grass lower part background apply glue, sprinkle this area with green semolina. The upper half of the picture is decorated with the same groats, but yellow.

Children's crafts from legumes with their own hands
Crafts from beans, beans, peas can also be done by children. At the same time learn the alphabet. Draw letters on the paper, let the child grease each one in turn with glue and attach the prepared seeds.

To make a pumpkin-shaped panel, give the child:
- seeds of halves of dry peas;
- glue;
- a sheet of cardboard and colored paper;
- a leaf of a tree;
- sesame seeds;
- pencil.

To make chickens so funny and beautiful, children can also use legumes. Give them a template for these baby chickens. Let them circle it, and sketch the noses and paws with a yellow pencil. Glue dry peas on the surface of one chicken. Create another from beans. For the third, corn is suitable.

To make an owl, kids will need:
- pattern of this bird;
- cardboard;
- white, brown, red beans;
- beans;
- dry yellow soup peas;
- glue.
Wings are made from red, and the tummy and outlines of the eyes are made from white. The pupils are laid out with black beans, and the paws and beak with yellow peas or corn of that color.

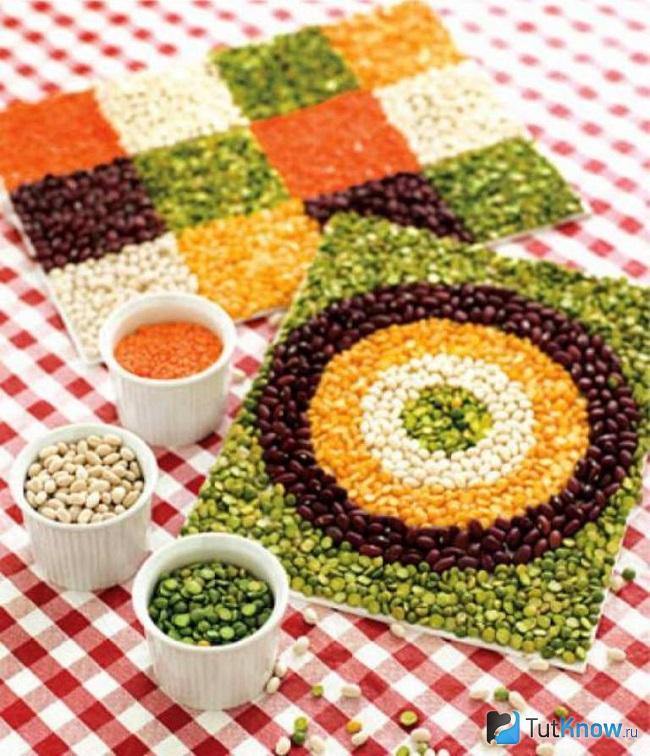
Bean seeds make beautiful colored crafts. You can invite the child to lay out a circular pattern. Glue lentil seeds in the center and outside, and build circles from white beans, beans, yellow peas or corn.
From green peas you can make a frame for a photo by pasting it around the perimeter with these seeds.

There is a very interesting decor Easter eggs. For it you will need:
- boiled eggs;
- paste based on flour or starch;
- grains;
- small cereals;
- dried herbs;
- spices.
You can create mosaic patterns by drawing a sketch on the shell in advance. Use stencils if you wish.

You can attach legume grains to the surface, using not only boiled eggs, but also balls for the base. Great idea for room decor.

How to make a topiary from peas?

Bean seeds will also help to make it. To make a tree count, you need to take:
- a package of green peas (polished and chopped);
- foam ball;
- dry moss packaging;
- 1 clay pot of medium size;
- hot glue;
- PVA glue;
- brush;
- for the trunk - a skewer, a wooden stick or a simple pencil;
- pot paint;
- green acrylic paint;
- floral foam or alabaster or cement;
- Styrofoam.

When it dries, decorate it with peas. Here's how to make the topiary next. Lubricate a small area of the ball with a brush with PVA glue, then generously cover it with peas.

When the beans are attached, decorate the next piece of foam base. Thus, close the ball completely and remove it until morning to dry.
When this happens, inspect the work, if there are small uncovered areas, sprinkle them with grits.
It's time to fix the crown. To do this, drop glue from the “hot gun” into the hole in the ball, insert the barrel here.

For better fixation, it is advisable to additionally fix the barrel with pieces of paper and carefully glue them, pouring more glue here. If you don't put paper in, the hot glue can melt the foam, making the hole too deep.
Now put the stem in the pot, secure this stick with alabaster, cement or floral foam.

After these solutions have dried, you need to put moss on the surface, glue it, decorate with sisal, peas, and cereals.

Applications and panels from cereals
Crafts from peas, beans are not only various topiaries, but also wonderful paintings.

To create one, you must first draw a cat's face on cardboard. Then fill the areas with legumes of a certain color. Crafts from cereals are also impressive.

For this, take:
- cardboard;
- pencil;
- buckwheat;
- semolina;
- gouache;
- PVA glue.
To make such a wreath, take:
- green peas;
- "hot gun" or PVA glue;
- straw wreaths - 2 pcs.;
- baking sheet;
- brush;
- leg-split.
If you don't have straw wreaths, then use a Styrofoam blank of this shape, but it needs to be covered with green acrylic paint.
Place the peas on a baking sheet or tray. Lubricating the inside of the wreath with glue, sprinkle it with peas.
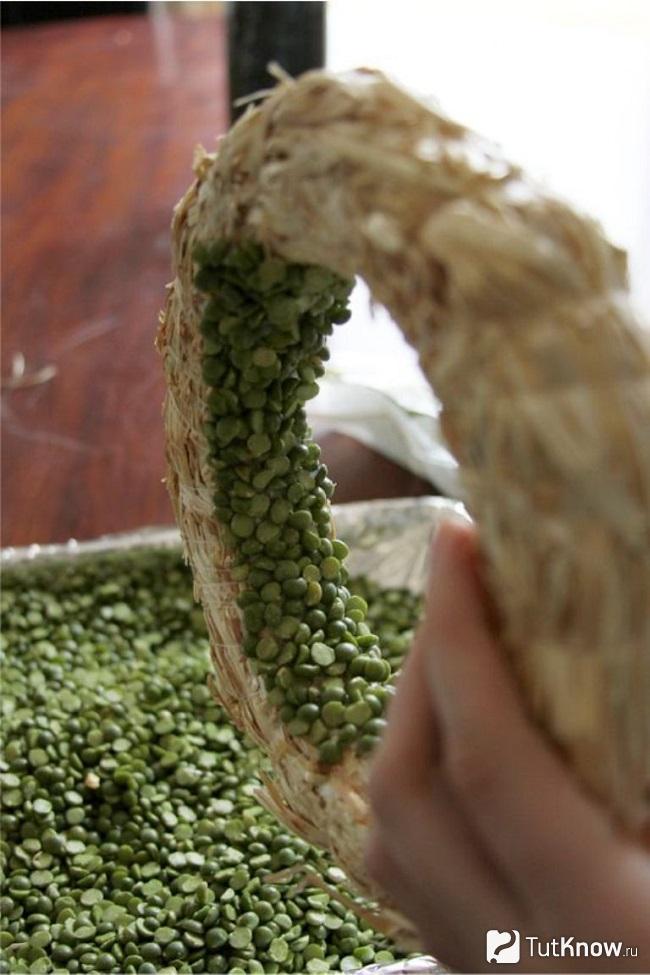
Then, spreading small areas of glue, roll the wreath over the peas to attach these small particles. Once the glue is dry, tie a twine to the wreath, decorate with ribbon, and hang over the door.
The door is decorated. Make table decorations. To make napkin rings, take:
- toilet paper rolls;
- paint;
- spices;
- seeds;
- small cereals;
- stationery knife;
- glue.
To give products additional strength, you can lubricate the decorated surface with glue.
Here are such wonderful crafts from seeds, cereals, beans, peas that you can advise the kids to make. And to make it even easier for them to learn this, let them watch videos with you that show the process of creation in an accessible way.
Cereals and grains of coffee are the most affordable handicraft materials that almost every home has. They make very creative crafts, which can be used to decorate the interior or give to a loved one. Works from cereals will allow you to fully reveal your Creative skills and also fun to spend with kids.
If we talk about coffee beans, they not only have a pleasant aroma, but are also practical enough for creative works, since they differ in optimal parameters. In addition, the smell of quality grains stabilizes nervous system and contributes to the stimulation of children's observation, perseverance, the formation of creative thinking and an original approach to business.
How to make pictures from coffee beans
- Photo frame of the right size.
- Polymer glue or thermal gun.
- Depending on the idea of the future picture, you can purchase colored paper, spray or watercolor paints, as well as any other accessories to your taste.

Before starting work, it is necessary to remove the glass from the frame and remove the protective film from the frame, pull out the cardboard lining, if desired, you can paste over it with paper, a plain cloth or paint it.
Then you need to think over a sketch of future work. Using a simple pencil, mark the location of the drawing. You can pre-lay out the grains without gluing them to the base, which will allow you to better think over the design, and, if desired, refine it. By carefully considering the picture, you can avoid mistakes and shortcomings. In general, the grains can be arranged as you like, in absolutely any direction.
If you want to change the shade of the grains, you can tint them with watercolors or spray paints. Do not forget about different varieties of coffee, which also have differences in color.
After you decide on the color and idea for the design, you can start gluing the grains. You should not use too much glue, because in the process it can protrude and create unwanted stains. Remove excess glue in a timely manner by blotting with a dry cloth.
Instead of a photo frame, you can take a wall clock as a basis, and also use it as the basis for your creativity.


No less relevant is the idea of \u200b\u200bcreating a kind of coffee tree or. It can be made by placing a stick on the stand, and fix a ball of light material, for example, paper. Subsequently, the surface of the ball and the stand are pasted over with coffee beans.
Crafts from cereals for children in kindergarten

The technique of gluing cereals to paper differs from the previously presented version with coffee beans. For example, legumes can be glued separately. Small cereals can be poured onto a surface smeared with glue through a stencil.


Cereal alphabet for children
When introducing a child to letters, as well as teaching reading, it is best to use the technique volumetric letters. This will help him remember the letters faster and he will be able to enjoy a kind of game.
Materials:
- A sheet of cardboard in a neutral shade;
- Pencils;
- PVA glue;
- Scissors;
- Groats: beans, peas, millet and others at your discretion.

We decorate the bottle with cereals or seeds

Such a craft will become a rather non-standard decoration for the house. The design depends on the color of the cereals, which, like coffee beans, can be tinted.
Educational games using semolina
Cereal games are widely used for development fine motor skills hands in children. To increase interest in the game, the croup can be painted. The essence of the method is that the cereal is poured onto a tray or any other flat surface, giving the child the opportunity to perform original drawings with his fingers. To begin with, you can choose fairly simple shapes like a circle or a square, and then move on to some more specific objects. This technique also develops the creative thinking of the baby.

Cereals, seeds and grains of coffee are widely used in needlework. At the same time, they can be made a large number of creative products, interior decorations and even exciting games for children. you can turn ordinary food and old home decoration into beautiful handicrafts.
As you know, a cozy atmosphere in the house is formed by various little things - lamps, vases, paintings. A special charm is given by hand-made things. And for your own creativity it is not necessary to use expensive materials. Look around - there are a lot of objects around that can be used for various kinds of decorative things. Particularly natural materials the best way for crafts: and exclusive, and environmentally friendly, and cheap. Pay attention to crafts from watermelon seeds. In any family, they love the largest berry - watermelon, and the seeds are usually thrown away. And if you collect and dry them, you will have in your hands a valuable material for, say, a three-dimensional figure, a picture or an application made from watermelon seeds. And if you frame these crafts, you will get a wonderful gift or an element of home decoration. And to make it easier for you, we will provide you with a few master classes with ideas for decorating watermelon seeds.
Panel of watermelon seeds
To make a painting, you will need the following materials:
- Watermelon seeds. We also recommend using other seeds - sunflower, melon, pumpkin, then the overall composition will look advantageous.
- Glue "Moment crystal".
- bottle caps.
- A piece of birch.
- Frame.
- A sheet of cardboard and the remains of wallpaper with a natural background.
So, let's start making a picture of watermelon seeds:


Crafts from watermelon seeds: box
A real work of art is obtained from an ordinary jar with a lid and the same watermelon seeds. So, for work you will need the following materials:
- watermelon seeds themselves;
- a jar with a lid, glass or plastic - any that can be found on the farm;
- hot glue or glue "Moment crystal";
- aerosol enamel;
- tweezers;
- piece of tissue paper:
- scissors:
- needle with thread.


That's how easy you get a real masterpiece - a box for all sorts of little things - sewing accessories, jewelry, memorabilia. Inside, the craft can be carefully overlaid with a cloth or foil.
How to make crafts from seeds (pits) of watermelon and plasticine with your own hands. Master classes.
Children's crafts from seeds (pits) of watermelon
Watermelon seeds are wonderful, which can be used in children's creativity. What can be done from watermelon seeds with children?
One of the most simple ways to fix watermelon seeds on a craft is to press them into plasticine. Even kids can handle this method of making crafts from watermelon seeds, and crafts can be both flat and voluminous. They can be made with children not only in the summer, during the watermelon season, but also at other times of the year, you just need to prepare the seeds.
I somehow met negative feedback one woman for such a craft. She wrote that crafts made from watermelon seeds make her squeamish. I think that she got such an attitude due to the fact that she herself ate watermelons like in a fairy tale - so that it would flow down her mustache, but not into her mouth. And spit out the seeds. But it is much more convenient to eat a watermelon by cutting it into small slices and removing the seeds from them with a knife. There is no reason for squeamishness in this case.
If cardboard is used in the craft in addition to plasticine, it is better if it is glossy, otherwise greasy spots appear on the cardboard from plasticine over time.
How to prepare (dry) watermelon seeds
To prepare watermelon seeds, they need to be washed well, spread out on a napkin or towel and wait until they dry. Then pour into a jar or box for storage.
Watermelon - craft from watermelon seeds
Such a craft can be done even if there are no watermelon seeds - instead of them, you can glue pieces of black or brown plasticine.
Materials and tools
For crafts you will need:
- cardboard
- pencil
- scissors (optional)
- watermelon seeds
- mat (board) for modeling
- red plasticine
- plasticine dark green
- light green plasticine (if there is only one block of green in the set, a lighter shade can be obtained by mixing it with white or yellow)

Stages of work

A bouquet of flowers in a vase - a picture of watermelon seeds
Materials and tools
- cardboard
- pencil
- scissors and glue (optional)
- watermelon seeds
- mat (board) for modeling
- yellow plasticine
- green plasticine
- plasticine of any color (for a vase)
Stages of work

Dog - craft from watermelon seeds
This is a Dachshund dog with food in a bowl. Craft without a master class, because it took very few watermelon seeds for it, only for food and ears.

Mouse - craft made from watermelon seeds
And for this craft, my daughter only needed one watermelon pit. The result is a very tiny mouse.

Craft "Hedgehog" from plasticine and watermelon seeds
For this craft, my daughter used the remains of plasticine different colors. She mixed them together, and got a suitable dark gray color.
Materials and tools
- watermelon seeds
- mat (board) for modeling
- plasticine gray or brown
- black plasticine
Stages of work

Composition of crafts made from watermelon seeds
And this is my daughter's composition of handicrafts made from watermelon seeds:
- hedgehog in the foreground
- a bush and a lizard for the company, watermelon seeds were not needed for their manufacture,
- near the bush on the right - an apple with a leaf from the stone of a watermelon,
- a mouse hides behind a bush from a hedgehog,
- a butterfly perched on a bush.

This composition decorated the lid of a coffee jar in which we store watermelon seeds. There is no lizard on the lid, but there are two strawberry bushes with leaves from the same seeds. And the jar itself can also be decorated with watermelon seeds. How to do this, read the article.

© Julia Sherstyuk, https: // site
All the best! If the article was useful to you, please help the development of the site, share a link to it on social networks.
Placing site materials (images and text) on other resources without the written permission of the author is prohibited and punishable by law.