Scheme of a hanging Christmas tree made of balls. Christmas tree made of Christmas balls with your own hands. Master class with step by step photos. Fringe tree is ready
Christmas tree from balls
Decor with Christmas balls. Photo
Today on tutdizain.com there is an excellent master class, from which you will learn how beautiful things become, decorated with Christmas balls.
To decorate the Christmas tree with Christmas balls, you will need:
The basis for the Christmas tree made of foam or thick cardboard
Christmas balls of any color, small sizes
hot glue gun
Process of creation Christmas tree from balls:
Take Christmas balls and remove the hanger from them. Next, start attaching the balls to the base with hot glue, starting from the bottom of the tree. Thus, gradually gain row after row, placing the Christmas balls according to the color scheme in a certain sequence. The balls need to be stuck into the pyramidal oasis, fixing your assembly at the base with hot glue.


After the entire surface of the Christmas tree is filled with Christmas balls, you will need to hide the voids (the gaps through which the base of the Christmas tree is visible). So, in addition, silver Christmas beads can be glued between the balls. Also, these voids can be masked with Christmas tree rain or tinsel.

Such Christmas trees can be made in any color scheme.

Also, a Christmas tree from balls can be created using a slightly different technology, for which you need to take a toy and fix the mount with glue. Next, a Christmas tree base with a pin is created, for which you can use a coil + long needle. After drawing up the design, Christmas toys are put on a knitting needle. In more detail, this option for creating a Christmas tree from Christmas balls see
Guys, we put our soul into the site. Thanks for that
for discovering this beauty. Thanks for the inspiration and goosebumps.
Join us at Facebook and In contact with
Many people notice that the older they get, the more difficult it is to re-experience that magical feeling of a fairy tale and a miracle that always came to us in childhood under New Year.
But we are in site sure - Christmas mood It won't keep you waiting if you make one of these wonderful decorations for your home and Christmas tree with your own hands. Almost all, with the exception of two or three, do not require much time and some special materials - they can be made in half an hour from what is at hand.
Thread stars
A wreath of balloons and an old hanger
In just half an hour, you can make a colorful wreath by buying a couple of sets of inexpensive balloons. Blogger Jennifer, the author of this article, recommends unbending an old hanger, but if you don't have one, then a piece of strong wire will do just fine.
- You will need: a couple sets of balloons (20-25 balloons of different colors and sizes), a wire hanger or wire, fir branches, braid or ready-made decoration for decorating a wreath.
Snowflake tablecloth
A delicate and surprisingly festive tablecloth will turn out from snowflakes, on which we have stuffed our hands since childhood. You can sit down and cut snowflakes with the whole family, and then lay them out on the table and fasten them with small pieces of tape. A wonderful solution for receiving guests or just having dinner with the family during the holidays.
multicolored hats
The cutest colored hats can be made from leftover yarn, which can be used to make a garland for a Christmas tree or for decorating a wall. Or hang them on a window or chandelier at different levels. Children over five years old will also do just fine. simple decoration. See details.
- You will need: a roll of toilet paper for rings (or regular cardboard or thick paper), scissors, multi-colored yarn and a good mood.
Lamp "Snowy City"
For this charming lamp, you need to measure a piece of paper around the circumference of the can with a small margin (to glue), depict and cut out the simplest urban or forest landscape. Wrap around the jar, and put a candle inside.
- You will need: a jar, thick paper of any color, white can be, any candle. Alternatively, you can cover upper part cans of "falling snow" with a special "snow" spray, which is sold in hobby stores.
Balloons with photos
A great idea for decorating the Christmas tree or as a gift to relatives and friends. The photo must be rolled up into a tube so that it passes into the hole of the ball, and then spread with a wooden stick or tweezers. Small black-and-white rectangular shots will do, and you can also cut out the photo in the shape of a ball or silhouette (as in the case of a cat in the snow).
- You will need: plastic or glass balls, photographs, various things for filling the ball - tinsel, garlands, coarse salt (for snow).
Christmas lights
And this miracle is a matter of five minutes. It is enough to collect balls, fir branches, cones and put them in a transparent vase (or a pretty jar) and add luminous garlands.
embers
Luminous garlands hidden among cones, branches and coniferous paws create the effect of coals smoldering in the fireplace or a cozy campfire. They even seem to be getting hot. For this purpose, a basket lying on the balcony for a hundred years, a nice bucket or, for example, a wicker container for small things from Ikea, is suitable. Everything else (except for the garland, of course) can be found in the park.
floating candles
Very simple decoration New Year's table or for a cozy evening with friends in new year holidays- composition with candles floating in a vessel with water, cranberries and coniferous twigs. You can use cones, circles of oranges, fresh flowers and leaves from a flower shop - whatever your fantasy tells you. And as a candlestick - deep plates, vases, jars, glasses, the main thing is that they are transparent.
Snowman on the fridge or door
From this, the children will definitely be delighted - fast, fun and very simple, because even a three-year-old can handle cutting out large parts. It is enough to cut circles, a nose and a scarf from self-adhesive paper, wrapping paper or colored cardboard and attach them to regular or double-sided tape.
Snowflakes on the window
An interesting use for a glue gun lying around idle. In order to stick these snowflakes to the glass, just press them lightly to the surface. See details in our video.
- You will need: a stencil with a snowflake drawn with a black marker, tracing paper (parchment, baking paper), a glue gun and a little patience.
Christmas trees-candy
Bright Christmas trees can be built together with the kids for children's holiday Or decorate your holiday table with them. Cut out triangles from colored paper or cardboard, attach with tape to a toothpick and stick the resulting Christmas trees into sweets.
- You will need: Hershey's Kisses or any other truffle candies, toothpicks, scotch tape, colored paper or patterned cardboard.
Garland with photos and drawings
New Year, Christmas - warm, family holidays. And it will come in handy with photographs, children's drawings, pictures. They are easiest to secure with clothespins that can be decorated with hearts or snowflakes.
origami star
painted spoons
Ordinary metal spoons or wooden spoons for cooking with acrylic paints turn into interesting Christmas decorations. This idea is sure to please the kids. If you bend the handle of metal spoons, they can be hung on a Christmas tree. And wooden spoons will look great in the kitchen or in a bouquet with spruce branches.
No New Year passes without green beauty. It fits perfectly into the holiday decor and is a wonderful winter gift. In this article we will look at: how to make a Christmas tree for the New Year in different creative ways with your own hands.
You will need: copper tubes or wooden smooth sticks, green fringe 15 cm wide, thin wire, paper, pompom garland, ruler, pliers, thin-bladed hacksaw, glue gun, scissors.

Master Class

The fringe tree is ready!

You will need: ice cream sticks, ruler, scissors, paints, glue gun, rope, decoration elements - stars, rhinestones, pompons, tinsel.
Master Class

Christmas trees from ice cream sticks are ready!

You will need: Christmas balls with fastening in the form of eyelets, fishing line, scissors, round nose pliers, chain, metal grill, carabiner (connecting link for hanging the Christmas tree).

Master Class


You will need: toilet paper or paper towel rolls, scissors, glue gun, paints, sponge, decoration elements - shiny ribbon, rhinestones, sequins ...

Master Class

The Christmas tree from the bushings is ready!

You will need: thick glossy paper Green colour, pencil, hole punch, ruler, decoration elements - asterisk, rhinestones, beads, thick thread ...
Master Class

Christmas tree box is ready!

You will need: thick cardboard, scissors, wrapping, double-sided tape, various decorations - beads, bows, stars.
Master Class


You will need: scrapbooking paper, compasses, scissors, wooden sticks, glue, candlesticks and caps, white paint.
Master Class

The original Christmas tree is ready!

You will need: cardboard, scissors, hole punch, glue, yarn, needle, pencil, ruler, spray snow and glitter (optional).
Master Class

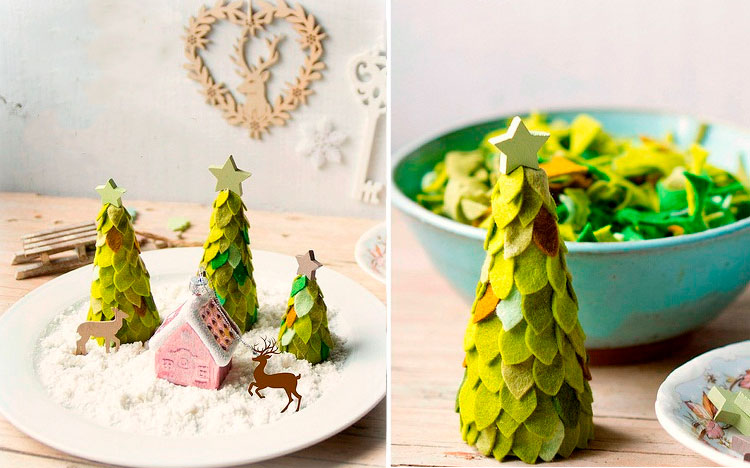
You will need: green felt, foam cone, glue gun, scissors, pencil, star.
Master Class
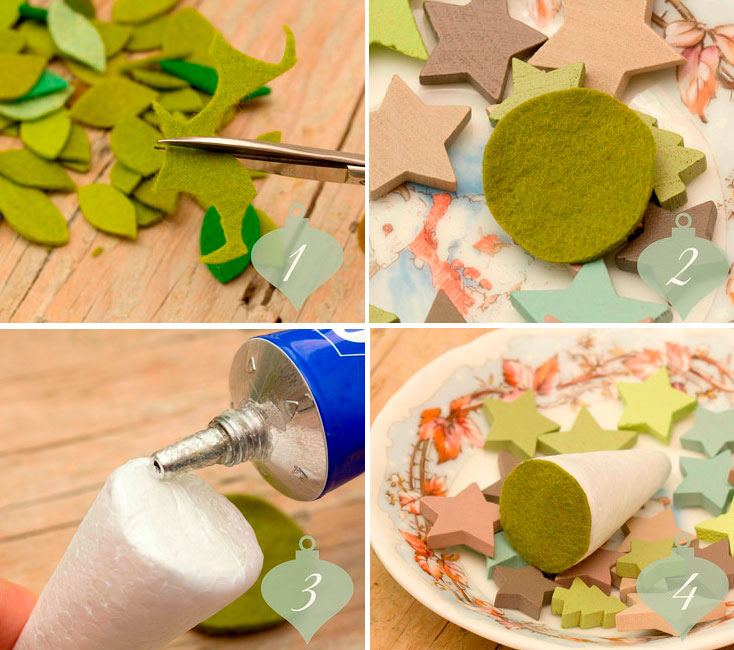
The felt tree is ready!

You will need: paper, stationery knife, scissors, hole punch, thread, template.
Master Class

hanging Christmas tree

You will need: colored paper, saucepan lid, simple pencil, scissors, tape, thread, needle.
Master Class
- Circle the lid on a piece of paper.
- Cut out the circle.
- Cut off a quarter of the circle, then tape the edges together.
- Make 3 blanks in this way.
- String the workpieces on a thread, forming a Christmas tree, fix each workpiece with a knot.
Hanging Christmas tree is ready!

You will need: magazine, decoration elements - stars, rain ...
Master Class

Christmas tree from the magazine is ready!

You will need: cardboard, strawberry, chocolate.
Master Class
- Make a cardboard cone.
- Melt the chocolate in a water bath.
- Attach the strawberries to the cone using the hot chocolate as glue.
- Draw an asterisk with chocolate, wait for it to harden and decorate the top of the strawberry Christmas tree.
Strawberry tree is ready!

You will need: scrapbooking paper, a white sheet of cardboard, twine, glue, decoration elements - buttons, an asterisk.
Master Class
- Twist the scrap paper tubes.
- Adjust the length of each tube and lay out the Christmas tree.
- Glue the tubes.
- Make a Christmas tree leg out of twine.
- Glue buttons and a star to decorate.

You will need: foam cone, red and green ribbons, safety pins, scissors, felt, glue, golden bow.
Master Class
- Cut out a circle of felt the size of the diameter of the base of the cone, then glue it.
- Prepare pieces of ribbon of the same size.
- Form a loop from a piece of ribbon, strung on a safety pin. Repeat the same process with all segments.
- Attach the eyelet pins to the foam cone, placing them in circles, alternating colors.
- Attach a bow to the top of the tree.
Ribbon tree is ready!

You will need: green felt and Brown, floss thread yellow color, needle, ruler, scissors, pencil, small star.
Master Class
- Cut out 25 squares from green felt (5 squares each with sides - 1,2,3,4 and 5 cm).
- Cut out 5 small brown felt circles.
- Prepare a thread with a needle, and tie a knot at the end.
- String circles as a tree trunk.
- String squares, starting with the largest, ending with the smallest.
- Decorate the top with a star.
The felt mini Christmas tree is ready!

You will need: 3 drawing paper, tape measure, adhesive tape, glue, scissors, corrugated paper green and brown, decoration.
Master Class
- Connect 2 whole paper and half of the third using tape.
- Draw a triangle with a height of 180 cm, as shown in the image.
- Cut it out.
- Prepare strips of corrugated paper 20 cm wide, then make a fringe.
- Paste the entire triangle with stripes, starting from the bottom - rising up.
- Cut out a rectangle for the trunk and cover it with brown fringe.
- Attach the Christmas tree to the wall and decorate as you like.

You will need: thick cardboard, glue, cones, a simple pencil, scissors, golden paint, sparkles.
Master Class

The golden tree is ready!

You will need: foam cone, yarn, pompom, buttons, glue gun, scissors.
Master Class
- Put a drop of glue on the end of the yarn and fix it at the bottom of the cone.
- Wrap yarn around the entire cone.
- Glue the end of the yarn to the top of the cone and glue the pompom.
- Glue the buttons to decorate the Christmas tree.
Christmas tree made of yarn is ready!
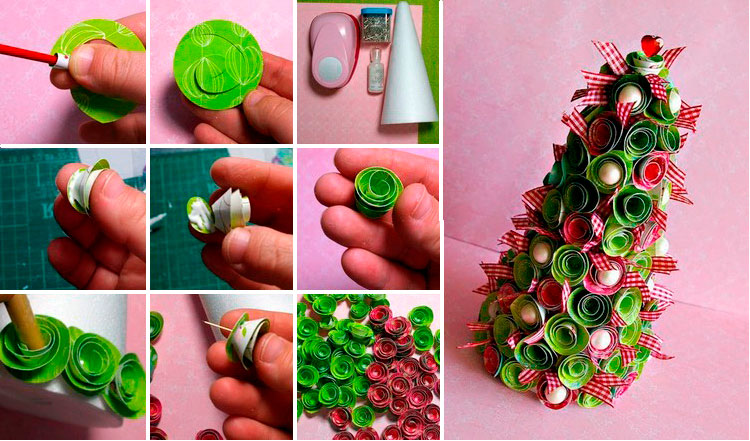
You will need: foam cone, scrapbooking paper, rep ribbon, scissors, simple pencil, toothpicks, glue.
Master Class
- Cut out a circle with a diameter of 3 cm.
- Draw and cut out the spiral.
- Form a rose and plant it on a toothpick, as shown in the photo instructions.
- Do a large number of blanks in the same way.
- Fill the cone with ribbon roses.

You will need: 24 sleeves, green crepe paper, scissors, glue gun, marker, stickers, ribbons.
Master Class
- Wrap each sleeve with corrugated paper and tie with a ribbon like a candy.
- Number each bushing with a marker.
- Lay the tape and lay out the base of the Christmas tree from 8 bushings on it. Make the second row from the bottom of 6 bushings, and lay out the next rows - 4,3,2,1.
- Secure the Christmas tree with ribbon and decorate with stickers.
The Christmas tree from the bushings is ready!
11/17/2018 289 ViewsWinter guest from Christmas balls and stepladder
It is impossible to imagine the celebration of the New Year without a Christmas tree, especially if your family has children who are anxiously waiting for miracles and gifts from Santa Claus. Modern designers and craftsmen offer many options for creating a Christmas tree without using a living tree and without even resorting to artificial imitation.
- Soaring Christmas tree
- You can make a floating or conical Christmas tree, consisting solely of Christmas balls using additional material.
- You can use unusual Balloons, and plus - Christmas trees. In general, there are many creative options for creating a Christmas tree for celebrating the New Year with your own hands.
- Styrofoam cone. It depends on its size finished product, so the main reference point is the dimensions of the cone.
- Christmas balls. You should take care of the color scheme in advance or use completely different colors without being tied to a specific combination sequence.
- To complete the composition at the crown, you can use a snowflake, a star, a tip, a bow - whatever you want.
- Glue gun or other good adhesive.
- Scissors.
- Ribbons, organza and more.
- Wooden spatula.
- We take a foam cone. We will gradually decorate it with balls from the bottom up (this is a very important point).
- We proceed to fastening the balls with a gun. It is worth noting that the formation of the second row of balls must be done as follows: they are placed between the balls of the first. If you have chosen the appropriate pattern in colors, you should follow it and alternate the balls.
- You need to fill the cone to the very top; when forming the upper rows, you can use Christmas balls of a smaller diameter.
- Next comes the formation of the crown.
- The voids between the balls can be filled with organza or beads. When using organza, you should cut it into small squares. By connecting two squares with a wooden skewer and glue, you need to place the resulting decoration in an empty place. You can also use tinsel for this.
- chains with which the structure will be suspended;
- carbines - in large quantities;
- hooks - by the number of carabiners;
- thick fishing line;
- Christmas balls;
- clips that will be used for fishing line;
- wire cutters;
- the basis for fixing the balls will be the mesh used for steam cooking.
- With the help of wire cutters, it is necessary to cut the chains into pieces of the same length, the structure will be suspended on them. With the help of hooks, you should fix the chains in the net and connect their ends to the carabiners.
- Next, cut into different lengths pieces of fishing line for attaching balls. Loops are made at each end of the fishing line, here you can use special clips or simply tie knots.
- Christmas balls ( color scheme and think about the dimensions in advance);
- frame (it can be a wooden beam);
- fishing line;
- Christmas decorations, garlands.

Herringbone for holiday table with metal frame


We bring to your attention several options for creating a Christmas tree.

Original idea for modern wall decor
Cone Christmas tree made of Christmas balls
To do Christmas tree from balls, you will need the following materials:

A short master class on creating easy and beautiful crafts
To create a Christmas tree, you need to follow the sequence:


Soaring Christmas tree
The idea with the unusual formation of a Christmas tree for the New Year can be realized with your own hands. Spruce will turn out as if it is floating in the air. For safety reasons, it can be placed at a height (if there are small children). Also, this kind of Christmas tree will be an unusual decoration for a school or kindergarten for the holiday.

Hanging Christmas tree
For manufacturing you will need:

A few details on creating such beauty
Advice! Fix the base in the position in which it will be used. On weight it is easier to form a silhouette of a Christmas tree. Balls on a short line are hung in the center, and on a long line - along the edges.


Note!In order to skillfully arrange an air Christmas tree, use spatial and creative thinking. Such a beauty will delight guests and members of your family throughout the holidays, while not a single living tree will suffer, and you will be more than provided with a New Year's mood.

Round bases make the process easier
Wall Christmas tree made of Christmas balls
The creation of a Christmas tree that will decorate the wall must also be approached creatively and with imagination. To complete it, you will need:


First of all, it is necessary to make a frame on which the balls will then be hung. You can make it immediately in the form of a spruce (triangle) or perform it in several levels (segments of different lengths, arranged from smaller to larger). Using a tool, you need to hang the frame on a nail. Further, everything depends on your imagination: place the balls on the fishing line, tying them to the frame, and use New Year's decorations.
Advice! The use of a garland (especially around the perimeter of the frame) makes the Christmas tree even brighter and more festive..

Creative approach to New Year's decoration walls
Important! Celebration of the New Year is a tradition of every family, which is important to support from year to year. Creating a holiday is within the power of everyone. The most important thing is to approach this issue creatively, and everything will work out for you, and all your wishes will come true.!


Agree, it is impossible to imagine the New Year without a Christmas tree, especially if there are small children in your house who are most looking forward to gifts and miracles from this holiday. Today, many craftsmen and designers offer a lot of different solutions on how to place a Christmas tree in the house without the use of living and even artificial wood.

- Creation of a Christmas tree from Christmas and unusual balloons;
- Making a conical or completely floating Christmas tree with or without a frame.

Wall fir tree using Christmas balls
It is worth approaching the process of creating a wall-mounted Christmas tree as responsibly as possible, with imagination and creativity. For work you will need:
- Garlands and others;
- Christmas balls;
- Fishing line;
- Frame (wooden sticks will do).

It is worth noting that the colors and sizes of Christmas tree decorations should be thought out in advance!
The first step is the frame, on top of which in the future the balls will be located. As an idea, you can make a triangle, in the shape of a spruce or in several horizontal levels, where each upper segment will be smaller in length, decreasing to nothing. With the help of nails, the frame is attached to the wall.

Further clearance wall christmas tree completely depends on you and your imagination: arrange christmas toys and decorations as you wish, place the balls by tying them with fishing line to the wooden frame. Below are some ideas for successful design.


Soaring Christmas tree
This option is perhaps the most unusual of all that you can think of to decorate your home for the New Year. The finished result should look like the tree is floating in the air, as in the photo below.

If there are small children in the house, then for greater safety, you can place Christmas decoration at a higher altitude.
Apart from hearth, a floating Christmas tree can become original decoration, for example, for kindergarten and school for the duration of festive events.


For work you will need:
- Mesh for steam cooking, which will play the role of the basis for fixing the balls;
- Thick fishing line;
- Chains for hanging the finished structure;
- Wire cutters;
- Christmas balls;
- A large number of carbines;
- Clamps for fishing line;
- Hooks.
The number of the latter depends on the number of carbines!
The chain is cut into equal fragments with the help of wire cutters, in the future, the finished structure will be hung on them. Hooks are needed to fix the chain in the net, as well as to connect carabiners with their ends.

As you can already guess, the balls will be hung on a fishing line. To do this, the latter must be cut into pieces various lengths. Each piece of fishing line is complemented by a loop at the end, which is done simply by tying the fishing line into a knot or using a special clip.
Install the base in the position in which the finished structure will be for the rest of the time. The silhouette of a Christmas tree is much easier to form on weight. Place balls with a long line at the edges, with a short line - in the center!

For a beautiful and elegant decoration of the Christmas tree in the air, you need figurative and spatial thinking. It is possible that the end result will not work for you on the first try, but it's worth it. A beautiful spruce will allow you to maintain a festive mood throughout the weekend, delighting you and impressing your guests.
Cone Christmas tree made of Christmas balls
To create a Christmas tree from balls with your own hands, you will need the following components:
- Wooden skewer;
- A bow, snowflake, tip, star or any other object that will decorate the top of the Christmas tree;
- Foam cone. The dimensions of the finished product will depend on its dimensions, so correctly focus on the dimensions of the cone;
- Organza, ribbons, etc.;
- Christmas balls;

It is worth considering in advance the color scheme for the Christmas tree by choosing the appropriate balls. Alternatively, you can use completely different colors without choosing any particular combination.
- Scissors;
- High-quality fast setting adhesive either.

Work order:
- First of all, the foam cone is decorated with balls, and this should be done from the bottom up!
- Using a glue gun, the balls are attached to the base. Moreover, the second row should be placed above the first so that the balls from above are placed between the balls of the first row;


When choosing any color pattern, you should follow it to the end, correctly alternating the balls with each other!
- The cone is filled to the top. It makes sense to use smaller diameter balls at the top;
- The top is being made;
- The voids formed between the balls are easily filled with beads or organza. In the latter case, it is recommended to cut the organza into small square fragments. Use glue and a wooden block to attach a couple of squares. The finished decoration is installed in an empty place. Alternatively, you can use tinsel.

To make a conical Christmas tree even more festive and bright, it will turn out if you place a garland around the perimeter of the structure.
Every family celebrates the New Year every year, making this holiday a real tradition! Everyone approaches the preparation of the festival in their own way, the main thing is to use creativity, imagination and creativity, and then you will spend the holiday as brightly and colorfully as possible. We hope our tips have helped you in preparing for the New Year.