Large Christmas tree decorations for the city Christmas tree. Ideas for Christmas decorations for an outdoor tree. New Year's toy for the city tree "Santa Claus"
New Year- the favorite holiday of our compatriots. Both adults and children are waiting for something mysterious, fabulous and very desirable on this magical night, but Santa Claus brings gifts and places them only under very beautiful Christmas trees.
Choose and buy Christmas decorations you can at numerous New Year's fairs, but handmade products bring great joy.
DIY Christmas tree toys

What are they used to make Christmas tree decorations from? You may find it useful:
- old postcards;
- colored paper;
- cardboard;
- foil;
- ribbons;
- beads;
- beads;
- Knitting;
- paints, pencils, felt-tip pens.

And the most important thing is that you have all this at home, and there is no need to run to the store and spend a lot of money.

Paper toys


Both adults and children can make New Year's decorations from paper. Apply a little imagination and you will definitely succeed. First, sketch out a sketch and decide what it will be:
- big toys or small ones;
- round, square, rectangular;
- bears, bunnies, foxes, famous snowflakes;
- boots for gifts, chests, bells?


It is not at all necessary to make huge balls; you can make small neat balls from postcards, for example, like in the next photo.

Let's figure out how to make Christmas tree decorations from other materials?
Knitted toys for the Christmas tree

Fairytale weaving with thin thread and crochet allows you to make magical angels, horses, snowflakes, hearts that look very impressive. Knitted toys They bring unusual warmth to your home and will definitely please your family and friends.


Christmas tree toys made of fabric

To make toys from fabric, you will need any scraps, preferably bright ones. Add some buttons, beads or beads.

Don't be afraid to experiment and you will have the most beautiful and unusual jewelry.
Soft toys for the Christmas tree


As practice has shown, children like soft toys made with their own hands most of all. They are happy to take part in their production because with such products you can decorate not only a Christmas tree, but also a window, wall, door, which means you can always take them off and play with them a little. The main thing is that your baby will not break the toy or get hurt by the glass.

 Photo 12 – Homemade garland made of paper and cellophane
 Simple materials, ordinary ribbons, buttons, and what beauty. And, of course, not a single Christmas tree is complete without Father Frost and Snow Maiden.
Christmas tree toy - “ball”


Balls can be made from any materials. Consider a paper sample. To make these balls you will need:
- glue;
- stapler;
- wire;
- colored paper in four colors.
 Photo 14 – Homemade toys from paper and photographs
 Take a small saucer or glass and trace it on colored paper with a pencil. Then cut out 4 circles of each color. The larger the circles are, the larger the ball will be. Balls of the same color look very original on the Christmas tree, but different sizes. The finished mugs must be bent in half.

The parts are fastened together with wire. Then they straighten and each circle is glued to the adjacent one at the top and bottom.
IMPORTANT! The “ball” toy is still the most common one on the New Year tree, so there are a huge number of options for making it.

Christmas tree toys made of beads

To do beautiful toy made of beads, you will need angelic patience, because the material is small and the work will be painstaking, but the result is worth it.
Wooden toys for the Christmas tree

If you think that it is impossible to make an original toy out of wood, then you are very mistaken.
Glass Christmas tree toys

 Photo 19 – Homemade felt toys: gnomes
 Of course, we won’t blow glass ourselves, but many people may still have old toys from which the paint has peeled off. They can be cleaned and decorated from the inside.
 Photo 20 – Homemade toys made of felt and beads: Christmas trees for the holiday
 Christmas tree decorations made from pine cones


Nature itself gives us ready-made material that just needs to be decorated a little. Pine cones make the most beautiful and most New Year's toys, because even a child knows that cones grow on a Christmas tree.

DIY Christmas tree toys: master class
We invite you to watch the video from step by step instructions manufacturing soft toys for the Christmas tree.
DIY Christmas toys for the street tree

Europe has been decorating Christmas trees outside for a long time. These could be forest beauties growing in the yard, which no one will cut down so that they can stand in the room for several days. IN Lately and in our country you can increasingly see beautifully decorated street Christmas trees.
Of course, the toys for such a Christmas tree will be slightly different, but you can make them yourself. For example, the most unusual and original toys can be made from ice. Photo 27 – Homemade toys from pine cones
You make any shape, freeze it right on the street, you can add multi-colored dyes, and your street beauty will shimmer in the sun with all the colors of the rainbow. Then you don’t need to clean anything up, the toys will melt on their own. Bulk homemade toys are suitable for a large Christmas tree.


 Photo 30 – Homemade toys made from ice and berries
 do it yourself from scrap materials
The New Year is definitely associated with the green beauty. The Christmas tree is a unique attribute that is inextricably linked with this holiday. It is decorated not only indoors, but also on the streets. It is against the backdrop of the festive coniferous tree that all New Year's events take place.
The most important city Christmas tree located on a large area (in the central room). It is often decorated with handmade New Year's toys. For this purpose, competitions are announced and prizes are given out, which motivates parents and children to create Christmas tree decoration. However, such toys must be able to withstand certain climatic conditions characteristic of a given area. The main material in the manufacture of outdoor Christmas tree decorations is plastic. Toys made from this raw material do not change their original shape in the event of snow, wind, or blizzard. To decorate a Christmas tree standing indoors, you can use cardboard, paper and other less durable materials at hand.
Anyone can take part in decorating the main city Christmas tree. To do this, you need to work hard on making a New Year's tree decoration, show imagination and patience. Don’t forget to involve your children in the process of making New Year’s toys for the city tree - these are wonderful memories that will warm your soul all your life.
New Year's toy for the city tree "Santa Claus"
To make such a toy for a street Christmas tree, you will need the following materials:
- Plastic disposable spoons, quantity of 100 pieces.
- Instant adhesive.
- An awl or a hook.
- Drill and drill bit for it, small size.
- Plastic caps from small bottles, 3 pieces (two of them dark, and one red).
- Large Christmas tree tinsel “silver”.
- A twine rope that will serve as a holder for the entire structure.
- Five-liter drinking water bottle.
- Gouache white and red paints.
- Paint brush, large and small sizes.

Having prepared everything you need, you can begin to complete all the stages of making a New Year’s toy for the city Christmas tree “Santa Claus”:
- Using a drill in the drill chuck, a small hole is drilled in the cap of a five-liter bottle. It is necessary for installing the mounting structure.
- A rope is threaded into the prepared gap using a hook or an awl and secured to the inside of the lid. It is the twine that will subsequently hold the Christmas tree decoration on the spruce branch.
- The bottle, with a volume of five liters, is screwed on with a lid with a rope device.
- The entire bottle is painted with prepared red gouache. Including the lid on it.
- Next, time is given for it to dry completely.
- Using scissors and disposable cutlery, elements of the Christmas tree decoration such as a beard, eyebrows and fur trim are created.
- For plastic spoons, the holders and bridges are completely cut off, since to make the toy you only need a scoop.
- Next, you should prepare instant glue, a painted bottle, and plastic scoops.
- The principle of work to create “Santa Claus” should occur in a “top to bottom” order. That is, disposable spoons will be attached to the bottle starting from the top.
- At the initial stage, a lid with a rope structure is decorated. The scoops of spoons overlap each other, with a small gap. That is, you should get a small bubo that will only cover the lid. But at the same time, the rope holder should look out of it.
- Having created the initial look of the Santa Claus hat, you should finish it with the same materials. For further creation of toys, scoops are glued to the bottle along its entire axis. Moreover, they are joined together by the edge sides.
- Next, you should outline where “Santa Claus” will have his eyes and nose. These parts of the body will be expressed as caps of small diameter. The eyes will be dark in color, and the nose, as expected, will be red. They should be secured with instant glue, which was used for gluing other materials.
- Eyebrows will help add age to the toy “Grandfather”. They can also be made from plastic scoops. To do this, you need to take one disposable spoon without a handle and cut it into two identical halves. Each of which should be glued above the eyes in such a way as to create the illusion of eyebrows.
- Then work begins on creating the “Santa Claus” beard. To complete this you will need glue and prepared scoops. Plastic spoons are glued on top of each other, starting below the nose of the toy “Grandfather”. And the glued layer ends, a little short of reaching the edge of the bottle. The gaps between the scooped parts are small, but they should be glued to each other, as it were. This creates volume in the beard.
- Further along the edge of the bottle, and in this case Santa Claus’s fur coat, scoops of plastic spoons are attached. Thus, these actions will highlight the lapels of the grandfather’s fur sheepskin coat. They are attached edge-to-edge to each other, but in no case stacked on top of one another.
- Now you should apply Creative skills. To do this you will need white gouache and a brush, preferably a zero brush. With the help of such an art set, you need to complete the face of “Grandfather”. Namely, in those places where it is necessary to highlight front part, paint over the redness with white. All actions are performed slowly and carefully, trying not to touch other parts.
- The finishing touches to making a Christmas tree decoration include attaching silver tinsel to the almost finished Santa Claus exhibit. This decoration is rightfully considered the most elegant and festive. It gives fun and naturalness to the made toy.
Having done a lot of work and shown a lot of patience, you can safely attach your creation to the main New Year's tree in the city.
New Year's toy for the city tree "Snowman"
The voluminous figure of a snowman will definitely attract the attention of everyone who is invited to the festive New Year's event. This character is also considered a New Year's character, along with Father Frost and the Snow Maiden.
To complete the “Snowman” craft, you will need not only physical strength, but also material costs. But the result will certainly please not only the performer, but also all those who will contemplate this New Year’s work. Before starting work, you should prepare the following materials:
- Disposable plastic cups (three hundred pieces).
- Black printed cardboard.
- Medium size office stapler.
- A piece of felt fabric.
- Staples for threading fastening tools, preferably No. 10.
- Children's plasticine, orange.
- Instant glue.
- Tennis balls.
- Black paint.
- Paint brush.
- New Year's electric garland.
- Connected Warm scarf.
- Colored paper set.
- Packaging cardboard paper.
- PVA glue.
- Stationery scissors.
- Metallized foil “gold”.
- Stationery knife.

Performing work on the manufacture of a large New Year's toy on city tree The Snowman takes place in several stages, but they are all inextricably linked. And therefore it cannot be said that there is something important here, and something secondary.
- The main task of the craft is to create balls, a kind of torso of the "Snowman". First you should start working on the lower part of the structure. To implement it you will need plastic cups, a stapler and staples for it. The first main circle is laid out, that is, the very beginning. You need to take twenty-five glasses, and fasten them together, place them in a circle. But at the same time, one should not forget that the bottoms of the cups should be inside the formed circle. That is, it turns out that only the edges of the plastic dishes need to be fastened.
- The next circle is formed on top of the laid one. The cups are also stacked upside down inside the circle, but at the same time each of them lies in a hollow between the two lower ones and all this is fixed between themselves and the previous row, forming a single structure. But when assembling, you must not forget that in each row it is necessary to retreat a little from the edge. That is, as if forming a regular geometric figure.
- Continuing also to collect cups, the number of circles should be eight. But at the same time, you do not need to pile up plastic dishes, creating a ball. It should be remembered that the cavity must remain level, otherwise there will be nowhere to put the second “snowball”.
- Having finished with the base of the "Snowman", you can safely proceed to his head. It is performed in the same way as the torso. But when creating it, some nuances should be taken into account. They consist in the fact that the ball should have a finished appearance and a smaller size, unlike the base.
- To complete the head of the "Snowman" it will take eighteen plastic cups. They are laid out in the form of a circle in the same way as the previous ones. In this case, one should not forget about reducing the diameter of the ball and the completeness of the geometric figure.
- Next, you need to collect these two “snowballs”, forming an excellent “Snowman” figure. They are assembled with staples and a stapler. The New Year's character is ready.
- Then you should proceed to highly artistic work. After all, it is she who will create the complete image of the "Snowman". Using tennis balls, you can try to make the eyes of a snowman. To do this you will need black paint and a brush. Using a paint brush, paint the tennis balls black. And leave them until the paint is completely dry.
- The next steps to get eyes for the Snowman are activities such as cutting and gluing. Here you will need: colored paper, scissors and PVA glue. From any paper bright color, cut out small circles correct form. They are glued to black tennis balls and are a kind of pupils. Now you can safely insert them into cups that should be eyes.
- The most important attribute of snowmen has always been made from carrots. But in this case, the nose must be molded from plasticine. Since its texture will allow you to better gain a foothold on the plastic model. Well, by showing the hidden talents of the sculptor and artist, you can get a very good copy. Also, with the help of scissors, glue and colored paper, the "Snowman" can quite acquire colored buttons. And they will be a bright accent on his snow-white body. A warm scarf purchased on occasion will add a special charm to the craft. And if you tie it correctly, it will help to hide all the fastening seams from prying eyes. And there are a lot of them between the body and head. So we can say that this accessory performs several functions at the same time.
- The city New Year's tree is considered an official reception. And therefore you need to look decent. And “The Snowman” in this case is no exception. To add solemnity, he should build a top hat. To make such a headdress you will need necessary materials, described above. The packaging cardboard must first be painted black. After drying, a circle is cut out of it, inside of which another one is cut. That is, the shape of a bagel is obtained.
- The cylinder itself is made from printing cardboard using a stapler or glue. It will be attached to the base, that is, the donut. The top of the cylinder can be closed with a circle cut from the same material. Its diameter must completely match the dimensions of the cylinder.
- Metallized foil can be used to cover all seams between the crown and brim. As a small headband, it may well do a good job.
- For a more stable position of the “Snowman” on the surface, a felt base will be useful. Well, if you want to surprise everyone, then you can install a garland inside the snow man.
Thanks to the imagination and perseverance of the performer, a rather unusual New Year's decoration can be obtained. And while it hangs on the main tree, everyone can admire it. You can make balls from plastic cups.

City New Year tree toys made from plastic bottles
To create a beautiful New Year's tree decoration, you can originally paint ordinary plastic bottles and carboys. It is important to choose the right paints.
- The best product for coloring plastic bottles- colored acrylic varnish that can be applied with a brush, but it is best to apply this coloring component from spray cans.
- It is advisable to choose acrylic paints without aggressive components. Using this type of paint for making toys for street tree, it is necessary on top of the dried paint, cover the product with a transparent acrylic varnish. This will prevent the paint from cracking on the surface.
- Automotive paints are also used to color plastic; they adhere well to the surface and give a bright, rich color to the New Year's tree toy.
- Enamel. Classic enamel paints are also well suited for painting plastic toys for a New Year's street tree. They can be applied with a brush or sponge.
You can paint a bottle for a future toy both inside and outside. The inside of the bottle is often painted by drawing paint diluted with a solvent into a syringe. By inserting a syringe into the neck of the bottle, squeeze a stream of paint into the container and turn the bottle in a circle, evenly distributing the paint over the entire surface. Then turn the bottle over and allow the remaining paint to drain.
Before proceeding with painting the outside, it must be washed, dried, the labels removed, and then wiped with a degreasing solution. By the way, vodka is suitable for these purposes. First, paint the bottom and let it dry. Putting the container on the newspaper with the painted bottom down, continue to cover the toy with paint.


Go to the product catalog section » Christmas trees ■ ECONOMY artificial Christmas trees (PVC needles). Tabletop Christmas trees up to 0.8 m Economy. Christmas trees 0.9-1.0 m Economy. Christmas trees 1.2-1.4 m Economy. Christmas trees 1.5-1.7 m Economy. Christmas trees 1.8-1.9 m Economy. Christmas trees 2.0-2.2 m Economy. Christmas trees 2.3-2.6 m Economy. Spruce 2.7-3.0 m Economy. Tall spruce trees from 3.5 to 5 m Economy ■ VIP artificial trees (needle line and PVC). Tabletop Christmas trees up to 0.8 m VIP. Christmas trees 0.9-1.1 m VIP. Christmas trees 1.2-1.4 m VIP. Christmas trees 1.5-1.7 m VIP. Christmas trees 1.8-1.9 m VIP. Christmas trees 2.0-2.2 m VIP. Christmas trees 2.3-2.6 m VIP. Spruce 2.7-3.0 m VIP. Tall artificial spruce trees from 3.5 to 5 m VIP ■ Artificial Christmas trees DELUXE (molded PE needles). Christmas trees up to 1.0 m Deluxe. Christmas trees 1.2-1.4 m Deluxe. Christmas trees 1.5-1.7 m Deluxe. Christmas trees 1.8-1.9 m Deluxe. Christmas trees 2.0-2.2 m Deluxe. Christmas trees 2.3-2.6 m Deluxe. Spruce 2.7-3.0 m Deluxe. Tall spruce trees from 3.5 to 7 m Deluxe ■ PREMIUM artificial Christmas trees (100% PE cast needles). Spruce up to 1.55 m Premium. Spruce trees taller than 1.85 m Premium ■ Tabletop Christmas trees. Christmas trees with PVC needles. Christmas trees with needles from fishing line. Christmas trees with cast (PE) needles ■ Wall-mounted and wall-mounted Christmas trees ■ Narrow Christmas trees ■ Christmas trees with light bulbs. Christmas trees with lights up to 1.55 m. Christmas trees with lights from 1.80 m ■ Decorative Christmas trees. Artificial Christmas trees with cones · Fir trees up to 1.4 m with cones · Fir trees 1.5-1.9 m with cones · Fir trees above 2.0 m with cones. White Christmas trees · Tabletop Christmas trees up to 1 m white · Christmas trees 1.2-1.9 m white · Spruce trees above 2.0 m white. Snow-covered spruce trees · Christmas trees up to 1.4 m snow-covered · Christmas trees 1.5-1.7 m snow-covered · Christmas trees 1.8-1.9 m snow-covered · Spruce trees from 2.0 m snow-covered. Shiny foil Christmas trees. Decorated Christmas trees. Original "fantasy" Christmas trees ■ Elite Christmas trees of world brands. TRIUMPH TREE, Holland · Spruce up to 1.55 m Triumph · Spruce 1.85 m Triumph · Spruce 1.95-2.15 m Triumph · Spruce 2.3-2.5 m Triumph · Spruce above 2.6 m Triumph · Coniferous decor Triumph Electric garlands Triumph . BLACK BOX, Holland Fir from 0.6 to 2.4 m Black Box. NATIONAL TREE Co, USA · Spruce up to 1.4 m National Tree · Spruce 1.5-1.7 m National Tree · Spruce 1.8-1.9 m National Tree · Spruce above 2.0 m National Tree · Coniferous decor National Tree. KAEMINGK, Holland · Tabletop Christmas trees up to 0.9 m Kaeming · Spruce trees 1.2-2.4 m Kaeming · Coniferous decor Kaeming. NORDIC Collection. EverChristmaS Tsar Elka, Russia · Spruce 0.6-2.4 m PVC and fishing line, EverChristmaS · Spruce 0.6-3.0 m cast needles-PE, EverChristmaS · Coniferous decor EverChristmaS . CRYSTAL TREES, Russia, Thailand. BEATREES MOROZCO, Russia ■ Fiber optic trees ■ Stands for trees, storage bags ■ Blankets, skirts, snow, baskets for the base of trees High-rise trees ■ Tall street trees 4-45m. Ate stem MOSCOVIA and others, PVC needles. Ate stem CRYSTAL and others, FISHING needles. Spruce stem WHITE PVC needles, LINE. Fir-tree frame URAL, PVC needles. Fir-tree frame URAL, needles LINE. Spruce frame EURO-2, PVC needles and LINE. Spruce frame IMPERIAL, PVC needles and FISHING LINE. LED DYNAMIC TREES ■ Decorations, fencing, installation and decoration > Decorations for high-rise Christmas trees
There is such a sign: if you decorate the Christmas tree with at least one homemade toy, good luck in different areas of your life will accompany you throughout your entire life. next year. In addition, DIY Christmas tree decorations are not only beautiful, but also very cheap. So don’t hesitate for a long time - quickly get to work creating colorful decorations that will evoke thoughts of the upcoming holiday!
DIY Christmas tree decorations made of paper
The most economical option for home crafts is made from paper. Use sheets of any color: red, white, yellow, blue. In special handicraft stores you can find art paper with different patterns: snowflakes, New Year's characters and attributes.
Father Frost
To create this craft, feel free to involve your children - they will love the bright result of the work done. The process itself will take you no more than ten minutes! If desired, for a short time you can make a whole army of paper Santa Clauses, with which it is easy to decorate an entire Christmas tree.
- Cut out two large circles from beige and red colored paper. Also prepare many small white paper circles, one smaller red one, two very small black dots and a thin white stripe.
- Cut the largest circles in half and glue them together so that the beige part is on the bottom.
- Place white circles in several rows along the edge of the flesh-colored part, forming something like a cloud—grandfather’s beard. Glue the same element onto the red hat as a bubo.
- A glued white strip will mark the boundaries of the hat and face. Immediately below it, attach black beady eyes and a small red nose.
Use large crafts to decorate your doors, replacing traditional Christmas wreaths. To get a Christmas tree toy, glue two small figures with their back sides to each other - before doing this, glue the edges of a thread loop between them, with which you will hang the toy on the Christmas tree.
Flower ball
The decoration turns out to be so delicate, airy and beautiful that you can easily present it as a gift to your friends. You will need a flower hole punch for scrapbooking. If you don’t have one, regular scissors and your patience will come to the rescue.
In addition, prepare a foam ball-shaped blank and sewing pins with round tips to match the paper.
- Cut out lots of small flowers.
- Start attaching the flowers, two at a time, to the foam blank close to each other in a chaotic manner - to do this, pierce their centers with pins and stick their point all the way into the ball.

It’s not difficult to make a loop for hanging such a toy - pierce the ball with a needle in one place and widen it a little. Take a wide ribbon and cut enough so that when folded in half, it forms a loop that makes it easy to hang the figurine on the Christmas tree.
Paper garlands
Paper toys are not the only thing you can make with your own hands. Try to make garlands and decorate them Christmas tree or hang them from the ceiling of the room - they will immediately give a festive atmosphere to your home.
Garland of snowflakes
The voluminous garland resembles a cluster of snowflakes floating in the air. Use the pictures below to learn how to cut your own snowflake.

Prepare as best you can more snowflakes to get a long decoration. Place a weight on a long thick thread or ribbon. Next, pull it through the hole in the center of the first snowflake. Now put on the tape in turn all the rays of the paper blank - you should get a semblance of a three-dimensional flashlight.
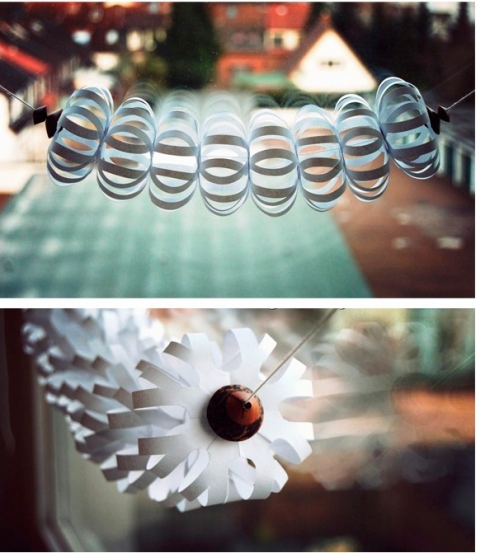
At the end of the garland, also put on a weighting agent in the form of a bead - it will slightly flatten the snowflakes, compacting them with each other.
Frost patterns
This multi-colored garland in cool shades will give the impression of frosty patterns in your room. Prepare paper of blue, cyan, purple colors.
- Cut sheets of paper into strips of the same width along the length of the A4 sheet.
- Use one strip as a base. Twist the second blank into a small circle and secure it to the base with a paper clip.
- Add bigger circles, loops and other decorative elements around it, securing the entire composition with a paper clip - it will help you remove unnecessary details and add new ones.
- When you've finished forming the pattern, secure it to the main strip with a stapler.

- Attach a new base strip to the finished element with a stapler and continue to create decoration further. If you do not connect the parts of the garland with each other, you can get large twisted DIY Christmas tree decorations.
Decoration with fringe
This is the most fast way get a beautiful garland toy. Invite the children to work on the decoration together - good mood you're guaranteed.
- Buy crepe paper in matching colors in rolls of several meters - the longer the better.
- Cut a long piece of paper about fifteen centimeters wide.
- Make many deep cuts close together on each side of the workpiece.
- Stretch the paper slightly - now your ribbon will curl in a spiral along its entire length.
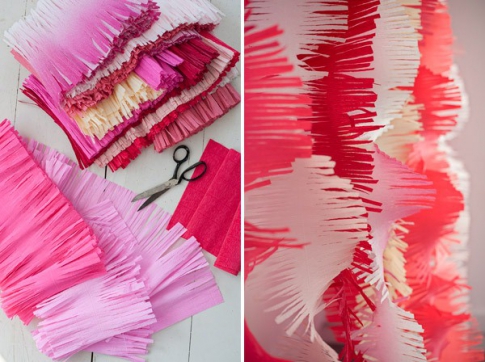
Hang a few New Year's decorations near the light source - they will create fabulous room lighting in muted tones.
DIY fabric toys for the Christmas tree
Despite the beauty of paper toys, almost all of them are very short-lived. Your DIY Christmas tree crafts made from fabric will last you much longer - just put them in a drawer after the holiday and take them out again next year.
Ball of thread
Try to create an imitation of a ball made of airy translucent fabric. For this you only need balloon, PVA glue and a skein of thread.
- Inflate a round shaped balloon.
- Wrap the threads around the ball in a thick layer and coat generously with glue. Leave the workpiece to dry completely in a warm, ventilated area.
- When the glue has completely dried and the threads have hardened with it, forming a kind of frame, pierce the ball with a needle to burst it, and pull out the remains through the hole.

The toy is ready! Such decorations can not only be hung on the Christmas tree, but also placed in a pyramid on the table as decoration.
Little Christmas tree
You can create fabric toys with your own hands from scratch - for example, if you first knit a working fabric on knitting needles. This way you can make a cute soft Christmas tree that will decorate your home during the holiday season or become a good gift for loved ones.
- Using green and brown yarn, knit the round base of the Christmas tree and part of the trunk.
- The base must be secured to a cardboard circle of the same diameter so that it does not lose its shape.
- Using simple circular knitting, make a green cone - the crown of the Christmas tree - its edge should be the same diameter as the base.
- Stuff the toy with soft material and connect its parts.
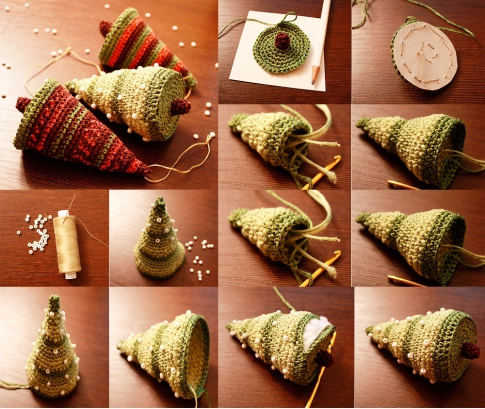
Decorate the resulting small Christmas tree with beads or beads. For such a toy you don’t even need a pattern - even a novice craftswoman can knit it in a simple circular way.
DIY street tree toys
If you live in a private house and there is a forest beauty growing in your yard, be sure to dress it up! This way, you won’t even need to buy a Christmas tree, and the festive atmosphere will envelop not only your home, but also the street.
It is necessary to take into account that paper toys are not suitable for decorating a street Christmas tree - they will fall apart at the first snow. It is also better not to use fabric toys - they will get wet and spoil.
A good option for decorating a living tree is natural materials! Paint the cones and nuts with gold paint, dry round lemon slices, tie cinnamon sticks with ribbons and place all this beauty on the Christmas tree. The main condition for such crafts is that they must be varnished so that they retain their shape longer and do not become damp.
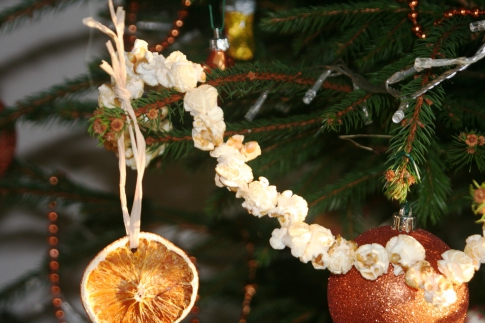
The garland can be made from corn, or more precisely, popcorn. Prepare the popcorn and thread it onto a long thread using a needle. You can eat such a Christmas tree decoration at the end of the evening without any regrets.
Do not forget that DIY Christmas tree decorations It’s easy to make from any available means – you just need to use your imagination. For example, this video tutorial will tell you how to make a beautiful star from clothespins that can be hung on both a street and home Christmas tree.
Take it for yourself and tell your friends!
Read also on our website:
show more
Very soon a blanket of snow will cover the ground and there will be a smell in the air New Year holidays. If you have a coniferous tree (pine, spruce, thuja) growing in your yard or dacha, then it’s time to think about their holiday decorations. Don’t rush to run to the Christmas tree decorations store and buy everything that shimmers beautifully with sparkles. Better make decorations for New Year's tree with your own hands. If nothing comes to mind, then look carefully at the photo and read the secrets of making different toys.
Candy
How can a New Year tree exist without a traditional toy? This is the simplest thing you can make. Take cardboard, roll it into a cylindrical shape and wrap the resulting object with bright fabric or colored cellophane. Tie it at the edges. Use tinsel and beads as decorative elements.Present
Another simple Christmas tree toy. To make it, you need to “hide” any old box under wrapping paper, and glue a layer of cellophane on top. Don't forget to tie the packaging beautiful ribbon with a lush bow. This gift looks very good against the background of pine needles.
Ball
As a base, take a regular foam ball and cover it with pine cones mixed with small balls of beige sisal. All components are attached to the foam with a silicone hot gun.
Herringbone
To make this toy you need to take dense polyethylene in green and white shades. Cut it into square pieces and form each into triangles. Using a glue gun, glue the blanks onto the base so that you get a Christmas tree.
Big star
This toy is made from ordinary twigs. Fold the cut branches into a star shape and tie them with wire. The most fragile areas should be additionally coated with silicone. Sprinkle the craft with artificial snow and decorate with pine cones, acorns, and plastic snowflakes.
Snowman
Cut out a snowman figurine from a thin sheet of foam plastic using a stencil. It's best to do this kind of work stationery knife. Draw a hat, scarf and face acrylic paints.
Cockerel
The basis for this bird, as well as for the snowman, is polystyrene foam. But it is made not only with paints, but also with sequins, rhinestones, and half-beads.
Star
This toy can be mastered by anyone who knows how to sew. It is made of waterproof fabric. You need to cut out 2 identical blanks, sew them and fill them with padding polyester. Tinsel is sewn along the edge of the star, and bows are sewn onto the fabric.
Snowflake
Another foam toy. If you like it, do it like this: using a stencil, cut out a snowflake with a head, and then paint the blank on both sides with acrylic paints. The wind will twirl the toy, but no matter how you look at it, it’s still beautiful.
Little star
Such a toy can be made from hardboard or wood. To do this, cut out a star, paint it golden and decorate it with sparkles. To secure them, drill small holes in the corners. This toy looks very original.
Ball
The pine cones in this craft are fixed on a foam ball. There are also red beads that imitate small berries.
Bell
Take a cardboard blank as a basis. Cover it with cellophane and decorate it with floral mesh, and tie a bow of golden ribbon on top. This bell looks very cute.
Rooster
Cut the base from thick cardboard or hardboard. As decoration, you can use self-adhesive film and colored cellophane.
Ship
This toy is made from the same materials as the previous one. You need cardboard blanks covered with self-adhesive film. The waves on which the boat will sail can be made of blue tinsel.
House
Take 1 big box and 1 small. Decorate them with wrapping paper, glue them on top and bottom white fabric and tinsel of the same color. The small box is connected to the large one using silicone, resulting in a house with a porch. Near it you can attach a figurine of Santa with a bag of gifts in his hands.
Watch
The base of this toy is cut out of hardboard using a stencil. On the dial, draw houses, windows, Christmas trees in the snow, a snowman, children or something of your own. In the center of the clock, glue arrows that will show that the New Year is about to come.
Chick
This cute toy is made on a foam base. oval shape. It needs to be covered with strips of white polyethylene. Paws, wings and scallops can be made from self-adhesive film and cardboard.
Father Frost
No one will guess that there is a five-liter bottle inside this one. Want to make one like this? Then find a suitable plastic container and paint it with paint from a can. You can use blue and white. Make the beard and hair from foam balls, fixing them with silicone. The nose will be a bottle cap, the eyes can be bought at a craft store, and the mouth will be a piece of red plastic. The craft is decorated with silver tinsel.
There is still plenty of time before the New Year; you can make all these decorations and even come up with something of your own. The more crafts you make, the more elegant the street spruce or pine tree will look.