How to make a pendant with your own hands, a master class. We make pendants with our own hands. How to make pendants from different materials? What do home pendants look like?
Every craftswoman wants to delight not only her home with new handicrafts, but also herself, dear people wonderful and unique decorations. There are a lot of types of jewelry, and not all of them are suitable as a gift for this or that person. It is never known which earrings will be comfortable and not heavy for the future owner. It is also hard to guess with the size of the bracelet or ring. But the pendant is a fairly versatile piece of jewelry that can be used as a keyring by men. It remains to decide only what and how to make a pendant with your own hands.
Photo in accessory
It will be interesting to make a pendant with a photograph, because wearing your own image or a picture of another person framed in an interesting style around your neck has never gone out of fashion at all times. For such a pendant you will need:
- thin transparent plastic;
- two photos;
- transparent glue "Moment";
- lighter;
- chain;
- scissors.
Cut out the same rectangles from the photos. If you wish, you can cut them out in the shape of a heart. Cut out two plastic parts of the same size and shape.
Each photo, carefully, along its front perimeter, we coat with glue and glue it to the plastic part. After that, with the wrong sides, we glue the photos to each other.

Carefully melt the edges of the workpiece with a lighter around the perimeter.
In this process, the main thing is not to overdo it, so that the plastic does not melt much, and the photographs and glue do not start burning.
The melted edges of the pendant are closed with chain links, which gradually sit on the glue along the perimeter. The pendant should dry for at least 20 minutes.

This pendant can be attached to the same chain or string.
Clay decoration
Polymer clay is an excellent material for creating the necessary exclusive shape for a pendant. For a clay pendant you will need:
- clay of two contrasting colors;
- flat wire;
- cylindrical objects of different diameters;
- rolling pin (not wooden);
- pin pin;
- acrylic varnish (transparent);
- a board made of plastic, ceramics or glass (for the role of a "workbench" in the work);
- thin gloves (optional).
The first step is to create a wire piece. It is necessary to make a bend in the form of a spiral of one of the ends of the wire.

Bending the wire about cylindrical objects, give its second edge a zigzag shape.

On a flat surface, the wire should be leveled so that all of its narrow edges lie flat on the plane.

After warming up the clay of both colors, make two pieces, rolled flat, after which they should be folded together.

After that, we turn the part in a spiral so that the light shade predominates.

We bend the workpiece several times and roll it into a cylinder.

After that, you need to roll out a flat part from the cylinder again.

The wire part is placed on a flat piece of polymer clay, after which it is well pressed.

Any excess plastic should be removed.

Roll a ball out of clay with a shade darker than the second, which is pierced with a pin and attached to the top of the main part.

The baking temperature should be as indicated on the plastic packaging. After the clay has dried, it must be varnished. The pendant is ready!

Art from scrap materials
You can also make a pendant from other materials at hand or purchased.
For example, for a felt pendant, you need to take four colors of this felt, cut out one strip of three colors from it, 10 cm long or less, 1.5 cm wide, and 9 strips 7 cm long, 1 cm wide. in tight rolls, with three strips different color we fold one, which we fold into a tube.

When folding the strips into rolls, it is necessary to glue them with textile glue, then fold and attach the rolls to each other in the form of a flower. To thread a pendant ring into one of the petals, use a thick needle, which will separate the felt fibers.
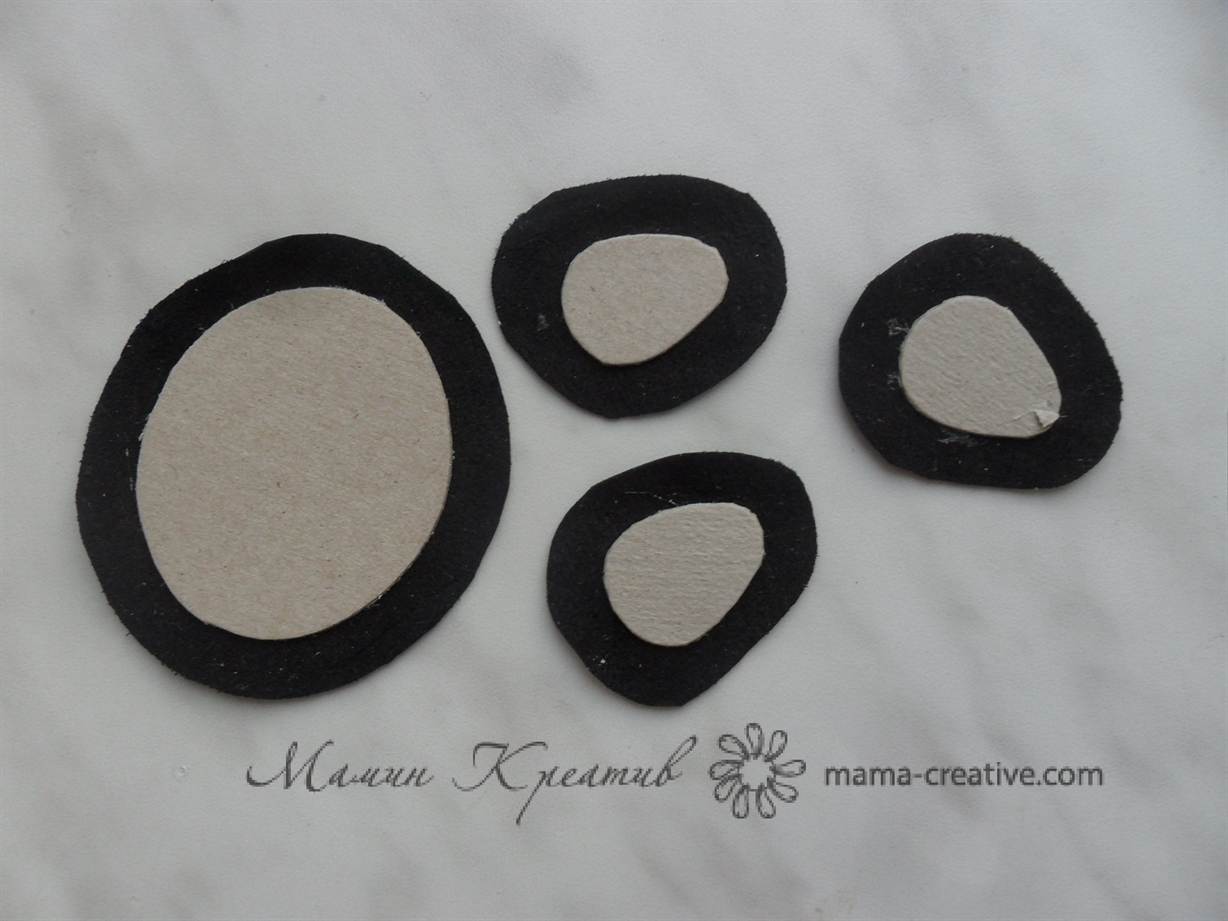
To make a leather pendant, you will need to cut 4 oval templates out of cardboard, one of which will be larger than the others. After that, cut out the parts of the same shape from the leather, but leave 1.5-2mm of allowance on them to wrap it around the cardboard and glue the edges.
From fair skin you need to cut out two strips, fold them inside out along and glue them to make the likeness of laces. We frame the pendant with one of the laces, with the other - a cabochon or other stone. From dark and light leather we make two decorative details in the form of crumpled fragments. This can be achieved by glueing polyethylene with glue, putting a piece of skin on it and crushing it so that folds form on the skin.

Lay out the composition on a large blank, add leather elements to the empty spaces. We also decorate small details with wrinkled leather and frame with laces.

We also form a "chain" of light leather, making knots on its ribbons. You get something like this suspension:

The wire is perfect for weaving the Tree of Life or Dreamcatcher pendants. If it is easier with the "tree" in the process of work - you can independently dream about the number and bends of roots and branches - then for the "catcher" you can use the following scheme:

The creation of a pendant is possible even from such unprepossessing objects as old keys or coins. A key pendant is an ordinary key decorated with beads, rhinestones or beads glued to it.

Making a pendant from a coin in the form bat- more male work. To do this, you need a coin with a face value of 10 rubles, which should be cleaned with sandpaper. After that, a drawing of the mouse is applied, a hole for the ring is made with a small drill. We knock out the middle part of the coin using a bearing and a hammer. We sharpen the inner edge of the ring and the outer edge of the knocked-out core. The drawing is cut from the core, clamped in a vice, with a jewelry jigsaw and a diamond bur or file files. After that, the middle is driven into place, into the ring. A holder ring is threaded into the pendant, through the previously drilled hole, and the pendant is ready.

Related videos
A selection of videos on creating various pendants with your own hands:
Often, to show our loved ones how dear they are to us, we are ready to spend any money on gifts. But it is not for nothing that they say that the most expensive gift is one made by oneself. A chain with a pendant symbolizing eternal love will appeal to both men and women. And if the chain with a pendant is made by hand, the gift will be doubly dear. In this article we will show you how to make a pendant with your own hands.
How to make a pendant with your own hands: materials

- A piece of fairly dense, well-seasoned wood (so that it does not crack later on drying). I had an apricot prepared for a musical instrument, but it had flaws and it was not a pity to use it for crafts.


- A sheet of brass, approximately 1.8 mm thick (the thicker, the longer and more difficult it will be to cut).

- Brass wire, about a millimeter in diameter (I only had copper wire).
How to make a pendant with your own hands: tools

- A hacksaw for metal or wood (the larger the teeth, the rougher the cut will be and it will take longer to grind it) - jigsaw - sharp knife 6 - a set of files for grinding / editing the edges after cutting (I had enough small round, semicircular, and medium flat).

- A portable drill (any portable drill is suitable, even not the most powerful and high-quality) drill is no less thick than a jigsaw file for wood, with which we will cut out the inner part of the heart; for convenience, you can take it a little thicker.


If there is no experience, it is better to take a few saws for wood and a dozen or two for metal. Wood saws are thicker, the wood is soft, and due to inexperience they can be easily broken, but if you saw it carefully enough, you can do almost without losses. Metal files are thinner, the metal is hard, the slightest distortion / excessive force will lead to breakage. The main thing is not to fly off into the eye (we use goggles). In general, it makes sense to take a couple of sets, so as not to run after the supplement later.

- Grinding wheel (do not take a cheap one, metal hairs constantly fly out of it during work, goggles do not help, the hairs get rather unpleasantly on the face, and because of this, the circle quickly becomes unusable).


- Various grit sandpaper for coarse and finer sanding. Two sheets were enough for me (one P1200 and one P220) and even left later, but you can take it with a margin, just in case
- to work with a jigsaw, you need such a device.

About the retainer
If you do not have a retainer, it is easy to make it from plywood, nine millimeters thick (the thinner one will spring, the thicker one will shorten the jigsaw's stroke). Cut off a rectangular piece of plywood about 12 × 30 cm, drill a hole with a diameter of about two centimeters in the center, then cut out a corner with a hacksaw. The latch is ready.


1. Saw off a piece of the desired thickness from a piece of wood. I made about one and a half centimeters.

2. Fasten the clamp to the table with a clamp. To make it fit more tightly, you can put a piece of rubber between the clamp and the retainer.


3. Print the drawing, cut it out along the contour, carefully glue it onto the workpiece with PVA glue. We try to press firmly, but do not move our finger on the paper, only press down. Paper wet from PVA tears easily (noticeably)

4. We drill a hole in the wing (preferably closer to the edge, so that we don't go far with a jigsaw). We thread a saw blade on a tree inside, fix it in a jigsaw, cut it out from the inside along a white outline, you can get out for about half a millimeter, but not more, otherwise the inner brass part will hang out.
5. We cut out the heart already along the outer edge - a heart comes out with a phoenix cut out inside (with straight edges).

6. With a knife we add volume to the heart, cutting off all unnecessary, trying not to cut ourselves (see the plaster on the thumb).
7. In the right place (from above, but anywhere) carefully mark with something sharp, for example an awl, the future hole for a wire ring. The diameter of the drill should be equal to, or slightly less by a fraction of a mm than the wire, it will always be possible to expand it later. We drill to a depth of about 5 mm.
8. We print the phoenix on the printer, which we will cut out of metal. I had no other ideas how to accurately transfer the drawing to wood and metal.

9. Cut out and glue on the brass sheet closer to the edge. You don't need to drill anything here.
10. Put the sheet on the holder, carefully cut out the phoenix (we try to break as few files as possible). You should end up with something like this

11. Insert the metal phoenix into the heart. Doesn't fit? We look why, what it rests on and what, we finish / file it with a file to fit. It is better to file the wooden part. Entered? Wonderful! Now, with a portable drill with a grinding disc, we polish the phoenix to a shine, smooth out the sharp edges.
12. Using sandpaper (first coarse, then fine), give the heart a rounded shape and bring it to the desired smoothness. Then we smooth out the inner edges of the heart (which are in the shape of a phoenix) with file files or a folded narrow strip of sandpaper.
13. We bring everything to beauty with sandpaper.
14. Bend a ring with a 5 mm tail from the wire with round-nose pliers.
15. Insert into the hole. Is it okay? Take out. A drop of cyanoacrylate inside, then insert again and fix in the desired position. Let it dry for half an hour.
16. Carefully insert the metal phoenix into the heart and with back side we grab it with cyanoacrylate in several places. Let it dry. We grab it again, on top, to form a thicker layer of glue.


17. We hang it on a chain or lace and wear it with pleasure or give it to a loved one.
Even a piece of wire will not disappear from real needlewomen on the farm, especially if it is new. There are many ways to apply it. In today's master class, you will learn how to make a beautiful pendant with your own hands from any pebble you like and a few decimeters of thin wire. The thinner the wire, the more elegant the product will look.
Natural stone talisman medallion
Have you vacationed on the sea or in the mountains and found an attractive pebble from which you can make a pendant? Or you can buy a stone, very beautiful and very inexpensive natural stones are sold in jewelry stores, at stone exhibitions. Most often they do not have any fasteners, they are simply sanded. It will take 10 minutes of time, round-nose pliers and a thin metal wire to fix such pebbles on a chain.
We wrap the pebble with wire in random order, helping ourselves with round-nose pliers. (In the photo, this is the usual " Tiger's Eye"From a souvenir shop, which is worn" from the evil eye "). We make a loop on top and fix it. Exquisite neck pendant made of natural stone ready.

You can complicate the product and make two hearts out of wire, as in this product from rose quartz, which is considered a love talisman. Such a pendant can be presented for Valentine's Day.

Teenagers are very fond of the so-called "friendship pendants", that is, paired medallions. It is believed that two paired things tend to connect, so their owners will be inseparable. The easiest way is to make friendship pendants from two identical stones.

How to make a pendant with your own hands as a keepsake
You can make a medallion with a photograph inserted inside and give it as a keepsake, as was customary in the old days. There are many ways to create such jewelry at home, it is better to start with the simplest.
You will need:
- purchased medallion with clear cabochon
- pencil
Step-by-step instruction
- Remove the cabochon from the frame by prying it with the tip of a knife.
- Attach the cabochon to the photo and trace with a pencil.
- Cut out the photo along the outlined path.
- Paste the photo into the frame.
- Slide the cabochon back into place.
- The pendant is ready, and the transparent cabochon makes the image bright and embossed.

Home decoration like a mermaid from H2O
At home, you can make unique, very interesting jewelry if you make friends with beads, epoxy, wood, polymer clay, skin. Having gained experience, you can independently make things at home that imitate well-known jewelry, such as the "Heart of the Ocean" pendant from the movie "Titanic". This video will teach you how to make a DIY pendant, just like the mermaid from the popular H2O series: Just Add Water.
V Lately it is becoming more and more popular to make a variety of jewelry with your own hands. And it is not surprising, because sometimes on sale you may not find the thing that you want for yourself, but it can always be done with imagination and skillful hands. For example, you can make beautiful pendants with your own hands, the most diverse. It is easy to make a pendant from a coin. You may ask: how to make a pendant from a coin? It's very simple. All you need is to find an interesting coin and make a hole in it. Now the pendant is ready for you. And how many more of the most diverse pendants you can think of! Let's take a closer look at how to make DIY pendants.
Unusual DIY pendants
So, let's figure out how to make a simple and interesting pendant with your own hands using a simple newspaper for this.
Materials that you will need:
- newspaper;
- scissors;
- glue;
- wooden skewer;
- putty;
- paper or napkin with the image that you would like to see on the pendant;
- putty;
- brush;
- a piece of cotton wool;
- pencils;
- coffee.
And now, having decided on necessary materials, let's go directly to the process of making the pendant.
- Cut strips from the newspaper (lay out the newspaper, then fold it once and cut at the fold, fold the resulting pieces again and also cut at the fold). Then roll up the tubes from the resulting newspaper strips, securing them along the edges with glue.
- Having made about 10 tubes, you can proceed to the first stage of making the pendant. Take one tube, squeeze it flat, apply glue to it and begin to roll a spiral out of it. When the tube ends, glue the second one and continue twisting the spiral. This will be the base for the pendant.
- To make a loop on which the pendant will hang, glue another strip of newspaper to the base. Place a pencil or pen under the tube and glue the tube in a circle to the base of the pendant. Then take out the handle so that it doesn't stick to the pendant.
- In order for the surface of the pendant to become even and more durable, apply several layers of putty on it, letting each layer dry. After applying the putty, let the pendant dry thoroughly.
- Print on paper the image you would like to see on the pendant. To make it look more stylish and interesting, you can age it with coffee by applying a strong drink with a brush to paper. If the picture is black and white, then you can paint it with watercolor pencils, or simply add color to the image, since even a color picture will fade slightly after aging with coffee.
- It is advisable to cut the picture a little larger than the pendant, since it is always easier to cut off the excess than to glue the missing. Using glue, glue the picture to the pendant, and remove excess paper around the edges. You can even just tear it off - a slight wear on the edges will look stylish.
- Apply the leftover coffee to the back of the pendant and then cover the entire surface of the pendant with varnish.

Based on this master class, you can make a combined bead and leather pendant. For example, instead of newspaper, take thin pieces of leather, form a medallion from them, and then embroider it with beads. You can also make a simple leather pendant with your own hands, without any frills. In general, you only need imagination and materials, but you can make anything from anything.
What do home craftsmen do at the present time. Of course, in the old days they also did a lot, but still they cannot compare with modern talents. There are so many beautiful things that girls do not do at home. And they sew, and embroider, and knit, just to please yourself and make a unique thing.
Today I will tell you how you can make a beautiful pendant at home. Indeed, you are not mistaken. If you can make any thing out of clothes, then why not make a small pendant that will an original gift for loved ones. But there is nothing better than a gift hand-made.

In order to make a pendant, you will first have to think over all the smallest details. What are these details you ask me. Well, quite a lot can be attributed here. First, we will need to decide on the size of the pendant, its shape, pattern. How it will be decorated, and what will be in the center of the composition.

And the main detail. What it will be made of. What material will you take as a basis. There are a lot of options from which you can make a pendant. It can be wood, or metal, wire, and you can also knit or sew a pendant.

As you can see, there is a lot of material to work with. The main thing is your imagination. You can make it from any materials. You can combine various materials... For example, wood and metal, wire and fabric.


Pendant for beginners
For a beginner, you must first decide on the choice of material. After choosing it, you can already start making it. In the vastness of the global network, there are many instructions with detailed description for beginner craftsmen. For young craftswomen, it is best to opt for a knitted pendant. You can also add a twist to this pendant.

Now I will give an example of how you can make a pendant using steel wire and crocheted threads.

First, we need to come up with a composition for the pendant. I will take the simplest one, it is a pendant in the form of a flower. You tell me why you need a wire if you can embroider it anyway. You can knit, I do not argue, but it will be too light, will not keep its shape, and will constantly wrinkle.

To prevent this from happening, we need a wire. We take a wire of the required length for a flower with a margin and begin to tie threads around it. Now it turns out that the wire will not be visible, but at the same time your pendant will gain weight and will not deform.

When you have finished knitting, all that remains is to give it the shape of a flower and tie a thread. That's it, your pendant is ready.


Master Class
On the Internet you can find many photos of various handmade pendants. Indeed, some are truly mesmerizing. How many varieties of species, shapes, and patterns. But it was done by ordinary people, the same as you and me. Yes, there are things that professionals have done, but they did not immediately achieve this either.

Yes, how much unprecedented beauty lies in them. Now I will tell you one master class on making a pendant with your own hands.

I will say right away that this is more suitable for men, since it will take a lot of work with carpentry tools. Although it is possible now, and many girls have the skills to work with them.

To make this pendant, you will need a piece of dense wood, a sheet of brass and brass wire. From the tools you will need a hacksaw for metal, a jigsaw, sandpaper, a grinding wheel, pliers.

First, we print a drawing of the pendant. I have this heart with a phoenix inside. We glue it on a piece of wood with PVA glue, and then drill a hole along the inner edge of the heart, and cut it out with a phoenix jigsaw, it will not be useful to us. We also cut out the pendant along the outer edge, and give it a certain shape with a knife.

Then we glue the phoenix onto a sheet of brass and cut it out. In a wooden blank on the side with an awl we make a hole for a wire ring. We grind and shape the entire product. Then we go through with fine sandpaper to eliminate all the flaws. We insert the ring into the hole and fix it securely with special glue.


Next, you need to insert it into our wooden phoenix heart, and also fix it with glue in several places on the inside. Wait until it is completely dry and reapply the glue. At the end, you can apply varnish to the wooden heart so that it will serve your family for many more years

That's it, your pendant is ready. Such a pendant will serve as an excellent gift for your loved ones, and will be more expensive than any diamonds, because it is made with a soul.

Conclusion
Now I think you will no longer have the question of how to make a pendant with your own hands. There are so many different schemes to create beautiful pendants. All of them can be found on the Internet, and found the best way For you. Whether it is a pendant made of metal or fabric, none of this matters. The most important thing is that it is made by hand, and not everyone can boast of this.


Remember, only your patience and imagination will help you create amazing and truly exclusive things.

Photo of pendants with your own hands


