A piggy bank of original DIY Christmas crafts for home decoration and gifts. A piggy bank of original DIY Christmas crafts for home decoration and gifts Interesting DIY Christmas crafts
New Year holidays are a time of miracles and the fulfillment of the most cherished desires. Children and adults rejoice in the New Year, a magical pre-holiday spirit is felt in the air.
To bring the winter holidays closer, spend the rest of the time before them creating unusual New Year's crafts.
The creativity associated with making holiday souvenirs is the best way for the leisure of children on the eve of the New Year. Children will be able to spend more time with their parents and learn useful things. Toddlers can be busy creating simple decorations, for example, from plasticine.
Children's crafts can be placed in a conspicuous place, and especially successful specimens can be sent to an exhibition at a school or a craft competition in Kindergarten. The result of joint creativity will delight both kids and parents.
DIY Christmas crafts, photo
In addition, self-made Christmas gifts is a great opportunity to please grandparents with souvenirs for the holiday: they will certainly appreciate the work of their beloved grandchildren.
We bring to your attention a selection of the most interesting ideas on creating New Year's crafts for 2017 with your own hands: see photos, study master classes and instructions with children.
funny cockerel
The coming year will have a bright patron - the Fire Rooster, so colorful presents are needed.

Christmas tree decorations in the form of colorful roosters are a great holiday souvenir. Thanks to toy cockerels, the Christmas tree will look more elegant, and the atmosphere will become more solemn.
A detailed video tutorial on creating original cockerels will help you:
New Year's amulets
 Christmas crafts, photo
 original New Year's present are amulets; you can make them with your own hands, spending very little time. Amulets symbolize happiness, prosperity, success in career and on the love front. Special charms help to improve the financial situation.
Home charms will provide protection from negativity for the whole year. Decorative amulets with the unusual name "temari", which came to us from Japanese culture, are easy to make in a quarter of an hour by watching this video tutorial:
Roosters on sticks

As a child, you probably enjoyed lollipops made in the shape of cockerels.
Make sweet treats on sticks for the holiday, the kids will be delighted with such a treat, our master class will help you with this.
Merry cracker

Winter holidays are always accompanied by fun - make New Year's cracker. This craft will delight you with an explosion of colorful confetti.
It is easy to make, and ordinary materials will do for this - see the video tutorial for details:
holiday notebook

If you want to please your work colleagues or friends with an inexpensive and at the same time cute present, give them a beautifully decorated diary. Such a gift will bring benefits (it will be possible to write important information into it), and it will bring joy.
The best solution is to decorate the notebook with images of a bright cockerel, and leave your wishes and congratulations on the New Year on the first sheet.
It doesn’t take much time to decorate the diary: this video will allow you to deal with this matter in half an hour:
New Year's confectionery
 Photo of edible crafts on New Year
If you work in a large and friendly team, and you have many colleagues to congratulate, this does not mean that you have to buy expensive presents.
Delight your employees with home-made baked goods, such as cookies shaped like cute little roosters. Colleagues can also present cakes and other sweet delicacies.
If you do not have the ability to bake - it does not matter, order sweets in a pastry shop. By handing sweet presents to colleagues, you will please them and provide them with dessert.
Video tutorial on making holiday cookies:
Star for the Christmas tree

Do not rush to buy decor elements for the New Year tree, it is better to make them yourself from the most common materials. Using improvised materials, you can create very unusual and attractive Christmas decorations and save money at the same time.
What is needed for this?
- Knitting thread.
- Office glue.
- Styrofoam.
- Christmas tree stencil.
- Matches.
Let's start creating decorations.
Pour the glue into a small container, if it is thick, add a little water and stir.
Take the stencil and fix it on the foam with matches.
Saturate the threads with glue and wrap the matches with them, but not clockwise, but counterclockwise. First on top of the match, then from below.
On a note! The end of the thread should be fixed on one match.
Fill the cavity with thread and wait for the craft to dry. Tie a loop to an asterisk and hang it on a Christmas tree.
White mini Christmas tree
 Easy and beautiful Christmas crafts
 At the mention of the New Year, the image of a Christmas tree immediately appears before your eyes. V last years artificial trees have become fashionable.
An elegant tree can be made independently, giving it originality due to color. Let your Christmas tree be the traditional winter snow-white color, and not the usual green.
You will need:
- three packs of cotton pads;
- stationery glue;
- small scissors;
- braid;
- A2 size cardboard sheet;
- beads;
- stapler;
- White paint.
Getting to work on creating a festive Christmas tree. First of all, you should make needles for the future tree. Fold the discs in half twice and secure with a stapler.
Form a bag from a cardboard sheet and trim with scissors lower part. Glue the prepared needles to the base - start gluing from the bottom. Coat the fold with glue and attach to the base, repeat these steps with each subsequent row.
Paste over the conical base in rows. Decorate the resulting tree by gluing stars. Place a larger star at the top.
Fancy snowman
 Ideas for original Christmas crafts
 Make an unusual New Year's craft from simple materials everyone can do it, you just need to want and carve out a little time for this. Make, for example, an unusual snowman.
For this you need the following materials:
- small disposable plastic cups;
- cardboard, preferably gold or black;
- patches;
- stapler;
- carrot.
Fasten the glasses with a stapler, first forming a spherical body, and then the head of a snowman.
On the finished frame, fasten the carrot, which will serve as a nose, and make eyes and a scarf out of the fabric.
Make a hat out of cardboard: for this you need to make two parts - one in the shape of a circle, and the second cylindrical. Glue the pieces together and decorate the hat with a gold ribbon.
Thread Christmas tree
 New Year's crafts to school for the competition
 Overwhelmed by the desire to make an unusual Christmas tree from threads? We recommend making a filament tree with a three-dimensional configuration. Such a Christmas tree will decorate the situation and give the interior a novelty.
In order to make a miracle tree, you need simple materials:
- woolen threads;
- liquid glue;
- membrane;
- scissors;
- thick paper;
- starch (large spoon without top);
- some water;
- beads or confetti.
Make a cone-shaped frame out of thick paper, cut the bottom, trim, and then glue.
Mix starch with liquid glue. Soak a long thread in a mixture of glue with the addition of starch (this takes about half an hour).
Wrap the frame with a membrane. Pull the thread out of the sticky substance and wrap it around the cone.
Wait for the craft to dry.

Take out the cone and decorate the confetti tree. An elegant filament Christmas tree will decorate any interior.
Fairytale souvenir
 Interesting crafts for the New Year with your own hands
 Many in childhood liked to play and admire the ball filled with artificial snow. The sight of moving snow acted bewitchingly, the ball seemed to immerse us in a fairy tale.
It is really possible to create such a toy yourself. Children will especially like this activity, they love everything unusual, the more interesting it is to make a miracle toy with your own hands.
To create a fabulous snow globe, you need to stock up:
- a glass container with a lid (size is unimportant);
- clean water;
- small figurines of a snowman, deer;
- glue (necessarily waterproof);
- decorative snow;
- glycerin.
Place the figures inside the container and fix them with glue. Fill the jar with water and dissolve the glycerin in it.
On a note! Glycerin is required in order to slow down the movement of snow.
Add some glitter to the water and turn the container upside down. If the sparkles move slowly to the bottom, then there is enough glycerin.
Cockerel-heart
 DIY Christmas crafts
 There are crafts-trinkets, the main purpose of which is to delight others with their beauty. These crafts include a cockerel made in the form of a heart.
In order to make a decorative cockerel, you will need colored felt fabric. Remember that the rooster is proud, first of all, of its colorful plumage, so feel free to combine bright colors.
Make a base of two pieces cut out in the shape of a heart, fill the space with cotton wool and overcast the edges. Cut out a bright ponytail (combine several shades), comb, beard and red beak. Do not forget about the eyes and wings, sew all the details to the base. Attach a ribbon in the center so that the toy can be hung.
You can make several cockerels-hearts at once. Choose the sizes at your discretion. Decorate a Christmas tree with cute birds or make an original garland out of them. At the sight of colorful birds, the mood will immediately rise.
Cute plasticine octopus
 New Year's crafts by children's hands
 From this lesson you will learn how to make an unusual craft for the New Year with your own hands, which can even be taken to a children's exhibition.
To implement this cool idea Minimum materials needed
- glass container;
- a set of plasticine;
- a container in which there was a surprise egg toy;
- multi-colored beads;
- threads.
Take emerald plasticine and form sausages out of it (imitation of algae), attaching them with glue to the container from the outside.
From yellow plasticine or orange, blind the fish and decorate the container with them on the outside in the same way.
Form the body of an octopus from the plasticine mass. Make eyes and long tentacles. Pour water into the container and close the lid.
Salt dough carved snowflake
 DIY craft ideas for the New Year
 Want to get your little one involved in cooking? Start by co-creating an openwork snowflake with easy-to-make salt dough. The child will be interested in the opportunity to make such a beautiful New Year's souvenir.
To prepare the dough you will need 200 gr. flour and the same amount of salt, 100 ml of water, paint of blue color, tape, glue, as well as sparkles to give the crafts brightness.
Form flower elements from the resulting dough and make small holes in them using a toothpick. Roll up the bundles and, having blinded them together, attach them to the middle of the snowflake. Create five more rays.
Cover the dried snowflake with paint on one side and the other. Apply some glue and decorate the snowflake with sparkles.
Decorative candlestick
 Ideas for crafts for the New Year
 In building new year atmosphere decorative candles play an important role. Why don't you make a homemade candle holder? In order to decorate the table with a beautiful candlestick in new year's eve All you need is salt dough and a little work.
In addition to the dough, to make a festive candlestick you will need paint, pumpkin seeds, small ribbon bows, sparkles.
Make a candle holder mold using salt dough(don't forget about the hole for the candle). Stick the pumpkin seeds into the mold (best in a checkerboard pattern). Paint the dried product, decorate with sparkles and small bows.
Watch this video to make the instructions more clear:
Original thread ball
 The most beautiful Christmas crafts
 Let's give an example of another original New Year's craft, which can be safely used in the design of the Christmas tree.
To create such an interesting unusual souvenir, you need the following items:
- Balloon;
- threads;
- stationery glue;
- skewers;
- ribbon;
- small basket;
- paints (chocolate and gold).
Let's start crafting. Inflate the balloon and wind the threads around it, then carefully glue it. After the threads are dry, pierce the ball and pull it out of the formed thread sphere.
Wrap the ribbon around the sticks and paint it chocolate. Cover the ball of thread with gold dye.
Attach the skewers to the basket and fix them on the ball.
Jewelry made of beads and wire
 Christmas crafts for home
 For an unusual decor for a Christmas tree, make a star out of wire, beads and multi-colored beads.
On a note! The wire is needed in two types: thin and thicker.
Form a frame of a future toy from a thick wire. Attach a thin wire rod to the frame and string beads on it in random order. Wind on the base and fix the tip of the wire rod.
If something is not completely clear, check out this video instruction:
New Year's angel
It will take about five minutes to create a gentle New Year's angel. From the materials you need the most necessary:
- thick ribbon with wire edges;
- big bead;
- glue gun;
- stapler.
 New Year's crafts - interesting ideas
 Take ribbons 30 cm long and fold them like an accordion with a distance of 20 mm.
On one side, cut off the wire edge and fasten the tape into an accordion with a stapler.
From 25 cm of ribbon, make an identical accordion. Fold it in half and secure in the center with a paper clip using a stapler.
Spread the skirt and wings, connect them together and attach a bead with a ribbon.
Christmas tree made of coniferous cones
This instruction will give you the opportunity to make an unusual Christmas tree, which can serve as a great alternative to a real Christmas tree. Choose the height of the artificial tree at your discretion.
To make a luxurious Christmas tree, you will need a large number of coniferous cones, thermal gun, plywood cut in the shape of a circle, supports, iridescent garland. Another material that you can’t do without in creating a homemade Christmas tree from cones is spray paint in silver and emerald shades.
 DIY Christmas crafts - for children
 To make a tree, 1m 40 cm high, you need to make a part from a plywood blank round shape, 70 cm in size and another smaller one - 30 cm. Attach supports to the base.
The most important part of the job is gluing the cones. Each subsequent row is shifted to the middle to form a cone. We turn the tree over and hang a garland between rows of coniferous cones.
We paint the tree in emerald color, and apply a little bit of silver paint to the tips.
Christmas pasta tree
New Year's crafts can be made even from the most unusual materials - for example, pasta.
This master class will tell you in detail how to make a pasta Christmas tree.
 Unusual crafts for the New Year
 Take whatman paper and give it a conical shape, fixing it with glue.
Glue pasta in rows, as in the picture. Paint the tree emerald or gold.
Pasta of a different shape can be used to decorate the resulting Christmas tree.
plastic snowflakes
Give the interior solemnity in anticipation new year holidays simple - make your own hands snowflakes from plastic bottles.
 Original crafts for the New Year
 In addition to plastic containers, you will need an awl, ribbon, paint white color and a knife.
Cut off the bottom of the container. Make a notch in it and thread the ribbon through.
Now paint the plastic blanks with a brush, decorating them with unusual patterns. Several plastic snowflakes can be hung on a ribbon, thus creating a unique garland.
Crafts for school
New Year is one of those holidays that are usually celebrated not only at home, but also at school. Preschool children celebrate the arrival of the New Year at matinees in kindergarten.
Carnival shows and matinees in schools on the occasion of the winter holidays suggest an interesting entertainment program, unusual costumes and often exhibitions of children's crafts. Pupils are given the task to make some kind of unusual thing and parents help their children in this exciting business.
How to make a New Year's craft for school with your own hands? There are plenty of options for unusual home-made souvenirs that can be taken to the school exhibition.
Colorful composition from colored paper
All the kids like to make interesting compositions from multi-colored paper. This material - light, flexible - is ideal for crafts and allows you to make a bright application on the occasion of the New Year. For example, you can make a paper Christmas tree, consisting of "palms".
Stock up on multi-colored paper sheets, cardboard, handy scissors, stationery glue, various decorations and get creative with your child.
 Cool DIY crafts
 Circle the palms of your child on paper sheets that differ in color. Let the child cut out the blanks, and in the meantime you take care of the decor. From silver or gold paper, you can cut out small balls or figures in the form of stars.
Glue the cut out palms by smearing the bottom of the cardboard sheet with glue and gluing blanks to it. Then draw a second strip of glue stick and stick another row of palms. Repeat the manipulations until the Christmas tree is ready.
The top can be decorated with a star, and the “branches” with beads.
Plasticine snowman
 New Year's school crafts
 An original composition made of plasticine, the central figure of which is a snowman, will help the child earn an A and will become the central composition at the exhibition of children's crafts.
To make a snowman, you need a set of plasticine, cardboard, gel with glitter, a knife, shiny varnish, and beads.
The first step is to make a foundation. From a thick plywood sheet or cardboard, make a circle with a diameter of about 15 cm. It is easy to make plasticine plasticine, for this you need to briefly lower it into slightly warmed water.
After making the material more plastic, take the white material and apply it to the cardboard base.
On a note! The plasticine layer should be thin.

Try to make the plasticine snow cover a smaller part of the craft. Create snow mounds around the edges to make the craft look more realistic. At the top, the cardboard should be covered with blue plasticine, simulating the sky.
Now let's make a Christmas tree. First of all, form the trunk: for this you need to take chocolate-colored plasticine. Create branches from emerald plasticine, creating a triangle out of it.
Glue the tree to the base. Make small notches along the edges using a knife.

Having finished with the Christmas tree, we blind the main character - a snowman. From white plasticine, make a torso (do not forget about the hands), and from gray material, a headdress in the shape of a trapezoid (imitation of a bucket).
Finish off the snowman look by adding buttons to the nose and eyes.

It remains only to decorate the craft and add small details to it. For example, in the sky you can fashion a yellow month. Decorate the whole composition with sparkles, and cover the snow edging with a shiny gel.
Apply varnish to the craft, and the festive composition is ready!
 New Year's crafts to school
 Advice. Around the main craft, you can place several small snowmen on a sheet of cardboard.
Winter crafts from cotton wool
 DIY Christmas crafts
 There is another material that allows you to make crafts of amazing beauty - cotton wool. Snowmen, bunnies, all kinds of Christmas decorations are made from cotton wool.
For creating cotton crafts you need to prepare a starch paste. Starch (about a spoon) must be dissolved, mixed thoroughly and pour hot water. The mixture should be stirred all the time so that lumps do not form.
Dip cotton wool into the resulting substance and let it stand for about a day. After this time, you can start sculpting New Year's characters.
In the New Year, everyone is waiting for gifts: everyone is pleased not only to receive presents, but also to give them. Gifts made by hand are especially pleasing: such gifts are not banal and can cause a storm of emotions with their originality.
The value of a homemade gift increases many times, because it keeps a piece of the warmth of the hands of its creator.
 Crafts for the New Year with your own hands
 In this article, a large number of interesting ideas for making crafts for the New Year were proposed. Almost all of them are simple, video instructions are also offered to help, so you will not have any difficulties in creating New Year's souvenirs.
Create Christmas crafts with love!
Sometimes, in order for a holiday to become special, it is not enough to have traditional attributes. Yes, without a Christmas tree and a capital salad in the new year - nowhere, but it's time to bring fresh ideas into the traditional celebration. Do-it-yourself New Year crafts for the new 2017 Year of the Rooster will help us with the implementation of this idea.
Many of us carefully keep real rarities from our childhood in the form of Christmas decorations that are now rare, others every year buy something new, trendy from the latest collection of some designer brand in modern shopping centers ... All this, of course, is good, but if add a couple of crafts to the festive decor, it will immediately become clear - in this house they love and wait for the new year.
colorful balls
I want to completely transform a boring set Christmas balls and you don't want to buy new ones? Then the next craft will be to your liking. To implement this idea, we offer a fairly simple master class:
- take the balls and wrap them in bright patches of fabric,
- tie with satin ribbon, braid,
- add spruce twigs or an artificial flower to the knot.
Such christmas balls, arranged in a single color scheme in consonant with each other graphic solutions, will be an excellent decoration for the Christmas tree. And if desired, the craft can play with all the colors of the rainbow (it is better to choose a palette loved by the Rooster - fiery, from bright red to pastel yellow). Balloons can simply be placed in a vase or put on a bookshelf, or they can be used as guest cards by providing each decoration with a sign with the name of the invitee. 
Christmas installation in a frame
An object for inspiration can be the most ordinary photo frame. Paint the frame red - the traditional color of the winter holidays and place (hang, lean against the wall, books) in a conspicuous place. The souvenir will organically look with the same balls or snowflakes. Any will fit dear to my heart, new Year decoration. It does not matter whether there will be many toys or just one - a favorable frame will give any content a great sound. Do not forget about the bow, which can crown the top of the frame, sit on the side, or acquire a democratic look of the tape, for which the crafts are fixed on the wall. 
With new happiness!
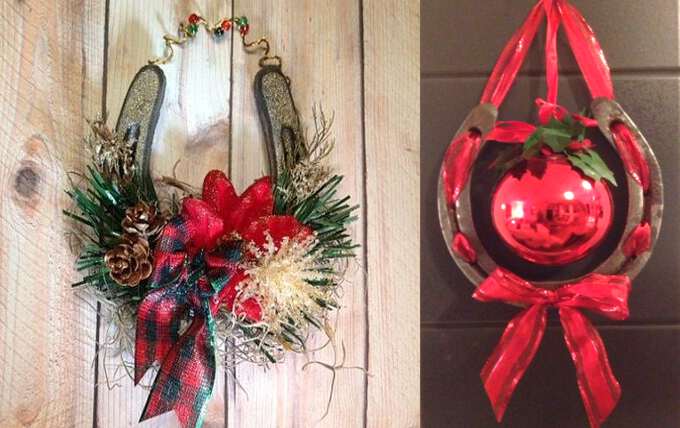
And how do you like New Year's crafts for 2017 with a horseshoe? This accessory can be purchased at a specialized gift shop, or you can use the one inherited from your grandmother. The effect in both cases will be amazing. The transformation of an ordinary horseshoe into a bright New Year's souvenir can be voiced in 2 versions.
Option one:
- Having placed the horseshoe with its “horns” up (this is the only way it will work to attract good luck and happiness), decorate its base with tinsel, spruce branches, cones, ribbons, in a word, with what you have at hand.
- Attach wire, ribbon, braid to the horseshoe horns, as shown in the photo, to fix an impromptu Christmas wreath on a wall or door.
Option two:
Hello Dedushka Moroz!
Such a Santa Claus, as you see in the photo, you definitely have never met. original lesson on turning the most ordinary object into a favorite of adults and children is simple and at the same time brilliant.
Deciding to decorate your house with funny symbols of the new year, just follow these instructions:
- we take a regular paint brush, paint the handle red and draw a few snowflakes on its surface,
- cut out a rectangular strip from fluffy material and attach it to the handle. This will be Santa's hat. On the side we glue a contrasting star or snowflake,
- glue the eyes and nose, as it is done in the photo. Black buttons can be used as an eye, and a round piece, which can be purchased at art stores, will serve as a spout.
- we pass a rough twine through the hole on the handle and place the resulting work where we like.
Funny Santa Claus can also be made from a round brush. The face can be made from pink paper or fabric by placing eyes and a round nose there, on which we boldly place wire glasses. We make the cap more elegant - for the fur trim we choose the fur more fluffy, and we turn the cap from red thick cardboard. Such New Year's souvenirs will look great on the Christmas tree or become the center of a decorative composition. 
Christmas wreath photo holder
A master class on creating a creative wreath that can simultaneously serve as a fixative for memorable photos or greeting cards, consists of the following steps:

funny snowmen
Making a whole family of funny snowmen and decorating your house with them is a great way to create a festive mood. A souvenir using our master class is made as easy as shelling pears. So:

Christmas tree
Surprise your guests with an unusual version of seating cards by making a small creative Christmas tree. The craft is easy to make - we take our lesson into service and proceed:

For fans of minimalism
Try to "grow" a whole forest of Christmas trees from paper cones. An unusual craft requires thick paper, beads, braid, scissors and glue. Having rolled up a cone from paper of the desired color (not necessarily green, it all depends on your vision and preferences), decorate its top with a golden star - the main attribute of the new year is ready! And if you want to create something special, decorate the Christmas tree with rhinestones, snowflakes, placing a transparent ribbon on top. At the base, the craft is decorated with a braid of beads - it will be very beautiful! Arrange such decorations around the apartment, decorate a table, a mantelpiece or a dressing table with them, and you will immediately feel that the New Year is just around the corner. 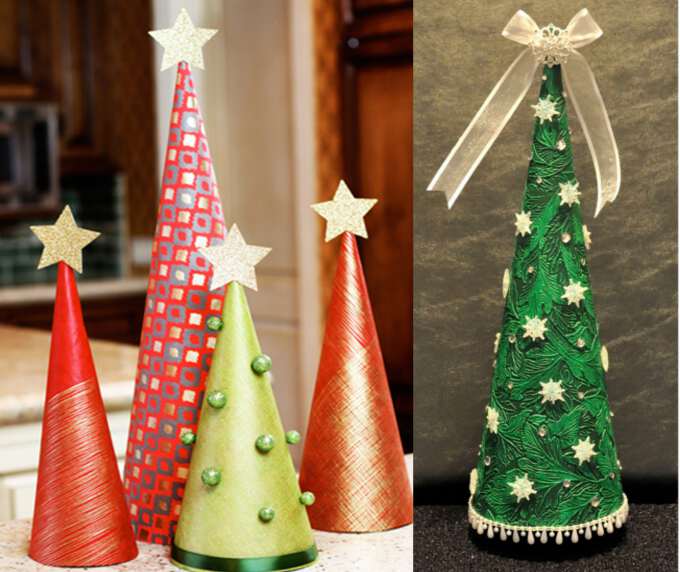
Charming wreaths
A very delicate and interesting Christmas wreath will be a wonderful element New Year's decor. Making such decorations is quite easy, you need a minimum of materials and time. Prepare thin wire satin ribbons the desired color and matching beads, a strong thread for hanging and get to work, based on the following master class:
- form a ring out of the wire and start stringing a ribbon on it,
- alternate one fold of tape with a bead to the end of the wire,
- when the wreath is ready, hang a decorative figurine on top and tie a bow,
- fix the thread on which you will hang the wreath.

And finally. The owner of the coming year, the Fire Rooster, has great respect for handmade (eng. hand made - made by hand), so that it prevents us from conquering the proud bird with our creativity? Using the photos presented in the review from original ideas New Year's crafts, you will succeed in this, surprising the rooster with New Year's crafts for the new year 2017, not only the eastern ruler of the year, but also all those close to you.
The eve of the holiday is one of the brightest periods of the year. The days before the celebration are always full of pleasant chores: you need to choose gifts, create a luxurious menu, decorate your home or office. After all, a nice decor creates an atmosphere of a winter fairy tale, even when it's +5 and raining outside. Of course, on the shelves of supermarkets you can find tons of stamped jewelry for. But you must admit: it is much more fun to make them with your own hands! Your crafts become one of a kind, and the creative process gives a lot of positive emotions. We have compiled an overview of the most interesting ideas for New Year's crafts. Which one will you choose?
Idea number 1: Wall spruce
Wall fringed fir tree in mint green quilted paperThe opportunity to install a two-meter forest beauty is not always there. But this is no reason to do without the symbol of the New Year! After all, a living spruce can be replaced with an unusual paper craft and make it an original background for holiday shots. To "grow" a tree at home, you will need the following materials:
- 5 sheets of A2 paper or cardboard.
- 1 sheet of thick A4 paper.
- 30-35 sheets of green ink paper.
- 1 sheet of kraft paper or brown cardboard.
- colored and white tape.
- PVA glue.
- stationery knife
- marker and hook from a photo frame.
- dense colored thread.
- 20-25 large beads (or small balls) for decoration.
 Do-it-yourself step-by-step scheme for making a wall-mounted spruce
 Lay four sheets on the floor so that they form a rectangle. Place the remaining sheet above the figure, in the center and at right angles to it. Tape all sheets together. The photo shows adhesive tape black, but in practice it is better to use white. Outline the outline of the future spruce and mark it with colored tape. Cut out the triangle. The layout of the tree is ready - it's time to start needles!
Cut each piece of tissue paper into two pieces and fold each piece three times lengthwise. Using scissors, make a fringe along the edges of the sheet, starting to cut 2-3 centimeters from the fold line. This is a rather monotonous activity, so you should stock up on delicious tea and remarkable patience. When all the branches are ready, you can start gluing them to the frame.
 Wall Christmas trees can be made without paper fringe - just stock up on Christmas toys, beads and brushwood
 Apply glue to the base of each sheet with ink and attach it to the spruce, starting from its base. Move up until the entire frame is decorated with green needles. Let the glue dry. Attach a hook to the clean side of the frame and hang the tree to the wall. It remains to make a trunk for our spruce. To do this, take an A4 sheet and brown paper.
Cut the latter into strips and glue them to the base. Attach the finished trunk to the tree with adhesive tape. On this, the construction of the spruce can be completed, but the craft, decorated with a garland, looks much more interesting. Even a child can do it. It is enough to choose a dense thread, string decorative beads on it and fix it on a tree.
Idea #2: Clear Glue Snowflakes
 Glue snowflakes are suitable for decorating windows and wrapping gifts.
 Do you want to update your Christmas tree decor? The most beautiful toys You can make it in just five minutes! Snowflakes twinkling in spruce branches will give festive mood the whole family. For this craft, the following materials will come in handy:
- transparent adhesive (silicone sealant).
- parchment paper.
- snowflake stencil.
- glitter, brush
- thin wire.
- acrylic paints.
Start by looking for a template for your future snowflake. You can download it on our website (see the article with templates) or draw it yourself. Creative kids will take up this business with pleasure. In this article, we also offer several drawings that you can use in your work:

Transfer the selected stencil onto paper. To prevent the snowflake from sticking to parchment, cover it with cling film. The next step is the formation of the frame. In order to avoid injuries, it is better not to trust this business to kids. Apply glue in a continuous stream along the lines of the drawing. If the snowflake is not bulky enough, apply another layer of glue and let the craft 1-2 hours to dry.
 How to make a snowflake with hot glue step by step
 After that, grease the snowflake with a thin layer of PVA glue and sprinkle with sparkles. Any decorative elements will fall into place: beads, pebbles, ribbons. Dry your creation a second time. Using the same silicone glue, attach a wire loop to one of the snowflake's rays. Now the craft can be hung on the Christmas tree.
Idea number 3: Volumetric stars
 From bulk paper stars you can compose whole compositions
 Stars of all colors and shapes remind us of the winter holidays. So simple and at the same time a beautiful craft can be made from ordinary colored paper or cardboard of any size. A voluminous star will perfectly decorate the top of the spruce. It can also be hung on a ribbon or placed on the wall as part of a whole constellation - all options are good.
 Production of a five-beam volumetric star step by step
 To make the frame of the craft, print out the five- or six-pointed star template (or manually transfer it onto two sheets of paper). Cut out both shapes. Using a ruler or pencil, you can decorate the rays of the star with geometric patterns and cut them out stationery knife. Even the simplest ornament looks very impressive.
 Scheme for creating a six-ray volumetric star
 Use a blunt object (such as a non-writing pen) to push through the dotted lines. Bend the places for gluing back, fold the paper along the dotted line and glue the two stars together. Make a small hole at the top of one of the beams and thread a thread through it. The craft is ready to decorate your home!
Idea #4: Sock Snowman
 Sock snowmen will look great under your Christmas tree!
 Surely you have a couple of unnecessary socks and buttons in your apartment? These little things should be given a new life by turning them into a cute toy. You can make crafts with your child. For creativity, you will need the following materials:
- white sock with a long top.
- a glass of rice.
- 2 small buttons.
- pins with colorful balls.
- piece of colored fabric.
- PVA glue.
- needle, white thread.
 Step-by-step instruction making snowmen out of sock and rice
 Iron the sock and cut along the line shown in the picture. Sew up the top or tie tightly from the side of the incision. Turn the bag inside out and fill it with cereal. Secure the top of the sock with a thread so that the rice does not spill out. Bandage the snowman again so that the head is separated from the body by a narrow jumper.
Tie a piece of fabric or ribbon like a scarf, stick pins in place of the eyes and nose. Sew the buttons to the body of the snowman. Wear the bottom half of the sock like a hat (or sew it separately). To decorate the toy, you can use ribbons, decorative stones and anything that comes to your mind. You will not find such snowmen in any store!
Idea #5: Salt Dough Decorations
 Salt dough can be used to create Christmas decorations and even garlands!
 Salty dough- excellent material for modeling, which is prepared at home. From it you can build the most different crafts, from simple Christmas toys to complex compositions (use our and). Salt dough is great for crafting with kids. But before you start modeling, be sure to convince the kids of the inedibility of the material. To make salt dough you will need:
- wheat flour - 500 g
- table salt - 250 g
- water - 250 g
Mix flour and salt thoroughly, add water and knead the dough. To check the readiness of the material, roll a ball out of it and make two or three recesses in it. If the dough is elastic and does not stick to your hands, then it is ready. You can also add 1-2 tablespoons of oil to the mixture. Thanks to him, the dough will dry out more slowly and it will become easier to work with.
 Salt dough crafts have an unlimited shelf life
 Do you want to receive colorful toys? Use a handmade soap dye or gouache. Crafts can also be decorated after baking with gel pens, felt-tip pens or paints. So, the dough is ready. It remains to let it brew a little, roll it out and cut out the figures. The easiest way to do this is with iron template molds.
You can also draw the desired shape on a sheet of cardboard, cut it out and use it as a stencil. Salty cookies will perfectly decorate various pebbles, beads, patterns from cereals. To give it a lace effect, make many holes in the dough with a cocktail tube or use special stamps for decoration. Make a hole at the top of each craft for threading.
 The scheme for making stars from salt dough step by step
 Now it remains to dry the cookies. It can be done natural way: Leave items outdoors for a few days. However, most needlewomen prefer to dry their creations in the oven at a temperature of about 150 degrees. The duration of this procedure depends on the thickness of the craft, but, as a rule, is in the range from 30 minutes to 3 hours. Remove pastries from the oven only after it has cooled down.
The last days of December are full of troubles. Each hostess is trying with all her might to create a fabulous atmosphere in her home. But in order to make your home even more beautiful on New Year's days, it is not necessary to buy bulky and a bunch of Chinese decorations. It is enough to arm yourself with scissors, glue, a sheet of cardboard and a pack of colored paper. From these materials you can make very unusual and cute crafts, which will be a wonderful decoration for your home or office. Some products can be used as, while others can be used on their own. Several hours spent on making paper decorations are worth the joyful smiles of your loved ones!
paper christmas tree
original christmas tree with lacing at the edgesChristmas tree - the main decoration New Year's interior. creates a solemn mood and pleases us all the winter holidays. Well, a decorative paper tree that will decorate your windowsill can be stored up to next year. To make this craft, prepare:
- 8 Christmas trees cut out of thick paper or cardboard
- cutter
- scissors
- hole puncher
- Double-sided tape
- white thread or thin cord
- white sequins
- white acrylic spray
- ruler
- cardboard sheet

Since there are no Christmas trees without stars on top, make the top first. Draw the outlines of the figure on the cardboard. Then, using a ruler and cutter, carefully cut out the star. From eight paper blanks, assemble a Christmas tree. Attach it with double sided tape. The edges of the product should be symmetrical, so it is better to fasten the corners with glue.
 Examples of the design of cardboard Christmas trees
 Punch holes along the edges of the craft with a hole punch and paint your product with white spray paint. Make the trunk of the tree 5 cm wide. Then pull a white woolen thread or cord through the holes made earlier. To "stitch" it was more convenient, take a needle with a large eye. Spray the star with white paint and attach it to the top with glue. Decorate the entire piece with glitter. To do this, you can use the golden rain, Christmas decorations or different colored paper glued on the sides of the Christmas tree.
House for sweets
 Such houses will be an excellent package for New Year's cookies.
 You can decorate your home with this craft, hang it on a Christmas tree, or use it as a package for sweets. To make it you will need:
- house template ()
- scissors
- stationery knife
- ruler
- double tape

 Creating a sweep of a cardboard house
 First, print out the house template. You can also draw a similar sketch of your choice. Then cut out the template. For particularly delicate items, use a clerical knife. Bend the workpiece dotted lines using a ruler or a postcard bender.
 Step-by-step instructions for making crafts
 Glue the house together using double-sided tape. Decorate and decorate the product at your discretion. Fill the craft with your favorite sweets and you can please the children with it! Well, if you print the templates of houses on colored paper, you will have a motley New Year's town.
Christmas lantern
 Cardboard lantern is ideal for children's creativity
 Lanterns will create a fabulous atmosphere in the house. They can be made from colored paper in just a few minutes! Cut ribbons of the same length and width (dimensions depend on the size of the future product). To make one flashlight, prepare about 15 strips of paper. Then put them in a pile and use an awl to make holes at both ends of the blanks.
 Step by step instructions for making a paper strip lantern
 Thread on one side. Tape its end to the strip. Then pass this thread through the second hole. Stretch it so that the paper is bent into an arc. Secure the thread with a knot. It should be large and not slip through the holes. At the final stage, straighten the strips so that a ball forms. Here is our flashlight! Several products of different colors and sizes, suspended side by side, look very beautiful.
Volumetric snowflake
 The 3D snowflake looks spectacular and is not difficult to create.
 Traditionally, most families use it as a New Year's decor. They are made mainly of paper and decorate the whole house with “snowfall”: a Christmas tree, walls, windows. There are many techniques for making this craft. For example, you can make an effective volumetric snowflake. To do this, you need to stock up:
- paper (white, color and wrapping)
- scissors
- glue
- stapler
 Step-by-step instructions for creating a three-dimensional snowflake
 Cut out six square pieces. Fold each square diagonally and cut inside with scissors. Open the square and place it on the table in front of you. Roll the first row of strips into a roller and fasten its edges with a stapler or glue. Then turn the snowflake to the other side and similarly connect the two strips of paper that are closer to the center. Turn the product over each time and fasten the remaining strips.
In the same way, fold the remaining five blanks. Connect the three parts of the snowflake with a stapler in the middle. Fasten the remaining three parts in the same way. Now glue these two halves together. To keep the shape, it remains to connect the snowflake where each of the six parts is in contact with the next. Decoration can be made from paper of any color.
christmas angel

The magical spirit of Christmas will always be present in a house decorated with angel figurines. They can be created with:
- colored paper
- PVA glue
- scissors
First, make a patterned snowflake. To do this, prepare a sheet of white paper measuring 20 by 20 cm. Fold it in half, then in half again and fold the two opposite corners together. Cut out with sharp scissors. Can be used instead of paper openwork napkins. Glue half of the snowflake onto colored paper and cut out a semicircle from it.

Thoroughly coat its edges with glue and connect into a cone. Cut out wings from paper and attach to the back of the product. Draw the face of the future angel: eyes, nose, mouth. Hair can be made from cotton. Attach a hanger to the toy so that the Christmas angel can decorate your Christmas tree.
paper star

Origami technique can be used to create Christmas decorations. From paper squares folded in a special order, you can easily make a star for New Year's table. Stock up on colored paper and patience.
- Fold the paper square in half.
- Bend the right corner of the resulting triangle up.
- Then bend it half down, and then up again.
- Unfold and flatten upper part angle.
- Fold the top corner back as shown.
- Also fold back the left corner.
- Make eight of these elements. Enclose their wide part in a small square.
- Flip over to the other side and fold the small square piece over the large square of the other piece.
Cardboard snowman

What's Christmas without a snowman? However, it does not have to be made of snow. Instead, you can take cardboard or thick paper. Such a craft is suitable for home decoration and gift wrapping, or can be used as a Christmas tree decoration. To make a snowman you will need:
- cardboard
- colored paper
- scissors
- black tissue paper

Glue a cylinder from white cardboard. On one side, make incisions in the form of cloves and bend them inward. Cut out a circle of the appropriate diameter and stick it on the cylinder. This will be its bottom. On the other side, attach a cover of the same size. Paint the top edges of the cylinder and the brim of the hat black. Cut out black eyes and buttons from colored paper, and a nose from red paper. Make snowman arms out of tissue paper strips.
Among the numerous options for a fairly wide selection of New Year's gifts, which are traditionally presented to relatives and friends on New Year's Eve, significant for each person, the most interesting and relevant in Lately exclusive New Year's crafts for the New Year 2017 with their own hands are rightly considered.
Among those made from the heart original gifts accepted to include all sorts of textile crafts, accessories made of fashionable felt in recent years, crocheted or sewn from fabrics that match the texture of soft toys depicting the symbol of 2017.
Many crafts for the New Year 2017 are quite easy to make with your own hands. Perhaps, precisely because the vast majority of the inhabitants want to have something unusual, created individually for them, such a direction as hand-made has become widespread today.
On the eve of the most beloved holiday for the vast majority of people - the New Year, almost every home prepares colorful, original, original decorations and gifts that can create an exceptionally positive mood on a significant night and give pleasure to everyone who welcomes a new, promising transformation in life year.
You can fully express your creative ideas and creativity in the New Year's apartment design and creating gifts for this celebration in the process of author's decor and self-production of all kinds of crafts.
New Year's crafts 2017 can be made from
- paper,
- table napkins,
- polystyrene,
- felt,
- fabrics,
- yarn,
- knitwear,
- natural materials,
- polymer clay,
- salt dough,
- beads.
Those who wish to please the results of their skill with relatives and numerous friends can take into service several illustrative examples of the independent manufacture of New Year's crafts, demonstrated in this article.
New Year's wreath - a mandatory attribute of the holiday
Following a long-standing European tradition, the Christmas wreath is gaining more and more popularity among the types of interior decor. Given the abundance of natural materials, it can be made without much difficulty in a short time.
For the manufacture of future jewelry front door at home or walls in the room where the New Year is planned to be celebrated, you will need:
- wreath base ring (foam or cardboard);
- fabric or burlap for covering;
- cones or other natural material;
- wire cutters;
- gun with silicone glue;
- New Year's tinsel;
- paint and glitter.

The ring serving as the base of the wreath can be decorated in different ways. Using nippers, cut off the top pine cones and the remaining bases of the same height are attached to the rim pre-covered with burlap using silicone glue.

Cones intended for decorating a wreath can be painted in different ways, imitating snow lying on them.
- the top of each cone can be gently dipped in white gouache;

- the outer parts of the open cones are covered with PVA glue, after which they are sprinkled with crumbs of broken Christmas tree decorations and fastened on the wire with the tops down to dry;


- for coloring cones, special paints are used in spray cans, which perfectly tint any natural material in the desired color; they can process an already formed product, preferably on a balcony or at an open window, since such paints are toxic.

The finished wreath of cones is complemented with New Year's tinsel: golden bells, small balls, miniature garlands from New Year's gifts.

New Year's crafts from paper napkins

Use for christmas decoration at home, you can not only natural pine or spruce cones, but also self-made from three-layer napkins for table setting or gift wrapping paper and polystyrene. Such an unusual craft can serve not only as an element of interior decor, but also be used as Christmas toys.
At the first stage of work on the craft, rectangles of a certain size are cut, which are folded on both sides, turning into triangles.

Finished paper triangles are attached next to each other with clerical pins, starting from the center of the sharp edge of the foam egg, thus forming cone scales.

Having reached the opposite end of the foam base, a hole is made in the center. On both sides of it, a braid is attached, which will play the role of a Christmas tree toy loop.
Insert a plastic twig with several berries into the hole of your choice.

Spectacular paper fir cone, easy to perform, will undoubtedly appeal to children and will make you want to try your hand at creating crafts for the new 2017 in such an unusual technique.

Snowmen: a variety of materials and techniques
The foam plastic used to create the crafts presented above is a sought-after material for this kind of needlework. Given its lightness and ability to be processed, polystyrene foam is in great demand for the manufacture of New Year's crafts.
A common example of a Styrofoam Christmas toy is a snowman.

It is very easy to make your own. For creative work you will need:
- two foam balls of different diameters;
- stationery knife;
- stationery pins;
- gun for working with silicone glue;
- scissors;
- marker;
- piece of fleece;
- buttons, ribbons, sequins.

Armed with a clerical knife, it is necessary to cut off a small layer from each foam ball to get a flat surface.

Smooth surfaces are connected with silicone glue, forming a snowman figure.
A scarf and a fringed hat are cut out of fleece.

The snowman is dressed up. A row of multi-colored buttons is planted on silicone glue, imitating the fasteners of his clothes.

Using a marker and stationery pins, draw out the eyes, nose and mouth of a funny snowman.

Colorful figurines of perky foam snowmen will perfectly decorate the branches of the Christmas tree.
In addition to foam, you can use the most unusual materials to create a snowman, for example, a knitted sock.

For self-production of such an original craft, you must have on hand:
- white sock;
- white cotton threads;
- scissors;
- a couple of buttons;
- stationery pins with a black and red ball at the end;
- a narrow piece of fleece or other material;
- a glass of rice cereal.
At the beginning of work, the sock must be cut into two parts.

The bottom of the sock should be left for the future snowman hat.

The second part of the sock is used to form the figure of the toy. First of all, one end is carefully pulled together with a thread, retreating a couple of centimeters from the edge, and tied tightly.

Pour the required amount of rice into the cavity of the sock.

Having visually divided the figure into two unequal parts, the sock is again pulled with a thread, forming the body and head of a snowman.


At the junction of the head with the body, a scarf cut out of fleece or other fabric is tied.

In front of the snowman's torso, two buttons are sewn in a color contrasting with the main material. Two pins with black beads at the ends and one with red ones are stuck on the front of the head, thereby imitating the eyes and mouth of the toy.

An entertaining snowman can serve as a decoration holiday table, take a worthy place under the Christmas tree or become a New Year's gift-souvenir.
Felt mitten with exclusive design
What a snowman and a fun winter time without warm bright mittens at all. An interesting option as christmas decoration, and popular new year gift over the past few years, mittens made of felt and decorated with various materials have become popular.

Such products can be filled with padding polyester or remain hollow. They can be hung on a Christmas tree or given as a souvenir for the holiday. Children will find such an interesting gift filled with sweets.
For self-production of such a colorful craft, use the pattern of the product proposed below.

As a rule, such a mitten is cut from felt, because this material has several advantages for making crafts of this kind:
- keeps its shape perfectly;
- does not cut, which means that it does not need additional edge processing;
- presented in a wide range of colors.
The symmetrical details of the mittens cut out of felt are traditionally connected with a front overlock seam.


The front panel of the mittens is usually decorated in various ways:
- embroidery floss or silk snowflakes or floral patterns;
- basting flowers or other elements cut out of felt;
- sewing on buttons on their own or over felt fragments;
- embroidery with beads or sequins.


Self-created for the celebration of 2017, crafts from a wide range of materials presented will find their admirers and talented craftsmen.
Crafts for the New Year 2017: Keyrings "Rooster" made of felt
Most simple option a self-made New Year's gift that does not require special sewing skills or mastering the complexities of another type of needlework is the manufacture of a felt keychain - an accessory that is extremely in demand today that can decorate a bag or complement a bunch of keys.
You can create such a craft in two ways. In the first case, it is enough just to choose a pattern of a flat key ring and felt in the colors necessary for working with this model. To make such an accessory you will need:
- dense colored felt;
- scissors;
- silicone glue;
- lace or metal fittings for attaching the key fob.
According to the selected template, cutting out the necessary elements of the felt keychain from paper, they are repeated in the material of the selected shades. Given the important nuance that the future keychain is the image of a rooster, it is recommended to use red, orange, yellow, green and black felt for such crafts.
The details of the key fob, cut out of felt, are alternately attached to the base of the accessory being made using a silicone glue heated in a special gun for working with such materials.

The final stage of work on such a model of widespread crafts is the attachment of a thread cord or a metal ring in its upper central part for a bunch of keys or future attachment of crafts to a bag or backpack.
There are various patterns of the described type of key rings, so it is quite easy to choose one of the craftsmen who specialize in making them to your taste.

The process of making a soft keychain from a different type of felt is somewhat more complicated. To work with such a craft, anyone who wants to make it needs to master the implementation decorative seam silk thread, through which the side of the product is formed.
To create this kind of keychain, you need to prepare:
- felt yellow, orange or red, salad color;
- synthetic winterizer;
- silk thread to match the base material;
- needle;
- scissors;
- silicone glue;
- black bead.
Following the patterns below, you need to cut out the felt parts of the keychain.

Carefully inserting in the indicated places between the symmetrical parts of the body of the rooster its comb, tail and beak made of felt, securing them if necessary with sewing pins or stealth pins, having previously placed the padding polyester inside, the accessory should be swept away, after which the parts of the body of the rooster are joined together by means of a decorative seam.

The final part of the work on such a keychain is the decoration of its front part with decorating elements. For this purpose, using silicone glue, heated to the proper temperature in a gun, peas cut from lettuce felt are attached. The last in turn in the process of work is sewn on a black bead that imitates the eye of a rooster.

If desired, you can use other models of a soft keychain depicting a rooster, consisting of other parts and presented in a different color scheme, to make your gift.

Some variations of this kind of crafts require resorting to the use sewing machine, capable of producing a line of material and a zig-zag operation, which needs to be stitched to decorate the keychain.

Household little things made of felt as a gift
Crafts for the New Year 2017 can be presented not only in the form of key rings. They can be such always sought-after gifts as household trifles needed in the kitchen of every home. These include colorful coasters for eggs cooked for a traditional morning breakfast in the family circle. It is best to make such a craft from the already mentioned felt, which for a long time perfectly retains the shape of the product and saves the heat of the boiled egg.
Those who wish to give someone from their loved ones such an exclusive craft must have the following materials and tools at hand:
- patches of yellow, red, green and blue felt;
- scissors;
- silicone glue.
Using the templates for the details of such a product below, elements of the future stand are cut out of the felt of the selected shades.

On the front side of each of the symmetrically cut parts of the stand, with the help of silicone glue used for such purposes, multi-colored elements of the tail and parts of the head of the rooster are attached in certain places.

Each of the finished components of the stand is neatly inserted into the groove of its pair thanks to the cuts made in advance in the felt parts. Inside the stand formed in this way, a ring glued from blue felt is inserted, intended in the future to serve as the basis for the egg boiled and placed in the stand.

A bright colorful stand for boiled eggs will create a positive mood at breakfast and, undoubtedly, will give each of the household members such a much-needed boost of energy in the morning for the whole next day.

New Year's crafts 2017 - Crochet Rooster Crochet
Those who know the art of crocheting will surely find another idea interesting that can be implemented in the process of preparing gifts for the new year. This craft, which can become interesting and useful gift in the coming year, is rightfully considered a kind of amulet for any home, a kind of talisman for its owners, which has become popular in recent years. This is a crocheted grain, which decorates modern kitchens, thus giving the interior of this room individual style features.
To make such a craft for the New Year 2017, you will need:
- wool or cotton yarn in beige or light brown, red, yellow and black;
- crochet hook No. 2 or No. 3 (depending on the thickness of the thread used);
- scissors.
Work begins on the manufacture of such crafts with the fact that, taking a beige or light brown thread as a basis, you need to crochet a chain of air loops, the number of which can vary from 12 to 20. Their number directly depends on what the height and width of the grain will be.
Based on what size craft is planned, using the most common “single crochet” technique, the number of rows necessary for the intended grain size is knitted. The result should be a tight rectangle.
Having folded the cloth formed in the process of knitting in half, the resulting square must be crocheted, tying both edges with a single crochet.
Next, you can proceed to the design of the head of the rooster. For this purpose, red yarn is tied to the thread with which the square base of the grain was knitted and 10-12 loops are knitted over the formed corner with a single crochet. Turning the knitting with the wrong side towards you, make another row in the opposite direction. After that, the strip of the future comb must be divided into three parts, each of which should be knitted in two more rows separately, evenly reducing the number of loops upwards, so that in the end the comb fragments become rounded. To form a flawless edge, the top of the comb should be tied with a single crochet. 
Using a similar method, a few centimeters below, by dialing only 5 loops, they form a red beard of a rooster.
Using thread yellow color, between the crest and the beard, it is necessary to dial 3-4 loops and knit several rows with a single crochet, in each next subtracting 1 loop, so that the result is a sharp bird's beak.
The last one in turn is the eye of the rooster. This is done quite simply. It is only necessary to make a couple of short stitches with a black thread threaded into the needle in the place indicated in the upper part of the grain.
At the end of knitting and decorating the grain, you can proceed to the final stage of work on it. Pour inside a small amount of different grain. Most often, grains of wheat, barley and oats are used, symbolizing prosperity in the house and the well-being of its owners throughout the coming year. Having done this, again resorting to the “single crochet” technique, it is necessary to connect together the folded edges of the grain formed in the form of a pyramid.
Such a product can be placed on a table, placed in a kitchen cabinet or on a hanging shelf, and it will perfectly complement the interior of the room.
The variety of hand-made crafts for the New Year 2017 is quite large, and everyone who wants to please their loved ones with something original, a one-of-a-kind craft can quickly master the technique of making such a product in order to present an exclusive gift on New Year's Eve.