Owl made of fabric with your own hands patterns. We sew an owl pillow with our own hands: a pattern, recommendations and rules for creating. Step by step instructions with photos
An owl is not only an intelligent and beautiful bird, but also a popular symbol today. It is believed that such a toy gives children calmness, perseverance and patience, increases the ability to learn; gives young girls mystery and femininity; for young men - strength; and for people experiencing financial difficulties - financial well-being. And if you make an owl with your own hands quickly and simply from fabric or other materials, then the power of such a talisman will increase many times over.
If it seems that it is difficult to sew a forest beauty and for this it is necessary to have the ability for tailoring, then this is a mistake. Even children can cope with the creation of a product, who will gladly take part in the birth of a new family friend.

We sew an owl with our own hands from fabric in a step-by-step MK
To sew a simple owl from fabric, you do not need to purchase special materials. Everything you need can be found at home. So, for this you will need:
- Pattern or templates (download and print on a printer, or redraw by hand);
- Pieces of fabric;
- Threads;
- Scissors, needle;
- Buttons and other decor;
- Glue (if applique will be made);
- Filler (holofiber, fabric, ordinary cotton wool, etc. for a volumetric toy).
The list is small, but the scope for imagination is huge. You can choose any fabric, but it should not crumble at the edges and see through. Suitable for crafts old clothes, for example, jeans, bright sundresses, a jacket and even a terry towel. Every time, even with the same pattern, the result will be different, but always excellent.

The first thing that can be done from fabric is applique. The easiest and fastest option, which both children and beginners of the handicraft world can easily cope with. To do this, you can take this diagram or those presented below.

- We draw by hand, or print the template we like on the printer. To begin with, you should choose an uncomplicated one, of 6-8 elements. It is best if it is made of a dense material, such as cardboard or an old box;
- We distribute the available pieces of fabric over the parts of the owl's body. It is best to use felt for appliqué - its edges are quite dense and do not require processing. The base can be made colored, the abdomen - monochromatic (or vice versa). The main thing is to avoid a large number variegated details, but this is also permissible if a funny comic toy is conceived;
- With a pencil, thin chalk or a piece of dried soap, draw a line around the outline of the template and transfer it to the fabric;
- Cut out the details along the contour and assemble the future owl. If you are satisfied with the result, we take on the glue and carefully glue all the details. You can choose any sequence (either start with small elements, or, on the contrary, from the abdomen);
- The finished toy must be allowed to dry in a ventilated place for at least 6-8 hours so that the glue dries out and the unpleasant smell disappears from it.
Below are the diagrams that you can print and use to create a variety of bright owl appliques.

You can use felt or regular fabric.
The applique technique is also suitable for decorating children's clothes, bags and bedding. For example, owls will look very beautiful on a pillow.

We create a fabric owl quickly and easily with a detailed description
If you have mastered the applique technique, you can proceed to mastering the sewing technique. Best to work with soft felt however, just about any fabric on hand will do. Since in this case you will need to work with scissors and a needle to make the owl, you must be careful. If children are involved in creating a toy, they must be supervised by adults. The process itself is quite simple. There are two differences from the previous technique: we will use a needle and thread to fasten the elements, and to make the owl look voluminous, we will use a filler.
- As in the previous technique, we find the pattern or pattern we like, or come up with it ourselves. We transfer to the fabric, cut out the details of the future owl.
- In order to sew one piece to another (wings, eyes, belly) it is best to use hand seam called "forward the needle". The technique of its implementation is that one stitch is done from the face, the other from the outside. The length of the stitch and the gap on the front of the product is equal.
- Sewing together the details of the front and back side owls, let's get down to the main thing - stitching two halves of an owl. To do this, it is necessary to combine the parts, fasten them with sewing pins and sew the needle forward in the same way, leaving about 2-3 cm unstitched.
- We fill the toy with filler through the remaining hole.
- Finish the seam and hide the end of the thread inside the toy.
- The resulting product can be decorated by gluing plastic eyes, bows, buttons, pockets, bow ties, etc.
Depending on the pattern used, a wide variety of owlets can be produced.

Sewing a loop to the resulting toy, you can use it as an interior decoration (crib, Christmas tree, fireplace, bookshelves) or as a key ring.
Related videos
You will learn a few more ways how to sew an owl from fabric by watching the video master classes.
Nowadays, the creation of various souvenirs and accessories for the interior is gaining more and more popularity. Try to use ready-made patterns pillows-owls to make original decoration for your sofa. Such a thing will be a great gift for any occasion.
Materials and tools
To sew the same cute characters, you will need the following:
- patterns of owls pillows;
- paper and pencil or printer to print the finished template;
- scissors;
- safety pins;
- fabric of any available shade or several colors;
- needle and thread;
- sewing machine;
- synthetic winterizer or other filler;
- eyes and other decor (optional).

As you can see, nothing complicated is needed. If you are doing needlework, you probably already have everything you need.
How to sew an owl pillow
Any soft toys are made using a similar technology. If you've done something like this before, making this cute souvenir won't be difficult. The sequence of work will be as follows.
- Build a pattern on paper. If you have a ready-made owl diagram in in electronic format, just print it out and cut it out.
- Pin the appropriate parts to the fabric and make the blanks in the required quantity.
- Fold the paired pieces or one with the main right sides inward.
- Sew or pre-tap the seams, leaving a fill hole.
- Turn the product right out and fill with padding polyester.
- Sew up the hole
- Sew on additional elements (if any), decorate the product.
Using such a simple and understandable technology, you can make a thing of any complexity.
DIY pillow: pattern
At this stage of your work, you have two options:
- use a ready-made template;
- build the image yourself.
If you find the circuit you like in electronic form, it is enough to print an image of suitable dimensions or redraw it from the monitor screen. You can change the scale of the entire workpiece or its individual parts at your discretion. As a first experiment, it is better to take an average size, within 30 cm. Too small a product is difficult to make, but a large one will take more time and patience.

If you have only a photograph of the finished item in front of your eyes, correlate the picture with the existing schemes. Modify the template as needed. In fact, it is not at all difficult to build patterns on your own, since all the details are usually symmetrical. In order to make the base of a pillow in the shape of a bird out of fabric, it is enough to have half a blank on paper, and then fold the material in half and pin the pattern along the fold line. By the way, having completed one blank, you can make many different options for souvenirs, changing the color and material of individual elements.
If you are new to sewing and needlework, grab the most pillow-owls. One of the easiest options is shown in the following illustration.

To get a similar product, use one of the blanks below. As you can see, the pillow consists of several parts: the body, eyes with pupils, beak, wings and legs. Additional elements are usually attached with a zigzag seam over the base, while the wings and legs can be made separately, only the work will become somewhat more complicated.

Please note that in the previous version, the body was built as one part with a closed contour, that is, it may well be asymmetrical. If the left and right halves are the same, use the second template when the part half is applied to the fold line of the material.
For the most easy way use the previous workpiece to complete the product, cut out all the parts one at a time, the body in duplicate. Stitch on the elements from the front of the front of the owl, and then do the work in accordance with the technology described above.

The second option (the diagram above) will be more difficult, since you will have to sew on the legs separately. By the way, they, like the base, can be made voluminous, only you need not two, but four parts. The same goes for the wings.

The third pattern shown in the section differs in proportions, as well as additional decor. The details that adorn the body can be stitched in tiers, then you get an owl in a dress with frills. It will look especially beautiful if these elements are made from light material and stitch only along the top edge. The effect of the volume of the "clothes" will be created.
Flat pillows
Most easy way of how to sew an owl (pattern in the next photo) is to make a product of a simple shape, consisting of two parts without additional elements.

In fact, you only need to make one seam. Wings, feet and other parts can be cut from fleece and sewn on or even glued to the base. If it is made from the same material, then the pillow can be sewn on the front side, since the fleece does not require processing of the edges. If you are building a pattern yourself, try to avoid sharp corners and shape transitions. Make the outline smooth.

If this is not possible, for example, if you want to show the carved shape of the wings, before turning the product inside out, carefully make small cuts in the seam allowances in "dangerous" places. This will prevent the fabric from gathering and wrinkling after being turned to the right side.
Bulky owls
Original and beautiful pillow do it yourself (the pattern can be made using the following photo) it will turn out great if you put in more effort and time. This is where you will actually be sewing soft toy, only the size corresponding to the pillow.

In this case, you will need to make many separate elements, and then combine them into a single whole. Such things look more spectacular and original and can fulfill not only the functional role of the pillow on which they lie, but also decorative or utilitarian, for example, to be a place to store the TV remote control.

So, you were presented with various patterns of owls and photos of finished products. Choose the ones you like. Create beautiful accessories for your interior.
Believe it or not - it's easy. Two pieces and 5 stitches - or six, you don't have to be a good seamstress of all trades. The work impresses with the simplicity and elegance of the solution. Only 30 minutes, and the owl made of fabric is ready - believe me, but rather check it out. Read the job description, look and make sure: half an hour - and a charming owl is sewn.
For a product measuring 15x10 cm, we need:
- Red fabric 17x10 cm - with a margin.
- Yellow color 10x10 cm;
- White or paper (for eyes, 2 buttons (eyes).
Owl-wise head - job description

DIY fabric owl pattern
1. Point one - an owl pattern: the dimensions in the photo correspond to the product 15X10 cm.

rice. one We cut out the details
Cut out parts A and B from paper. Cut out two parts from the fabric of the corresponding colors - red (torso) and yellow (belly). Mark the indents for the seams (fig. 1).

fig. 2 Sweeping the owl
2. Place part B with the wrong side on the wrong side of part A, sweep it from the left side (Fig. 2), leaving an indent of 5-10 mm, stitch it. Connect the right parts of the parts in the same way - we get a triangle. Important: turn the resulting blank of an owl inside out - do not forget if you have a one-sided pattern or the color of the inside does not match the front side.

Fig. 3 Sew two parts of the product
3. Sweep and sew upper part triangle. The length of the seam is 5-7 cm - approximately 1/3 of the length of its side. Thus, the yellow part is inside the red corner (Fig. 4), nested inside.

Fig. 4 We pinch the corner - we fix the blank of the head and beak
4. Shaping the head. Secure with a pin, separate the sewn "corner" from the main part of the workpiece (Fig. 4). We will bend it in the next step.

Fig. 5 MK Owl made of fabric with your own hands - the final step - we complete the formation of the body and beak
- Bend (throw) the corner of the workpiece down (or forward, towards yourself) - we made the long-awaited beak of an owl.
- Fill the body tightly with a stitched padding polyester (foam rubber) to the level of a pin. The body should be round-elongated, almost spherical.
- Pick up and sew lower part owls are the last step of our MK.
- Sew the tip of the corner of part A to the yellow belly (workpiece B) - see fig. 5. We select the threads according to the color of the product.
- Cut out small 1.5-2x1.5-2 cm circles from a white dense fabric - for the eyes. Stick with a pencil or silicate fabric glue. After waiting for it to dry, sew on large black beads or buttons - if there are blanks for toys, great.
On a note:
- To understand the principle, you can cut out the pieces from paper and roll them up, as suggested in the photo.
- What kind of fabric to take for sewing an owl - it can be flax, chintz. But maybe it is more dense, flock or velveteen - the main thing is not to stretch, it allows you to fill the toy tightly. If the fabric with a double-sided pattern is great: you can not be afraid to confuse the front side and the wrong side.
- The eyes are an important element: so that the fabric does not wrinkle, it is easier to stick it on - with textile glue, using a glue stick.
- An ingeniously simple solution can be used differently: increase the size of the pattern - you get an owl pillow in the same 20-30 minutes. And if you reduce it - you get a cute pincushion - experiment.
Again, to begin with, heed the advice: to see how easy it is to sew an owl, to understand the sequence of actions, you can cut a pattern out of paper and repeat the step-by-step MK described above. Believe me, this will make the job very, very easy. According to this principle, you can sew an owl a toy, or you can increase the size and a pillow. You can crochet the blanks using this pattern and the same principle - but that will be a completely different story 🙂
The image of an owl is incredibly popular among needlewomen and there are a lot of different ideas on the network. And this is not casual, because the owl symbolizes wisdom and calmness. Despite the fact that in nature an owl is a predatory nocturnal bird, hand-made owls turn out to be very cute and touching, they create a special aura and comfort in the house. Many would like to receive an owl as a souvenir. Today we will consider one of the options for how to sew an owl from fabric with our own hands, which is suitable for novice craftswomen.
We will sew such cute owls
The toy owl is best made from hard fabrics such as felt, denim- they keep their shape well and give the toy even more realism.
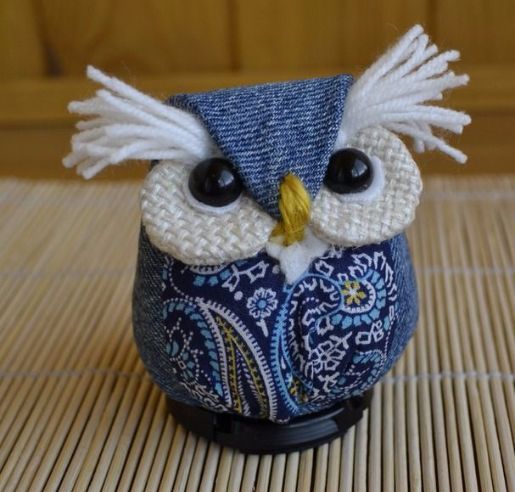
Show your imagination when creating a toy - pick up the most beautiful and vibrant scraps of fabric, unusual beads or buttons, ribbons and yarn to decorate the owl.
Owl pattern

How to sew an owl from fabric with your own hands for beginners


For the bottom of the owl, you need a round base, for example, made of cardboard

Another option for how to sew an owl from fabric:

You will need:
- Thick paper or cardboard;
- large flap of tissue;
- Filler;
- Eye notation;
- Thread, needle;
- Scissors.
You will need a paper segment of a circle with an angle of 85 degrees and another one with an angle of 30 degrees. The radius of both circles of the segments must be the same. You get 2 triangles with a convex bottom made of paper.

Sew the details, you should get a fabric cone like this.

Pin off the top of the cone, about one fourth

Fill the rest of the cone tightly with filler and sew.

Sew the empty tip of the cone to the owl's body - this will be the head and beak

Now we need to make a stable bottom for our owl. Cut a circle out of cardboard, cover it with fabric and sew to the bottom. This will allow the owl to sit firmly on the surface.
It remains only to sew on the eyes and decorate the owl.
An owl is a well-known symbol of wisdom, which has become very popular in our time. You can sew a toy or a pillow in the shape of an owl with your own hands. This is not difficult at all, and even a beginner can handle it. And if you make a high-quality pattern, then such owls, for example, from fleece, can be easily made almost on an industrial scale. In this article, you will learn what you need to make such a toy owl.
Textile owl applique: master class
The simplest owl made of fabric can be done using the applique technique. To do this, take the owl diagram below.
We sew a soft owl pillow - this craft is useful both as a gift and for personal use:
DIY owl pillow: pattern and master class
Such an owl will become wonderful accessory for sleep. To make it you will need:
- cotton fabric;
- pieces of felt of different colors;
- chalk or a bar of soap;
- thread;
- needle;
- scissors;
- owl pattern;
- sewing machine;
- glue (fabric);
- zipper;
- filler.
Stages of work:
- For the owl pillow, draw the pattern on paper and cut it out. Graph paper is best for this, but newspaper is also fine.
- Place the pattern on the cotton fabric and secure it with pins.
- Leaving 1-1.5 cm for allowances, outline the template with chalk or soap. You need to cut two pieces of fabric. For convenience, fold the fabric in half and cut both parts at the same time.
- In the same way, we transfer the template to the tick and cut it out.
- Cut out two circles from felt, which will become the eyes of an owl.
- Next, cut out the beak in the shape of a drop.
- We spread the eyes and beak on the front of the pillow and mark them.
- Sew on these elements with a zigzag machine seam.
- Cut out the owl's cilia from suede or felt fabric and glue them to the bottom of the eye circles.
- Now we take two pieces of cotton fabric and tuck the bottom edge.
- We fix the fold with a basting stitch, and then we sew a machine stitch.
- We mark one side of the zipper. The fabric should overlap the fastener to the teeth.
- We attach the zipper on one side, we sew the zipper to the second piece of the pillow on the other side.
- We turn the cover inside out and put the fabric so that both parts lie exactly right side to each other.
- We overcast the edges of the product and go through the machine stitch. Also, allowances can be sewn with an overlock.
- The cover is now ready. It remains only to turn it back to the front side.
- Next, draw and cut out the patterns of the owl's legs on paper.
- As with the owl pattern, we apply patterns to the fabric and cut out four parts. For allowances, 0.5-1 cm will be enough.
- Fold the pairs of legs with the right side inward. We sweep and sew with a machine seam. Feet can be stuffed or left without filler.
- Next, we apply the finished parts to the front side of the cover where the zipper is sewn, and fix it with pins.
- After that, we sew the paws to the cover.
- Set the cover aside and take two teak blanks.
- We fold them face inward and sew according to the same principle as the cover: first with a basting seam, then with a machine seam. At the bottom we leave a hole for the filler.
- We turn the pillow to the front side.
- We fill it with filler.
- Sew the remaining hole with a blind seam.
- We put on the previously made cover on the pillow. The owl pillow is ready.
Gallery: do-it-yourself owl (25 photos)


How to sew an owl out of felt with your own hands: a master class
To do cute toy from felt in the form of an owl you will need the following materials:
- felt;
- diaper fabric;
- scissors;
- embroidery needle;
- thermal gun;
- fabric marker;
- button or bead;
- filler;
- blush;
- decorative elements.
Stages of work:

DIY owl toy: master class
To make a toy owl, the following materials are needed:
- large scraps of fabric;
- cardboard;
- filler;
- pieces of felt and eye beads;
- scissors;
- needle and thread.