Tilda doll master classes to sew a toy using video and photo tips. Do-it-yourself Tilda - a detailed master class Mk we sew a tilde
Tilda doll is a textile toy that is known all over the world. Tilda dolls are distinguished by their extraordinary simplicity and at the same time charm, evoke only the warmest associations. This doll will serve very a good gift for dear person. We suggest you make a tilde doll with your own hands, because it is much more pleasant to give things that are made with your own hands and with a soul. An article will help us with this, which will teach you how to make a Tilda doll in several versions with your own hands, ideas come immediately with patterns.
We make a cute Tilda doll with our own hands with patterns
Before we start working on the tilde doll, we need to prepare some materials.
- Fabric for the doll (light and dark beige).
- Dress fabric.
- Lace.
- Holofiber.
- Black and pink threads.
- Acrylic yarn for hair.
- Satin ribbon.
- Needles, scissors, thread, tape.
- Sewing machine.
Sewing a tilde doll at home is not difficult at all. You just need to follow our instructions exactly and everything will work out. Tilda doll can become excellent attribute for the interior. It is also interesting to make this doll with children, thus developing their creativity and craving for needlework. The materials are ready, and we are transgressing!
Before starting our work, you need to familiarize yourself with the patterns on which we will sew the tilde doll.

First you need to sew two fabrics that are intended for the body together and transfer the outline of our pattern to the fabric using chalk or a pencil. Attach cutouts with pins.
Then we need to make a line along the lines of our patterns.
We turn inside out our arms, legs and body.
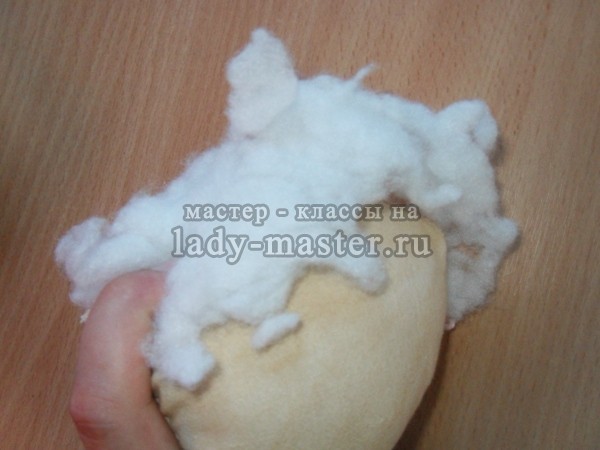
After that, we fill our doll with filler - holofiber. Remember that the doll's knees must bend. You must first fill the leg to the knees, then insert a thick needle and only then continue to fill further. It is unnecessary to fill the legs to the end, it is necessary to leave 3-4 cm so that the chrysalis can sit.
Then you need to get the needle and make a tight line in its place.

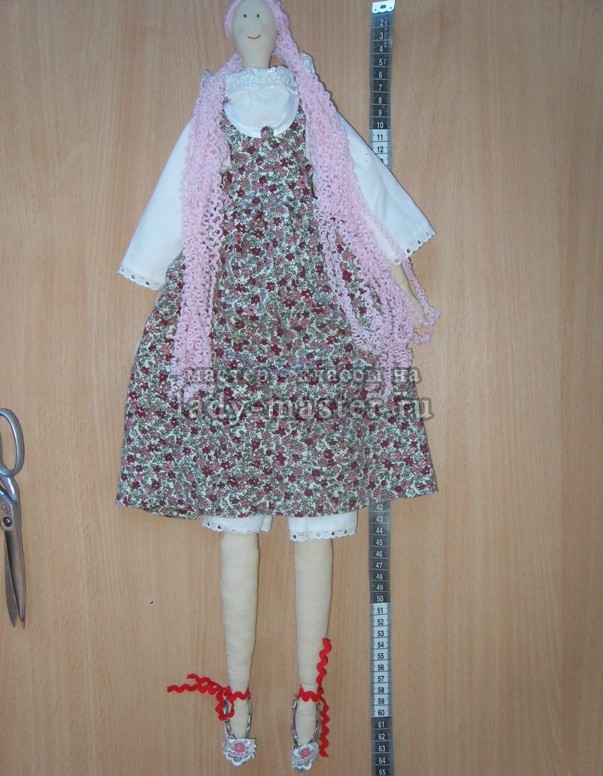
Then we move on to the outfit of our doll. To do this, you need to make a pattern and decorate the bottom of the skirt with white lace.
The top of the skirt must be pulled on a thread and sewn to our doll. The belt of the skirt must be made of satin ribbon. We fasten it with beads and tie a bow at the back. We decorate the sleeves and bust of our doll with lace.

Then you need to fold the hair in half and draw a line along which we will fasten the hair. After that, make a line and attach the resulting wig to the head of our doll.

After that, we begin to make the face of the doll. We outline the eyes with a pencil and sew them with black thread. We leave the knot from the eye on the back of the head. They hide behind hair. In the same way we make a mouth.
Now we braid our doll and weave satin ribbons into pigtails.
Our doll is ready!

Master class on making "Flower Angel" at home
Tilda dolls are very diverse and they never cease to amaze us with their unusual and cute images. For many years now, tilde dolls have been decorating people's houses and giving the interior a sense of peace and comfort. Sewing such a doll with your own hands is not at all difficult. You can choose any fabulous image for your doll. If you want your home to always be bright and cozy even on a frosty winter day, then our master class on creating a flower angel tilde will be very useful to you. Flower angel are very sophisticated, romantic and elegant dolls that will decorate any home and bring love and peace to it. The peculiarity of the flower angel tilde is the wings behind the back. Such a doll will look good on the windowsill among pots of flowers. She will look after and care for them while you are not at home.
Before starting the manufacture of this doll, you need to familiarize yourself with the pattern that will help you create elements for the doll.
- To make a tilde doll, it is better to take a plain natural fabric. Next, you need to transfer the pattern to the fabric using a simple pencil. The fabric needs to be folded in half so that the front side looks inward.
- Then you need to lay a running seam. It should run along the lower body of the tilde doll.
- After that, it is necessary to take and fill the doll with filler, carefully distributing it over the entire body of the doll. When the doll is completely stuffed with filler, you need to carefully sew the product on the sides. The handles of the doll must be sewn almost near the very neck.
- Next, we move on to making clothes for the doll. To do this, you need to take two pieces of rectangular fabric and fold them in half with the wrong side. Transfer the dress pattern to the fabric, sew along the sides. Then put the dress on the doll and carefully sew it to her.
- After that, we proceed to the manufacture of hairs for the doll. Any yarn is best for hair, and the face of our doll needs to be painted with paints and blush. You can attach a small rose to the doll's hair.
The doll is ready!
Video on the topic of the article
At the end of our master class, we suggest that you familiarize yourself with the video guide, which will facilitate your learning. Tilda dolls are great option a gift and a wonderful toy that won the hearts of all children. As it turned out, making a tilde doll with your own hands is not so difficult. A little imagination, sleight of hand and everything came out. Happy viewing!
I first met Tilda a couple of years ago at some needlework forum. This naive rosy-cheeked and so cozy doll fell in love with me at first sight. I generally like everything so unusual, vintage and beautiful. Once upon a time in my youth I sewed toys, so I had a burning desire to try to make Tilda, because there is nothing complicated about it. The main thing is the details and endurance of a unique, characteristic only to her, style.
My first pattern was intended for beginner wizards, but I still use it to this day, having slightly changed and improved the proportions. Large parts are easier to sew than small ones, although longer, especially by hand. Therefore, for starters, it’s worth practicing on tall dolls. How to sew such a Tilda-style Doll, I will tell you now.
Materials for sewing Tilda for beginners
We need a few pieces of fabric different color but must be made from natural fibres. I did not buy anything, everything was found at home in stocks old clothes. For the body and clothes I used cotton - white and in small flowers. The sleeve from an old woolen sweater came up as hair, which I unraveled to get wonderful curls. I also used lace to decorate Tilda's blouse and shoes. As well as two small buttons, braid for the same shoes, two decorative flowers in the hair, a thin white ribbon to stretch into pantaloons. These decorative little things can also be found at home, for example, cut buttons from old things, tear off lace from blouses that have long been boring. For work, you will need white, black and red threads (my Tilda has a mouth), blush, padding polyester, scissors, paper, a pen, pins and a needle.

The working process
1. On paper, wallpaper or newspaper, you need to draw a pattern for the future Tilda. The optimal size for the first experiment from the top of the head to the edges of the legs is 50-60 cm. Cut out the finished pattern.


2. Next, take the fabric from which the doll's body will be sewn. If there is no material of a suitable (dark beige, flesh, light brown) color, you can make it that way. Ordinary white cotton perfectly turns into a pleasant swarthy color if it is soaked for several hours in coffee or thick tea infusion. I used coffee: good effect and aroma.

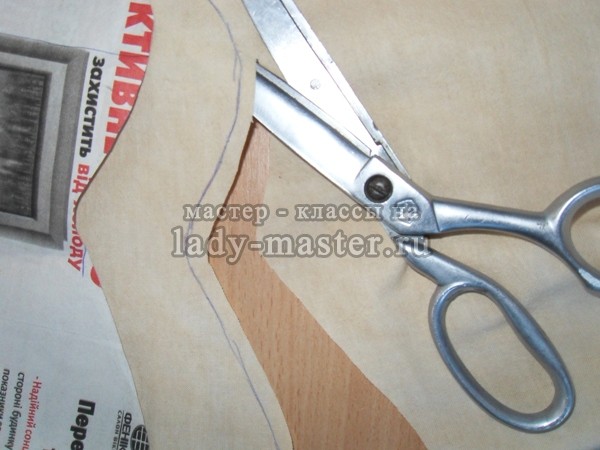
3. All fabrics with which you will work must be ironed so that there are no folds or wrinkles. Lay the pattern on a flat rag cloth and circle it with a pen. Each part requires two copies - back and front.

4. It is necessary to cut the pattern not along the very contour of the pattern, but with an indent of 0.5 cm at least. This margin is necessary so that the edges do not fray after stitching.
5. When everything is already cut, it's time to sew the details. It is easier and more convenient to do this with a regular laying stitch, making small, even stitches and following the lines drawn on the fabric. Leave the bottom of the torso, arms and legs at the bases unsewn, so that later they can be stuffed through the holes with filler.
6. Finished parts must first be turned out. To make it neat, because the neck and limbs are rather thin parts, use a pencil or pen, just stick the blunt edge inside. Carefully and with a moderate density, fill all parts of the body of the toy with synthetic winterizer, after filling the holes, fasten with pins so that the filler does not come out back and it is more convenient to connect everything together.
7. Sew on the arms, sew the legs in a straight line, tucking a little edge on the body so that the threads do not climb and look aesthetically pleasing.
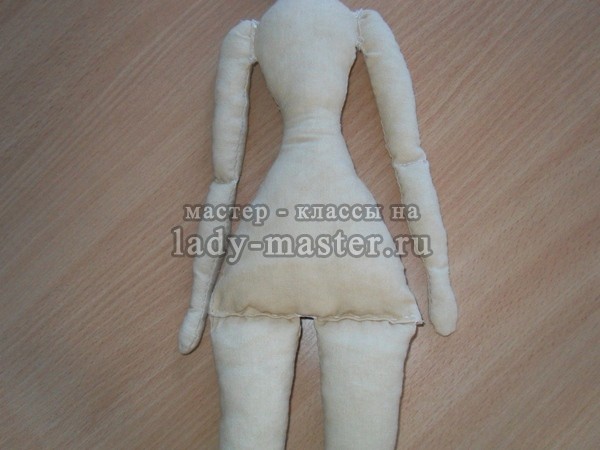
8. In the area of \u200b\u200bthe elbows and knees of the doll, it is necessary to make tightenings so that they can bend (make several even stitches, pulling the thread well and pressing the synthetic winterizer inside).

9. The body is ready, now it remains to dress it and give it a human face. Clothes for Tilda can be sewn according to your own taste. The standard option is a colorful sundress, white blouse and underpants.

10. A pattern for underpants can be made according to the same pattern that was sewn for a doll, measuring the desired length - approximately from the line just above the waist and to the knee, adding in width so that they come out lush, and not tight. Pants are sewn from two identical parts, the upper edge is tucked and hemmed, leaving a cavity inside it, and the lower edges are decorated with lace. Pull the tape through the hole in the hemmed top to fix the underpants on the Tilda figure.

11. A blouse can also be made from two identical halves that are sewn together. I made it a little more complicated - I separately cut a sleeveless jacket with a longitudinal slit on the back for ease of dressing and sleeves for it. Then she sewed, collecting small folds on the sleeves in the area of the shoulders to make them more magnificent. Cuffs and collar, as well as underpants, were decorated with lace.

12. Sundress consists of the top and lower parts. The top is a short top with the same vertical slit at the back, the edges of which overlap each other a little, like the blouse.

Bottom - fluffy skirt a length slightly above the knees, for which it is necessary to take a fabric with a width two to three times the width of the top to make frills during stitching with a connecting buttonhole. When the top and skirt are already together, connect the hem, do not forget to hem the bottom edge.

13. On the back of the sundress there should be buttons for fixing. Sew them on, make and process holes for fastening. The area around the neck can either be hemmed or decorated with a thin light ribbon.

14. Shoes for Tilda are sewn along the leg, or rather the pattern of the legs. Circle only the edges, draw an oval. Leave one in this form, and remove a piece from the other in the form of a v-shaped cutout. It will be top part shoes. Transfer the oval details to the white fabric, and the curly ones to the one from which the sundress was sewn. Cut with an indent and sew along the contour of the sole and toe. When turned inside out, decorate with a small piece of lace and a button in the middle, and attach a ribbon long enough for ties at the back.

15. The doll is already dressed, shod, but faceless and hairless. Cut off a piece from an old knitted wool sweater and start making hair. By unraveling it, you will get a wavy thread. I decided that the pale pink hair color of my Tilda would suit my face, so I chose this one.

When you pull enough threads for a good head of hair, cut them into strands of the same length and sew to Tilda's head in the middle, separating them with a seam in the middle.
16. With black threads, embroider two noticeable points on Tilda's face - these are her eyes. Usually these dolls do not have a mouth, but I decided that my girl would be prettier with it, so I made her a cute smile with red threads. With the help of any blush available in the cosmetic bag, we make rosy cheeks for the doll.

17. The final stage is a hairstyle. Take a couple of tiny decorative bows, ribbons or flowers, divide the curls into two parts and tie two tails.

I got such a slightly modern Tilda, she sits on a pedestal near the TV and decorates our living room with herself.


If you follow my master class, follow the basic principles of work, but do not forget to show imagination, for sure, her sister will appear at your home very soon, just as sweet and positive, and most importantly, made with your own hands and soul.
Tilda doll is a very cute interior decoration. Moreover, the options can be miraculously chosen for any room in the house. Patterns of Tilda dolls are very diverse, but at the same time they have much in common with each other. And although these toys are suitable for children's games, their main purpose is to bring beauty to the interior of our home. Such products are created not only in the form of people. You can find patterns for Tilda dolls for hares, bears, cats, sheep and even geese. The variety of options available is amazing. In addition, more and more new ideas appear in the puppet world.
Do-it-yourself Tilda dolls. patterns
To start sewing a cute toy, you should study the variety of these wonderful creatures available, as well as understand what you need first.
If you have never made Tilda dolls before, patterns for beginners will undoubtedly help. Start from simple to complex. Don't jump right into big projects. Carefully study the options for tailoring clothes, shoes, as well as ways to create hairstyles. If this is your first time starting to master the process of sewing a Tilda doll, patterns with sizes are what you need. They will help to accurately calculate all the details and not be mistaken in the size of individual elements.

What are the toys
Mastering the sewing of a Tilda doll with your own hands, select patterns that are simple and with a small amount elements. The most popular are angel toys. They exist for different rooms. These are the most popular Tilda dolls. Patterns for beginner needlewomen are perfect.

They differ from each other in their design style. Another favorite option for everyone is products such as a snowman and Santa Claus. And don't forget the deer. Patterns of Tilda dolls for the New Year theme are also quite popular among needlewomen. No less popular are "pregnant" toys. They are given to expectant mothers and turned into a kind of talisman. Also, everyone knows delicious snails, bears, cats and hares. When sewing any Tilda doll, patterns with sizes will become indispensable.
Preparation of materials
When choosing a material, it should be borne in mind that such toys are created from natural fabrics. You can use linen, calico, satin, cotton or wool in your work. The body of the doll is usually sewn from fabric dyed natural dyes. It can be tea, coffee or cinnamon. Such material should certainly be dried in an expanded state so that unnecessary streaks do not form. For clothes, use fabrics with small prints so that the patterns match the size of the doll.

In addition, in in large numbers ribbons and lace are used, as well as various sewn-on elements. Today there is a whole Tilda industry. Craftsmen and designers create everything for sewing these dolls, from fabrics to various decorative sew-on elements. Whole sets are also assembled to create one or another toy. They include everything you may need in the process of work. If you have chosen a simple Tilda doll (pattern), a master class on sewing it will come in handy. However, the beauty of the product lies in its simplicity.
The process of sewing a doll
The piece of fabric required in size should be ironed well and folded in half with the front side inward. To sew a Tilda doll, the patterns need to be transferred to the fabric. To do this, they are cut out of paper, pinned to the fabric with pins and circled with a pencil or chalk. After all the details of the pattern are transferred to the fabric, they are sewn along the contour, leaving room for stuffing, and only then cut out. For this, zigzag scissors are often used. If there is no such tool, allowances should be cut in the corners and bends. This is done so that when turning out there are no extra folds.
These pupae are stuffed most often with holofiber or sintepukh. Moreover, the head and torso are stuffed tightly, but the arms and legs are made softer and more flexible. To obtain airiness, the legs, like the handles, are stitched in the area of the knees and elbows. Then it will be easy to give the limbs any position. You can also easily seat your doll in any place. All holes that were left for stuffing are sewn up with a blind seam.

Hairstyle for a doll
A variety of materials are used to create hairstyles for Tilda dolls. It can be wool, thread, yarn, satin ribbons or just natural and artificial doll curls. The boucle yarn is very popular among craftsmen. Hair can be sewn on, glued on, joined with a felting needle, and even simply drawn on with brushes and acrylic paints.
Clothes for Tilda doll. patterns
Every doll must be dressed. Craftswomen dress their Tilds in two ways. One of them involves a one-piece suit. In this case, the doll pattern already includes elements of clothing.
Of course, this option is best suited for thematic and exclusively interior dolls. This is due to the fact that subsequently such outfits are not removed, and it is not possible to change clothes for the doll. If you are going to give such a toy to a child, then you can create additional clothes for the Tilda doll, the patterns of which are developed separately.
Such a doll can be dressed and changed outfits, which will be more interesting during the game than when the clothes are sewn on.

Additional accessories
In addition to clothing, needlewomen often "gift" their dolls with additional accessories. It can be various handbags, hats, suitcases and other little things. For dolls in nautical style often sew small fabric shells or sea stars, and to make them realistic, you can paint on some elements using fabric paints. Accessories are created different ways. Masters resort to a huge variety of creative processes. Modeling, and papier-mache, and wire weaving, and much, much more are used. Everything that is created also has its patterns. For Tilda dolls, they make stands that allow you to fix the product.
Features of Tilda's face
All Tilda dolls are united by a special face. These are two points as eyes and a blush on the cheeks. The eyes are usually embroidered with floss threads using the "French knot" technique, but they can also be painted with acrylic paints or beads sewn in their place. When embroidering eyes, you can leave small tips when cutting threads. They will imitate cilia. The doll's cheeks are created using a brush or sponge, which are used to apply the usual loose blush. If they were not at hand, then you can draw the cheekbones with acrylic paint or use a crushed red pencil lead. If you are sewing animals in the Tilda style, such as a hare or a cat, then using floss threads, you can also embroider a nose and muzzle. Cheeks made with blush are a must not only for dolls, but also for animals too.

The wonderful Tilda doll will easily conquer the heart of not only a child, but also any adult. It will complement the interior in any room. Properly selected patterns of Tilda dolls will help you easily master the entire process of creating such a toy. You will certainly have a great time designing these cute angels, bunnies, cats. You will be happy to select the material so that the clothes for the Tilda doll, the patterns of which are built separately, reflect the entire personality of this toy. By creating such beauty with your own hands, you will give a lot of positive emotions not only to yourself, but also to all close and familiar people to whom you will give your dolls along with the warmth of your hands and wishes.
Tilda dolls have already conquered millions of needlewomen around the world with their cute simplicity. Creating in the same style, craftswomen create truly unique toys. Today's master class is about creating a tilde doll for beginners.
For “real” tildes, special fabrics and accessories are sold in needlework stores, which, by the way, are quite expensive. But for beginners or just wanting to create a tilde for themselves or their friends, fabrics that are on hand or sold at the nearest sewing store are quite suitable.
To sew a tilde doll for beginners, you will need:
white and flesh-colored cotton for the doll;
white cotton for pantaloons;
white lace for pantaloons and dresses;
white organza, tulle or chiffon for a petticoat;
colored fabric in a small pattern for a dress;
sewing threads to match body tissue;
sewing threads white;
mohair yarn for hair;
narrow satin ribbon matching yarn for hair;
synthetic winterizer for stuffing;
paper or cardboard for patterns;
pen or tailor's chalk for tracing the pattern;
stick for turning and stuffing small parts;
cutting scissors.
There are several types of tilde doll figures, we chose a pear-shaped one. Click on the picture to open the pattern in pdf format.
Almost everyone and everyone is familiar with the Tilda doll ... But not all of them know how to sew a Tilda doll with their own hands according to patterns and step by step instructions.
The Tilda doll is most often used to decorate the interior. With their help, it is very easy to create the desired coziness and warmth in the room.
Dolls can look like an ordinary girl (we will analyze just such a pattern in this article), and look like other characters - bunnies, angels, hearts and others.
Beautiful Tildu doll
Many believe that the Tilda doll is a primitive creature in which there is nothing interesting. Actually it is not.
Depending on your imagination, it can take on a simple, sophisticated or rustic look. Boho-style Tilda dolls are especially popular.

Adhering to any step-by-step instructions for sewing a Tilda doll with your own hands, you still will not get exactly the same doll as shown in the picture. Even if you used the same patterns to be presented in the description.
Tilda dolls are just interesting precisely because each of them is individual in its own way. It depends only on the creator what appearance Tilda will acquire - whether it will be a dreamy mischievous doll or a restrained lady.

Tilda doll patterns
What is needed from improvised materials to sew Tilda:
- Pattern.
2. Fabric for the body (length 30 cm, width 125 cm).
3. Nude threads.
4. Cotton wool.
5. Foam rubber.
6. Scissors.
7. Marker (disappearing).
8. Needles.
9. Pins.
10. Rulers.
11. Stuffing and turning tools.
Instruction:
Preparation of patterns. First of all, you need to deal with patterns. Download them to your computer, enlarge if needed, and print.
Photo of Tilda doll patterns
(enlarge by click)


Pattern of details. Once you have your paper patterns, you can transfer them to the fabric. Use a disappearing marker to draw patterns on fabric. You should have the following details:
- torso;
- arms;
- legs.

Tilda (dolls)
Remember to leave some room for allowances (2 cm) and cuts (0.5 cm).
Making seams on parts. The next step in the step-by-step instructions for sewing a Tilda doll with your own hands in accordance with our patterns is making seams on the details. Seams are performed on all the above parts.
Do not forget to bartack at the beginning and at the end of the seam. You also need to leave holes. They will be needed for turning. So far, the doll is on the wrong side of you.


They are placed in the following places:
- on the shoulder;
- at the top end of the leg;
- on the thigh.
For now, don't flip anything.
Seam processing. Continuing our step-by-step instructions for making a Tilda doll with your own hands, we begin to work with seams. Cut the allowances with an interval of 1-2 cm. Turn the details on the face. Smooth them out with a ruler.
Cotton padding. For the hand, you will need foam rubber. It is wrapped on a stick and threaded into the detail. A little cotton wool is also put inside. The part must be filled evenly. In this case, the last 2 cm remain hollow. Stuff your legs up to your knees. Otherwise, the doll will not be able to sit. Be sure to fill the torso.
Hand sewing. Tuck in seam allowances where pieces are not stuffed. Do the same with the turning hole. Use pins to secure your hands. Slightly move your hands forward. Attach the arms to the body with small stitches.

Leg sewing. The open sections of the legs are inserted into the torso. Before that, allowances are tucked. Fix the position of the legs with pins. For sewing, the technique of "stitches over the edge" is used.
Work on the face and hair. To create a hairstyle for a Tilda doll with your own hands, threads of any color are suitable. You can also dress her in a handkerchief so as not to waste time on a hair blank. The nose, lips and eyes can be cut out of fabric, or they can be drawn with a marker or made from beads.

Preparing clothes. The last stage of work on the doll is preparing clothes for her.
How to sew clothes for Tilda?
Having figured out how to sew a Tilda doll with your own hands (step-by-step instructions with patterns are presented above), you should also think about what clothes your doll will wear.
Tailoring is not difficult. Especially if you are doing this for the first time. The only thing that is required of you is the accuracy of the work. Imagine that you are making clothes for yourself. Even though it's just a doll, it still has to look pretty.
The first thing you should pay attention to when sewing clothes for a Tilda doll with your own hands is the fabric. As a rule, it can be sewn from almost any material.


Sew a Tilda doll - patterns
Most often, craftswomen use the following types of matter:
- Linen.
2. Coarse calico.
3. Cotton.
As you can see, in order to make a Tilda doll with your own hands according to the instructions, natural fabrics are a priority. Concerning colors, it should be pastel colors.
One-piece clothes for the Tilda doll are practically not sewn with their own hands. Most often, an “apron” is sewn to it, which can take the form of a skirt with a blouse, overalls or a dress. Beautiful ribbons are suitable for making cuffs.

By adhering to our step-by-step instructions for sewing a Tilda doll with your own hands (look for a pattern in the article above), you can make up to 10 different dolls, each time inventing for them new clothes and looks...