How to make paper barbie food. Food for dolls with their own hands. How to make food for dolls. You will need: plasticine of different colors
Children increasingly want toys from real life: clothes by latest fashion, dolls with human face, analogues of real furniture, dishes, transport. These items help the child reproduce the behavior of adults: hospitality, tea drinking, housework. And you do not need to buy anything, you can do everything with your own hands at a professional level. Today we will look at how to make food for a doll.
What can you make "doll" food from?
It is conditionally possible to divide puppet food into “disposable” and “reusable”. The first options are:
- imaginary dishes: leaves, paper, plants, pebbles and other objects that vaguely resemble culinary delights;
- products: cereals, pasta, noodles, toppings used in games once;
- which can also be lost or deformed.
"Reusable" dishes are made of durable material that does not deform over time. Such food is baked from salt dough, mastic, molded from specially hardened dough and created from threads and beads.
How to make food for dolls without special skills? Pay attention to sewing accessories, where you can find buttons of various shapes. Just saw off the "loop" and get a ready-made set of fruits and vegetables. Or draw the shape of the product on cardboard and glue it with beads of the right color.
How to make food for a doll at minimal cost
The most economical way is to cook dishes from salt dough. This will require salt, flour, water, as well as modeling tools, paints, varnish and sometimes glue with fittings. What is the benefit of the test?
- You can mold a variety of dishes: sweets, fruits, vegetables, meat, cereals, fish.
- The child will be happy to take part in the creation of culinary delights. And raw dough without impurities will not harm if the baby takes it in his mouth.
- The dough allows you to cut out any shapes and lines, and the paints only add brightness.
The process of preparing food from dough is simple. Sculpt dishes, place them on a baking sheet and dry in the oven or microwave. Next, they need to be painted and varnished. In some cases, beads, sequins and decorative trifles are glued for jewelry.
Food can be created whole or cut into pieces. In the latter case, the product must be put in the refrigerator and, when frozen, carefully cut into portions, and only then dried in the oven.
Knitted food for dolls
With your own hands, you can make food differently if you don’t want to spend time kneading, baking and drying the dough. Grab your yarn and hook! Knitted dishes are also suitable for theatrical games with other children. In addition, they can be washed when dirty and put back into the game.

How to make food for a doll with thread? Take real products for the image, then pick up the yarn and “copy” the shape of the fruit or dish with a crochet. For example, how to knit a scrambled egg:
- start work with two yellow circles;
- fill with padding polyester and sew them together;
- from the resulting yolk you knit the protein.
Or we start knitting ice cream from the bottom of the cup, then by decreasing and adding loops we create a “waffle” and “ice-cream” wavy shape. The last step is to fill the product with padding polyester and close the last rows.
According to the same plan, you can knit fruits, vegetables, cakes, cakes, sausages, chicken, chop. The advantage of large knitted products is that small children will not swallow them and injure themselves.
The harm and benefits of "doll" food for children
Wishing children well, parents create chic miniature culinary masterpieces. However, such foods can be harmful to young children. How? Paints and varnish add shine and brightness to products and cause an irresistible desire to eat them. Toddlers are not aware of the danger of small parts and swallow them, resulting in the need for medical attention.

Therefore, for babies, it is better to create large products with a developmental bias. How to make baby doll food? For example, tie pea pods to peas of different sizes. As a result, the child learns to unfasten and fasten the pod, separate the Velcro peas, learn color, size, and count with them.
Big kids need small, real foods to help them “get used to” playing roles. They are especially actively used by psychologists in educational institutions when dealing with family conflicts. Therefore, create all kinds of educational dishes for kids, and create miniature culinary masterpieces together with older children!
The little owners of the crowd of dolls do not lag behind their mothers-needlewomen and all demand for their "girls" either new clothes, or furniture, or ... food. However, the mothers themselves are seriously interested in either collecting dolls, or creating a doll miniature, or both at once. We bring to your attention a master class on making food for dolls, namely, small jars with preservation!

To make food for dolls - miniature mushrooms, tomatoes and cucumbers - we need the following materials:
glass jars;
polymer clay (white, brown, red and light green);
dry pastel;
thin rubber bands for hair;
thick paper;
Super glue;
sandpaper;
clear varnish or epoxy;
dry dill;
black peppercorns (small).

Food for dolls: job description
Let's start with making mushrooms: knead white and brown polymer clay well, and roll thin sausages out of it.

Cut the sausages with a knife into small pieces.

We roll balls from brown plastic and form hats from them for future mushrooms.


We also roll balls from white plastic, give them the shape of a droplet - these will be the legs. We spread the blanks on the glass, on which we will bake the products in the oven. Foil can be used instead of glass.

Now knead the red plastic for the tomatoes. We roll out the sausage a little thicker than for mushrooms. Cut into small pieces different size(small and large tomatoes).

We roll balls. To give them more natural look, “draw” the ass: break off the tip of the toothpick, dip it into the green pastel chopped with a knife and slightly press the middle of the future tomato.


To make cucumbers, we roll out light green polymer clay. Cut into small and large pieces.

We give the plastic the shape of a cucumber, imitate a rough surface with a toothbrush.

We tint the cucumbers with crushed dark green pastel. Leave the ends light.

Well, what kind of preservation without garlic - especially if it is food for dolls! The cloves are made very simply - cut a ball of white polymer clay into 4-6 parts, depending on the size of the slice that we want to get.


We send the glass (foil) with all the blanks to the oven and bake according to the instructions indicated on the packaging of polymer clay. Usually the temperature for baking is 110 - 130 degrees.

Baked products harden and become like plastic. We collect mushrooms from two parts. We grind the leg with sandpaper, glue the hat to it with superglue.


And now the most interesting thing - we fill the jars. Put garlic on the bottom, you can add dry dill and small peppercorns. Next - cucumbers, tomatoes, mushrooms; Top with chopped dry dill again.


Filling the contents of the floor clear varnish. You can also use fimo gel (requires re-baking the product) or epoxy.

Glue the plugs with superglue. Cut off the loop with a knife.


We cut out small squares from thick paper, cover the jars with them and fix them with rubber bands.


Everything, miniature food for dolls is ready, we send jars to Dollhouse. If you do not cut the loop on the cork, you can hang the preservation on a keychain.


Even in handicraft stores, you can buy ready-made fruit canes made of polymer clay, cut them, put them in jars, fill them with epoxy - and get jam or compote. It is easy to make other sweets that you see in jars here in the photo. And if we are talking about larger dolls, for example, Baby Bon, you can offer them more substantial food - for example,.
Irina Golub specially for the site
How to cook salty dough for modeling.
We take: 1 cup of premium flour, 1/2 cup of fine salt (not iodized!), ¼ cup of very cold water. Mix flour and salt in a bowl. Pour water in small parts, kneading the dough well each time. The amount of water can be different, it depends on the properties of the flour, so water should be poured in small portions. Knead until the dough crumbles and sticks to your hands. It will turn out very similar to plasticine. Store the dough in a closed container or bag so that it does not dry out in the refrigerator. Shelf life is three days. To keep the dough longer, you can add 2 tablespoons of citric acid during kneading. (UPD- Looks like lemon acid somehow interacts with varnish for children's creativity, the first time I did it without it and the varnish was transparent, and now it is some kind of whitish.)
How to color the dough.
You need to take a small piece of dough, make a cake and put a little gouache in it. Knead this piece until the dough is evenly colored. You can first mix the color on the palette, and then color the dough. But it is much more convenient to color the dough with the main colors, and then mix the already colored pieces until the desired new colors are obtained. For sculpting food, it is very important to repeat the color of what we are sculpting as accurately as possible.
For example - sausage color = pink + a little brown
pink = lots of white + little red
To sculpt food, you will need the following colors - white (a lot), pink, sand, brown, yellow, orange, green, red. And be sure to leave part of the test unpainted.

We sculpt almost like from plasticine. We take out the dough from the container in small pieces so that it does not dry out. If the dough is still dry, add a few drops of water. If wet, add a little flour. You can also dust your hands with flour. To glue individual pieces of dough, moisten the junction with water using a brush. We use improvised materials for modeling - a garlic press, a strainer, toothpicks and more.
How to blind:

Broccoli
Let's see what broccoli looks like. Mixing three green shades. From a piece of the lightest shade we sculpt a sausage, divide it into small segments - these are broccoli legs.
We squeeze our dough through a kitchen metal strainer, we get an interesting texture. We moisten the leg with water and “glue” on it what was pushed through the strainer.


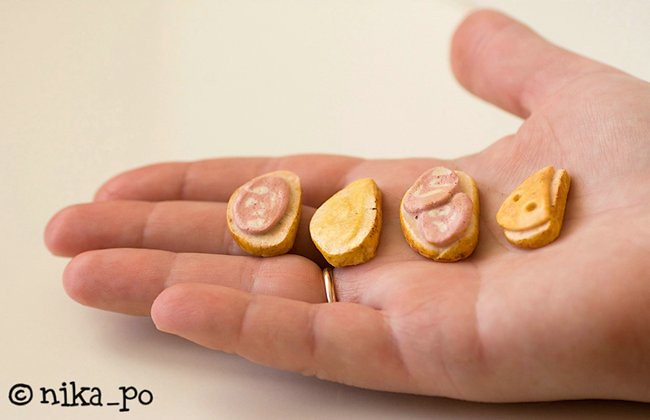
Sausage
We make a thin cake of sausage color. We lay thin strips of white dough on it. We turn the cake, roll it a little in our hands and put it in the refrigerator for a while. When it has cooled, cut the sausage into slices. We saw, but do not squeeze the dough.

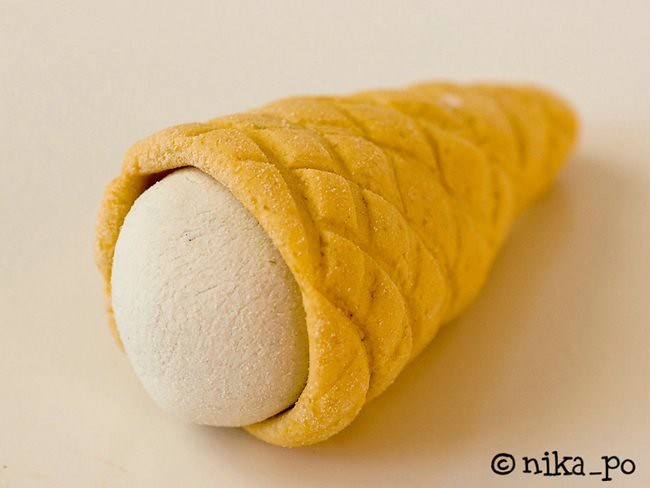

Ice cream
We make a sand-colored cake, a ball and a cone of white. On the cake, with the back of the knife, we squeeze the cells, like a waffle. Let it lie down a little, dry a little - a piece that is too soft cannot be wrapped like a waffle. We make ice cream from white parts and wrap it in a waffle.

Cheese
Cheesy color = yellow + a little orange.
We make a cake, cut off the excess to make a triangular slice of cheese. With a rod from the handle we make holes, large holes with the back, small holes with the nose of the rod.

Bread and other dough products
We sculpt pieces of bread from uncolored dough, pies can be sculpted from uncolored dough or from sand-colored dough. We tint already completely dried products with crayons of oil pastels for children's creativity - we make a golden crust.


It is better to dry finished products simply in the air, on a smooth surface - for example, on a plastic file or oilcloth. When the top dries, turn over to dry the bottom.
When drying, the products turn a little pale, they must be covered with any varnish. It is better for children to use a special water-based varnish for children's creativity - it has no smell.

Yet
You can make a completely liquid dough (add water) and spread it. So you can depict butter on a sandwich or chocolate icing.

In order not to confuse with the sizes, it is good to try on while sculpting to the plate from which the toys will then be eaten.


We got to dessert.


Enjoy your meal:)
They became incredibly popular a few years ago and every year they have more and more fans. These toys are collected by adults, children also enjoy playing with them. For monster dolls, young housewives build entire play houses with furniture and all the necessary little things. A popular question among toy fans: how to make food for Monster High dolls with your own hands from improvised materials? We bring to your attention a selection interesting ideas and mini master classes.
Materials and techniques for making miniatures
The easiest way is to make food and other little things for dolls using the modeling technique. Any plastic material will do. With children, it is easiest to make similar or plasticine. Teenagers and adults can try making food and utensils for dolls out of polymer clay. Do-it-yourself Monster High, if you have never worked in the miniature technique before? Experienced craftsmen in sculpting small items use not only their own hands, but also auxiliary accessories. It is most convenient to have a set of special figured spatulas on hand. But if you don’t have such tools, it’s okay - they can be replaced with improvised items. Take a pen rod, a few felt-tip pens of different cuts, plastic cutlery and any other household items that can leave marks on plastic material, give it the desired shape.
Plasticine vegetables and fruits

How to make food for Monster High dolls from plasticine, where to start? Try with creating products that are simple in form. Even a child can handle sculpting fruits and vegetables. You can make balls from red plasticine - tomatoes or apples, decorate them with small leaves. "Sausages" from green will become cucumbers. It is not difficult to make bananas from yellow plasticine. Gradually move on to more complex shapes, try making pears, eggplants or grapes.
“Cooking” complex dishes
We figured out how to mold fruits and vegetables, but is this Monster High food? From plasticine, you can mold a miniature of any shape, modern manufacturers also delight with a variety of colors. Monster High dolls are notable primarily for their aesthetics. This series depicts the children of famous monster characters. And each doll is made in its own style, has its own tastes and history. Cakes in the form of skulls, or a coffin-shaped chocolate cake will be an appropriate addition to such toys. In their kitchen, Monster High will cook food that will definitely look unusual. How to fashion such dishes and products? Miniature products of complex shape can always be cut from a rolled plasticine layer of suitable thickness. By improving this technique, you can create real masterpieces - for example, puff cakes or pizza.
For play or love?

Food for dolls is ready, but what to do with it next, can I immediately proceed to the game? Attention: many types of plasticine retain their plasticity for a long period of time even in the open air. And this means that your crafts may turn out to be short-lived or even spoil something badly in How to make food for Monster High dolls that you can play with? If you sculpt from plasticine - cover ready product transparent nail polish or furniture in several layers. Products made from puff pastry are dried in the air or in the oven. After that, they can be painted to your liking and also varnished.
Paper food and kitchen accessories

An interesting idea is to try filling a doll fridge with paper miniatures. Using the appliqué technique, you can also make a variety of pies, and if you use corrugated cardboard, you will get an excellent imitation of puff cakes. Go to your kitchen and look at the filling of the refrigerator and cabinets. Surely you will see a lot of cardboard and plastic packaging. You can repeat them in miniature, also using paper as a starting material. It is not difficult to glue simple boxes out of it, then just paint them and dry them. If making doll food from scratch seems too complicated for you, you can try to look for ready-made kits for factory-made creativity on sale. Often they are called like this: “Dinner for a doll with your own hands”, “how to set the table for Monster High”. How to make food with your own hands using a ready-made kit? Instructions are included with the toy. Most often, the set includes blanks and paints for coloring them, sometimes it is proposed to mold some kind of object with a complex shape from plasticine matched by color. Try making products for dolls in various techniques and very soon you will be able to organize a real feast for the whole doll family.
Perhaps any girl should know how to make food for plasticine dolls in order to arrange doll parties and tea parties. Making plasticine food is interesting and exciting. The very occupation of modeling can be turned into a game. Creating plasticine food will help not only decorate the doll table and make the game more interesting, but also develop hand motor skills, give room for imagination and aesthetic taste.

Plasticine for modeling is suitable for anyone. In order for food to retain its appearance for a long time, it is possible to sculpt from special masses for modeling, for example, from colored polymer clay that hardens in air.
Let's start sculpting
For Monster High dolls, popular today among children and adults, you can make barbecue, donuts and fruits. Some girls collect these dolls, create houses, spaces for them, make furniture, clothes and shoes, so the food modeling workshop may also be of interest to collectors.


It is very easy to make a barbecue with plasticine kebabs. For this you will need:
- gray, brown, pink or white plasticine;
- matches (7 pieces);
- a small box (for example, from perfume);
- stacks;
- modeling board;
- napkins.

Progress:
- We prepare the box (cut off the excess, cut out the recesses for the skewers) and knead the plasticine;

- We roll out the plasticine into a thin cake and wrap the box;


- We make the legs: we spread a small layer of plasticine on each match, smooth it so that all the legs are the same;

- We assemble the brazier completely (we insert the legs);

- We make skewers: cut brown plasticine into small pieces, make cakes from pink or white plasticine;

- We string the prepared pieces of plasticine onto matches, alternating them with cakes (“onions”);

- We place ready-made skewers on the brazier, inside the brazier you can put pieces of black and red plasticine (“coals”).


Here is another option for creating a brazier from cardboard and toothpicks (you can not glue it with plasticine):

Plasticine donuts are beautiful and appetizing.

The following materials are required:
- plasticine yellow, brown, black;
- modeling board;
- tools;
- hand wipes.

You can also use blue plasticine and white flowers for "icing" or orange for a browned look. It all depends on your imagination: a donut can be decorated with “chocolate”, “vanilla” icing, “confetti” or berries.
Progress:
- Mix yellow and brown plasticine to get the color of the dough;

- To create two types of donuts, roll up a small sausage and a ball, which we press on top to make a cake;

- We glue yellow plasticine on top of the sausage and the cake;

- We collect the sausage into a ring, coat the seams, and push the cake in the middle with a felt-tip pen or other suitable round object;

- We decorate the "donuts": we will make a thin sausage from black or brown plasticine and glue it on top in a zigzag pattern, we will make purple (or other color) berries and confetti.

Baked goods can also be used to make cakes. Just follow the instructions below:

From fruits we will make a bunch of bananas and a watermelon.


To sculpt bananas, you will need yellow and yellow plasticine. Brown color, board and tools for modeling.

Progress:
- Cut plasticine into small pieces and roll balls out of them;


- We make sausages from balls: they should be short and pointed at the ends;

- We bend the sausages a little and collect them in one bunch, put shorter “bananas” on top;

- Glue small brown dots to the ends of the sausages;

- We crush the beam at the base with a finger or tools and glue a brown strip of plasticine.

Bananas are ready!

Watermelon is made from black, red, white and green plasticine. To begin with, we make black thin sausages - these are future bones.

Then we put one sausage in the middle of the rolled out piece of red plasticine.


Fold in half and lay the "bones" again.


We bend the red plasticine in half and form a ball.

We wrap the "pulp" in white, and then in green plasticine.


We make stripes.


You can also make pizza for Monster High.
To do this, you need yellow or orange plasticine for the base and multi-colored plasticine, depending on the “ingredients”.


Progress:
- We sculpt a test base from orange or yellow plasticine (you can mix brown and yellow). To do this, roll out a round cake from a plasticine ball. To make the pizza look lush, you can wrap the edges with sausage and smooth the seams or use your fingers to make the sides of the cake.

- “We coat” the base with sauce: roll out a thin layer of a red ball of plasticine according to the size of the cake and spread it on top. You can also use white clay.

- We sculpt the ingredients: tomatoes, onions, sausage, olives, peppers and whatever we want.

- We lay out the ingredients in layers or simply in a chaotic manner on the base.


- From above, you can sprinkle with "cheese" - finely chopped pieces of yellow plasticine.

The pizza is ready.

A tea party for Barbie will be decorated with a beautiful plasticine cake.


First, a small cake is rolled out. Balls of orange or purple berries are laid out on it. Strips are cut from a thin sausage and stacked crosswise on top. A pigtail of two intertwined sausages is glued around. The pie is ready!


Ideas for creating doll food from plasticine can be noted from the selection of videos below.
Video on the topic of the article