How to felt wool toys for beginners. Master class for beginners: felting from wool, clothes. Detailed instructions, recommendations. Wool felting: toys for beginners
What is felting and what types of felting are there? Let's try to answer this question in more detail. In the Stone Age, people noticed the ability of wool to fall off. Today, felting (stuffing, felting, felting, felting) is again becoming a very popular type of needlework. The simplicity of the methods used makes it accessible to everyone. Even a beginner can create designer clothes, toys, accessories or interior details. They emphasize the individual style and taste of the owner.
Two main types of felting, dry and wet- based on the property of natural wool fibers to tangle with each other and compact, forming a single canvas. In both cases, combed tape (Merino wool) is used as a consumable. In the process of dry folding, wool lumps are repeatedly pierced with special needles, which contribute to the adhesion of the villi to each other. In this case, a three-dimensional product is obtained: a toy, a souvenir or jewelry. This technology also allows you to apply a pattern and decorate ready-made things.
Technique wool felting is also called felting and felting. It is used to create various decorative products from unspun wool. For example, using felting, you can make parts of clothing, toys, jewelry, etc. Felting is performed only from natural wool. The most successful choice for felting will be mohair and alpaca wool. The rest of the yarn may not fit. Therefore, before you start felting, you need to check the suitability of your chosen yarn. Take a small piece of thread, crumple it in the palm of your hand, add soap and water, and rub it in your hands for some time. Then rinse thoroughly and rub again. If five minutes later the yarn begins to shrink and cling to the fibers, then this means that it is suitable for felting, otherwise select another yarn.

Wet felting involves the use of a soapy solution and straightened strands of wool. In warm water, light massaging movements achieve the connection of individual layers into a common canvas. It is clear that the product turns out to be flat, and clothes, a blanket or a panel can be made from it. Recently, nuno-felting (from the Japanese “nuno” - fabric) has become very popular. This is a type of wet felting that combines traditional wool with thin or loose natural fabrics. The new kind fabric makes it possible to create scarves, shawls and other designer products.

Technology Secrets
The main thing that is needed for dry folding is a combed tape and a set of needles. In order not to get hurt during work, the future creation must be kept on the basis: a thick sponge made of foam rubber or a special brush. In order to save expensive consumables, the inner frame is made of cotton wool or synthetic winterizer.
For this type of needlework, needles are used different in shape and thickness, as well as in the direction of the notches. Such a tool can be in the form of a triangle, a four-sided star or a crown, twisted or reversed. At the thinnest needle, the diameter of the working part is 43. It is used at the final stage of work. The thickest tool with a diameter of 19 is used at the very beginning of felting. If there is a large amount of work to be done or you need to speed up the process, then a holder pen for 4-7 needles is used.
For wet felt, in addition to the wool itself, you need:
- Soap solution (from any bar or liquid soap).
- Mesh (for plaster, anti-mosquito, from fine knitwear or tulle).
- Mat (grooved rubber, bamboo or packing tape with air bubbles).
The wool is carefully laid out on the rug. The first layer is the base, then the background and the top layer is the drawing. In the process, wool shrinks, so initially the size of the product should be approximately 25% larger, and the thickness should be 4 times higher than planned. The fibers are evenly laid crosswise without gaps, and covered with a net on top. It will prevent the pattern from spreading and help fix the layers. The product is moistened with a warm solution (you can use a spray bottle) or gently rubbed with soap.
At the initial stage of felting, movements should be very careful. “Light massage” with hands or a vibration grinder should be gradually increased. To make your hands glide better, you can wear cellophane gloves. When the mesh moves away from the fabric, it can be removed, turn the wool over and continue folding. Wool can be wrinkled, wrapped and kneaded like dough. Ready felt must be rinsed and dried without squeezing in the unfolded form.
Needles for dry felting are made of steel. Due to this, they do not bend during operation. When you stick the needle into the wool, the notches on the underside of the needle engage the fibers of the wool and push them down into the layers below. This results in entanglement of wool fibers.

At first glance, wool felting for beginners may seem like a rather complicated process, but it is not so - it is enough to have patience, a little skill and choose the right technique.
Wool felting techniques
There are 2 main techniques for felting wool, the process for creating products for which is fundamentally different. That is why it is difficult to say which style of felting is easier for beginners to master - here everyone chooses what he likes.
Wet felting
It was wet felting from wool that gave the name to the technique of creating warm products.
A piece of woolen material must be wetted with a simple soapy solution and begin to roll the product in your hands, giving it the desired shape. Since the wool decreases in size during felling, it takes 2-3 times to work. more material than the size of the future product.
There are 2 ways of skating: in the first one, a wet ball is skating in the hands, which results in voluminous crafts. In the second, the wool is laid out evenly in a thin layer on a bamboo rug, moistened with a solution, covered with a film. The resulting workpiece must be rolled into a roll of medium density and rolled for a long time, gradually increasing the pressure of the hands.
The latter method is used more often - it allows you to make beautiful bright matter with the effect of a marble color transition, sometimes it also looks like a patchwork technique. However, wet felting for beginners is better if you work with bulky figures.
In this style, it is customary to create paintings, clothes, bags, scarves and capes, accessories, jewelry.
dry felting
Dry felting is done in a completely different way. Prepare a ball of wool and roll it a little between your palms, giving it the desired shape. Take a special needle with notches and start poking it into the ball often, often - this tangles the wool fibers inside the ball, fastening them and compacting them.
You can understand that the part is already ready by slightly pressing on it - workpiece desired density will return to the shape that you gave it before squeezing. Further, the fibers will no longer be confused, but torn.
Dry felting from wool is used to create volumetric figures of animals, fairy-tale characters, people - they can be used as ordinary figurines or toys.
Felting wool for beginners always seems to be a very long and laborious task. However, the result of each lesson pleases and makes needleworkers continue to create amazing woolen works.
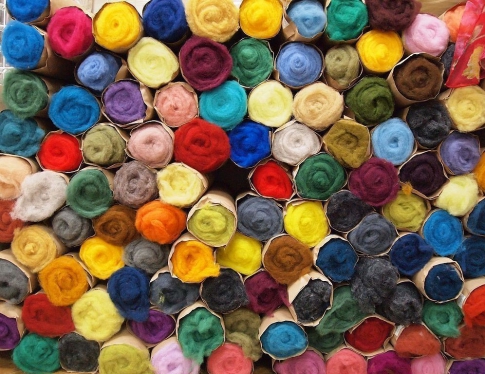
Wool for felting
Even for beginners, it is no secret that the felting technique chose wool as the main material. It comes in different textures, densities and colors, and each variety is used for specific purposes.
Tops
Tops wool, or comb tape, is of the highest quality - it is actively used in both wet and dry techniques. The material is well combed, the fibers are soft and lie in one direction. It is also called spun wool.
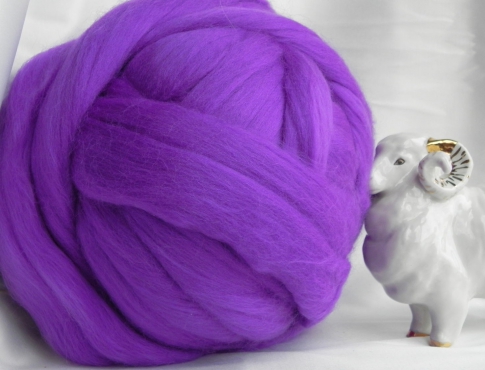
In its raw form, the blank is similar to a woolen ribbon, from which you can tear off shreds.
wool wadding
Another type of wool is called carded wool due to the large brushes (cards) with which it is combed out. Unlike tops, the fibers in carded wool are multidirectional, and the material itself is more like cotton wool.
Such wool is cheaper than comb ribbon and therefore suitable for beginner needlework. Properly made products made of woolen wool look no different from tops.
Sliver
This is the name of combed, cleaned, but not dyed wool, which is used as a base - if you make the whole toy from tops or carded wool, too much expensive material will go away.

In addition, this variety is specially designed to serve as stuffing - it is denser and therefore holds its shape better.
Tools for the job
Special devices are needed mainly for dry felting. Wet felting wool involves more work of fingers and hands than special accessories.
Needles
Dry felting from wool, as a rule, is performed using special needles in the form of the letter L with notches on the tip - they tangle the hairs of wool, compacting the material and forming a certain thing out of it.

For beginners, it is very important to remember the classification of needles by number:
- No. 36 - the roughest, used at the initial stage of material processing;
- No. 38 - thinner, the main felting is performed precisely by this number;
- No. 40 is the thinnest needle, which is used to process small details, decorative elements.
In addition, there is a needle with notches directed in the opposite direction - it does not dump, but draws out the fibers, and is suitable for giving fluffiness to toy animals.
Felt machine
Automatic alternative to the needle - can hold up to 12 or more needles in the nozzle! It is understood that the device allows you to speed up the processing time of the product several times. Such a device is especially useful when working on flat things.
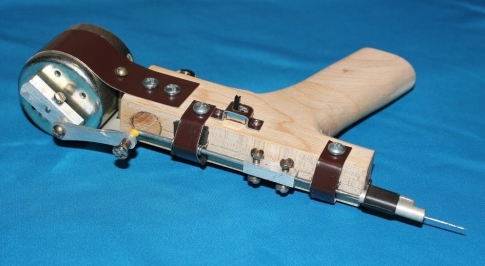
However, before buying it, you need to get used to working with needles and practice well - this is especially true for beginners.
Substrate
In other words, the rug you work on. Its presence is important for several reasons:
- due to the hard surface under the work, the needle can easily break or bend;
- it is also inconvenient to hold the product on weight - you can accidentally pierce your finger.

It is not necessary to buy a special substrate - instead, use foam rubber washcloths, thick hard brushes, felt mats or foam blocks.
Beginner Tip: Felt counts best material! It doesn't fluff the bristles like brushes, it doesn't leave pieces of foam rubber in the work, and it doesn't make nasty sounds when pierced like foam.
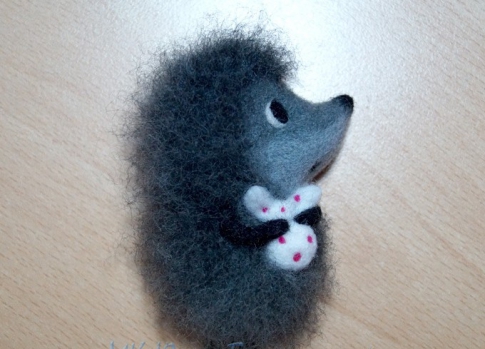
Master class: do-it-yourself hedgehog
Below is a master class on dry felting for beginners - you can make a cute brooch in the form of a hedgehog from the cult cartoon "Hedgehog in the Fog".
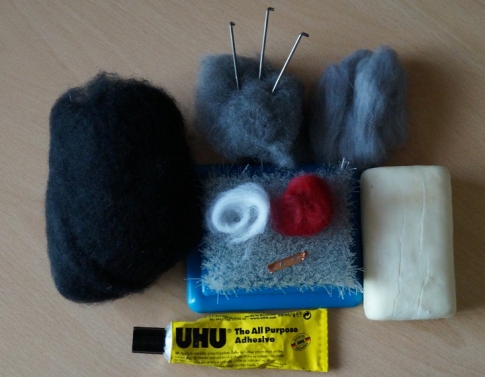
You will need: black, dark gray, light gray, white and red carded wool, needles of all thicknesses, brooch clasp, Moment glue, soap and hot water.
When creating some small details, wet felting from wool was used.
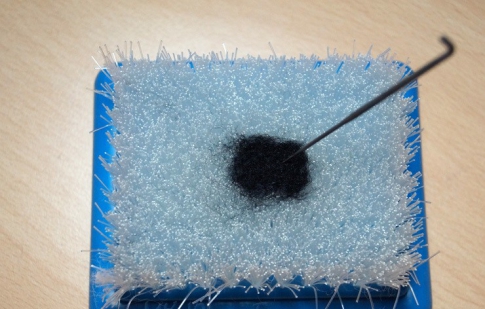
- Lay a small ball of black wool on the backing and sew along the entire length with a size 38 needle.
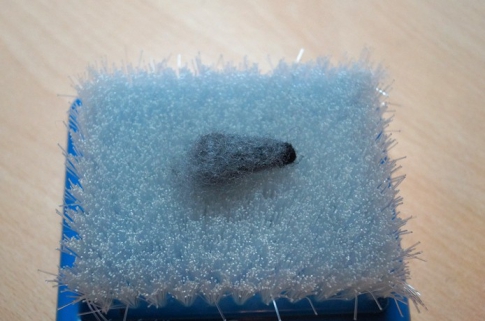
- Roll the part into a roll, put it back on the substrate and let it go.

- One side of the foot should remain fluffy, do not touch it.

- Wet the workpiece completely in warm water. Lather your fingers well and begin to gently rub the foot from all sides.

- Now put the “sausage” on the palm of your hand and roll it, covering it with the other palm on top.

Rinse the workpiece in clean water and send to dry. Similarly, make all 4 paws: longer - legs, a little shorter - handles.
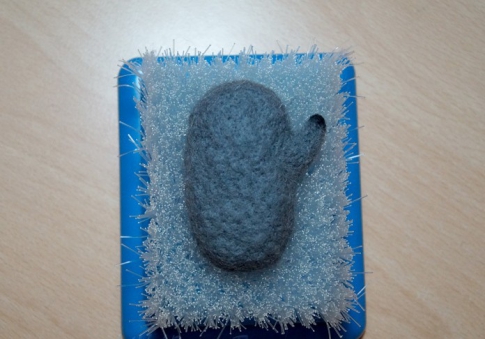
- Prepare a ball of black wool about 10 centimeters long, 3 centimeters high and thick. Lay it out in the form of a flat oval on the substrate. You can choose other options, but remember that the material will decrease by about a third in the work.

- Start felting the product with a needle number 36, moving over the entire area of \u200b\u200bthe oval. Stick the needle in the center at a right angle, decreasing it towards the edges.

- When the ball turns into a dense, plump oval, wrap it with dark gray wool so that the black color does not show through it.

- At this stage of work, use a needle number 38. Stick it not so deep - the black layer is already quite dense, you need to fill the gray wool.

- When the torso is ready, take care of the nose. Lay a small triangle of dark gray wool on the backing and work it with a size 38 needle.

- Roll the workpiece into a roll and go through the needle again, leaving a wider edge fluffy.

- Now work out the base of the triangle - as a result, you will get a cone that is dense on all sides. Roll a small black piece to the tip of the cone - this is the spout.
- Attach the nose blank to the body and roll it, working with a needle from all sides at the base.
- If the shape of the nose or torso does not suit you, you can always correct it by rolling a piece of a suitable color in the right place.
- Take a flat small piece of light gray, straighten and roll under the nose, marking the mouth area.

- Now grind the product - stick the needle shallowly and as often as possible. Each puncture should be as close as possible to the previous one.

- From a tiny black piece, roll an oval and fasten the eyes in place.

- Lay the white color around the black oval and fix the protein around the pupil.
- Make a mouth in the same way.
- Roll up small ball white color, screw it with a No. 38 needle. Fasten it to the hedgehog with the same needle. Roll small white “petals” on top - you get a road knot.

- Fasten the handles on top of the knot.

- The legs need to be fastened by attaching the free side to the "back" of the brooch. WITH reverse side hedgehog, make a recess for the fastener - often go through the needle number 36 in the right place.
- Place the clasp in the recess, cover with a pre-felted rectangle of dark gray wool on top and fasten with a No. 38 needle.

- Use felting to decorate the knot with small red peas - this can also be done using beading.

- Go over the entire surface of the brooch with a needle with reverse fibers. Stick it not very deep, but often to get fluffiness - hedgehog spines. Leave the muzzle and knot smooth.
Remember that even for professionals, felting one product from wool takes from several hours to several days, despite the fact that the work progresses easily. In this case, the main thing is to be able to wait and watch how a wonderful little animal emerges from a simple piece of wool!
Another simple tutorial for beginners you can learn from the video - here you can see how to make felting a flower from wool.
Do DIY toys- this is an extremely exciting activity. One has only to try once to make some kind of doll or animal, and you already understand that this toy is by no means the last one. I bring to your attention dry felting master class Bunnies named Victoria.
Materials and tools for felting.
- Felting wool (Australian merino): gray, white, pink and red. The colors suggested here are by no means dogma. You can use any you like.
- Trinity wool.
- Felting needles: No. 38 (for forming parts of the toy), No. 40 (for smoothing the surface), reverse needle in order to make the toy fluffy.
- Sponge for felting.
- A small button (we will use it to fasten the head).
- sewing needle soft toys. It can be purchased at craft stores.
- Scissors.
- Threads for attaching legs and head.
We will first dump all the details of the toy from Trinity wool. It's cheaper than the one we'll be using to roll the surface. Take a bunch of medium-sized wool for felting the head of the toy. In the photographs, I tried to capture not only the materials, but also the hands, so that you have an idea of the size of the tufts of wool and details.
Using a needle number 38, give the head the desired shape.

Using a #40 needle, smooth the surface of the toy's head. On the front side, make the head flat, as shown in the figure:

Take a small bundle of wool. The photo shows what the beam should be relative to the head.

We roll this bundle of wool to the muzzle of the toy, we form cheeks.

The finished muzzle looks like this:

Now take a small amount of gray wool and roll the surface of the head, thus cutting it in grey colour. Roll the cheeks with white wool.

Now let's take a look at the body. Take a bunch of Trinity wool, give it a cone shape with your hands.

On the sponge, using a No. 38 needle, we begin to form the body of the toy. As soon as the tuft of wool begins to take the necessary shape, change the needle to #40. I noticed that when you felt with a thick needle, a void forms inside the mold, a bag is obtained. When working with a thin needle, this does not happen and the work looks much neater.

Repeatedly poking in the same place, we form recesses for the paws and head of the toy.

When the shape of the body is ready, roll it with gray wool.
Now back to the muzzle. Take a small bunch of pink wool and roll a small ball out of it on a sponge. This is the future nose of the bunny.

Roll this ball to the muzzle of the toy:

Now that we have the head and torso ready, we will make the articulated mount. Now in needlework stores you can buy real hinges, like those used in toy factories. But we will use an ordinary button as a hinge. Pull the thread as shown in the photo:

In the head of the toy, at the junction with the body, make a small depression, in other words, poke it many, many times with a felting needle. Place a button in this recess. The thread that is threaded into the button should be long enough.
Take a small bundle of gray wool and use it to roll the button, thus securing it on the head. Leave the ends of the thread outside.

Just as you made a recess for a button on the head of a toy, make notches on the torso at the place where the head and paws are attached.

Using a needle, pull each end of the thread through the torso.

After pulling both ends of the thread through the body, pull them and tie a knot, thereby securing the head of the toy.

Using a small bunch of gray wool, mask the ends of the thread.

Now let's take care of the muzzle. Let's make eyes. For this purpose, you can use small black beads. Ready-made eyes can also be purchased at needlework stores. For this bunny, I made the eyes myself. How? Yes, very easy! I'm sure you can do that too. I have a whole briquette of self-hardening clay. It is not plastic enough to sculpt toys or things with small details from it, but you can make small cakes for the eyes from it. Tear off a small piece of clay, make a tablet out of it, let it harden and cover with black nail polish. Everything, eyes are ready!
On the muzzle of the toy, we choose a place for the peephole, make indentations there and glue our eye-pills. Using dark gray wool, we make small, surprisingly raised eyebrows.

Now we move on to felting the ears. To do this, take two identical bundles of gray wool and, after confusing them a little, give them the shape of ears. I recommend taking exactly two bundles at once, and not knitting them in turn, because it is very difficult to judge from a felted product how much wool you need to take in order to felt the same part.

On the sponge we begin to roll the ear. We do not touch the upper edge (the place where the ear is attached to the head).


Carefully, trying not to injure your fingers, we process the edges of the ear.

Here's what happened:

With the reverse needle we will make the ear fluffy. It is more convenient to do it right now, when the ear is not attached to the head.

The edges of the ear can be slightly trimmed with scissors.

By analogy, we make the second ear. It's not scary if the ears don't turn out exactly the same :)

We attach the ears to the head:

Here is the baby:

We turn to felting paws. Take a small bunch of Trinity wool and give it the shape of a paw. To make things go faster, you can roll with several needles at the same time.

We roll the paw with gray wool.

We do the second leg in the same way.

The handles of the toy will also be movable. We will again need a needle and thread. We make a knot on the inside of the foot and pull the thread through the body. Since our toy is miniature, the paws are small, it is enough to get by with just a thread mount, without using a button.

We pierce the second foot through and pull out the needle in the opposite direction.

After we fasten the thread, grooves will remain on the outer sides of the legs - marks from the threads.

They need to be masked with small tufts of gray wool.

Here is what happens at this stage of work:

I looked at our bunny and decided that it was still necessary to make a mouth. She is very sad without him. So, with the help of a thin needle, we outline the mouth on the muzzle.

With the help of pink wool shade the mouth:

It remains quite a bit before the completion of the toy, namely, to dump the legs. We take a bundle of wool, the size of which is shown in the photo:

We give the bundle of wool the shape of a small leg:

top legs slightly off.

Roll the leg with gray wool, do not touch the top. Leg from different angles:

Our bunny will be in red sandals. For their felting we need small quantity red wool. We begin to roll the wool to the sole.

Then carefully form the shoe. At this stage, the red wool does not need to be tangled before felting.

The shoe is almost ready.
Every craftswoman who is fond of needlework has tried to create toys. There are many techniques for making such products. Among them, toys have gained wide popularity. This technique is also called felting or felting.
Dry felting technique
In ancient times, carpets, flooring, clothes, and hats were made from wool. Now needlewomen are fond of creating decorative items, toys, jewelry and souvenirs from felt. In the process of felting, the wool fibers get tangled and form a dense lump, which in the hands of the fullers acquires the desired shape. The main thing is to take into account that the initially taken amount of wool during felting will shrink by 2-3 times. Therefore, when creating toys using the dry felting technique, you need to stock up on the necessary amount of material.
If irregularities have formed in the product, they can be repaired by adding additional pieces of wool. Often felted toys are created from several parts, which are made separately, and then connected by nailing one element to another using small pieces of wool.
felting tools
This type of needlework, like dry felting of toys, does not require special equipment. In the initial set, it is enough to have needles of different diameters and sections. You will also need a synthetic winterizer, from which the felting work begins. It is inexpensive, therefore, for the manufacture of large toys, it is taken as the basis for a future product. You also need wool for the top layer, which wraps the prepared synthetic winterizer part and clings to the base.
Many people use a tool such as a needle holder. It is a plastic or wooden handle with holes that holds several needles at once. The needle holder speeds up the work process, helping to capture the most of the area.
Dry felting of toys cannot be performed on a hard surface. A needle that pierces the product through and through can break from hitting the table. To avoid this, you need a special felting mat, brush or foam sponge.

More about felting needles
The whole felting process is done with needles different sizes. does not have an eyelet, its shape resembles a poker and can be up to 13 cm long. Needles are classified according to the number and shape of the section. The thickest ones are marked No. 32-No. 36 and are used at the beginning of work, but leave behind large punctures in the product. Therefore, having compacted the parts, the needle is changed to a medium one with the number 38. With its help, recesses are formed, the main work and decoration of the toy are performed. With a number 40 needle, the product is polished and the decor is finalized. The needle should be changed when it does not fit well into the part of the craft. If you do needlework such as dry felting toys, for beginners it will be enough for three needles of different diameters with a triangular cross section. This form is the most common and can be used at all stages of work, only the number of the needle changes. There are those that have a stellate section. They are used to polish the product. The crown needle helps to attach decorative elements without deforming them. There is also a reverse section needle that tears out the inner layers of the base. It is used by professional craftsmen to give the toy a natural color from different shades.

Needle work process
In the process of felting, the needle is continuously stuck into the ball of wool, penetrating deep and capturing the fibers. In this case, the villi become tangled and crushed until the workpiece acquires sufficient density.
Felting needles are very sharp, so you need to work with them with extreme care. During felting, you should not be distracted, otherwise you risk seriously injuring yourself. When working with a needle, the felt product cannot be kept on weight; it must be placed on a special device that cannot be knocked down. When working, the needles cannot be tilted and moved, but you need to keep them perpendicular to the craft, as they are very brittle.

Variety of wool
Toys in the technique of dry felting are made of sheep wool. The wool of Australian and New Zealand merinos is especially valued, which has its own differences.
Felt boots and toys are made from coarse sheep wool, which are obtained with shaggy wool.
Bleached, which can be easily dyed at home, is called bleaching. It is used as a base or to create a light background.
Oches is called sheep's wool from small hairs left after scratching. It can be used for stuffing toys.
Sliver is the cheapest undyed wool. It is used as a filler, on which the main layer of the desired color is applied.
Semi-thin Used for finishing products.
Also, dry felted toys are made of camel and goat hair.

How to connect the parts correctly
If you have never worked with wool and you are interested in dry felting a toy, it is important for beginners to know how to connect the individual parts to each other. After you have piled the parts of the toy separately, the main thing is to attach them correctly to the body. The place of attachment should not be as tight as the whole product. Working with a needle, you need to bypass these places, leaving them loose. The wool of the part to be joined should sink deep and be firmly fixed inside. We pin the element to the body with pins and find the correct position. After that, with a thick needle, we fill the wool of the part inside the body, achieving a strong connection. After making sure that the part sits firmly enough, we level the surface and close the seam with separate tufts of wool with a medium-sized needle. Having sealed the joints, they can be sanded with a thin needle.
How to fluff the product
A toy made of wool can be fluffed in two ways:
With a reverse section needle;
By lapping individual bundles of wool.
Craftswomen basically fluff up a ready-made polished toy with all the attached details. Sticking the reverse needle into the body, we pull the wool fibers out. Try to make punctures close to each other so that the toy has thick fur without bald spots. Depending on the size of the product, it may take several hours to fluff. After completing the work, the fur can be trimmed in a model, giving the toy a finished look.
The second method of fluffing involves external piling on the craft of thin strands of wool. Starting from the bottom of the toy, we apply the middle of the strand to the body and attach it with a No. 38 needle. Thus, we increase the wool in a circle of the product. Then we lower all the strands down. We attach the following bunches, stepping back 1 cm from the bottom row. The work will be completed when you fluff the entire surface intended for wool.

Mixing colors
If you want to make toys with your own hands, dry felting makes it possible to make the animal as natural and lively as possible. Mixing six different shades will help to give the toy a natural color. This can be done both at the beginning of work, creating the details of the future product, and by nailing wool of different colors.
If you choose the first method, a lump of wool of the same color is taken as the basis and slightly rolled over, then wrapped in the color of the future skin of the animal and also rolled over. The color will mix during the reverse needle phase. The needle will release the wool inside and partially fluff the outer layer. During the process, the toy will acquire an interesting, life-like shade. The main thing is to choose colors that are close to the animal's coat.
To create stripes, the method of fluffing by piling is suitable. Only in this case, you need to increase the hair, alternately changing the color of the strands at a distance you determine. This method is suitable for toys with long hair. To create short-haired animals, the strand must be firmly rolled along its entire length, creating a schematic arrangement of stripes on the body. Then fluff with the reverse needle.
Dry felting toys: a master class for felting toys on a frame
The process of felting is a very exciting activity. It calms and gives you the opportunity to think and dream.
Consider for beginners a small MK. Dry felting of toys can be done using a frame. Let's create a doll from wool. For work, you will need from which cut pieces 8 and 14 cm long, wool for felting different colors- It depends on the image. Triangular needles #38 for the initial stage, #40 for full compaction, and star-shaped #40 for sanding, sponge for felting.

To create a frame, fold a piece of wire 14 cm long in half, it will serve as legs. Insert the second piece for the hands into the loop. Twist the wire several times, forming a torso. Next, leave 5 cm of wire free for the legs. Depending on what position the pupa will take, bend the frame. It can be the bends of the knees, feet, elbows and hands. Wrap the entire frame of the product with strands of wool, gradually securing it with a felting needle. In the area of the body and brushes, wind a little more wool, increasing the volume.
To make a head, you need to form a woolen ball and felt it with a needle, achieving a diameter of no more than 2 cm. Then tear off a long and wide strand, wrap it around the doll's head, rolling it if necessary, and fasten it with a small piece, creating a neck. Distribute the hanging hair in front and behind the body, attach the head and roll the strands to the frame.
Next, you need to put on a dress on the doll. To do this, take the wool of the desired color and begin to roll strands vertically to the waist line, creating a skirt. Having rolled strands around the entire body of the doll, cut off the ends so that the lower edge of the skirt is even. To form the top, wrap the doll's body with strands, securing them with a #40 needle.
In the same way, you can make ballet flats or sleeves for the doll. The handles can be bent and placed in the palms of a flower. Finish off the look with a matching hairstyle.
When choosing dry felting toys as needlework, you should know that this work is very painstaking and requires perseverance and patience.
Felting - very ancient art, products from felted wool animals appeared a long time ago, several thousand years ago.
Only much later did people figure out how to spin, make yarn, knit, and then they got the fabric. We will do toy mouse wool dry felting.
Felting (Filz in German felt) or felting, or there is also the term felting, is the compaction of unspun wool, using special notched needles.
Due to them, felting occurs - entanglement of wool fibers and its compaction. There are many other articles on the site with examples of dry felting toys.

Fun not only for children, but also for adults - cute eared, mustachioed animals with beady eyes, and even in their own one-room apartment with windows and a door!
Beginners can quite master the rodents, the mouse mice are very simply and quickly made in a dry way with a felting needle. The house is a little more difficult.
Felting from wool ornaments - toys
First, a few ideas of the World Wide Web - what can be done using the method of felting or felting, it is possible to implement them even for beginners in felting.
You can just make a toy or a decorative figurine, or you can make not only a toy, but also an ornament for your beloved at the same time. Below are some examples of these small wool animal figurines that can be used as decorations.
A very cute pendant in the shape of an ermine, a sloth brooch (easy to make even for beginners), and two tiny brooches in the shape of a tiny owl and a teddy bear with a balloon. Draws attention, doesn't it?
For such toys (small size) very little unspun wool is required, especially if you use small old unnecessary balls as a basis. Usually they start doing felting after all with felting balls.
Dry and wet felting of wool - felting
Felting is dry and wet. Beginners always roll balls first. I already had the first experience of dry felting - I tried to make several identical balls.

First you need to tear off a small piece from the skein, roll it into a ball in your hand, then roll it with needles on the foam rubber until the ball is sufficiently compacted. Then I tried to make them up wet way felting in the washing machine. I took unnecessary tights, inserted balls into them one at a time, then tied a knot. Tights with balls stuck together with the usual wash in washing machine, added washing powder and launched.
After felting, the balls turned out to be even, and even so dense that after they dried, they could not be pierced with a needle - there was an idea to make winter beads, and now they are lying, waiting in the wings. I met pictures with beautiful multi-colored felted beads and felted ball earrings. To make earrings, you only need to glue the temples to the balls. By the way, the balls can be either one-color or several, two or more colors, they also look very good.
Recently discovered another very interesting way making felted earrings with your own hands. For a long time I have been staring in stores at such small (1.5 - 2 cm in diameter) spheres of spirally twisted wire for making jewelry with my own hands. Most recently, at a sale of summer clothes, I grabbed earrings with such spheres, inside each there were three pieces of indistinct color of small beads dangling. Instead of glass beads, I placed in spheres (they can be moved apart shortly and anything can be placed inside) along a large - almost the size of the wire ball itself - a felt bead of bright red color. It turned out great! I'll take a photo and attach it soon. There is already an idea to make similar beads in a set for earrings.

You may be interested in another very easy-to-make sheep figurine. Everything is elementary simple, and the result is very nice. The animal is good for a small gift, a nice souvenir for both an adult and a child in particular. It is warm, cozy and fluffy, it is pleasant to hold it in hands, children can take it to bed with them.
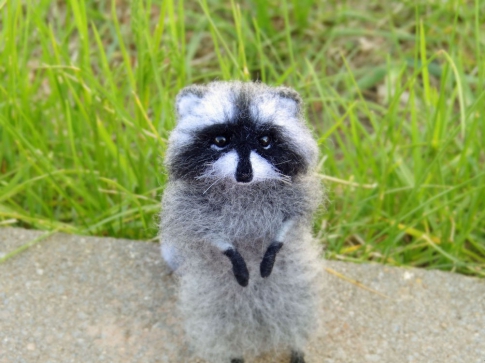
I was very impressed with the photos of felted mice, I decided to try it on occasion. And this case has come. First, I’ll show you what kind of mouse - the norushka ended up falling on the frame, serious, but with a forelock.

Materials needed for felting wool toys
- Colored wool
- felting needles
- Felting sponge (or a thick piece of foam rubber)
- Eyes (you can glue plastic or fill with wool of a different color)
- Wire for frame
- Unnecessary small balls of wool (we will save expensive unspun wool)
Needles for dry felting can be purchased separately from the holder. There are holders for several needles at once. This is convenient, there is a large felting area, then things go much faster than with one needle.
Foam rubber is needed so as not to prick yourself with sharp needles when felting, because you need to work quickly, you can accidentally pierce your finger. On it we will roll our toy mouse. There are some other special brushes for this, but I didn’t buy them - I used the most ordinary sponge for washing dishes, its foam side.
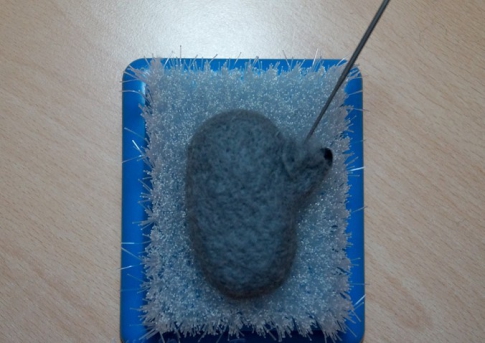
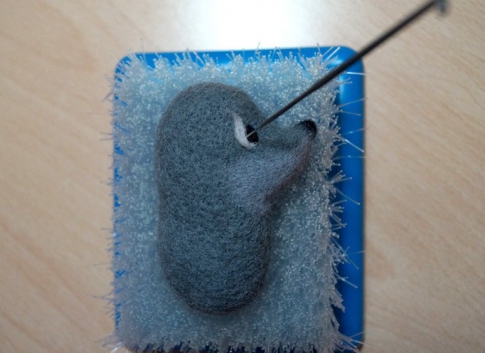
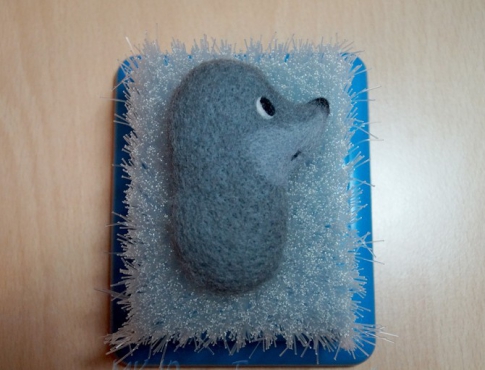
Mouse felting from wool
As a basis for the mouse's head, I used an unnecessary small ball of wool from some loose woolen product. On top, I began to roll white wool in a beige shade. The long nose is also a ball, only smaller. Ears - rolled about two circles on a sponge, first on one side, then on the other, so alternated. Before attaching the ears to the head, I made a small fold in them so that they had a natural shape.
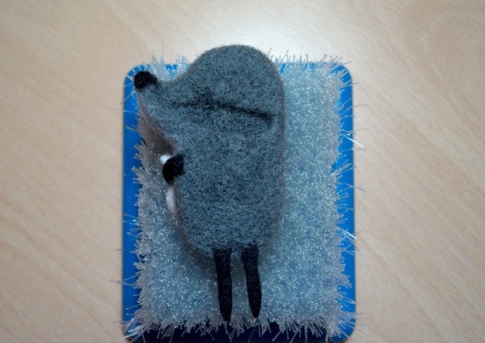
After the head was ready, I started felting the body of the toy. Rather, at first I made the frame of their wire - the “spine”, two handles, two legs and a tail. At first, she began wrapping the frame with old unnecessary woolen remnants of threads, at first she did not pay attention to their color - black, burgundy, and in the end she found gray-beige and some shaggy white ones.
At first, the wire with threads wound around it looked very suspicious ... It strangely resembled a Voodoo doll. As the mouse “fatted” the situation improved, but now the handles of our mouse toy were very reminiscent of Freddy Krueger. :)

Threads were wound on the wire frame of the arms, legs and tail light color. Finally, I decided that the mouse was plump enough, and began to roll unspun wool over the winding of the frame.
When the body of the mouse was ready, I made a hole in the bottom of the head with an awl, poured some glue there, stuck a wire for the head, which stuck out of the mouse. I added wool to the neck of the toys, connected the head with the body by felting.
I didn’t find suitable black beads at home, I used purchased plastic eyes for toys. The wool was only this (almost white) and also red (remained after the first experience of felting balls). For the sake of the peephole, I also did not want to buy a black one for big money. After gluing the eyes, I made barely noticeable eyelids above and below each eye. Chubchik - this is so, indulged, so the mouse looks funnier.
The mouse is not quite ready yet, not even finished. I’ll probably change the muzzle too - I’ll make a nose and a mouth, I’ll designate fingers and toes, and I’ll also knit or sew some doll clothes for her - socks or slippers, a skirt, maybe a sweater with a scarf for the winter. Or maybe I’ll dump some kind of apple in her hands so that she has something to eat.

You may be interested in:

TO church holiday- Easter - you can knit such cute products from unspun wool using the dry felting technique.
Bright, multi-colored, they will greatly decorate your home along with other traditional decor elements such as bunnies, hens, chickens, whether it be embroidery, knitting or sewing.

By adapting the felted balls made by the method of dry and wet felting with unspun wool, you can make with your own hands such large interesting earrings as you see in the picture. For details on how to make such original earrings and what you need for this, read the article about felted earrings.

The cats are funny, very cute, they are made in St. Petersburg. Beads go for the eyes, and the holes in them serve as pupils, this gives the animals a comical expression. Made mainly on the frame, there are sitting and standing options. The mouth and nose on the muzzles are embroidered with a needle and thread, the fishing line serves as a mustache.
Felted wool warmer toys for beginners
Toys that are actually designed to warm the testicles for breakfast - a funny little kitchen accessory. You can make it in the form of some animal, here are examples of a black and white cow with a bell, a pink pig with a bow, gray sheep.